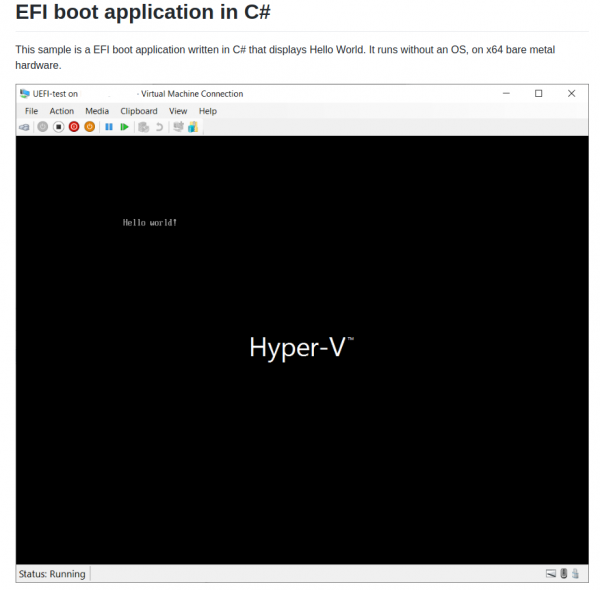
Zero-Sharp is using the CoreRT runtime to very impressively demonstrate how to get down to bare-metal application operation using C#. It compiles programs into native code…
Everything you wanted to know about making C# apps that run on bare metal, but were afraid to ask:
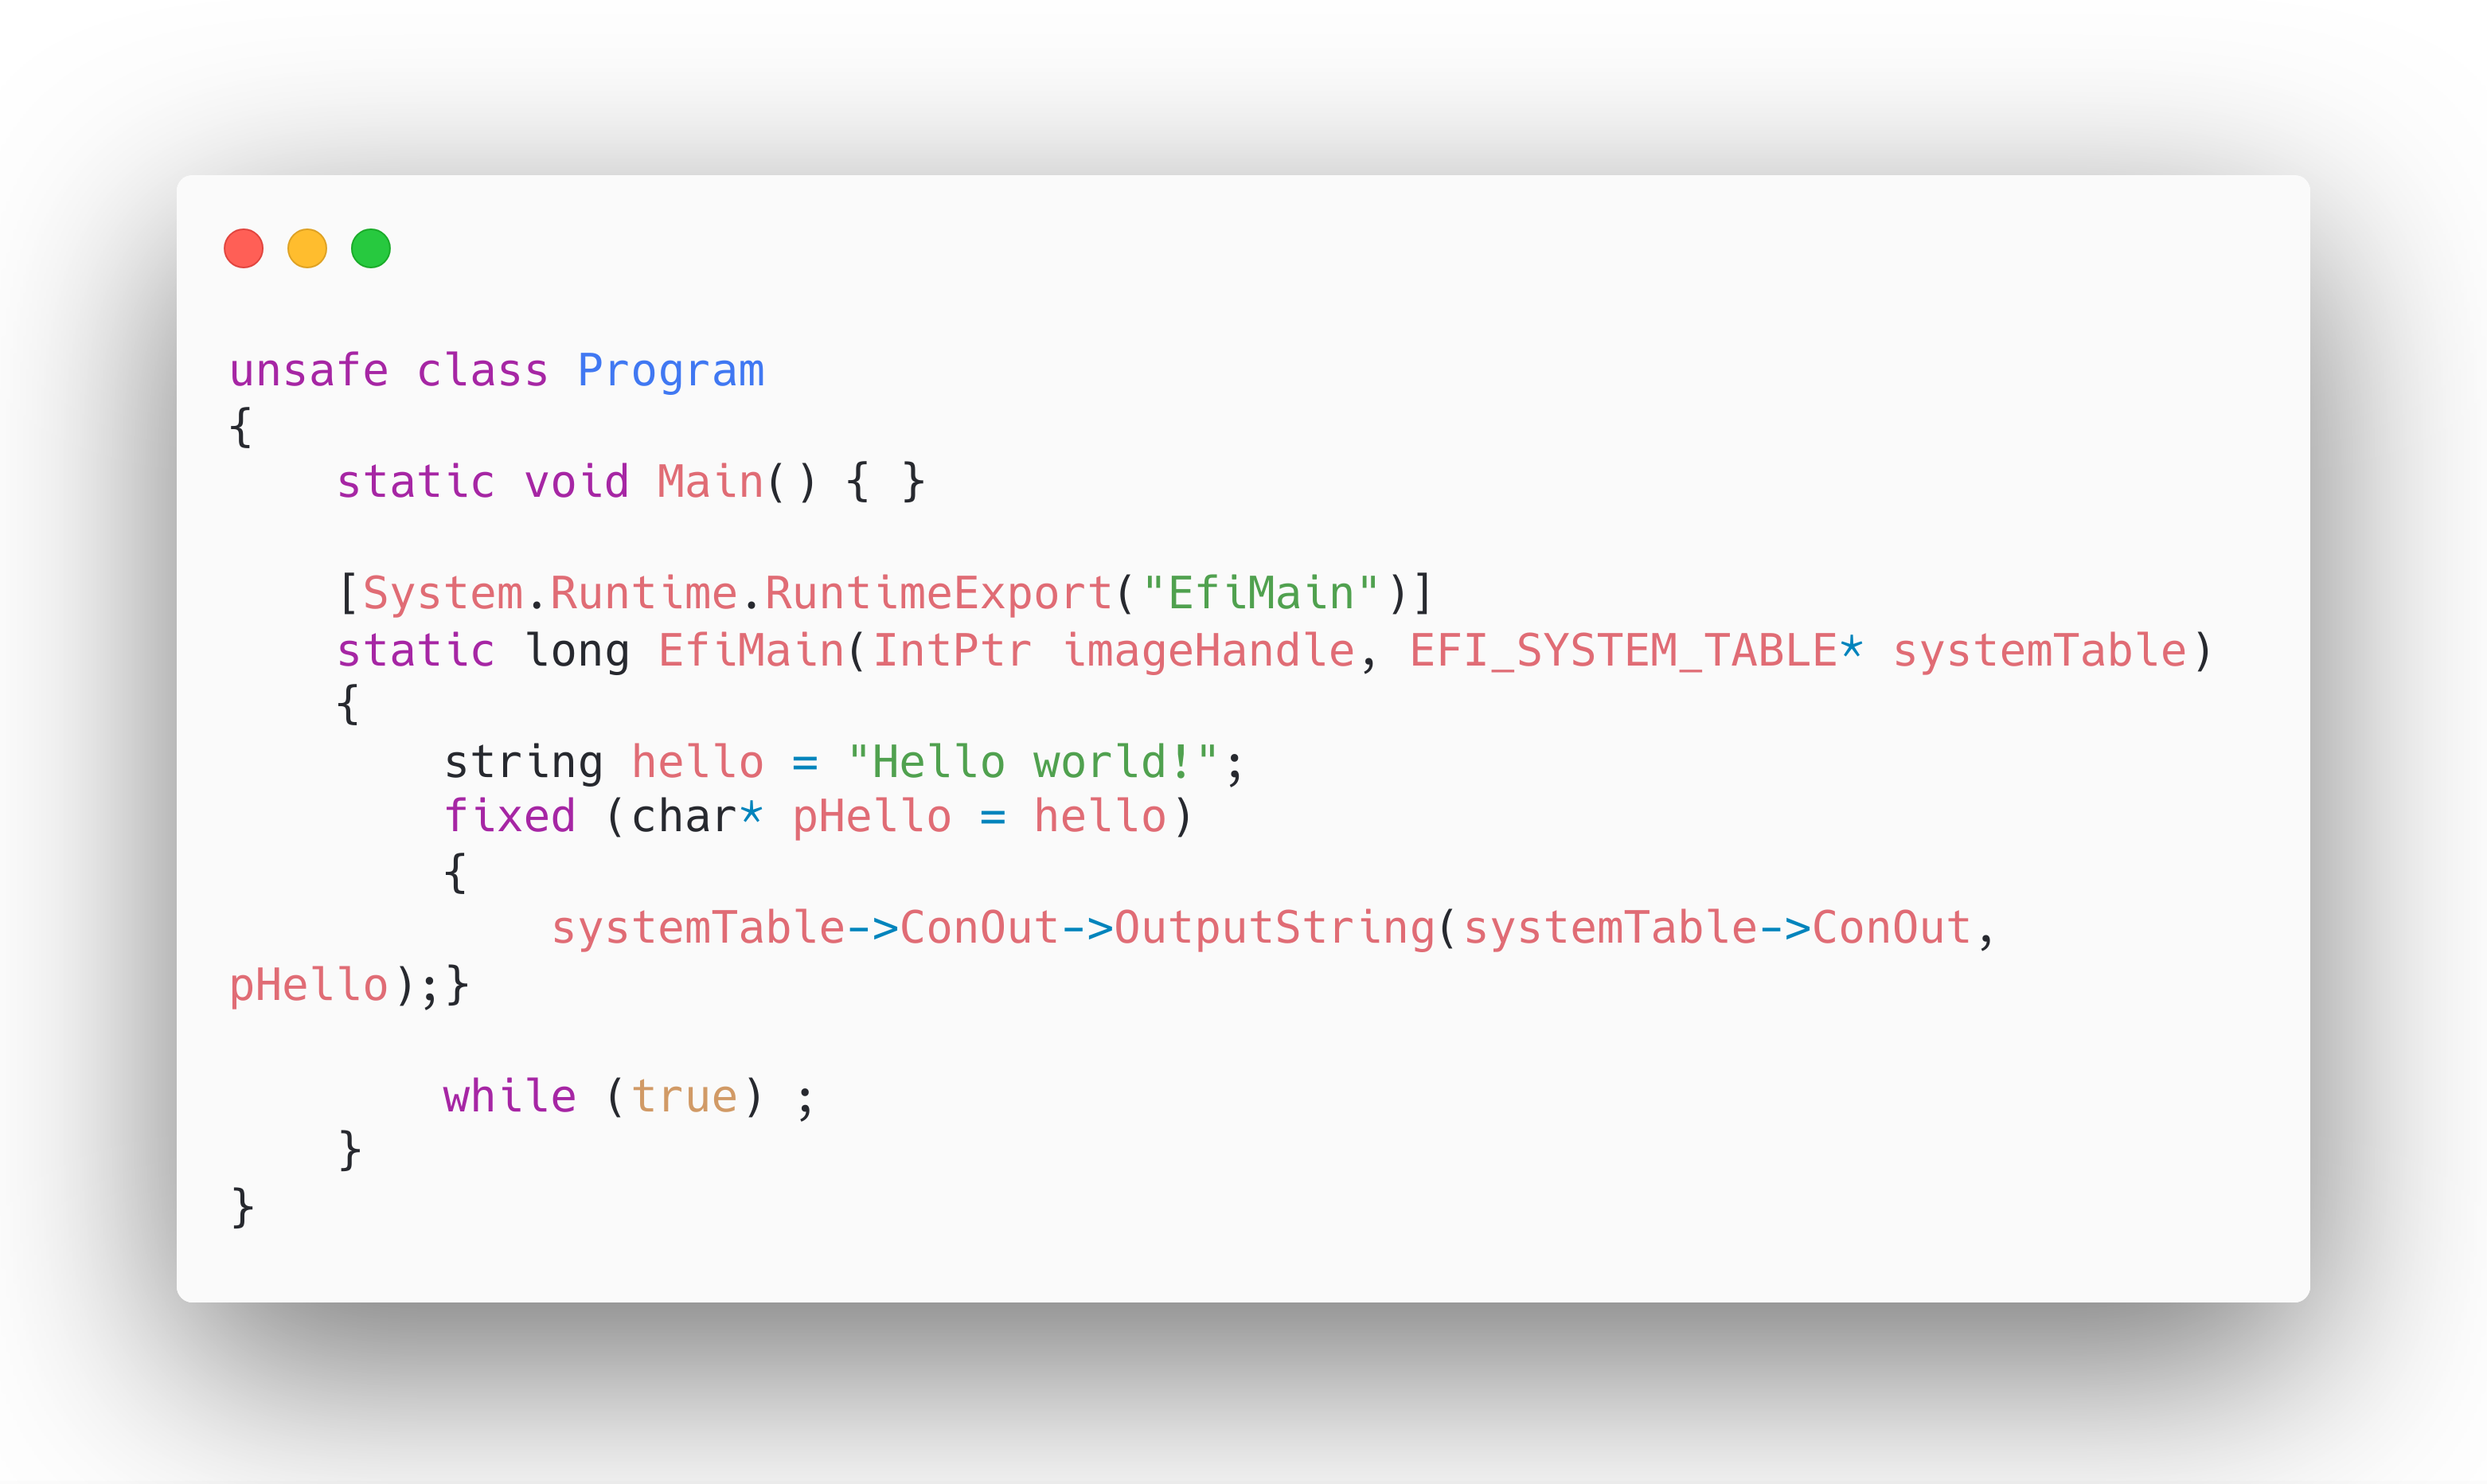
A complete EFI boot application in a single .cs file.
MyFitnessPal is a great online service we are using to track what we eat. It’s well integrated into our daily routine – it works!
Unfortunately MyFitnessPal is not well set-up to interface 3rd party applications with it. In fact it appears they are actively trying to make it harder for externals to utilize the data there.
To access your data there’s an open source project called “python-myfitnesspal” which allows you to interface with MyFitnessPal from the command line. This project uses web-scraping to extract the information from the website and will break everytime MyFitnessPal is changing the design/layout.
Since the output for this would be command line text output it is not of great use for a standardized system. What is needed is to have the data sent in a re-useable way into the automation system.
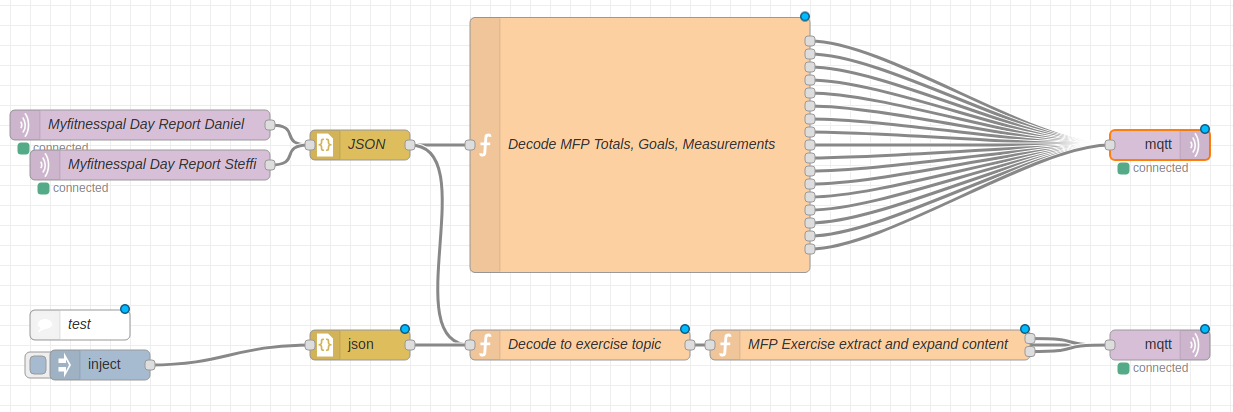
This is why I wrote the additional tool “myfitnesspal2mqtt“. It takes the output provided by python-myfitnesspal and sends it to an MQTT topic. The message then can be decoded, for example with NodeRed, and further processed.
As you can see in the image above I am taking the MQTT message coming from myfitnesspal2mqtt and decoding it with a bit of javascript and outputting it back to MQTT.
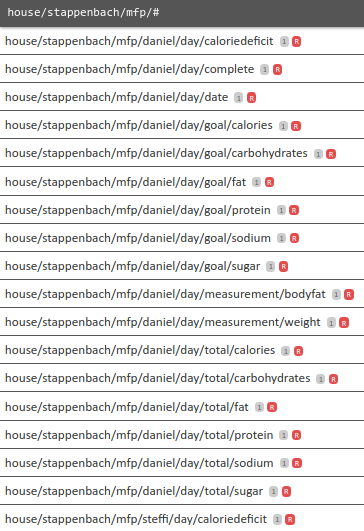
In the end it expands into a multitude of topics with one piece of information per MQTT topic.
And with just that every time the script is run (which I do in a docker container and with a cronjob) the whole lot of pieces of information about nutrition and health stats are being pushed and stored in the home automation system.
This way they are of course also available to the home automation system to do things with it.
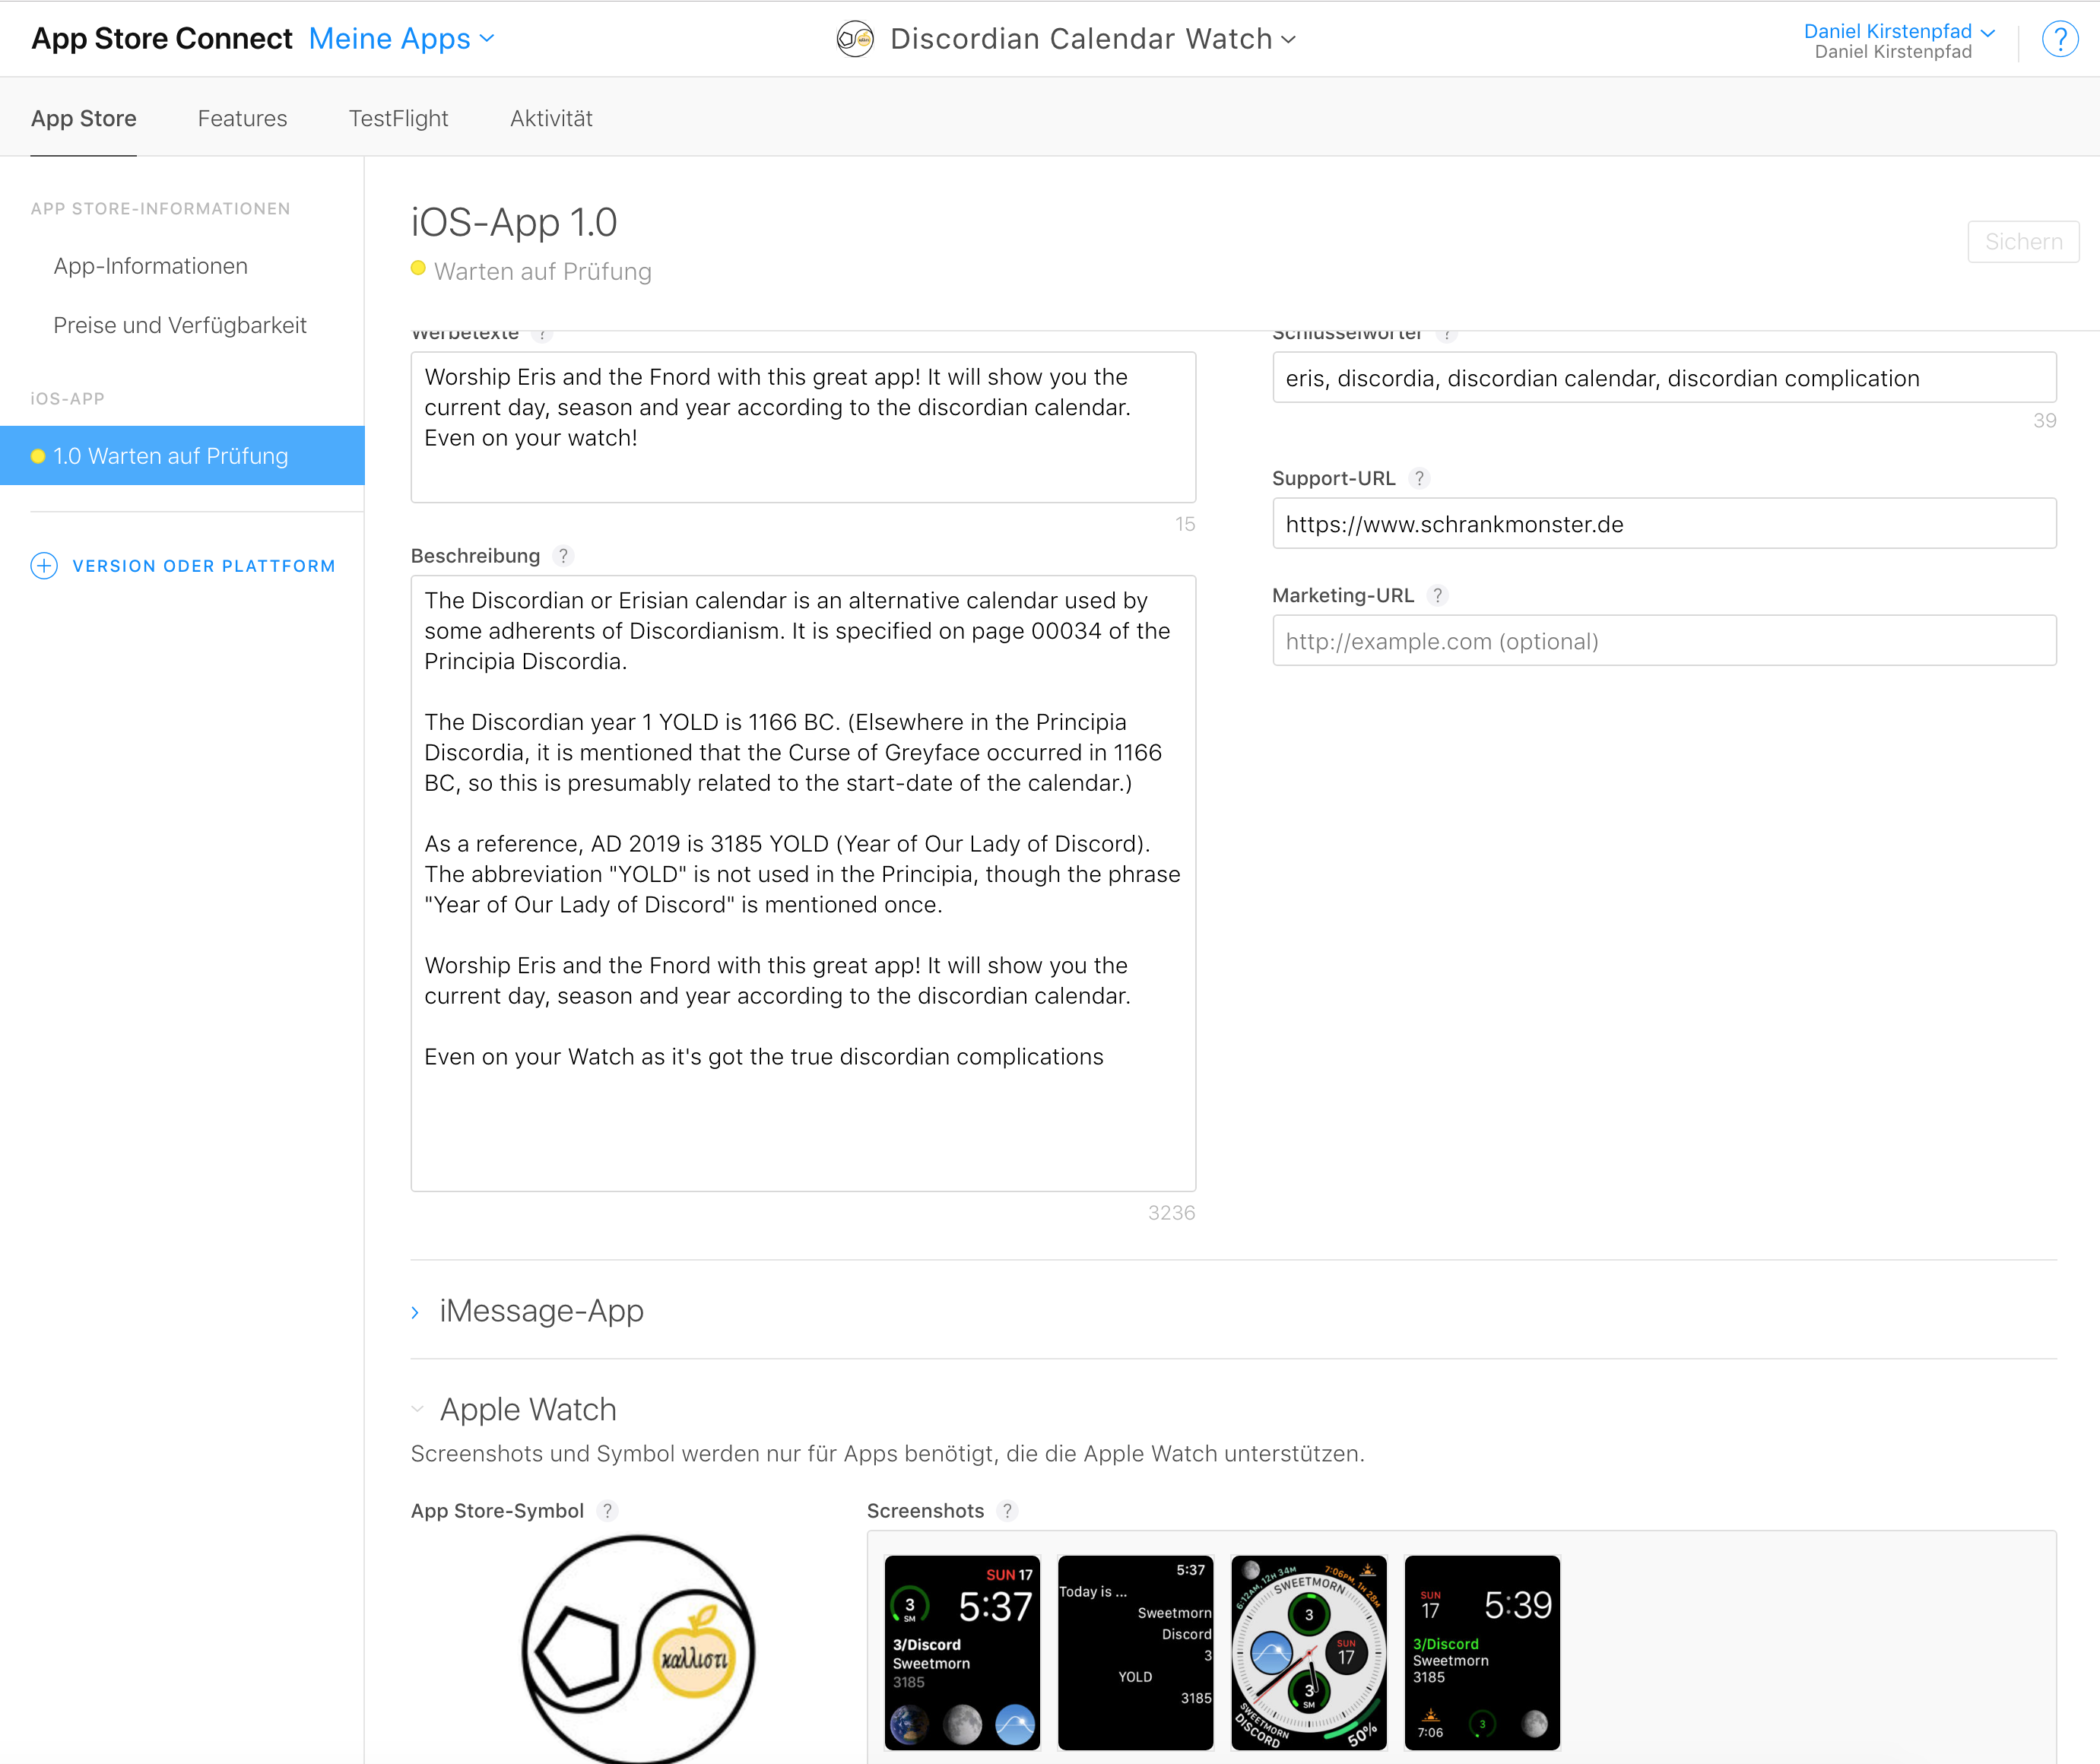
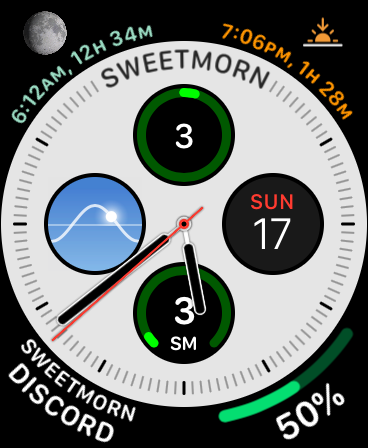
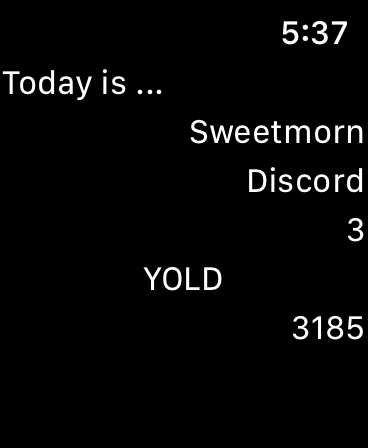
I’ve finished my little coding exercise today. With a good sunday afternoon used to understand and develop an iOS and Watch application from scratch I just handed it in for Apple AppStore approval.
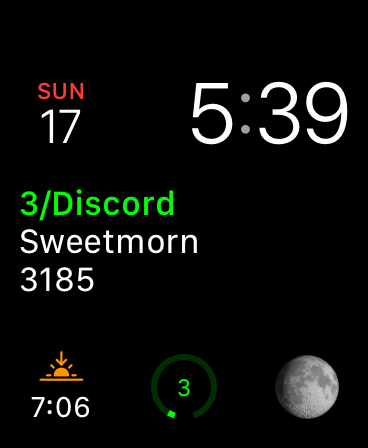
The main purpose, aside from the obvious “learning how it’s done”, is that I actually needed a couple of complications on my watch that would show me the current day/date in the discordian calendar.
I have to say that the overall process of developing iOS and Watch applications is very streamlined. Much much easier than Android development.
The WatchKit development was probably the lesser great experience in this project. There simply is not a lot of code / documentation and examples for WatchKit yet. And most of them are in Swift – which I have not adapted yet. I keep to Objective-C for now still. With Swift at version 5 and lots of upgrades I would have done in the last years just to keep up with the language development… I guess with my choice to stick to Objective-C I’ve avoided a lot of work.
Anyhow! As soon as the app is through AppStore approval I will write again. Maybe somebody actually wants to use it also? :-)
With writing the app I just came up with the next idea for a complication I just really really would need.
In a nutshell: A complication that I can configure to track a certain calendar. And it will show the time in days/hours/minutes until the next appointment in that specific calendar. I will have it set up to show “how many hours till wakeing up”.
Cascading Style Sheets or CSS in short are a very powerful tool to control how content is being displayed.
CSS is designed to enable the separation of presentation and content, including layout, colors, and fonts. This separation can improve content accessibility, provide more flexibility and control in the specification of presentation characteristics, enable multiple web pages to share formatting by specifying the relevant CSS in a separate .css file, and reduce complexity and repetition in the structural content. Separation of formatting and content also makes it feasible to present the same markup page in different styles for different rendering methods, such as on-screen, in print, by voice (via speech-based browser or screen reader), and on Braille-based tactile devices. CSS also has rules for alternate formatting if the content is accessed on a mobile device.
I frequently come across content I want to read. And almost as frequently I do not have time for a longer read when I come across interesting content.
My workflow for this is: keeping some to-be-read backlog of PDF files I have printed from websites. These PDF files are automatically synced to various devices and I can read them at a later stage.
What often is frustrating to see: bad the print results of website layouts as these websites have not even thought of the remote option of being printed.
With this blog I want to support any workflow and first and foremost my own. Therefore printing this blog adds some print-audience specifics.
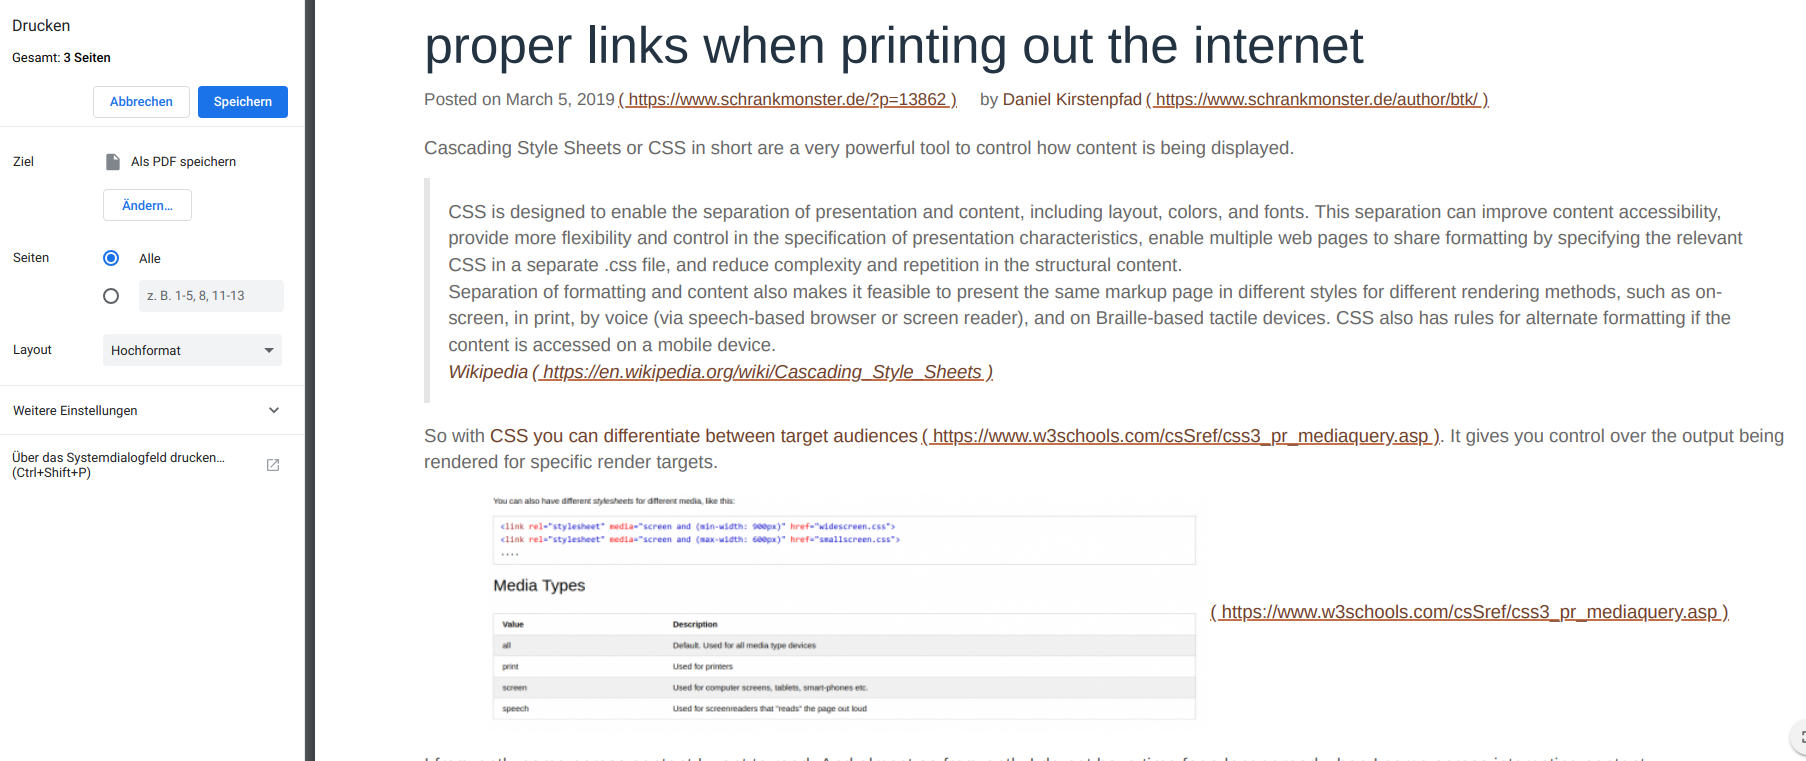
For example the links I am using in the articles are usually inline when you are using a browser. When you’re printing the article those links get converted and are being written out with the text. So you can have them in your print-outs without loosing information.
this is how Google Chrome shows you the print preview…
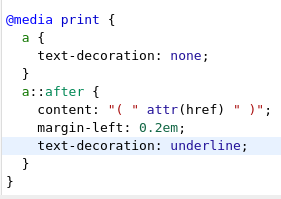
And the changes you need to apply to any webpage to instantly enable this are very simple as well! Just add this to your page stylesheet:
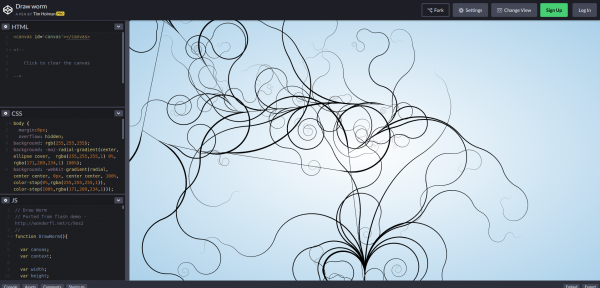
I had redone the header of this blog a while ago but since I was trying around some things on the template I wanted something more dynamic but without any additional dependencies.
Tim Holman did a very nice implementation of this “worm generator” with only using the HTML5 canvas tag and some math. I made some very slight changes and integrated it into the header graphic. It will react to your mouse movement and resets if you click anywhere. Give it a go!

![var complete = {};
var sodium = {};
var carbohydrates = {};
var calories = {};
var daydate = {};
var fat = {};
var sugar = {};
var protein = {};
var weight = {};
var bodyfat = {};
var goalsodium = {};
var goalcarbohydrates = {};
var goalcalories = {};
var goalfat = {};
var goalsugar = {};
var goalprotein = {};
var caloriesdiff = {};
var ttopic = msg.topic.toLowerCase();
var firstobject = Object.keys(msg.payload)[0];
complete.payload = msg.payload[firstobject].complete;
complete.topic = ttopic+'/complete';
sodium.payload = msg.payload[firstobject].totals.sodium;
sodium.topic = ttopic+'/total/sodium';
carbohydrates.payload = msg.payload[firstobject].totals.carbohydrates;
carbohydrates.topic = ttopic+'/total/carbohydrates';
calories.payload = msg.payload[firstobject].totals.calories;
calories.topic = ttopic+'/total/calories';
fat.payload = msg.payload[firstobject].totals.fat;
fat.topic = ttopic+'/total/fat';
sugar.payload = msg.payload[firstobject].totals.sugar;
sugar.topic = ttopic+'/total/sugar';
protein.payload = msg.payload[firstobject].totals.protein;
protein.topic = ttopic+'/total/protein';
weight.payload = msg.payload[firstobject].measurements.weight;
weight.topic = ttopic+'/measurement/weight';
bodyfat.payload = msg.payload[firstobject].measurements.bodyfat;
bodyfat.topic = ttopic+'/measurement/bodyfat';
goalsodium.payload = msg.payload[firstobject].goals.sodium;
goalsodium.topic = ttopic+'/goal/sodium';
goalcarbohydrates.payload = msg.payload[firstobject].goals.carbohydrates;
goalcarbohydrates.topic = ttopic+'/goal/carbohydrates';
goalcalories.payload = msg.payload[firstobject].goals.calories;
goalcalories.topic = ttopic+'/goal/calories';
goalfat.payload = msg.payload[firstobject].goals.fat;
goalfat.topic = ttopic+'/goal/fat';
goalsugar.payload = msg.payload[firstobject].goals.sugar;
goalsugar.topic = ttopic+'/goal/sugar';
goalprotein.payload = msg.payload[firstobject].goals.protein;
goalprotein.topic = ttopic+'/goal/protein';
caloriesdiff.payload = msg.payload[firstobject].goals.calories - msg.payload[firstobject].totals.calories;
caloriesdiff.topic = ttopic+'/caloriedeficit';
daydate.payload = firstobject;
daydate.topic = ttopic+"/date";
return [complete, sodium, carbohydrates, calories, fat, sugar, protein, weight, bodyfat, goalsodium, goalcarbohydrates, goalcalories, goalfat, goalsugar, goalprotein, daydate, caloriesdiff];](https://www.schrankmonster.de/wp-content/uploads/2019/03/Bildschirmfoto-zu-2019-03-22-14-13-41.png)