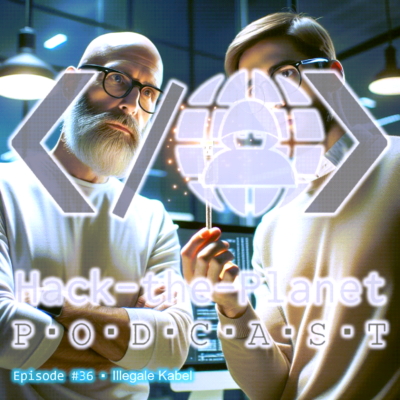
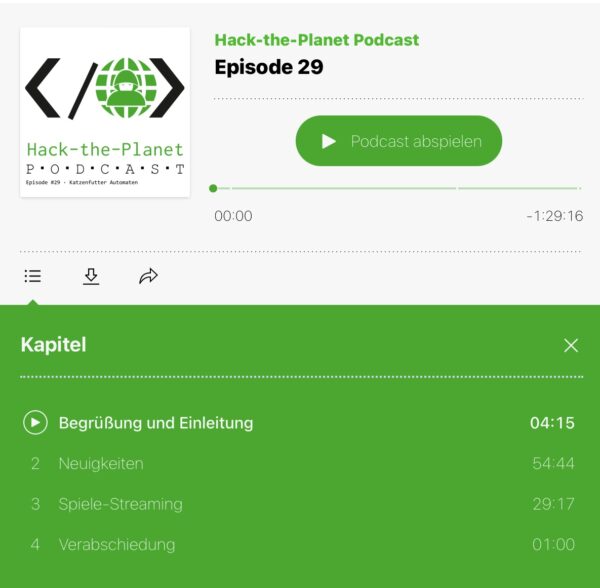
In dieser Folge des „Hack the Planet“ Podcasts diskutieren Daniel und Andreas über Smartmeter, Code mit LLMs, Grafiken (ohne KI), einen USB-Kabeltester, eine teure Gamer-Tastatur, selbstprogrammierte Features und den Xbox Elite Controller. Andreas berichtet über seine Erfahrungen mit Smartmetern und den Herausforderungen, die damit einhergehen, wie z.B. der Kosten und der Umstellung auf neue Technologien. Sie sprechen auch über Photovoltaikanlagen, Batteriespeicher und die Regulierungen, die es erforderlich machen, Smartmeter zu installieren. Außerdem geht es über die Herausforderungen und den Spaß, den sie beim Programmieren mit LLMs hatten, sowie über ihre Erlebnisse mit neuen technologischen Gadgets.
In der 35. Folge des Hack-the-Planet-Podcasts diskutieren Daniel und Andreas eine Vielzahl von Themen rund um Technik, 3D-Druck, persönliche Projekte und Community-Veranstaltungen. Sie beginnen mit einem Rückblick auf die lange Pause seit der letzten Folge und teilen ihre Erfahrungen mit technischen Problemen und Updates an ihren Computern und Software.
Ein zentrales Thema ist der 3D-Druck, wobei Daniel seine Erfahrungen mit verschiedenen 3D-Druckern und Materialien wie PLA und PETG teilt. Er beschreibt die Herausforderungen und Lernkurven beim 3D-Druck sowie die Nachbearbeitung der Drucke. Andreas berichtet von seinen Projekten, darunter der Bau einer kompletten Trooper-Uniform aus Star Wars und eines lebensgroßen B1-Battle-Droiden. Andreas berichtet von Science-Fiction-Treffen und Cosplay-Veranstaltungen, insbesondere dem jährlichen Treffen in Speyer, und beschreibt die Technikmuseen in Speyer und Sinsheim.
Daniel und Andreas diskutieren zudem verschiedene technische Gadgets, einschließlich der Nutzung von ESP32 für Chat-Anwendungen im Flugzeug, und teilen ihre Erfahrungen mit der Sicherheit und Lagerung von Lithium-Polymer-Batterien.
Ein weiteres Thema ist die Einrichtung eines eigenen Minecraft-Servers für die Familie und die Herausforderungen bei der Nutzung von Xbox und anderen Konsolen für Multiplayer-Spiele.
I have really waited this out. Some “galaxy-sized brains” tell us for decades now that virtual reality is the next big thing. And it might as well have been.
Almost nobody (me included) cared to even try – and with good reason: There’s no way to transport the experience that virtual reality creates in an easy way. Language and “flat-screen-video” is not enough. Even any 3D video is not going to come even close to deliver.
And I knew this was the case. Apart from a 30-second rollercoaster ride years ago I never had any direct contact with virtual reality technology until late this year 2022.
I did of course read about the technology behind all this. About the rendering techniques and the display – sensor – battery – processing hardware. I had read about the requirements for many-frames-per-second to have a believable and enjoyable experience. Would the hardware not be fit for the job the papers said: You will feel sick, very fast.
So I hesitated for years to purchase anything related to this. I wanted to “wait it out” as I had calculated the average spending required for a good set of hardware and software would easily roam into 2k-5k euro territory.
This year the time had come: the prices where down significantly for all components needed. Even better: There where some new hardware releases that tried to compete with existing offerings.
Of course the obvious thing to do would have been to purchase either a Valve Index or some Oculus,eh, Meta VR headsets. But that would have easily blown any budget and actually none of these is technologically interesting in End-2022.
CPU+GPU inside – the headset needs to be able to work stand-alone for video playback and gameplay
battery for at least 1-2 hour wireless play
touch+press controllers
capable of being used as SteamVR / PCVR headset – wireless and wired
Pancake lenses (as in “no fresnel”)
do-not-break-bank price
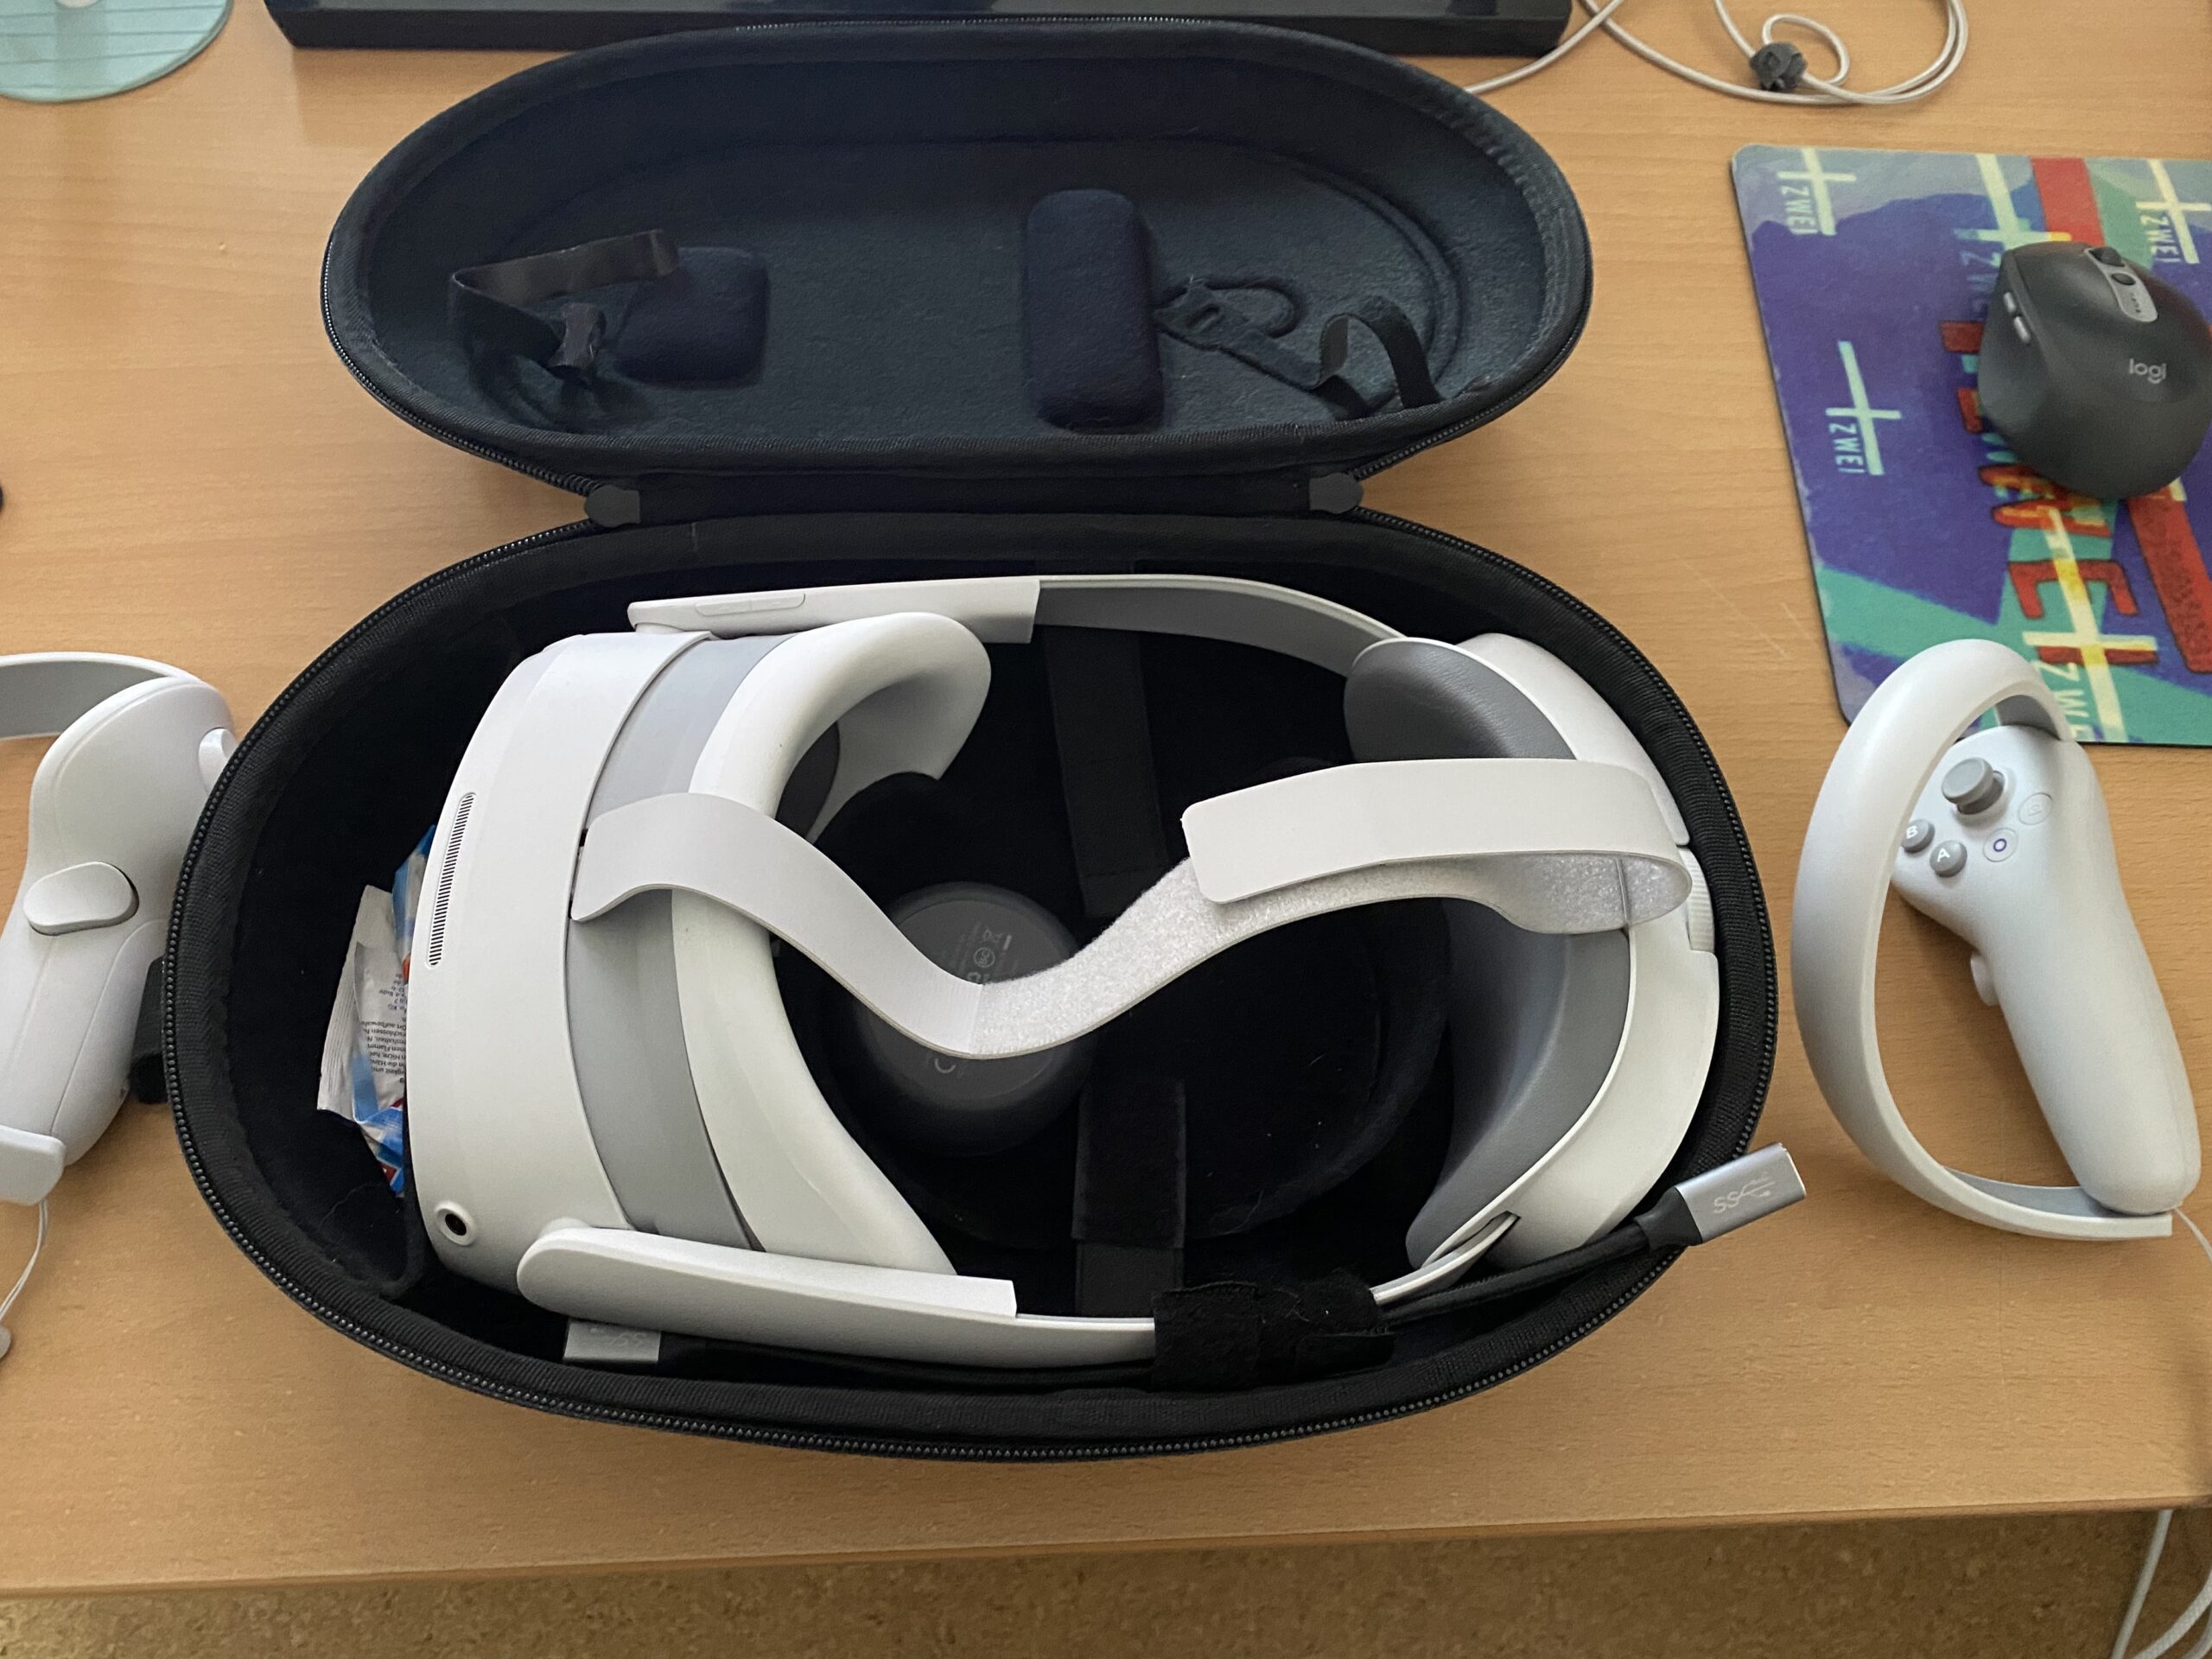
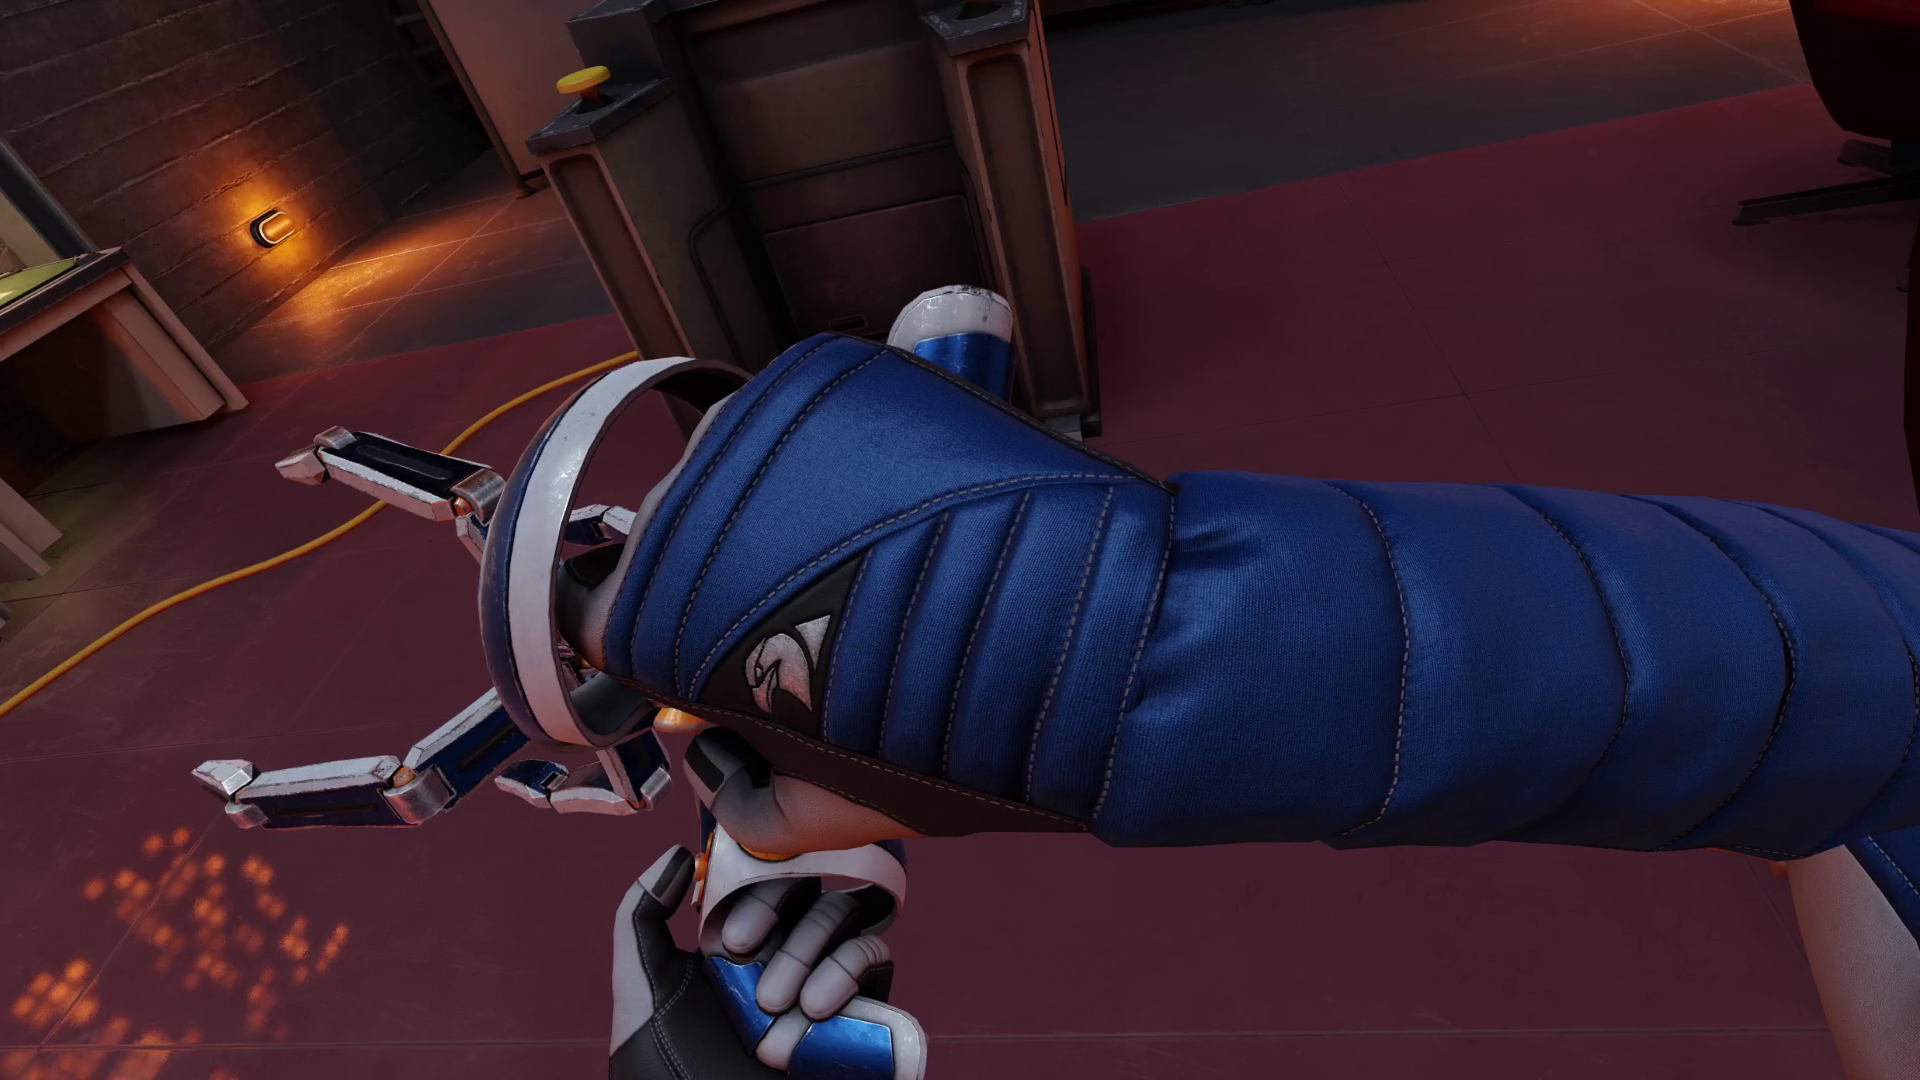
And what can I say. There was at least one VR headset released in december 2022 that fit my requirements: PicoXRs PICO 4 headset.
Pico 4 VR headset
So I went ahead and purchased one – which was delivered promptly. It came with charger, USB-C cable, two controllers and the headset itself. The case I got in addition to carry it around and safely store it when not in use.
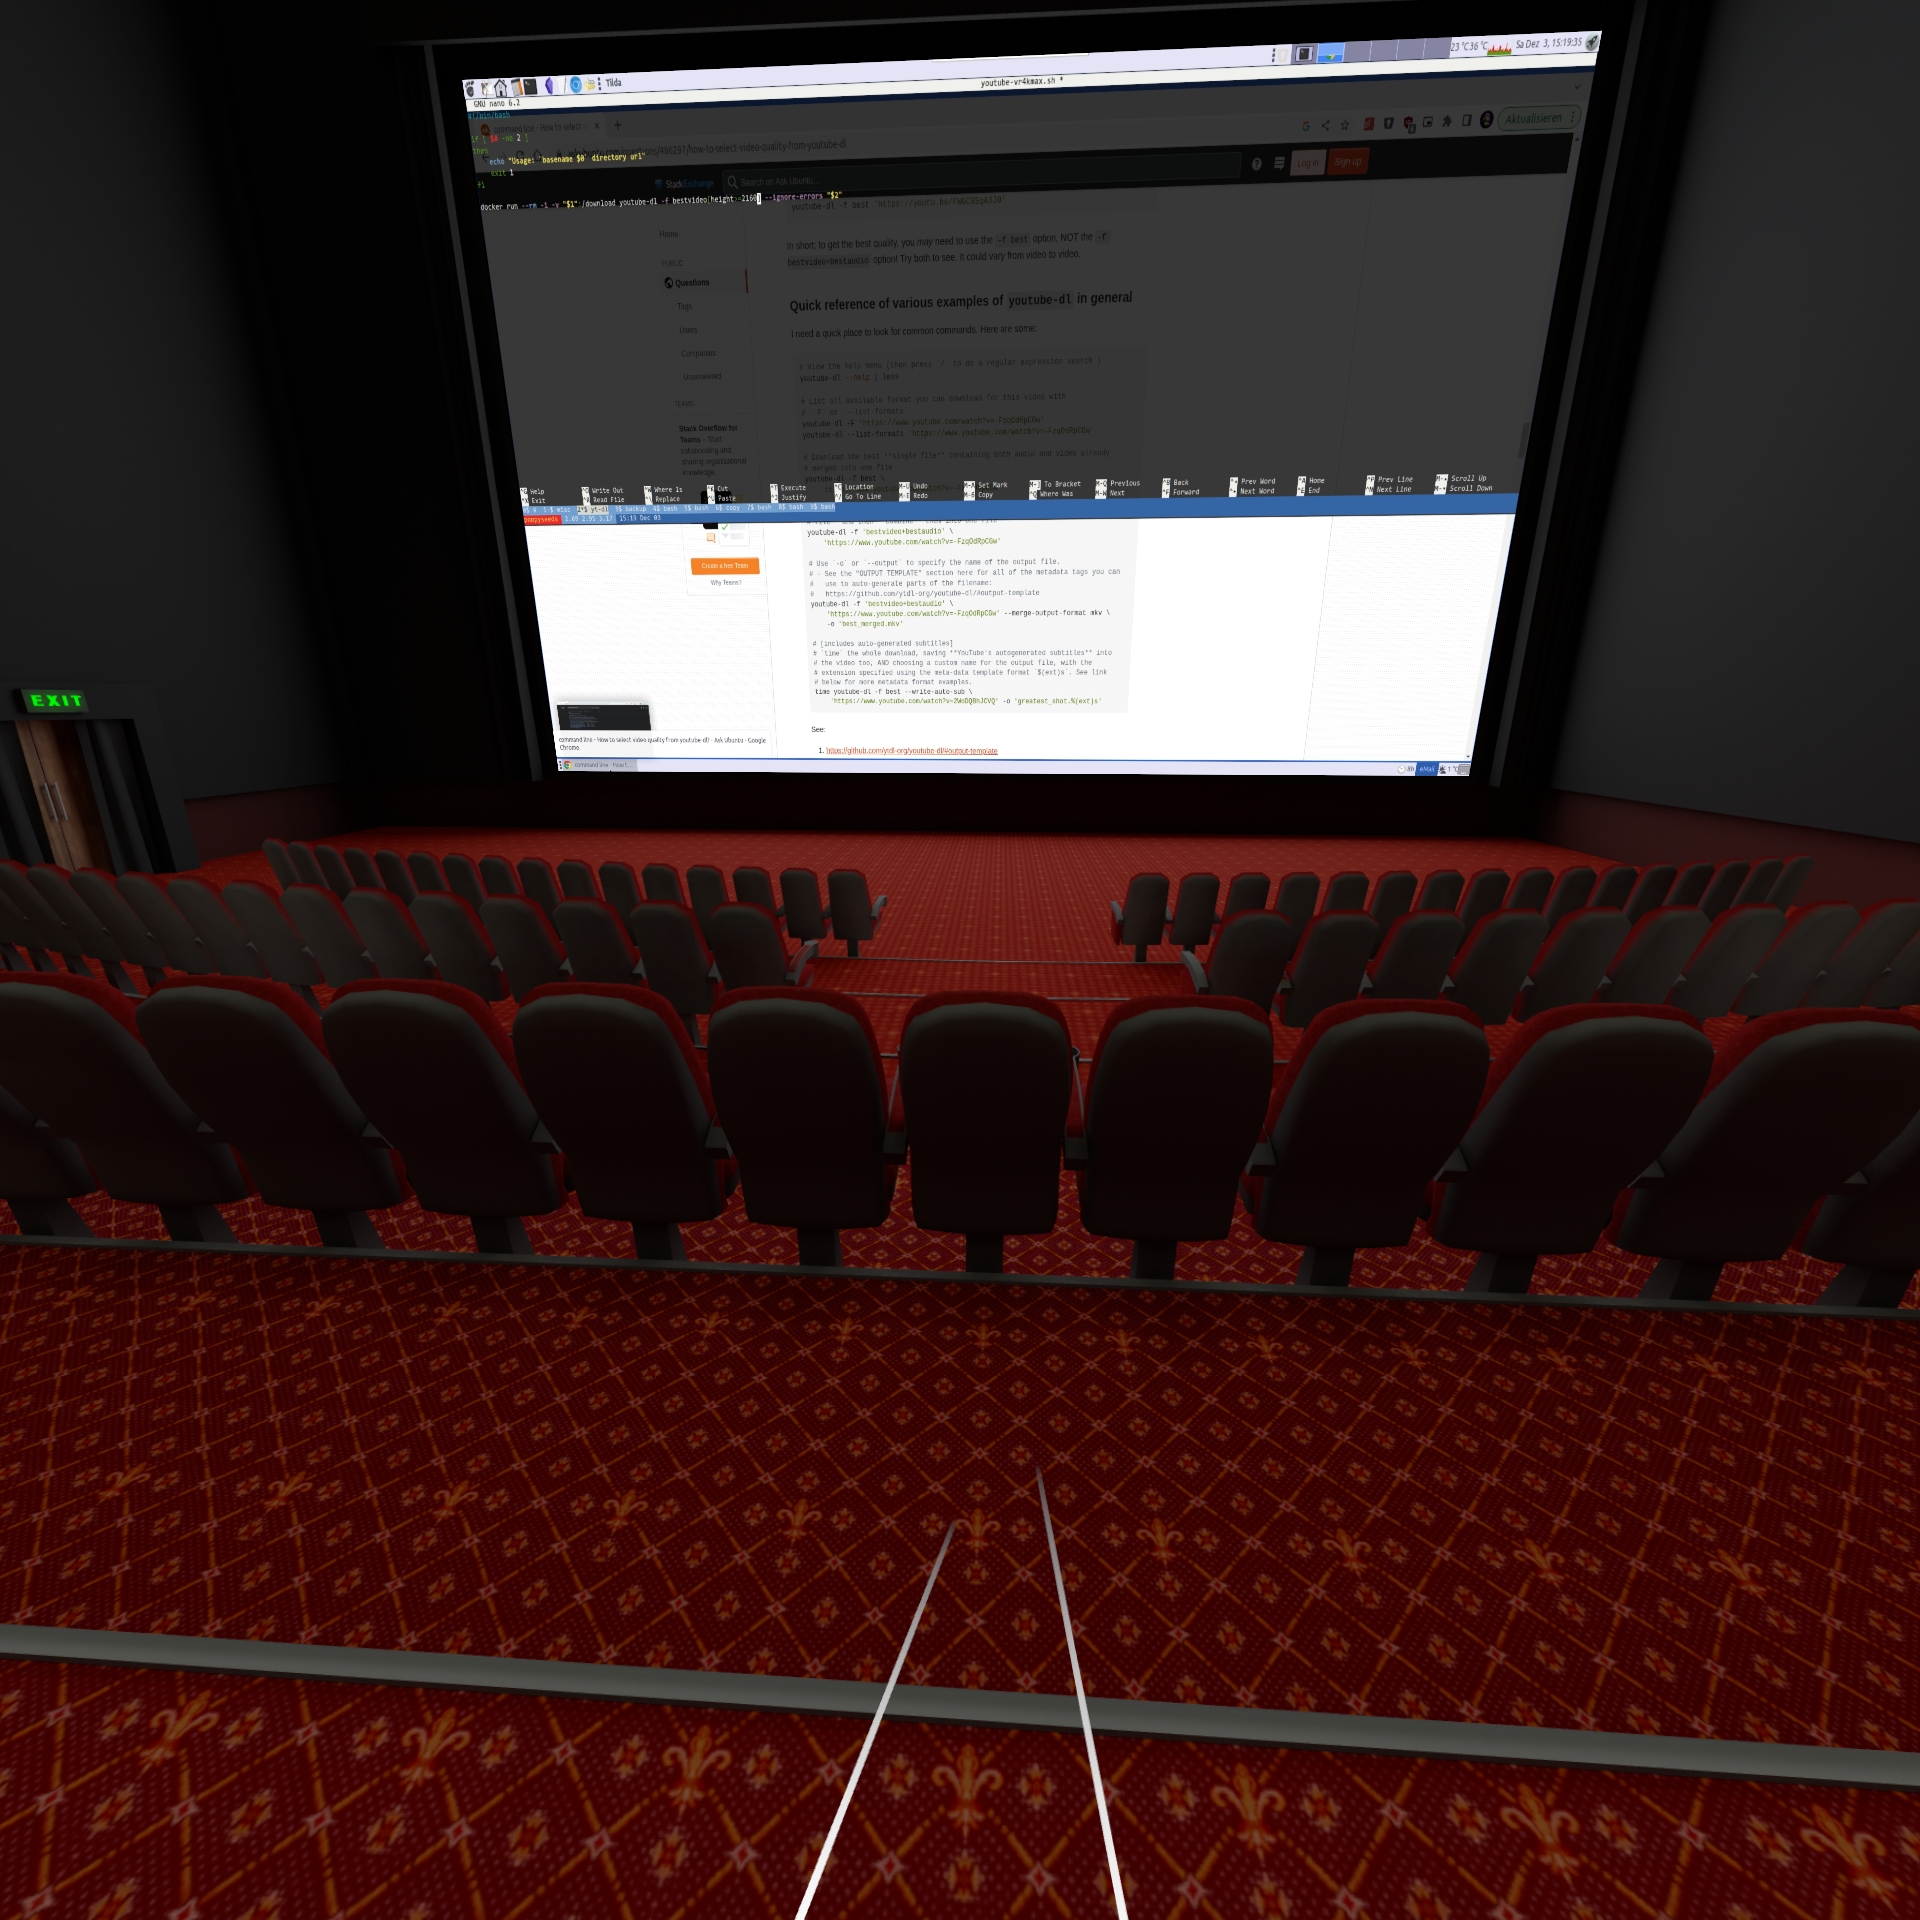
At first I tried only applications and games that can be run directly on the headset. Of course some video streaming from YouTube and the likes. There is VR/180/360 content readily available with a huge caveat: I quickly learned that even 8K video is not enough pixels when it’s supposed to fill 360 degress around you. 8K video is rather the minimum that starts to look good.
Then there’s formats of videos. Oh god there are formats. I’d probably spend another blog article just on video formats for VR and 180 or 360 degree formats. Keep in mind that you can add 3D to the equation as well. And if you want decent picture quality you see yourself easily pushing 60 frames of 8K (or more) times 2 (eyes) through to the GPU of the little head mounted displays. The displays can do 2160×2160 per eye. So you can imagine how much video you should be pushing until the displays are at their potential. And then think: 2160 per eye is NOT yet a pixel-density that you would not be able to see pixels sometimes. I do not see a screen-door-effect and the displays are really really good. But more pixels is…well more.
Anyways: There’s plenty of storage on the device itself so on the next airplane trip I can look funny with the headset on and being immersed in a movie…
Or a remote desktop session:
After about a week of testing and playing (Red Matter 1 for example…) I was convinced that I’d like the technology and the experiences it offered.
The conclusion after the first week was as good as I could have hoped with the first 500 euro investment done: I would not get sick moving around in VR. I would enjoy the things offered. I was convinced that I was able to experience things otherwise not possible.
And I was convinced that I could not have come to any conclusion when not actually having owned such a headset and tried myself. It’s just not possible to describe to you what the feeling of being able to walk into a 3-dimensional world that gets rendered by a computer and fools your brain so well. Of course it’s NOT reality. That’s not the point. I do not feel like going to the holo-deck. But it feels like computer games become “3D touchable”. In virtual reality games there is a lot more going on than in non-VR games. And that’s the main reason that there are not more good VR games. It’s hard to build an immersive, believable game world. It’s real effort and I named Red Matter specifically because it was one of the most immersive and approachable puzzle, non-stressing games I have played.
Being convinced brought up the question: Now what?
Until this point there was no computer in our household that could even dream of powering a modern virtual reality PCVR experience. But there was one Windows PC which I could use to do the due dilligence for “what to buy” and if it at all would work as I wanted.
What did I want?
a set-up that would allow me to play any modern PC VR game
play the games with at least high details and with framerates and resolutions that would not make me sick
no wired connection to the computer necessary
ideally the computer would not even be in the same room or floor
So I had to do some testing first to figure out if the most basic requirements would work. So I purchased “Virtual Desktop” on the headset built-in store and installed the streamer app on the one Windows PC in the household that had a very old dedicated GPU.
I did the immediate extreme test. The computer connected to the wired network in the house. The headset connected to the house wifi shared with 80+ other devices. And it worked. It worked beautifully. Just out of the box with my mediocre computer I had the desktop screen of the computer floating in front of me. I was able to launch applications and I was even able to run simple 3D VR applications like Google Earth VR. I literally only had Steam and Virtual Desktop installed, clicked around and got the earth in front and below me in no time.
Apparently the headset was smart enough to connect to the 5ghz Wifi offered in addition to the crowded 2.4ghz. Latencies, bandwidth all in good shape.
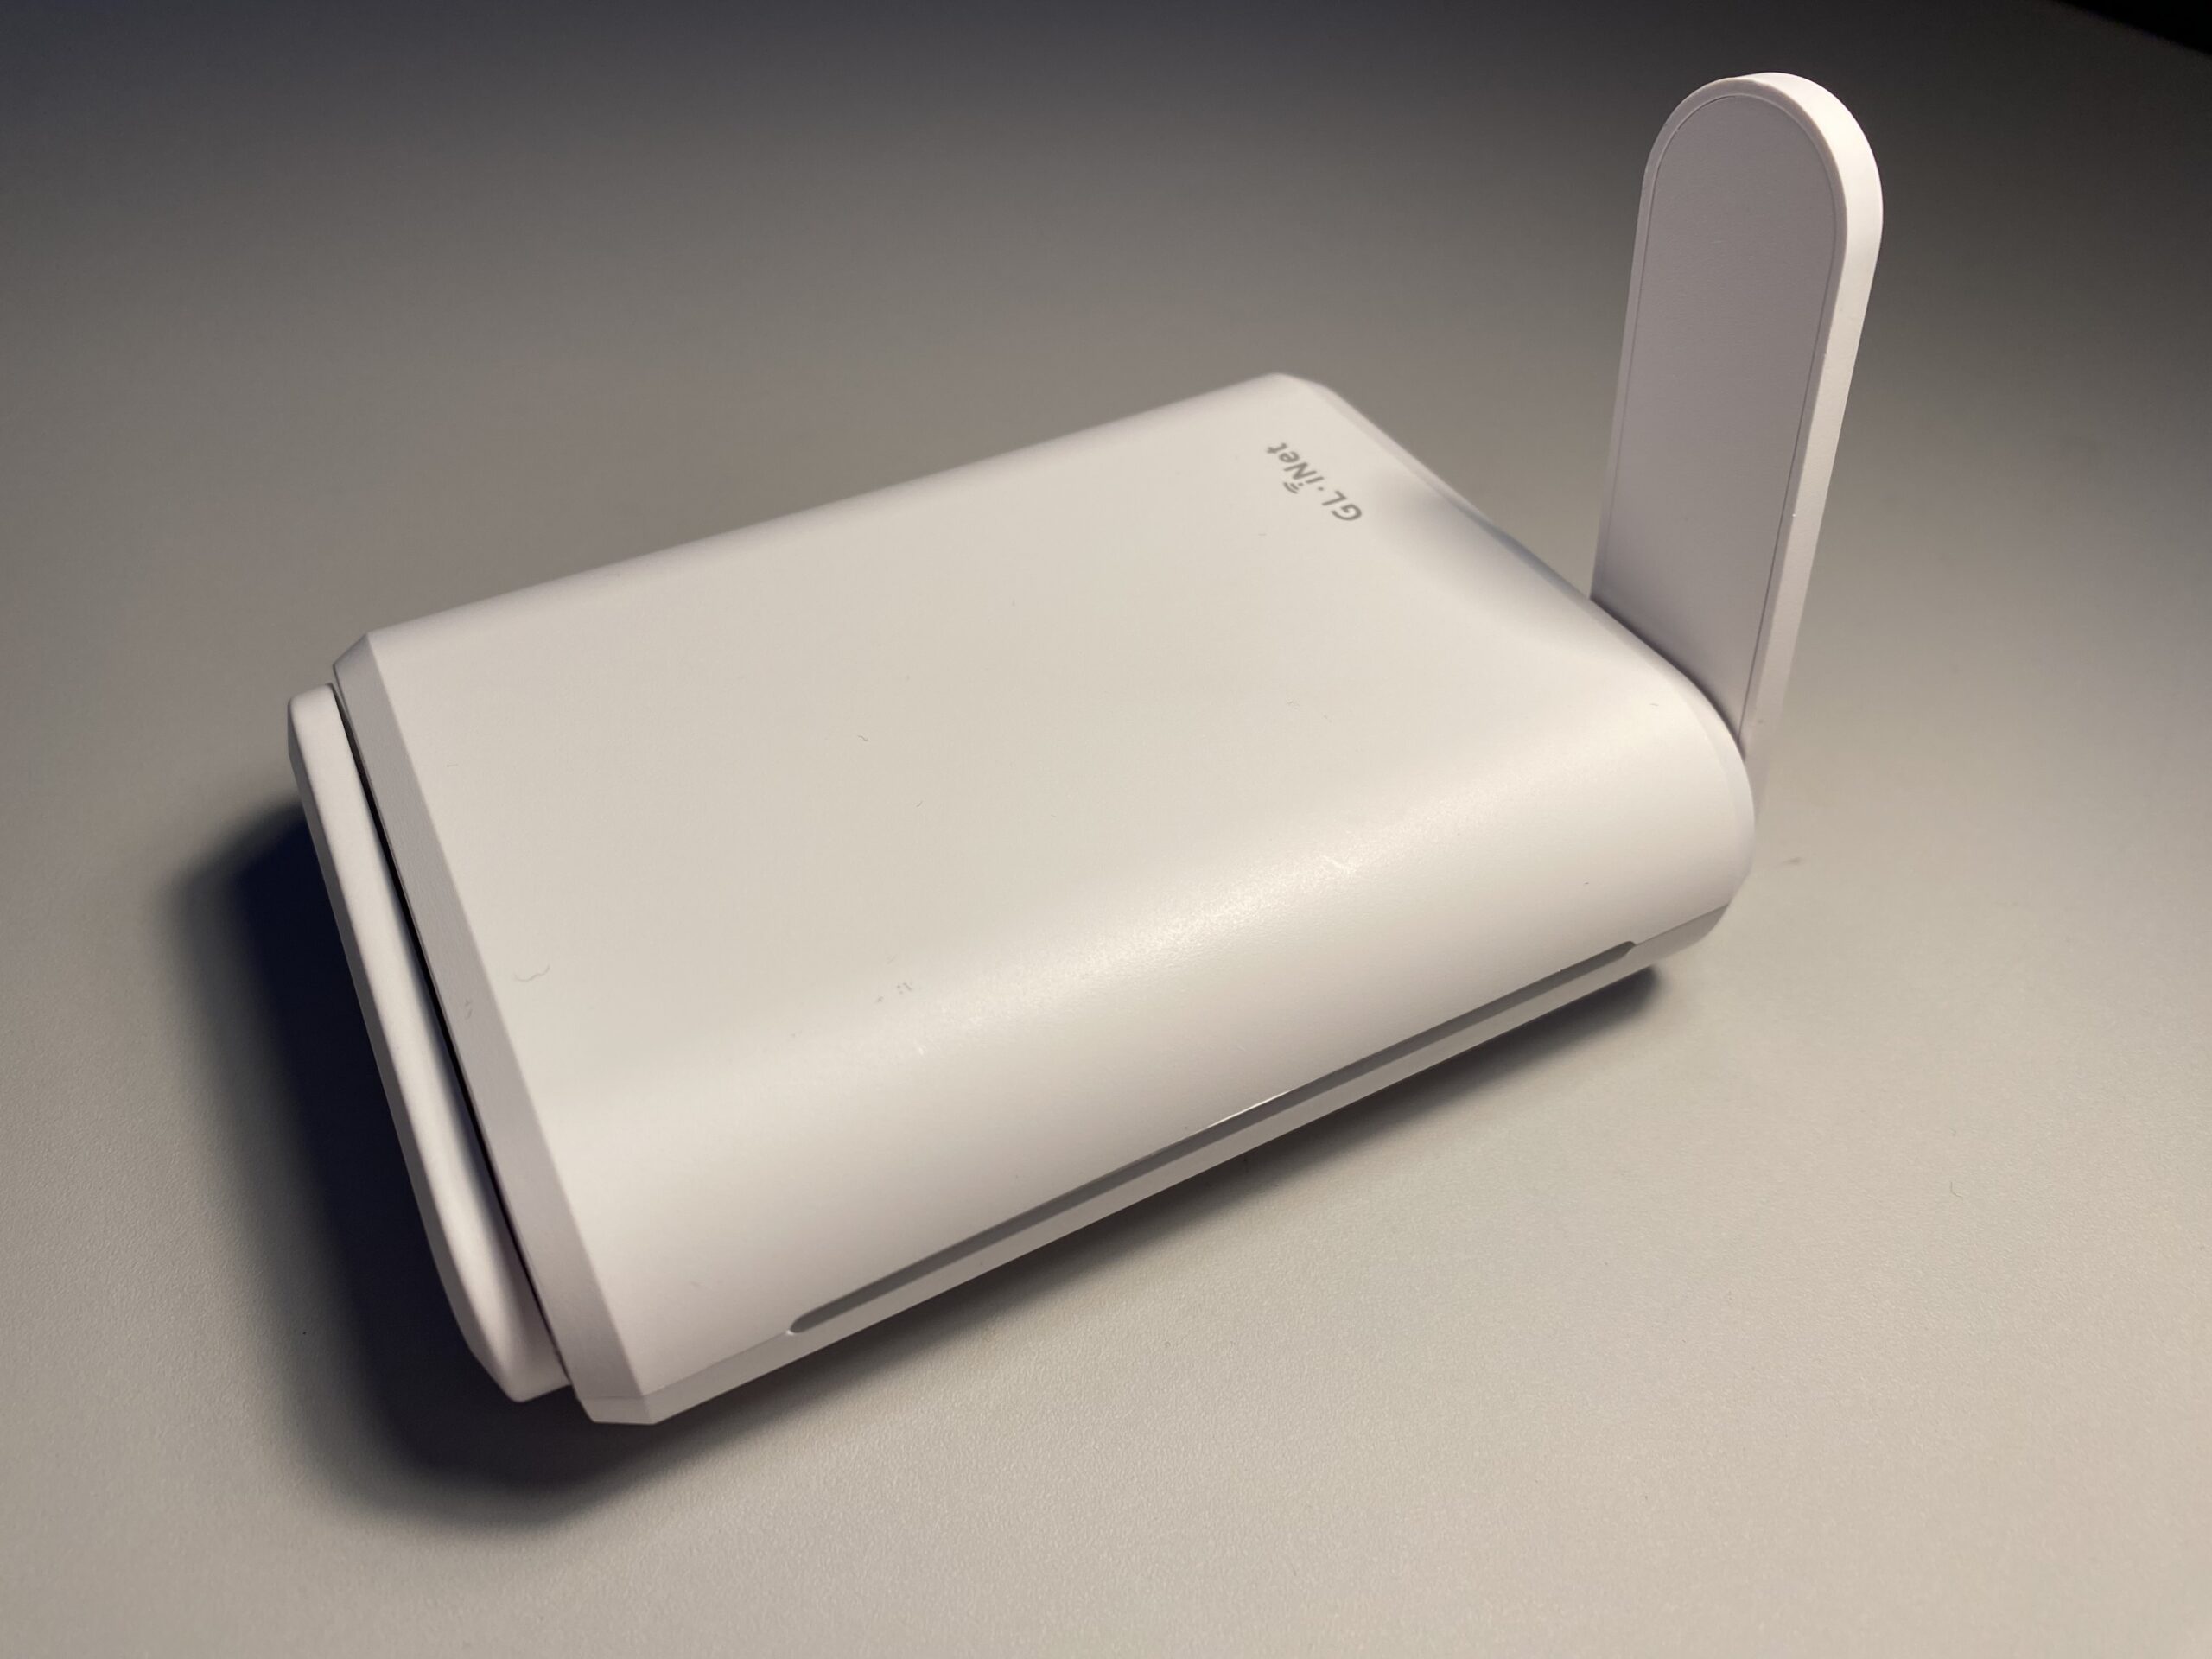
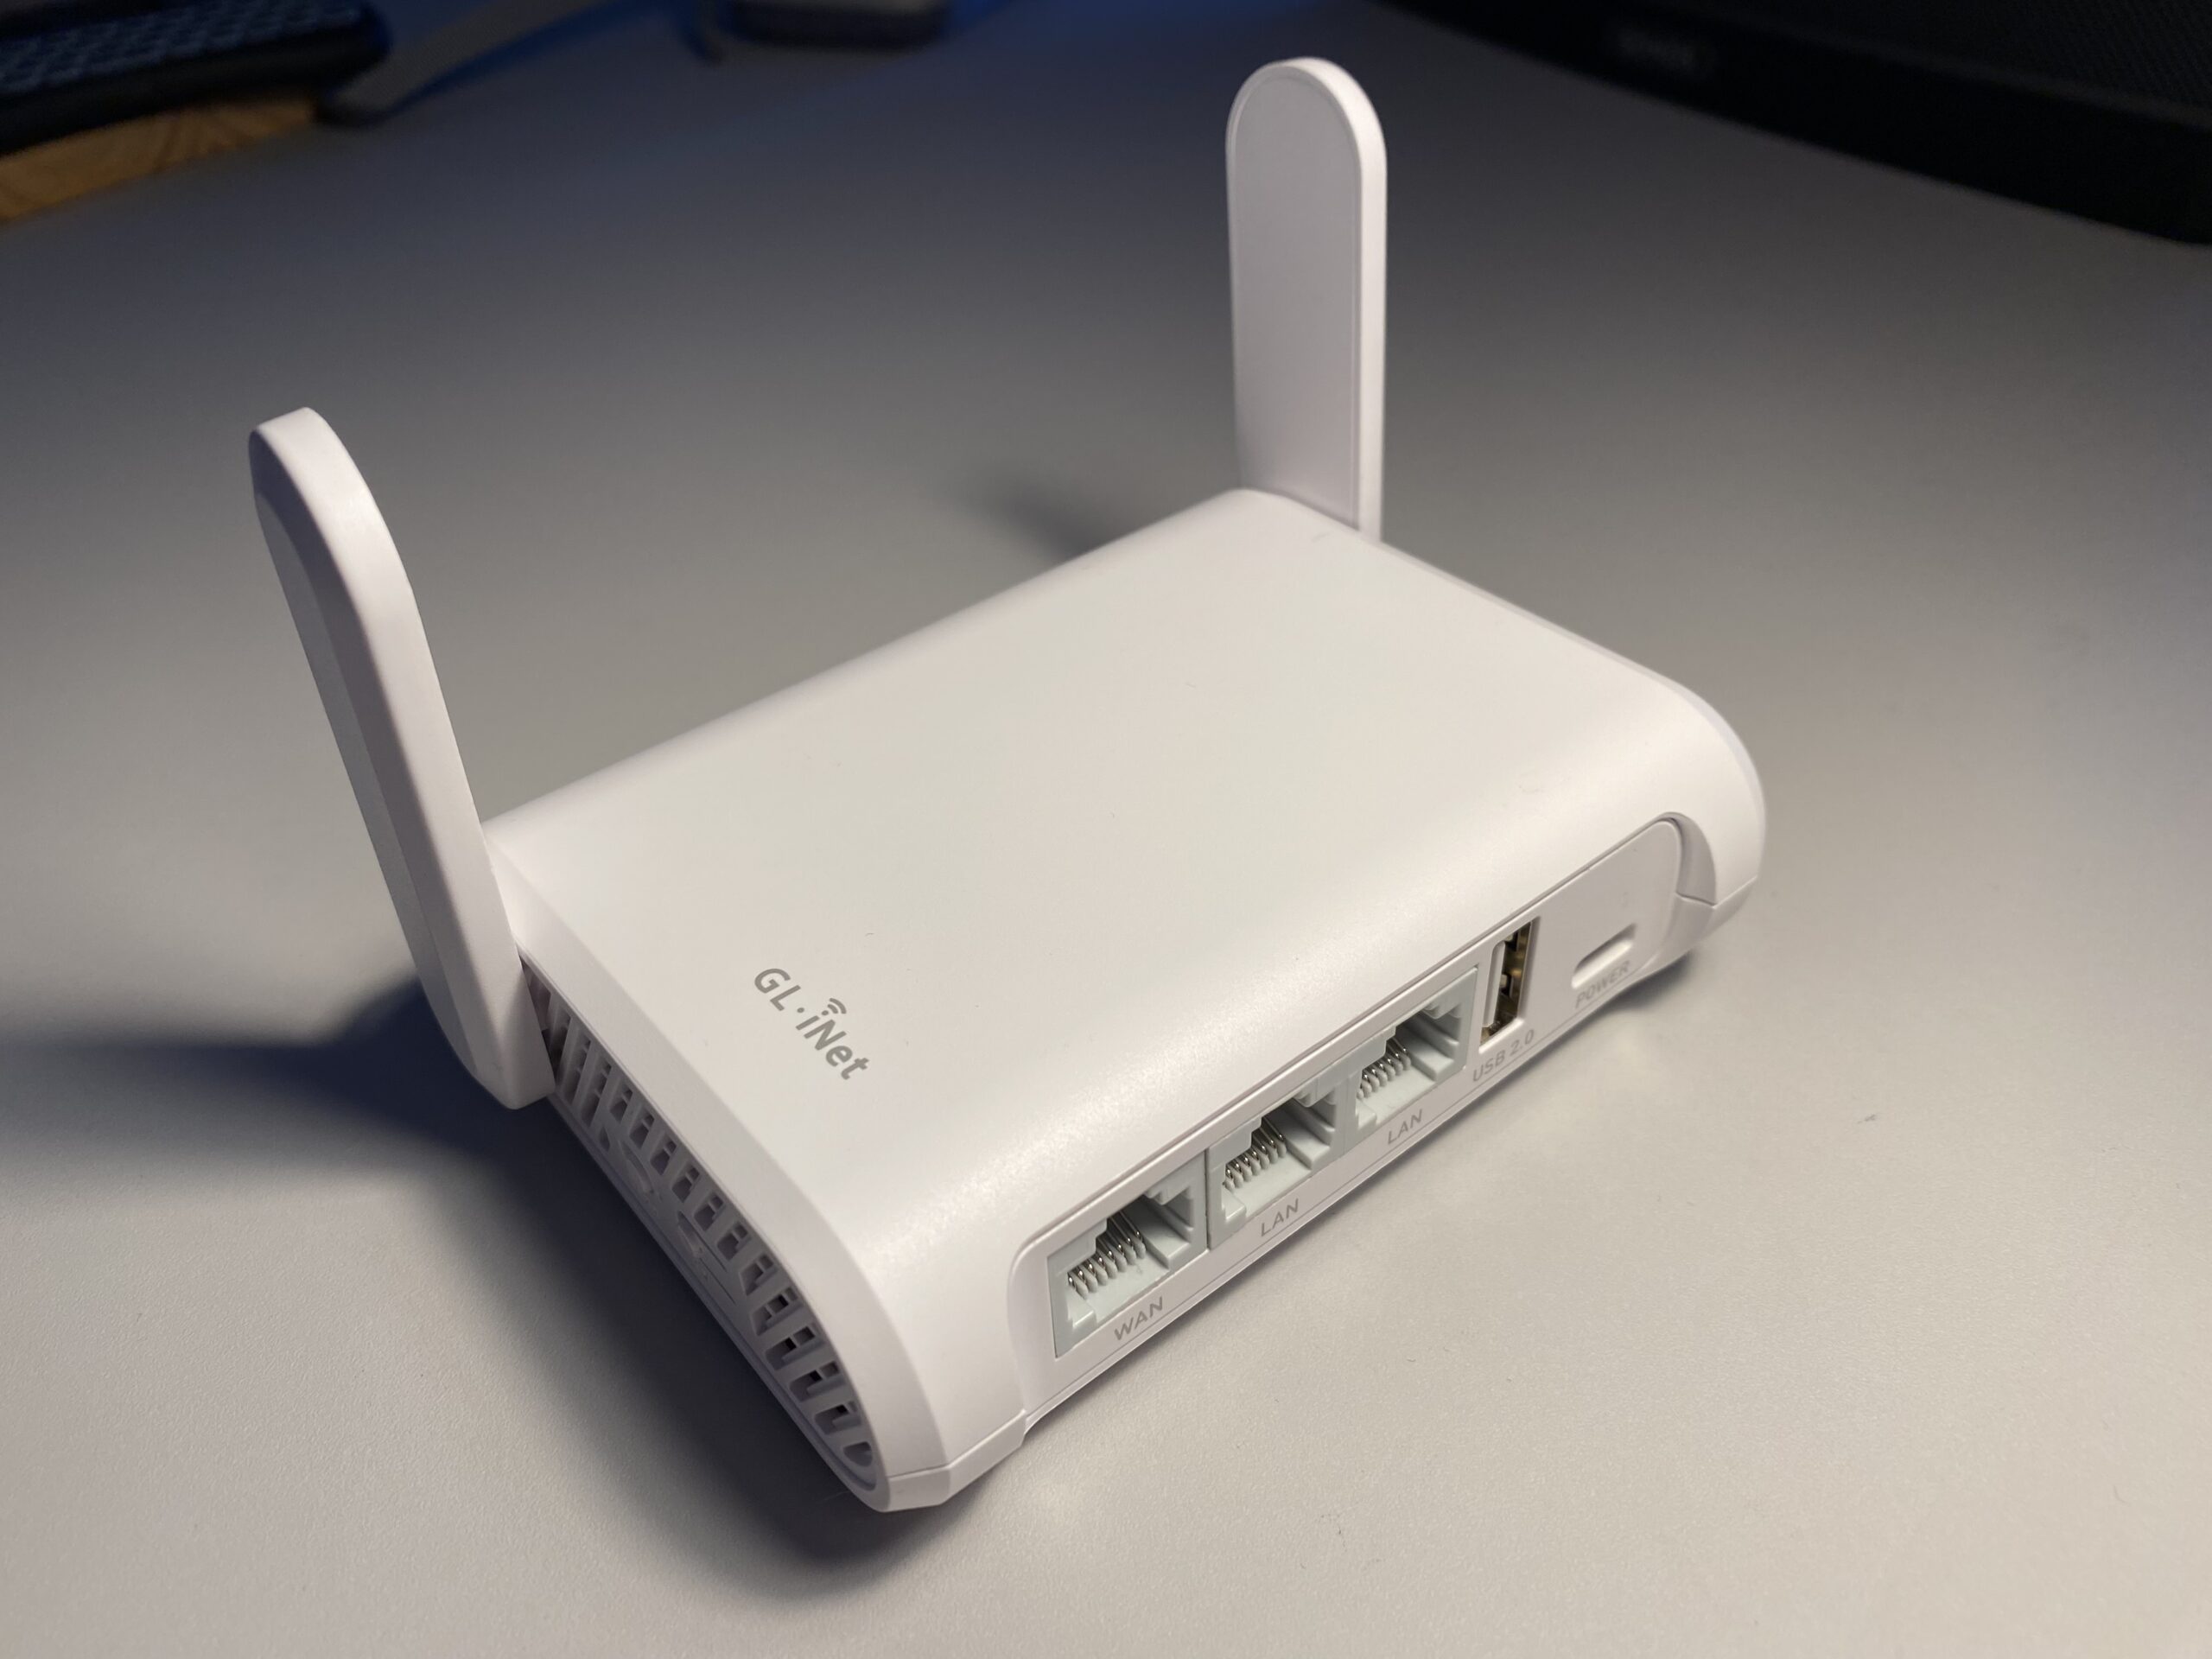
To make things just a bit more forseeable I’ve dedicated a mobile access point to the headset. My usual travel access point (GLinet OPAL) apparently works quite well for this purpose.
It’s connected to the house wired network and creates an access point just for the headset. The headset then has reliable 500+ Mbit/s access to any computer in the household.
After some more playing around and simulating some edge case scenarios I came to the conclusion that his would work. I would not even have to touch a computer to do all this. It could all be done remotely over a fast-enough network connection.
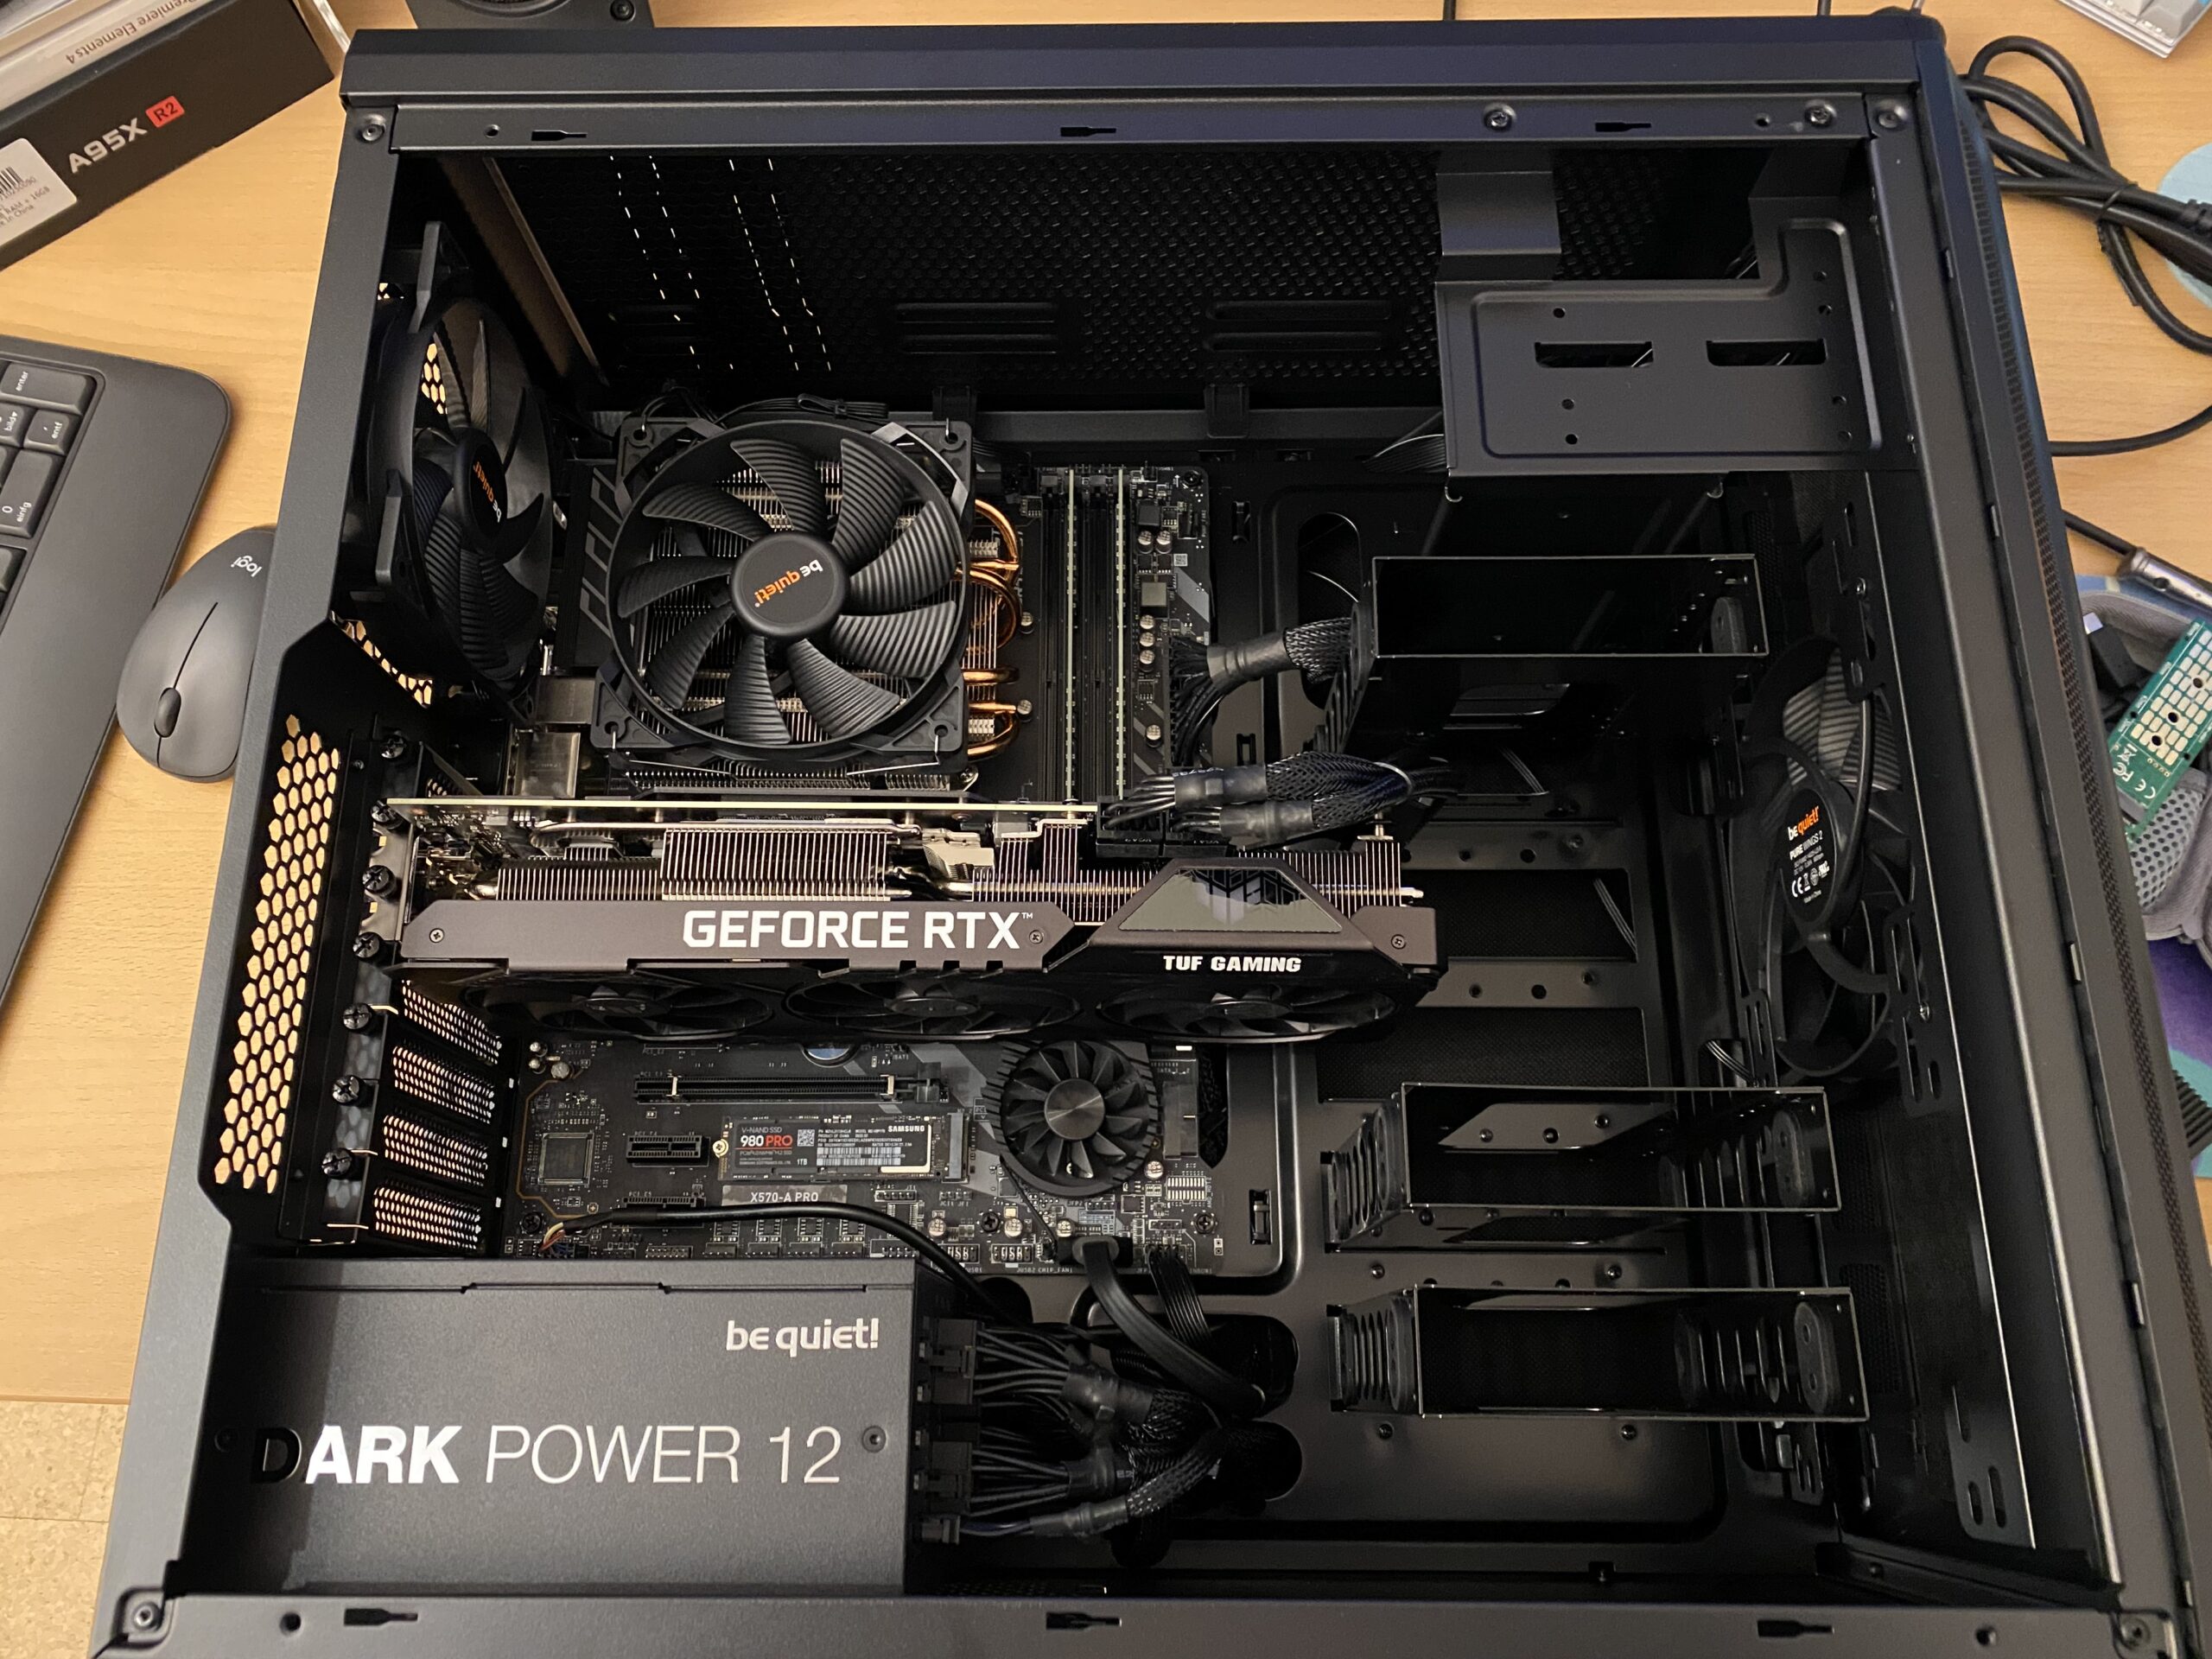
After consulting with my knowledgable brother-in-law I then settled for a budget and had a computer built for the purpose of VR game streaming. After about 2k Euros and 2 weeks of waiting I received the rig and did the most reasonable thing: Put it in the server room in the house basement where it’s cool and most importantly far enough away from my ears.
Ryzen 5800x + 3070ti
So this one is closed up and sitting in the server room. The only thing other than power and ethernet that is plugged into the machine is an HDMI display emulator dongle:
The purpose of this HDMI plug without anything connected to it is to tell the graphics card that there’s display connected. It even tells the graphics card about all those funky resolutions that ghostly display can do… When there’s nothing connected to the HDMI ports the only resolutions that you can work with out-of-the-box are the default resolutions up to 1080p. This device enables you to go beyond 2160p.
I did a bit of setting-up for wake-on-lan and some additional fall-back remote desktop services in case something fails.
To wake-up the machine it’s sufficient to send the “magic packet” – either through the remote play client built-in features (Moonlight can do it…) or through the house-internal dashboard:
yes, the computer is called “Valerian” – the machine I am mostly using to control it (other than the headset) is called “Laureline”…go figure!
streaming games
For VR game streaming it’s as I had tested beforehand: Steam + Virtual Desktop doing their thing. Works, as expected, very pleasently even with high/ultra details set.
The machine can also be used to play normal non-VR games. For this I am using the open source Sunshine (server) / Moonlight (client) combination with great success.
I can either just open up the Moonlight app on my iPad, iPhone, RaspberryPi or Mac computer and connect to the computer in the basement and use it with 60-120fps 1080p to 4k resolutions without even noticing that there is no computer under the desk…
Oh – I do notice that there’s no computer under the desk because of the absence of any noise while using it.
What I have found is really astonishing for me – as I was not expecting a that well integrated and working solution without having to solve problems ahead.
Virtual Reality games are just working. It’s like installing, starting, works. The biggest issue I had run into was the controllers not being correctly mapped for the game – easily solvable by remapping.
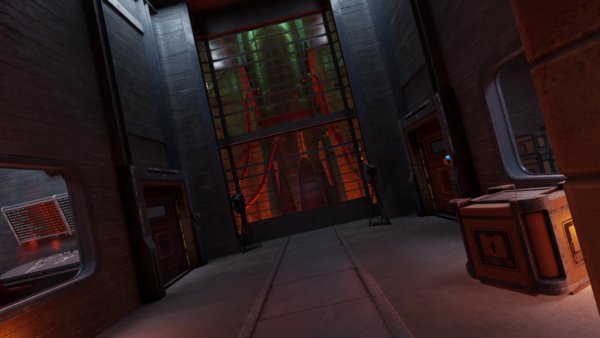
I “upped” the stakes a bit a couple of days ago when I installed OBS Studio to live stream my VR session of playing Red Matter 2 (the sequel…).
resized screenshot of one eye of an impressive scene of the game Red Matter 2. Just having landed on the Neptune moon Triton.
Nice hand tracking…
After installing OBS and setting up the “capture this screen” scene it was very nice to see that not only did OBS record the right displays (when set right) but out of the box it recorded the correct audio AND the correct microphone. Remember: I am playing in a specific room at the top floor of my house. Using the awesome tracking of the head-set for room-scale VR to the fullest.
The computer in the basement means that the only connection from headset to the computer is through Virtual Desktop – 5ghz WiFi – Ethernet – Virtual Desktop Streamer.
I did not expect a microphone to be there but it is. I did not expect the microphone to work well. But it does. I did not expect the microphone being seamlessly forwarded to the computer in the basement and then OBS effortlessly picking it up correctly as a separate microphone for the twitch streaming. I was astounded. It-just-worked.
adding an (usb) gamepad
After a bit of fooling around, especially with standard PC games I found that some games make me miss a game pad. It was out of the question to connect a gamepad directly to the computer the games ran on – that one was in the basement and no USB cable long enough.
I remembered playing with USB-over-IP in recent years just for fun but also remembered not getting it to work properly ever. After investigating any hardware options I decided to give software another look.
Apparently a company called “VirtualHere” had seen their chance since I played around the last time. They offer a server and client software that seemingly can run anywhere.
So I picked an old RaspberryPi 1 out of the drawer and flashed a fresh version of RaspberryPi OS. Booted it up and copied the one Linux ARM7 binary over that VirtualHere offers. It started without issues and further dependencies.
On the Windows Machine you also only have to run a simple application and it’ll scan the network for “VirtualHere USB hubs”.
For me it immediately showed up the RaspberryPi as an USB hub. I plugged in my old Xbox 360 wireless receiver and it showed up and connected on Windows. When I then powered up an Xbox 360 wireless controller it made the well known Windows “device plugged in” sound and I had a working gamepad ready to use in Windows – all over the network.
I cannot notice any added latency for the controller. And essentially anything I had plugged into the USB ports of the RaspberryPi could immediately be used/mounted on the computer in the basement all over the already existing network.
It cannot be overstated how little hassle this solution was over any other way I know and would have tried. The open source USB/IP project is still there and seems to work on modern Windows BUT you have to deal with driver signing and security issues yourself.
VirtualHere does cost money but it’s at least not a subscription but a perpetual license you can purchase after trying out the fully functional 1-device versions. For me it now brings working USB-over-my-existing-network to any device I want around the house. There are some other uses I will look into – like that flatbed scanner I have. That camera that can now connect anywhere via USB… so many options…
conclusion
I went head-first into the virtual reality rabbit hole and it’s quite fun so far. The costs of this came down far enough and I was able to learn a lot of things I would otherwise not have been able to. Looking into the technology-side of how all this comes together and how latencies add up, build or ruin an experience is remarkable.
If you want to get a (albeit clumsy and not 3D) look of what one of the many options to do in VR is – take a look at a VR session recording from two days ago:
Bonus: The GLinet OPAL travel router does have 1 USB port. And you can run the USB VirtualHere hub software as an MIPSEL binary on there and you would not need the RaspberryPi anymore. The only thing you must figure out yourself is how to route the traffic out the right ports.
Ever since I stumbled across several IRL streamers I was intrigued by the concept of it.
IRL or “in-real-life” is essentially the art of streaming everyday life. For hours and totally mobile. Of course there are some great gems in the vast sea of content creators. One of them – robcdee – streams for hours live almost every day and shows you his way around in Japan.
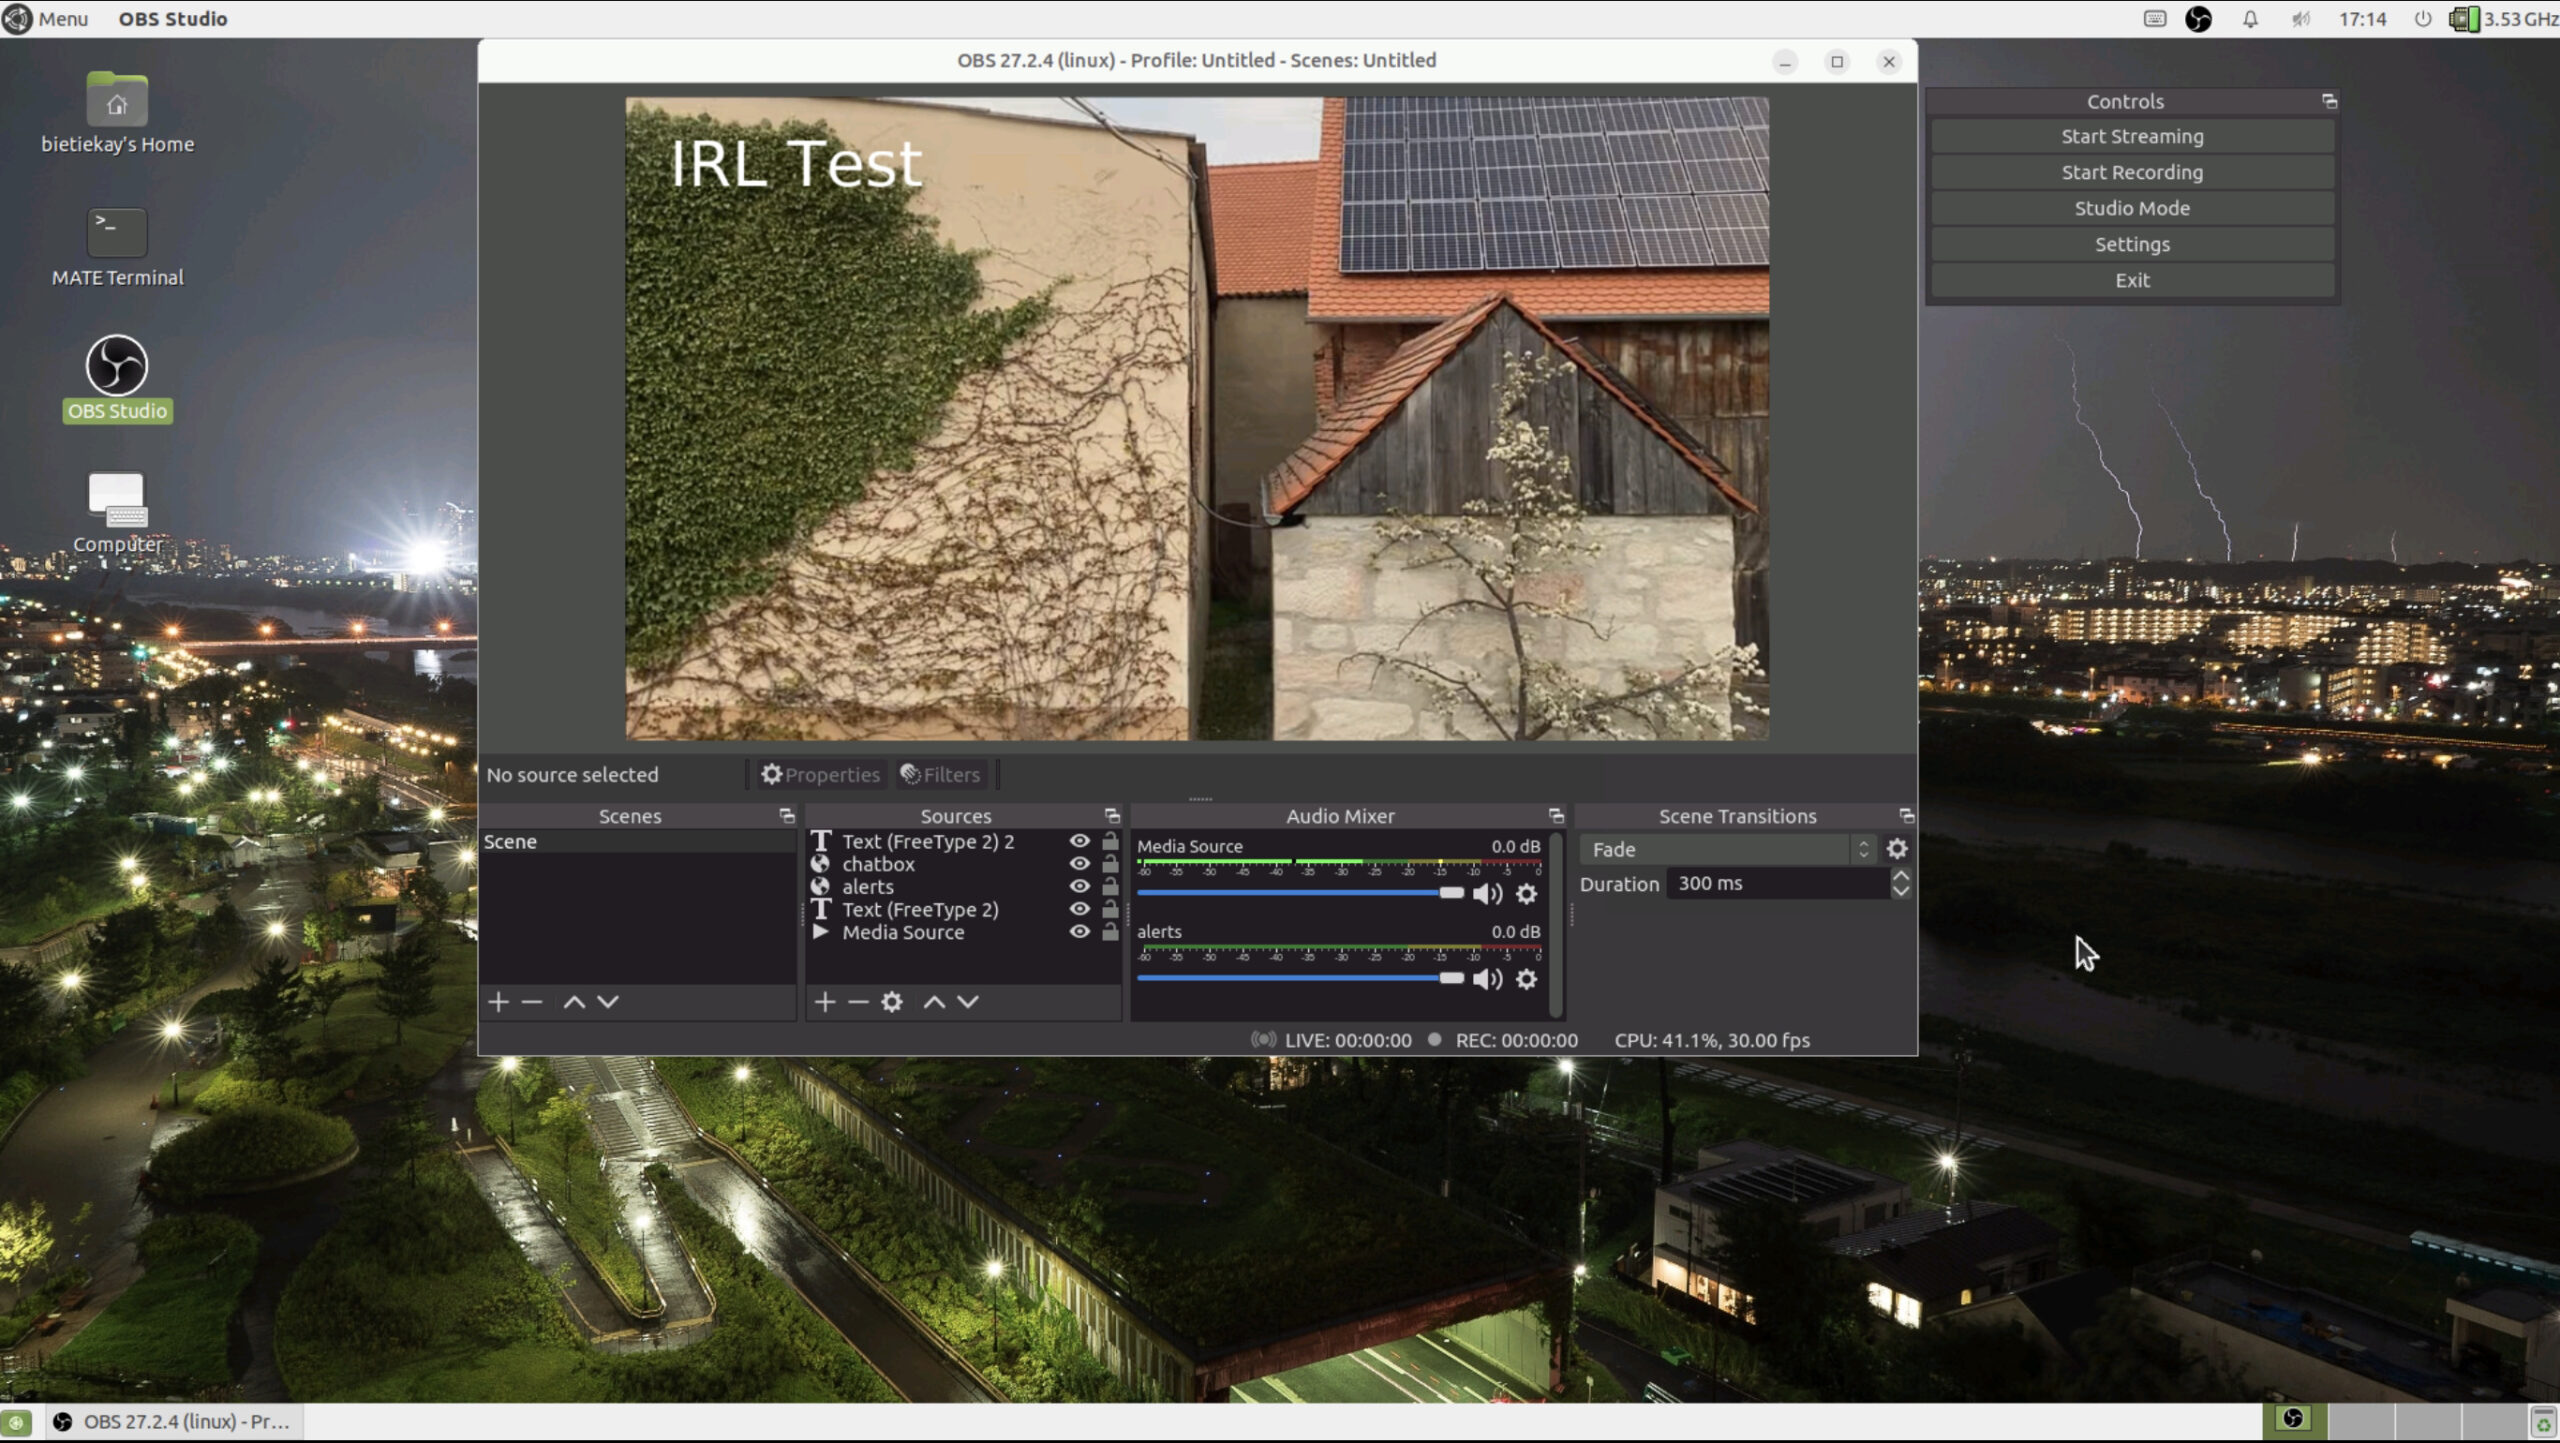
Apart from the content – Japan is great – the technical side of this IRL streaming set-ups is quite interesting. Imagine: These streamers wander around with usually a backpack filled with batteries, several modems (4G/5G…) that load balance and bundle a 2-6 Mbit/s video+audio stream that gets sent to a central server either through SRT or RTMP protocol. This central server runs OBS Studio and receives the video stream offering the ability to add overlays and even switch between different scenes and contents.
After I had a basic understanding of the underlying technologies I went ahead and started building my own set-up. I do have plenty of machines with enough internet bandwidth available so they could be the host machine of OBS Studio. I wanted all of this live in a nice docker container.
I went ahead and built a docker container that is based upon the latest Ubuntu 21.04 image and basically sets up a very minimal desktop environment accessible over VNC. In this environment there is OBS Studio running and waiting for the live stream to arrive to then send out to Twitch or YouTube.
How I have set-up this docker desktop environment exactly will be part of another blog article.
look at this nice OBS Studio running on Linux inside a Docker Container on a root server on the other side of the country…
So far so good. OBS offers the ability to define multiple scenes to switch between during a live stream.
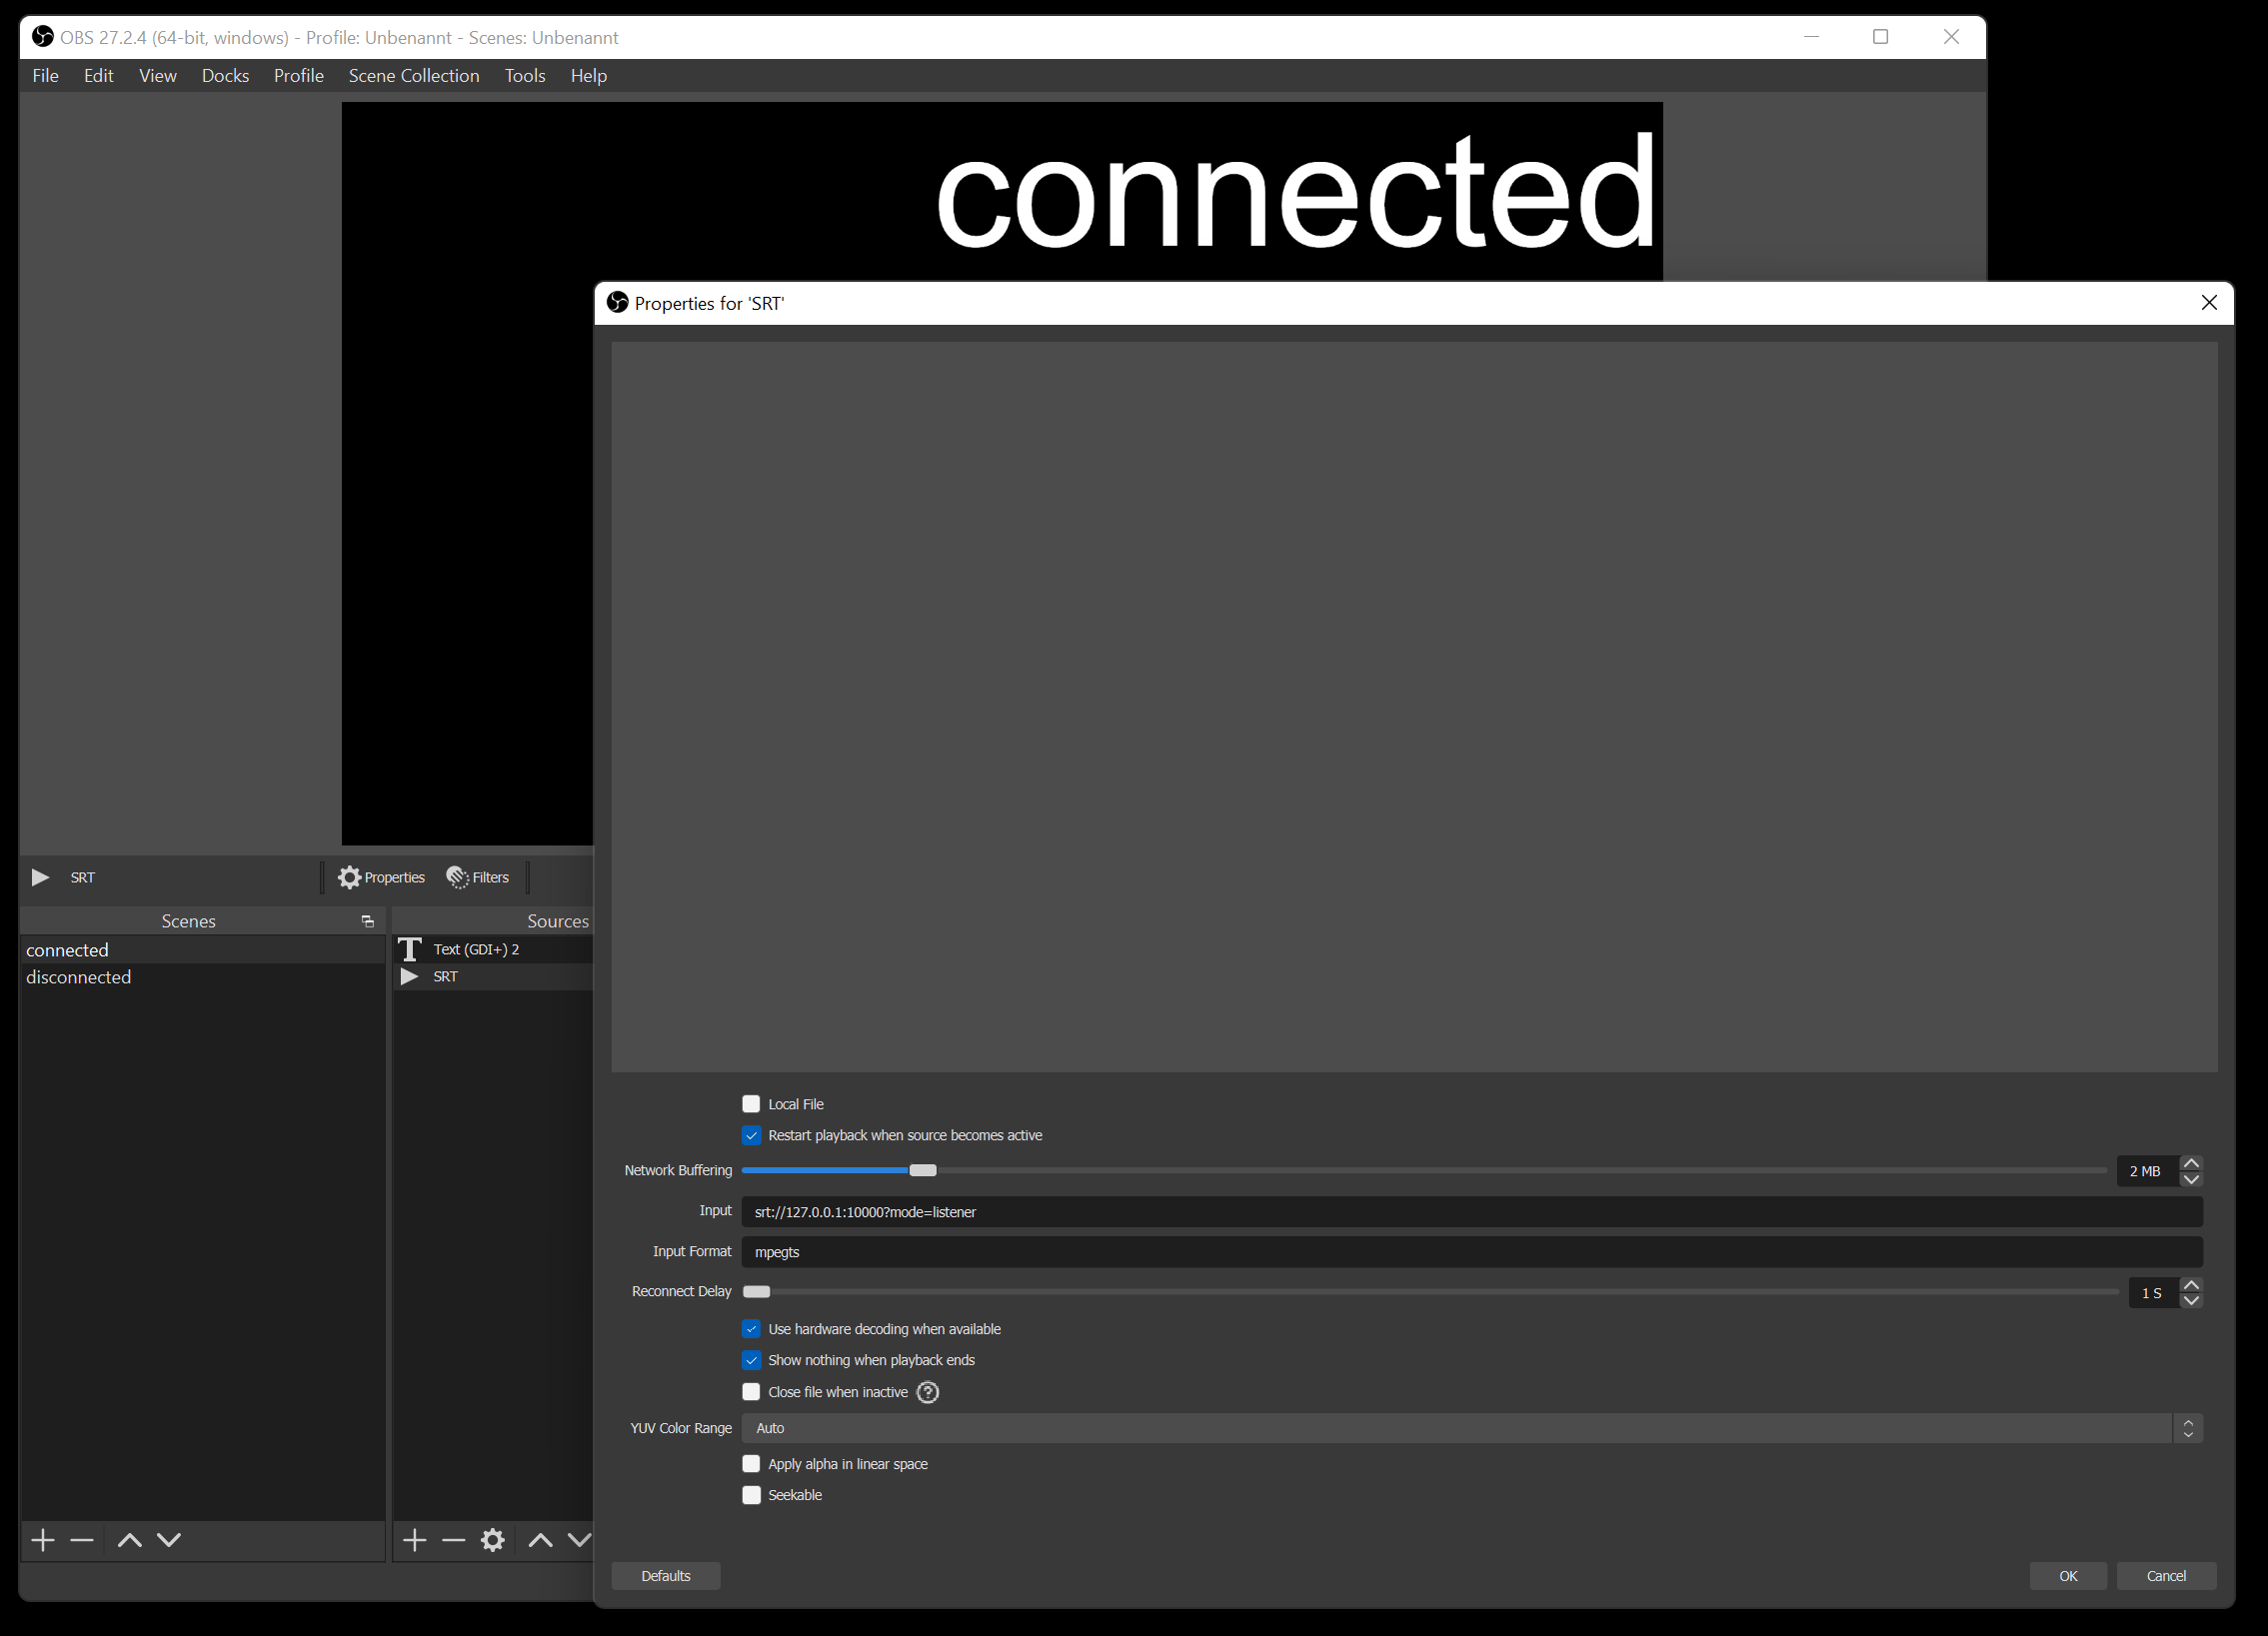
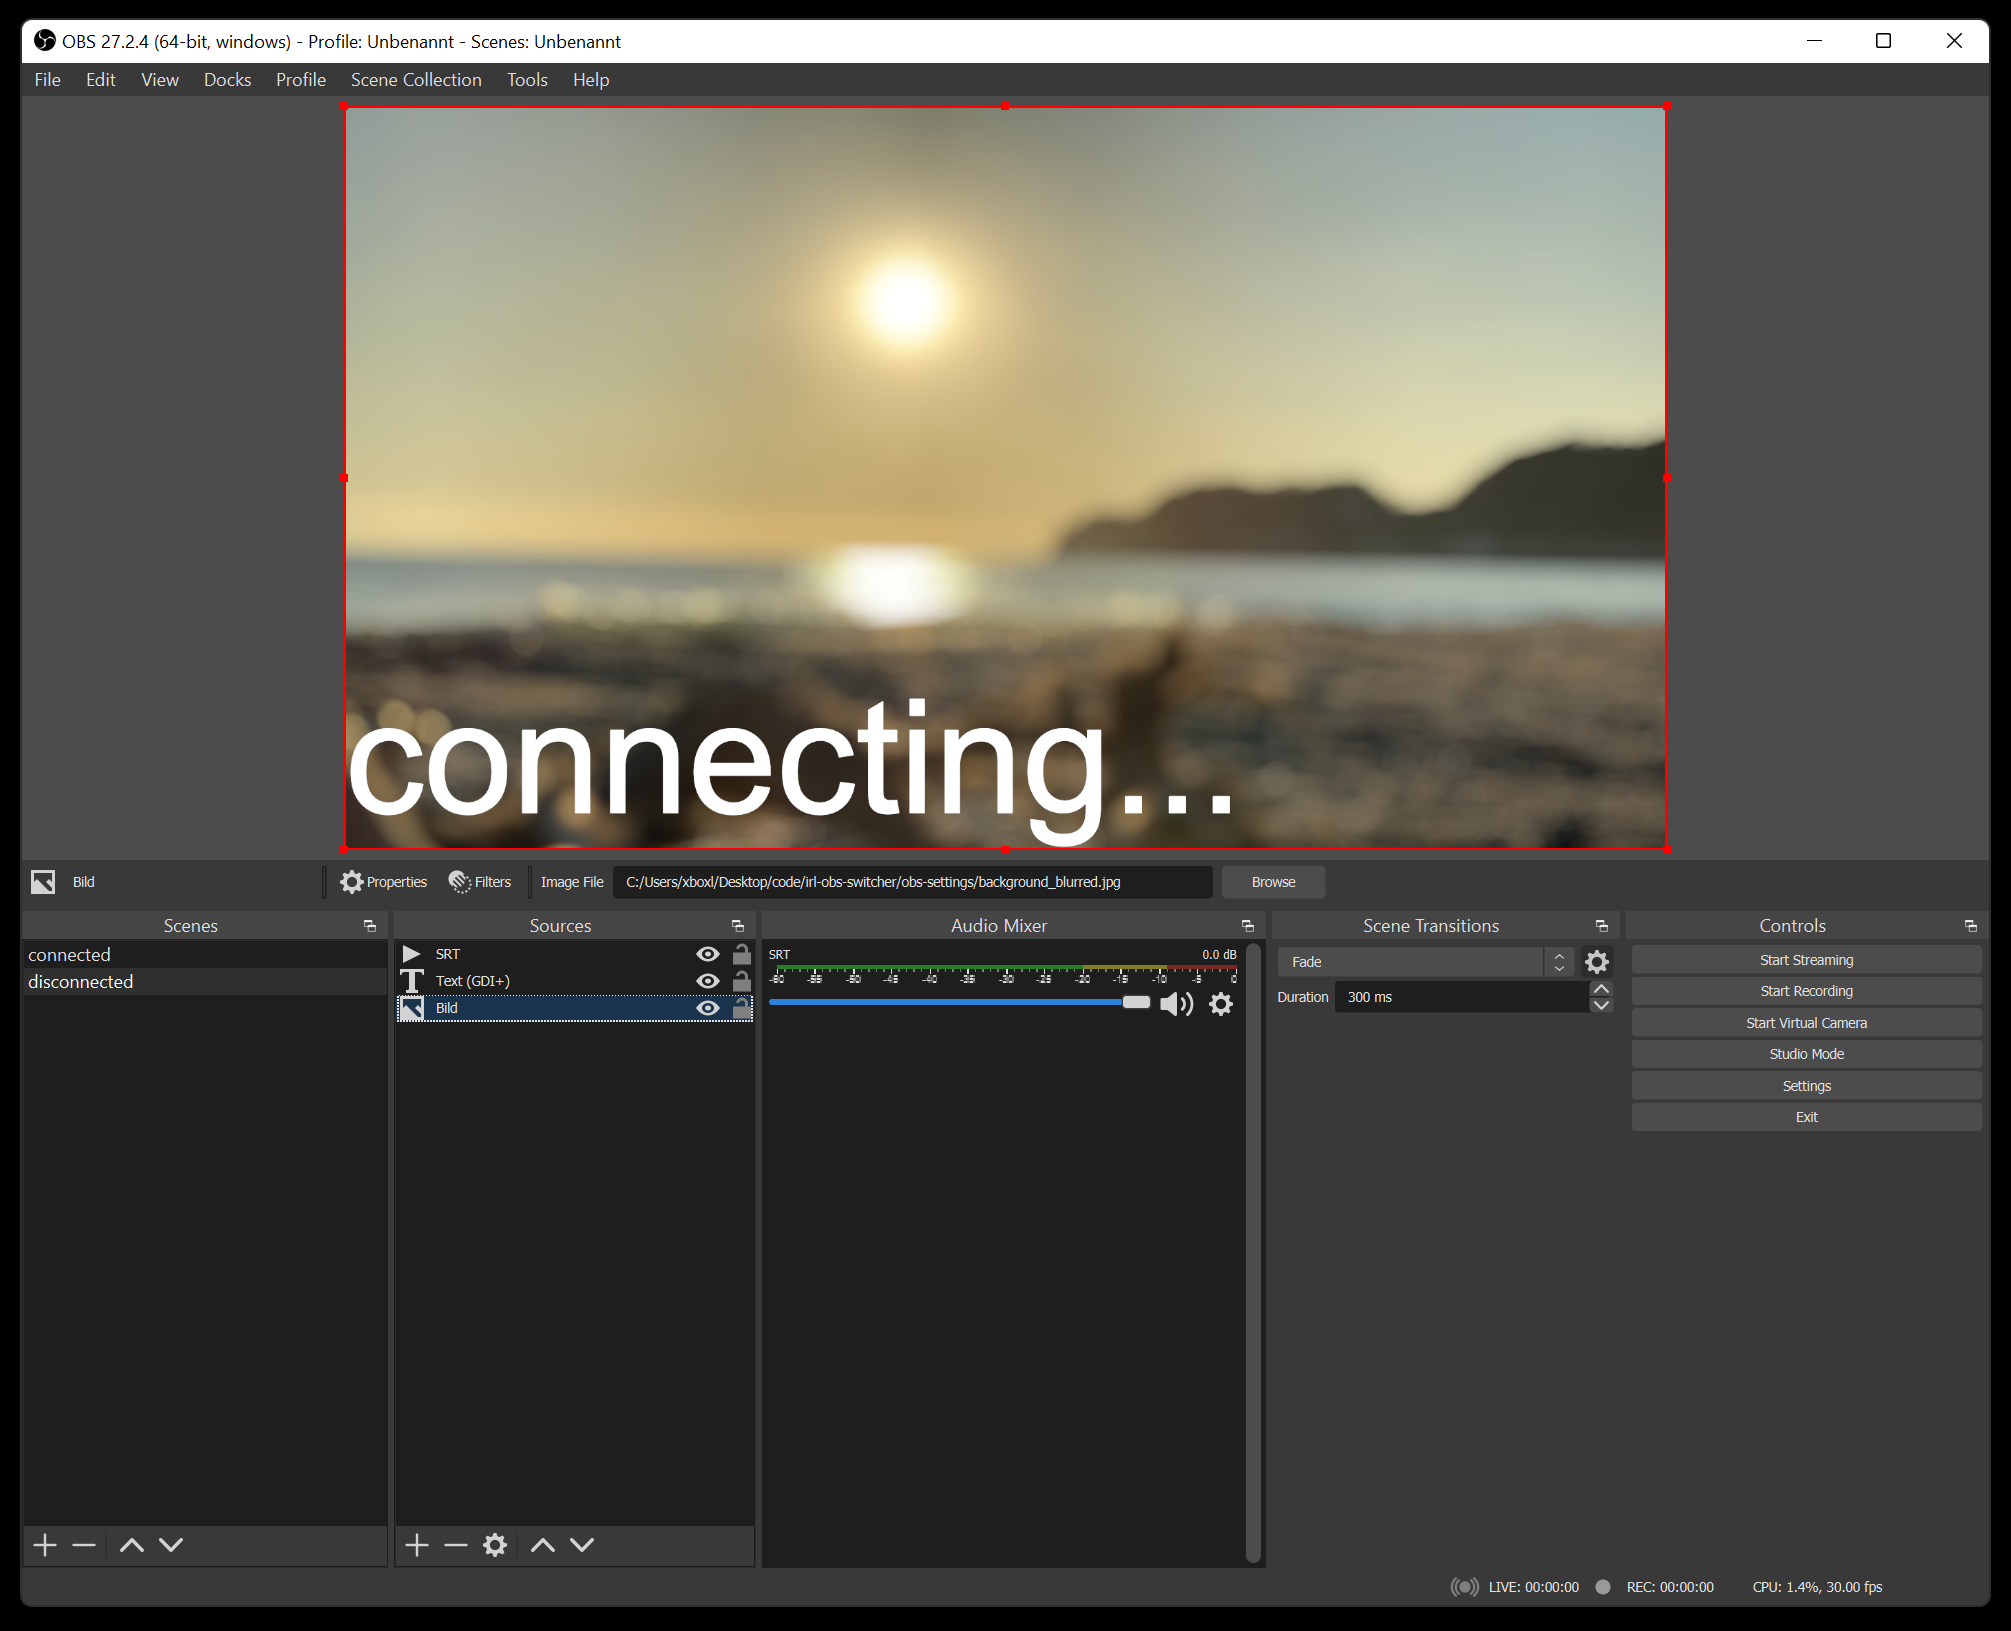
These IRL streamers usually have one scene for when they are starting their stream and two more scenes for when they are having a solid connection from their camera/mobile setup and when they are currently experiencing connection issues.
All of the streamers seemingly use the same tooling when it comes to automatically switch between the different scenes depending on their connectivity state. This tool unfortunately is only available for Windows – not for Linux or macOS.
So I thought I give it a shot and write a platform independent one. Nothing wrong with understanding a bit more about the technicalities of live streaming, right?
It runs on Linux, Windows, macOS as I have used the .NET framework 6.0 to create it. It is all open source and essentially just a bit of glue and logic around another open source tool called “netproxy” and OBS WebSocket.net.
My tool basically runs on all sorts of platforms – including Linux, Windows and macOS. I run it inside the docker container with the OBS Studio. It essentially proxies all data to OBS and monitors wether or not the connection is established or currently disconnected. Furthermore it can be configured to switch scenes in OBS. So depending on wether there is a working connection or not it will switch between a “connected” and “disconnected” scene all automatically.
the “connected” scene configured as an SRT media source
So when you are out and about live streaming your day this little tool takes care of controlling OBS Studio for you.
the “disconnected” scene configured to play a nice beach sunset and quiet music to calm people down as the live streamer reconnects…
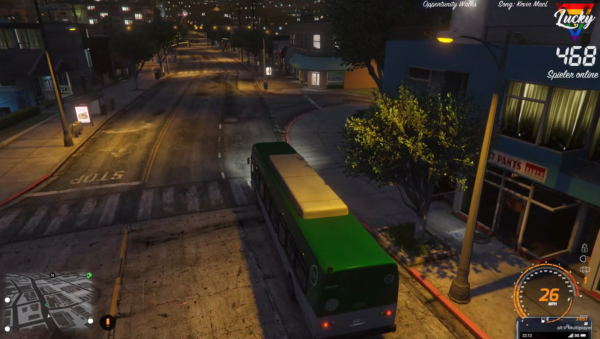
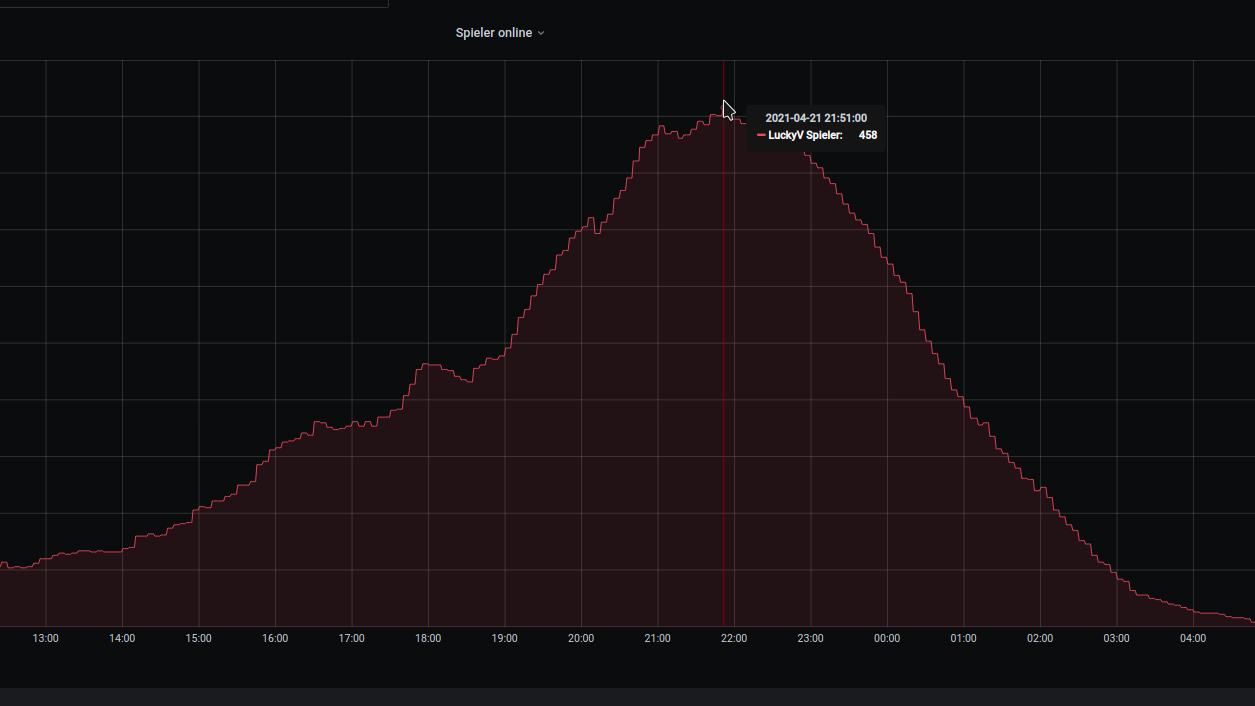
Gleich zu Anfang habe ich mir meinen Stream so eingerichtet dass jeweils der aktuelle Spieler-Counter immer im Bild zu sehen war. Ich finde das einfach eine ganze witzige Information vor allem für LuckyV-Interessierte.
rechts oben – die aktuelle Zahl der gleichzeitigen Spieler auf LuckyV
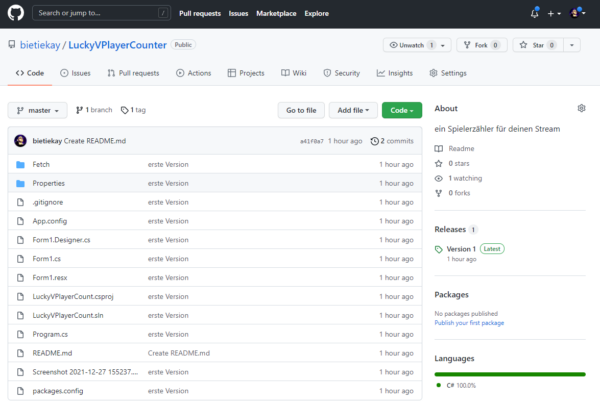
Meine ursprüngliche Implementierung war etwas kompliziert – zu kompliziert um sie einfach mit anderen zu teilen.
Daher habe ich mich entschlossen den Zähler in eine eigene Windows Applikation zu verpacken die von Streamern einfach verwendet und in OBS eingebunden werden kann.
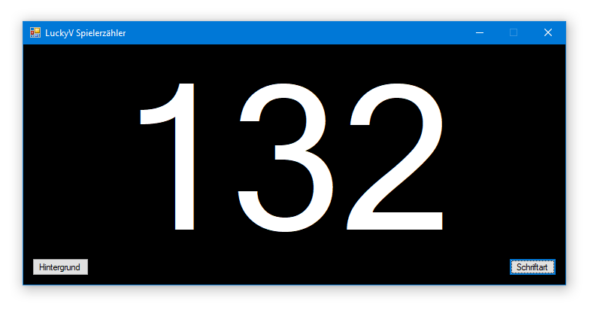
Starten und prüfen ob die Zahl auch angezeigt wird – es sollte ungefähr so aussehen:
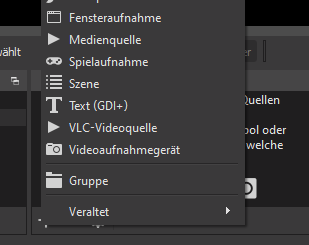
Man kann das nun auf zwei Wegen einbinden.
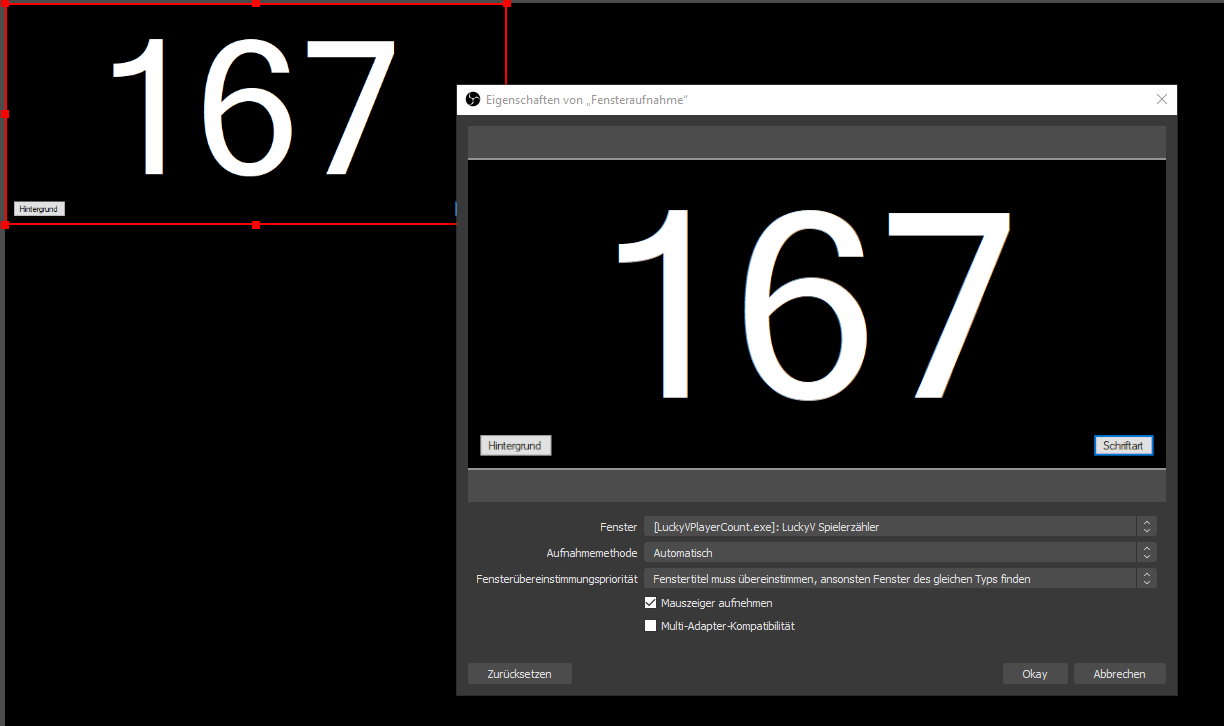
Weg 1: Fensteraufnahme
In der Applikation kann man Hintergrundfarben sowie Schriftart und Farbe konfigurieren. Wenn man das erledigt hat wie man es haben will wählt man im Quellenmenü “Fensteraufnahme” und dann das Applikationsfenster.
Fensteraufnahme
Diese Quelle kann man dann wie man möchte konfigurieren. z.B. mit Filtern um bis auf die Schrift alles transparent zu gestalten oder oder oder…
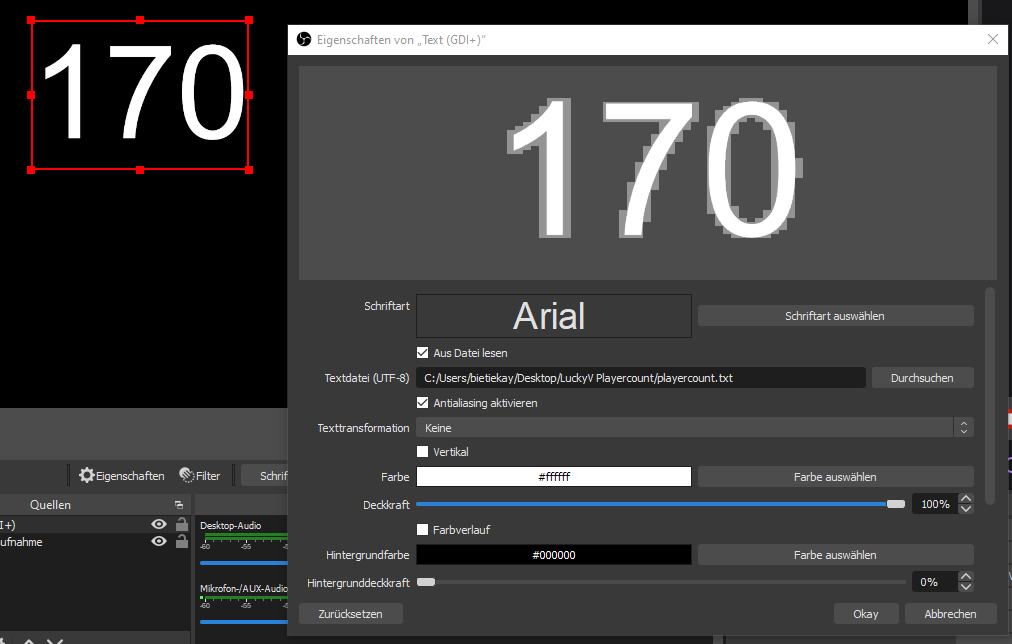
Weg 2: playercount.txt
Wenn die Applikation läuft aktualisiert sie ständig eine Datei “playercount.txt” im gleichen Ordner. Man kann nun OBS so konfigurieren dass diese Datei regelmässig ausgelesen und angezeigt wird.
Dazu fügt man ein “Text (GDI+)” im Quellenmenü hinzu und konfiguriert diese Quelle so dass der Text aus einer Datei gelesen wird:
Hier kann man dann auch beliebig Schriftart, Größe und Farbe konfigurieren.
Found that nice heap of Icons that are free to use and high-quality:
Health Icons is a volunteer effort to create a ‘global good’ for health projects all over the world. These icons are available in the public domain for use in any type of project.
The project is hosted by the public health not-for-profit Resolve to Save Lives as an expression of our committment to offer the icons for free, forever.
Disclaimer: I’ve joined for fun and not for profit – this is a new hobby.
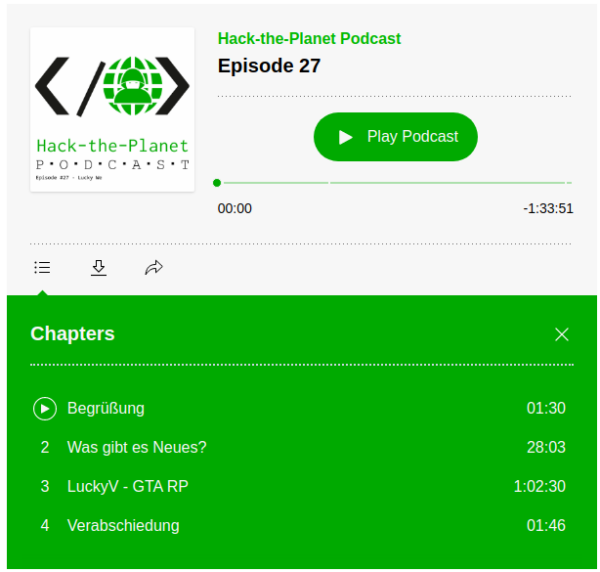
For about a year now I was regularly watching some Twitch streamers go along their business and it spawned my curiousity when some of them started to do something they called “GTA V roleplay”.
Grand Theft Auto V (GTA V) is a 2013 action-adventure game developed by Rockstar North and published by Rockstar Games. Set within the fictional state of San Andreas, based on Southern California, the open world design lets players freely roam San Andreas’ open countryside and the fictional city of Los Santos, based on Los Angeles. The game is played from either a third-person or first-person perspective, and its world is navigated on foot and by vehicle.
So these streamers where mostly using an alternative client application to log into GTA V online servers that where operated by independent teams to play the roles of characters they created themselves. It started to really get interesting when there is dynamics and interactions happening between those characters and whole stories unfold over the course of days and weeks.
It’s great fun watching and having the opportunity to sometimes see multiple perspectives (by multiple streamers) of the same story and eventually even to be able to interact with the streamers communities.
One such fairly big german server is LuckyV. It’s an alternative GTA V hardcore role-play server creates by players for players.
The hardcore here means: the characters are supposed to act as much as possible like they would in the encountered situations in real life.
So in order to play on this server you have to create a character and the characters background story. You gotta really play that character when on the server.
When you play it’s not just a vanilla GTA V experience. There are lots of features that are specific to the server you are playing on. Some examples are:
Communication: you are communicating with people in your vicinity directly – you can hear them if they are close enough to be heard and you can be heard when you are close to people
Jobs: there’s lots to be done. Become CEO of your own company and manage it!
Social Interaction: there’s probably an event just around the next corner happening. You are able to meet people. Crowds of people even. Remember: There are usually no non-players. Every person you see it a real human who you can interact with.
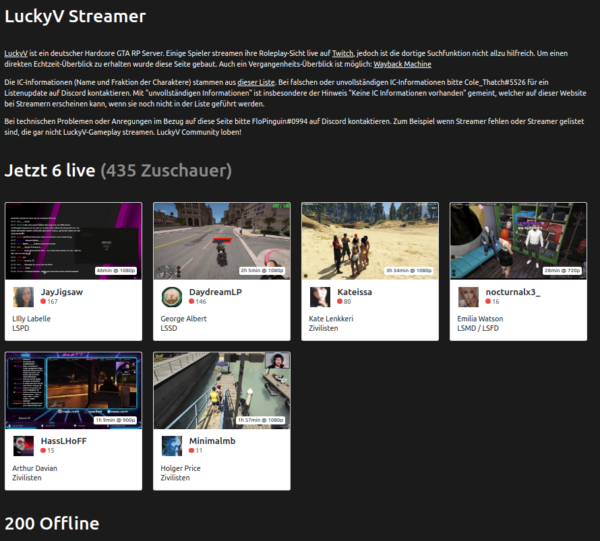
The LuckyV community made a great overview page where you can watch other people playing and live streaming their journey. It’s extensive – over 200 streamers are online regularly and the screenshot below shows a mid-week day right after lunch…
LuckyV Streamer overview page
Anyhow. This is all great and fun but plot twist: I do not play it. (yet)
So what do I have to do with it except I am watching Streamers? Easy: Behind the game there’s code. Lots of code actually.
In a nutshell there’s a custom-GTA V server implementation that talks to a custom GTA V client. LuckyV is using the altV server and client to expand the functionalities and bring the players into the world.
It allows for 1000 simultaneous players in the same world at a time. So there could be 1000 people right there with you. Actually since LuckyV is about to have it’s first birthday the regular player numbers are peaking at around 450 simultaneous players in Los Santos at a time.
The whole set-up consists of several services all put together:
web pages for game overlays, in-game UI and administration tools (PHP)
a SQL database that holds the item, character etc. data
a pub/sub style message hub that enables communication between in-game UI, webpages and the gamemode
a TeamSpeak 3 server that allows players to join a common channel (essentially one teamspeak room) and a plug-in called SaltyChat that mutes/unmutes players in the vicinity and allows features like in-game mobile phone etc.
everything of the above is in containers and easily deployable anywhere you got enough hardware to run it – when there are 100s of players online the load of the machine grows almost linear – and the machine is doing it’s moneys worth then…
So after the team announced some vacancies through those streamers I watched I contact them and asked if I could help out.
And that’s how I got there working on both the gamemode code as well as helping the infrastructure become more stable and resilient.
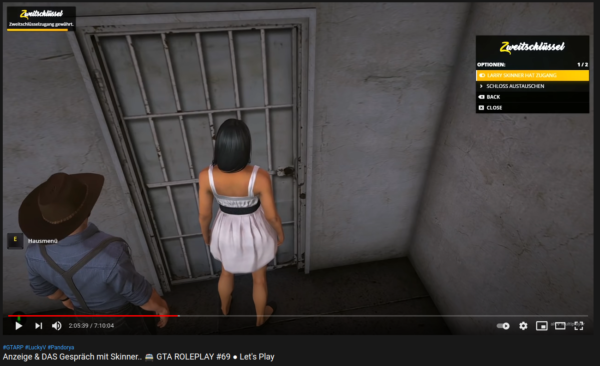
For my first real contribution to the gamemode I was asked to implement secondary keys for vehicles as well as apartments/houses.
Up until now only the owner / tenant of the vehicle or apartment had access to it. Since this game is about social interactions it would be a good addition of that owner could hand out additional keys to those they love / interact with.
And that I did. I worked my way through the existing code base – which is a “grown codebase” – and after about 3 days of work it worked!
Most impressive for me is the team and the people I’ve met there. This current team welcomed me warmly and helped me to wrap my head around the patterns in the code. Given the enthusiast / hobby character this has it’s almost frightening how professional and nice everything works out. I mean, we developers had a demo-session with the game design team to show off what our feature does, how it works and to let them try it out to see if it’s like the envisioned it.
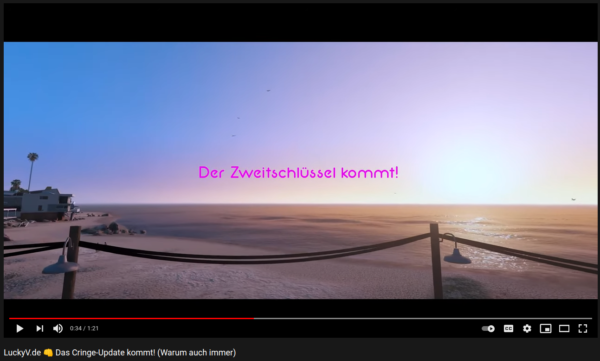
They even did a trailer for the feature I worked on! And it is as cheesy as I could only wished:
So far so good: It’s great fun and really rewarding working with all these nice people to bring even more fun and joy to players. Seeing the player numbers grow. Seeing streamers actually use the features and play with it – handing over keys to their partner. Really rewarding.
Like this example:
just at 2hrs 5 Min Ariane Barnes is handing over a key to her loved one.
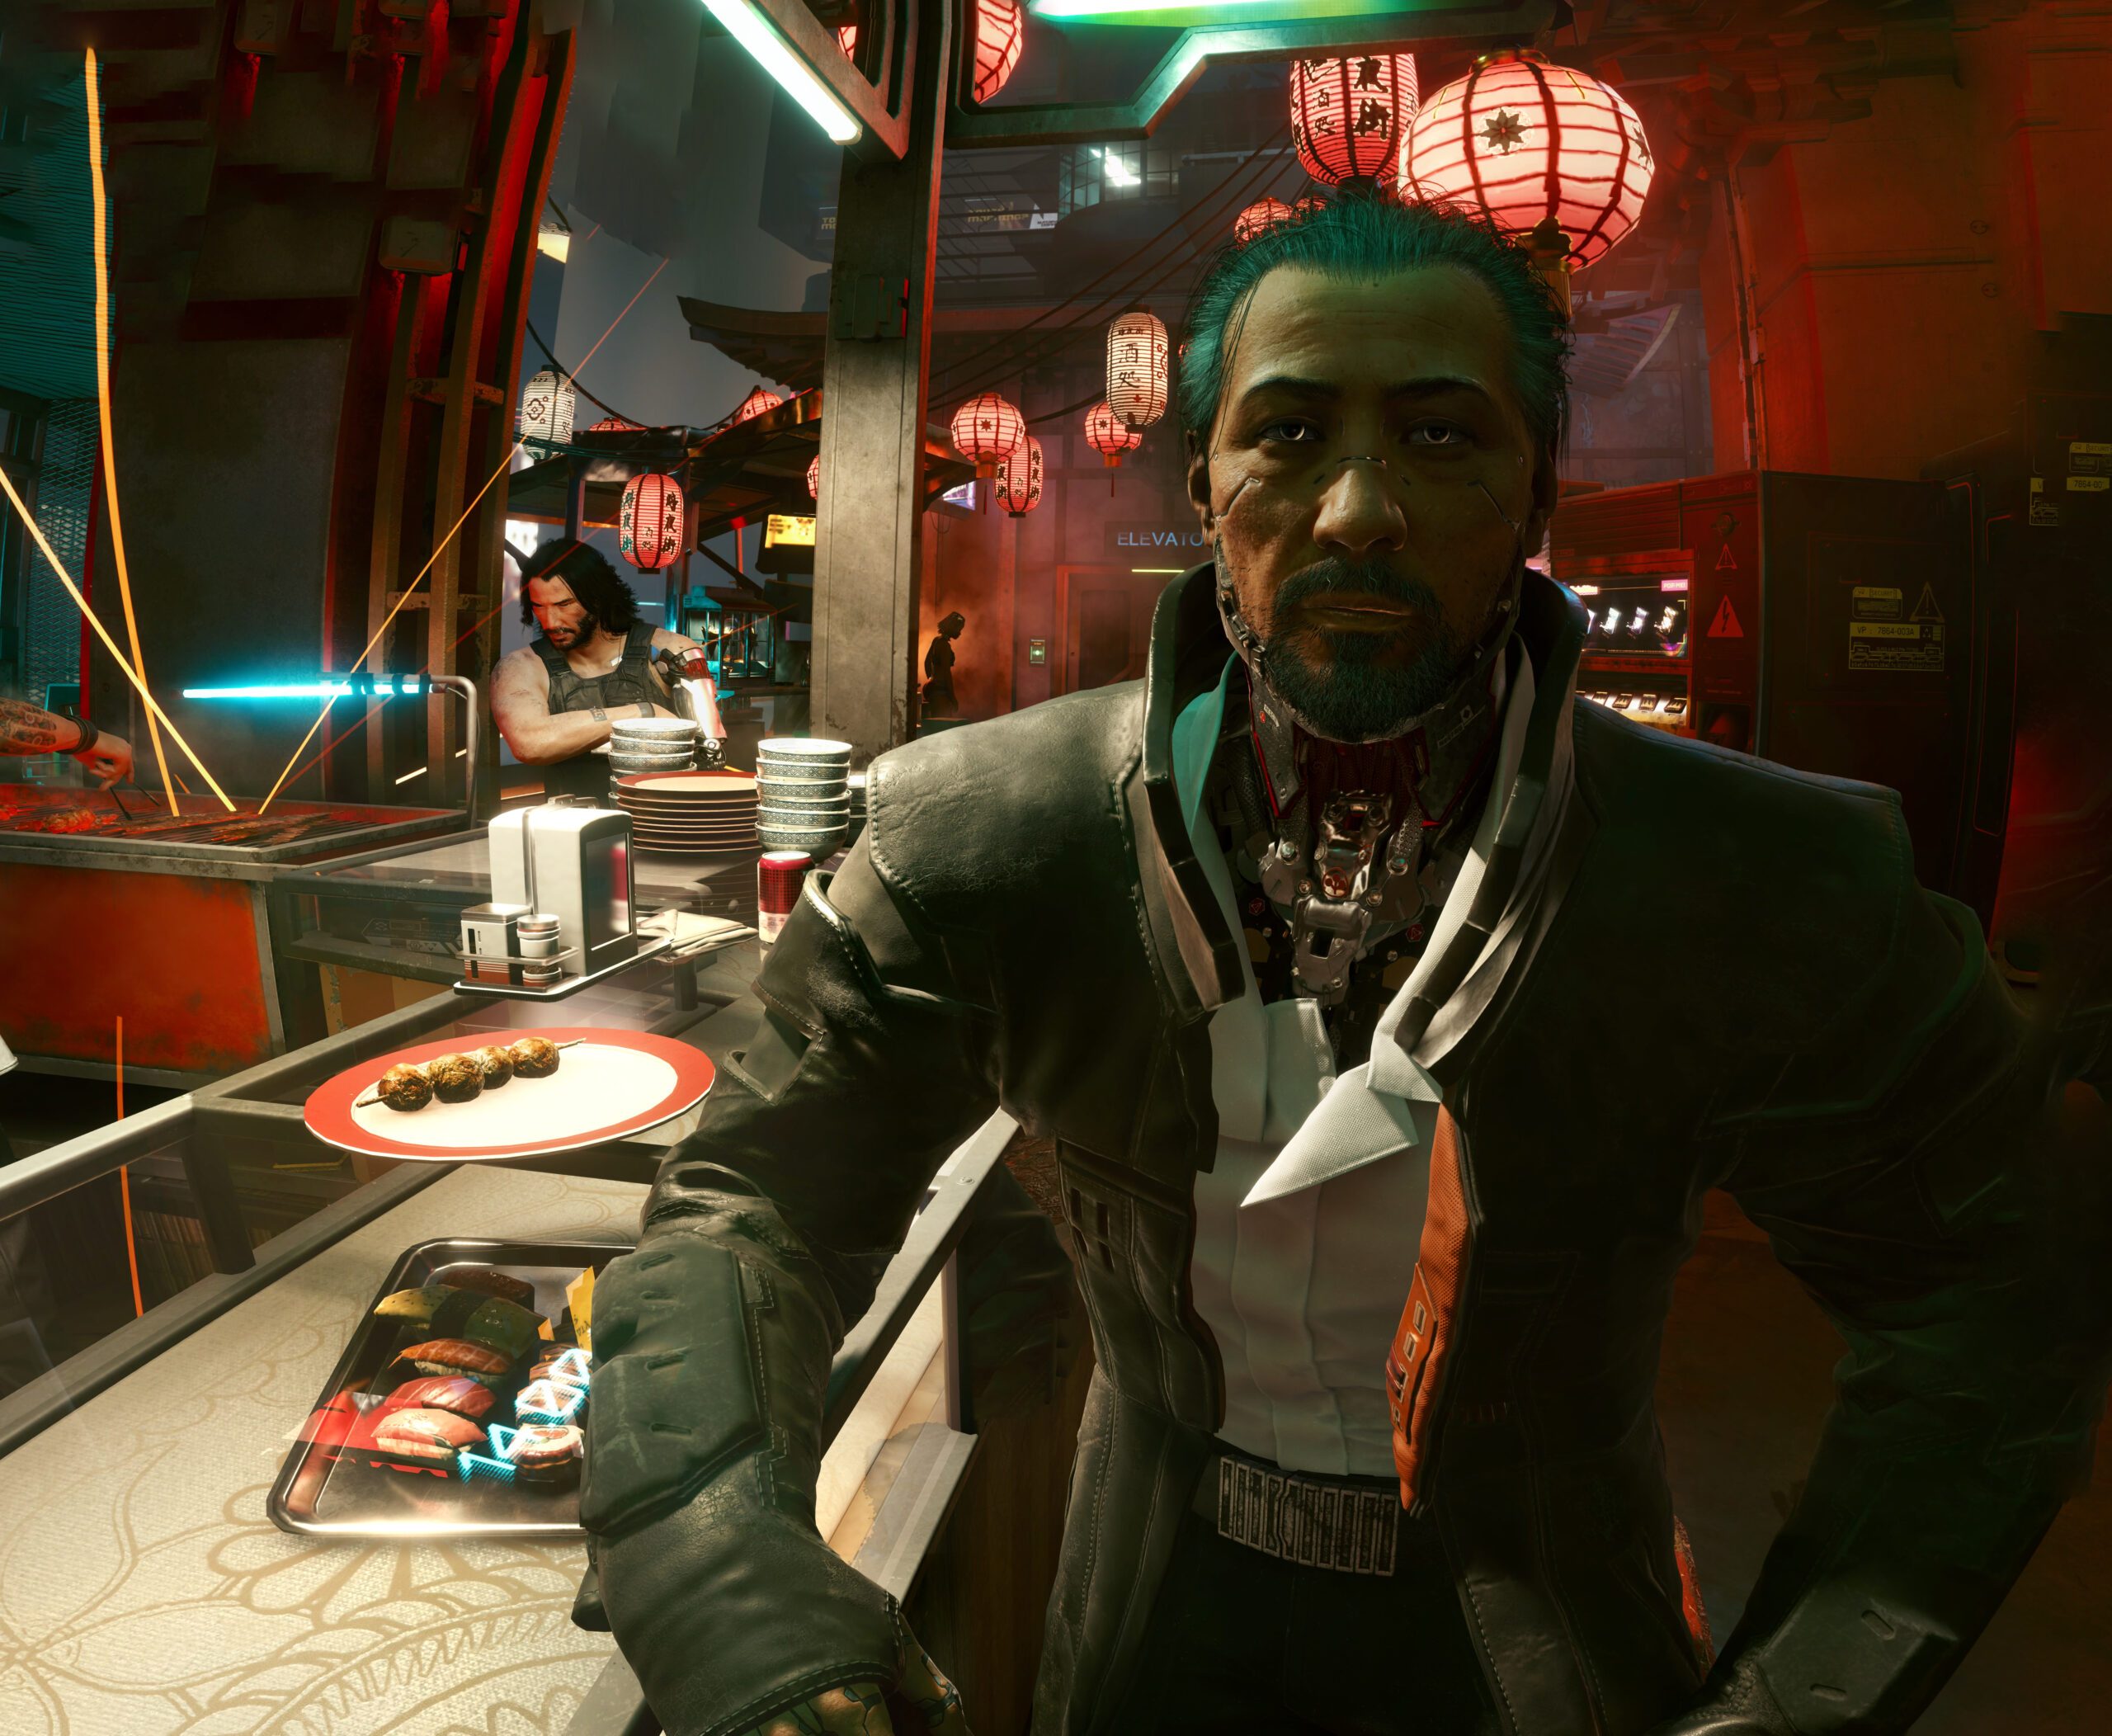
In part 1 I wrote a bit about this great game and shared some screenshots. By now I’ve finished the story and almost all side-quests and I still see it as the best game since years.
Anyway, here are more pictures taken in-game (sometimes stitched):
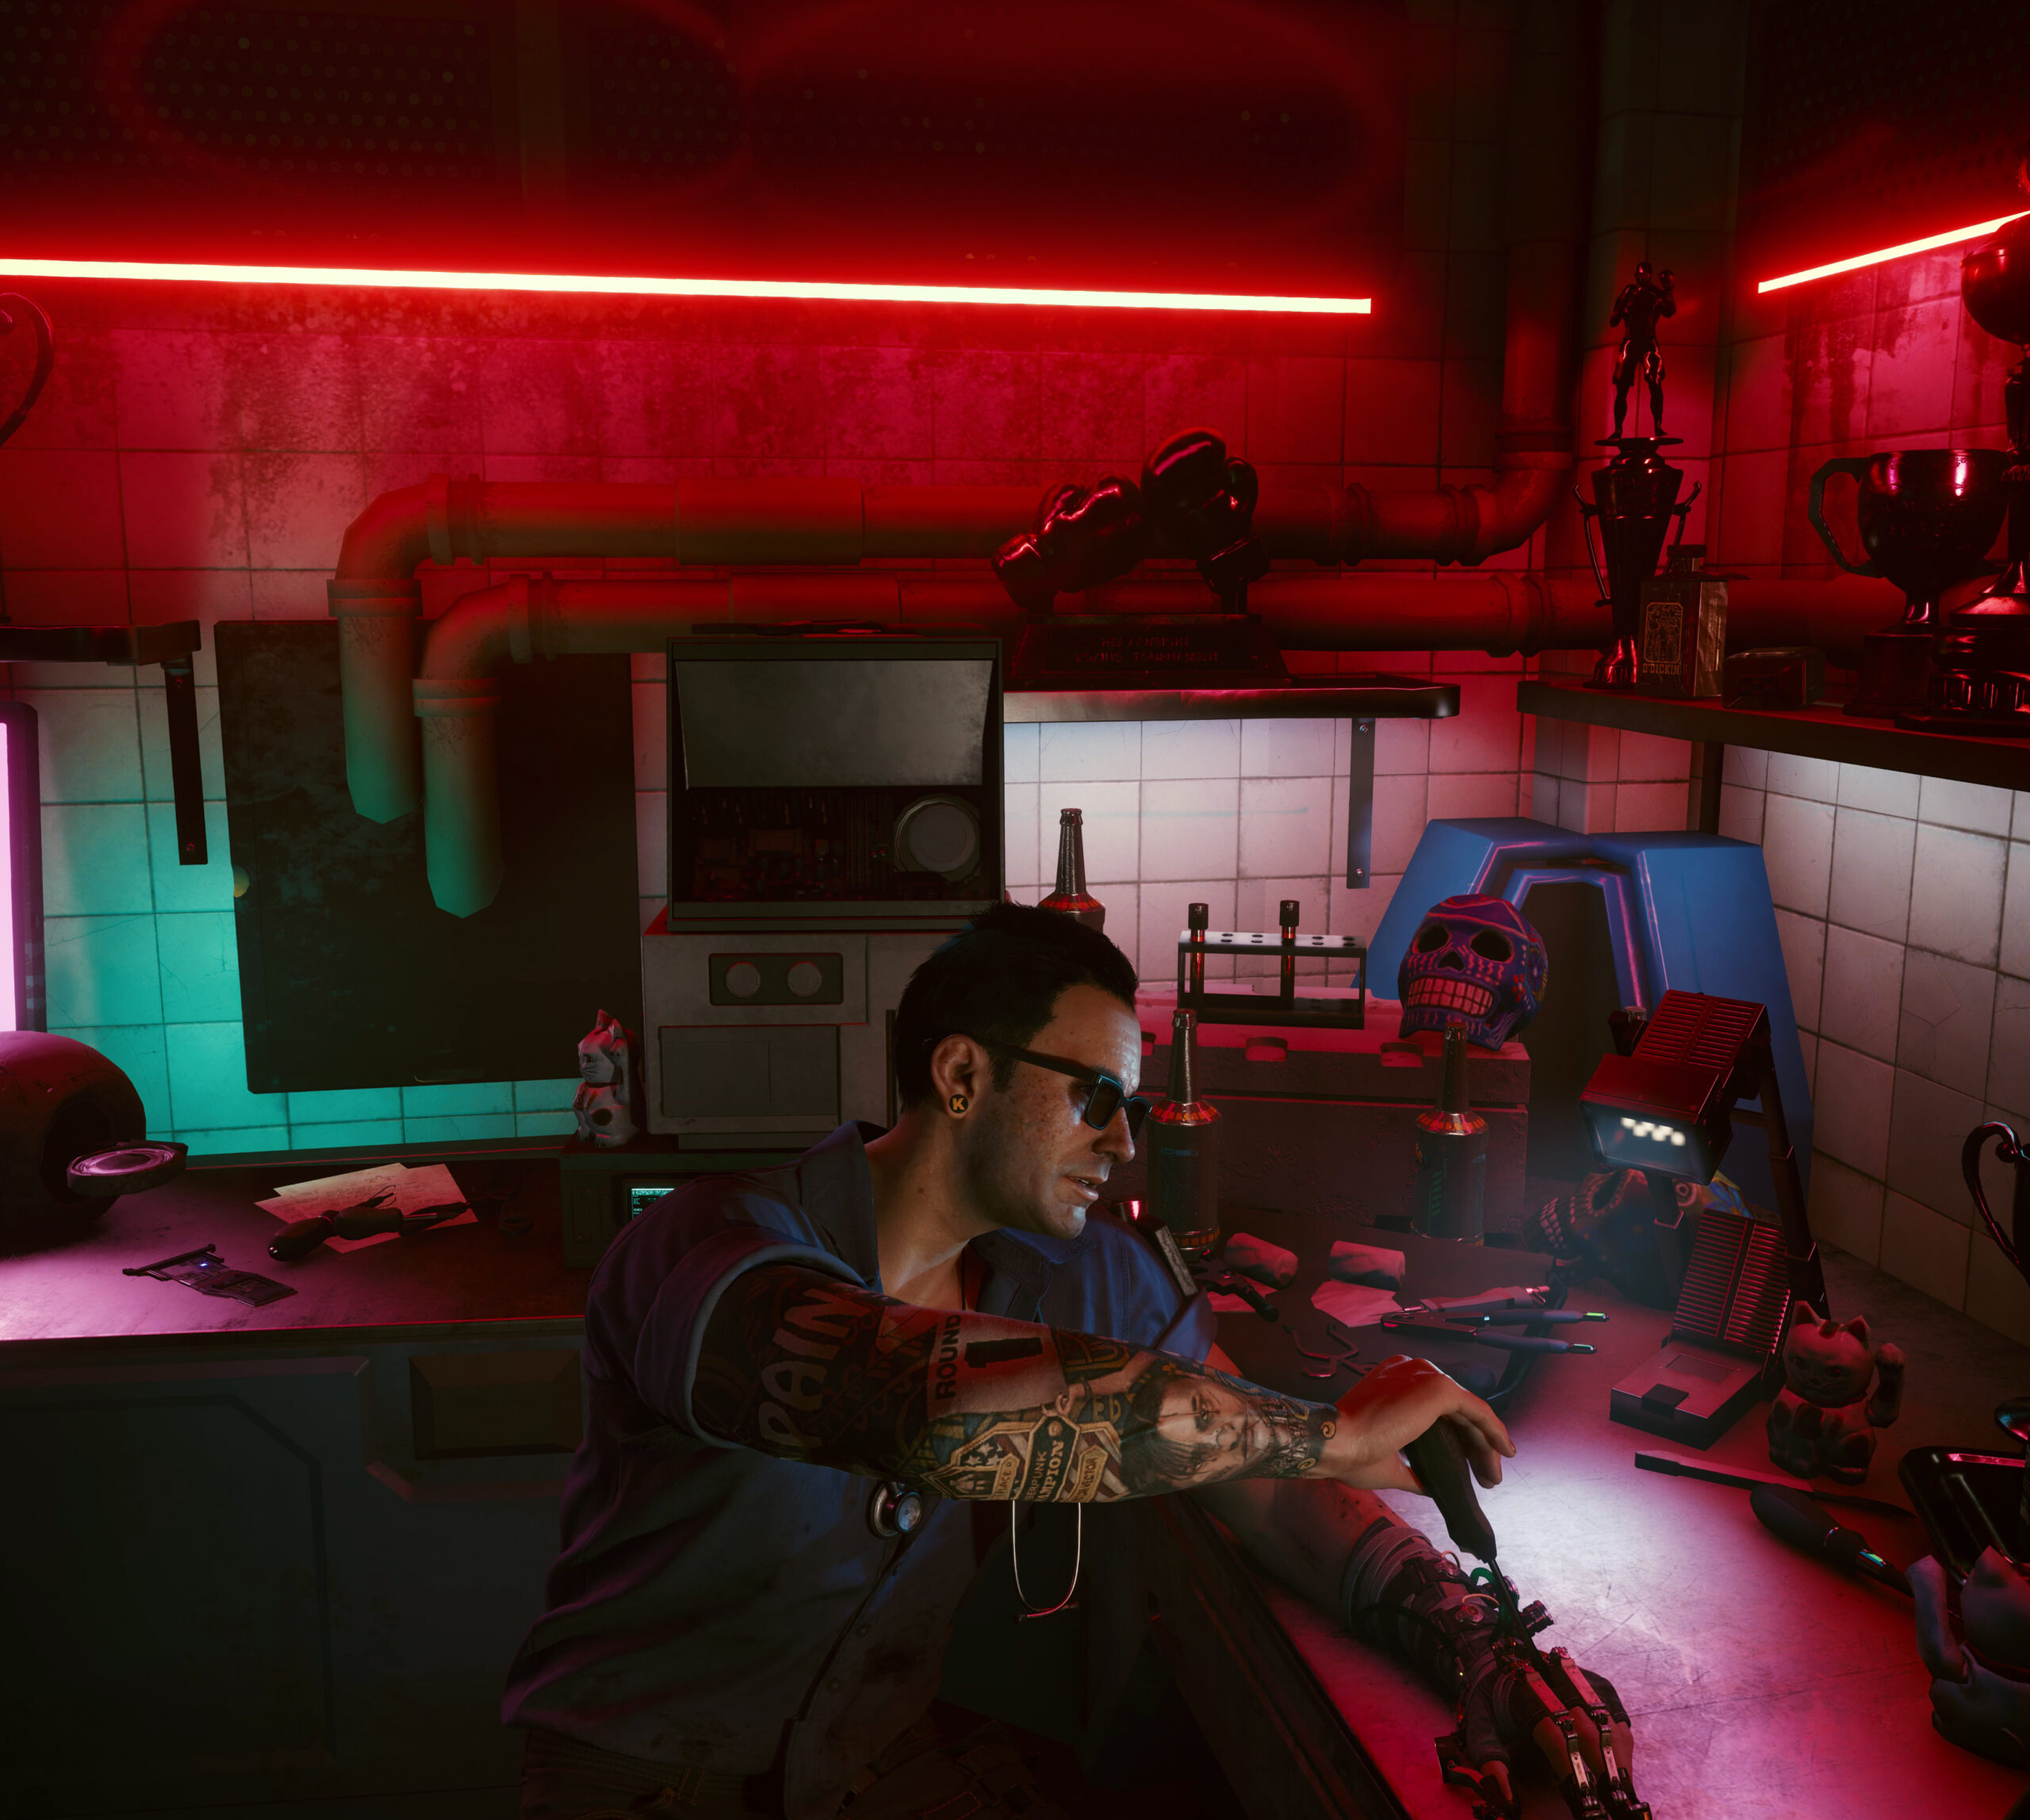
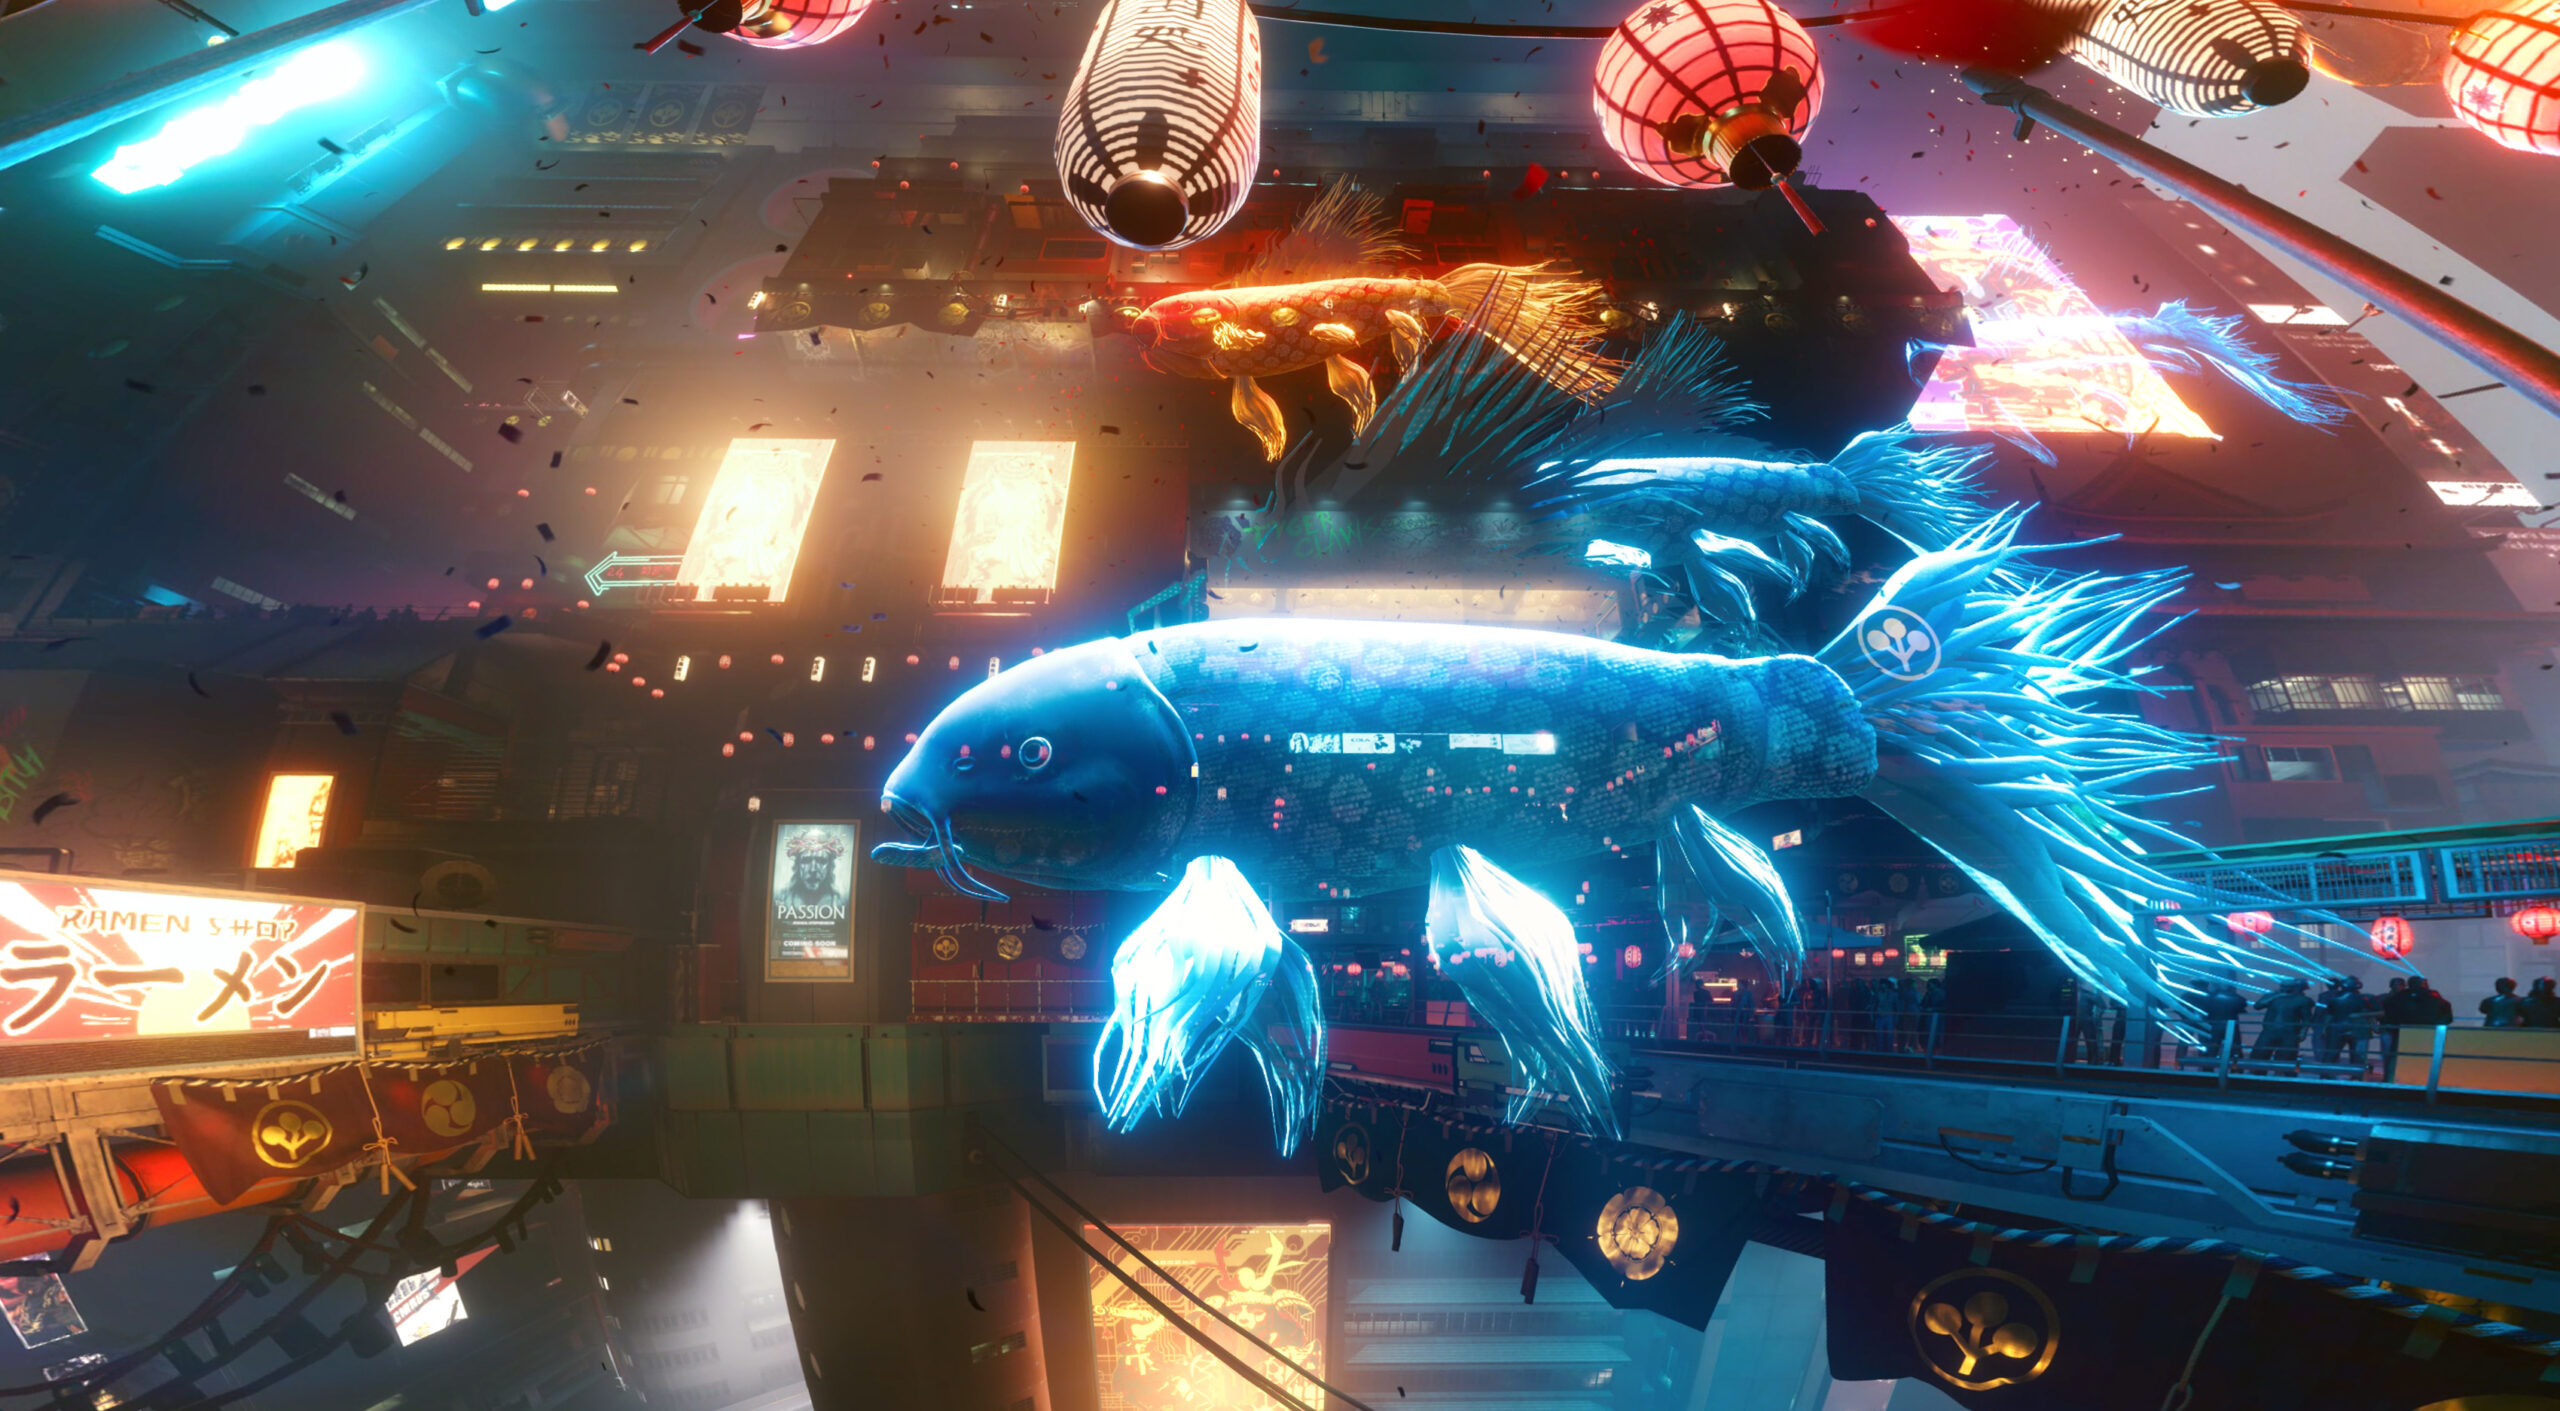
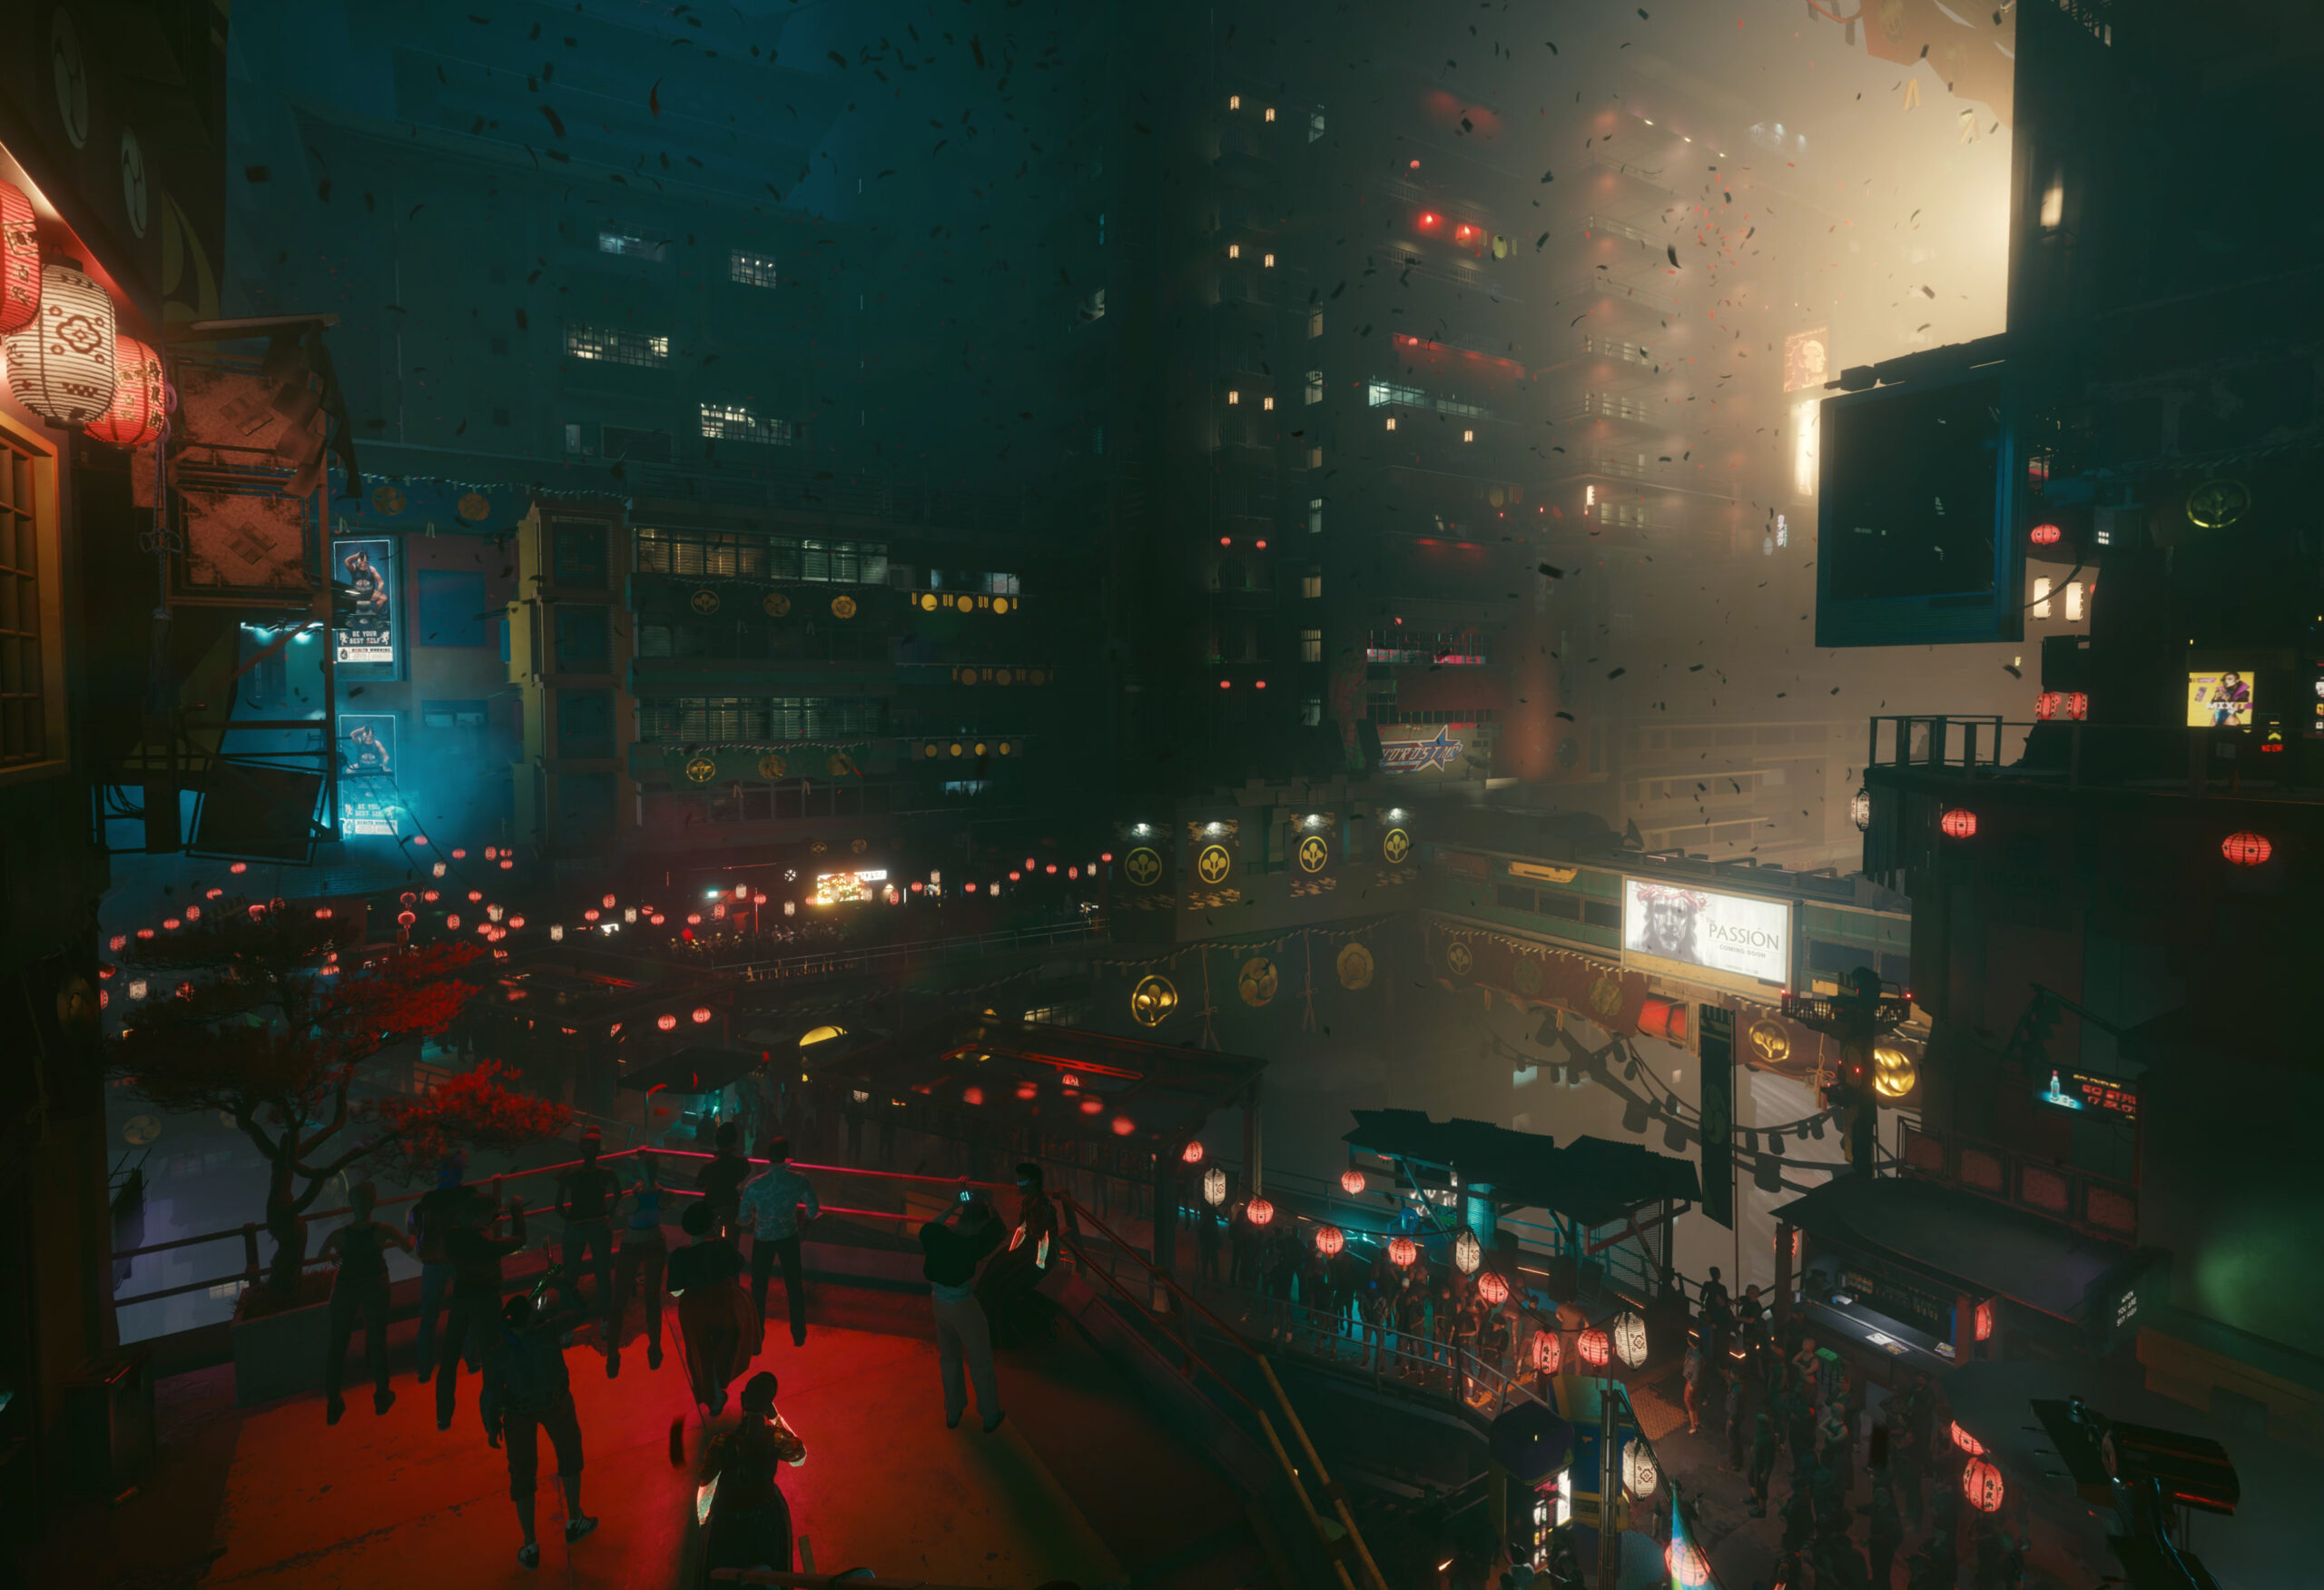
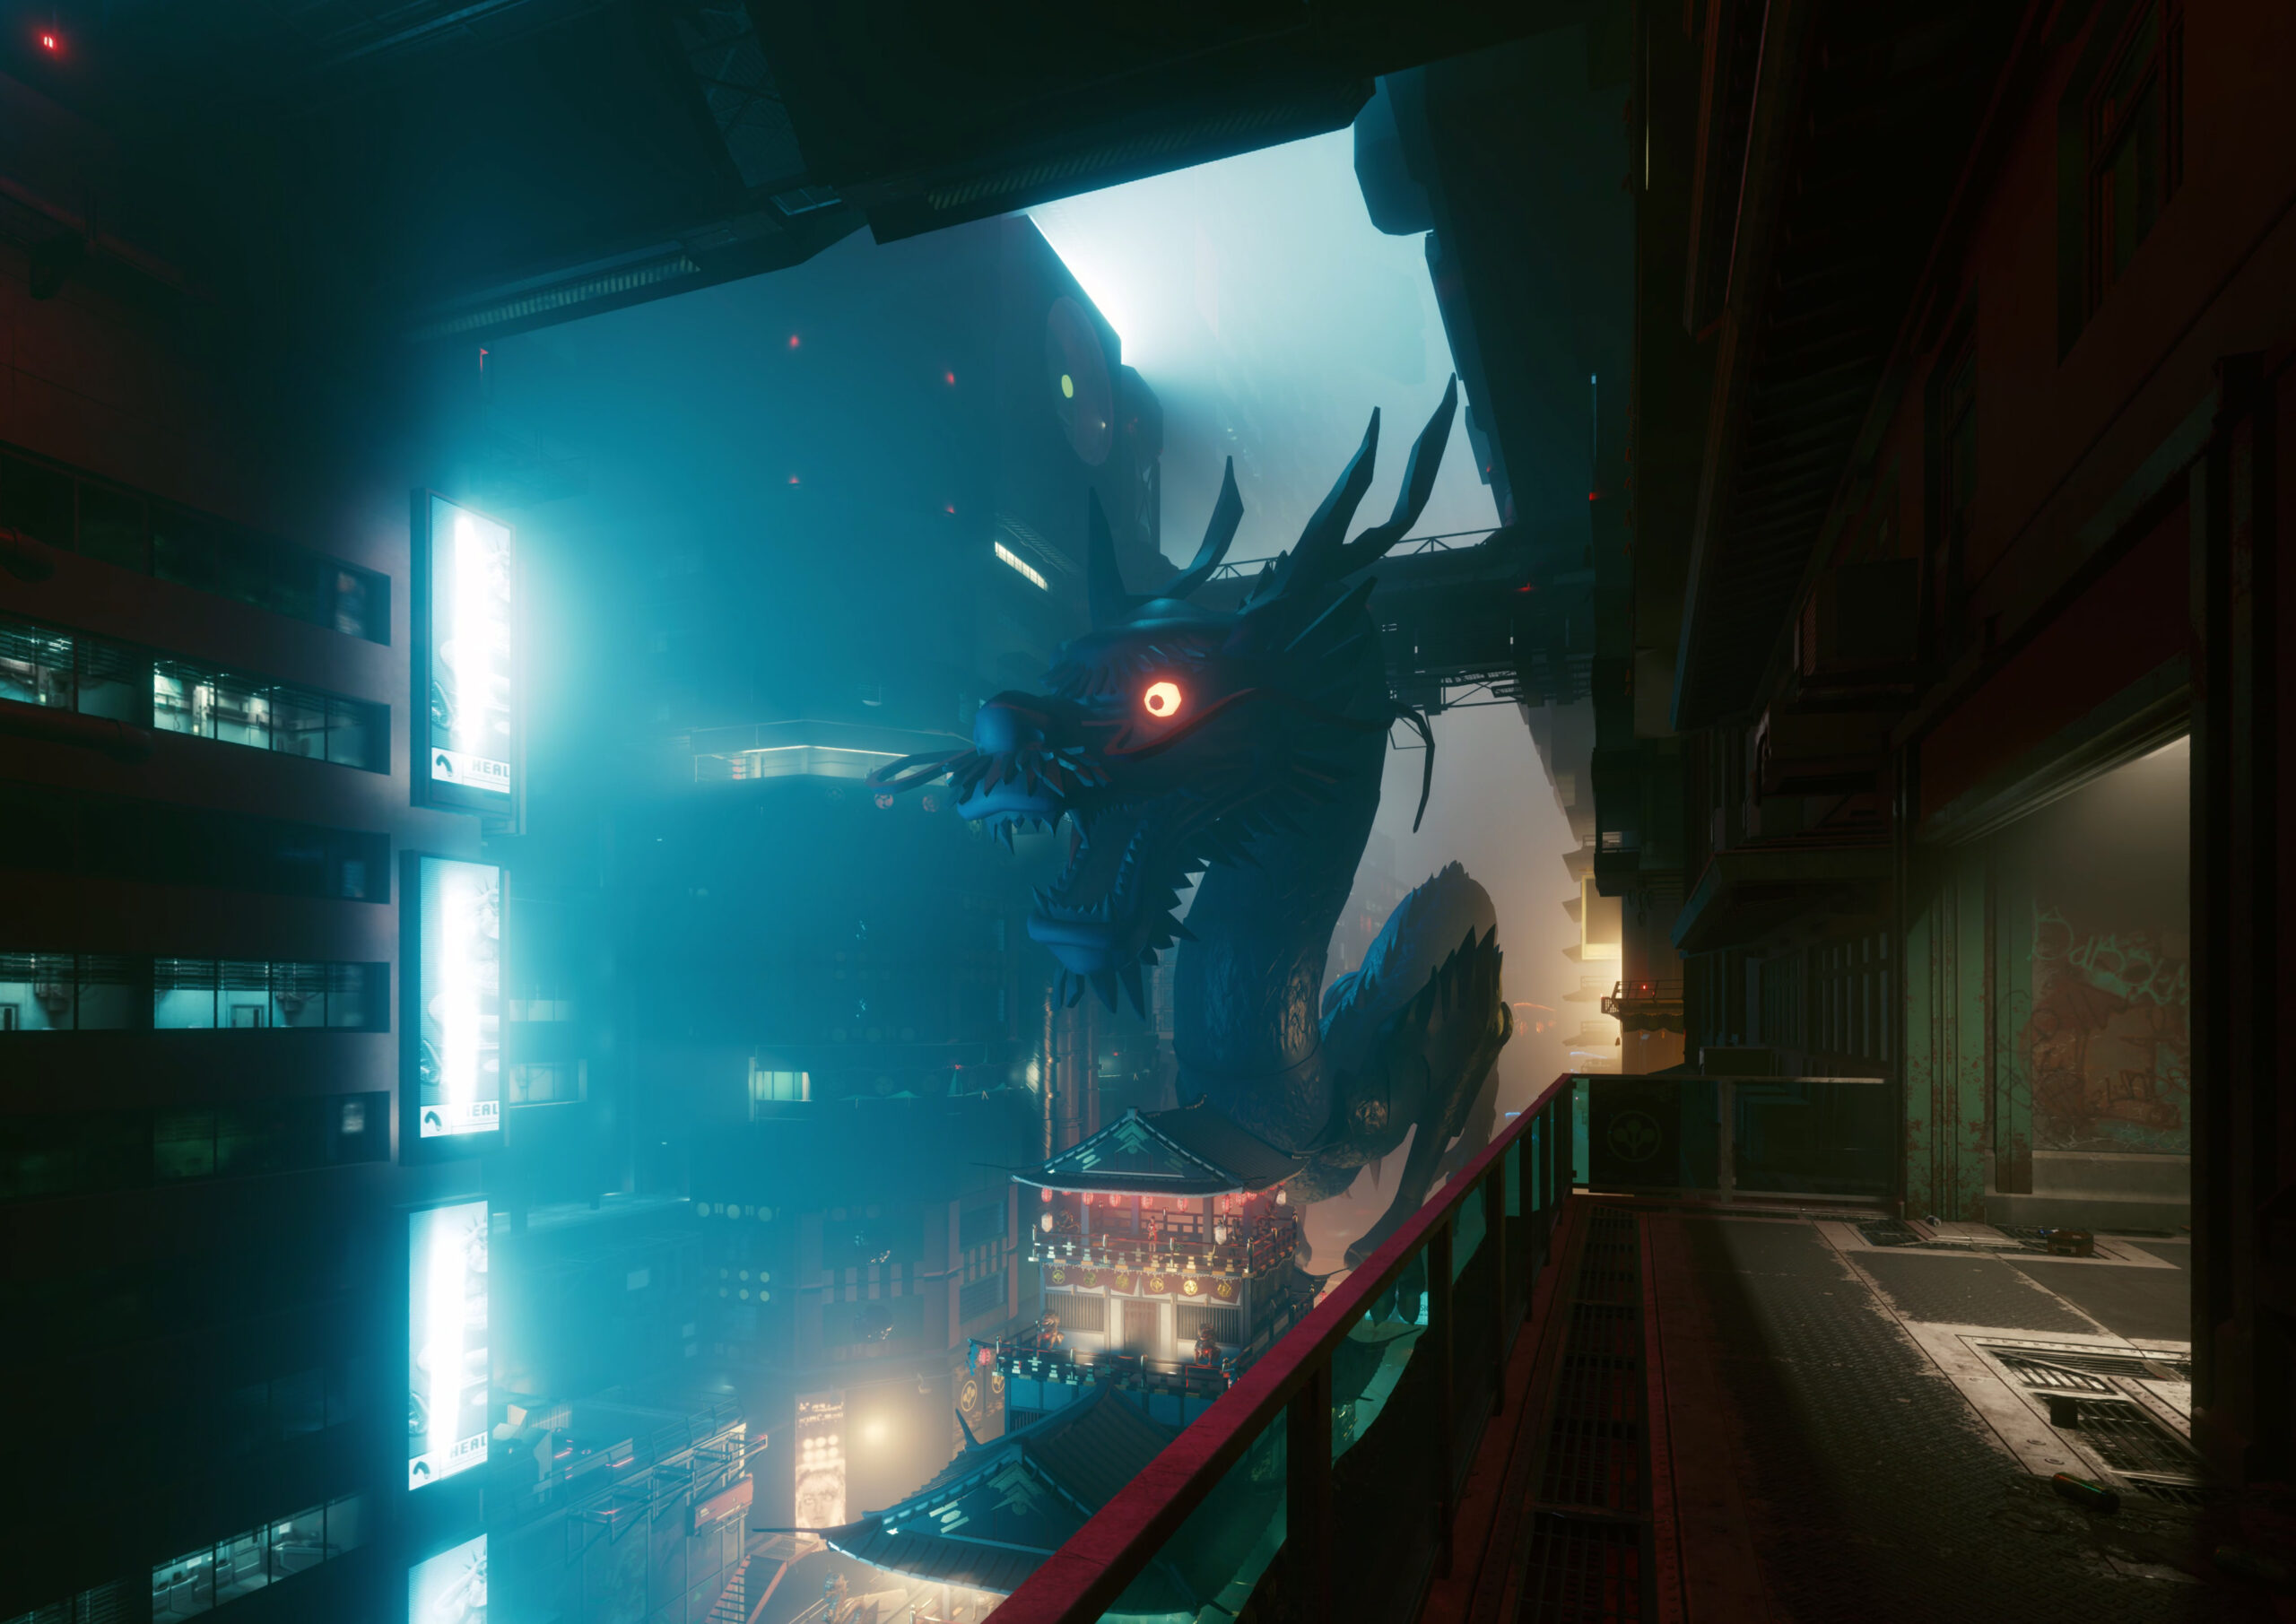
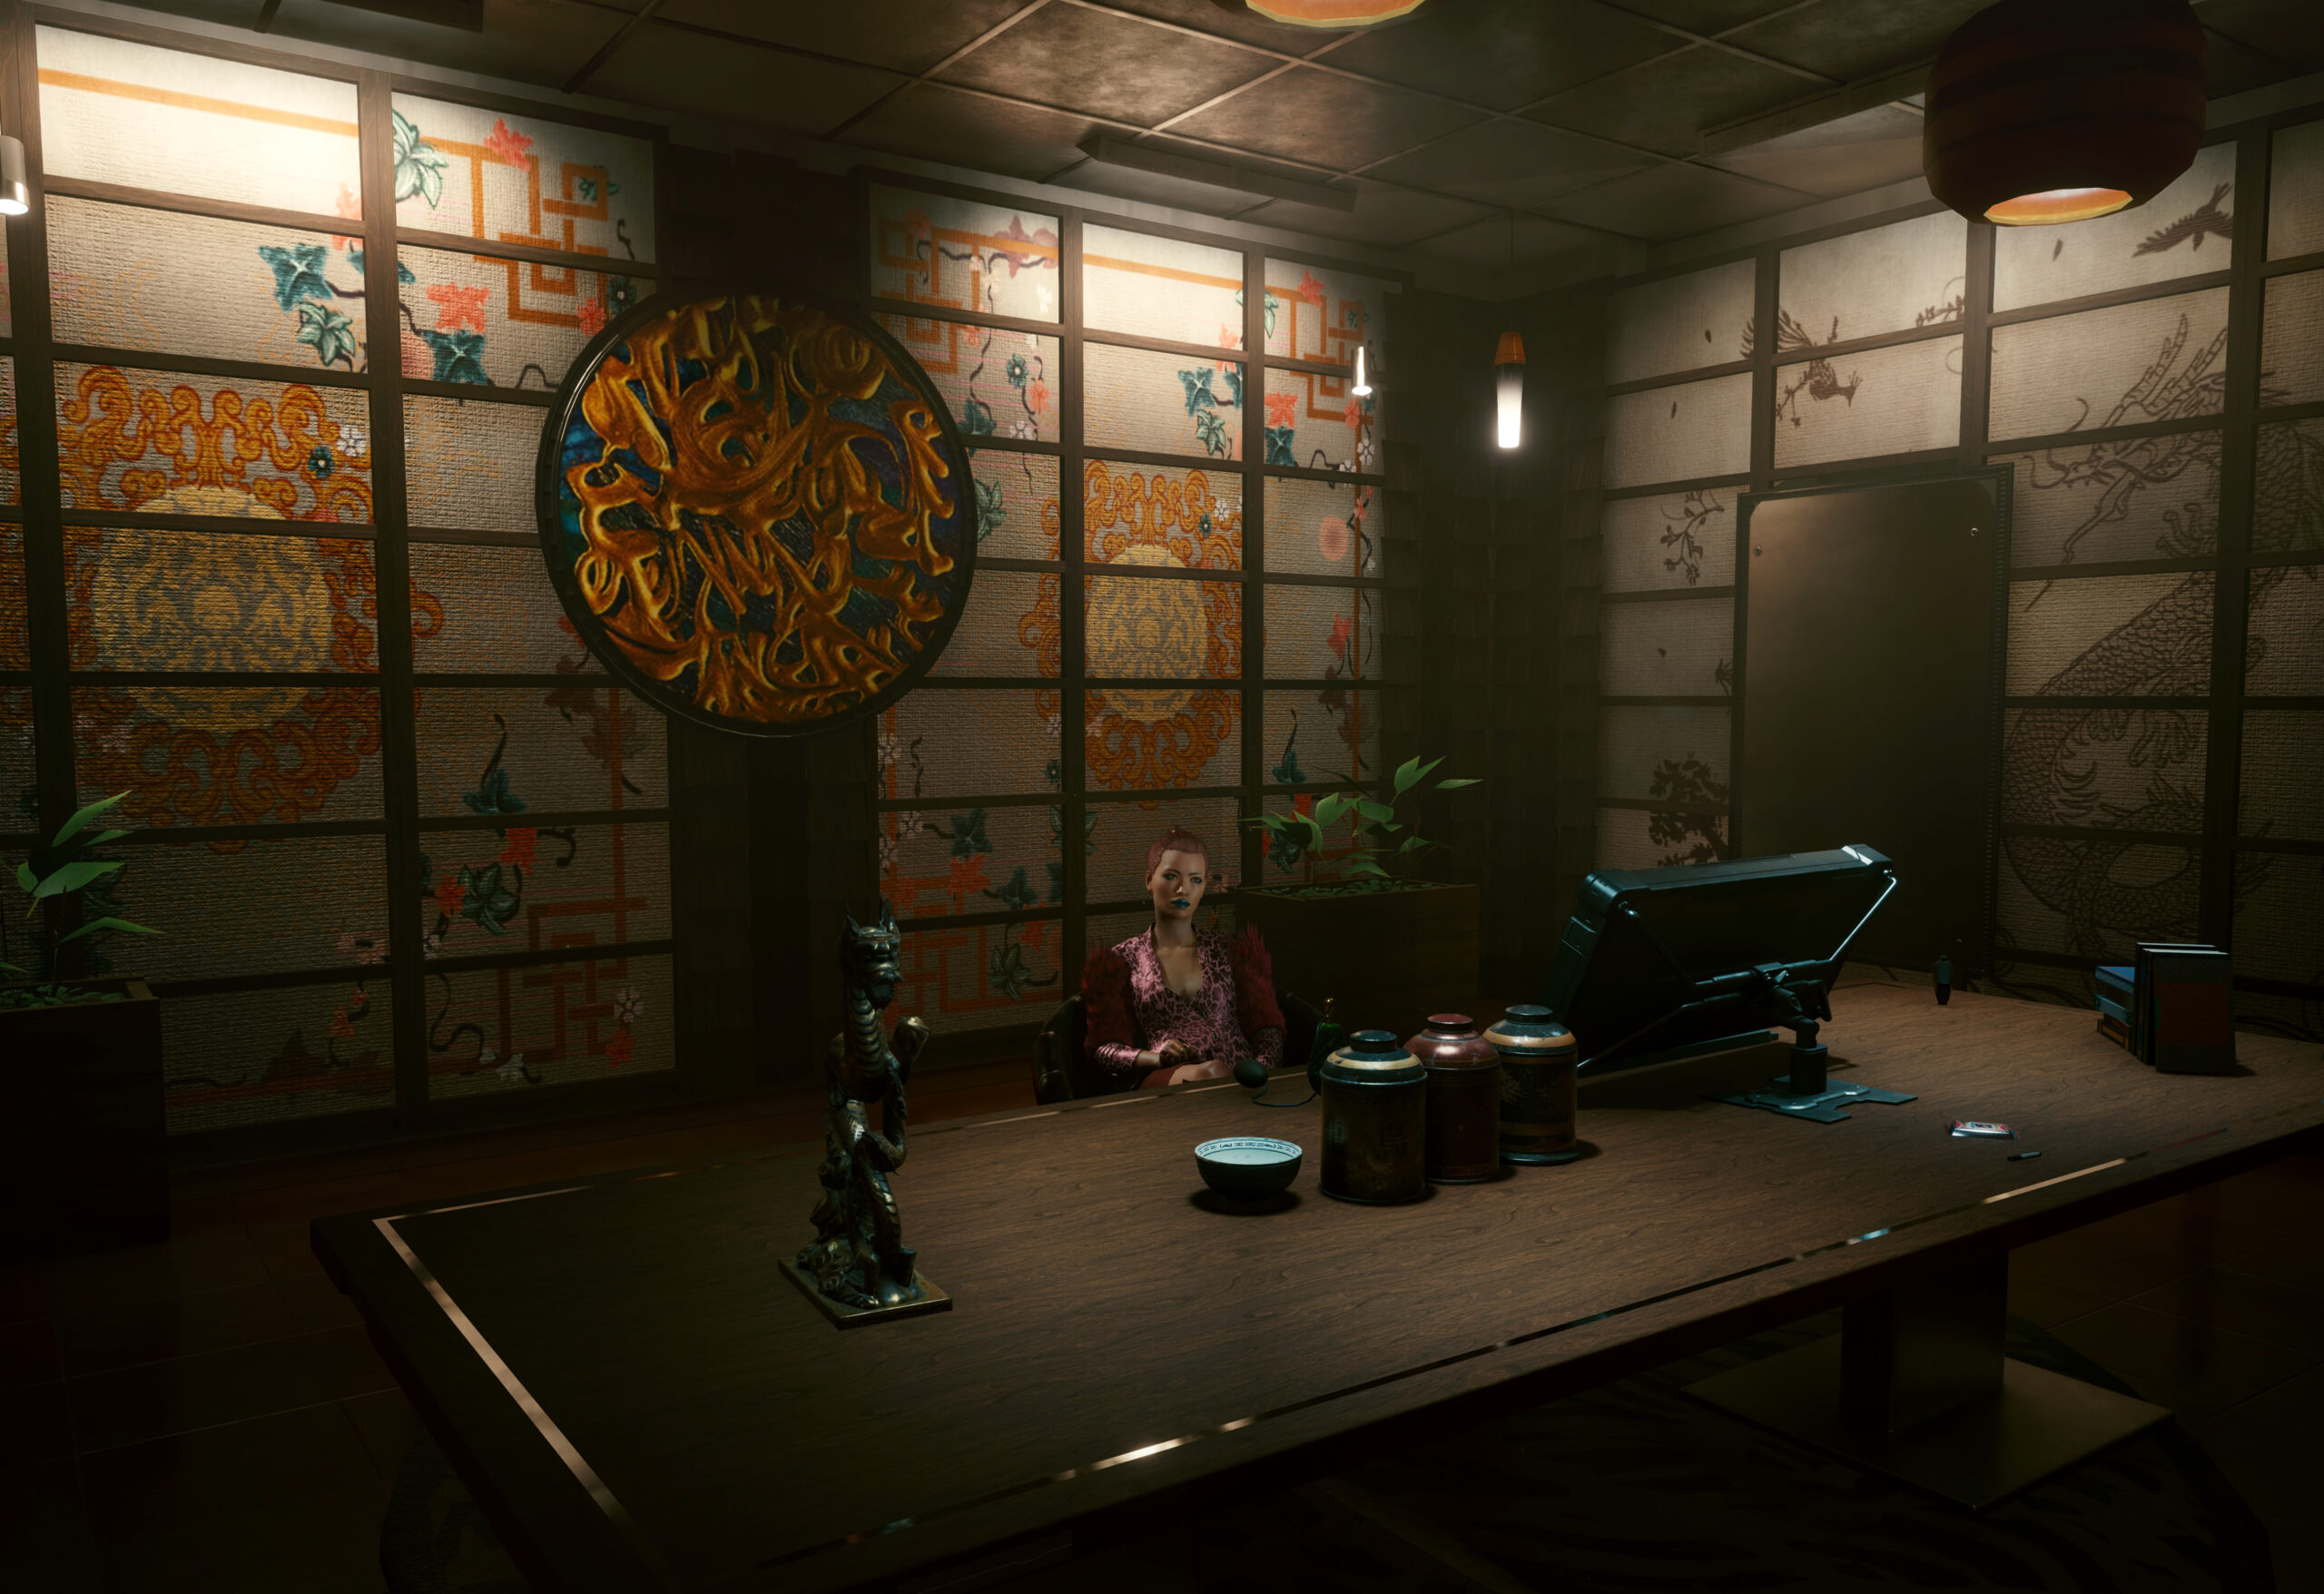
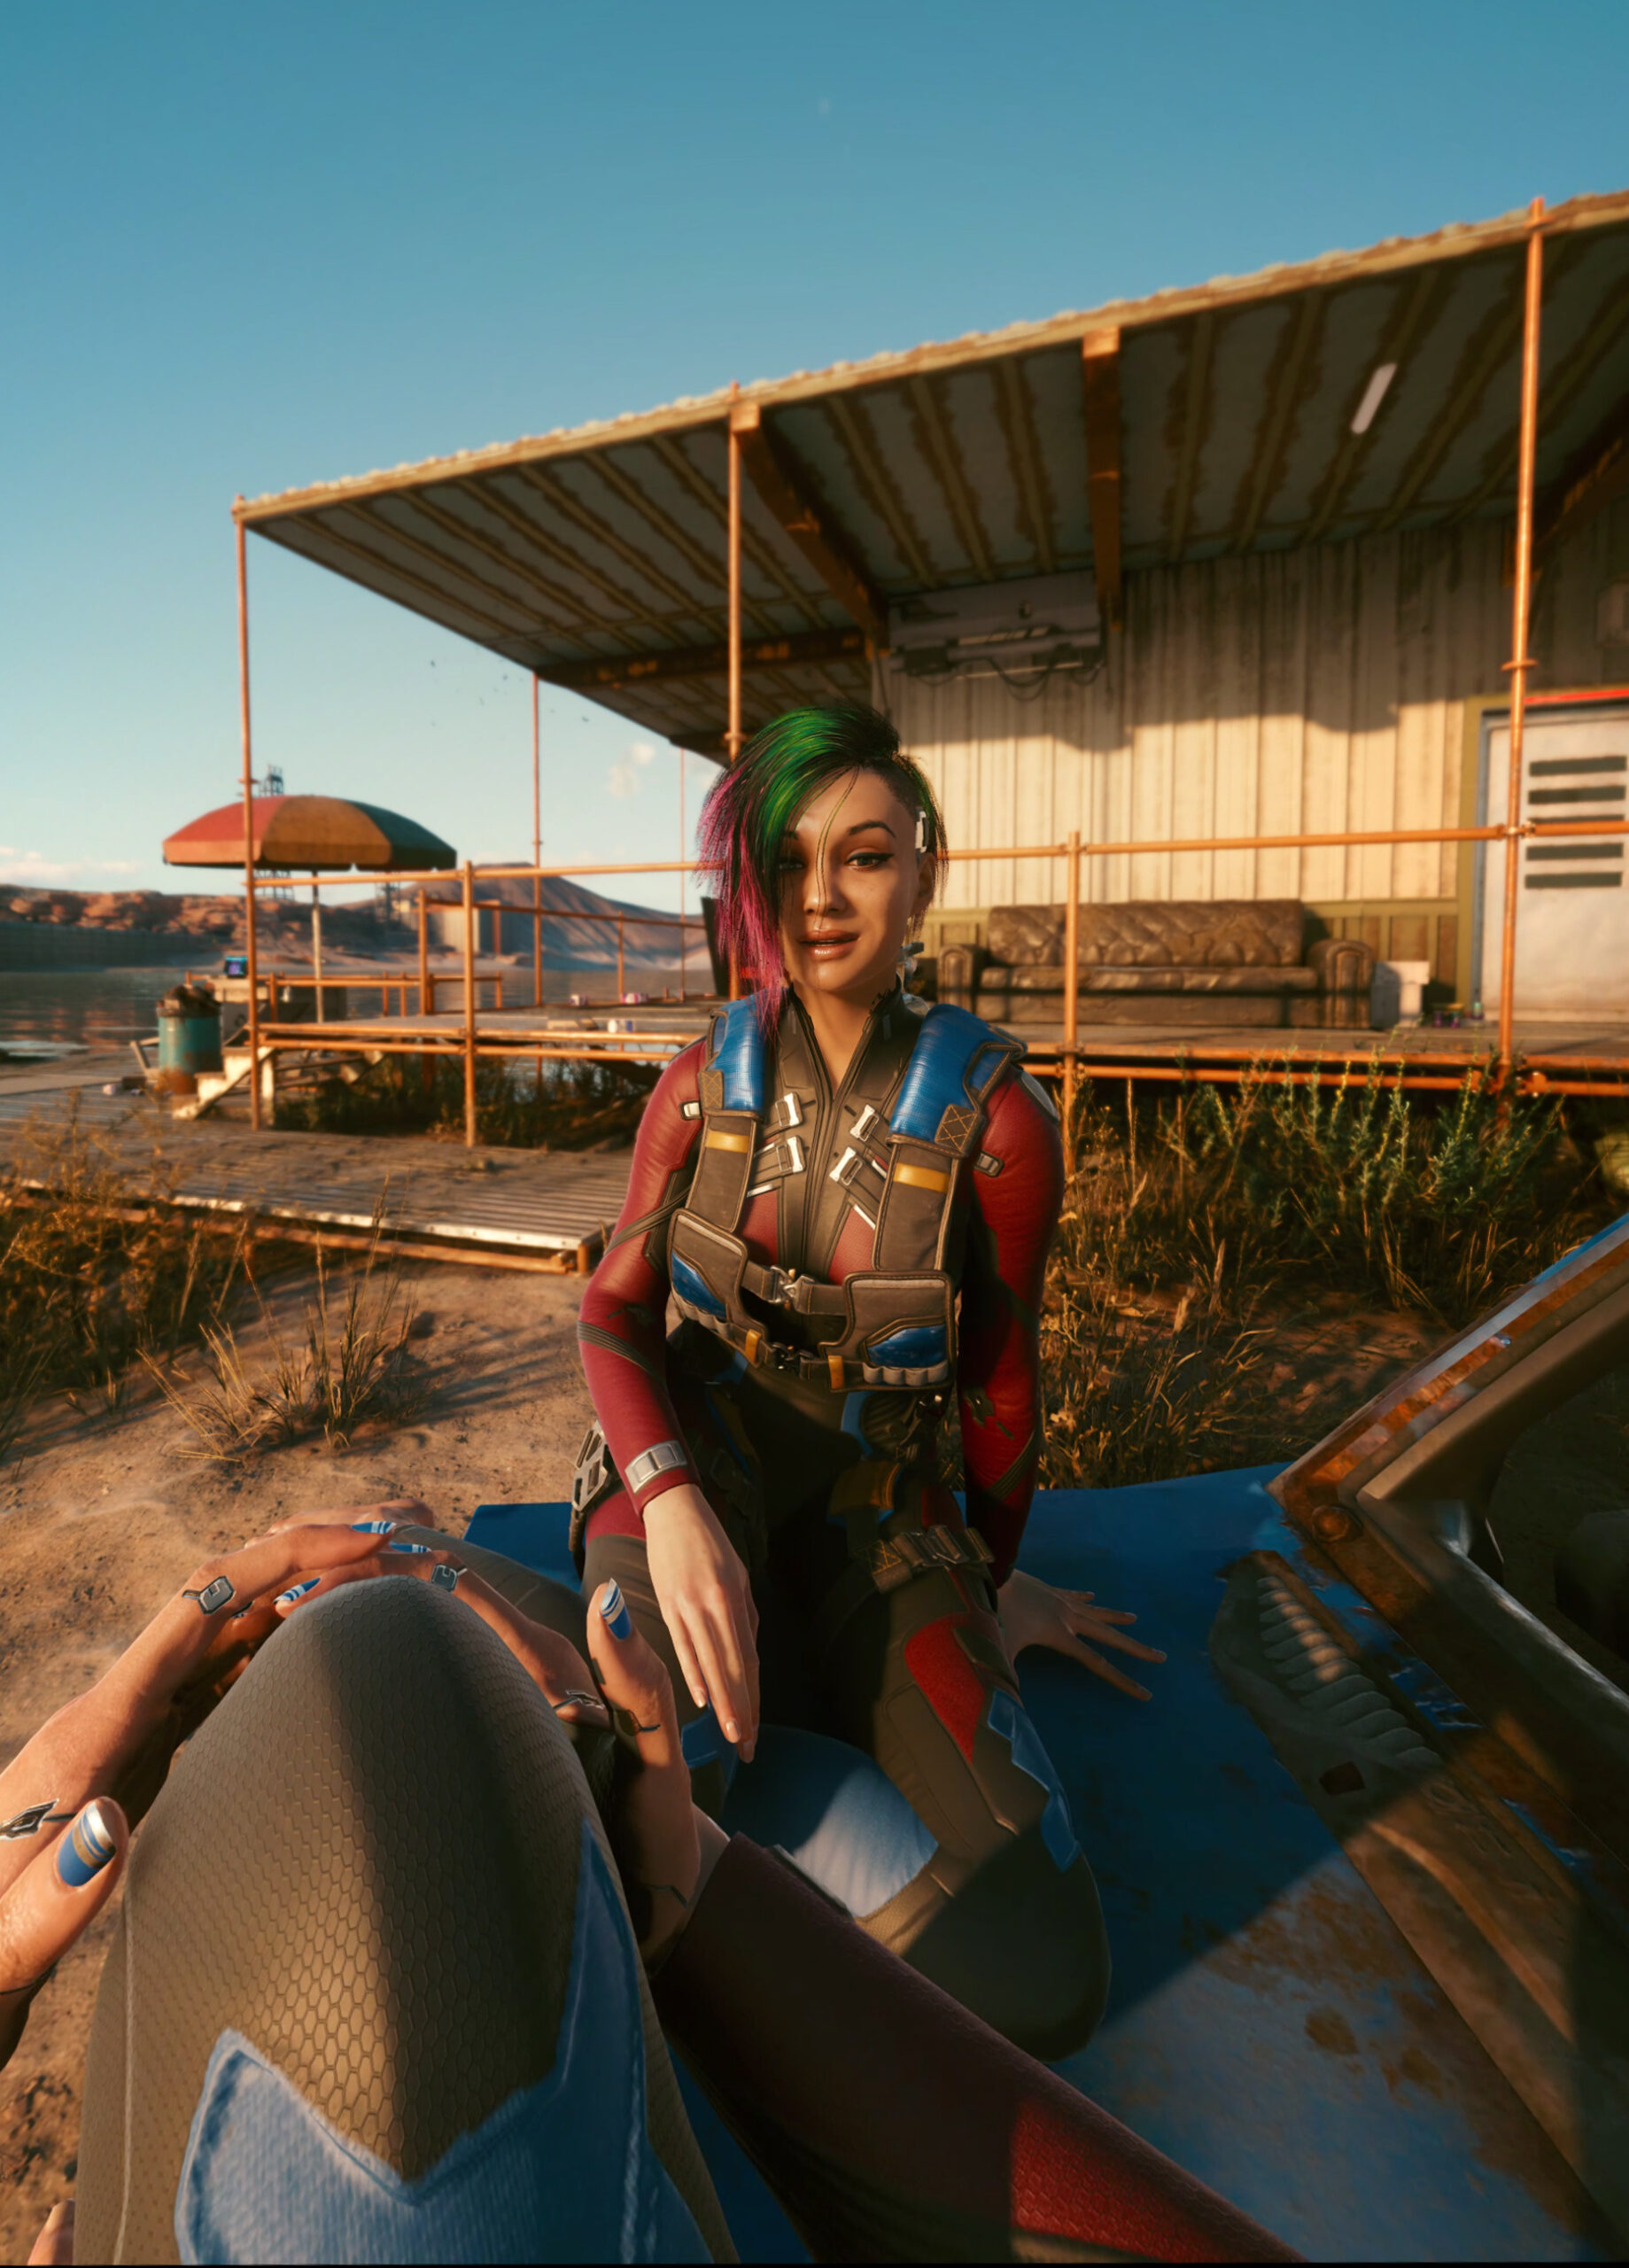
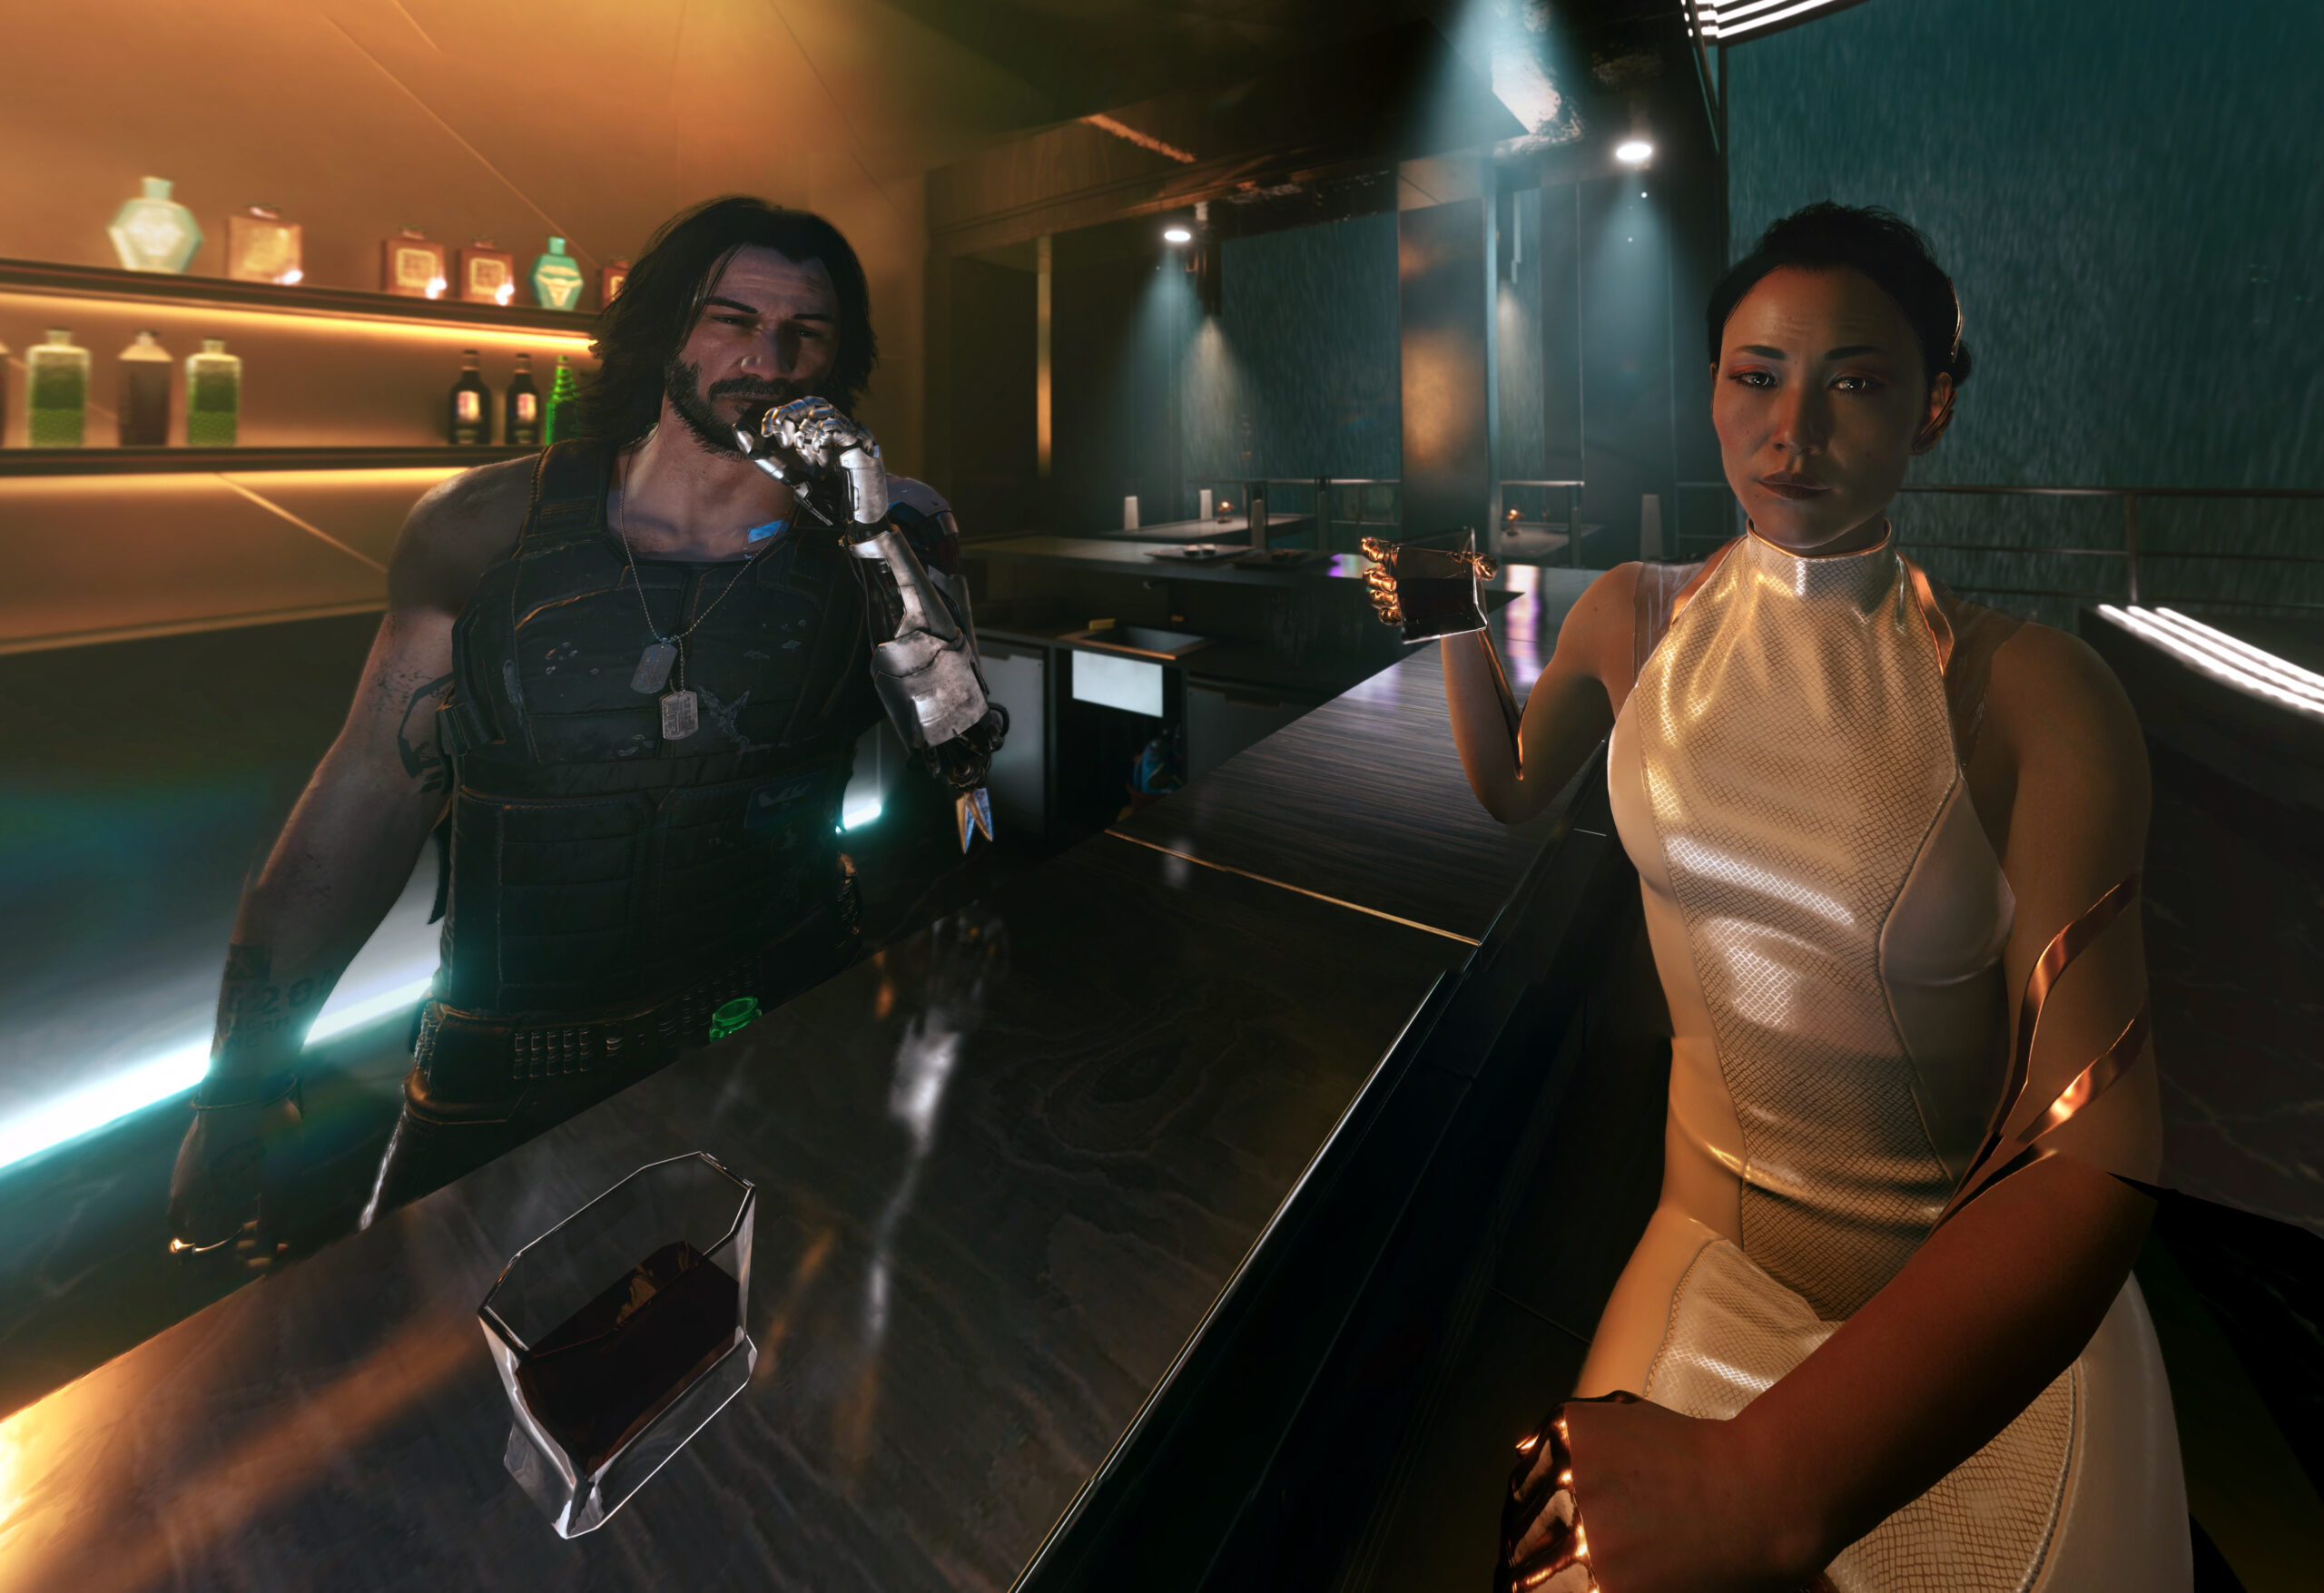
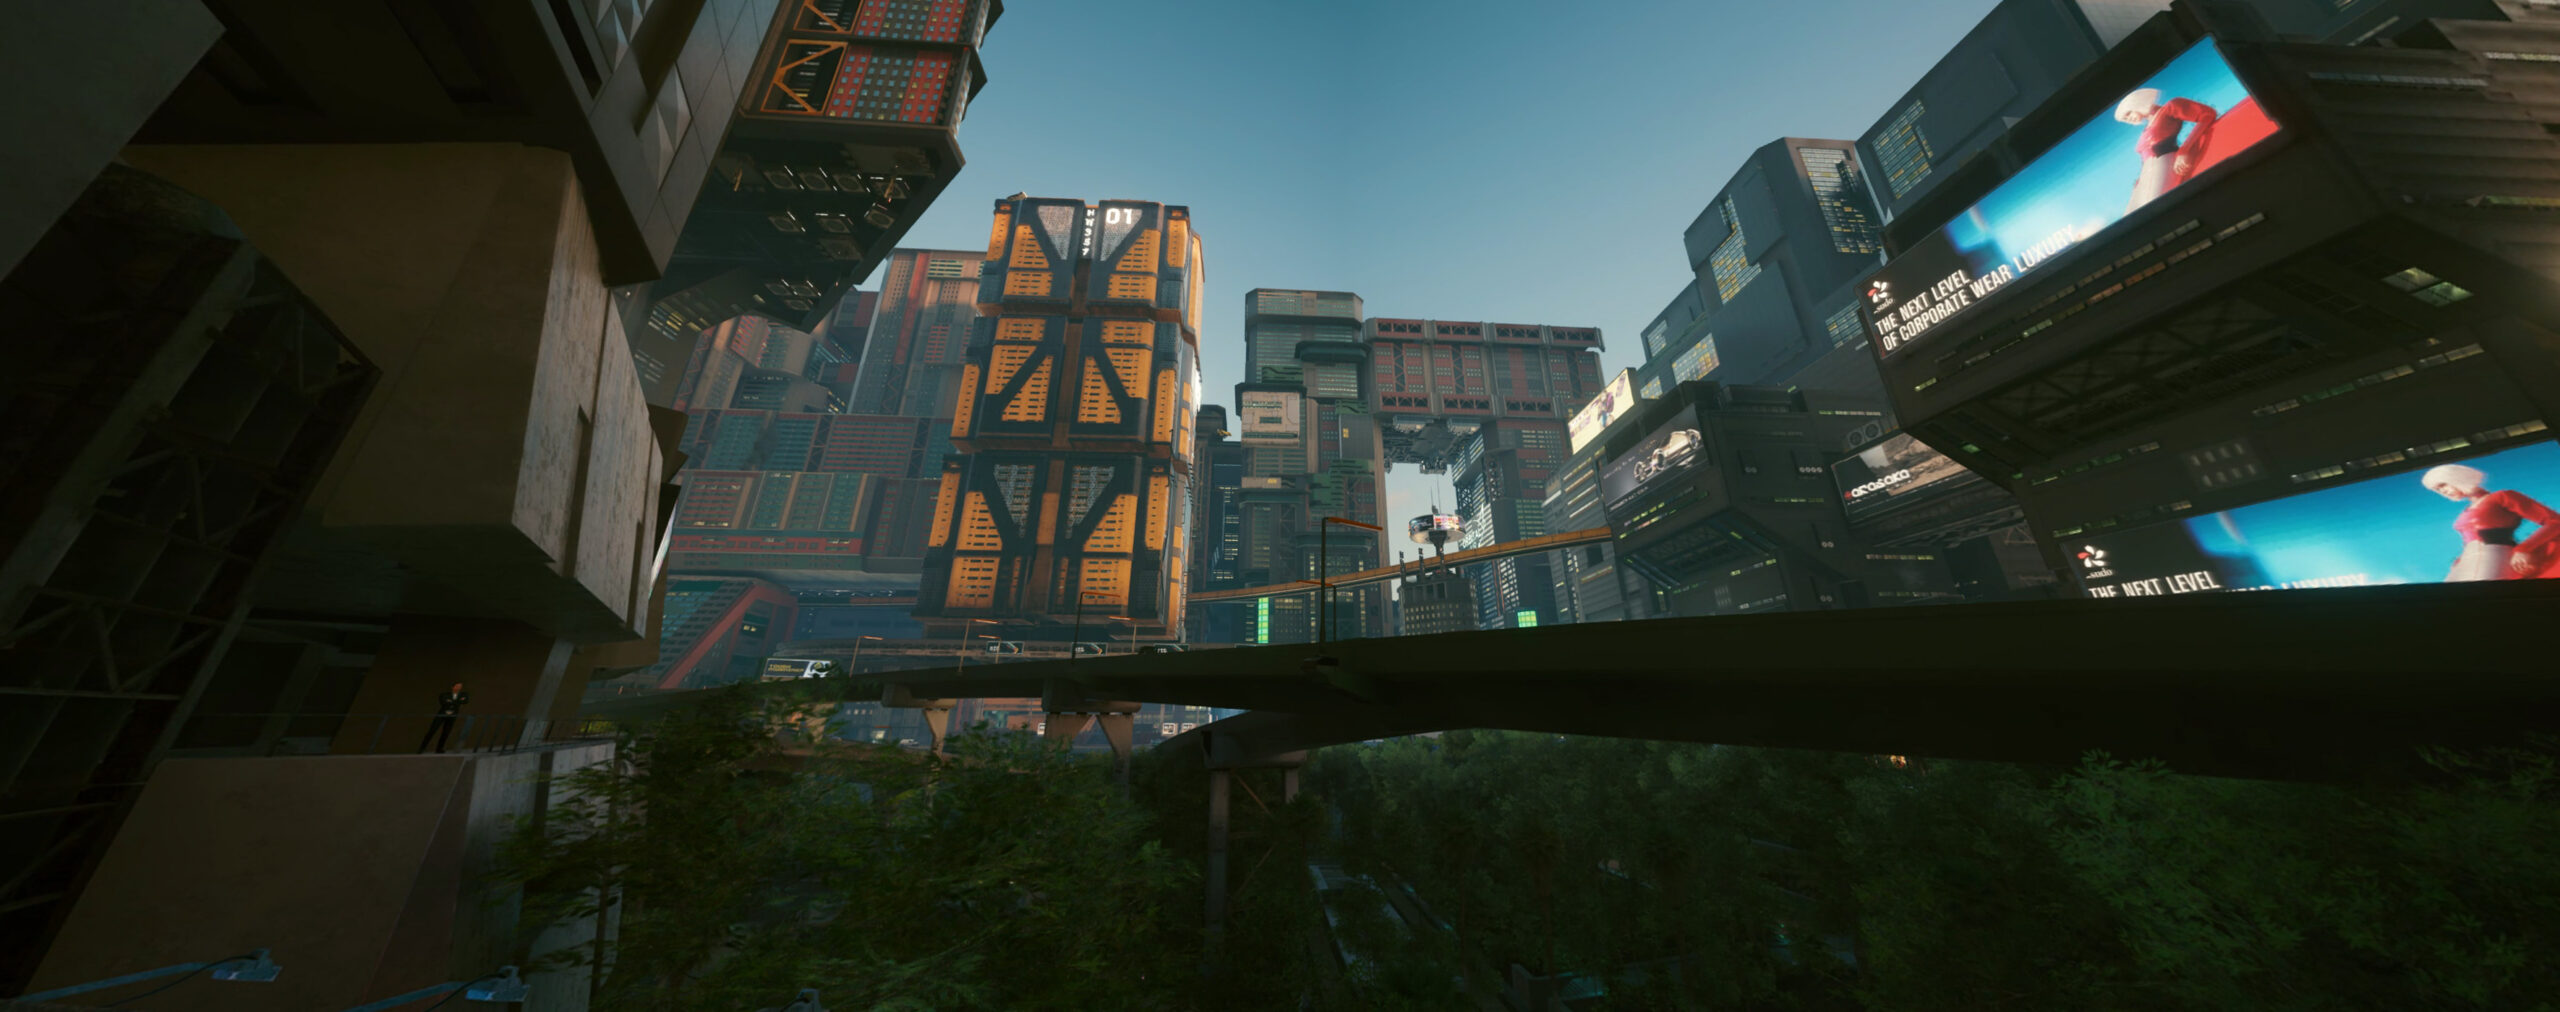
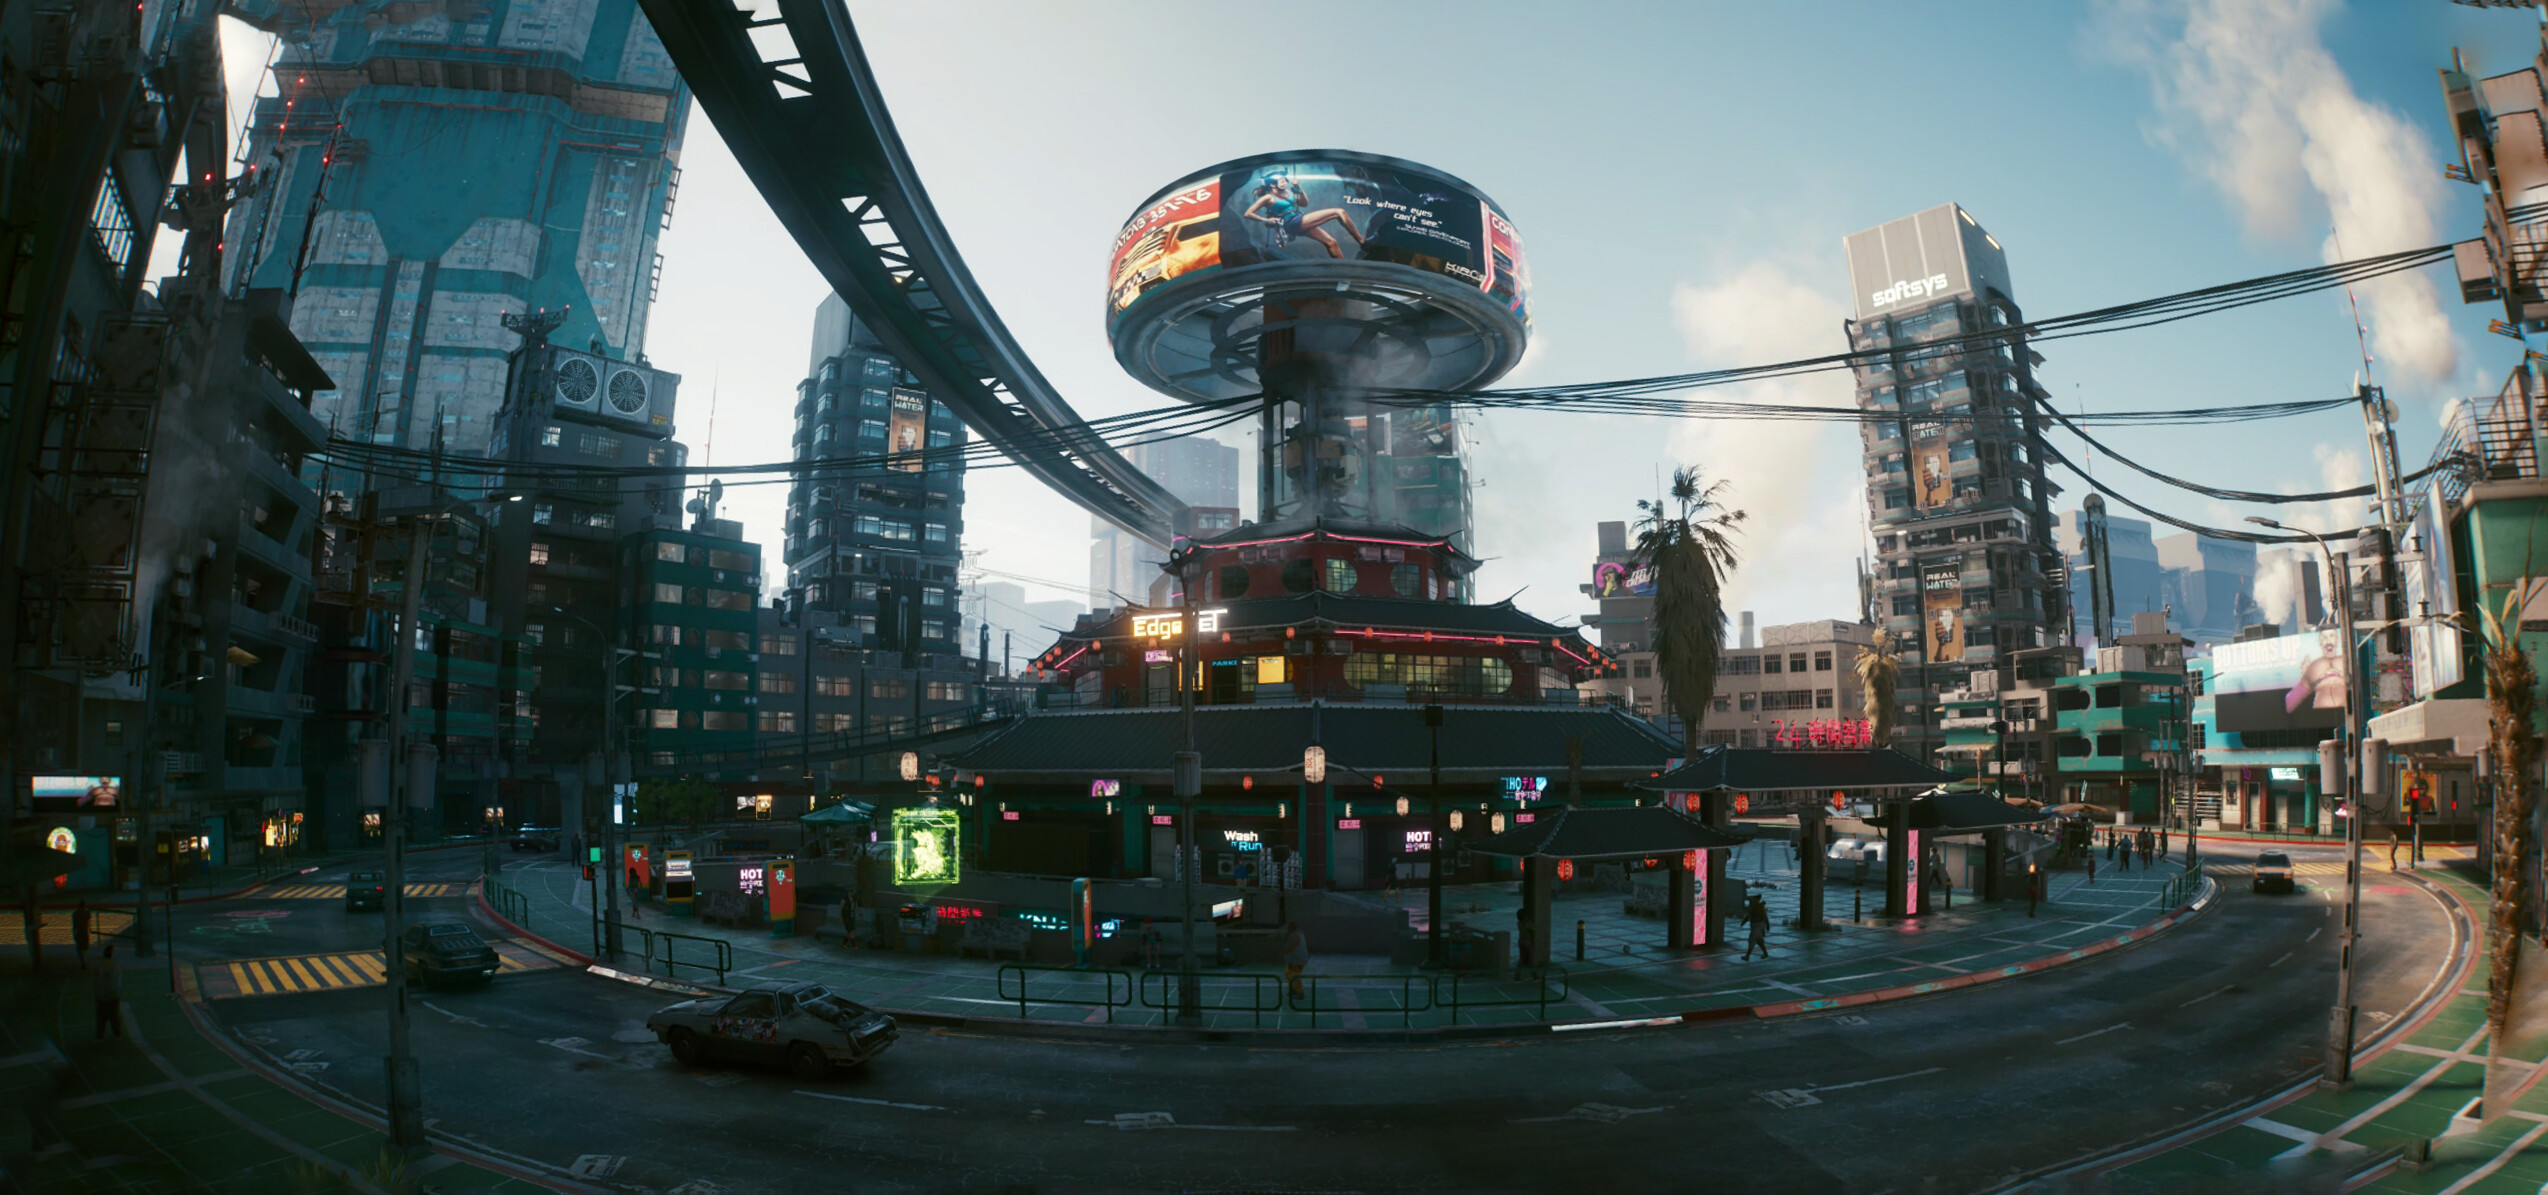
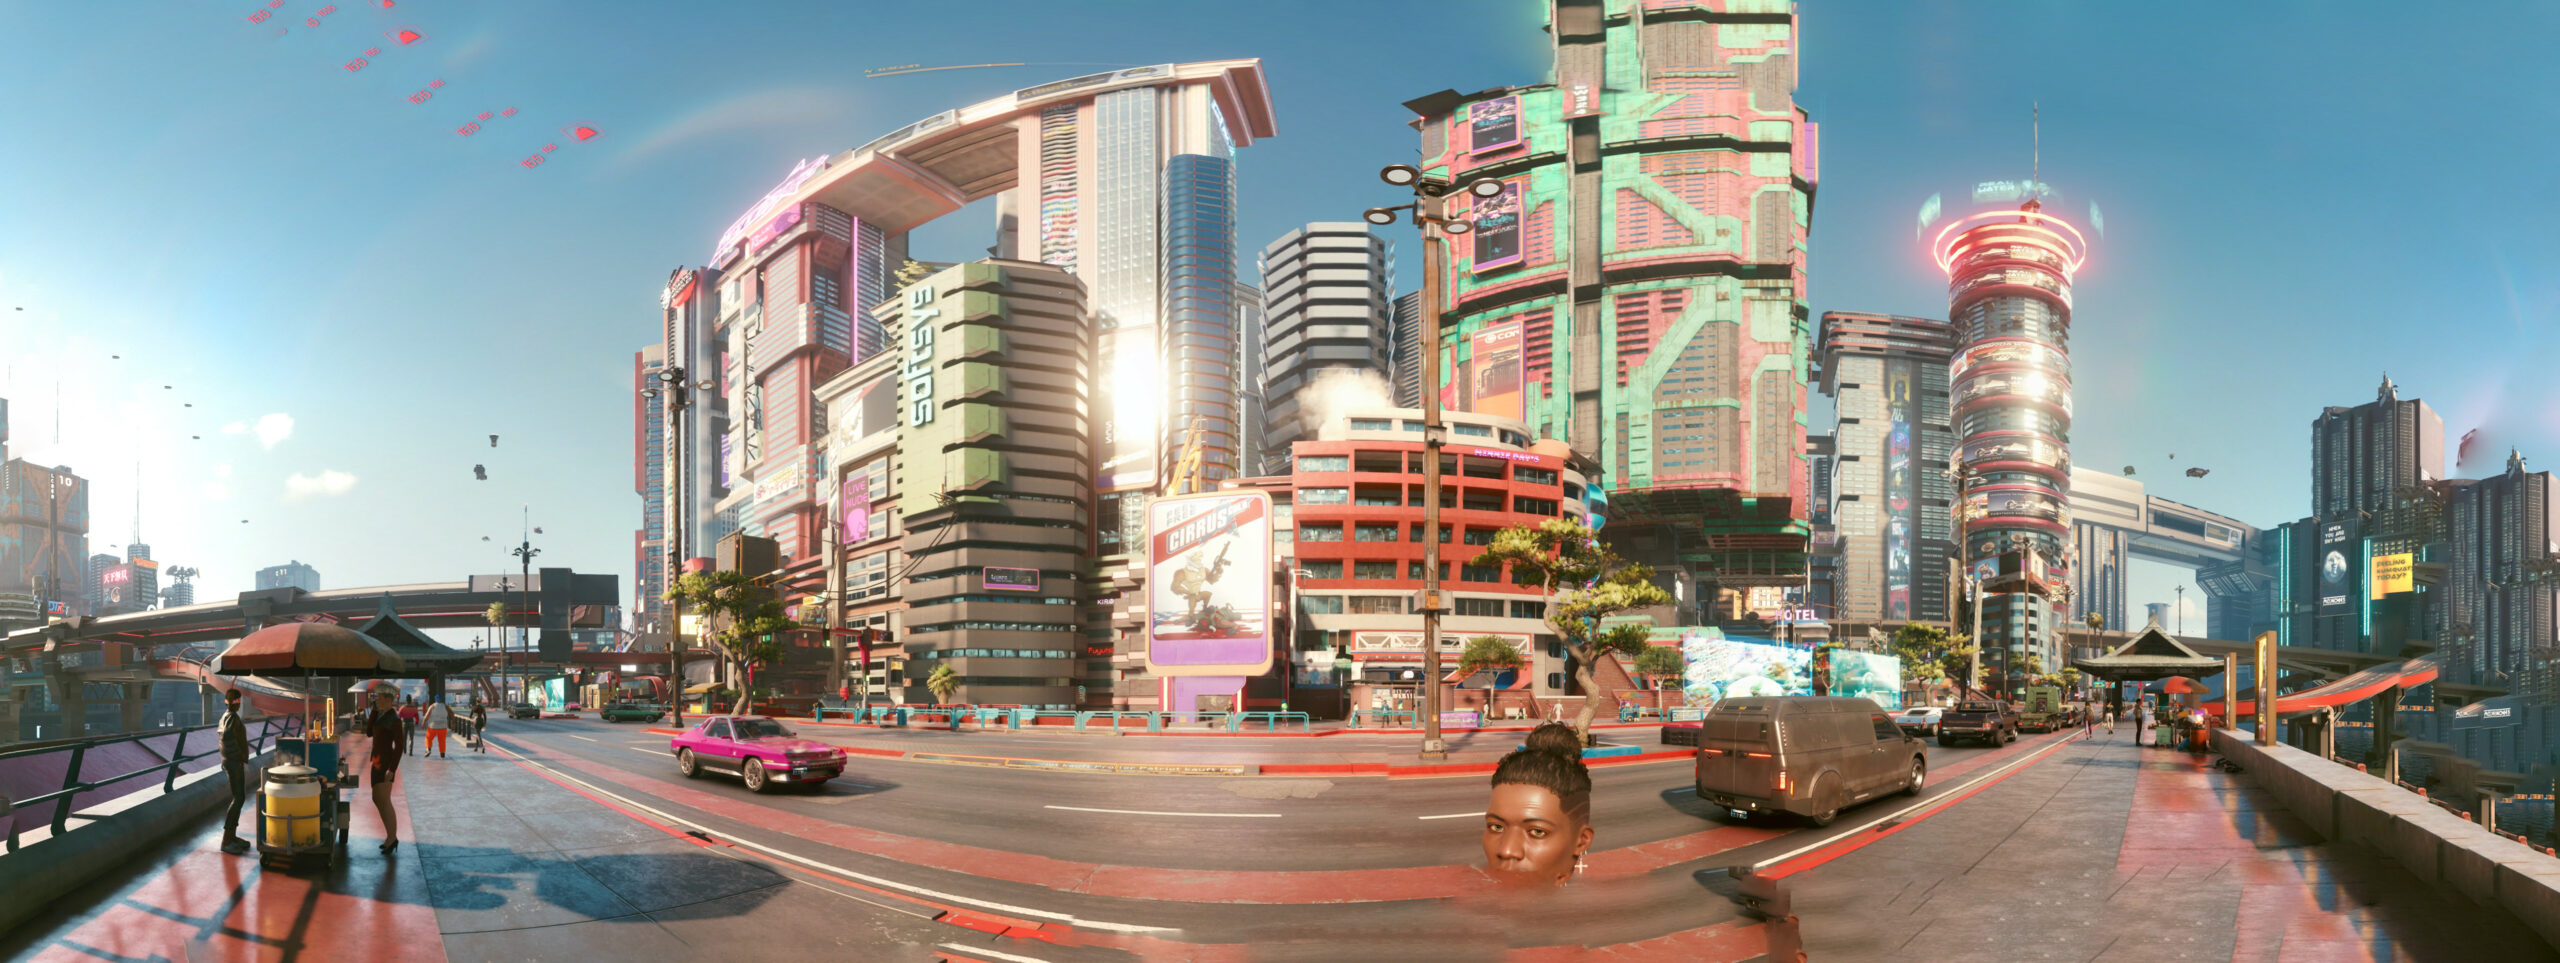
For the first time in the last 10ish years I am back playing a game that really impresses me. The story, the world and the technology of Cyberpunk 2077 really is a step forward.
It’s a first in many aspects for me. I do not own a PC capable enough of playing Cyberpunk 2077 at any quality level. Usually I am playing games on consoles like the Playstation. But for this one I have selected to play on the PC platform. But how?
I am using game streaming. The game is rendered in a datacenter on a PC and graphics card I am renting for the purpose of playing the game. And it simply works great!
So I am playing a next-generation open-world game with technical break-throughs like Raytracing used to produce really great graphics streamed over the internet to my big-screen TV and my keyboard+mouse forwarded to that datacenter without (for me) noticeable lag or quality issues.
The only downside I can see so far is that sooo many people like to play it this way that there are not enough machines (gaming-rigs) available to all the players that want – so there’s a queue in the evening.
But I am doing what I am always doing when I play games. I take screenshots. And if the graphics are great I am even trying to make panoramic views of the in-game graphics. Remember my GTA V and BioShock Infinite pictures?
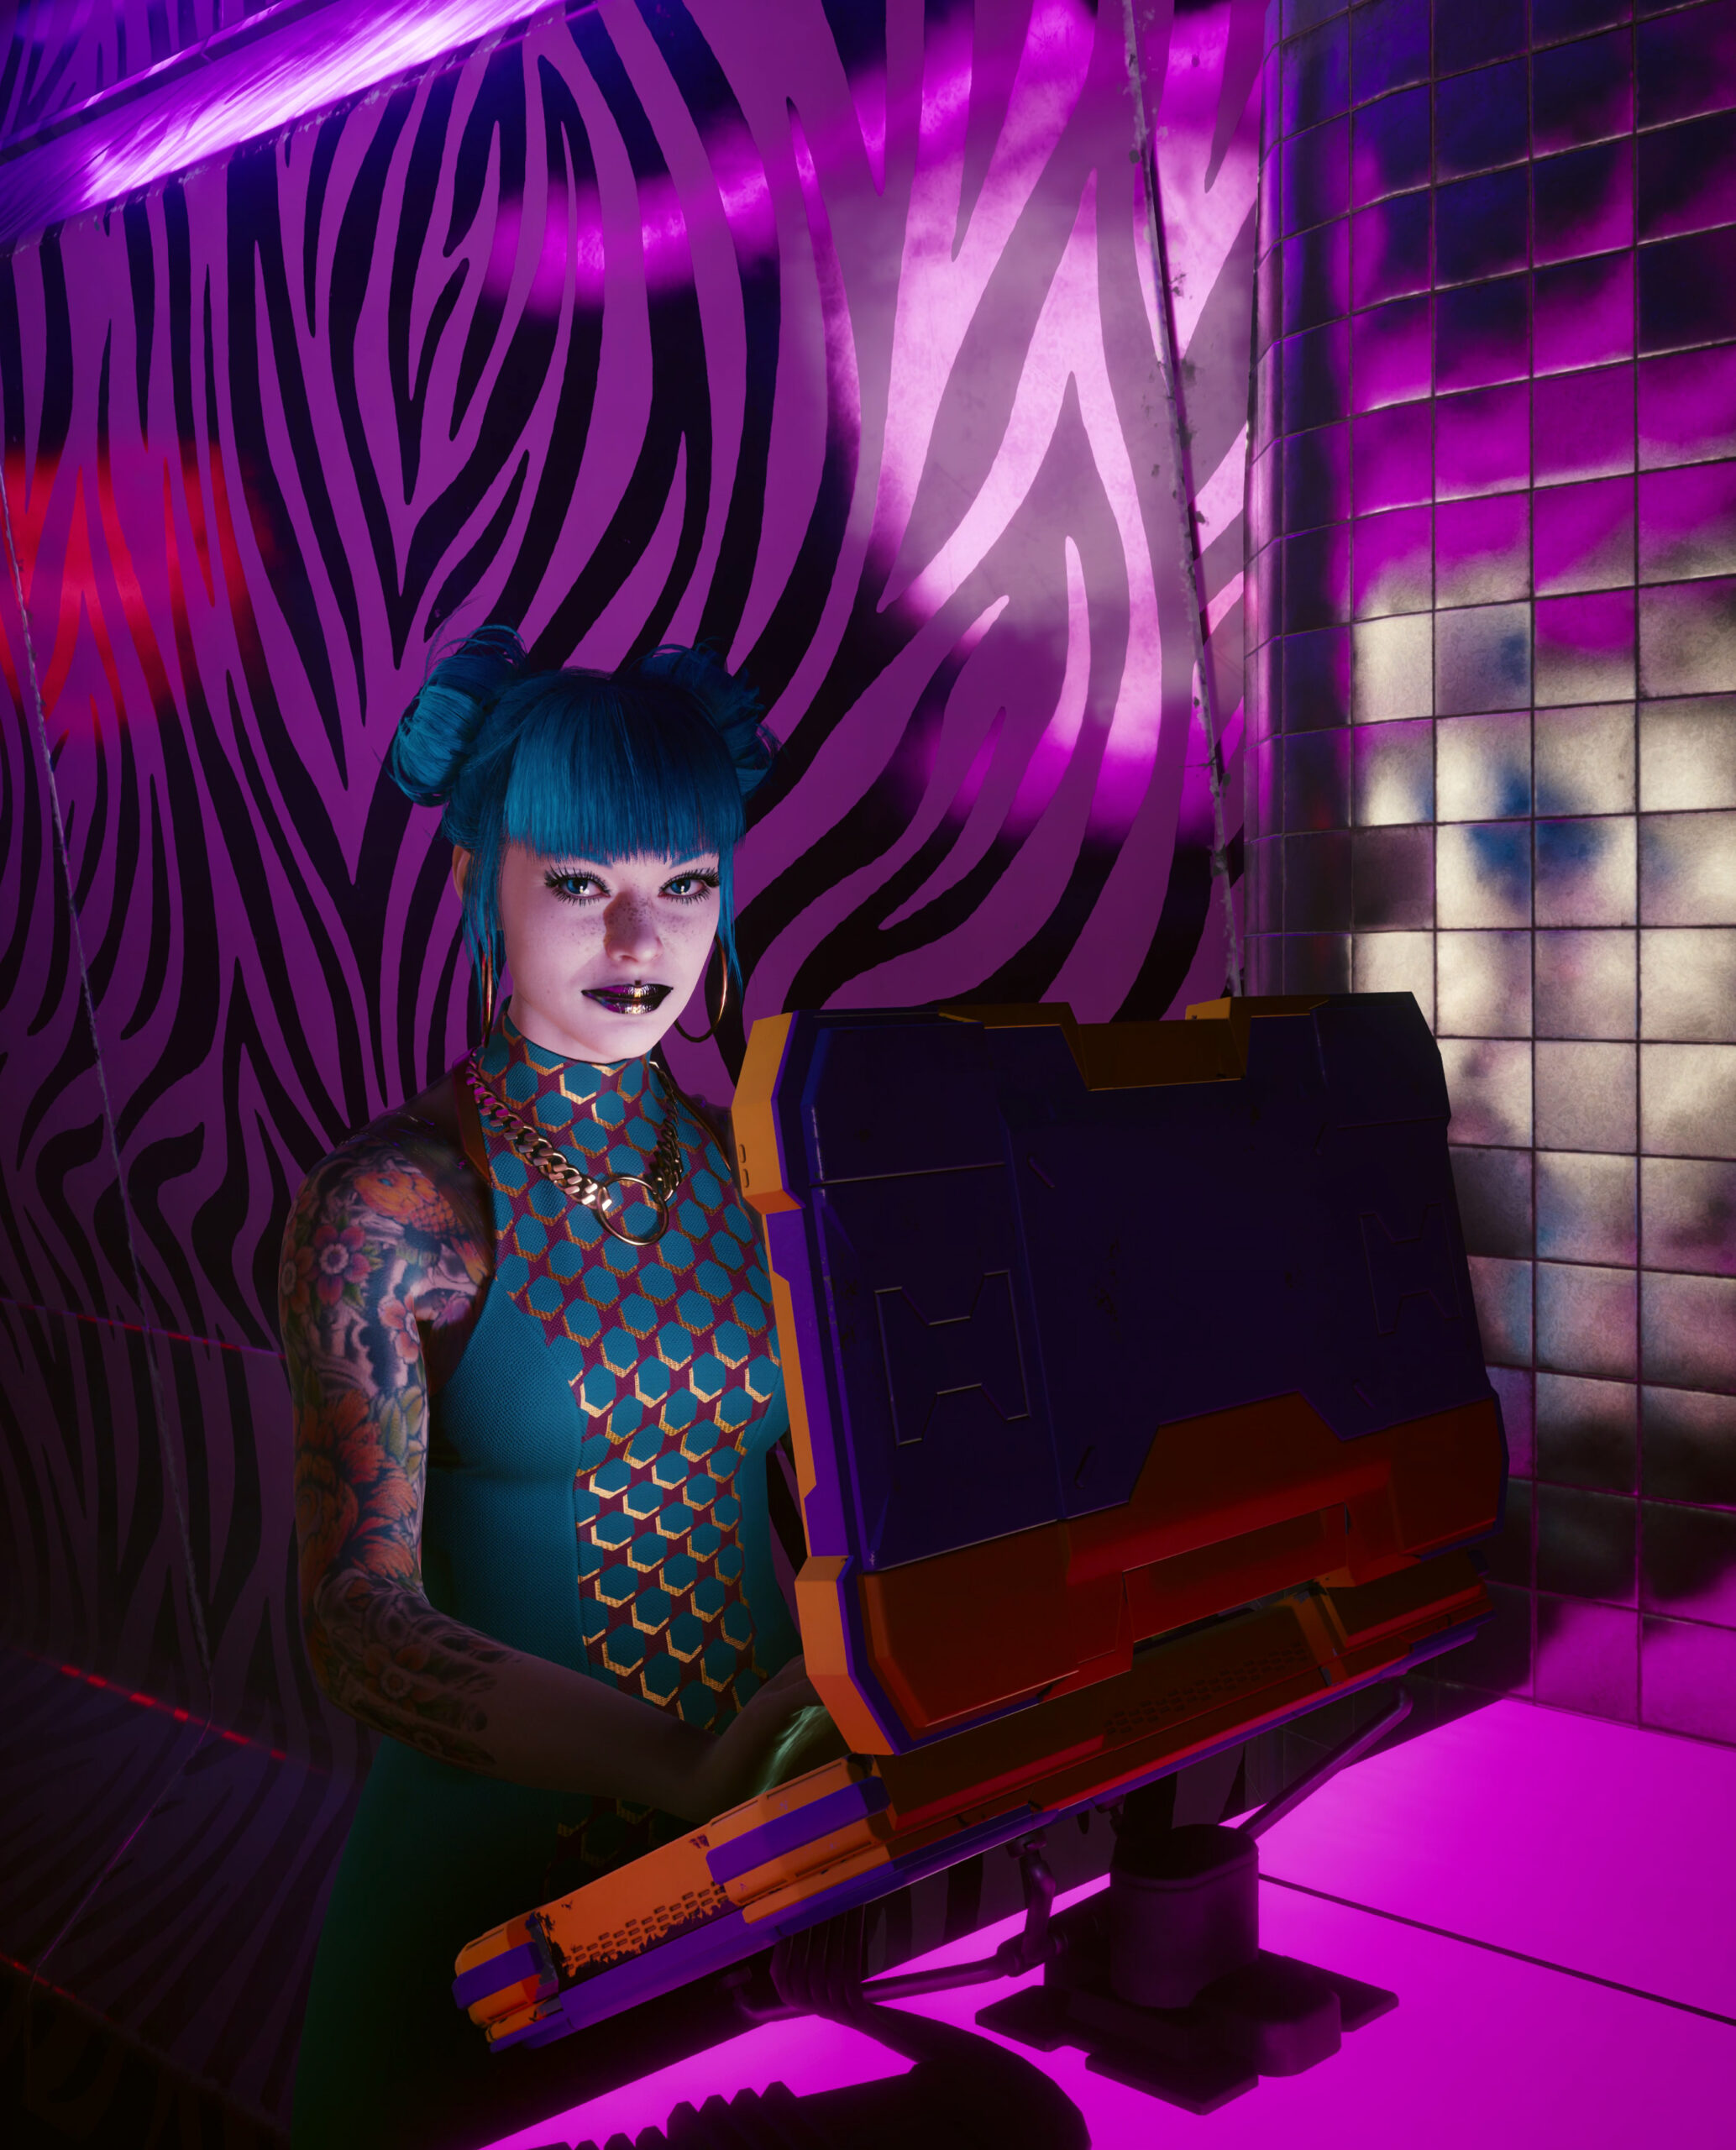
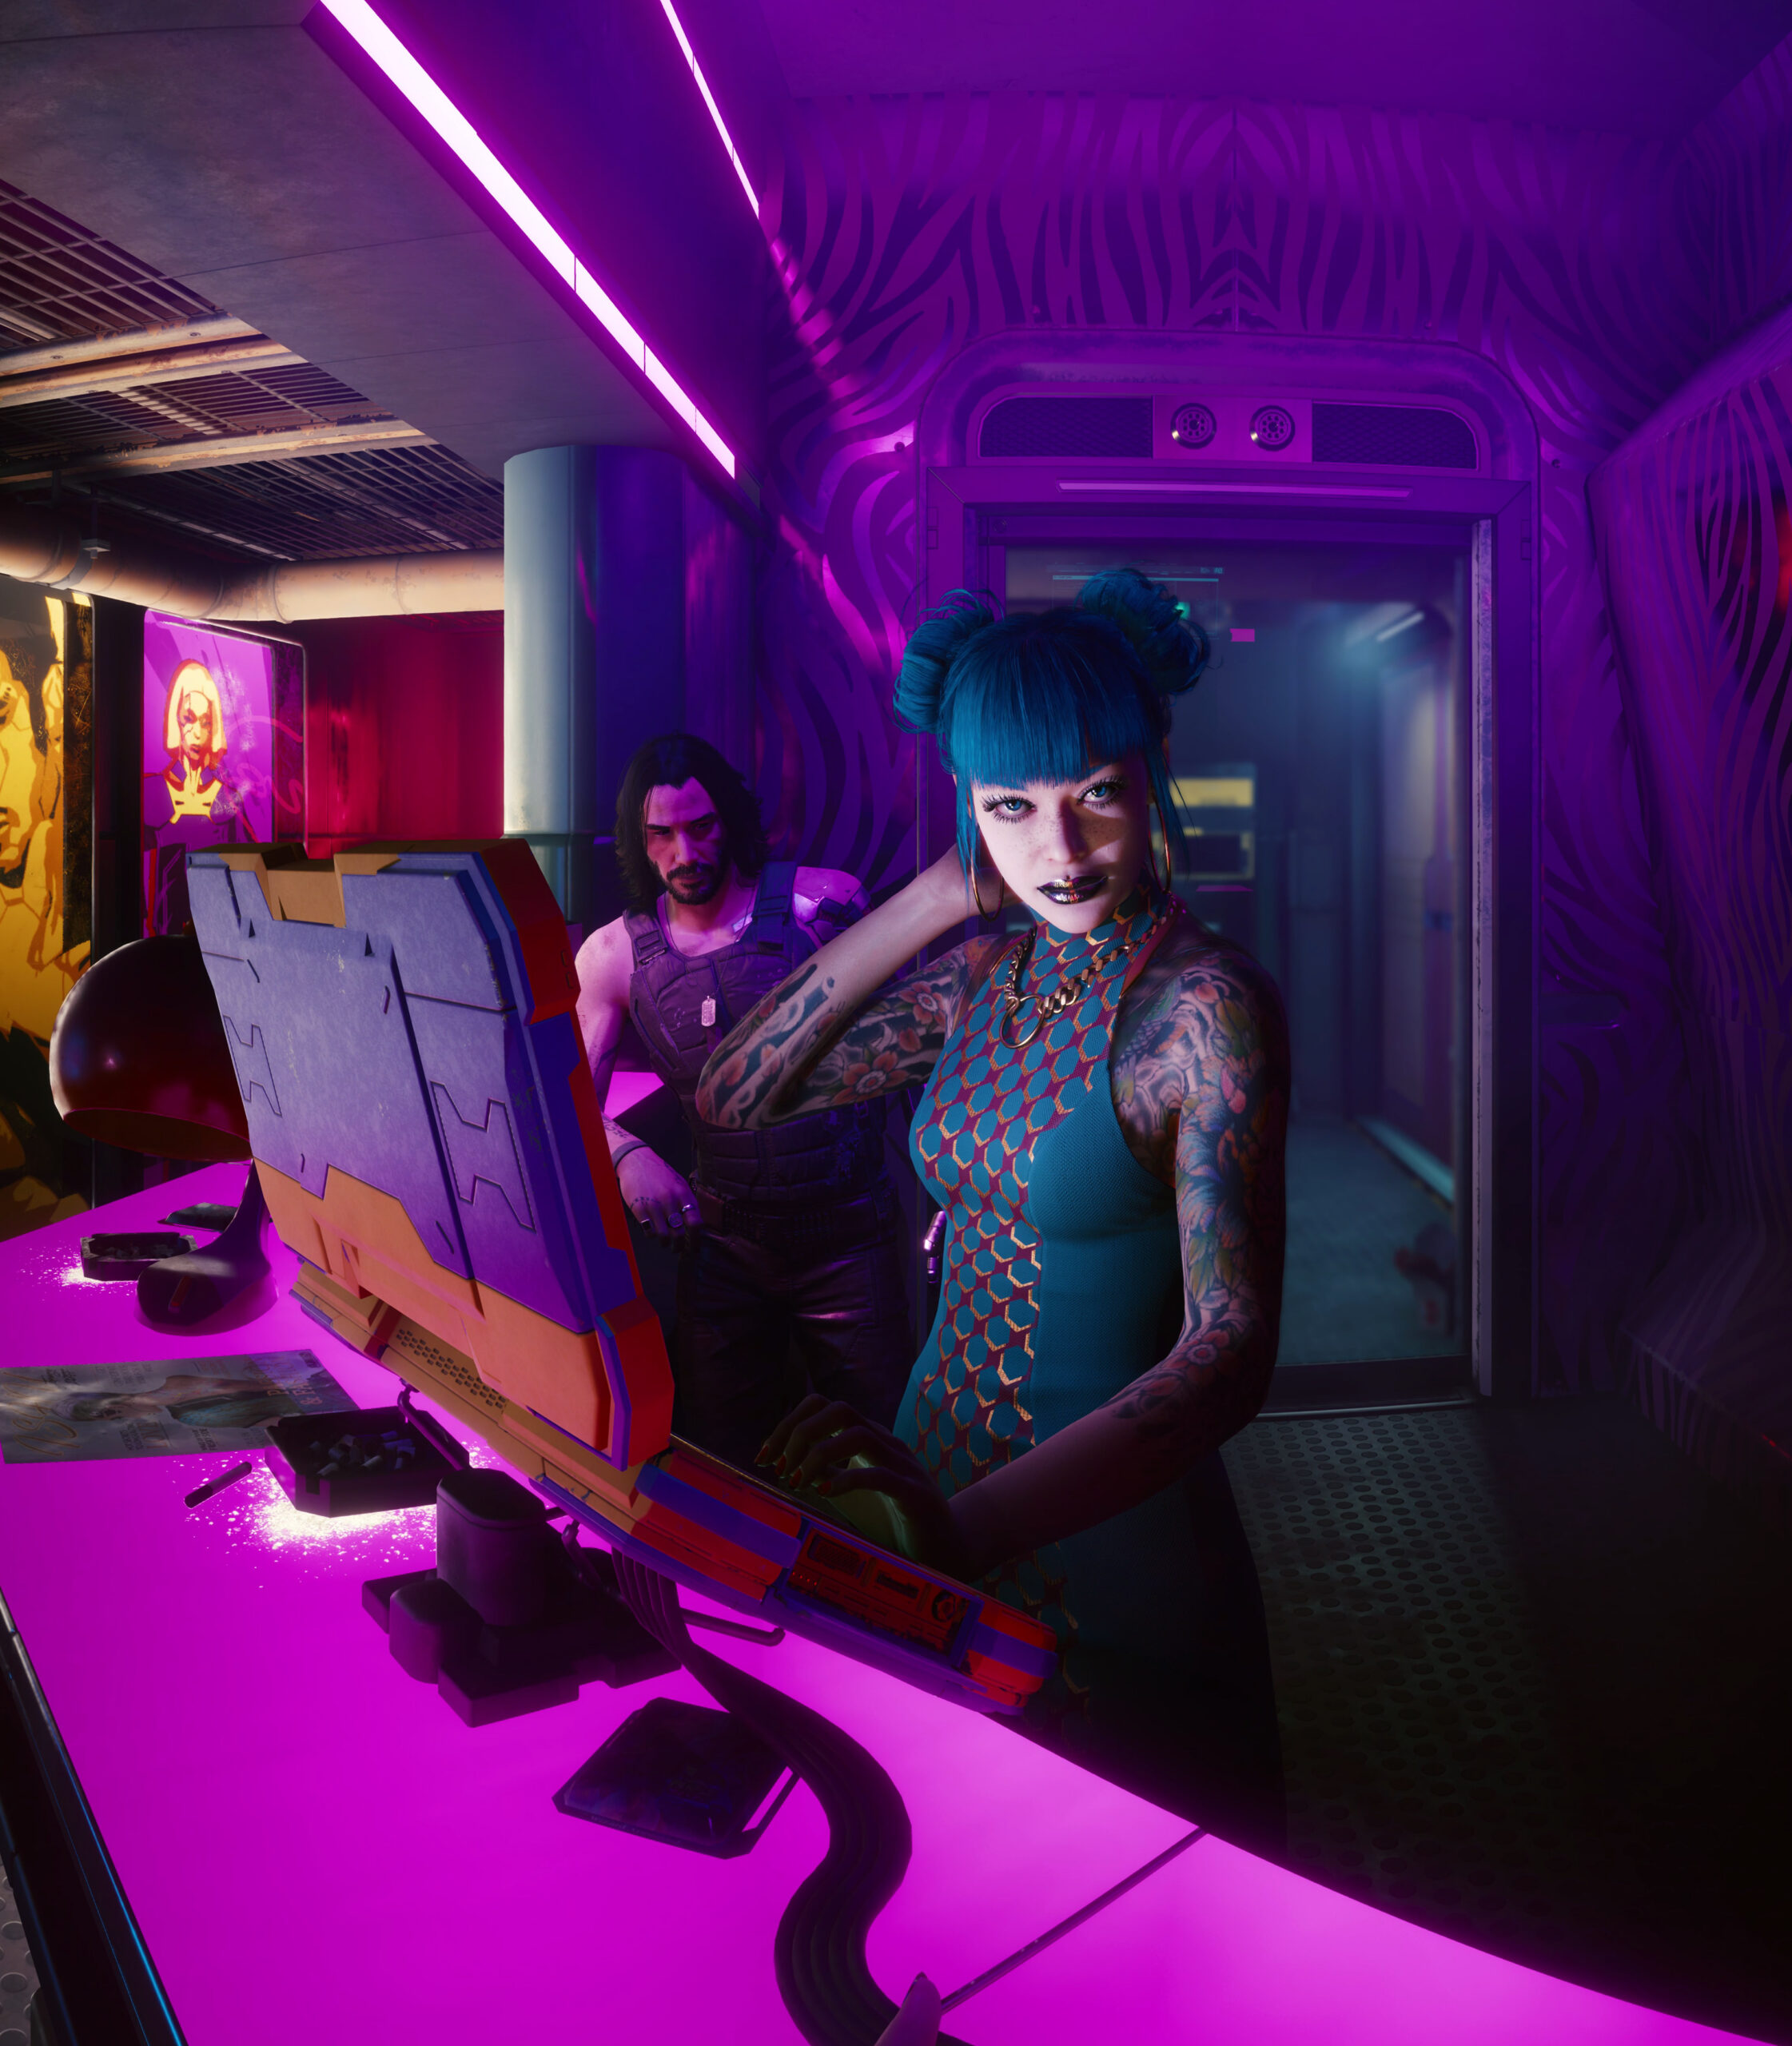
So here is the first batch of pictures – some stitched together using 16 and more single screenshots. Look at the detail! Again – there are in-game screenshots. Click on them to make them bigger – and right-click open the source to really zoom into them.
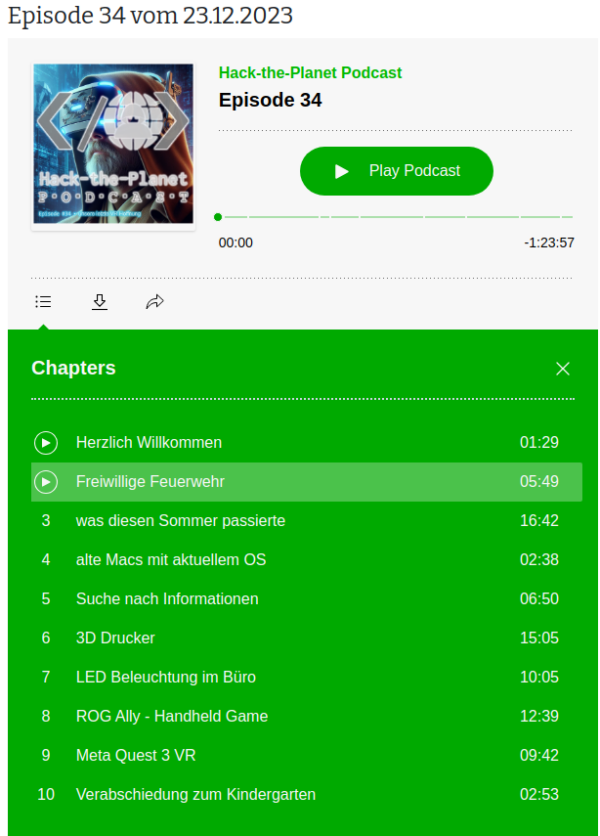
Diesmal gehen wir der Frage nach, wie viel Speicherplatz ein 5 Meter PNG File benötigt, das Daniel für seinen DIY Arcarde Automaten gebaut hat, wundern uns über LED-Leuchten an, die wie echter Himmel aussehen sollen und freuen uns über den “Digitalen Alltag als Experiment”.
I like playing arcade games. I’ve had an “arcade” in my home town and I used to go there after school quite frequently. It was a small place – maybe 5 machines and some pinball machines.
In february this year it occured to be that with the power of the Raspberry Pi and a distribution called RetroPie I could build something that would bring back the games and allow me to play/try those games I never could because my arcade was so small back in the days.
With their basic plans I started drawing in Inkscape and told my father about the plan. He was immediately in – as the plan now was to not build one but two bartop arcade machines. He would take the task of carrying out the wood works and I would do the rest – procurements, electronics, wiring, design and “painting”.
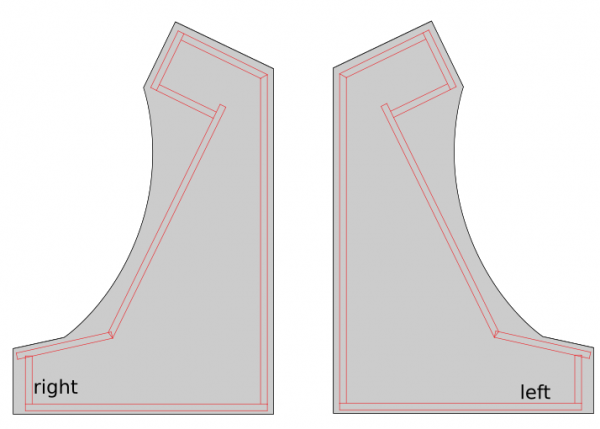
first drawings of the side panels
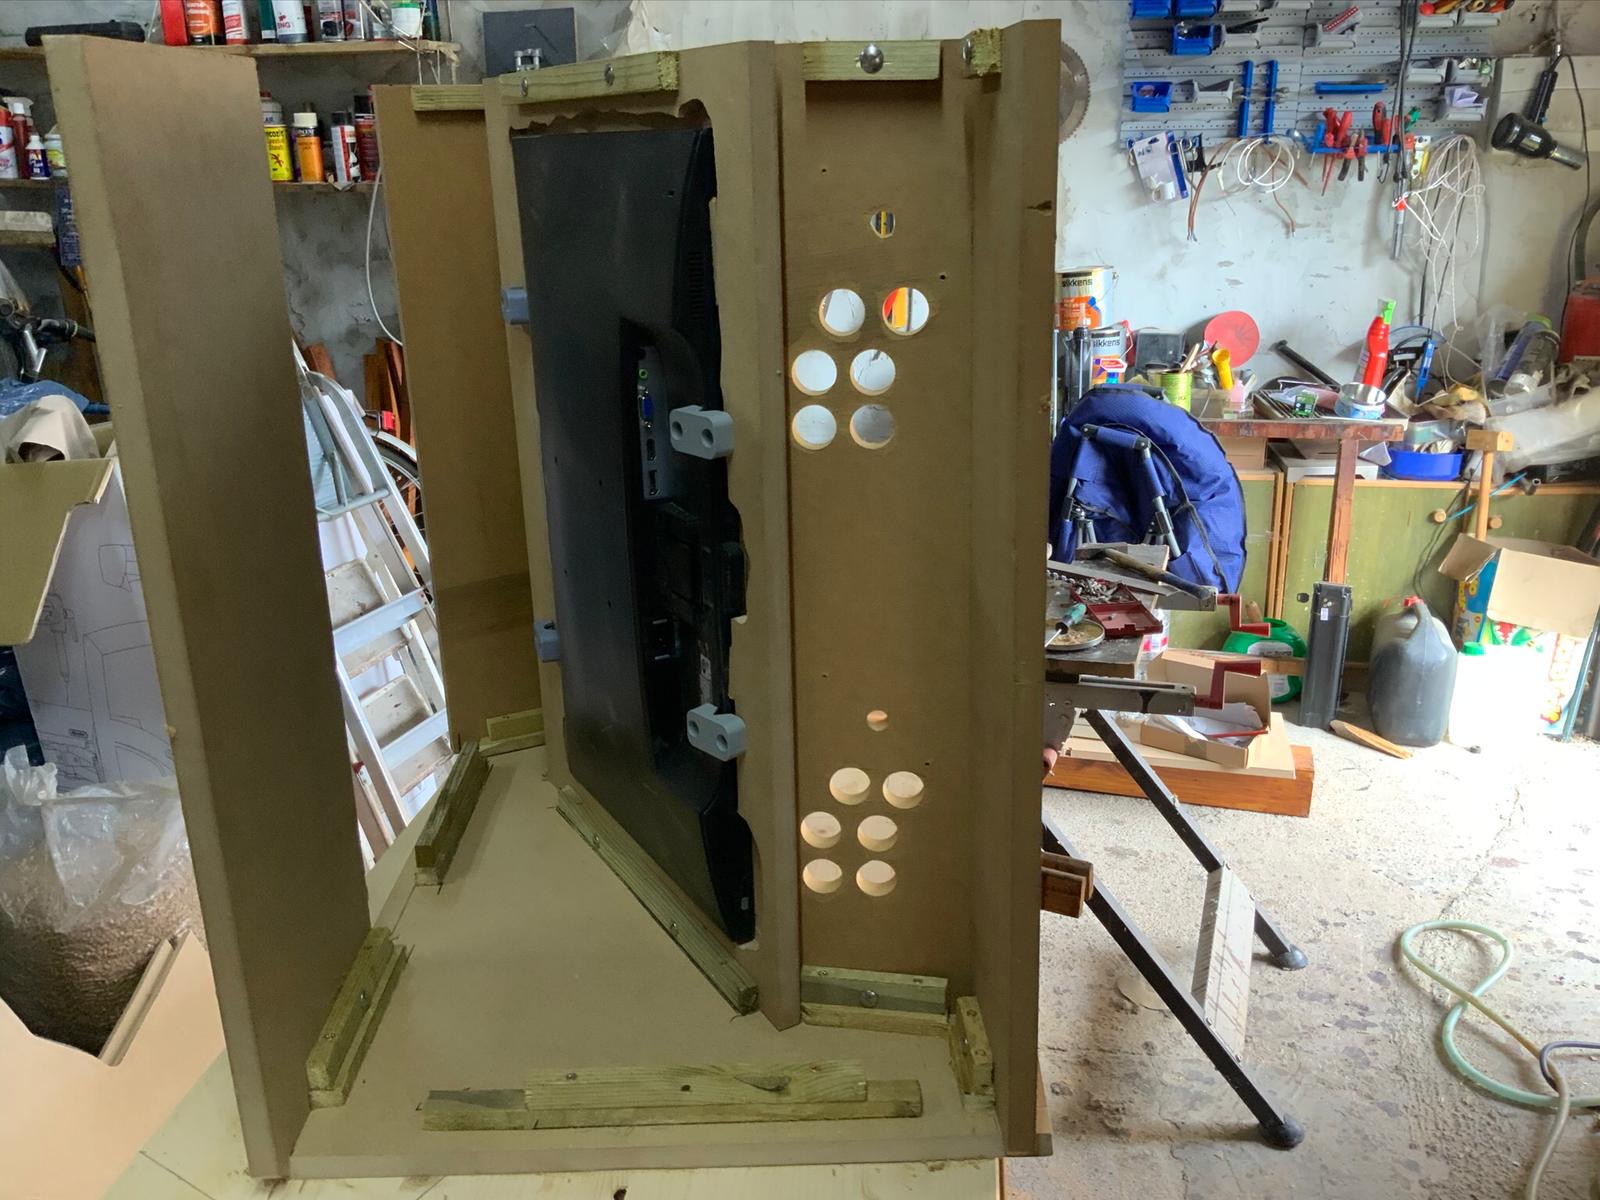
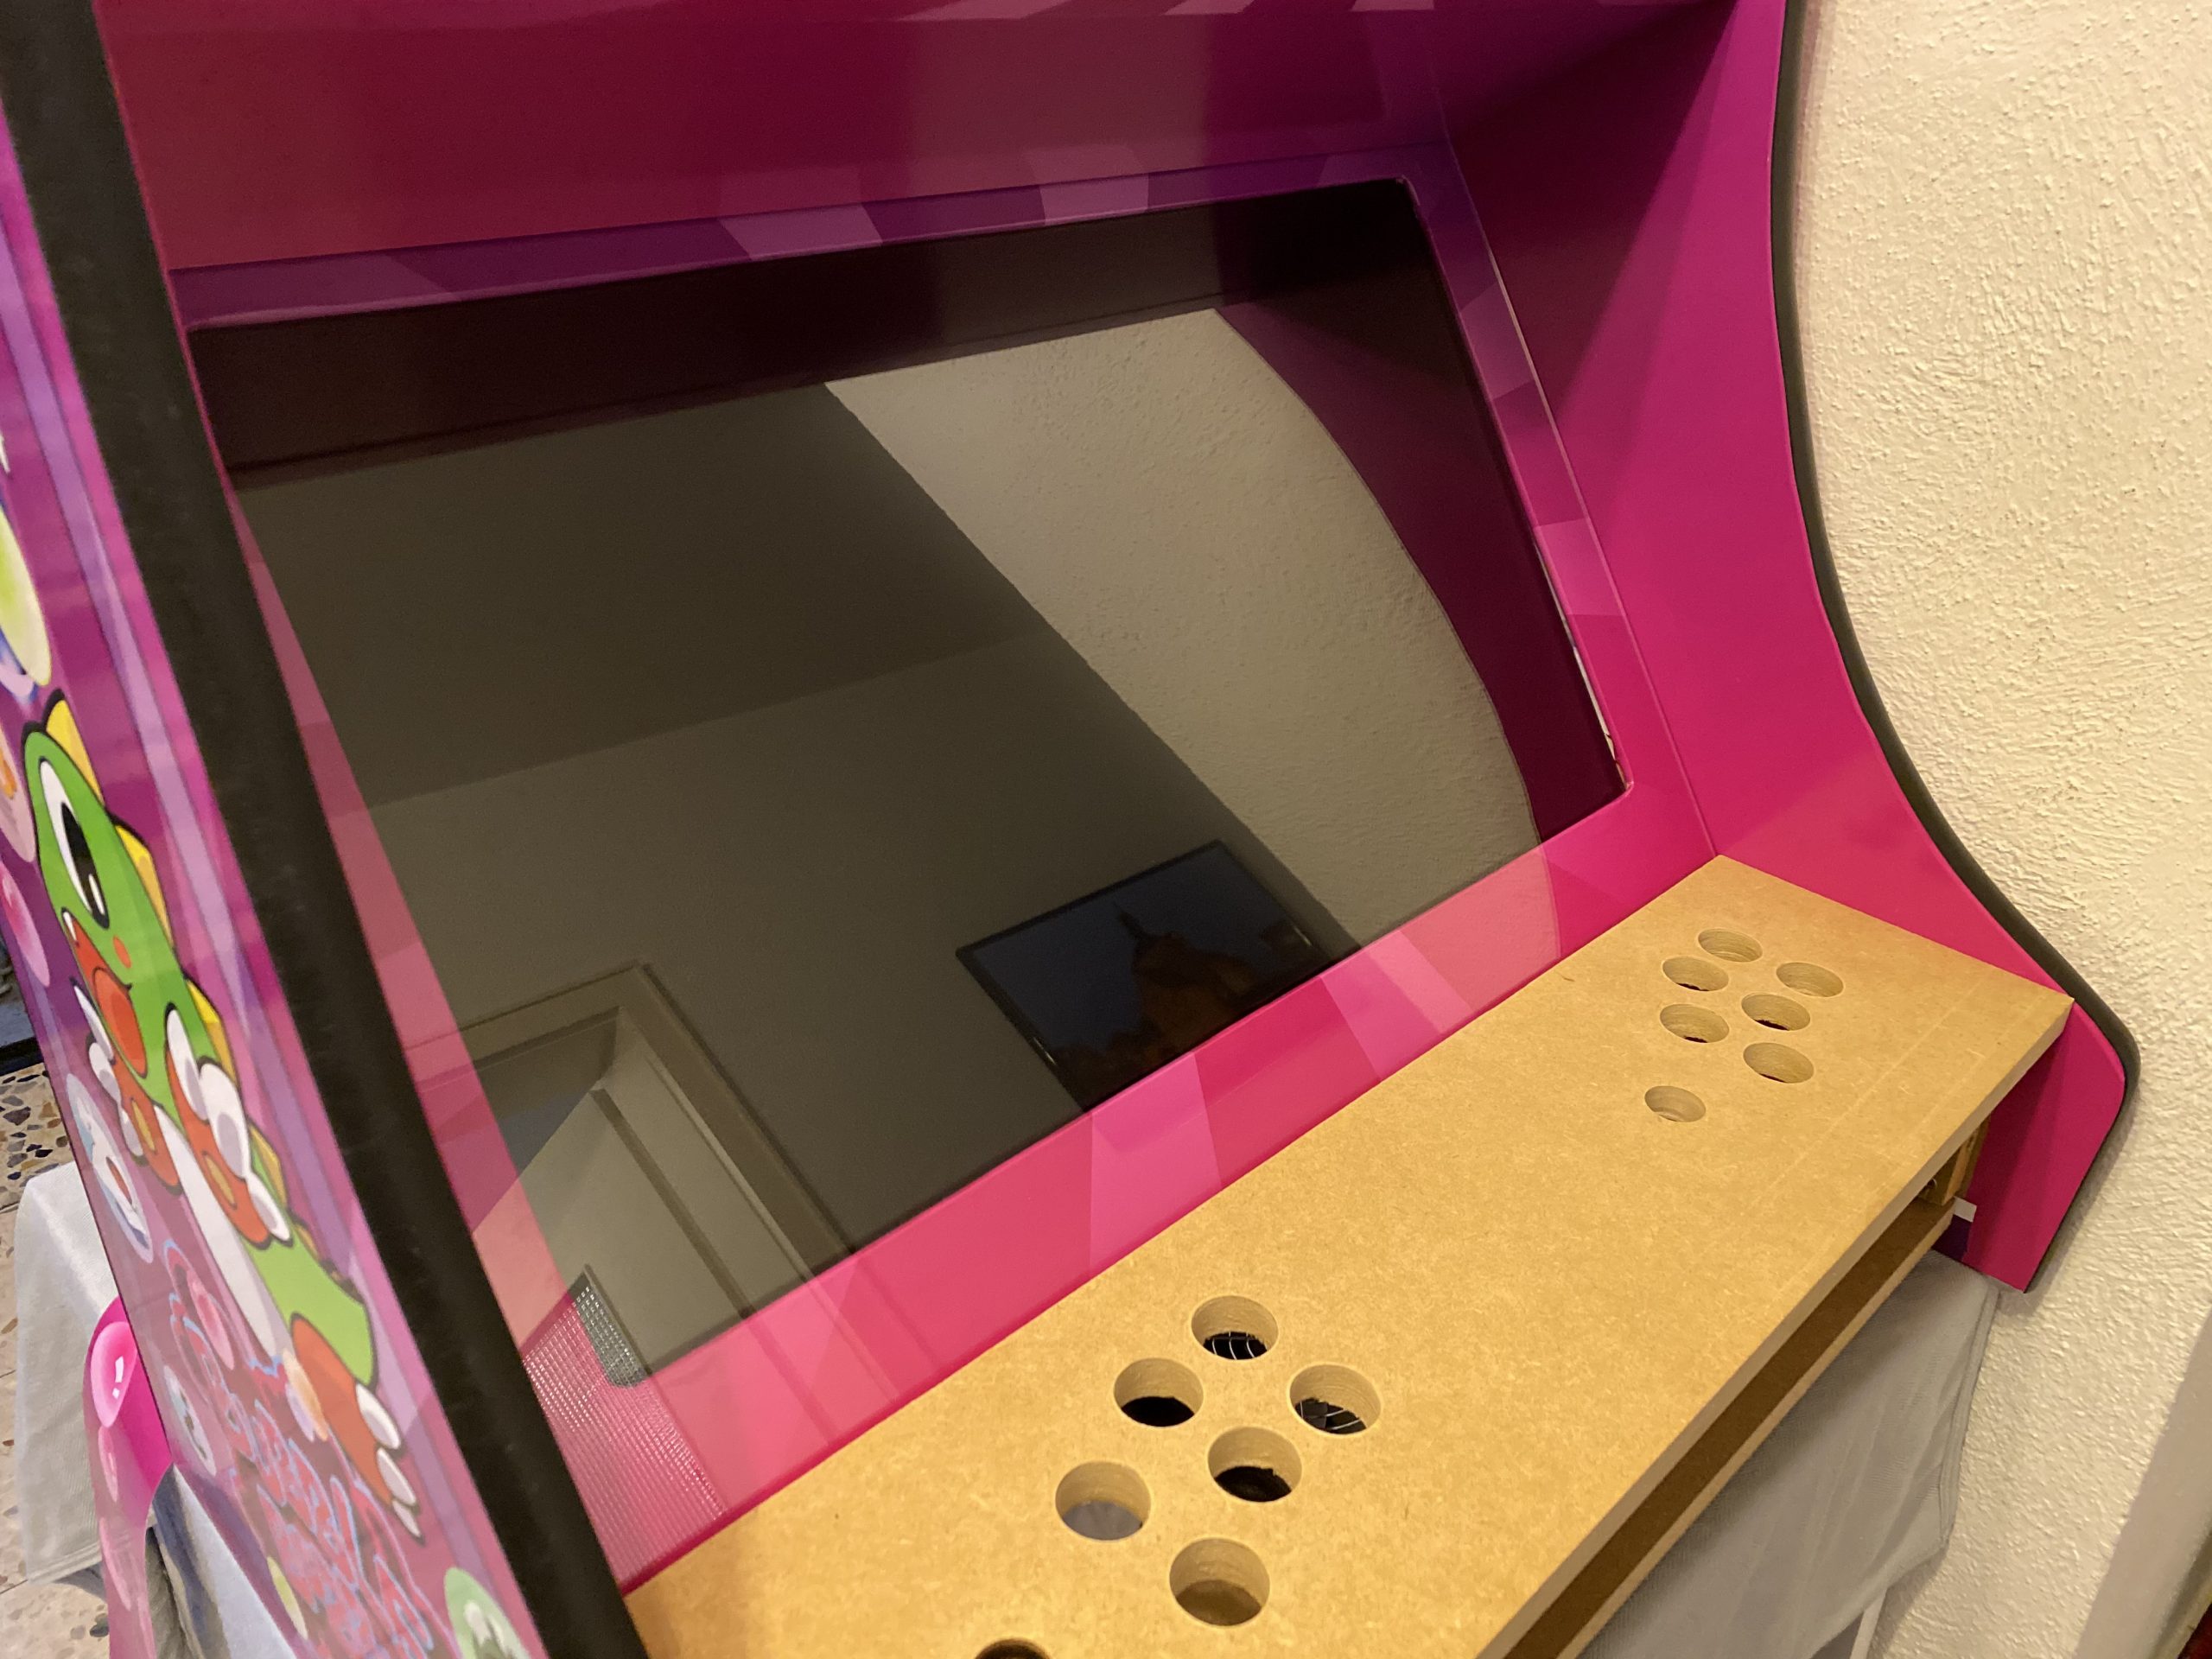
While I took the Holbrook Tech schematics as a base it quickly came apparent that I had to build/measure around the one fixed big thing in the middle: the screen.
screen
I wanted something decently sized that the RaspberryPi would be able to push out to and that would require no maintenance/further actions when installed.
To find something that fits I had my requirements fixed:
between 24″ – 32″
colour shift free wide viewing angle
1080p
takes audio over HDMI and is able to push it out through headphone jack
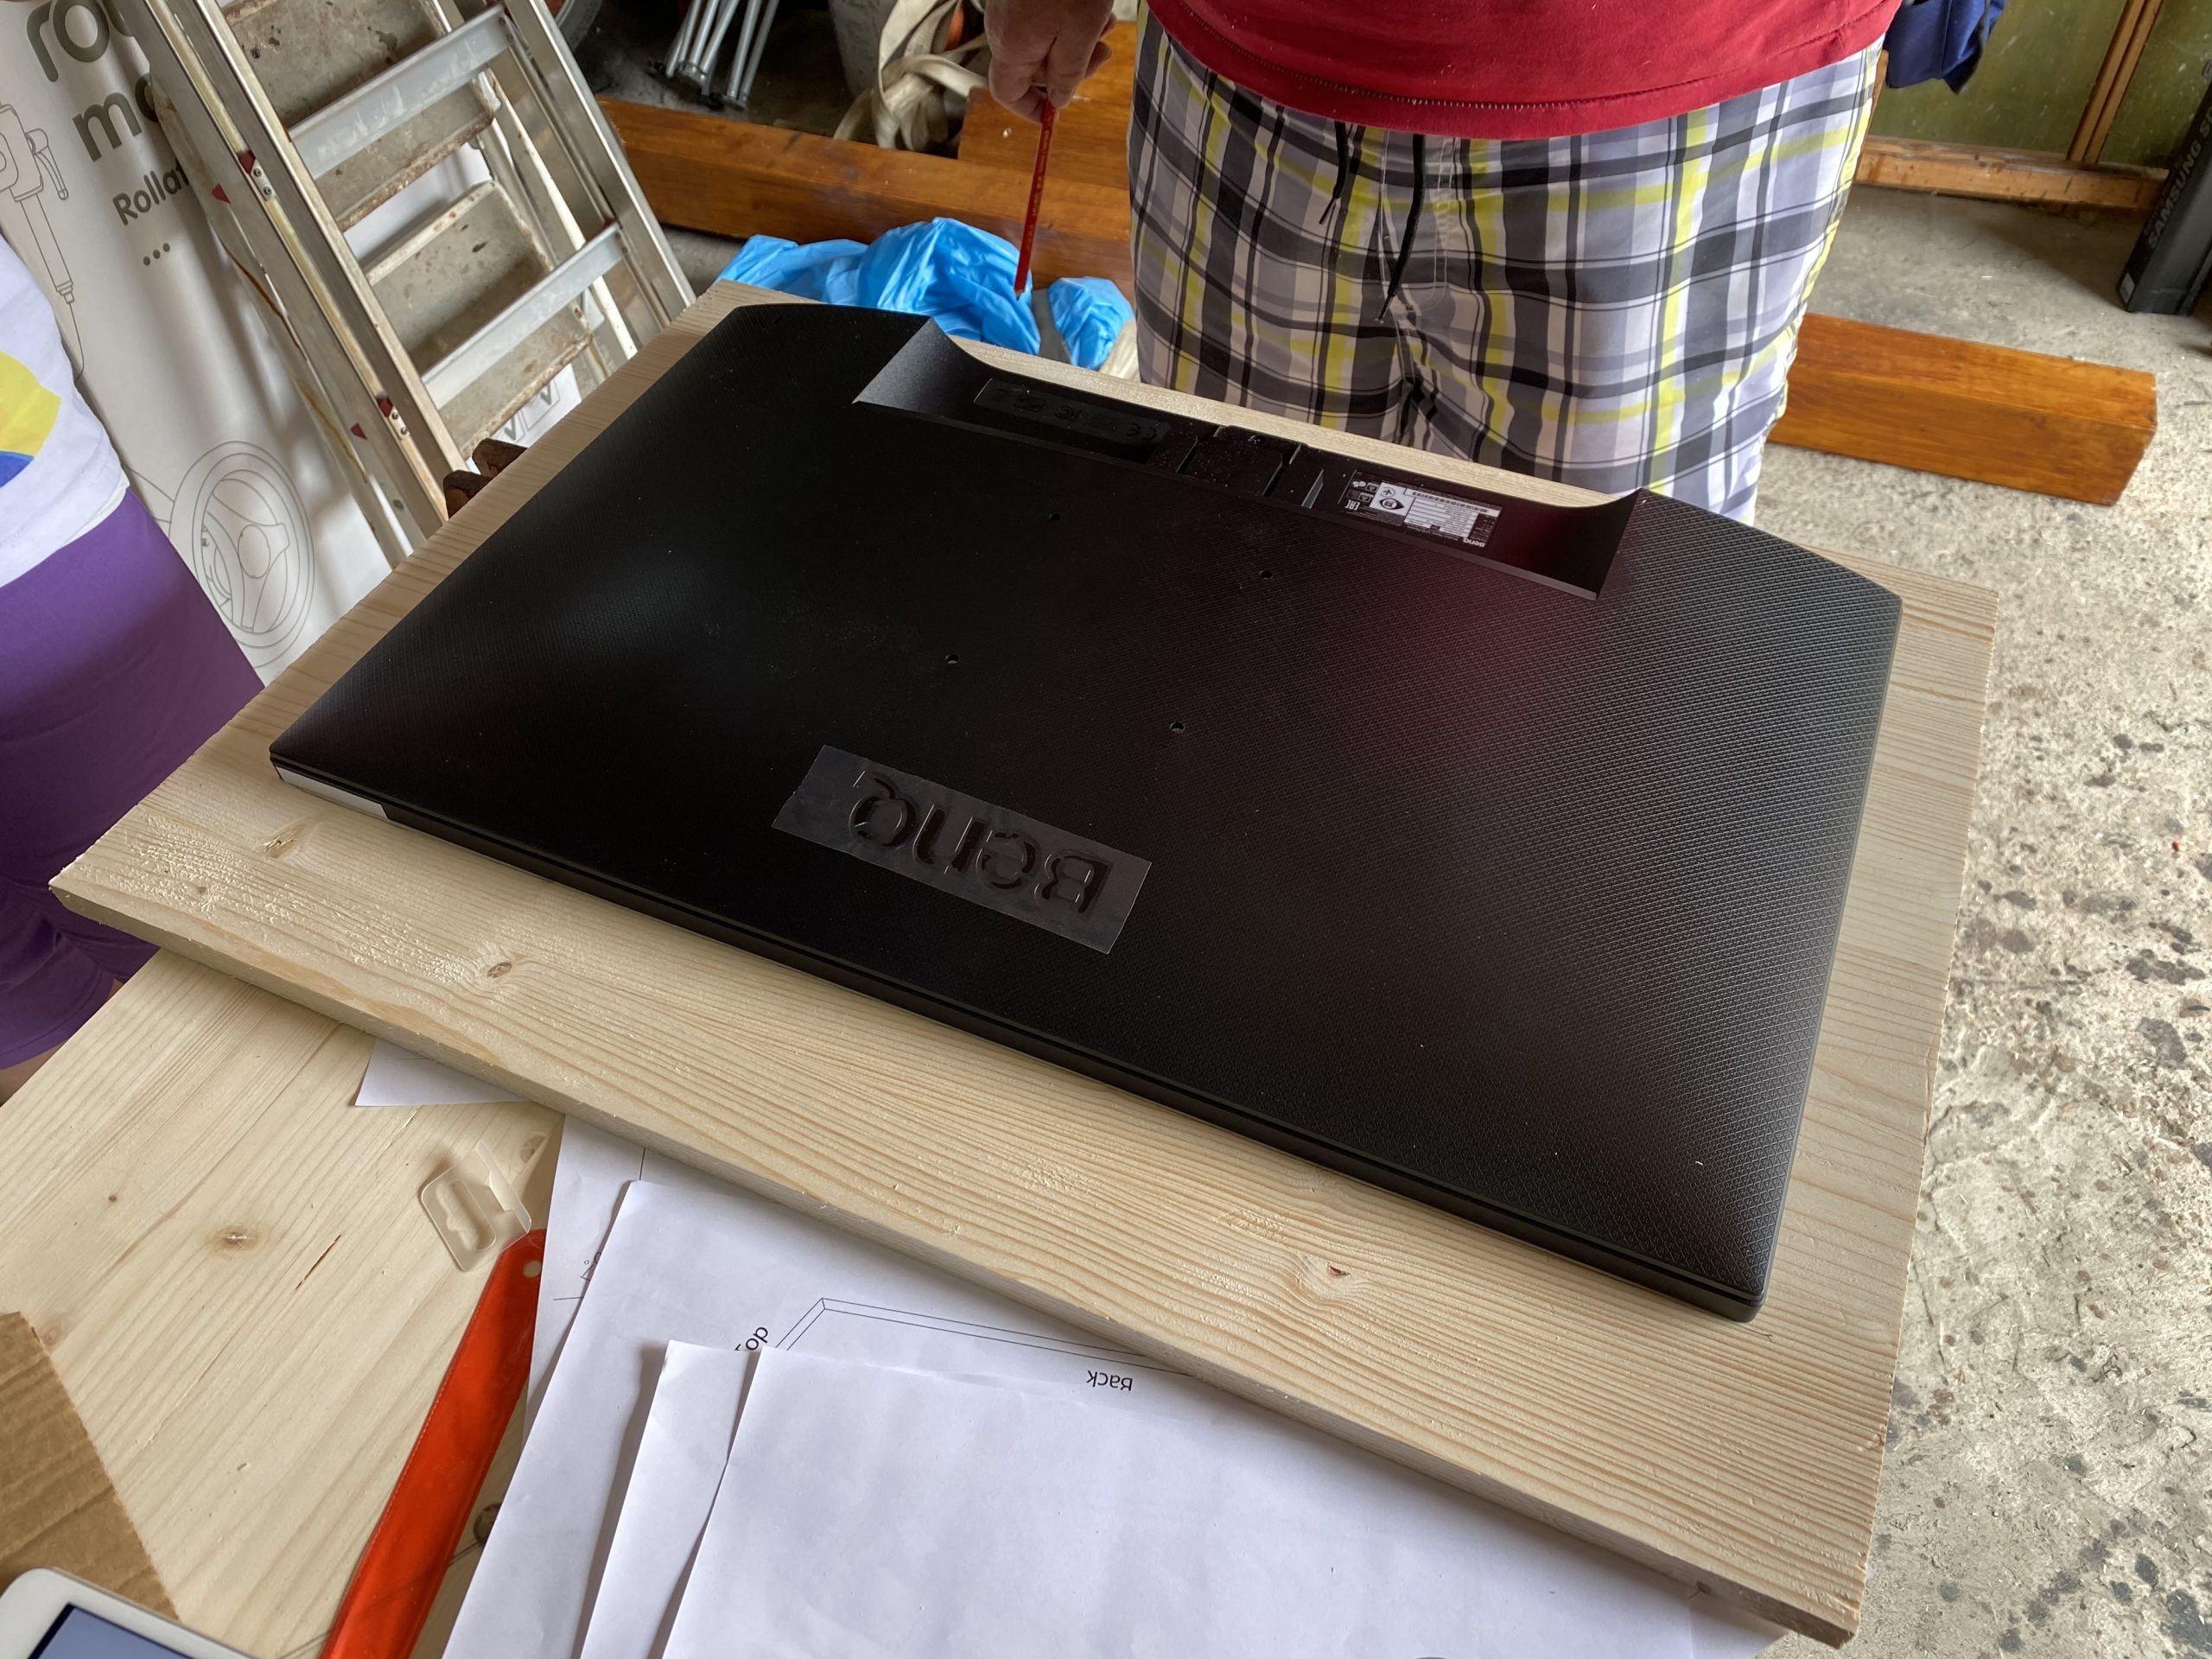
I eventually settled for a BenQ GW2780 27″ monitor with all boxes ticked for a reasonable price.
After the monitor arrived I carried it to my fathers house and we started to cut the bezel as a first try.
measuring the monitor in – on a piece of wood for testing.
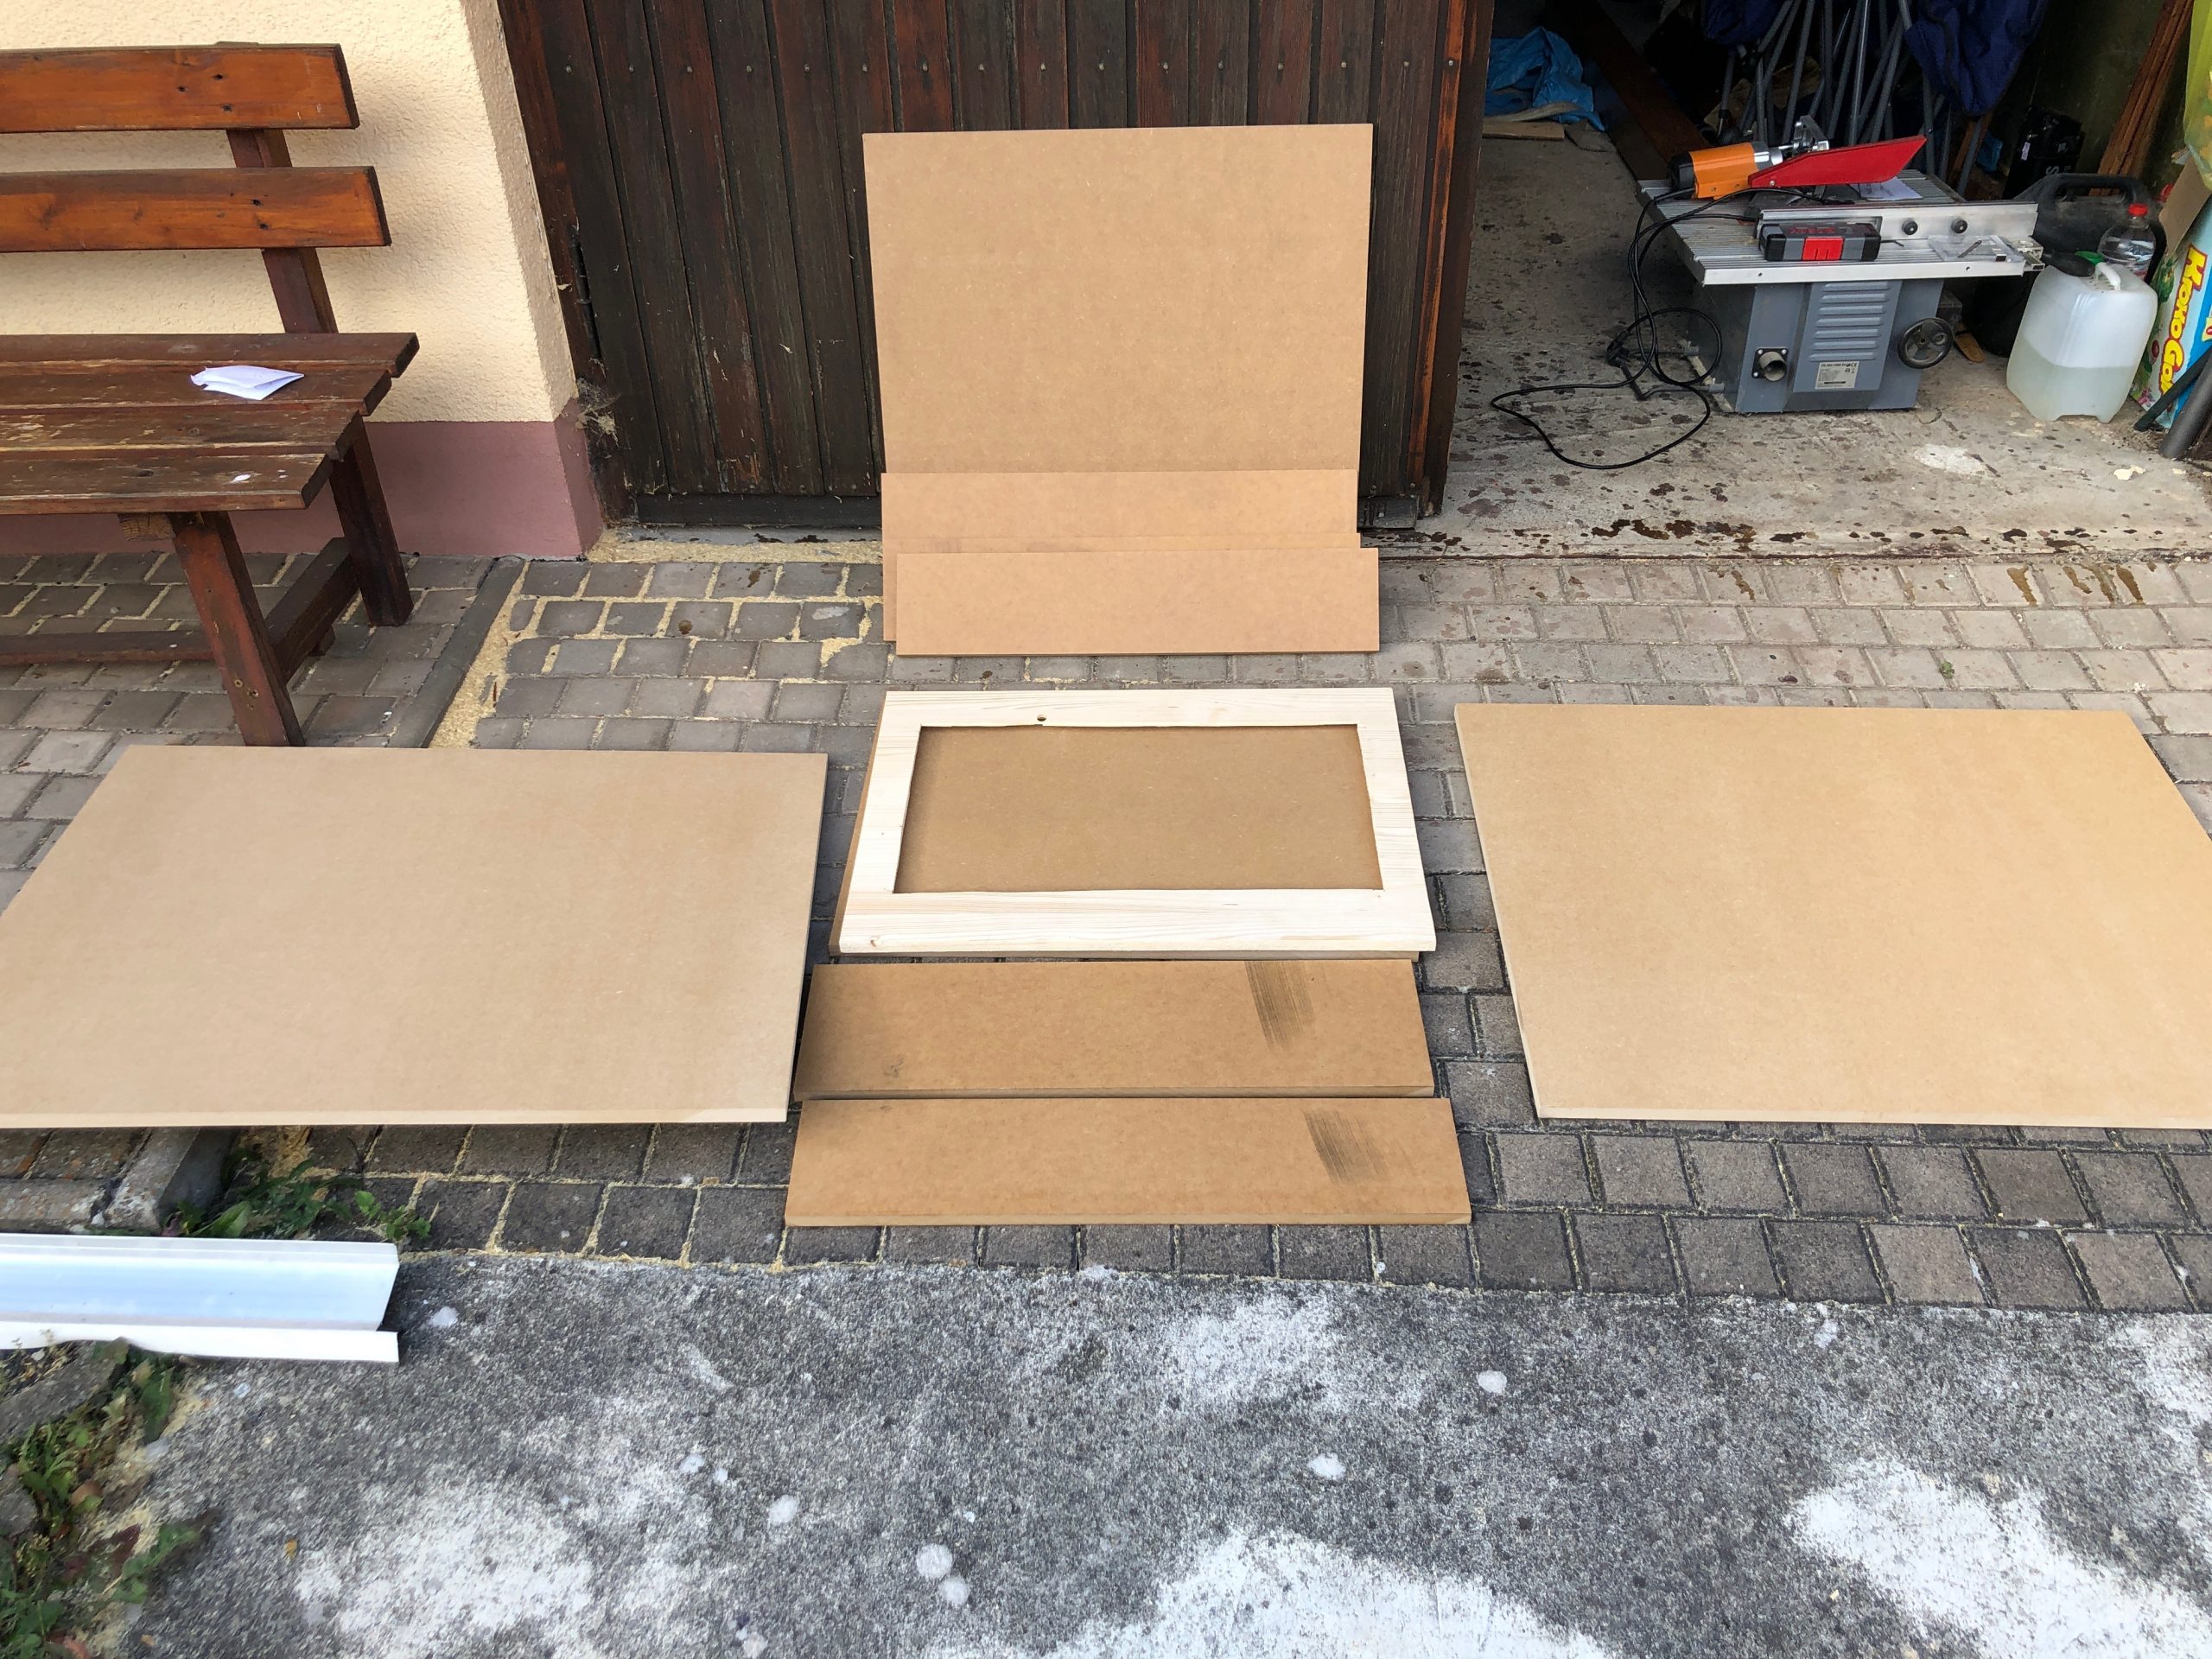
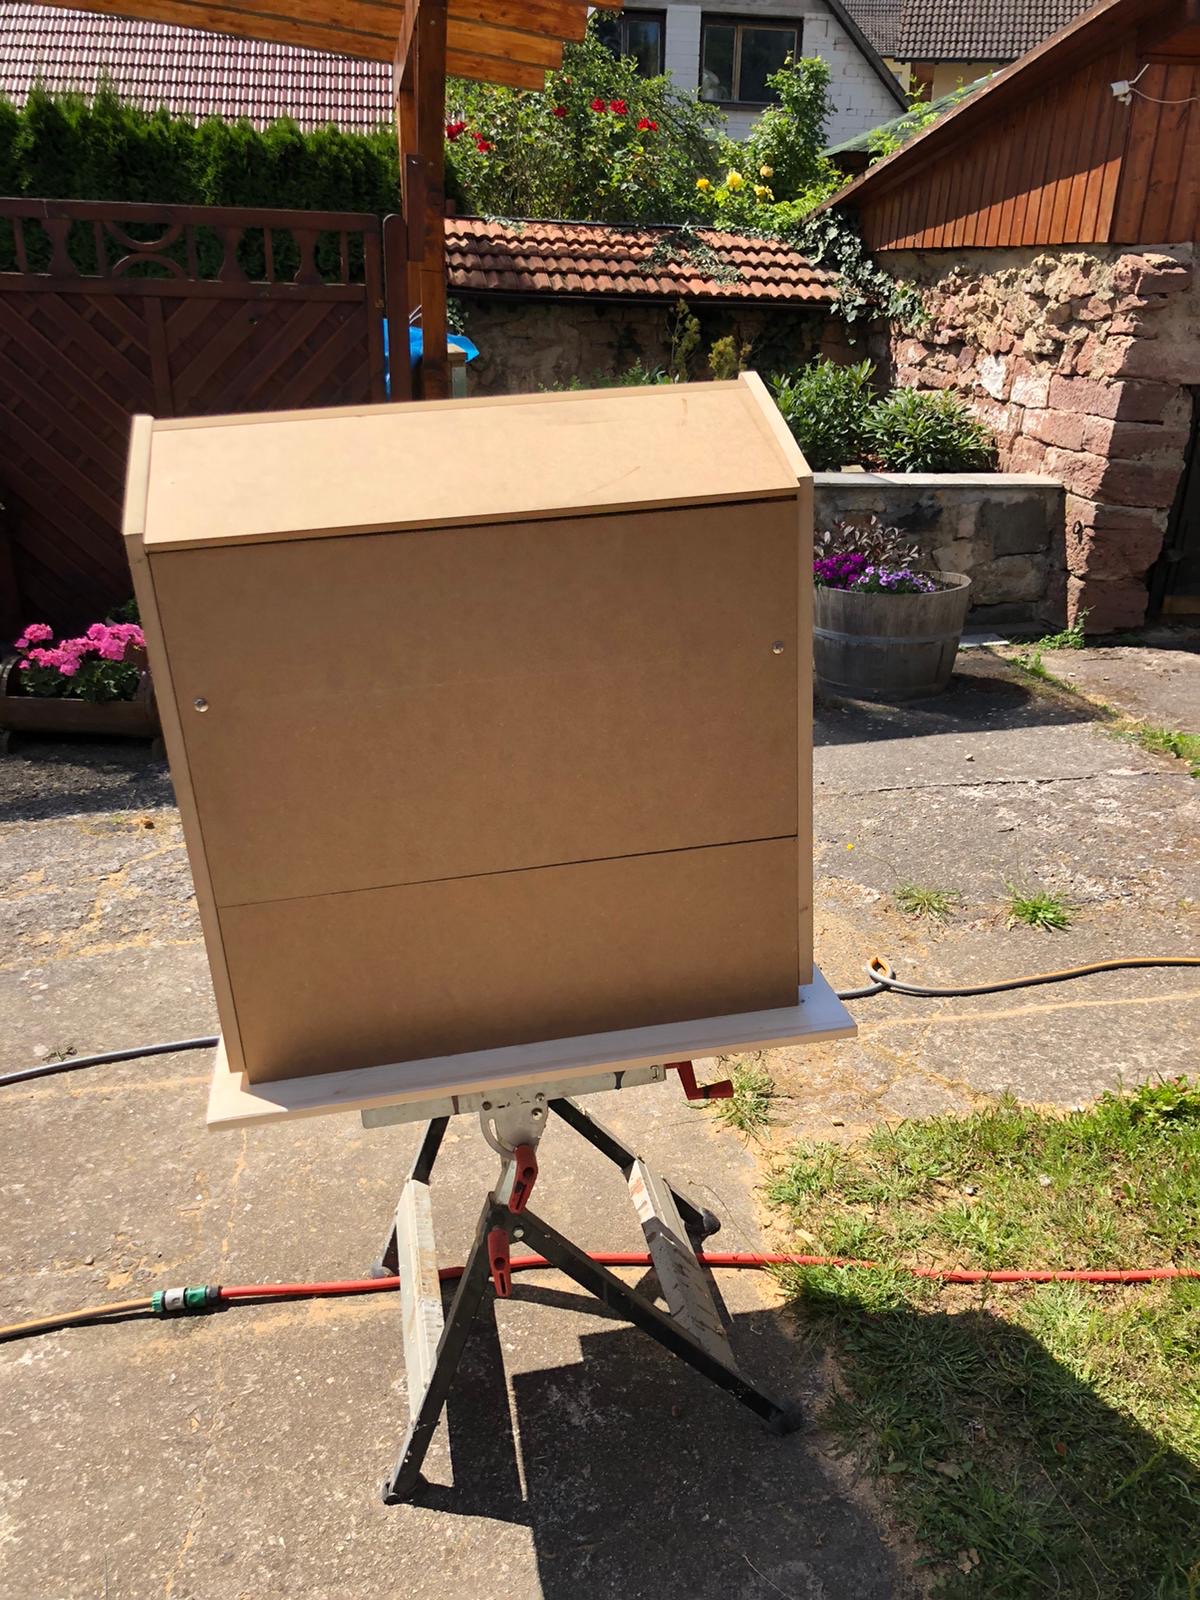
After some testing with plywood we went for MDF as it was proposed by others on the internet as well. This made the cutting so much easier.
woodwork
We went with standard 2cm MDF sheets and my father cut them to size with the measurements derived from the monitor bezel centerpiece.
Big thanks to my father for cutting so much wood so diligently! The next days he sent me pictures of what he’d made:
the plywood bezel was replaced with the MDF version
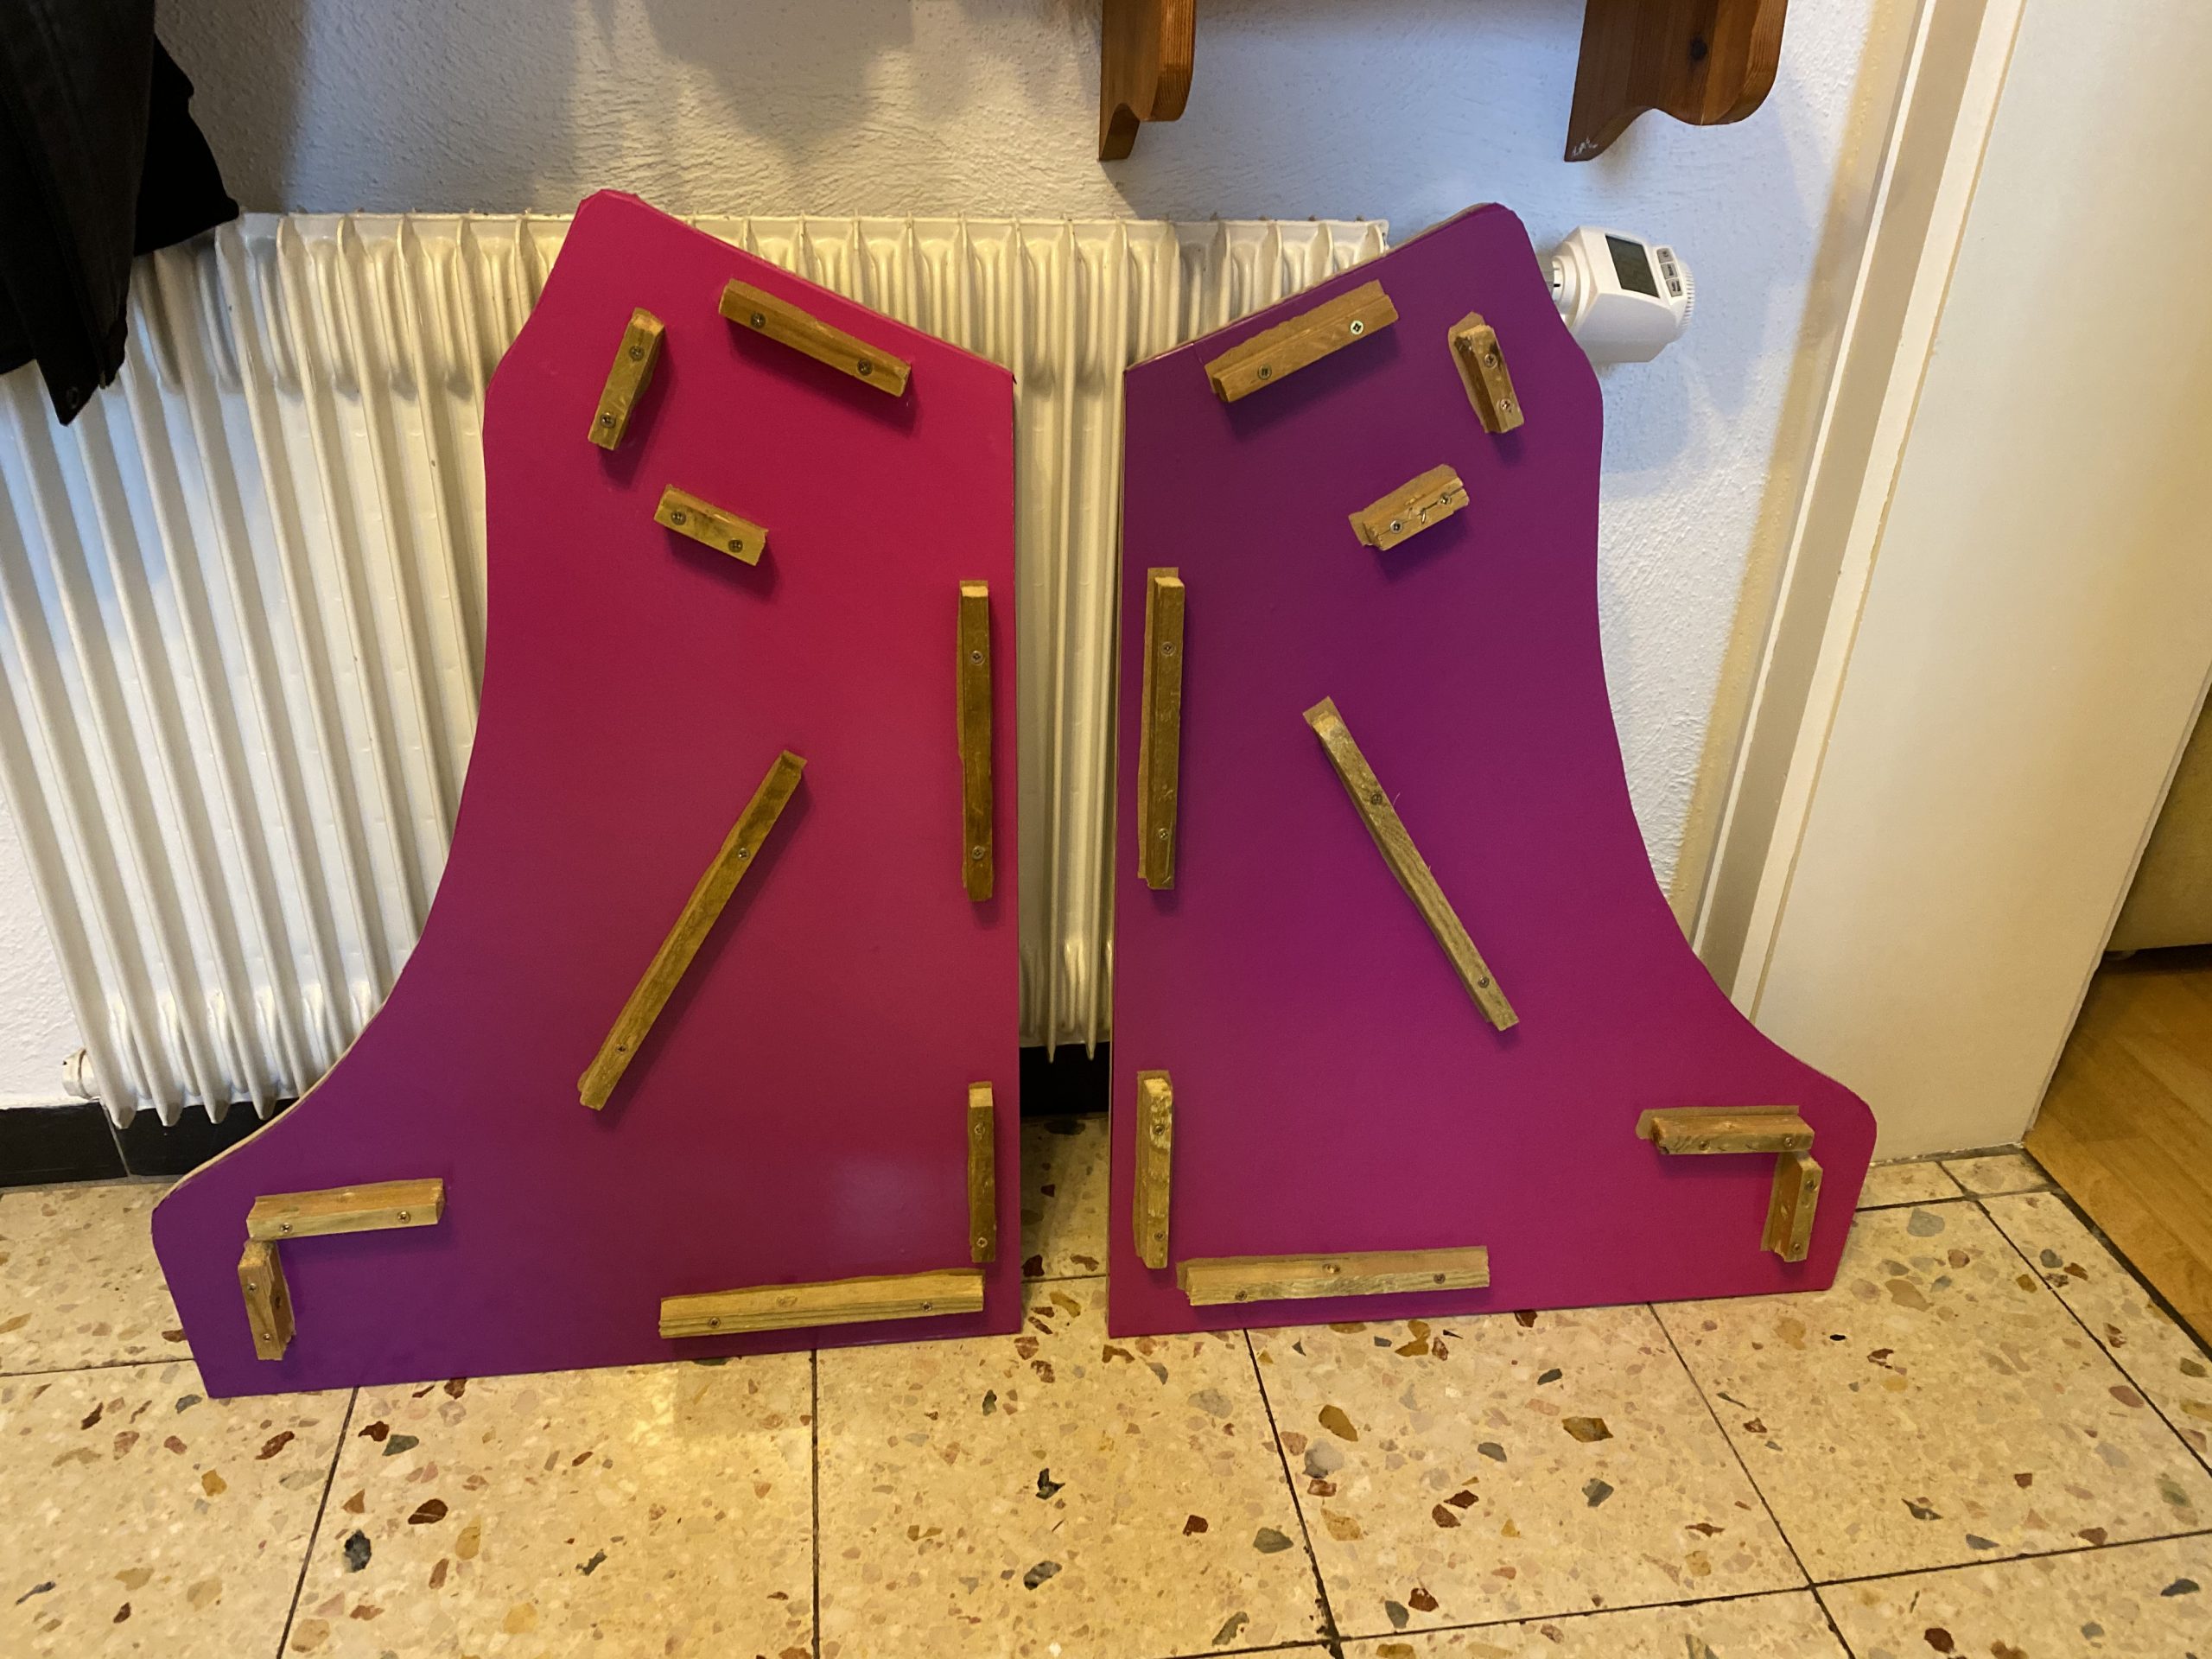
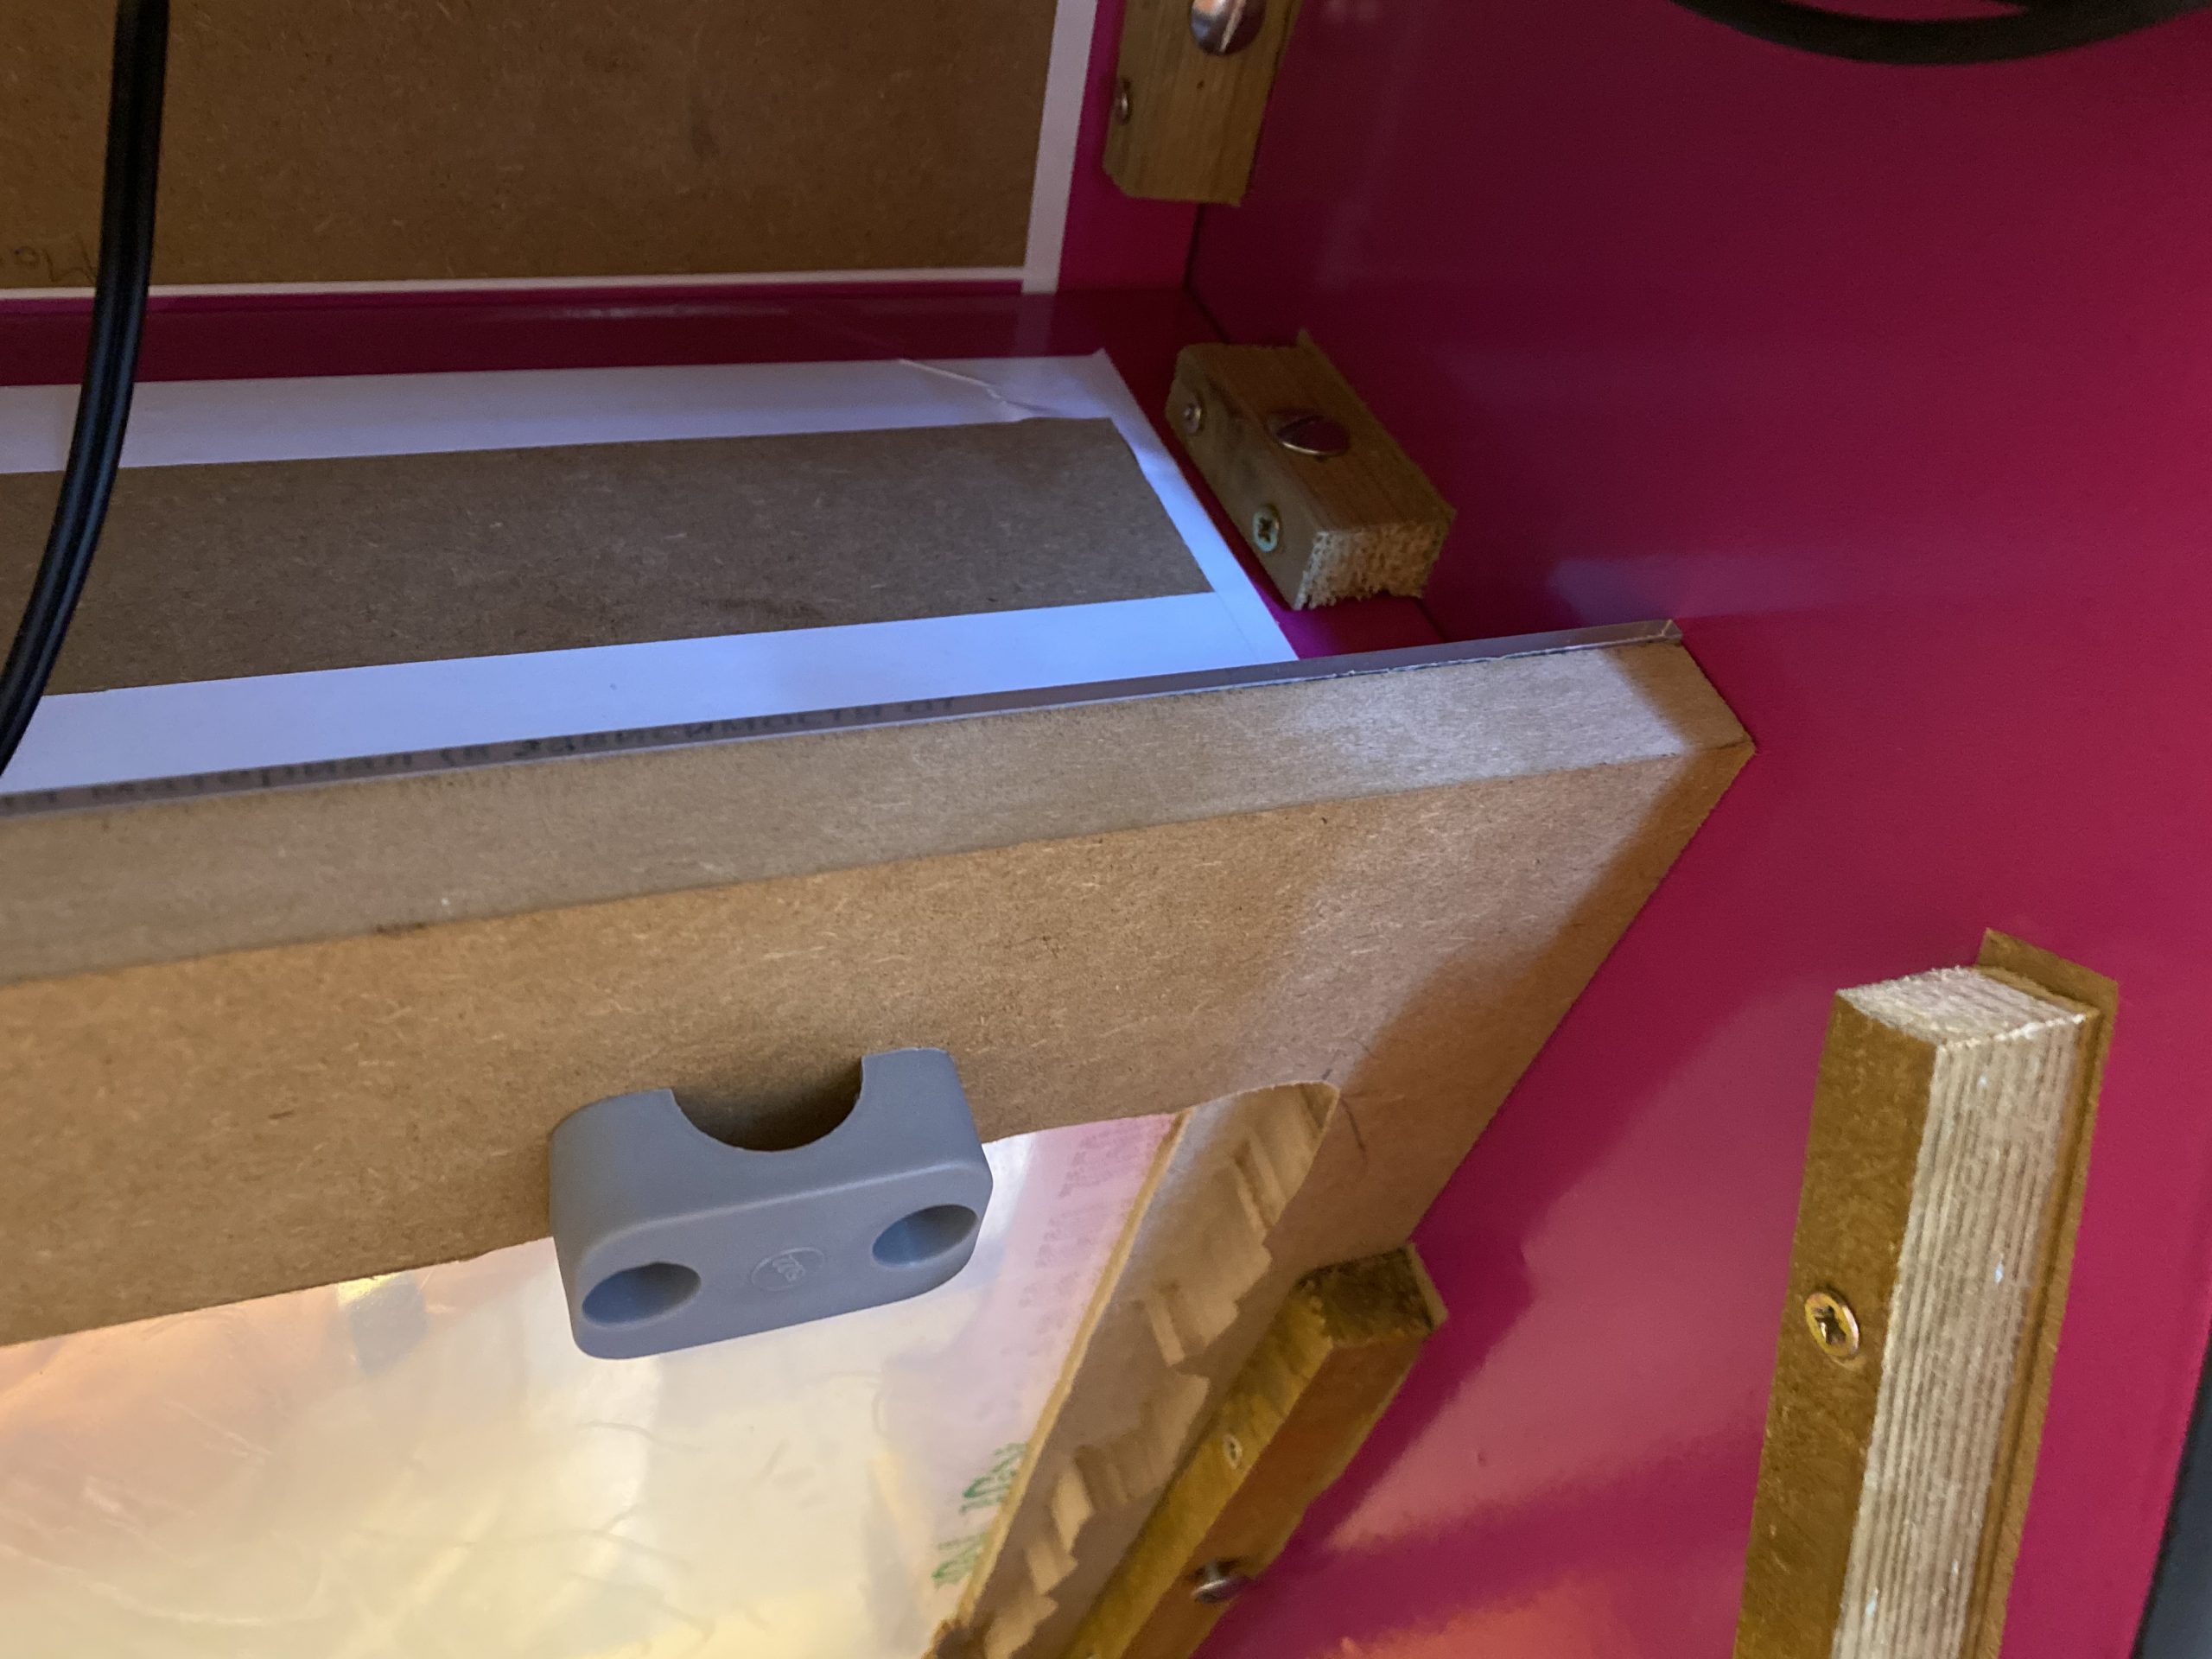
Each sheet of MDF wood got a steel screw thread insert. The screw is going on the inside through another peice of wood which is screwed and glued directly to the insides. This holds everything firm and is invisible from the outsides.
The only screws visible from the outside are holding the back panel on. Because you need to be able to remove the back panel they can be removed. Also the back panel is plit into two parts because that gave more structural strength and helps with the power input mounting later.
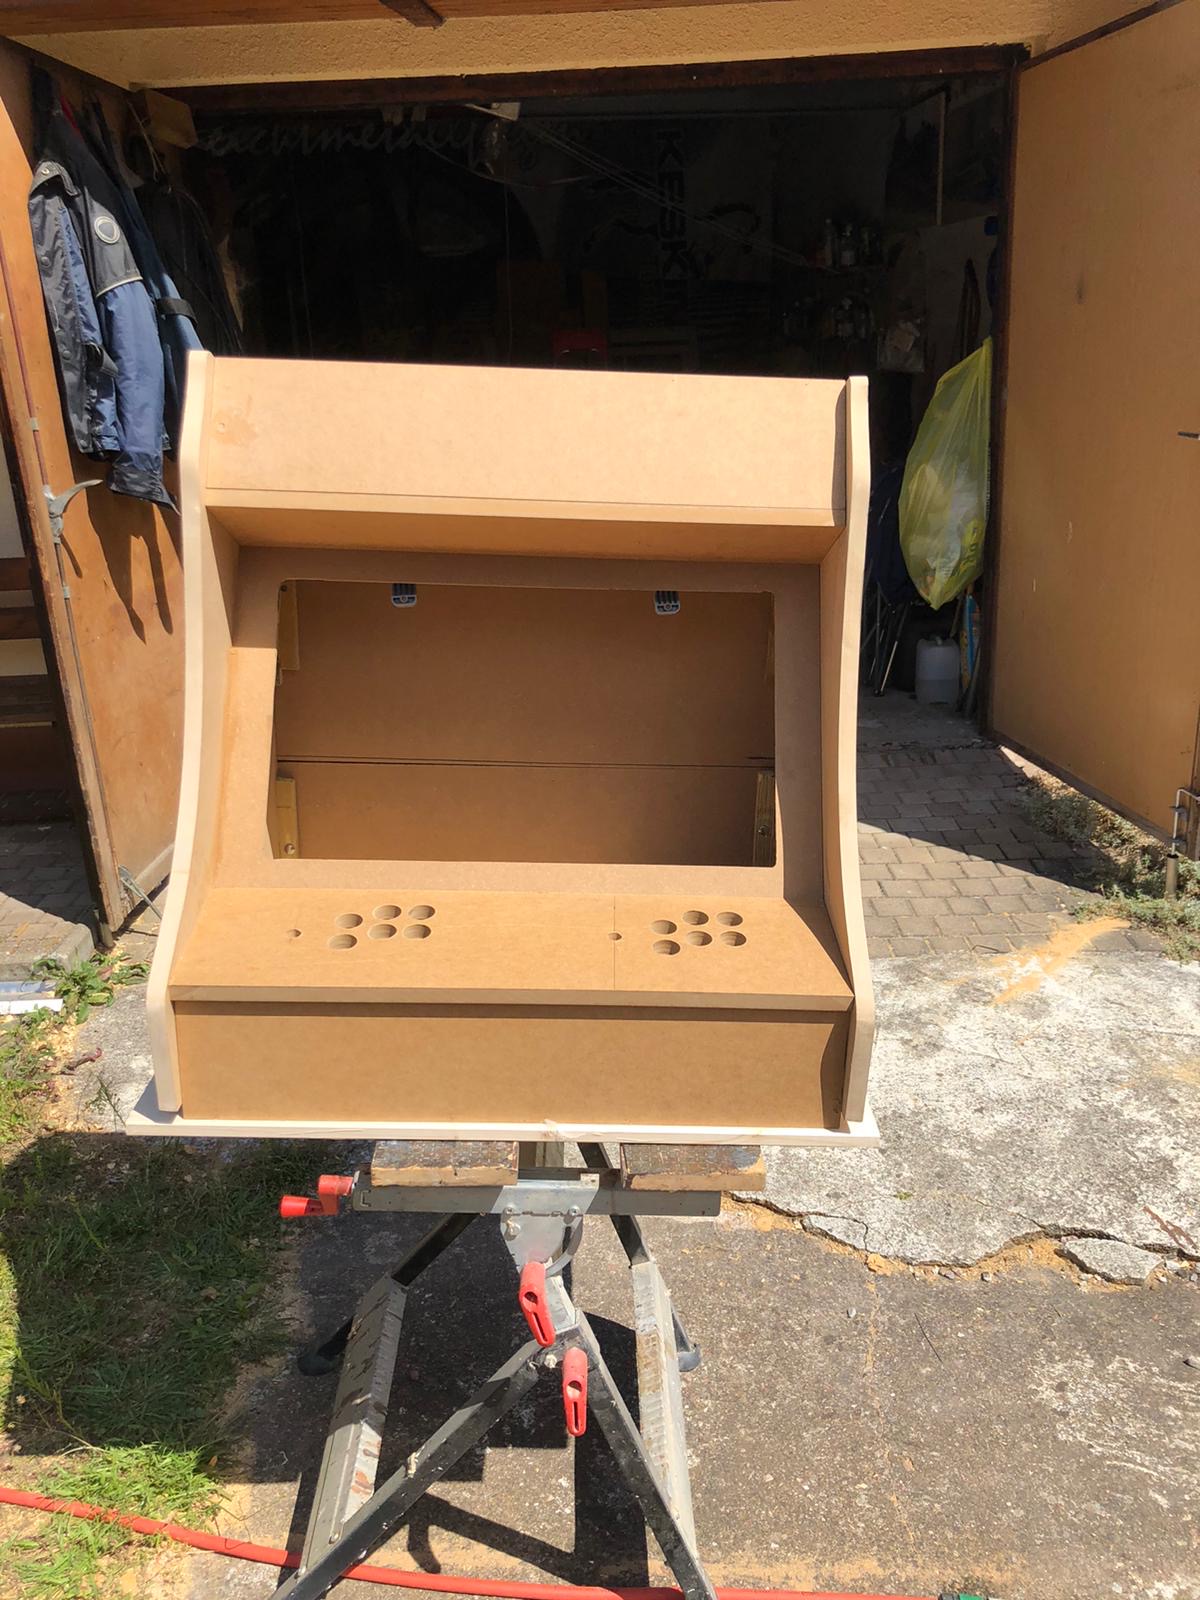
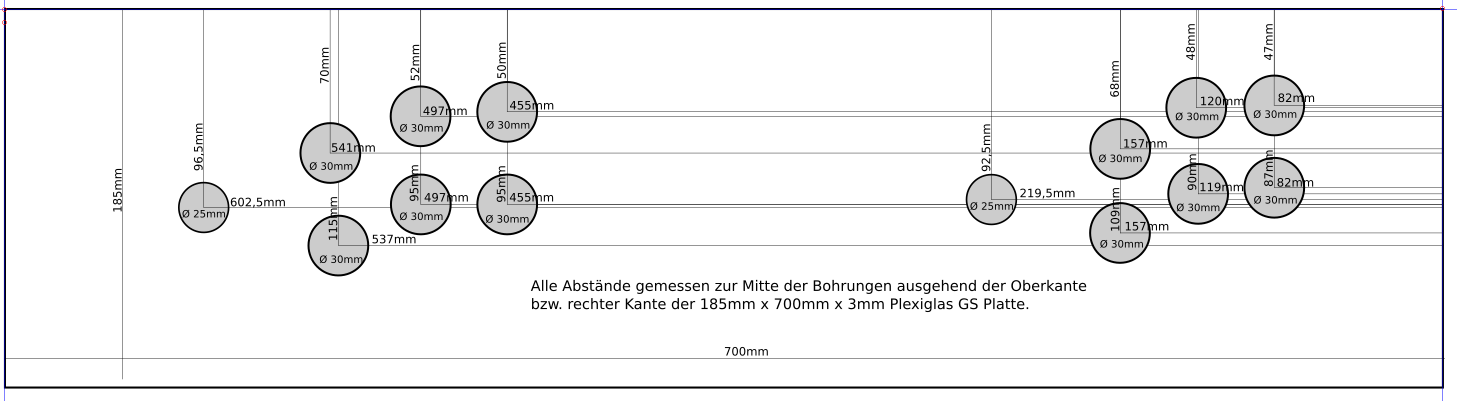
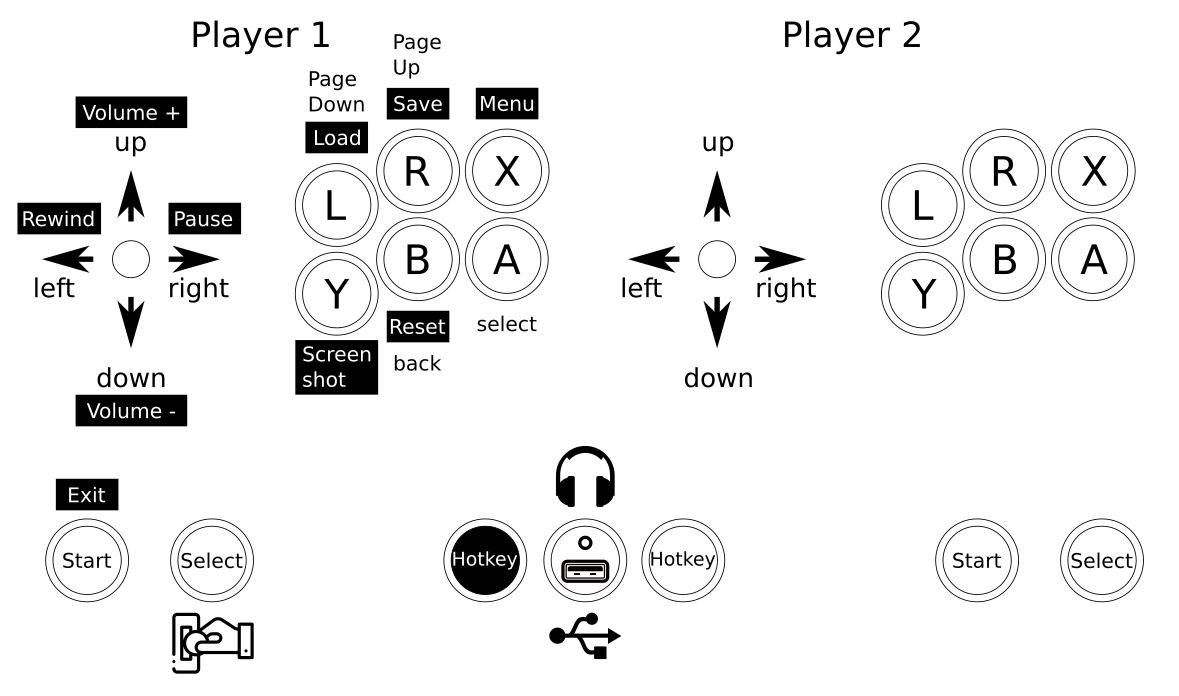
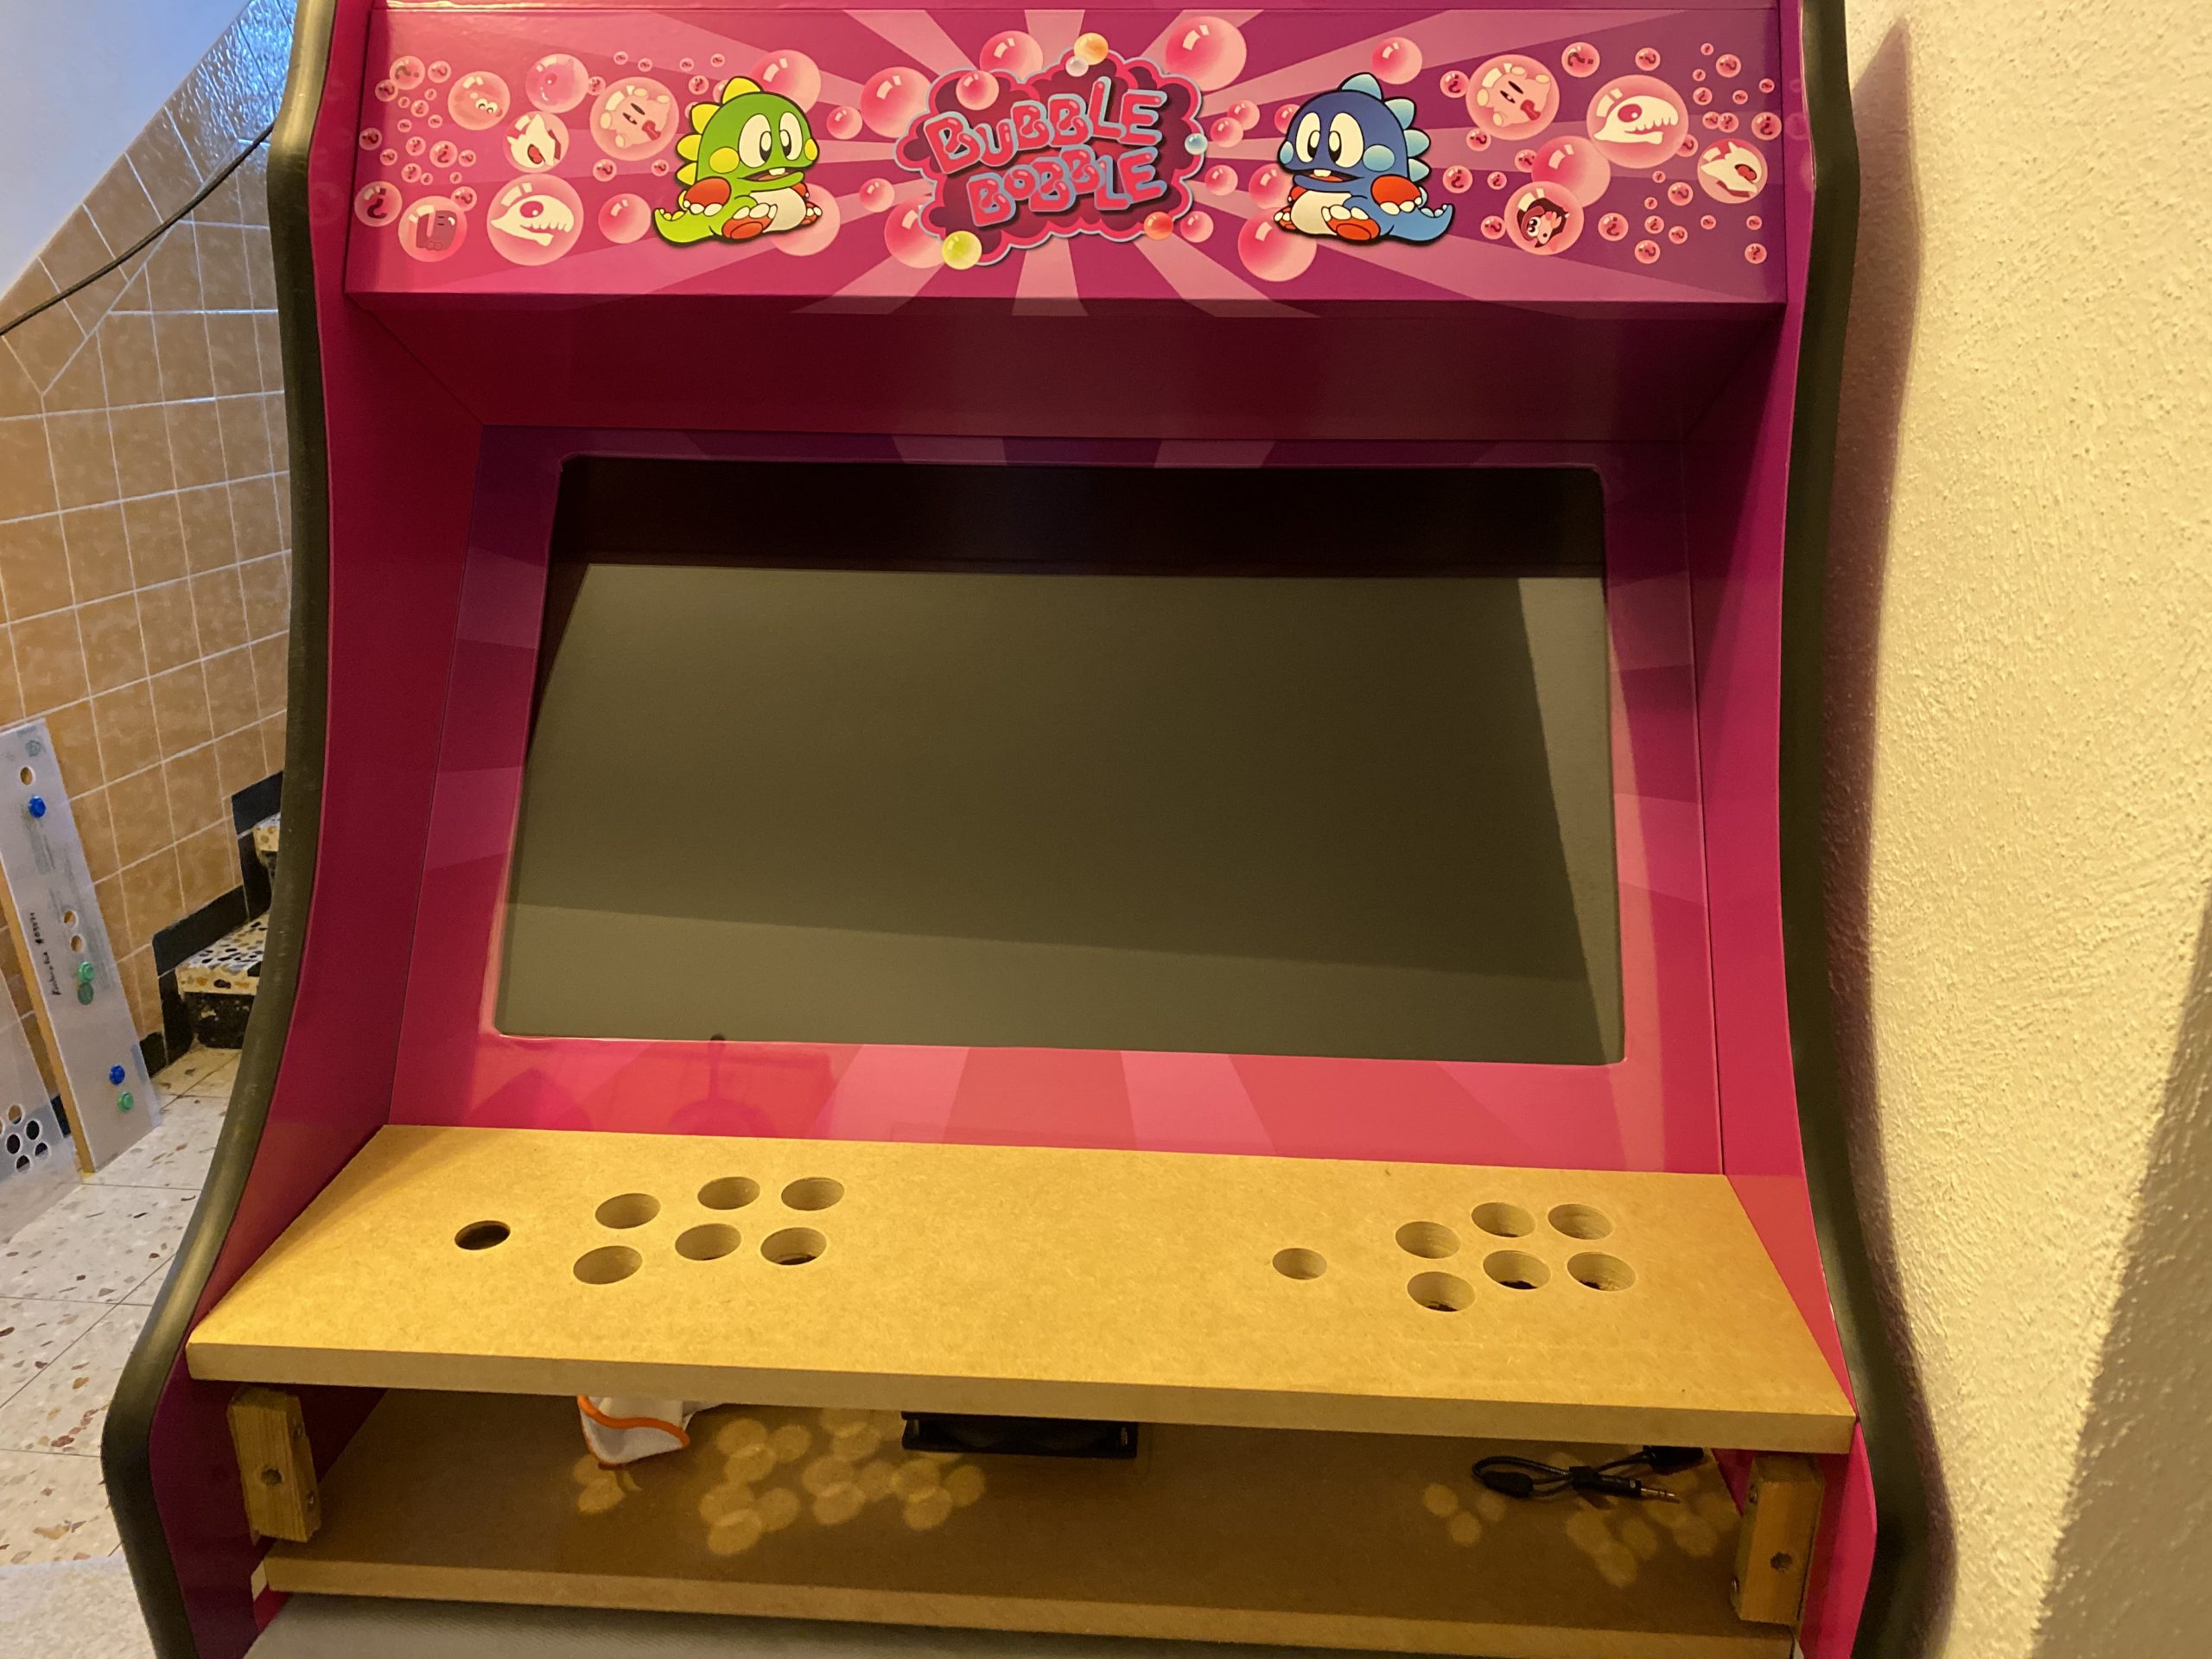
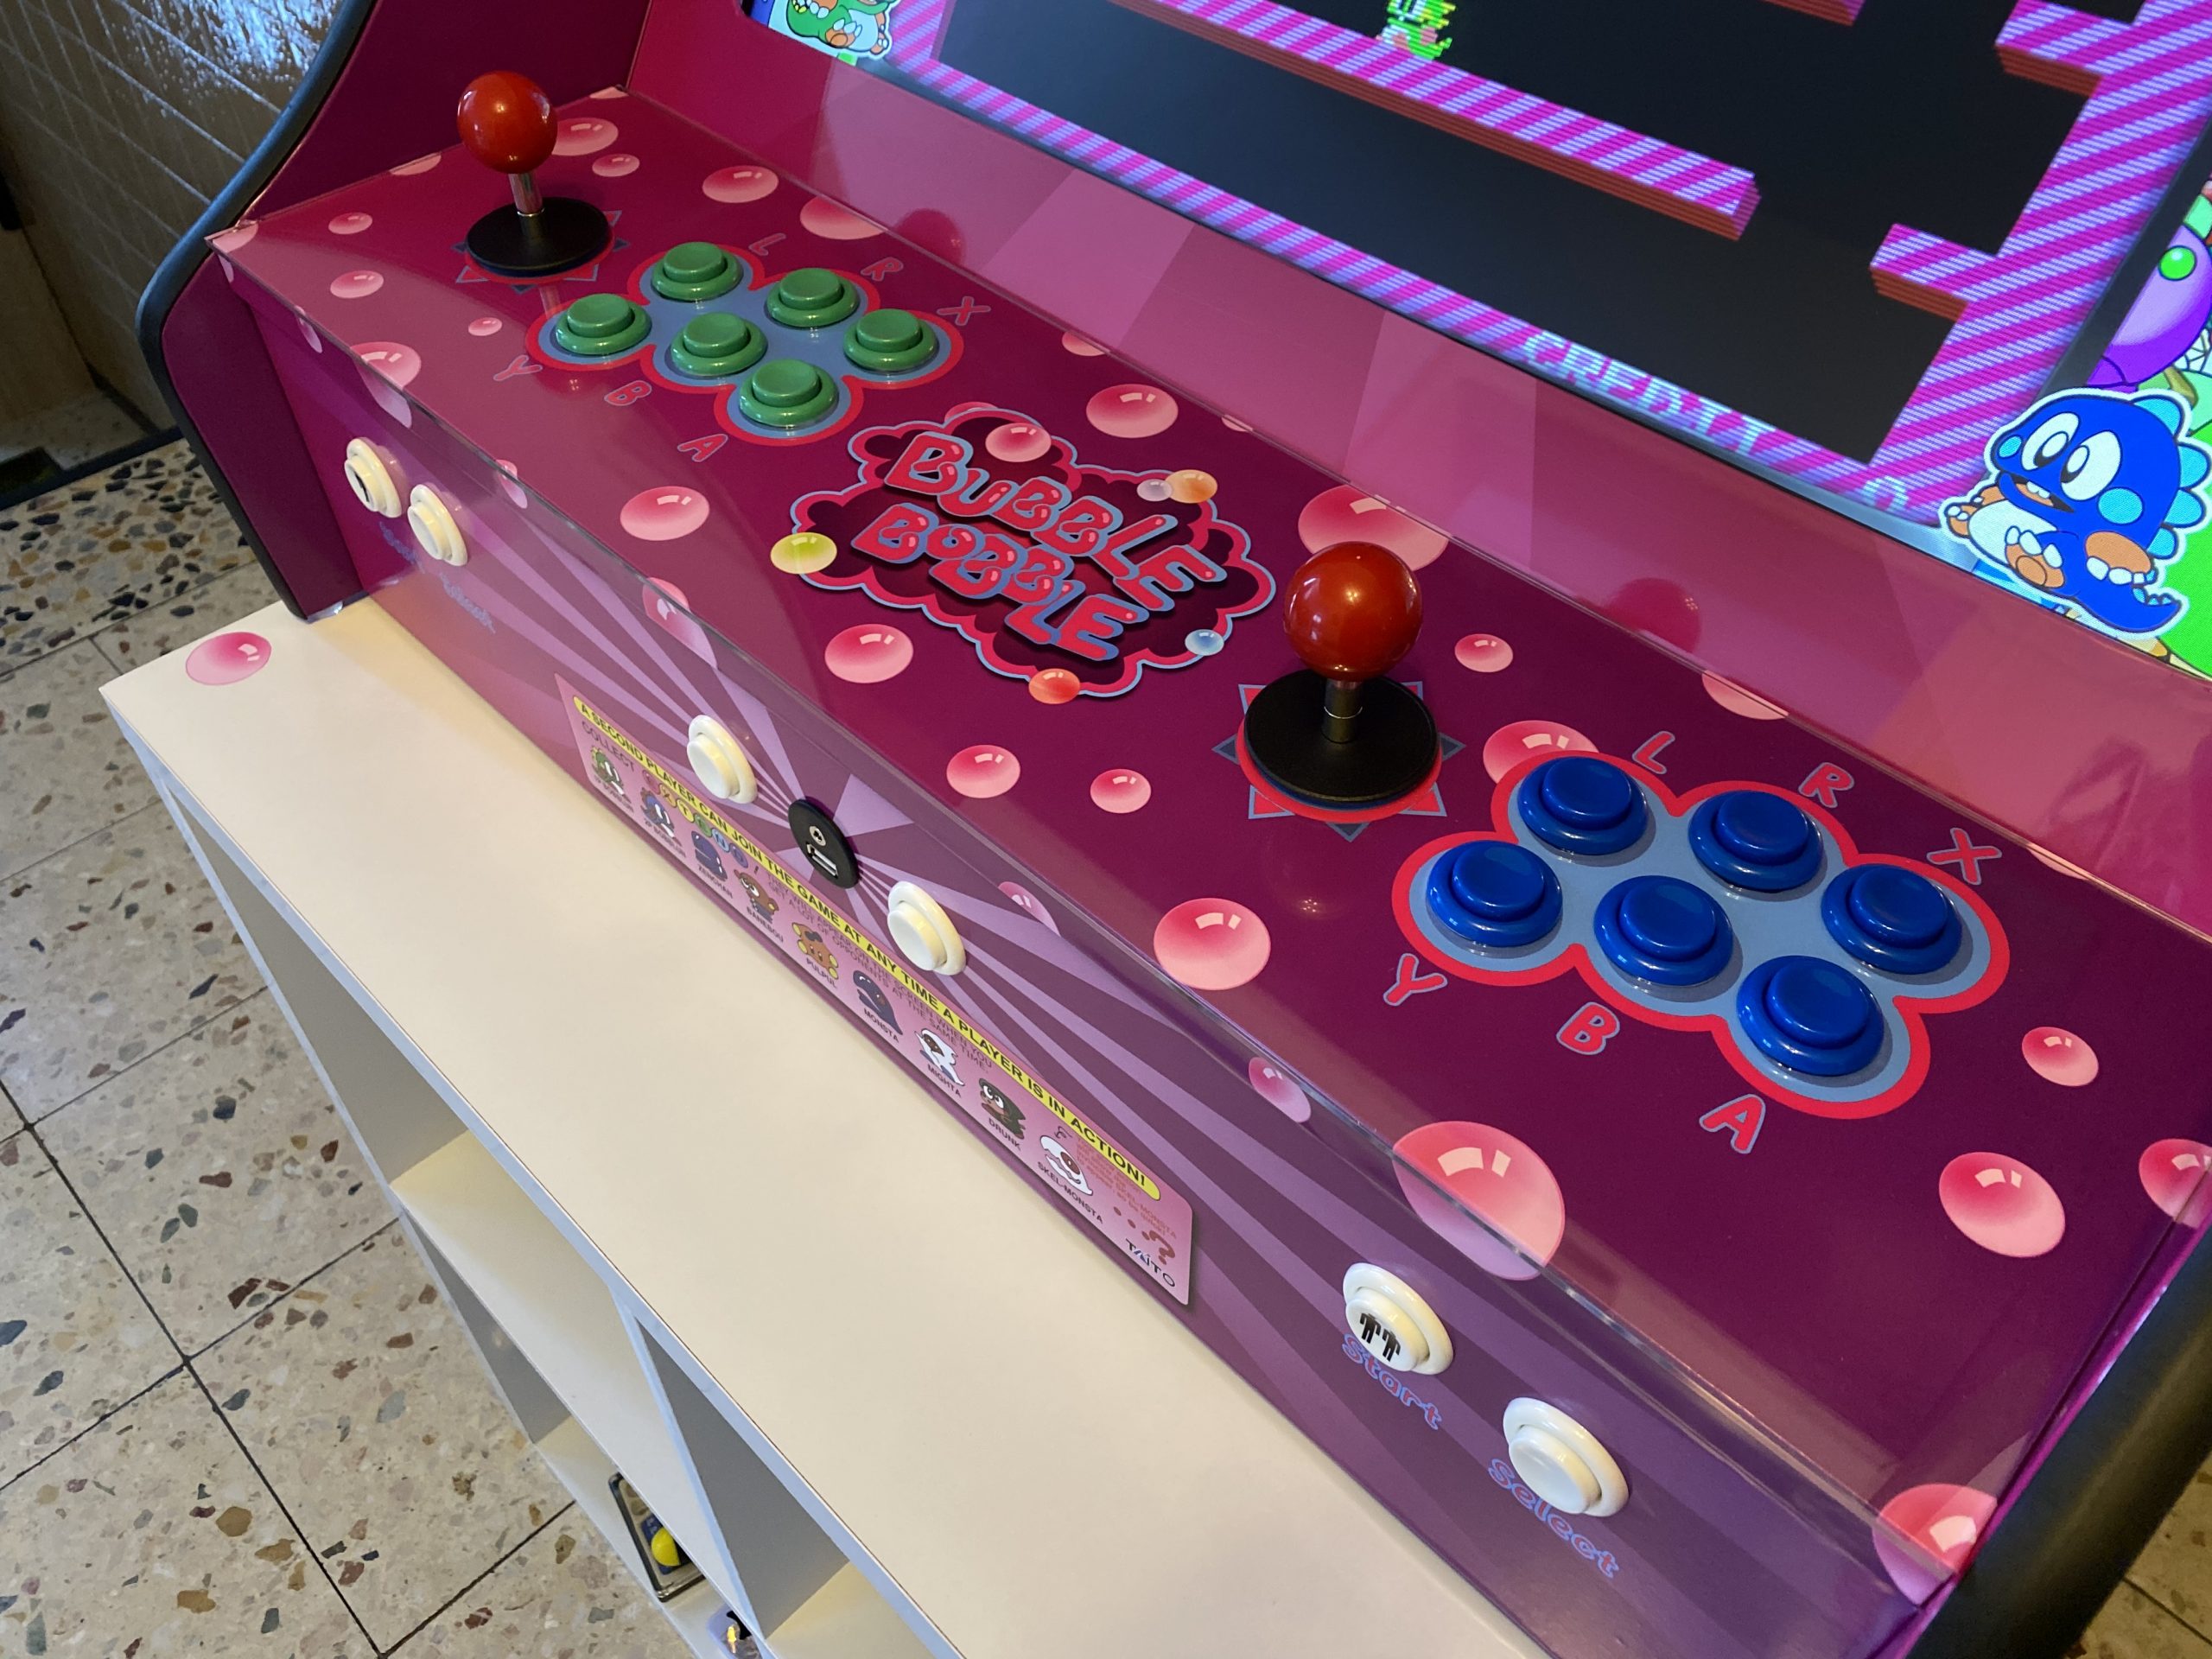
I went for Joystick + 6-Button layout for the control panel. I’ve changed the measurements a bit over the ones I’ve found on the internet to my taste.
The above schematics show the actual measured holes as they were drilled. As everything went more or less “free-hand” it’s quite astonishing to me how accurate it went. This measurement schematic was later used to laser cut the acrylic handrest.
The side panels got a cut around for the black T-Molding to be added later.
electronics and wiring
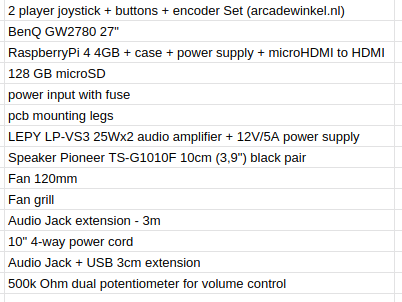
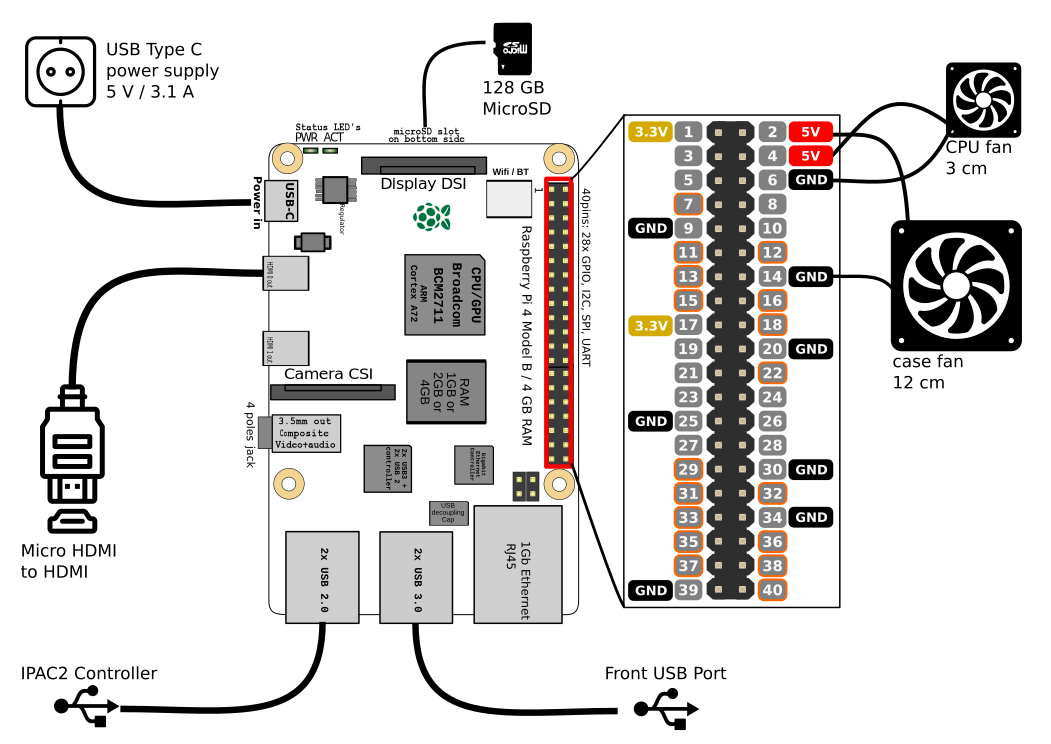
After about 2 weeks my father had built the first arcade out of sheets of MDF and I had taken delivery of the remaining pieces of hardware I had ordered after making a long list.
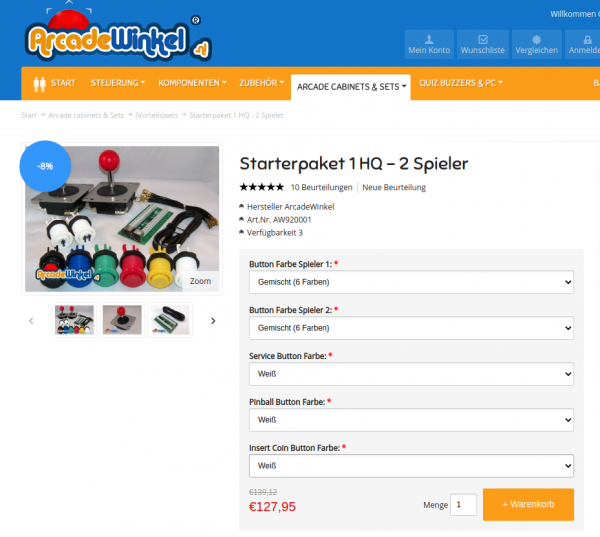
It contains 2 standard 4/8-way switchable arcade joysticks, 10 buttons, all microswitches required and the Ultimarc I-PAC-2 joystick encoder.
You connect every microswitch to this board and it will translate all button presses/joystick movements into keyboard or joystick movements. You connect it through USB to the RaspberryPi and it either shows up as 2 gamepads or one keyboard. Also a nice configuration app is available from the manufacturer.
So when I got the first arcade from my father I started to put in the electonics immediately.
The wiring to the I-PAC was straight forward. Worked at the first try.
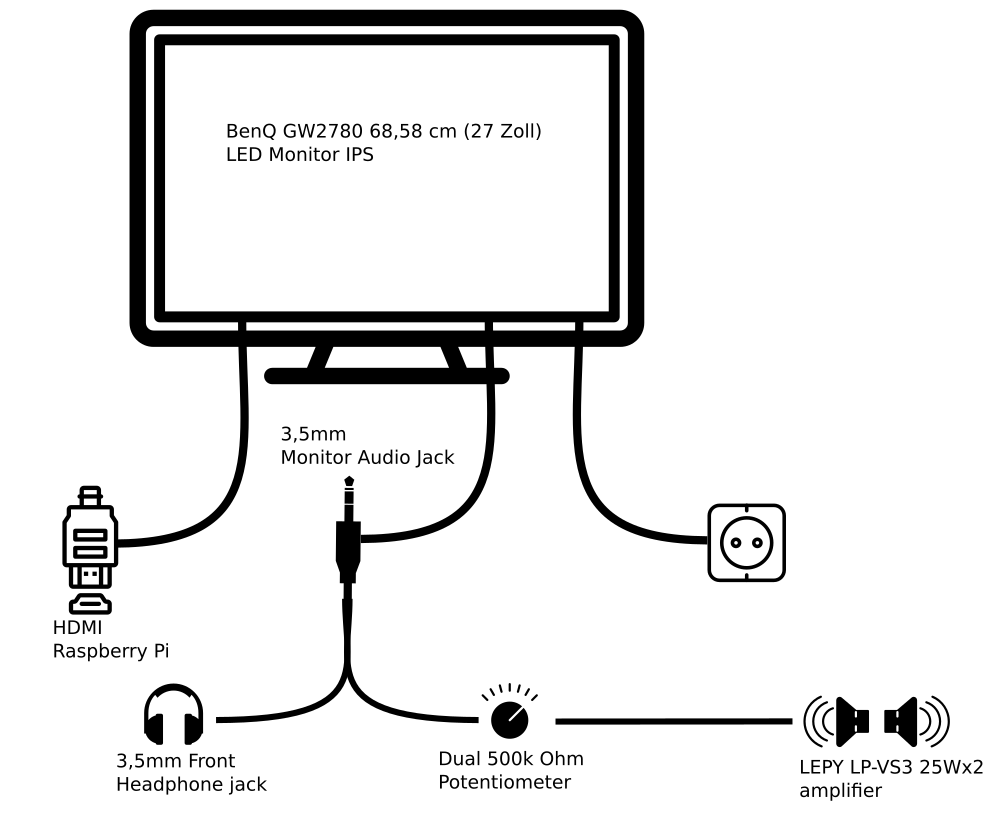
The sound was a bit more complicated. I wanted a volume control knob on the outside but also did not want to disassemble any audio amplifier.
I went with the simplest solution: A 500k Ohm dual potentiometer soldered into the headphone extension cable going to the amplifier. The potentiometer then got put into a pot and a whole made it stick out so that a knob could be attached.
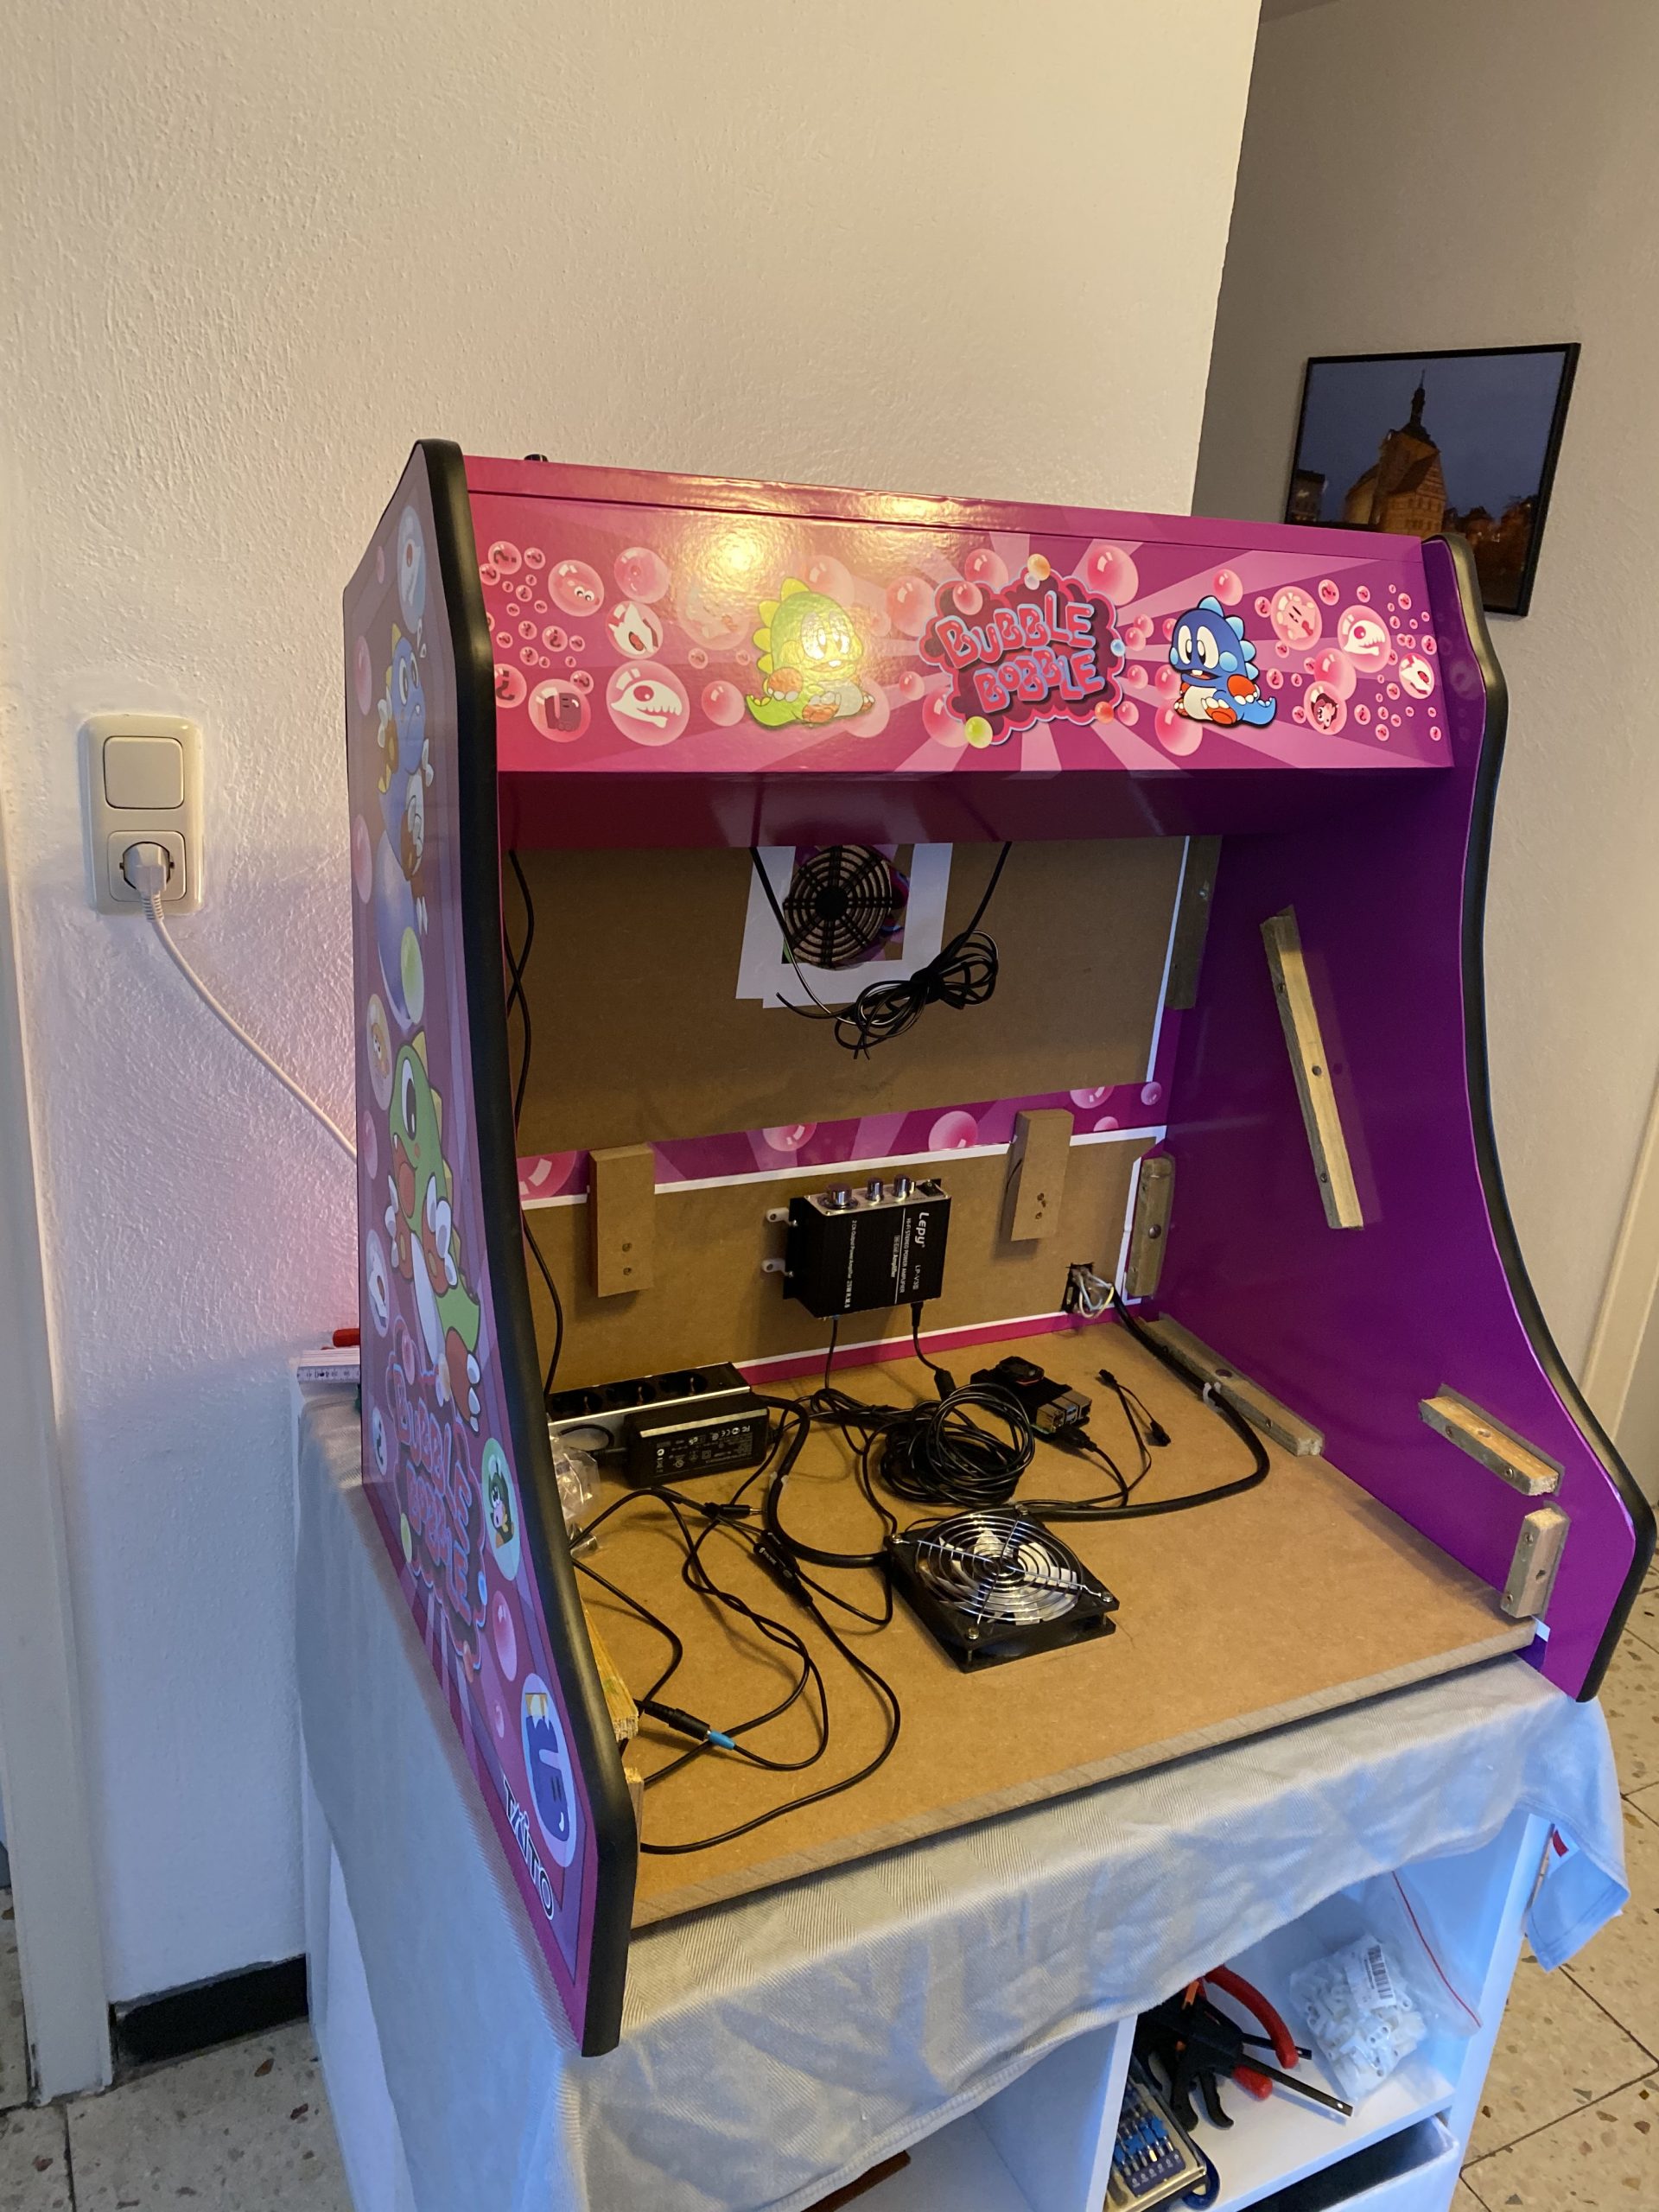
The RaspberryPi set-up then only lacked cooling. The plan was to put a 120mm case fan to pull in air from the bottom and went it out another 120mm case hole at the upper back. Additionally the RaspberryPi would get it’s own small 30mm fan on top of it’s heatsink case.
I attached both fans directly to the RaspberryPi – so I saved myself another power supply.
software
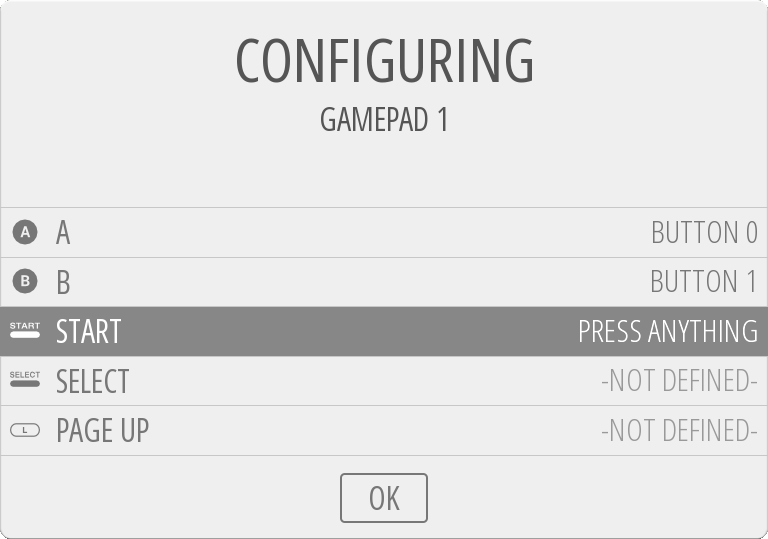
Now I had to make it all work together. As I wanted to use RetroPie in the newest 4.6 release I’ve set that up and hooked it all up.
On first start-up EmulationStation asked me to configure the inputs. It had detected 2 gamepads as I had put the IPAC-2 into gamepad mode before. You can do this with a simple mode-switch key-combination that you need to hold for 10 seconds to make it switch.
The configuration of the buttons of the two players went without any issue. First I had set-up the player 1 input. Then I re-ran the input configuration again for player 2 inputs.
The controls where straight forward. I wanted mainly 4-way games but with enough buttons to switch to some beat-em-ups at will.
So I configured a simple layout into Retroarch with some additional hotkeys added:
vinyl design
I tossed around several design ideas I had. Obviously derived from those games I wanted to play and looked forward to.
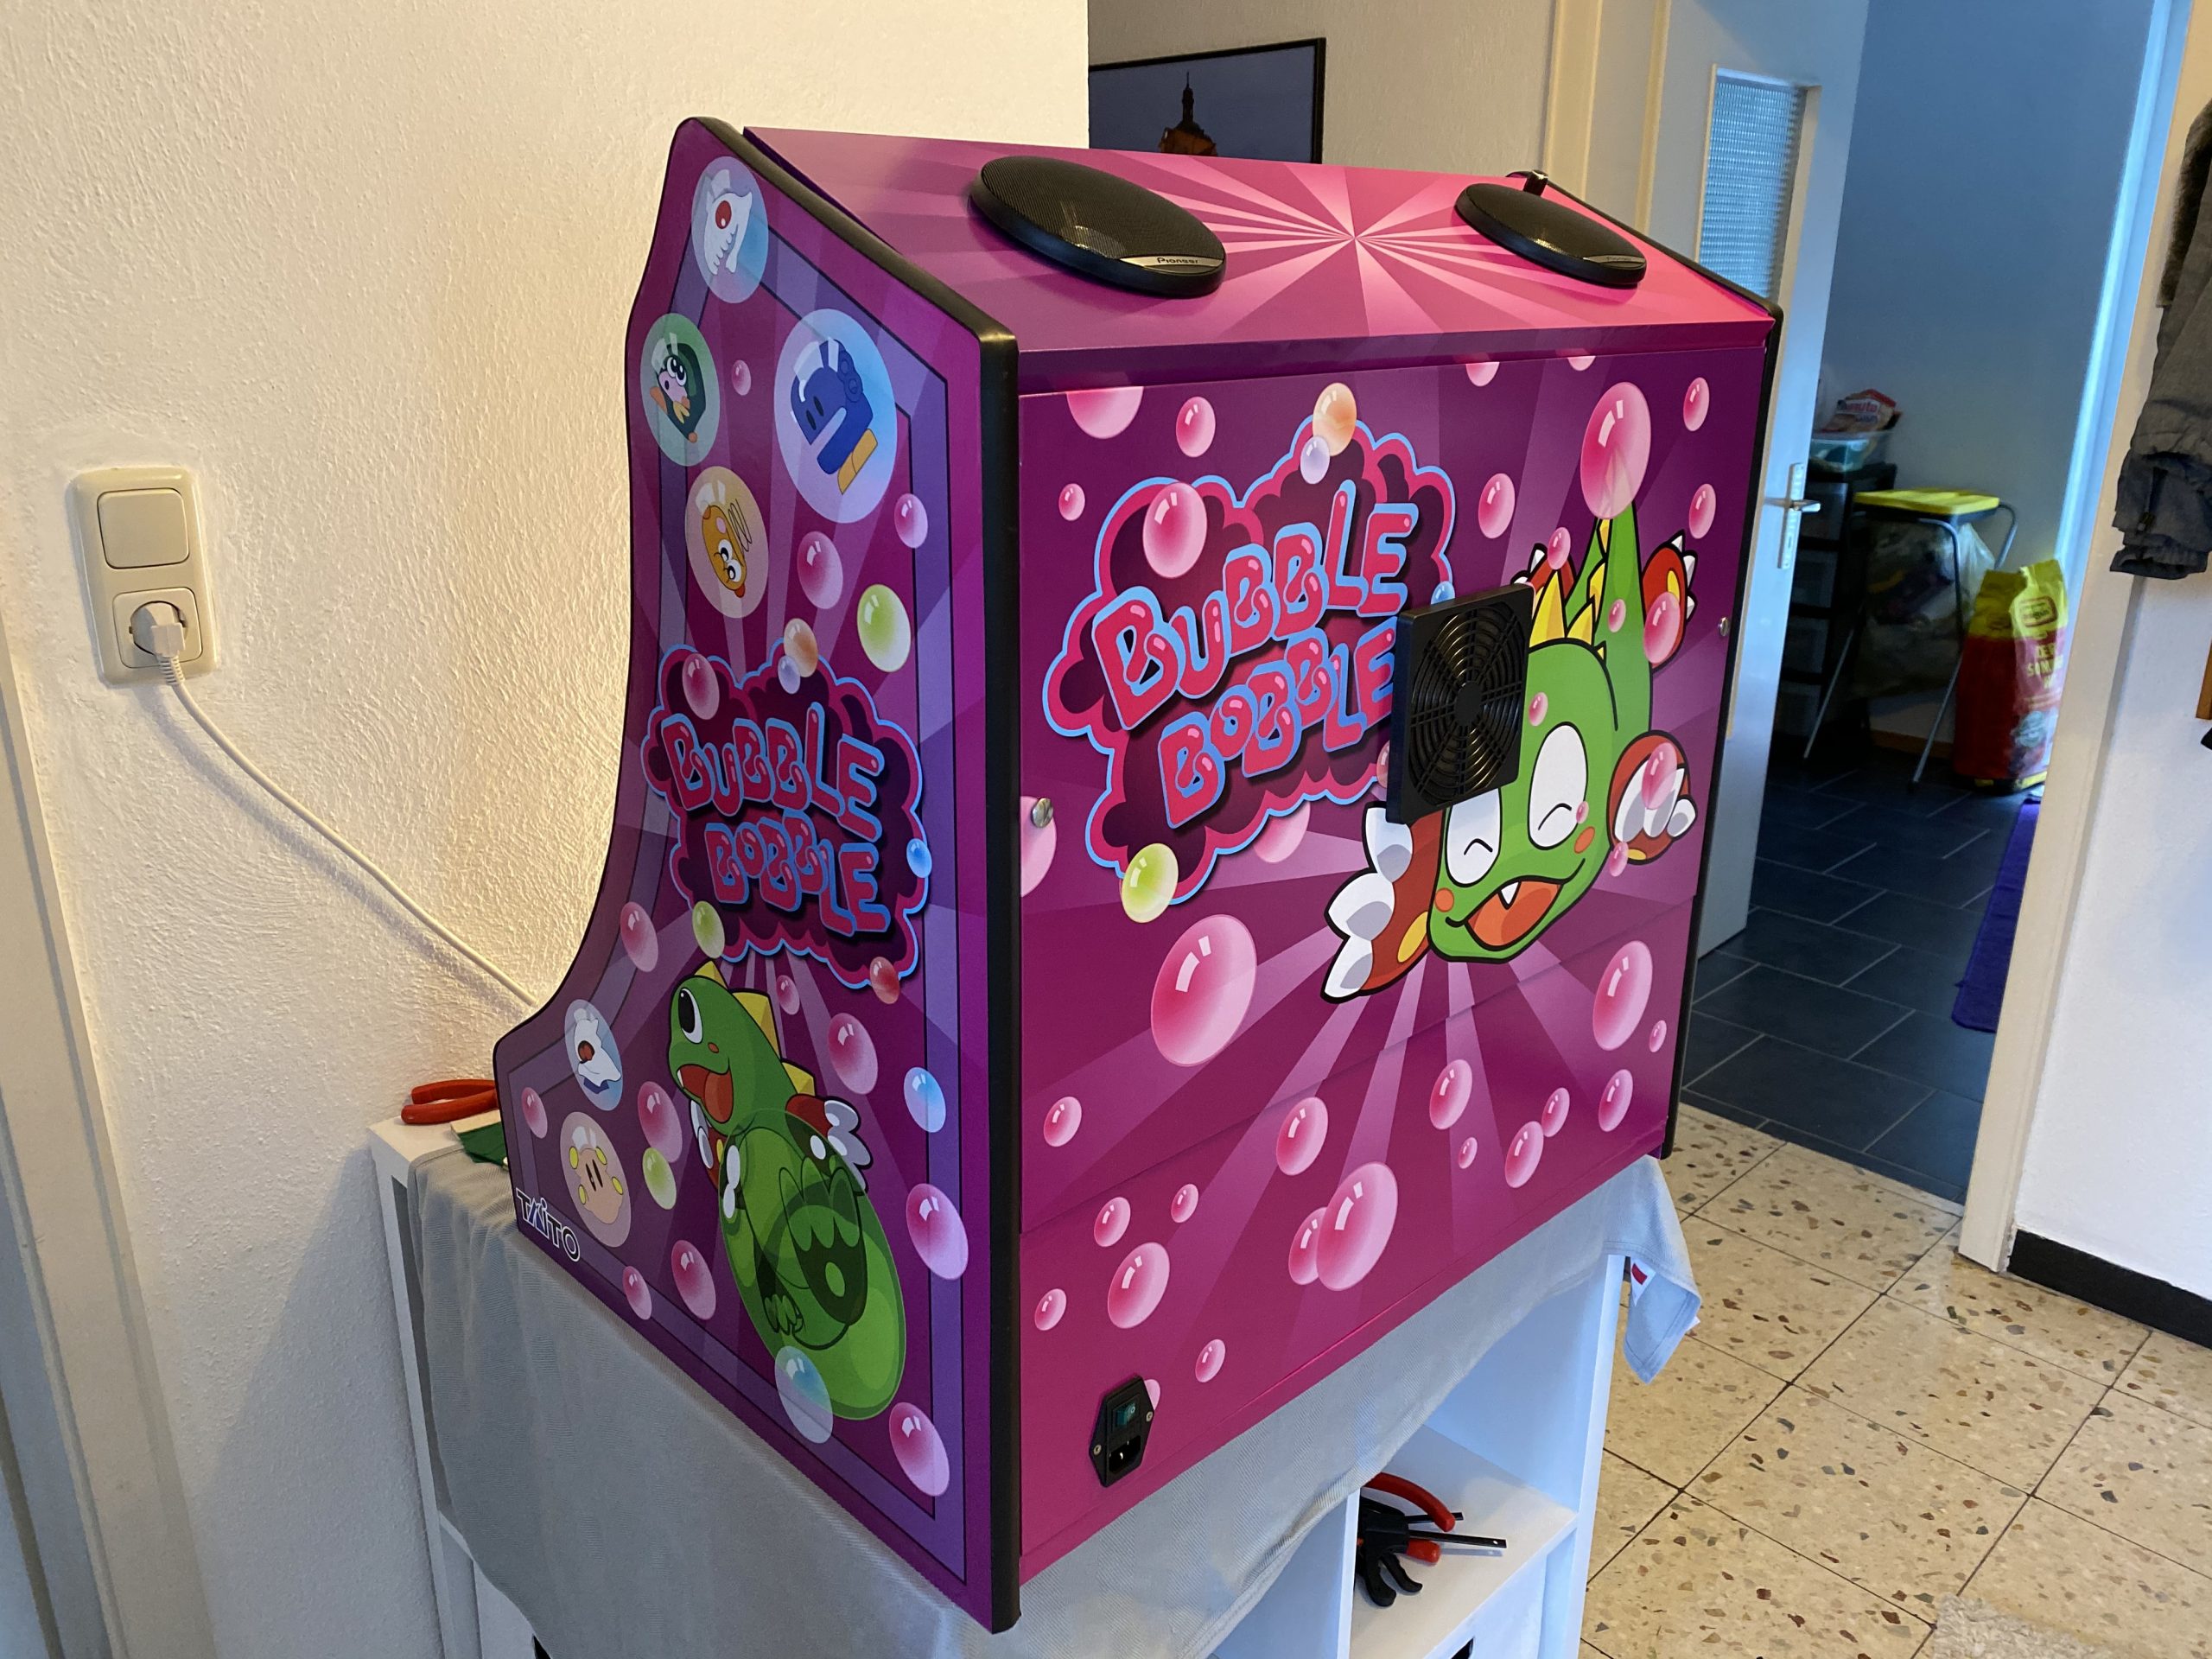
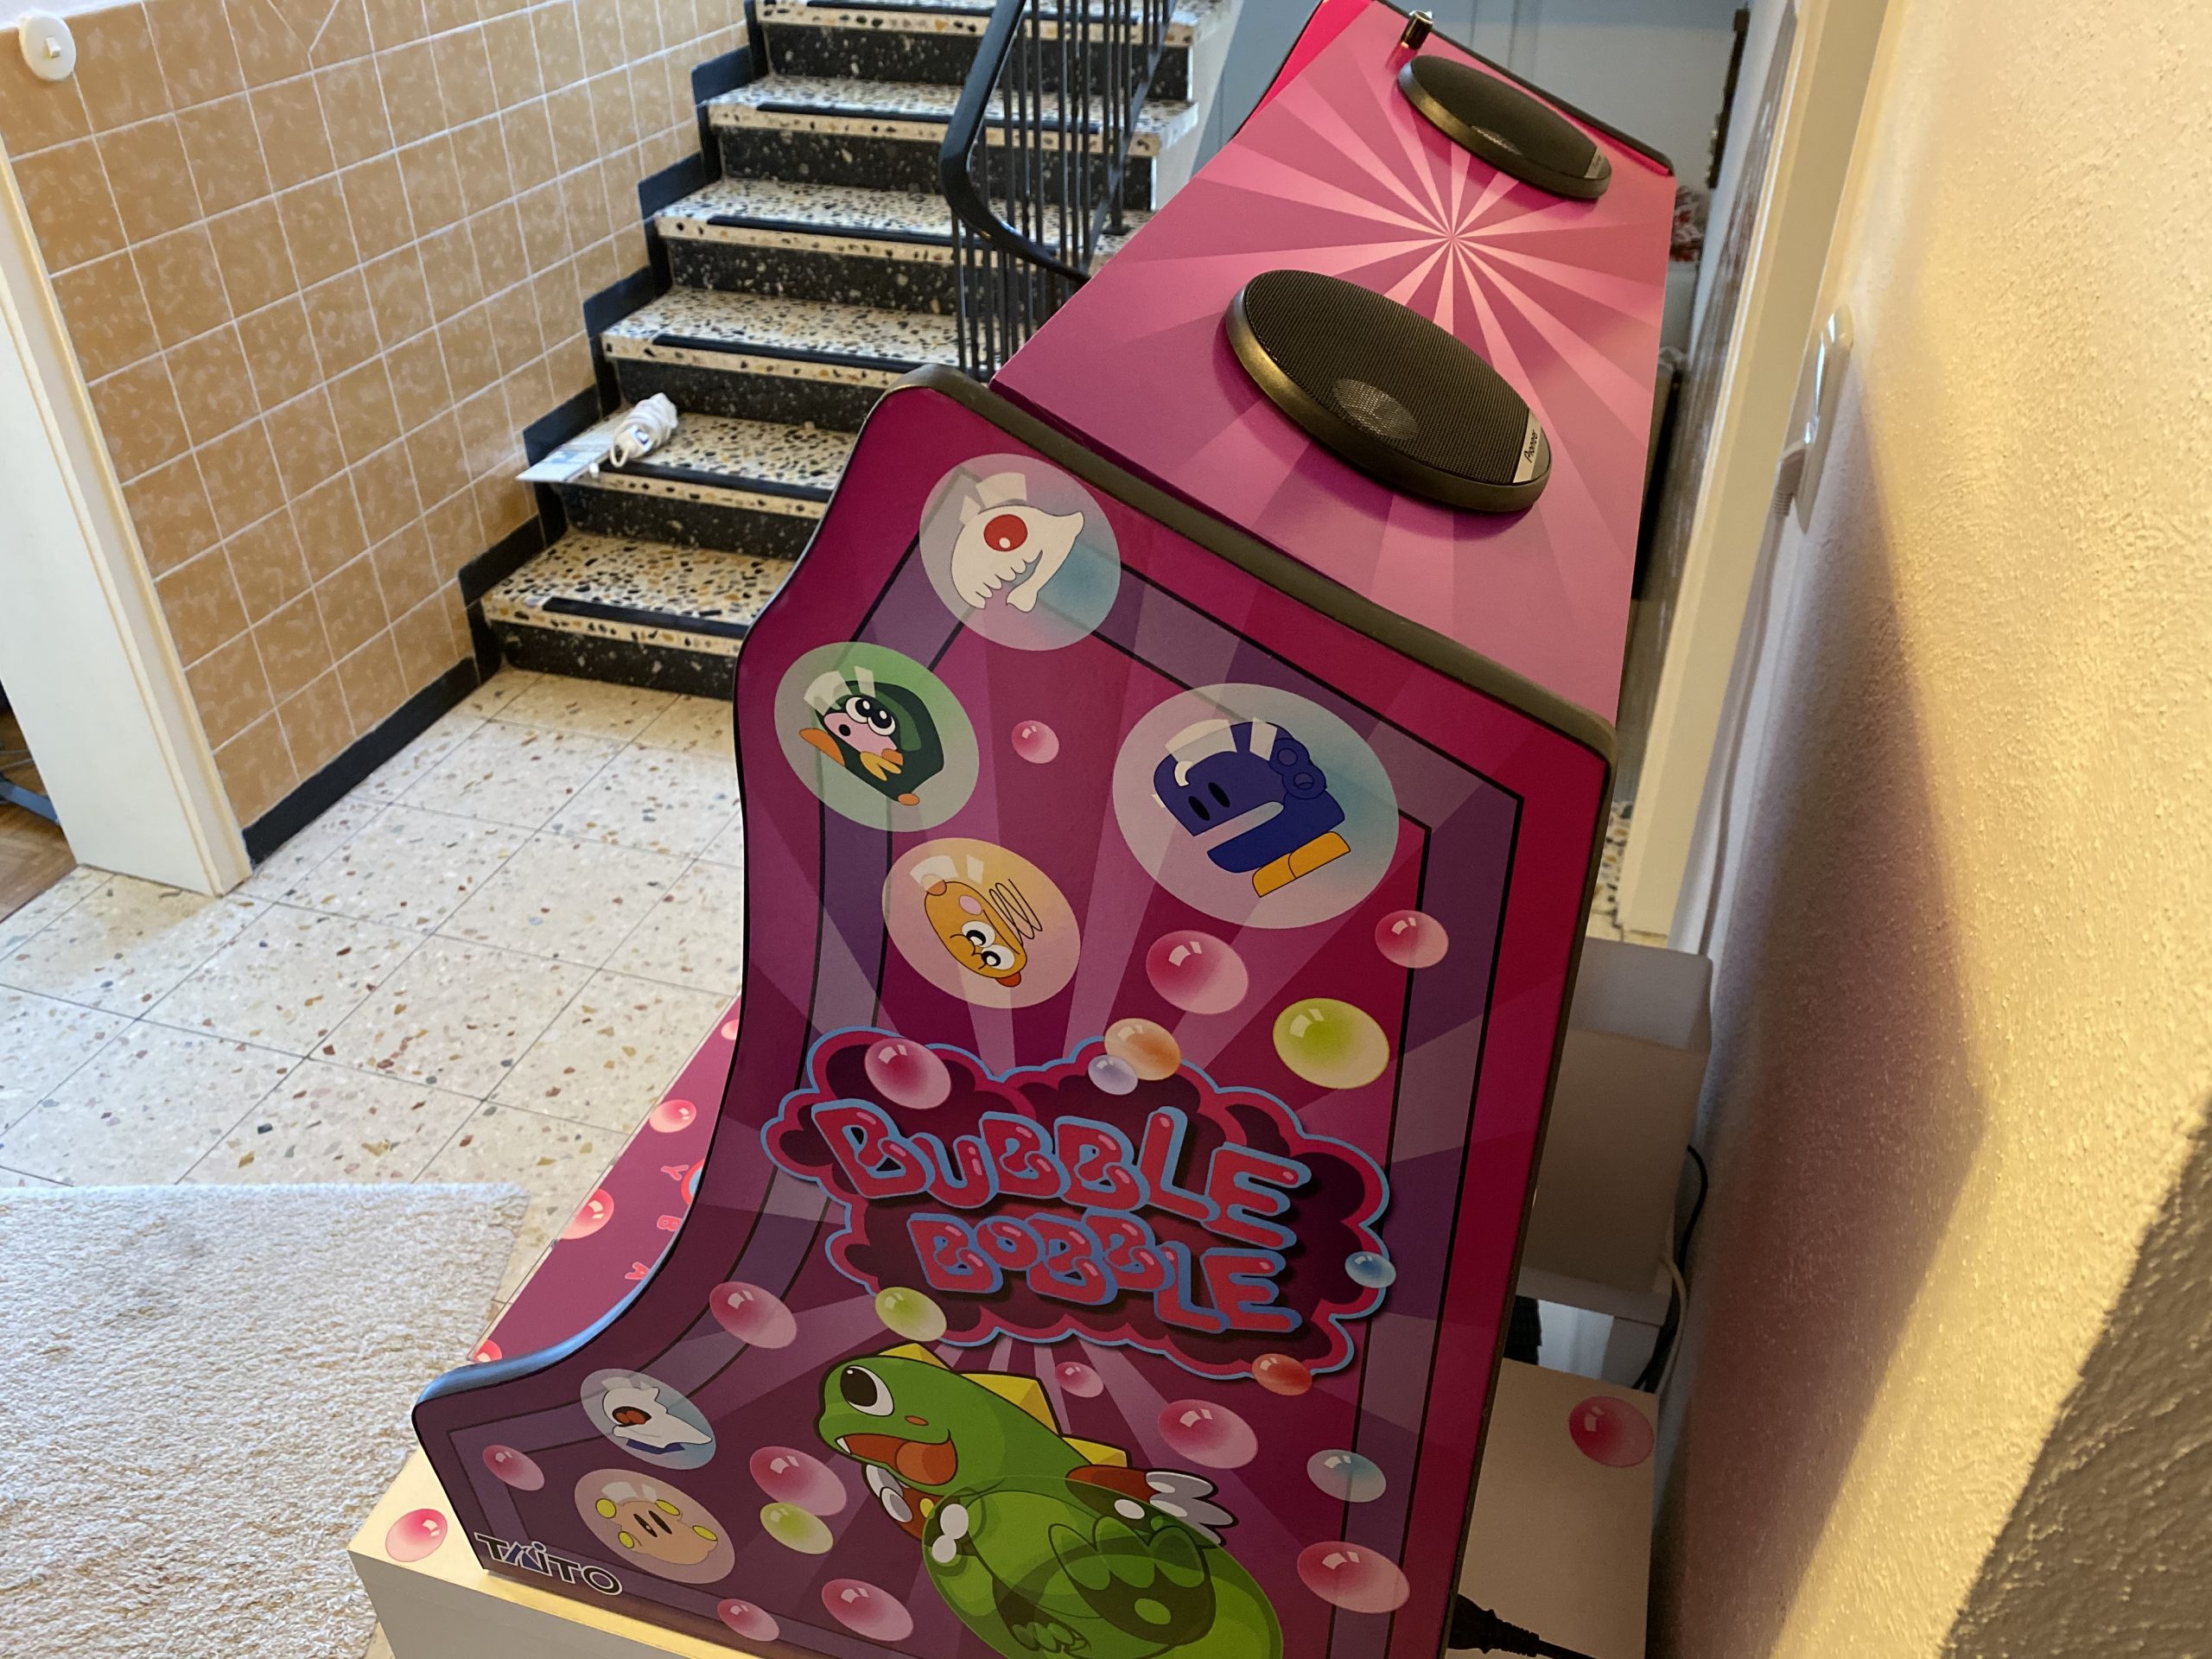
There was some Metal Slug or some Cave shooter related designs I thought of. But then my wife had the best ideas of them all: Bubble Bobble!
So I went and looked for inspiration on Bubble Bobble and found some but none that sticked.
There was one a good inspiration. And I went to design based upon this one – just with a more intense purple color scheme.
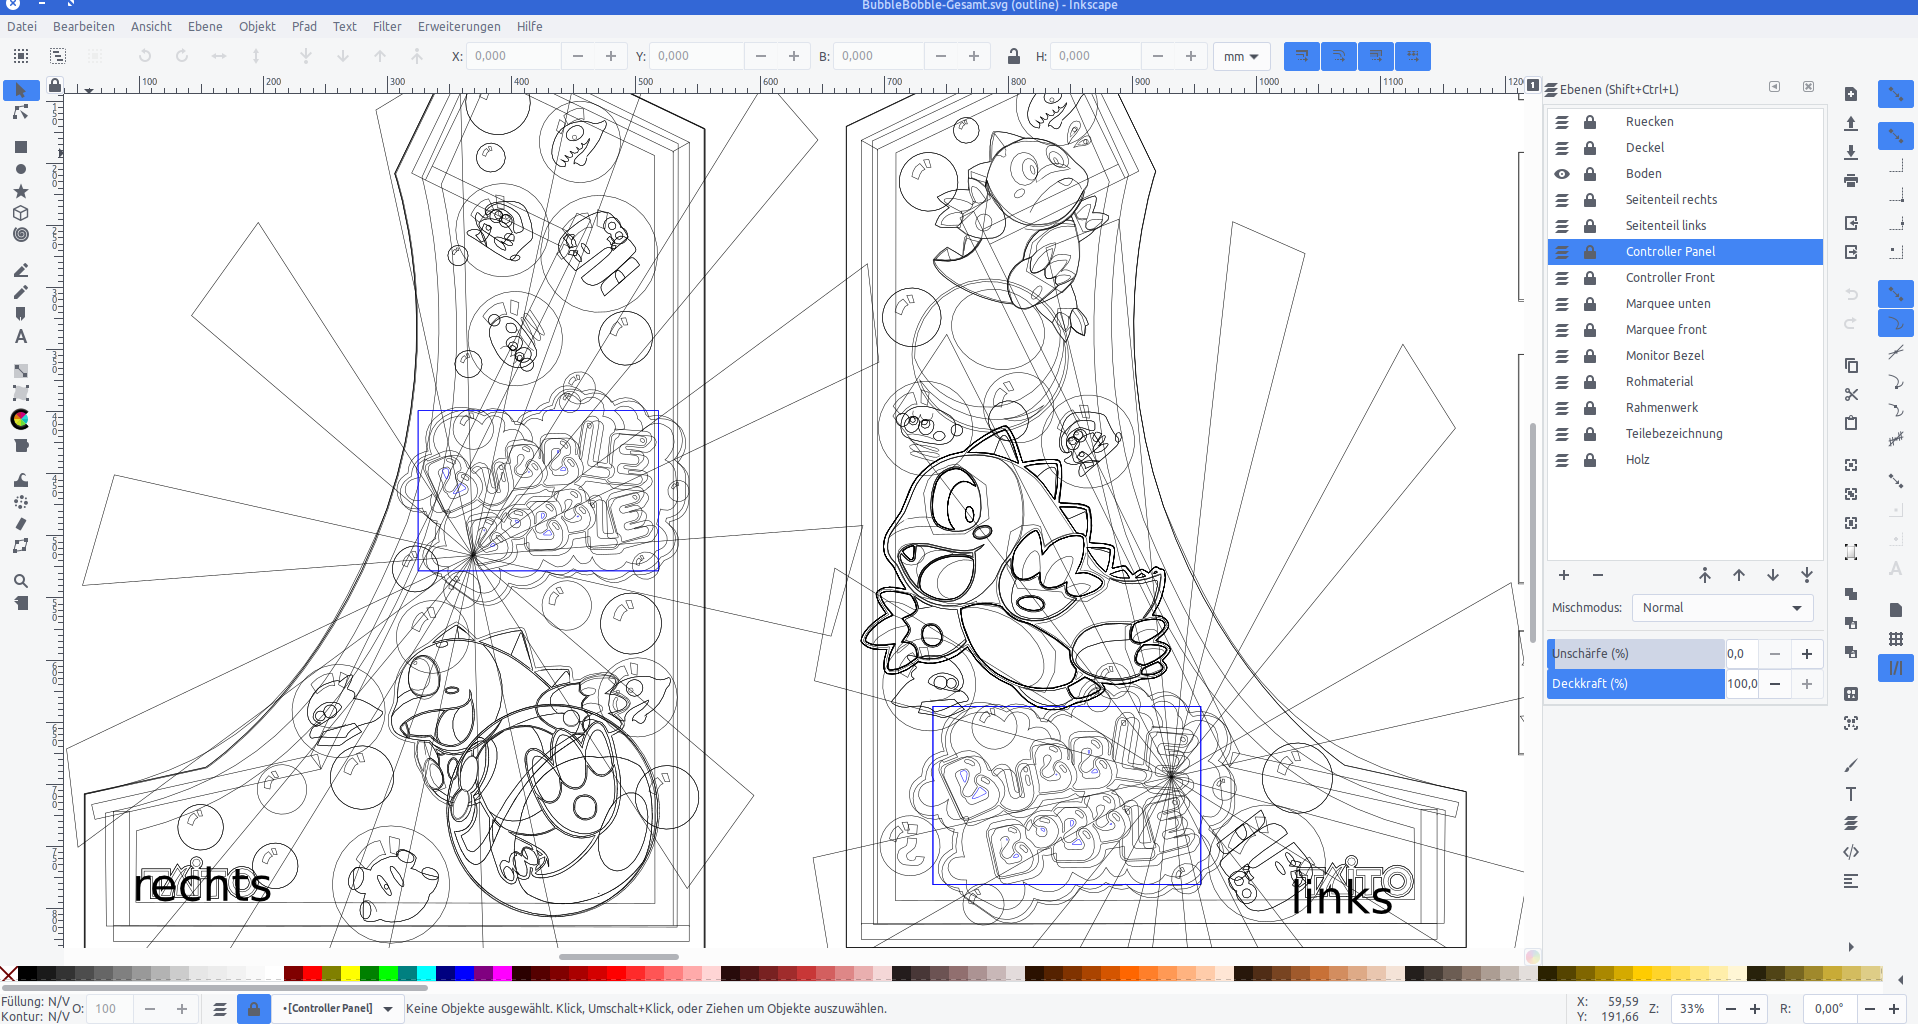
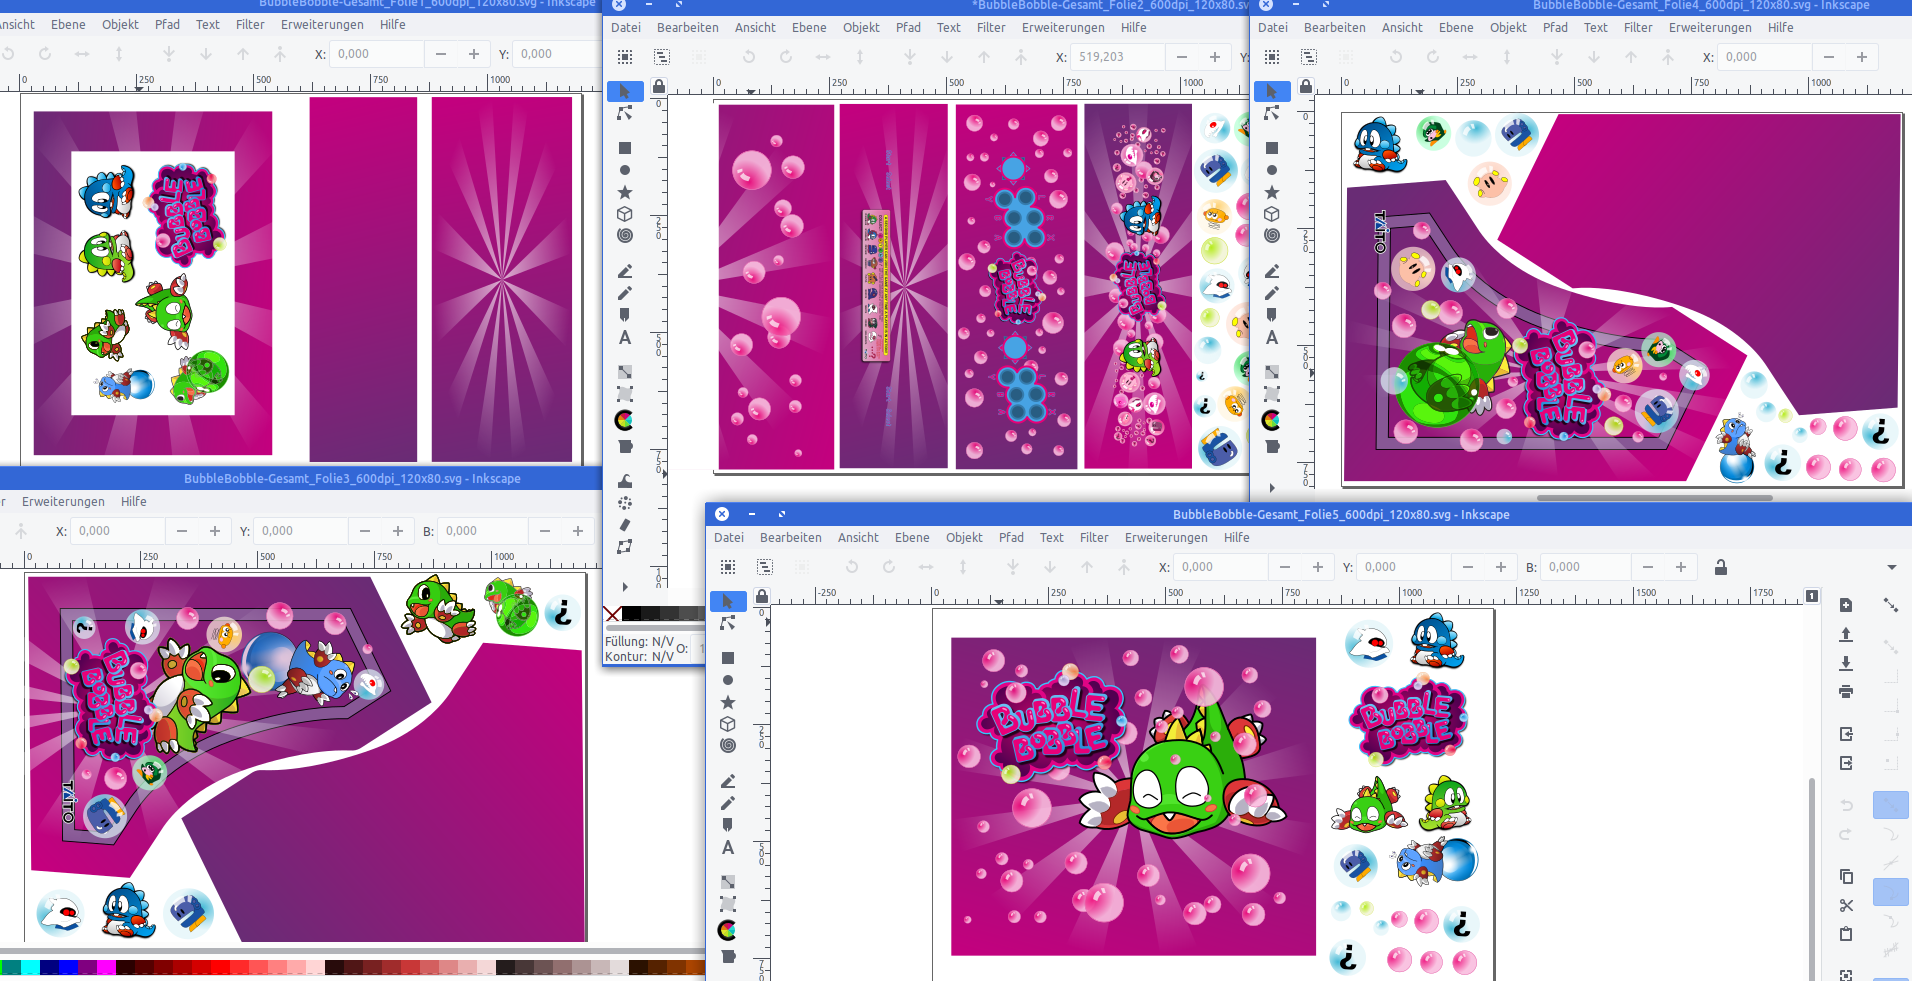
I used Inkscape to pull in bitmap graphics from Bubble Bobble and to vectorize them one by one, eventually ending up with a lot of layers of nice scalable vector graphics.
With all design set I went and sliced it up and found a company that would print my design on vinyl.
With the final arcade-wood accessible top me I could take actual measurements and add to each element 4cm of margin. This way putting it on would hopefully be easier (it was!).
Originally I wanted to have it printed on a 4m by 1,2m sheet of vinyl. It all would have fit there.
But I had to find out that Inkscape was not capable of exporting pixel data at this size and a pixel-density of 600dpi. It just was too large for it to output.
So I had to eventually cut all down into 5 pieces of 1,2m by 80cm each.
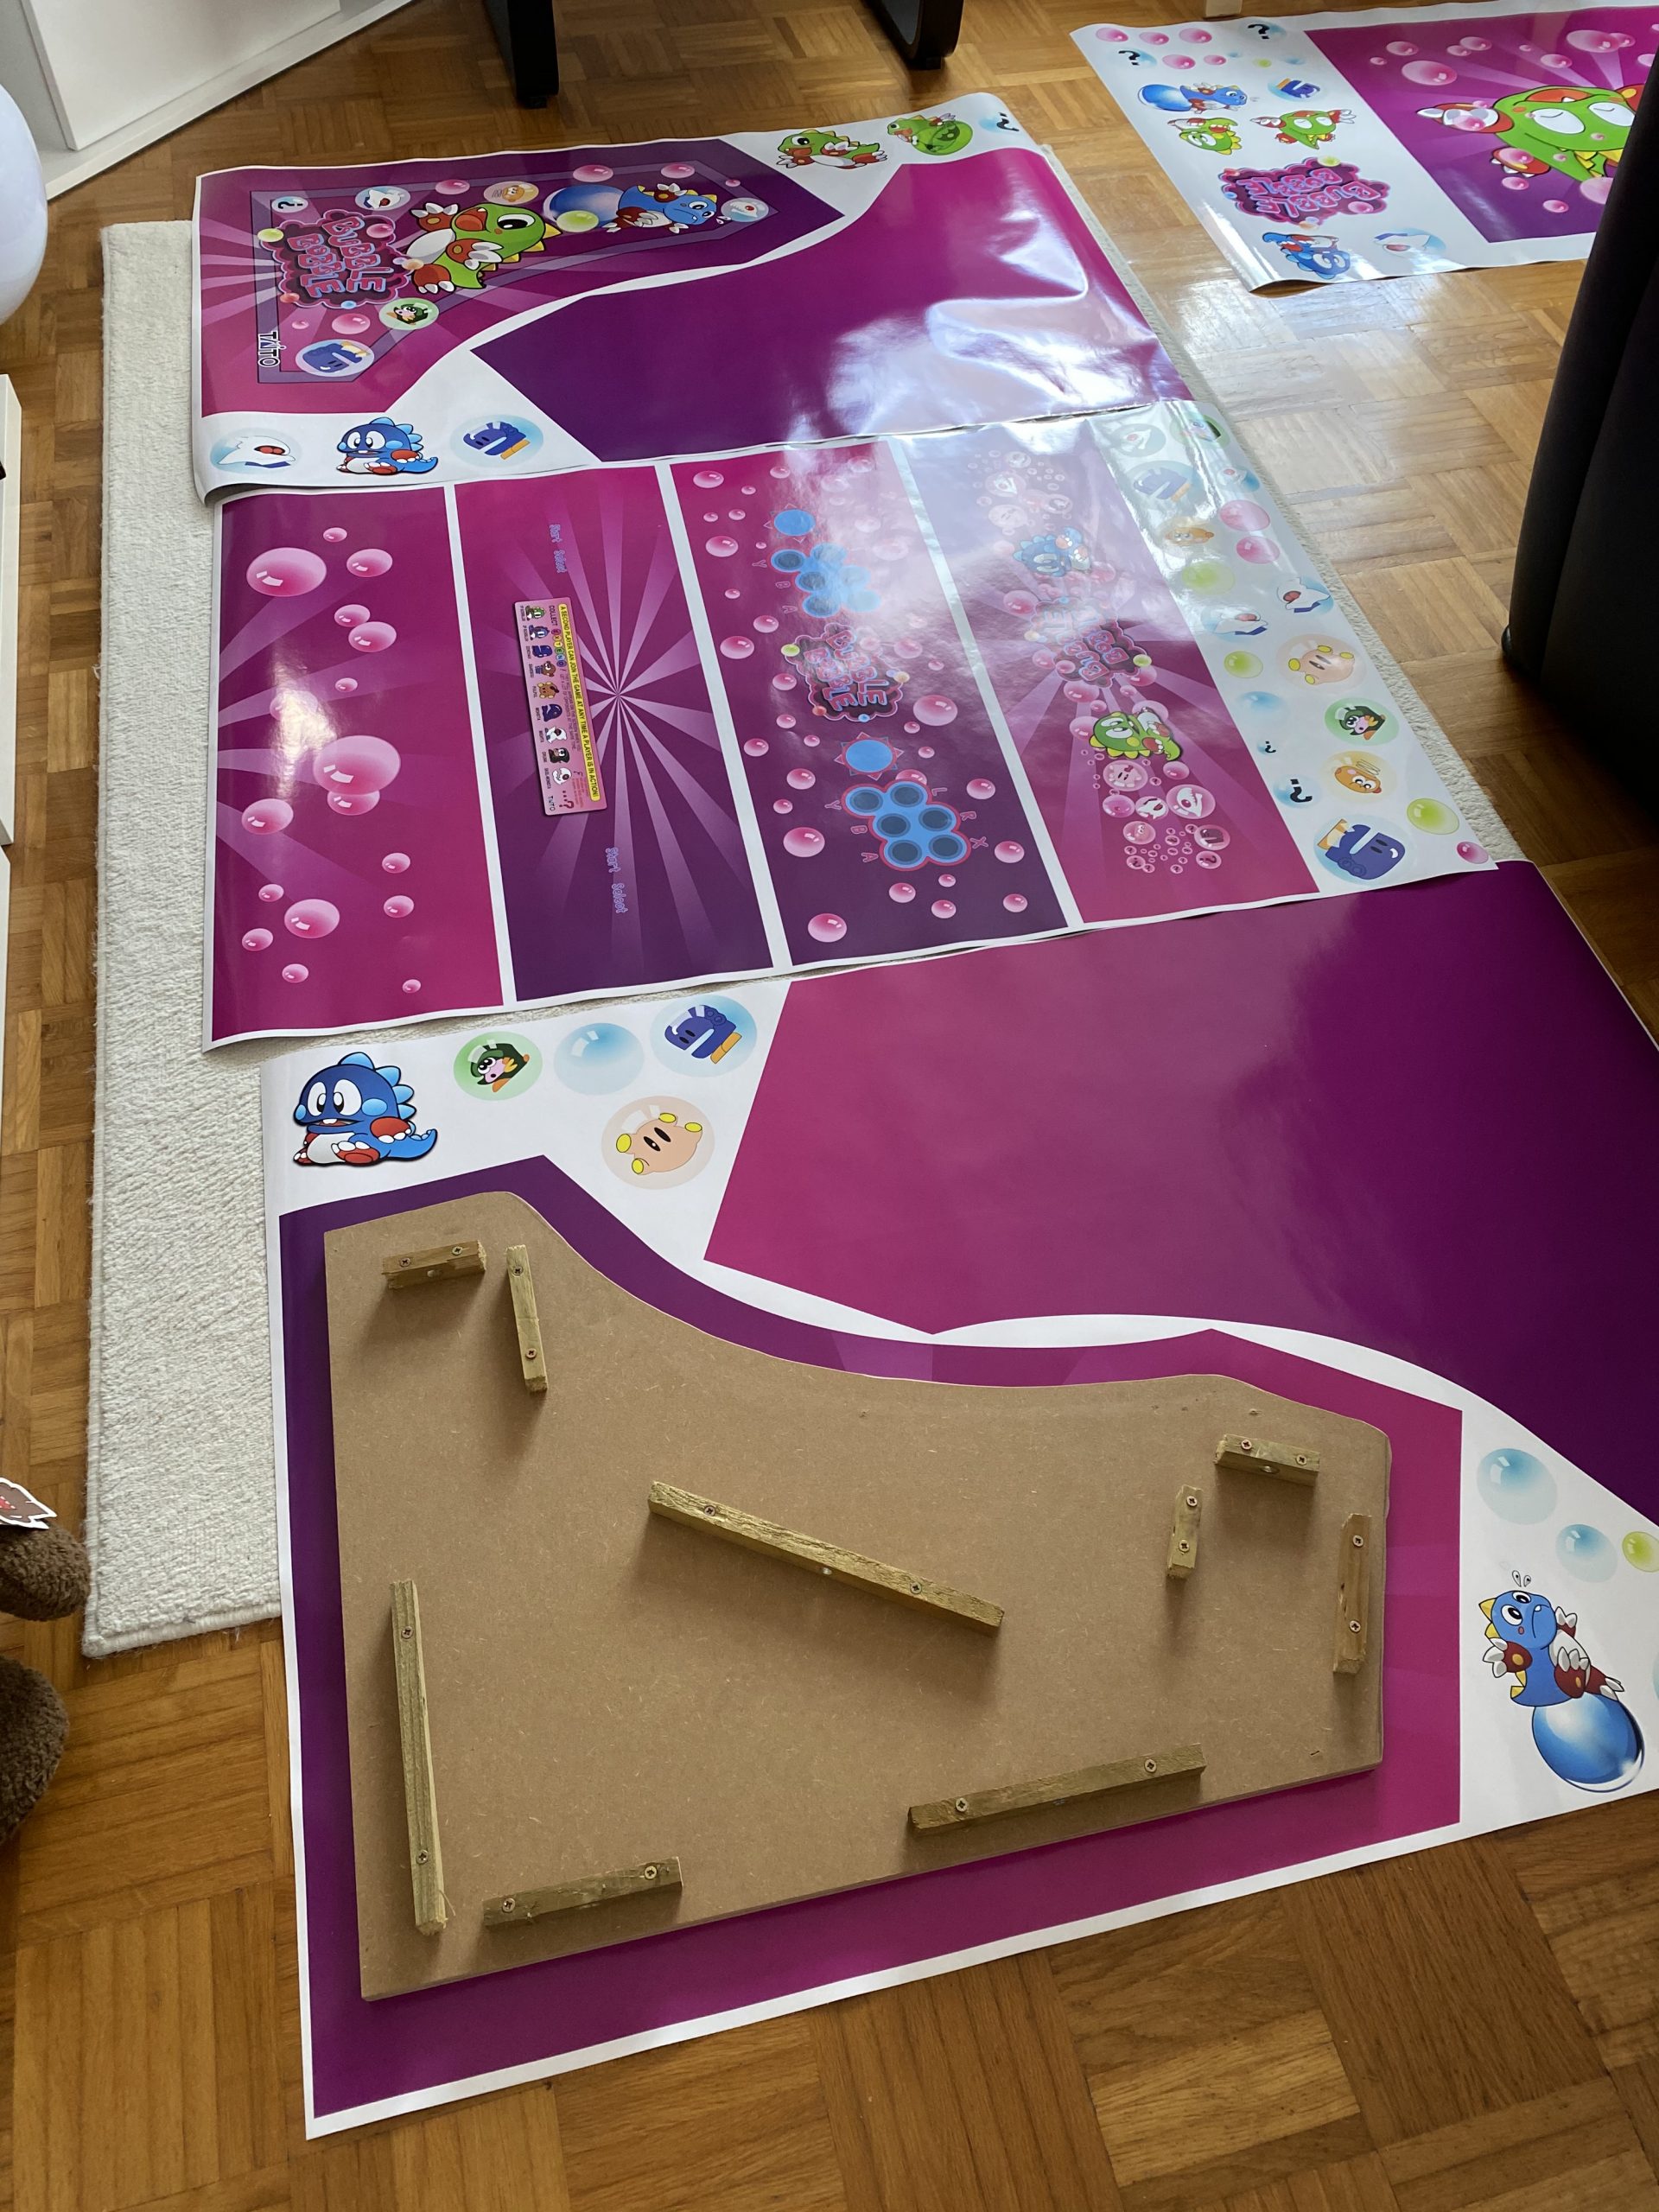
After about 7 days all arrived printed on vinyl at my house. I immediately laid everything out and tried if it would fit. It did!
Now everything had to go onto the wood. I did a test run before ordering to check if it would stick securely to the wood. It did stick very nicely. So putting it on was some intense fiddling but it eventually worked out really really great.
You can see the inside here and the structural struts where everything attaches to screwed in from the insides.
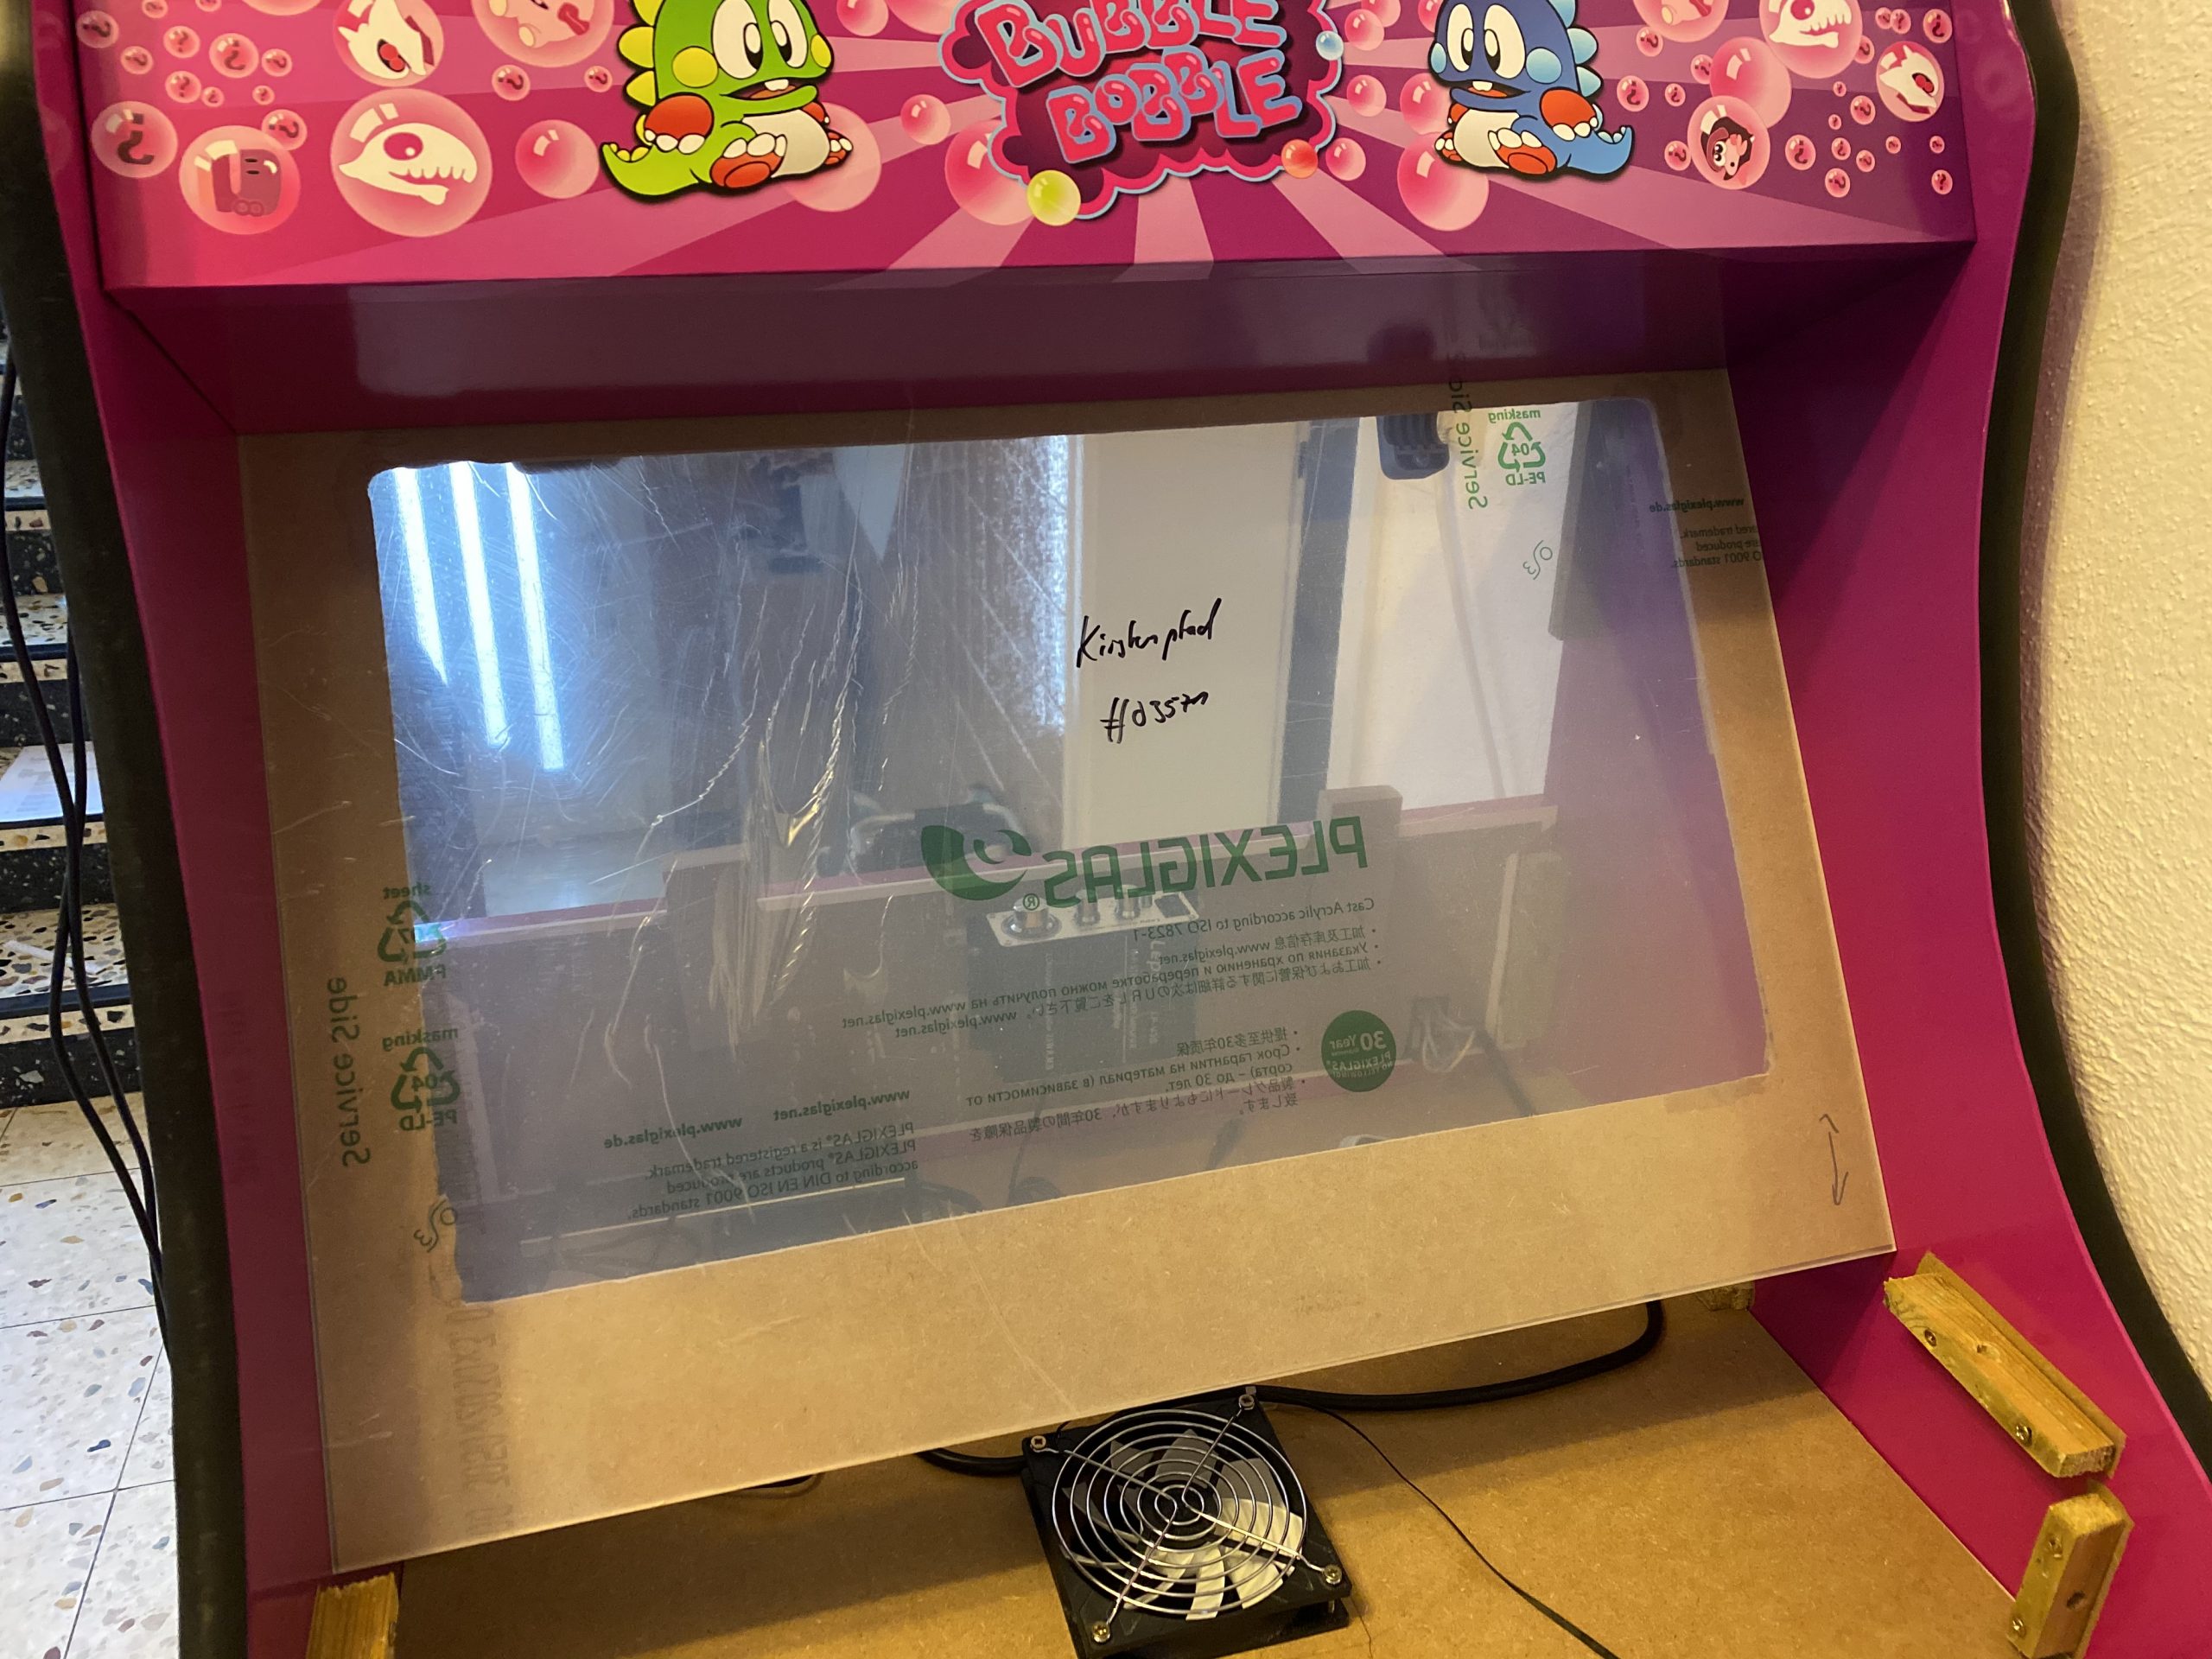
Now it was time for some acrylic. I wanted to get a good bezel and covering of the monitor as well as the handrest and the front buttons.
Cutting acrylic myself was out of questions – so I went with a local company that would laser-cut acrylic for me to my specification.
I’ve sent them the schematics and measurements and the panels for reference and 4 days later the acrylic arrived. We could then put the last bits together for completion!
Result
I am really happy how this turned out – especially since with everything that required actual work with hands I am a hopeless case. With this somehow everything worked out.
I still employ the idea of a vertical shoot-em-up centered version… but maybe some day.
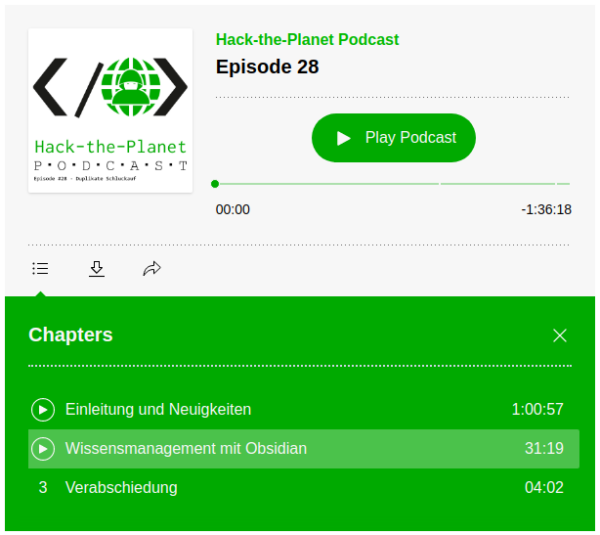
Wir haben uns wieder zusammengefunden – diesmal mit unserem Gast Philipp von nerdbude.com – und haben über Tastaturen, Github Arctic Vault, OCRmyPDF und einen selbstgebauten Arcade Automat gesprochen.
Wie schon bei der letzten Folge 23 haben wir zusätzlich zur Tonspure eine Videospur aufgezeichnet – allerdings nicht als “Talking-Heads” Episode sondern während wir über die Themen sprechen versuchen wir die Themen mit zusätzlichem Inhalt zu unterfüttern – Links und Bilder eben.
Neumorphic card however pretends to extrude from the background. It’s a raised shape made from the exact same material as the background. When we look at it from the side we see that it doesn’t “float”.
This is so much nicer! Of course this has to be taken with the addition of: there are several “jokes” hidden in the names and lines. Don’t take this as an actual reference – rather go by the official ones.
Video incoorporating image processing via python and BigGAN adversarial artificial neural network to breed new images. There are papers about “high fidelity natural image synthesis”.
Anthony Baldino – Like Watching Ghosts from his recently released album Twelve Twenty Two
When you own a recent iOS device (iOS 11 and up) you’ve got the choice between “High Efficiency” or “Most Compatible” as the format all pictures are being stored by the camera app.
Most Compatible being the JPEG format that is widely used around the internet and other cameras out there and the “High Efficiency” coming from the introduction of a new file format and compression/reduction algorithms.
A pointer to more information about the format:
High Efficiency Image File Format (HEIF), also known as High Efficiency Image Coding (HEIC), is a file format for individual images and image sequences. It was developed by the Moving Picture Experts Group (MPEG) and is defined by MPEG-H Part 12 (ISO/IEC 23008-12). The MPEG group claims that twice as much information can be stored in a HEIF image as in a JPEG image of the same size, resulting in a better quality image. HEIF also supports animation, and is capable of storing more information than an animated GIF at a small fraction of the size.
As Apple is aware this new format is not compatible with any existing tool chain to work with pictures from cameras. So you would either need new, upgraded tools (the Apple-way) or you would need to convert your images to the “older” – not-so-efficient JPEG format.
Along the presentation of a redesigned Singapore transit map, there’s more content to gather on the “Transit Mapping Symposium” website.
The “Transit Mapping Symposium” will take place in Seoul / South-Korea on 20/21st of April 2020 with researchers and designers meeting up.
The Transit Mapping Symposium is a yearly international gathering of transport networks professionals, a unique opportunity to share achievements, challenges and vision.
Our participants and speakers include experts from all fields of the industry:
– Mapmakers – Network Operators – Transport Authorities – Digital Platforms – Designers