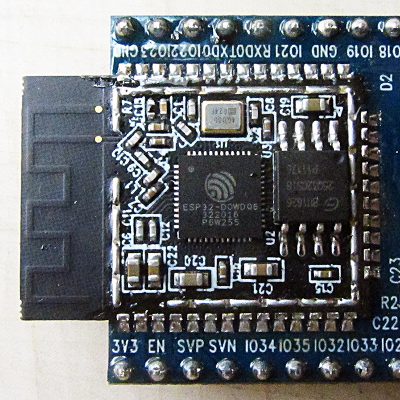
I had reported on my efforts to develop an indoor location tracking system previously. Back in 2017 when I started to work on this I only planned to utilize inexpensive EspressIf ESP32 SoCs to look for bluetooth beacons.
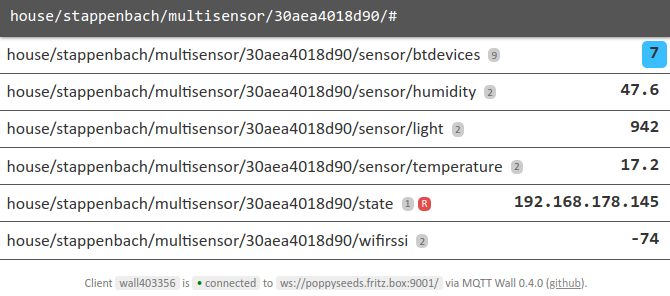
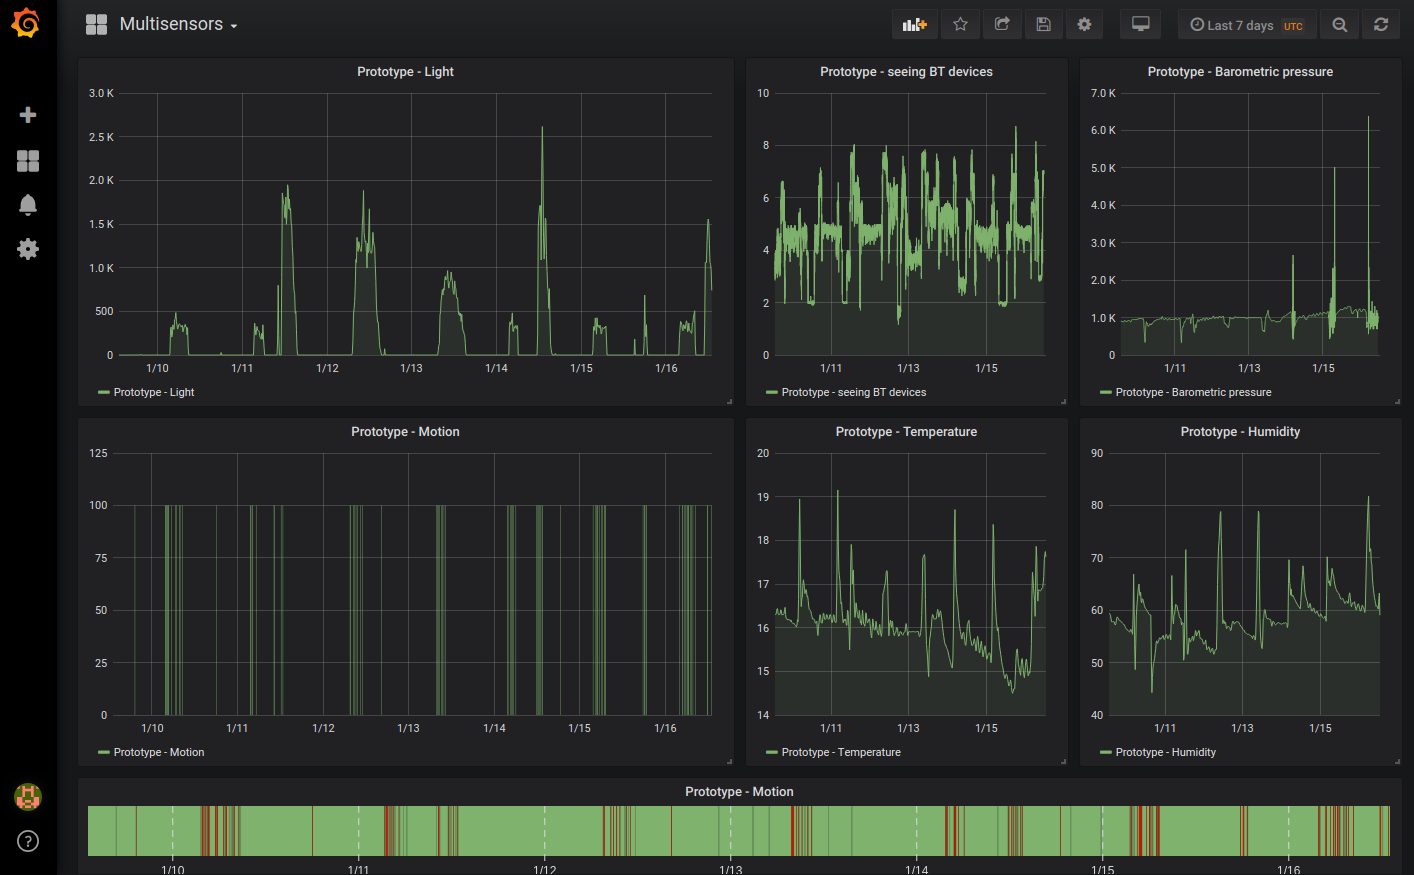
In the time between I figured that I could, and should, also utilize the multiple digital and analog input/output pins this specific SoC offers. And what better to utilize it with then a range of sensors that also now could feed their measurements into an MQTT feed along with the bluetooth details.
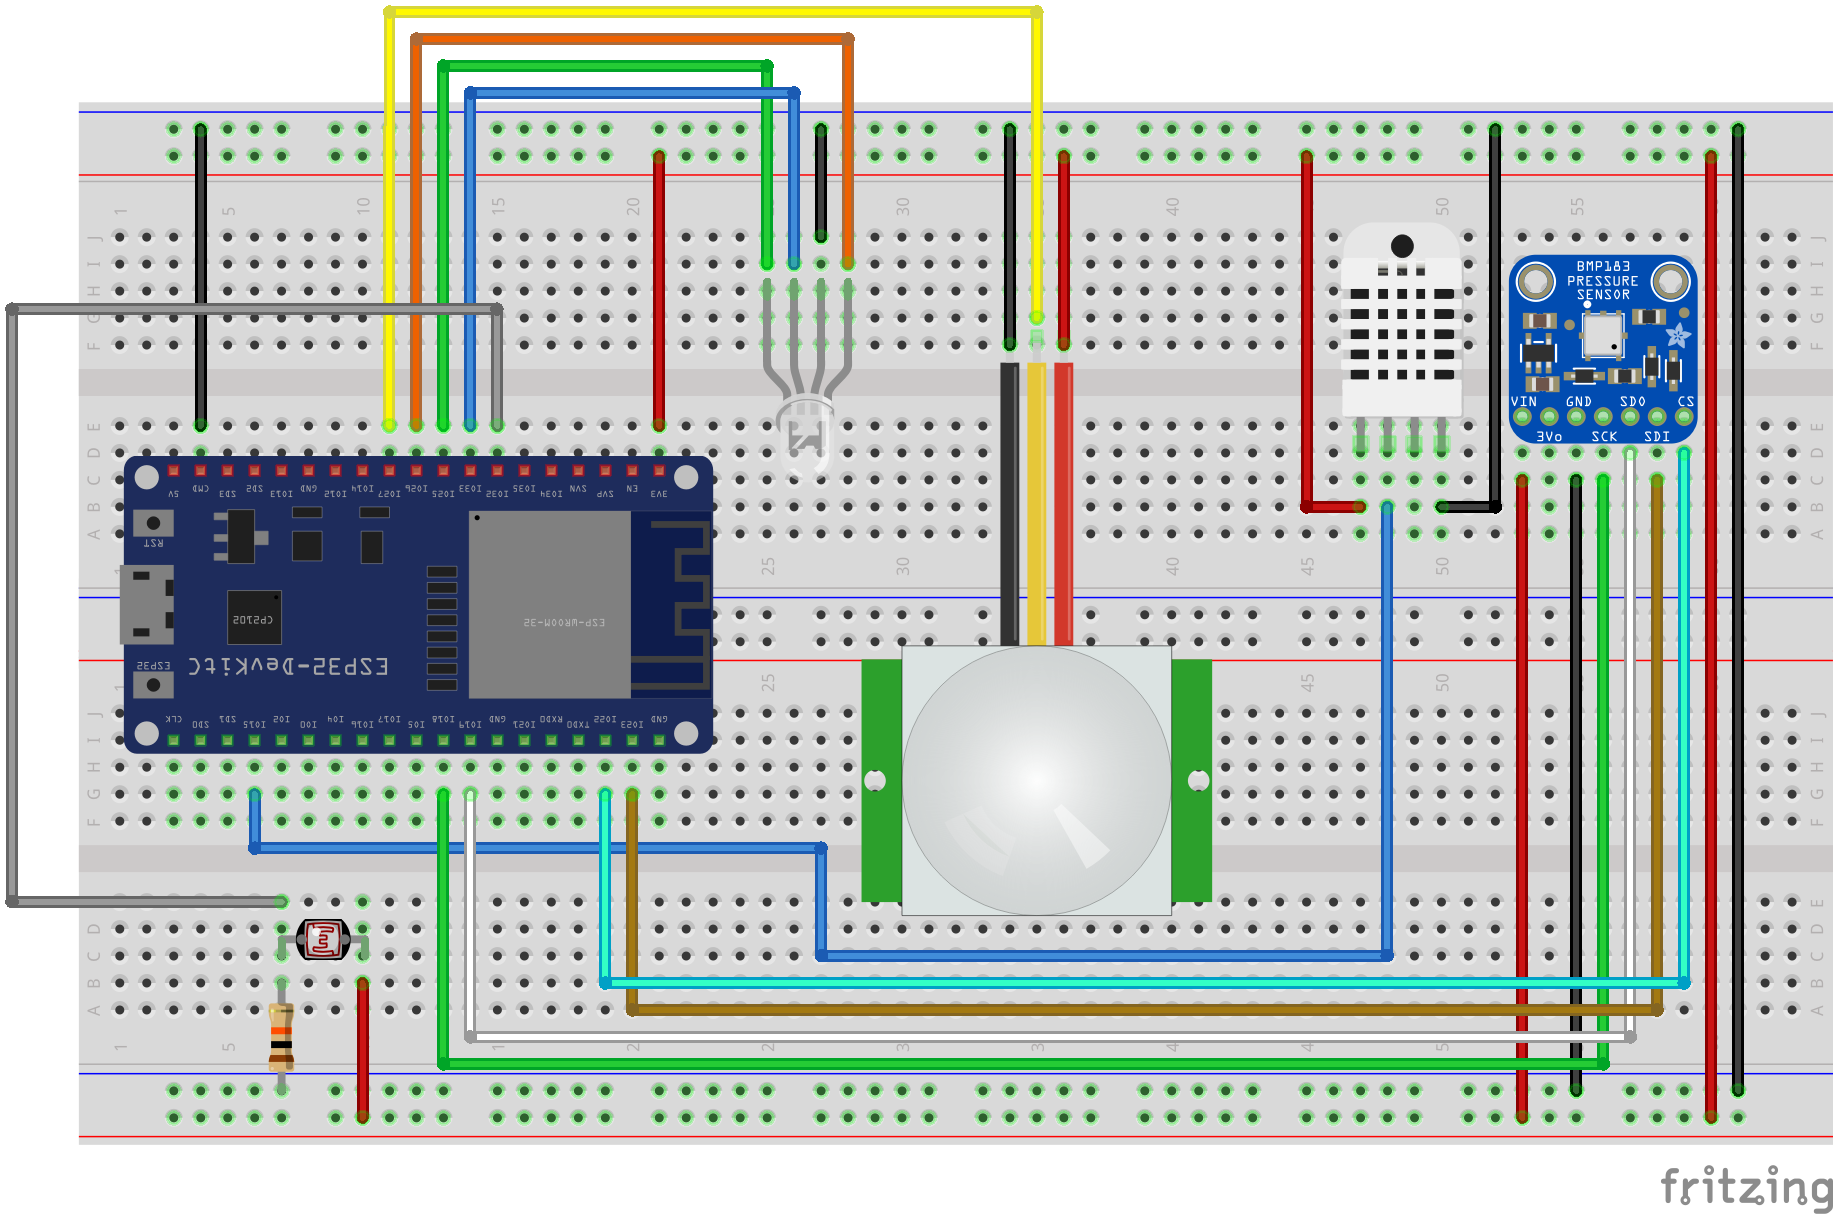
And there is a whole lot of sensors that I’ve added. On a breadboard it looks like this:
So what do we have here:
Motion sensor
Temperature sensor
Humidity sensor
Light sensor
Barometric pressure sensor
and of course an RGB LED to show a status
The software I’ve done already and after 3 weeks of extensive testing it seems that it’s stable. I will release this eventually later in the process.
I’ve also found plastic cases that fill fit this amount of sensory over the sensor cases I had already bought for the ESP32 alone. For now I’ll close this article with some pictures.
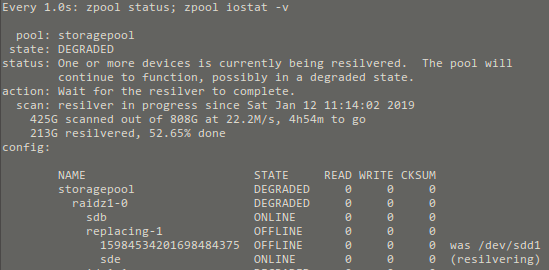
The last Ubuntu kernel update seemingly kicked two hard disks out of a ZFS raidz – sigh. With ZFS on Linux this poses an issue:
Two hard drives that previously where in this ZFS pool named “storagepool” where reassigned a completely different device-id by Linux. So /dev/sdd became /dev/sdf and so on.
ZFS uses a specific metadata structure to encode information about that hard drive and it’s relationship to storage pools. When Linux reassigned a name to the hard drive apparently some things got shaken up in ZFS’ internal structures and mappings.
The solution was these steps
export the ZFS storage pool (=taking it offline for access/turning it off)
use the zpool functionality “labelclear” to clear off the data partition table of the hard drives that got “unavailable” to the storage pool
import the ZFS storage pool back in (=taking it online for access)
using the replace functionality of zpool to replace the old drive name with the new drive name.
After poking around for about 2 hours the above strategy made the storage pool to start rebuilding (resilvering in ZFS speak). Well – learning something every day.
4+ hours to go.
Bonus: I was not immediately informed of the DEGRADED state of the storage pool. That needs to change. A simple command now is run by cron-tab every hour.
GIST: I am looking for interested hackers who want to help me implement a neural network that improves the accuracy of bluetooth low energy based indoor location tracking.
Longer version:
I am currently applying the last finishing touched to a house wide bluetooth low energy based location tracking system. (All of which will be opensourced)
The system consists of 10+ ESP-32 Arduino compatible WiFi/Bluetooth system-on-a-chip. At least one per room of a house.
These modules are very low powered and have one task: They scan for BLE advertisements and send the mac and manufacturer data + the RSSI (signal strength) over WiFi into specific MQTT topics.
There is currently a server component that takes this data and calculates a probable location of a seen bluetooth low energy device (like the apple watch I am wearing…). It currently is using a calibration phase to level in on a minimum accuracy. And then simple calculation matrices to identify the most probable location.
This all is very nice but since I got interested in neural networks and KI development – and I think many others might as well – I am asking here for also interested parties to join the effort.
I do have an existing set-up as well as gigabytes of log data.
Did you know how dangerous Lithium-Polymer batteries can be? Well, if not treated well they literally burst in flames spontaneously.
So it’s quite important to follow a couple of guidelines to not burn down the house.
Since I am just about to start getting into the hobby of FPV quadcopter racing I’ve tried follow those guidelines and found that the smart house can help me tracking things.
Unfortunately there are not a lot of LiPo chargers available at reasonable price with computer interfaces to be monitored while charging/discharging the batteries. But there are a couple of workarounds I’ve found useful.
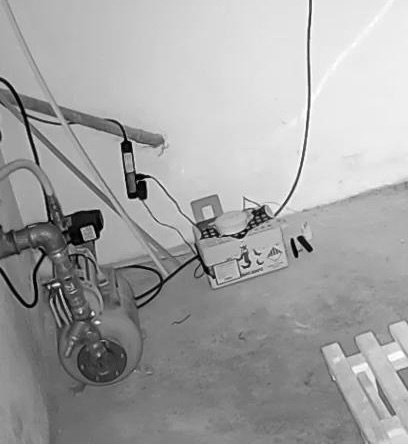
a proper case. I’ve got myself one of those “Bat-Safe” boxes that fit a couple of battery packs and help me store them safely. Even if one or many burst into flames the case is going to contain any heat and fire as good as possible and with the air / pressure filter it’ll hopefully get rid of most of the very nasty smoke (I hear). Cables go into it, so the actual charging process takes place with everything closed and latched.
the obvious smoke detector which is on it’s own connected to the overall fire alarm is mounted on top, like literally on top. It’ll send out the alert to all other smoke alarms in the house making them go beep as well as sending out high priority push notifications to everyone.
an actual camera is monitoring the box all the time calling on alerts if something is fishy (like making sound, smoke, movement of any sort). When charging is done the charger will beep – this is being caught by the cameras microphones and alerts are sent out.
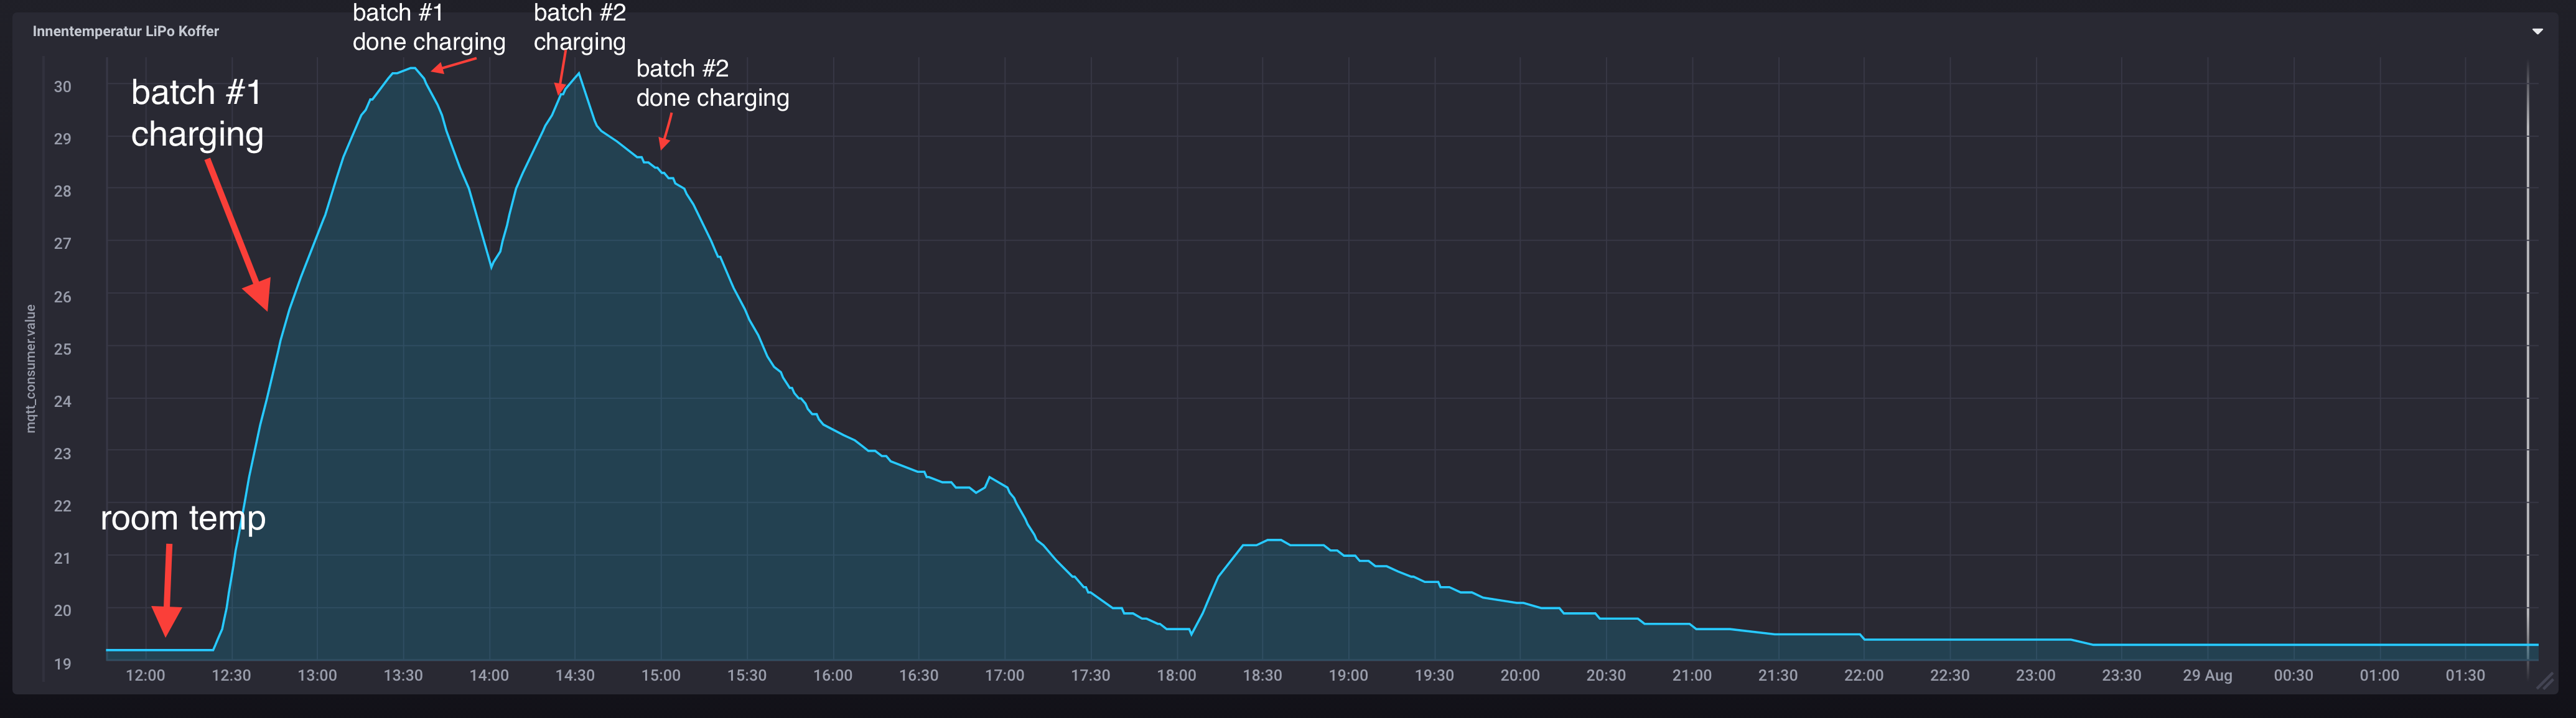
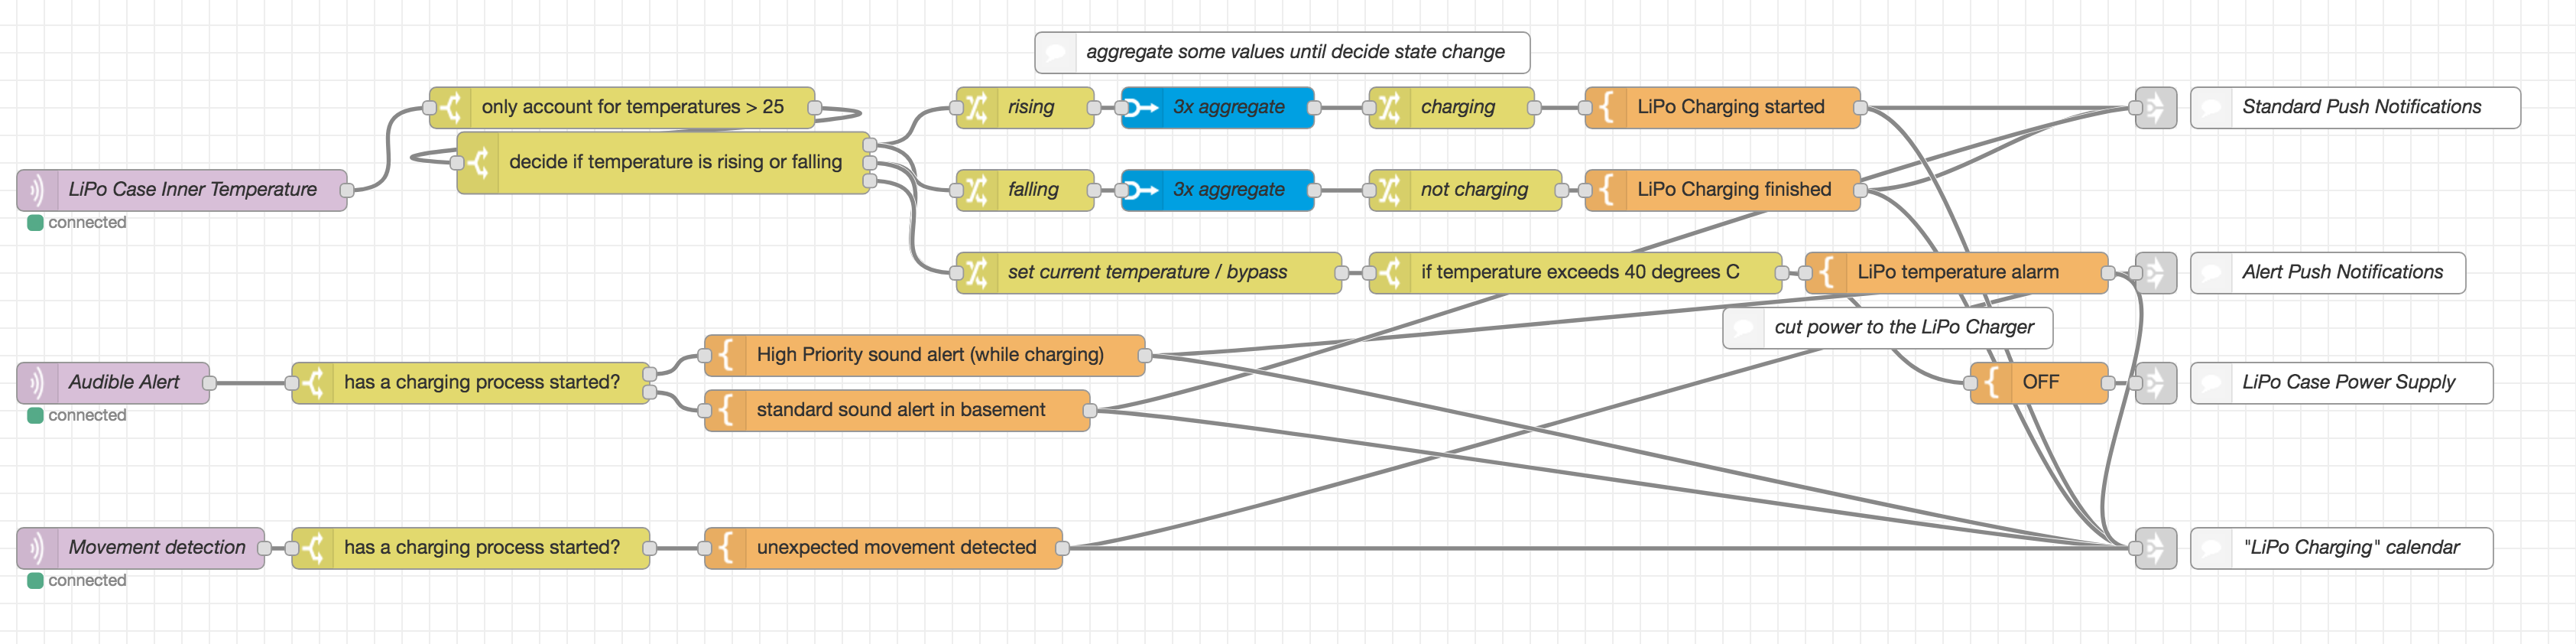
the temperature inside the case is monitored all the time. The surrounding temperatures are usually pretty stable as this case is stored in my basement and as the charging goes on the temperatures inside the case will climb up and eventually level out and fall when charging / discharging is done. Now the system basically will look at the temperatures, decide wether it’s rising of falling and alerting appropriately.
There’s a couple more things to it, like keeping track of charging processes in a calendar as you can see in the flowchart behind all the above.
There are a lot of things that happen in the smart house that are connected somehow.
And the smart house knows about those events happening and might suggest, or even act upon the knowledge of them.
A simple example:
In our living room we’ve got a nice big aquarium which, depending on the time of the day and season, it is simulating it’s very own little dusk-till-dawn lightshow for the pleasure of the inhabitants.
Additionally the waterquality is improved by an air-pump generating nice bubbles and enriching the water with oxygen. But that comes a cost: When you are in the room those bubbles and the hissing sound of the inverter for the “sun” produces sounds that are distracting and disturbing to the otherwise quiet room.
Now the smart home comes to the rescue:
It detects that whenever someone is entering the room and staying for longer, or powering up the TV or listening to music. Also it will log that regularly when these things happen also the aquarium air and maybe lights are turned off. Moreso they are turned back on again when the person leaves.
These correlations are what the smart house is using to identify groups of switches, events and actions that are somehow tied together. It’ll prepare a report and will recommend actions which at the push of a button can become a routine task always being executed when certain characteristics are lining up.
And since the smart house is a machine, it can look for correlations in a lot more dimensions a human could: Date, Time, Location, Duration, Sensor and Actor values (power up TV, Temperature in room < 22, Calendar = November, Windows closed => turn on the heating).
The Internet of Things might as well become your Internet of Money. Some feel the future to be with blockchain related things like BitCoin or Ethereum and they might be right. So long there’s also this huge field of personal finances that impacts our lives allday everyday.
And if you get to think about it money has a lot of touch points throughout all situations of our lifes and so it also impacts the smart home.
Lots of sources of information can be accessed today and can help to stay on top of the things going on as well as make concious decisions and plans for the future. To a large extend the information is even available in realtime.
– cost tracking and reporting
– alerting and goal setting
– consumption and resource management
– like fuel oil (get alerted on price changes, …)
– stock monitoring alerting
– and more advanced even automated trading
– bank account monitoring, in- and outbound transactions
– expectations and planning
– budgetting
After all this is about getting away from lock-in applications and freeing your personal financial data and have a all-over dashboard of transactions, plans and status.
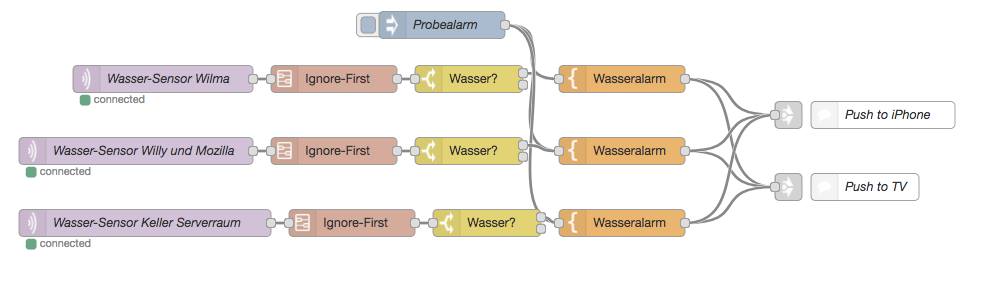
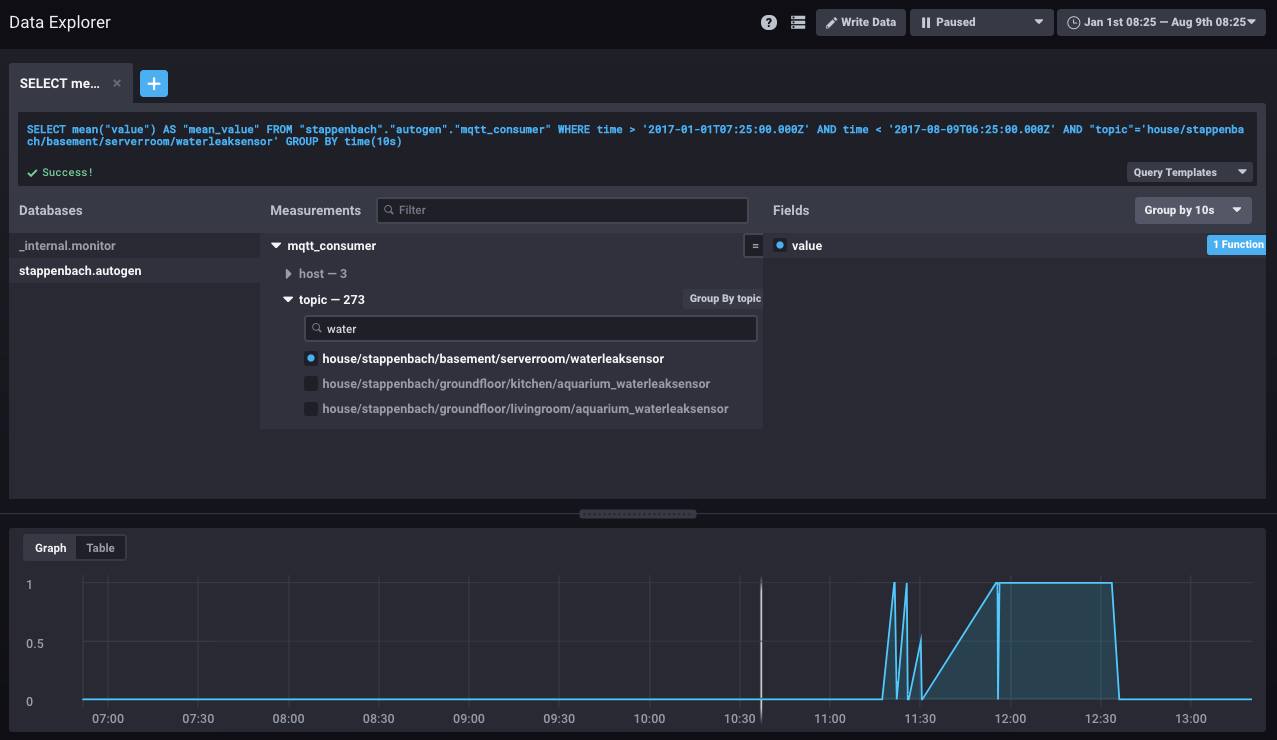
Water! Fire! Whenever one of those are released uncontrolled inside the house it might mean danger to life and health.
Having a couple of fish and turtle tanks spread out in the house and in addition a server rack in the basement it’s important to know when there’s a leak of water at moments notice.
As the server-room also is housing some water pumps for a well you got all sorts of dangers mixed in one location: Water and Fire hazard.
To detect water leaks all tanks and the pumps for the well are equipped with water sensors which send out an alerting signal as soon as water is detected. This signal is picked up and pushed to MQTT topics and from there centrally consumed and reacted upon.
Of course the server rack is above the water level so at least there is time to send out alerts while even power is out for the rest of the house (all necessary network and uplink equipment on it’s own batteries).
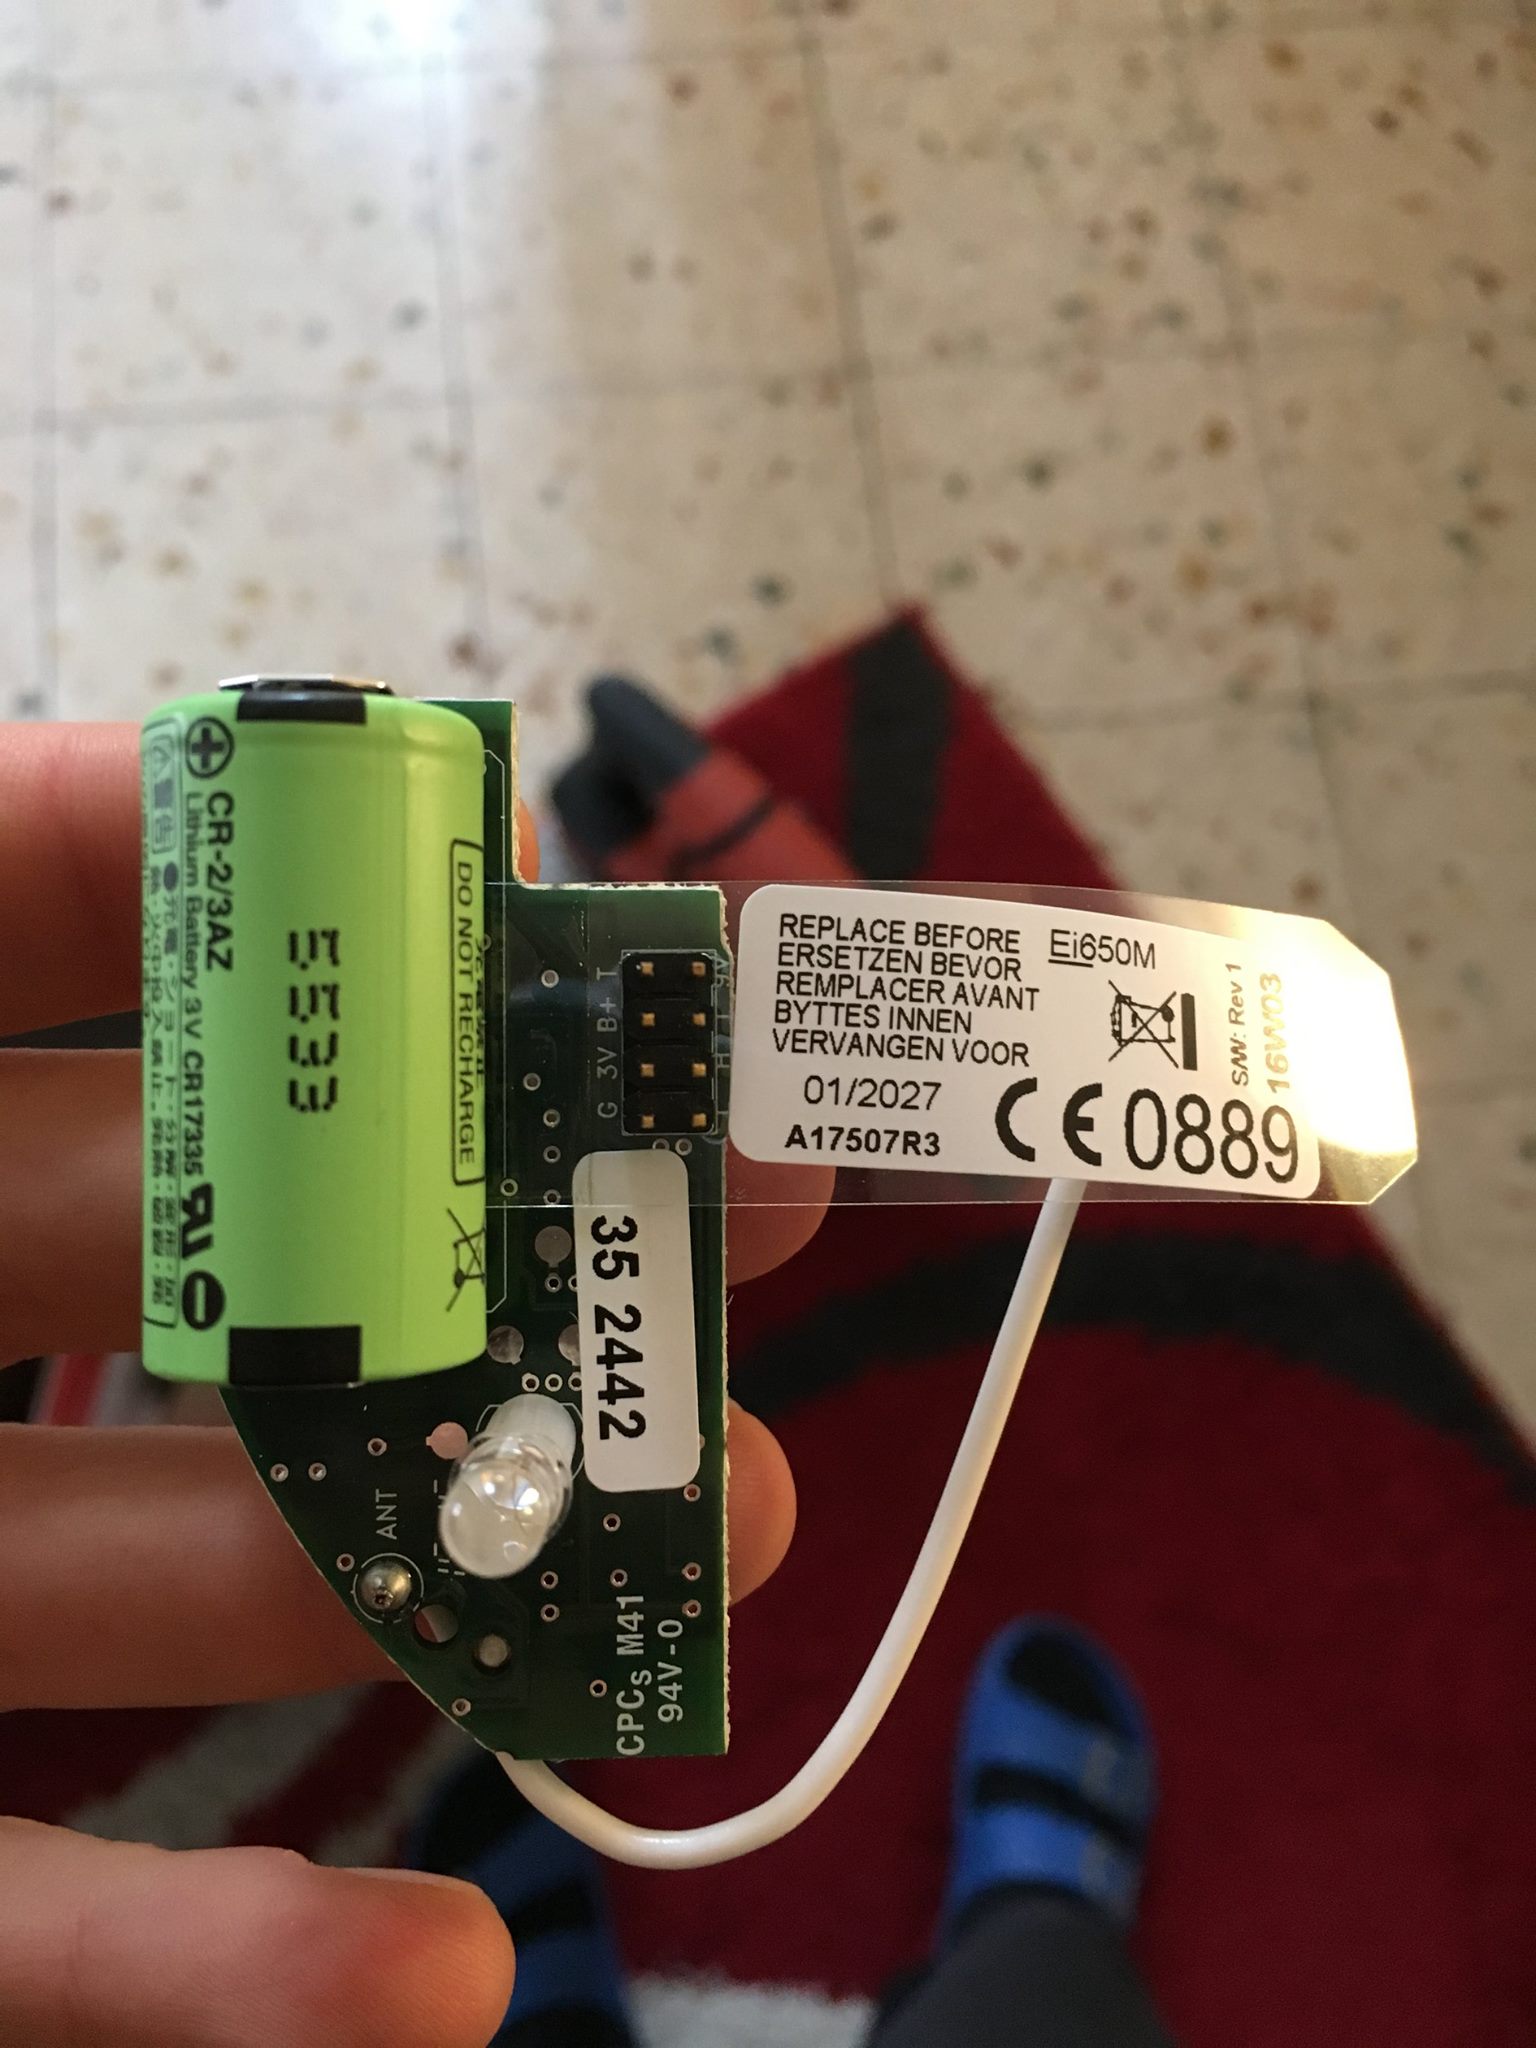
For alerting when there is smoke or a fire, the same logic applies. But for this some loud-as-hell smoke detectors are used. The smoke detectors interconnect with each other and make up a mesh for alerting. If one goes off. All go off. One of them I’ve connected to it’s very own ESP8266 which sends a detected signal to another MQTT topic effectively alerting for the event of a fire.
In one of the pictures you can see what happened when the basement water detector did detect water while the pump was replaced.
A lot of things in a household have weight, and knowing it’s weight might be crucial to health and safety.
Some of those weight applications might tie into this:
– your own body weight over a longer timespan
– the weight of your pets, weighed automatically (like on a kitty litter box)
– the weight of food and ingredients for recipes as well as their caloric and nutrition values
– keeping track of fill-levels on the base of weights
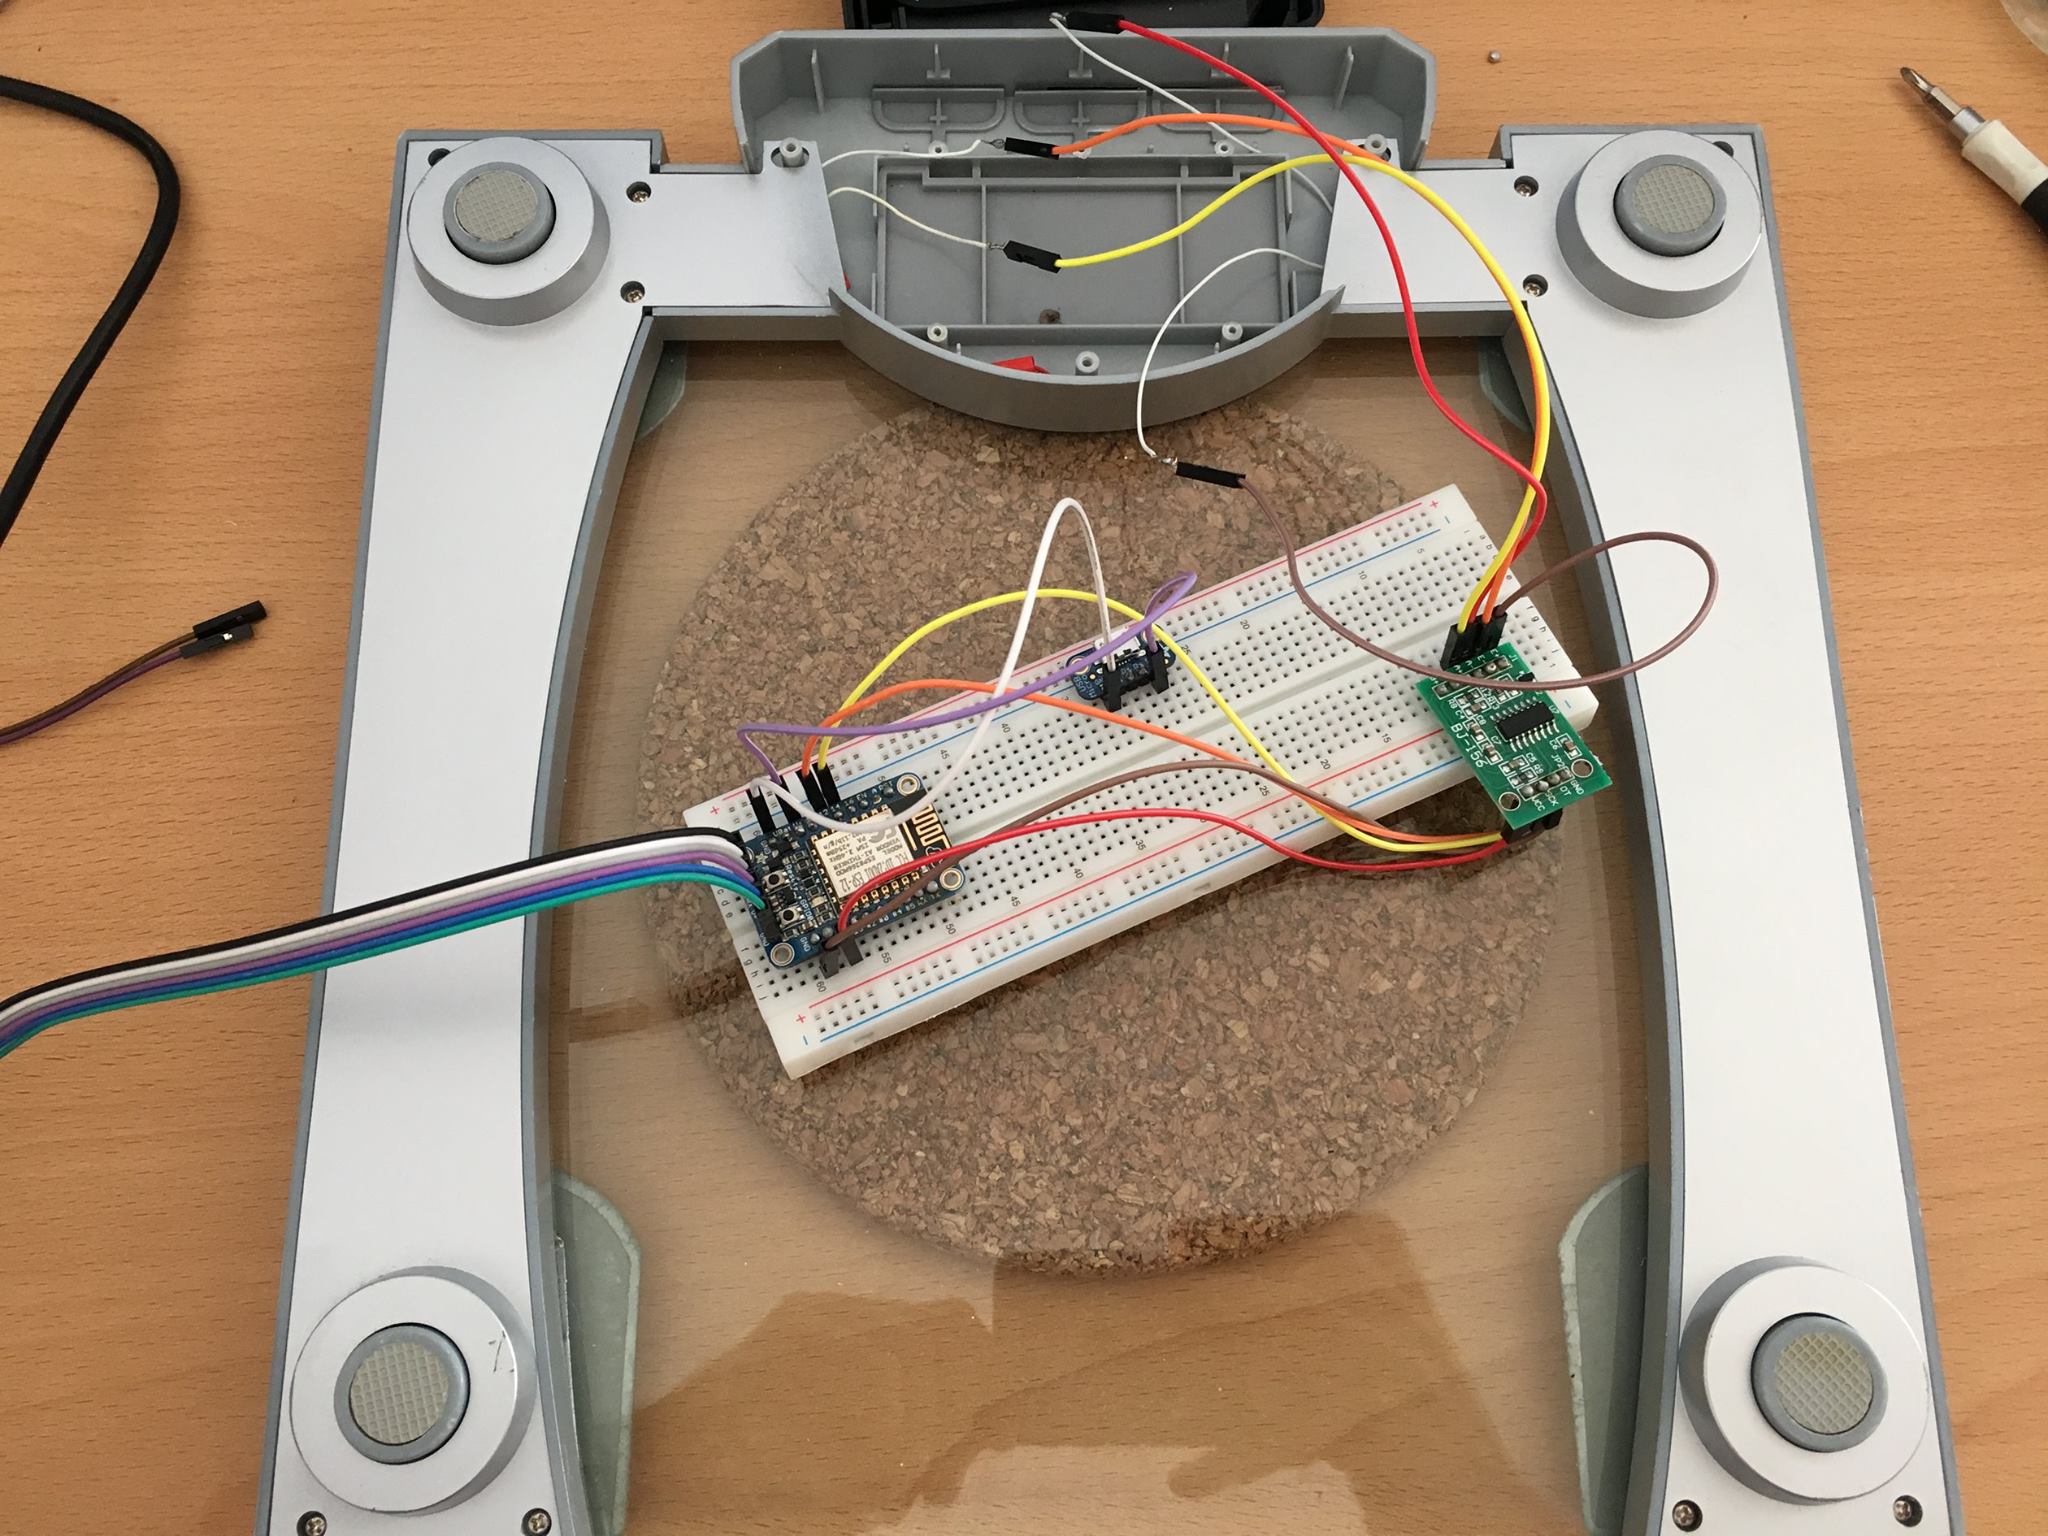
All those things are easily done with connected devices measuring weights. Like the kitty-litter box at our house weighing our cat every time. Or the connected kitchen-scale sending it’s gram measurements into an internal MQTT topic which is then displayed and added more smarts through an App on the kitchen-ipad consuming that MQTT messages as well as allowing recipe-weigh-in functions.
It’s not only surveillance but pro-active use. There are beekeepers who monitor the weight of their bee hives to see what’s what. You can monitor all sorts of things in the garden to get more information about it’s wellbeing (any plants, really).
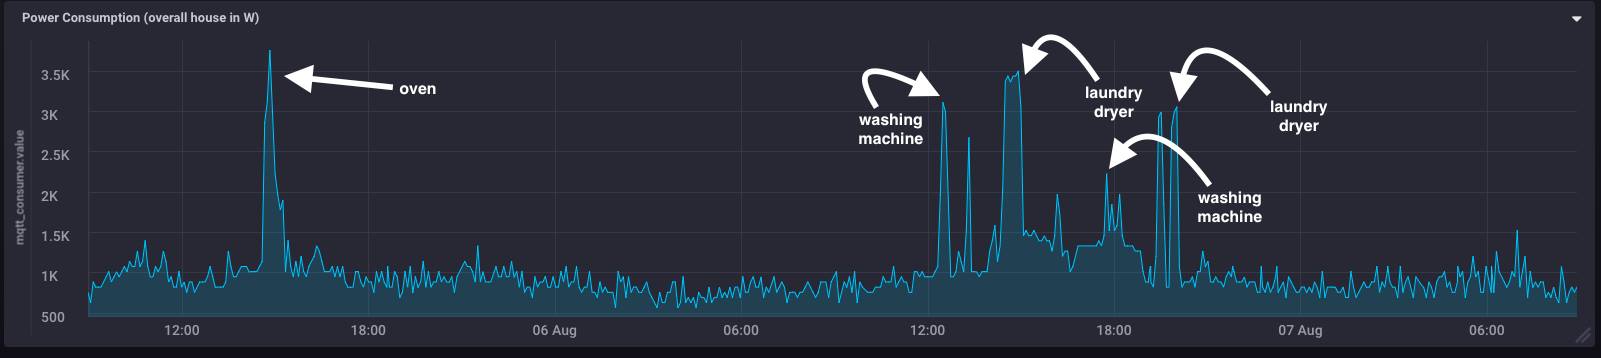
Weekend is laundry time! The smart house knows and sends out notifications when the washing machine or the laundry dryer are done with their job and can be cleared.
Of course this can all be extended with more sensory data, like power consumption measurements at the actual sockets to filter out specific devices much more accurate. But for simple notification-alerting it’s apparently sufficient to monitor just at the houses central power distribution rack.
On the sides this kind of monitoring and pattern-matching is also useful to identify devices going bad. Think of monitoring the power consumption of a fridge. When it’s compressor goes bad it’s going to consume an increasing amount of power over time. You would figure out the malfunction before it happens.
Same for all sorts of pumps (water, oil, aquarium,…).
All this monitoring and pattern matching the smart house does so it’s inhabitants don’t have to.
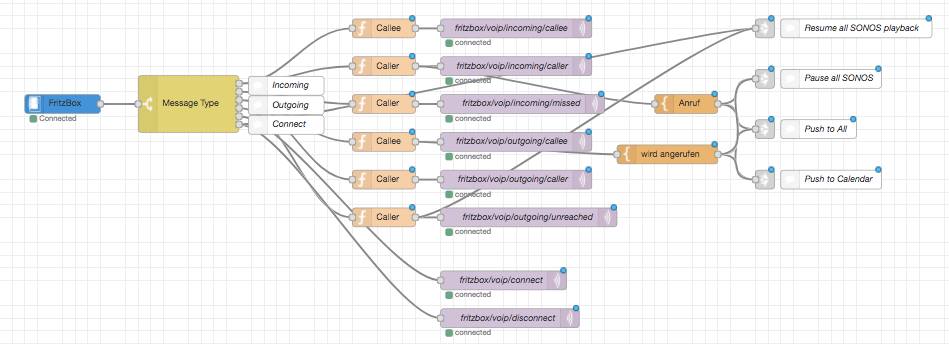
We love music. We love it playing loud across the house. And when we did that in the past we missed some things happening around.
Like that delivery guy ringing the front doorbell and us missing an important delivery.
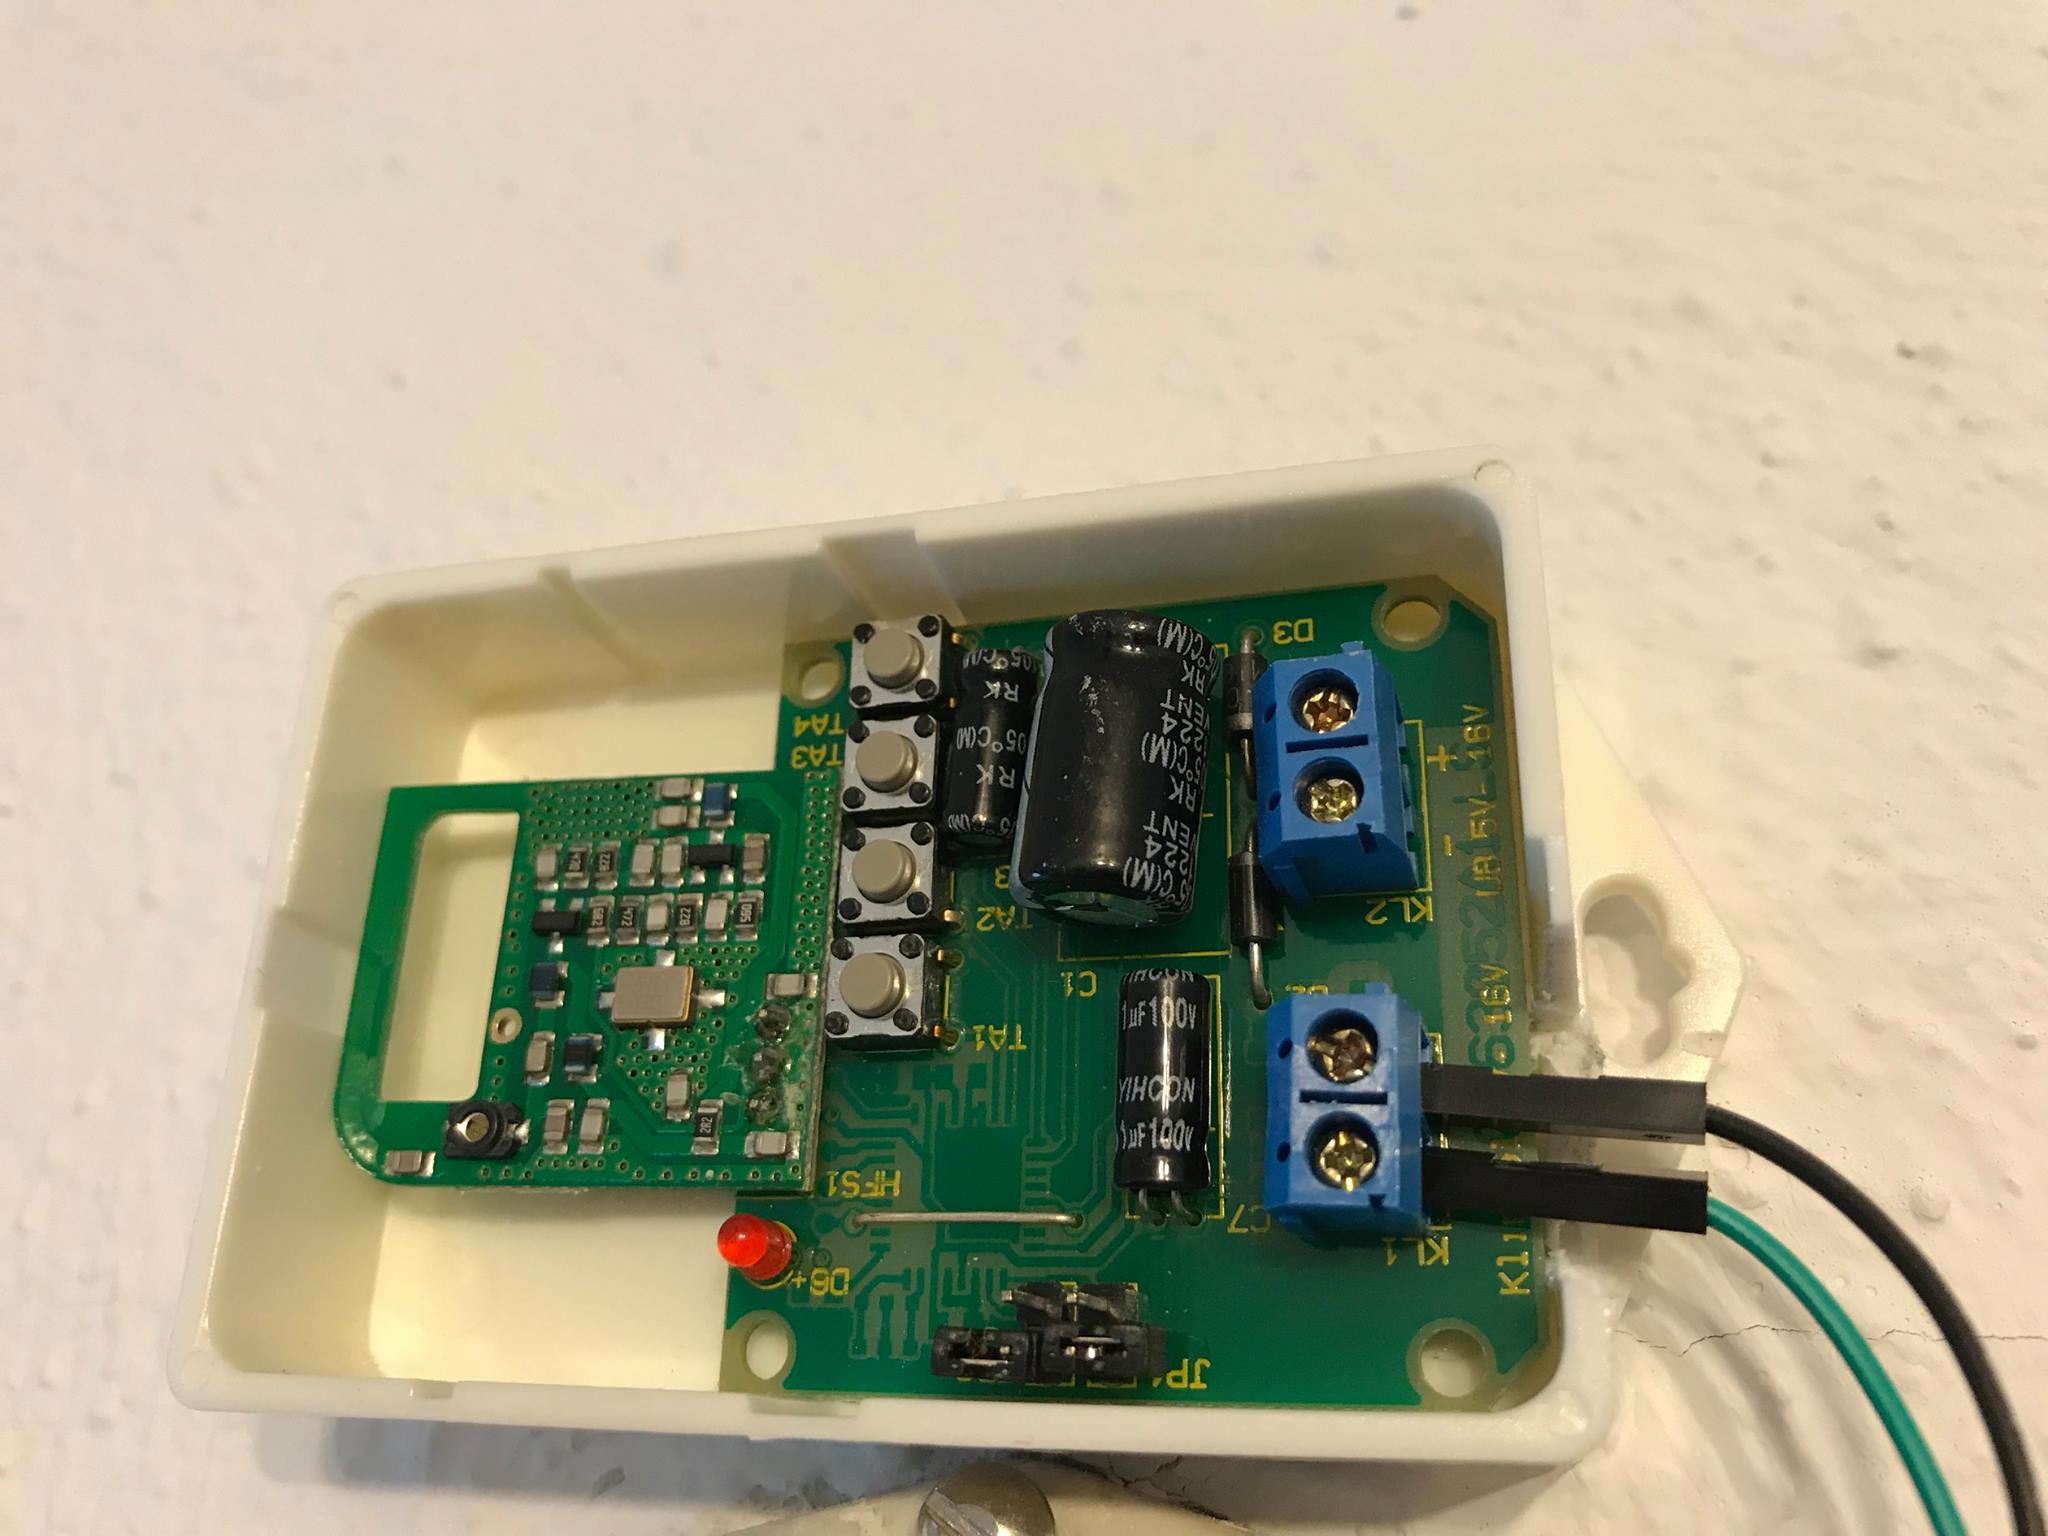
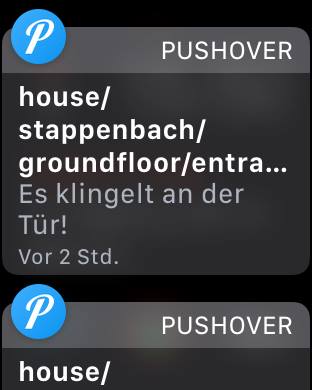
This happened a lot. UNTIL we retrofitted a little PCB to our doorbell circuit to make the house aware of ringing doorbells.
Now everytime the doorbell rings a couple of things can take place.
– push notifications to all devices, screens, watches – that wakes you up even while doing workouts
– pause all audio and video playback in the house
– take a camera shot of who is in front of the door pushing the doorbell
And: It’s easy to wire up things whatever those may be in the future.
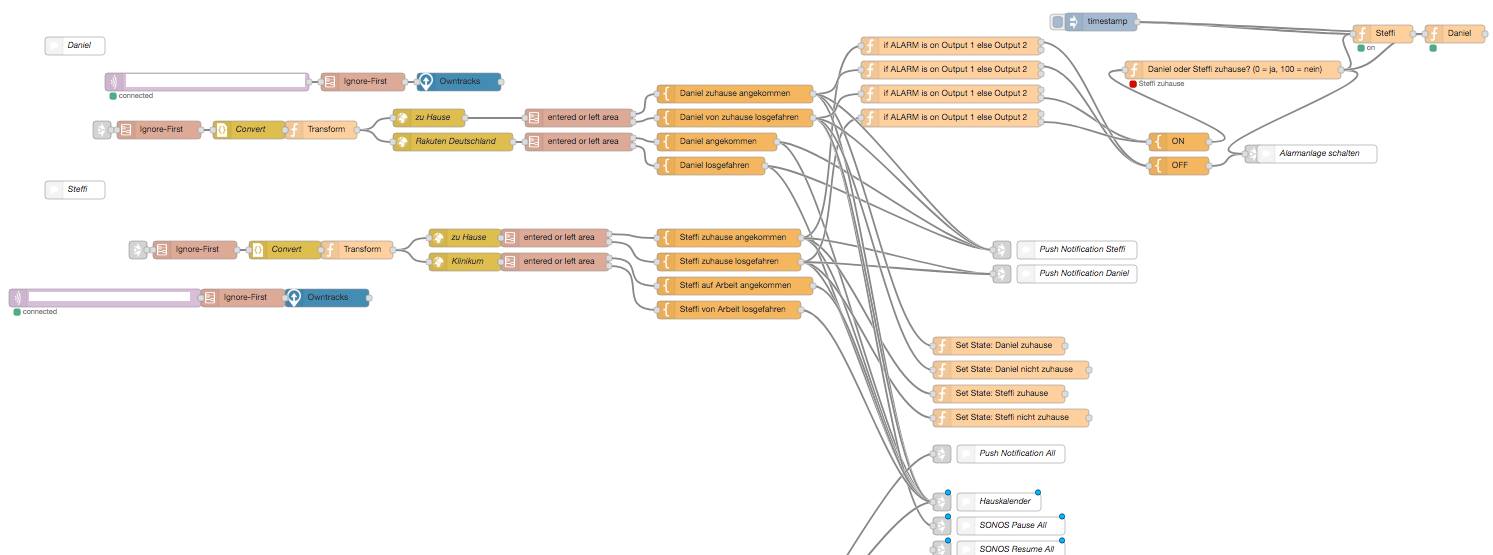
So how do you manage all these sensors and switches, and lights, and displays and speakers…
One way has proven to be very useful and that is by using a standard calendar.
Yes, the one you got right on your smartphone or desktop.
A calendar is a simple manifestation of events in time and thus it can be used to either protocol or schedule events.
So the smart house uses calendars to:
schedule on/off times for switches, alarms, whatever can be switched
notes down locations and can react upon locations on schedule or when members of the household arrive/leave those locations based on calendar events
reminds members in the house on upcoming events
protocols media playback (what song,…) for later search
lets members of the house set events through different means like voice, smartphone, …
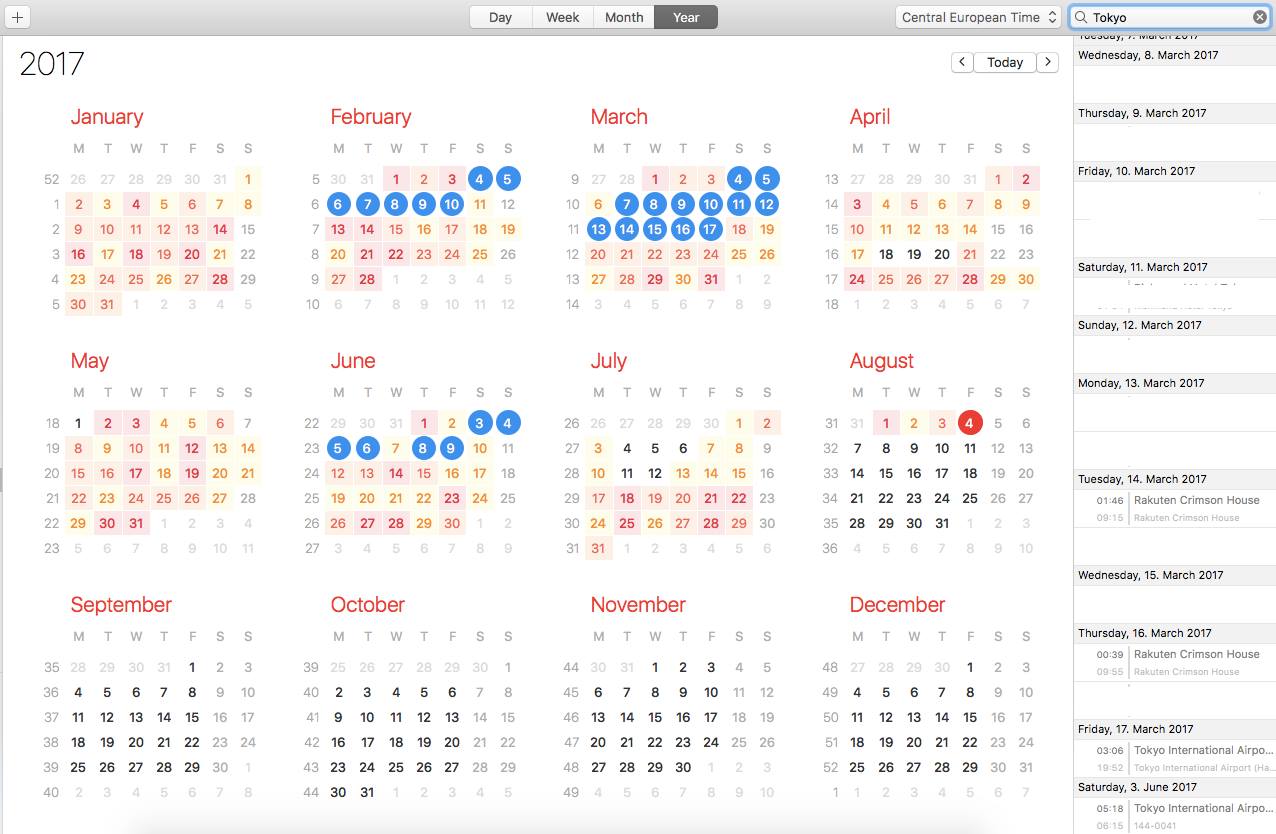
So what am I using this calendar(s) for? Simple. It’s there to track travelling since I know when I was where by simply searching the calendar (screenshot). It’s easy to make out patterns and times of things happening since a calendar/timeline view feels natural. Setting on/off times and such is just a bliss if you can make it from your phone in an actual calendar rather than a tedious additional app or interface.
And of course: the house can only be smart about things when it has a way to gather and access that data. Reacting to it’s inhabitants upcoming and previous events adds several levels of smartness.
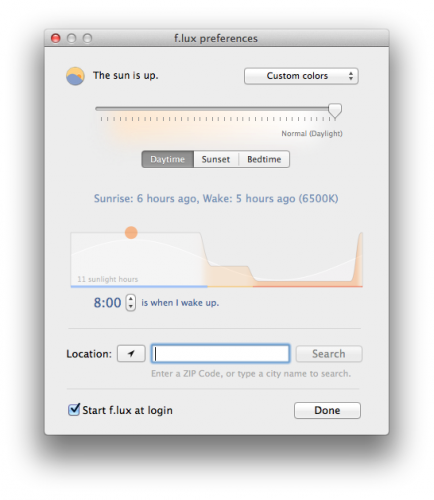
We all know it: After a long day of work you chilled out on your bean bag and fell asleep early. You gotta get up and into your bed upstairs. So usually light goes on, you go upstairs, into bed. And there you have it: You’re not sleepy anymore.
Partially this is caused by the light you turned on. If that light is bright enough and has the right color it will wake you up no matter what.
To fight this companies like Apple introduced things like “NightShift” into iPhones, iPads and Macs.
“Night Shift uses your computer’s clock and geolocation to determine when it’s sunset in your location. It then automatically shifts the colors in your display to the warmer end of the spectrum.”
Simple, eh?. Now why does your house not do that to prevent you being ripped out of sleepy state while tiptoeing upstairs?
Right! This is where the smart house will be smart.
Nowadays we’ve got all those funky LED bulbs that can be dimmed and even their colours set. Why none of those market offerings come with that simple feature is beyond me:
After sunset, when turned on, default dim to something warmer and not so bright in general.
I did implement and it’s called appropriately the “U-Boot light”. Whenever we roam around the upper floor at night time, the light that follows our steps (it’s smart enough to do that) will not go full-blast but light up dim with redish color to prevent wake-up-calls.
The smart part being that it will take into account:
– movement in the house
– sunset and dawn depending on the current geographic location of the house (more on that later, no it does not fly! (yet))
– it’ll turn on and off the light according to the path you’re walking using the various sensors around anyways
Now that you got your home entertainment reacting to you making a phone call (use case #1) as well as your current position in the played audiobook (use case #3) you might want to add some more location awareness to your house.
If your house is smart enough to know where you are, outside, inside, in what room, etc. – it might as well react on the spot.
So when you leave/enter the house:
– turn off music playing – pause it and resume when you come back
– shutdown unnecessary equipment to limit power consumption when not used and start-back up to the previous state (tvs, media centers, lights, heating) when back
– arm the cameras and motion sensors
– start to run bandwidth intense tasks when no people using resources inside the house (like backing up machines, running updates)
– let the roomba do it’s thing
– switch communication coming from the house into different states since it’s different for notifications, managing lists and spoken commands and so on.
There’s a lot of things that that benefit from location awareness.
Bonus points for outside house awareness and representing that like a “Weasly clock”…“xxx is currently at work”.
Bonus points combo breaker for using an open-source service like Miataru (http://miataru.com/#tabr3) for location tracking outside the house.
So you’re listening to this audio book for a while now, it’s quite long but really thrilling. In fact it’s too long for you to go through in one sitting. So you pause it and eventually listen to it on multiple devices.
We’ve got SONOS in our house and we’re using it extensively. Nice thing, all that connected goodness. It’s just short of some smart features. Like remembering where you paused and resuming a long audio book at the exact position you stopped the last time. Everytime you would play a different title it would reset the play-position and not remember where you where.
With some simple steps the house will know the state of all players it has. Not only SONOS but maybe also your VCR or Mediacenter (later use-case coming up!).
Putting together the strings and you get this:
Whenever there’s a title being played longer than 10 minutes and it’s paused or stopped the smart house will remember who, where and what has been played and the position you’ve been at.
Whenever that person then is resuming playback the house will know where to seek to. It’ll resume playback, on any system that is supported at that exact position.
Makes listening to these things just so much easier.
Bonus points for a mobile app that does the same thing but just on your phone. Park the car, go into the house, audiobook will continue playback, just now in the house instead of the car. The data is there, why not make use of it?
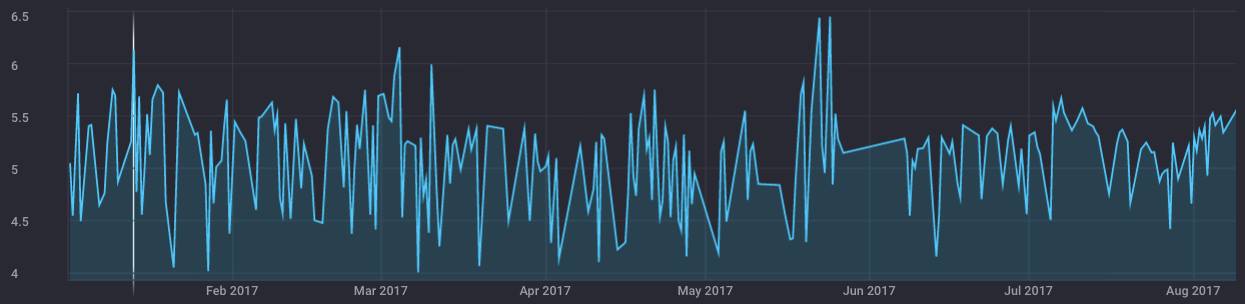
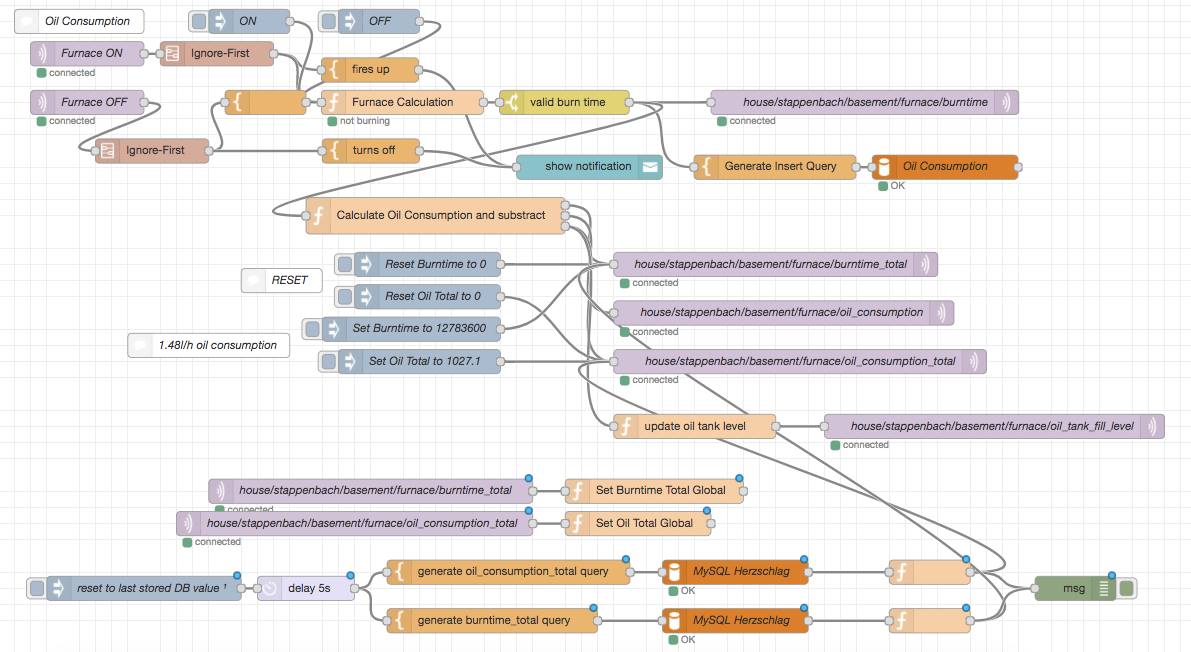
know how much oil your house burns with just measuring the light of the furnace going on/off and calculating oil throughput of the valves with burn-time.
Over the period of 1 year it’s as accurate as +/- 20 liters of oil.
That way you do not have to climb down into the storage space and measure it yourself…smelly job that is.
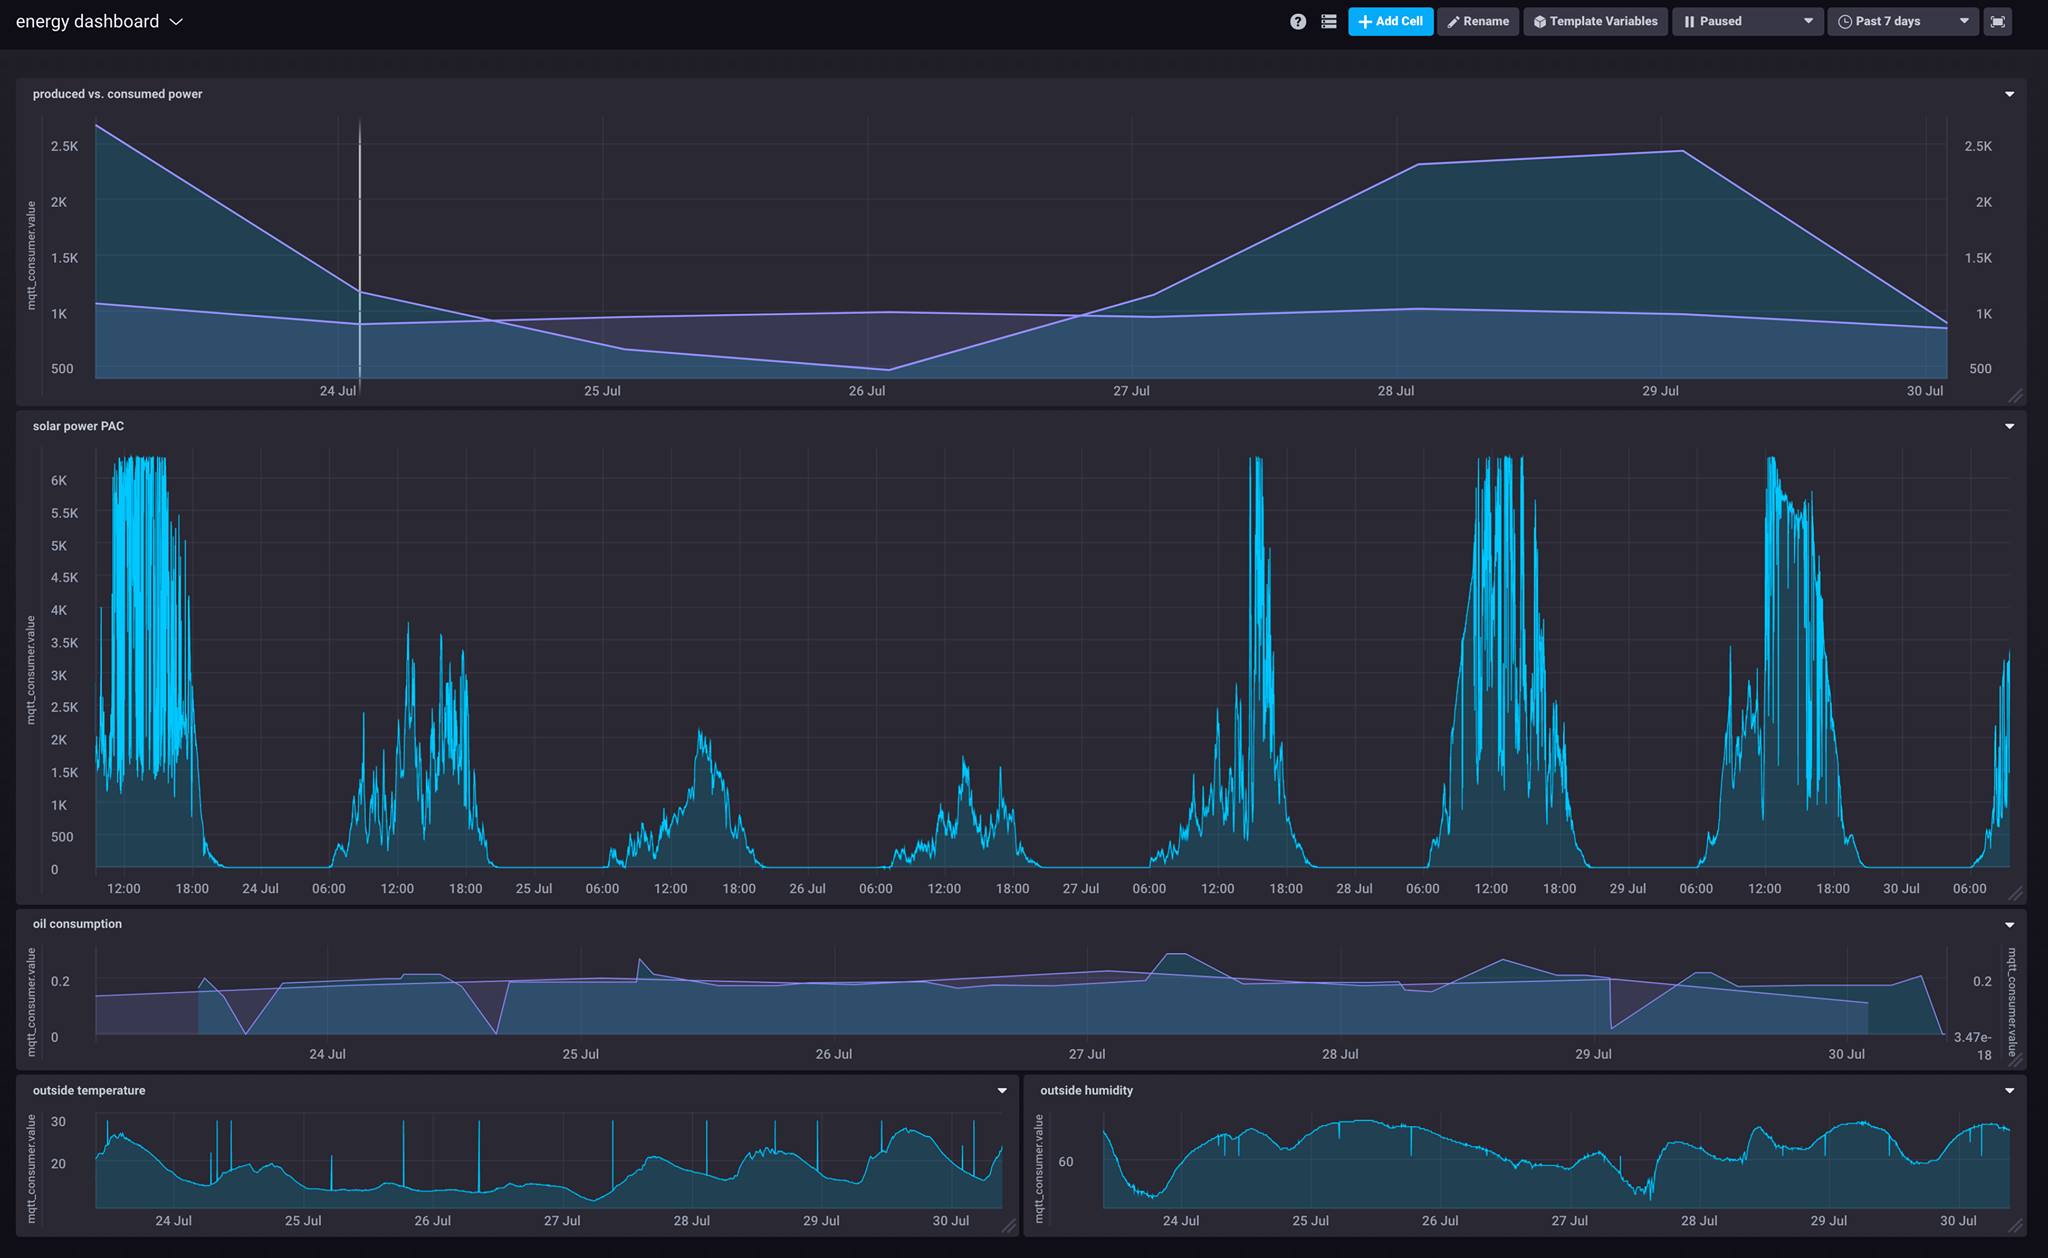
7 day and 30 day graphs for solar power generation, power consumption, oil burn to heat water and outside temperatures to go along with.
Having everything in a time-series-database makes such things a real blast… data wandering around all the telemetry. There are almost 300 topics to pick from and combine.
Yes, generally the solar array produces more than the whole household consumes. Except that one 26th.
Thinking about building a display showing when we are closing in to consume what has been produced in terms of electricity… something like a traffic light getting more red towards the use-up of electricity generated carbon-neutral.
“Ever notice how people texting at night have that eerie blue glow?
Or wake up ready to write down the Next Great Idea, and get blinded by your computer screen?
During the day, computer screens look good—they’re designed to look like the sun. But, at 9PM, 10PM, or 3AM, you probably shouldn’t be looking at the sun.
f.lux fixes this: it makes the color of your computer’s display adapt to the time of day, warm at night and like sunlight during the day.
It’s even possible that you’re staying up too late because of your computer. You could use f.lux because it makes you sleep better, or you could just use it just because it makes your computer look better.”
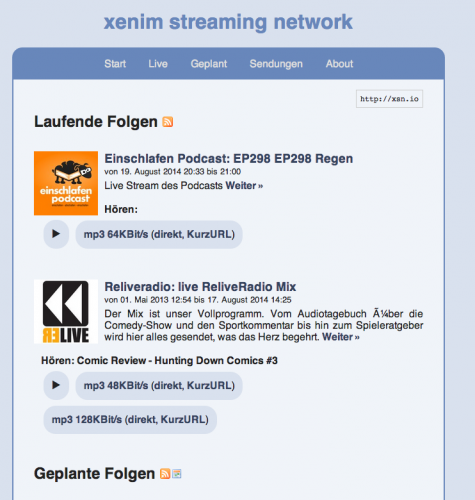
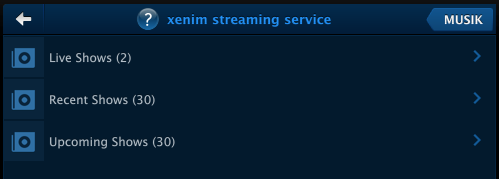
I am a frequent podcast live-stream listener. And being that I am enjoying the awesome service called xenim streaming network.
Any Podcast producer can join the xsn and with that can live-stream his own Podcast while recording. It’s CDN is based on voluntarily provided resources and pretty rock-solid as far as my experience with it goes.
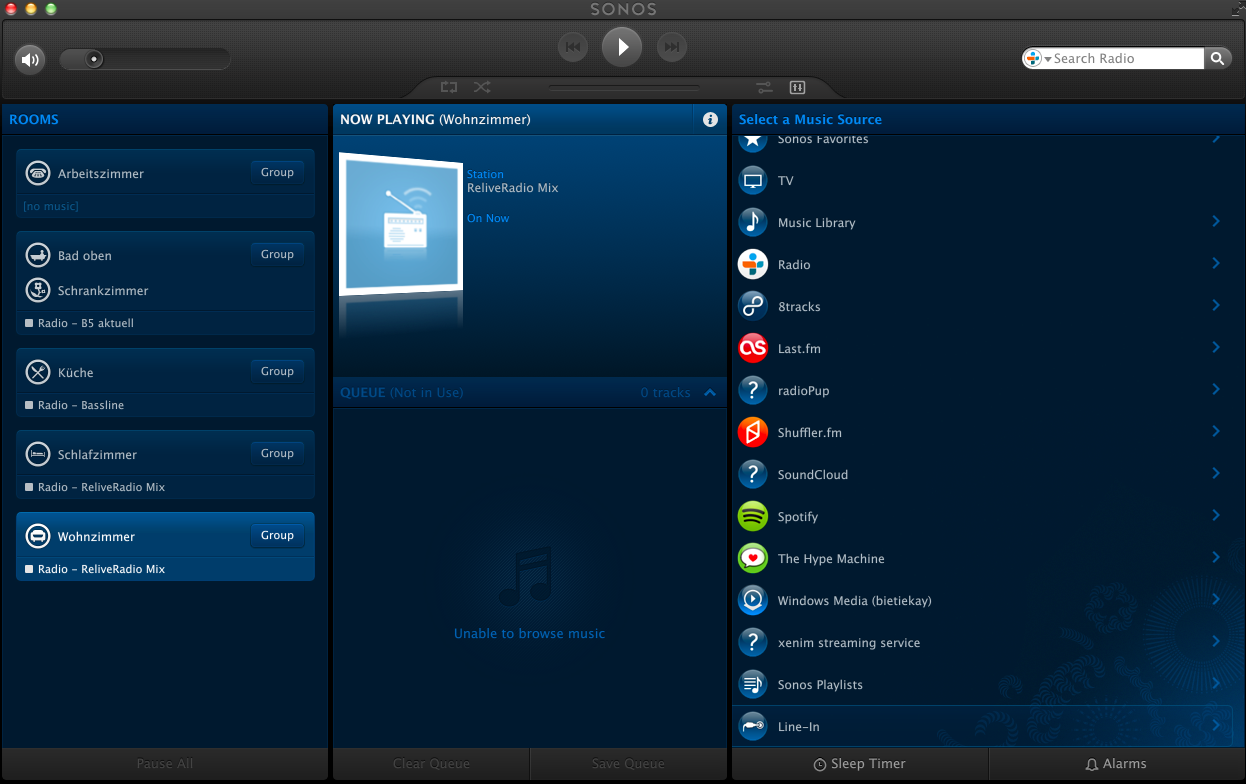
Since I am a frequent user of this – and I’ve got that gorgeous SONOS hardware scattered around my house – I thought I need to have that service integrated into my SONOS set.
The SONOS system knows the concept of “Music Services”. There are quite a lot of them but xsn is missing. But SONOS is awesome and they got an API!
Unfortunately the API documentation is hidden behind a NDA wall so that would be a no-go. What’s not hidden is what the SONOS controllers have to discuss with all the existing services. Most of the time these do not use HTTPS so we’re free to listen to the chatters. I did just that and was able, for the sake of interoperability, to reverse engineer the SONOS SMAPI as far as it is necessary to make my little xsn Music Service work.
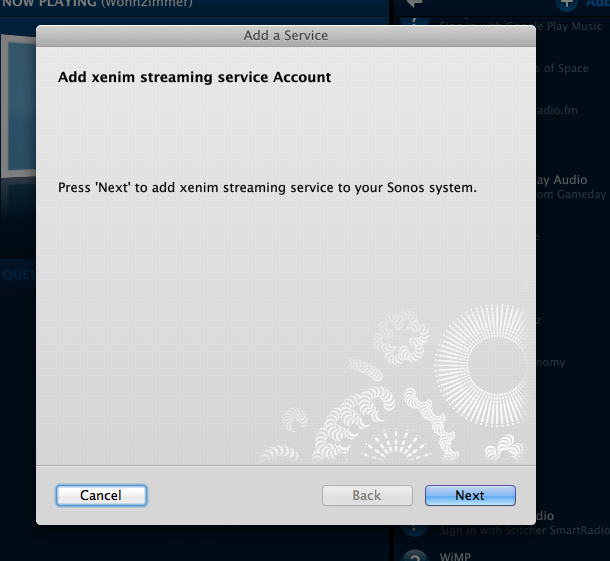
As usual you can get the source-code distributed freely through Github. If you’re not into that sort of compiling and programming things, you are invited to use my free-of-charge provided service. To set it up on your home SONOS just follow these simple steps:
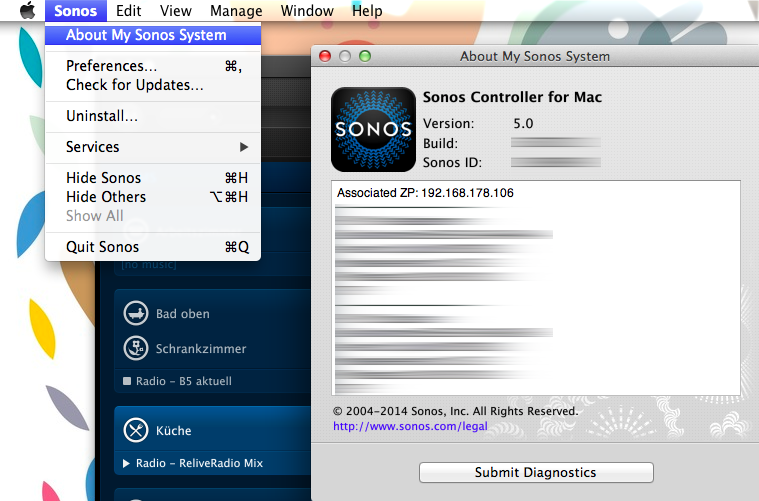
Step 1:Start your SONOS Controller Application and find out the IP address of your SONOS.
Click on “About My Sonos System” and check the IP address written next to the “Associated ZP”.
Step 2: Add the xsn Music Service.
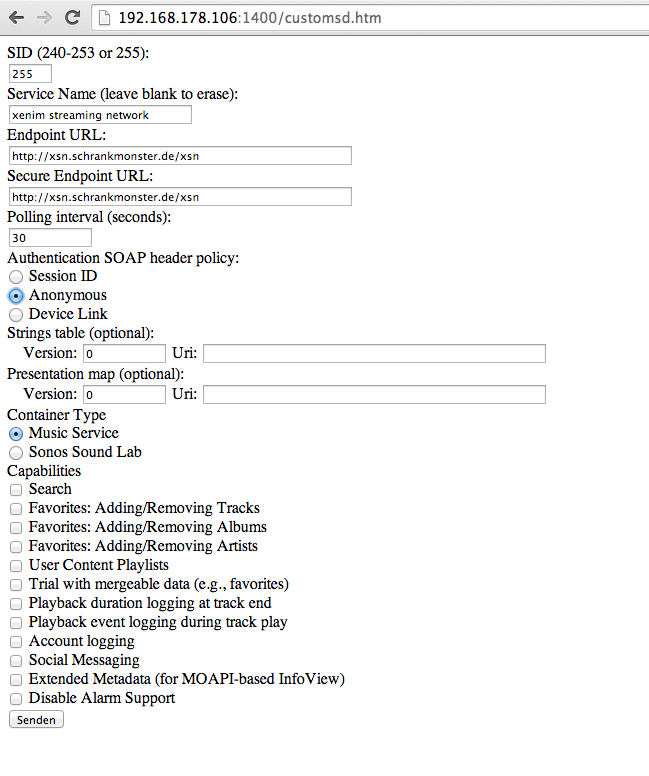
By opening a browser window and browsing to: http://<your-associated-zp-ip>:1400/customsd.htm
When you’re there – fill out the fields as below. The SID is either 255, or if you used that previously, something between 240-253. The service name is “xenim streaming network”. The Endpoint URL and Secure Endpoint URL both are http://xsn.schrankmonster.de/xsn
Set the Polling interval to 30 seconds. Click on the Anonymous Authentication SOAP header policy and you’re good to go. Click on “send” to finish.
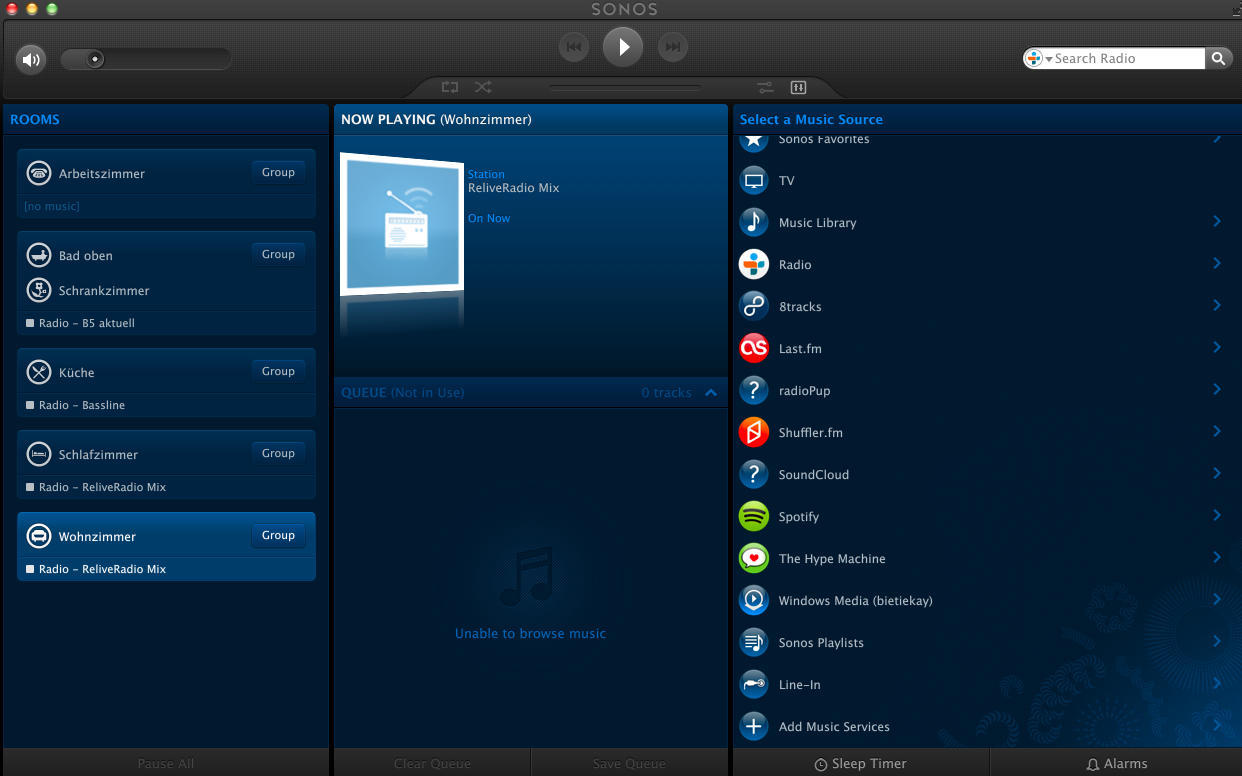
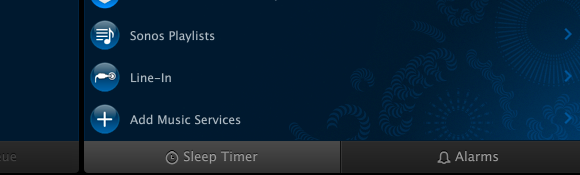
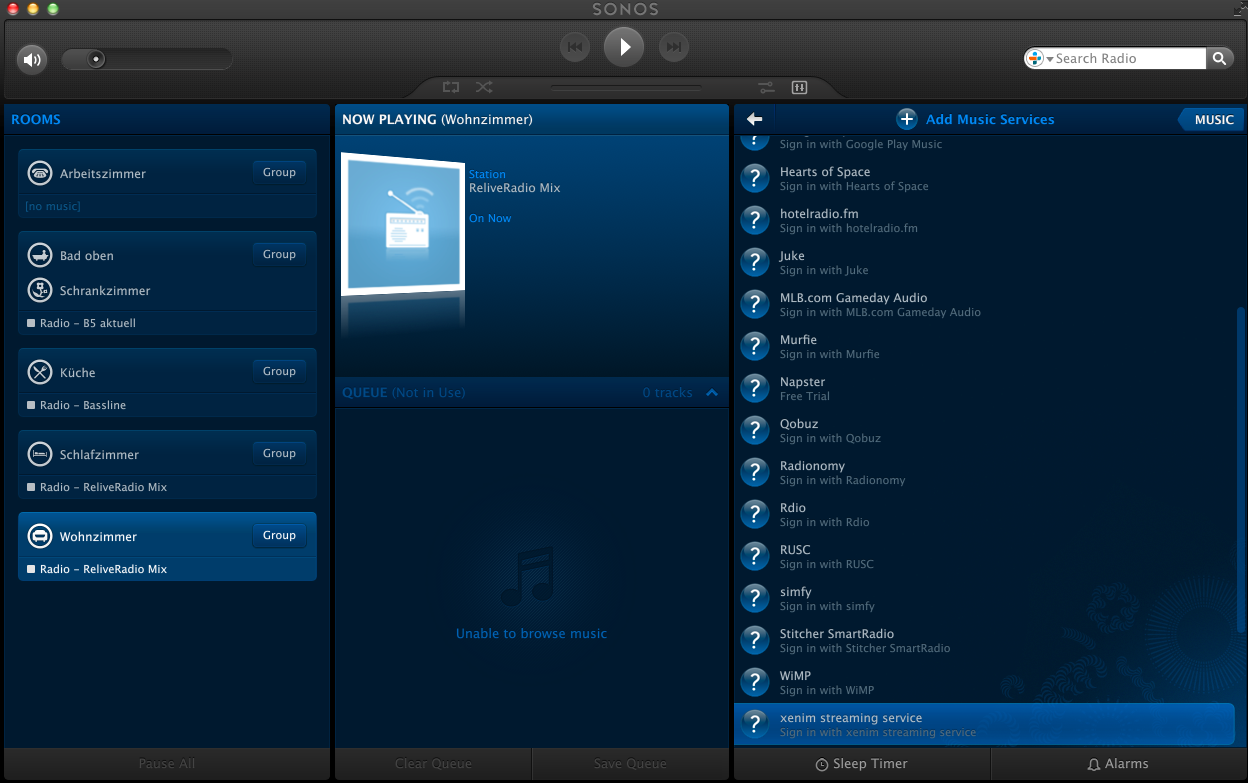
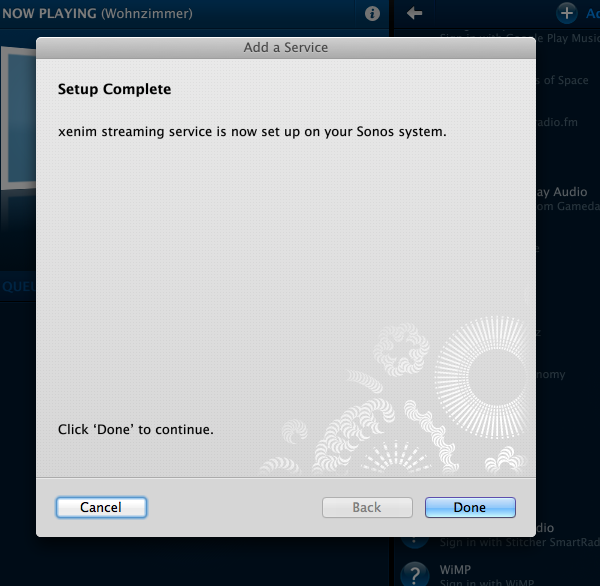
Step 3: Add the new Music Service to your SONOS Controller.
Click on “Add Music Services” and click through until you see “xenim streaming network”. Add the service and you’re set!
p.s.: It’s normal that the service icon is a question mark.
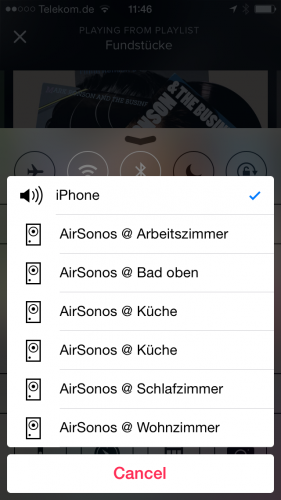
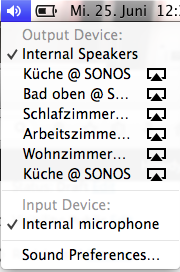
Airplay allows you to conveniently play music and videos over the air from your iOS or Mac OS X devices on remote speakers.
Since we just recently “migrated” almost all audio equipment in the house to SONOS multi-room audio we were missing a bit the convenience of just pushing a button on the iPad or iPhones to stream audio from those devices inside the household.
To retrofit the Airplay functionality there are two options I know of:
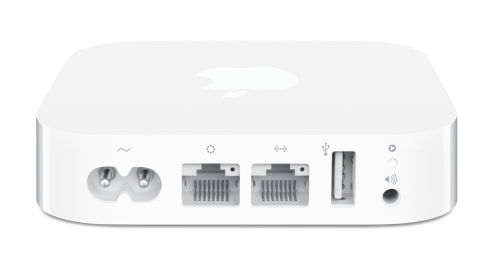
1: Get Airplay compatible hardware and connect it to a SONOS Input.
You have to get Airplay hardware (like the Airport Express/Extreme,…) and attach it physically to one of the inputs of your SONOS Set-Up. Typically you will need a SONOS Play:5 which has an analog input jack.
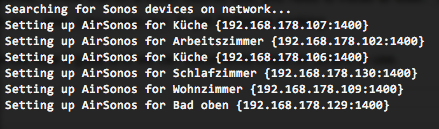
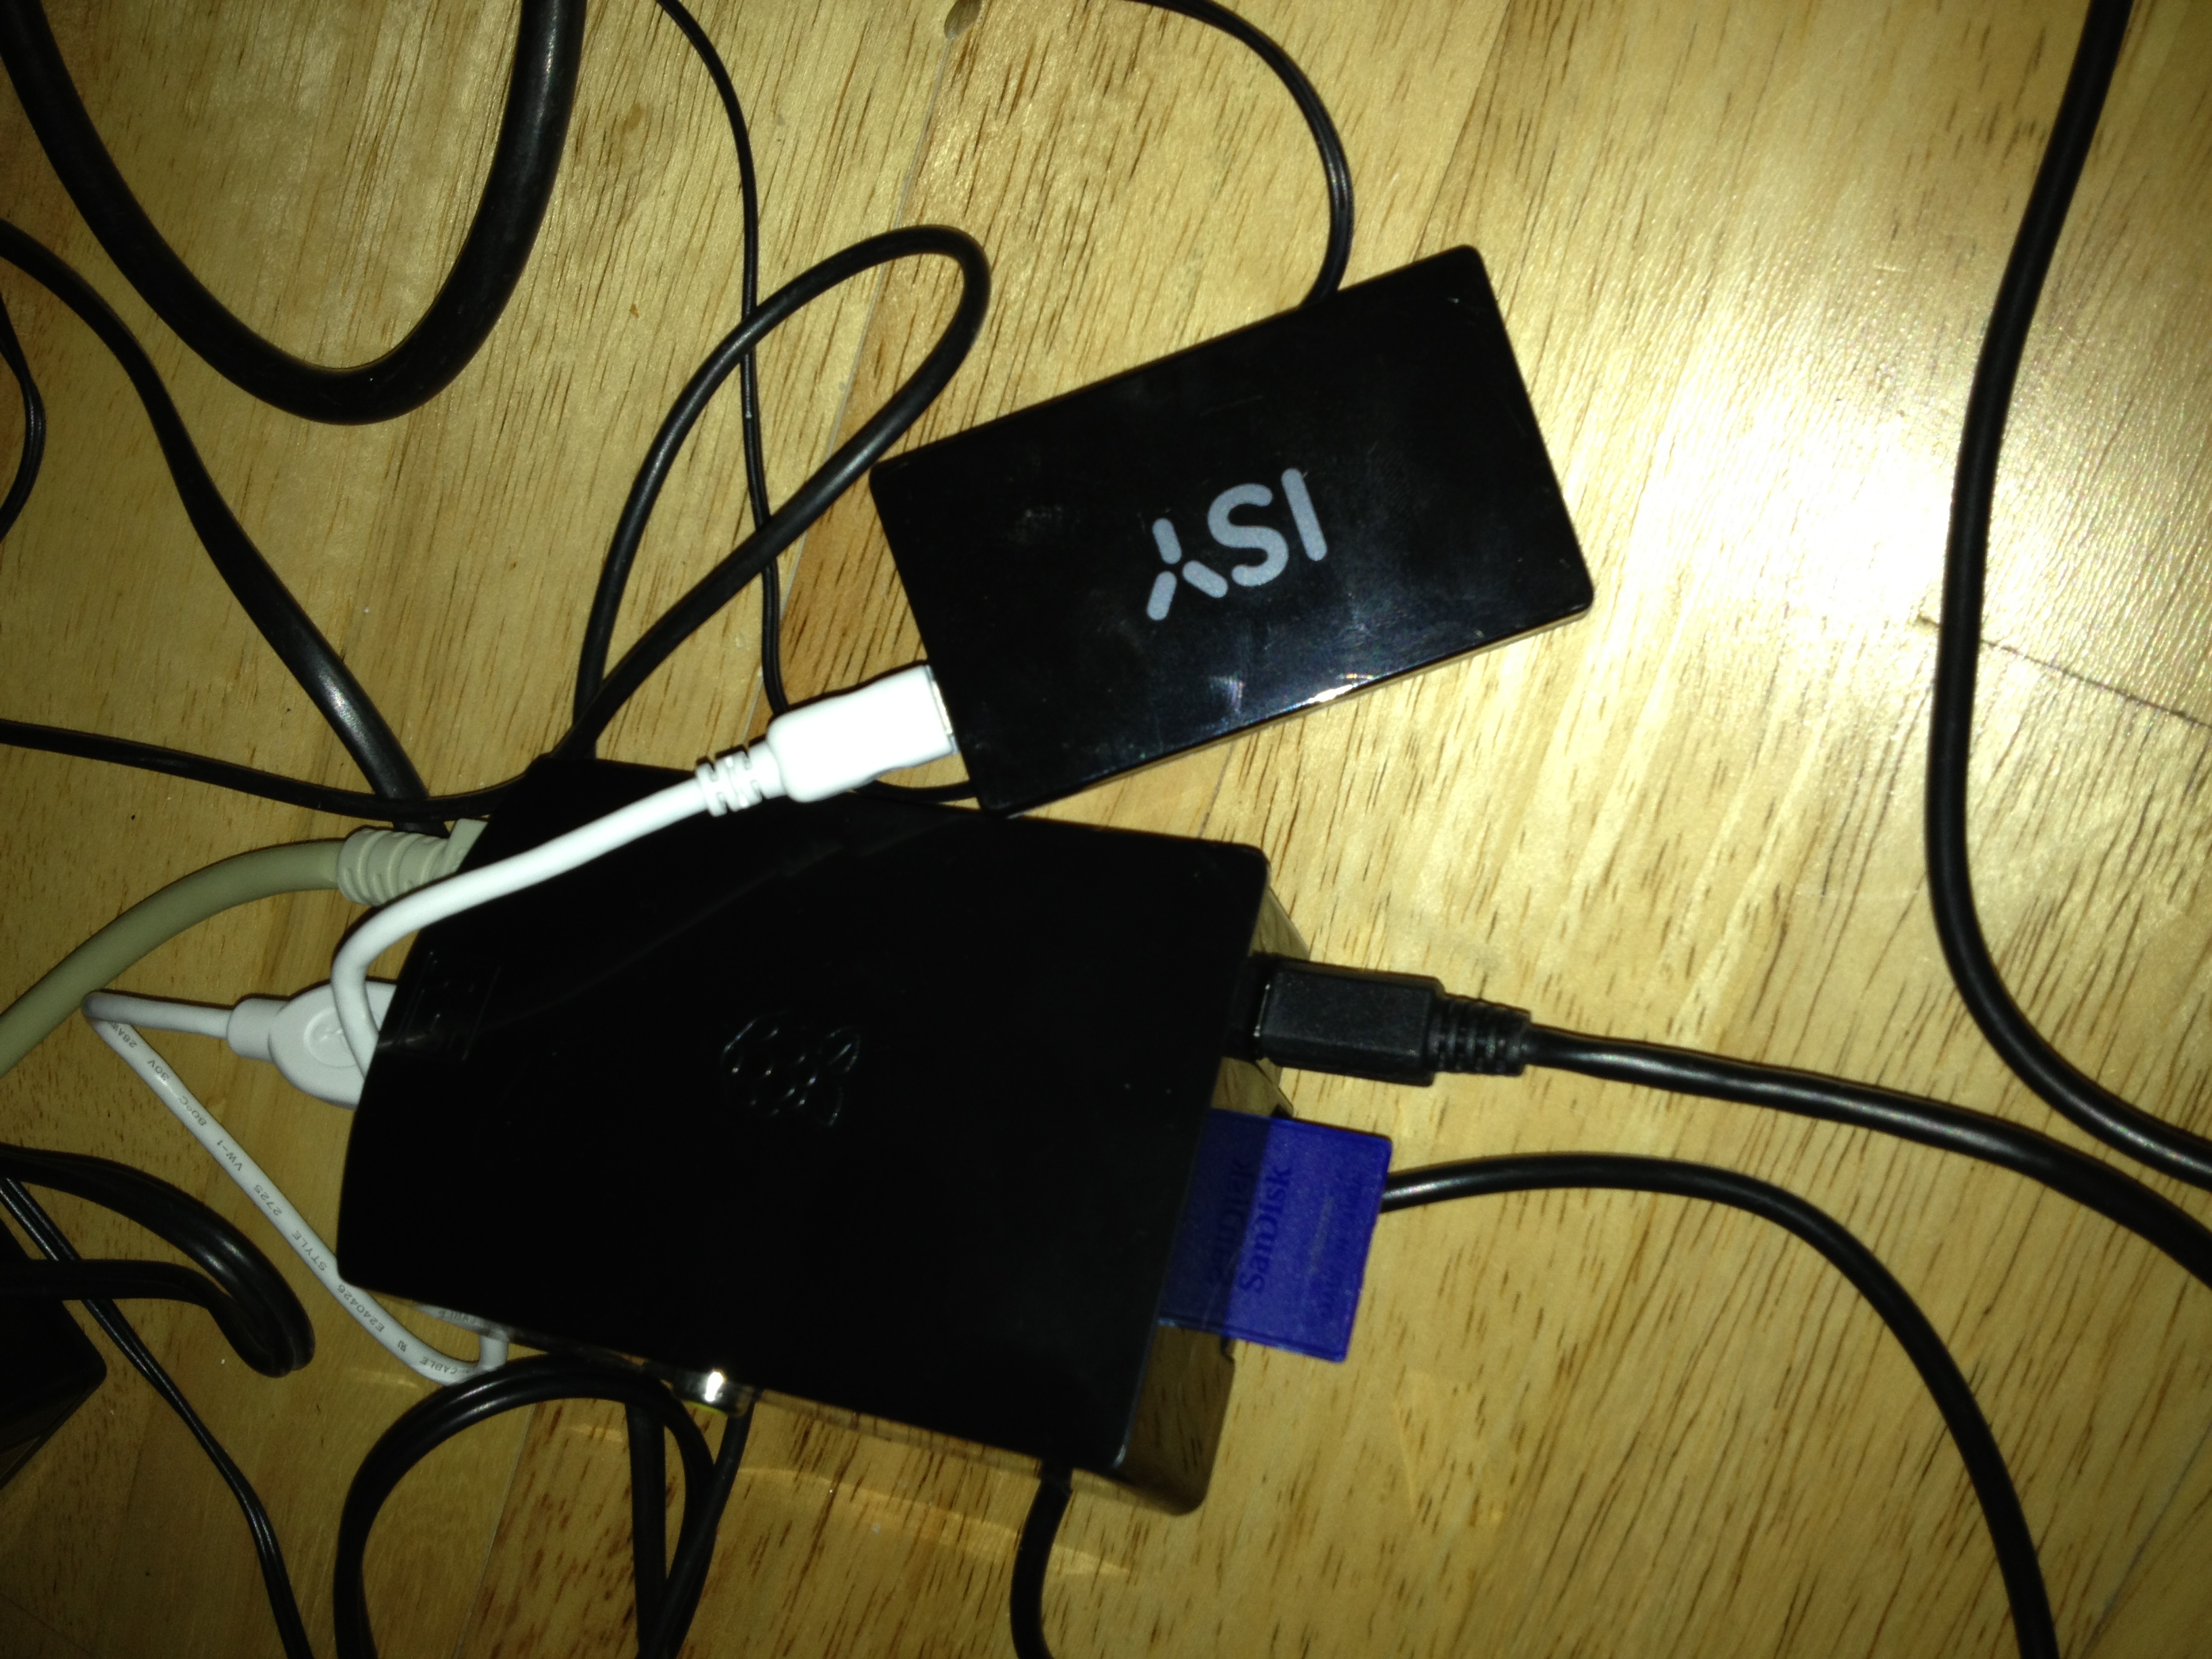
2: Set-Up a RaspberryPi with NodeJS + AirSonos as a software-only solution
You will need a stock RaspberryPi online in your home network. Of course this can run on virtually any other device or hardware that can run NodeJS. For the Pi setting it up is a fairly straight-forward process:
You start with a vanilla Raspbian Image. Update everything with:
sudo apt-get update
sudo apt-get upgrade
Then install NodeJS according to this short tutorial. To set-up the AirSonos software you will need to install additional avahi software. Especially this was needed for my install:
“The internet of things” is a buzzword used more and more. It means that things around you are connected to the (inter)network and therefore can talk to each other and, when combined, offer fantastic new opportunities.
Yeah right.
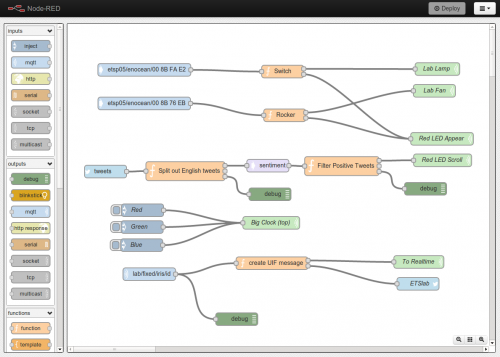
So NodeRed is a NodeJS based toolset that allows you to create so called “flows” (see picture above). Those flows determine what reacts and happens when things happen. Fantastic, told you!
Since my wife started working as a photographer on a daily basis the daily routine of getting all the pictures off the camera after a long day filled with photo shootings got her bored quickly.
Since we got some RaspberryPis to spare I gave it a try and created a small script which when the Pi gets powered on automatically copies all contents of the attached SD card to the houses storage server. Easy as Pi(e) – so to speak.
So this is now an automated process for a couple of weeks – she comes home, get’s all batteries to their chargers, drops the sd cards into the reader and poweres on the Pi. After it copied everything successfully the Pi sends an eMail with a summary report of what has been done. So far so good – everything is on our backuped storage server then.
Now the problem was that she often does not immediately starts working on the pictures. But she wants to take a closer look without the need to sit in front of a big monitor – like taking a look at her iPad in the kitchen while drinking coffee.
So what we need was a tool that does this:
take a folder (the automated import folder) and get all images in there, order them by day
display an overview per day of all pictures taken
allow to see the fullsized picture if necessary
work on any mobile or stationary device in the household – preferably html5 responsive design gallery
it should be fast because commonly over 200 pictures are done per day
it should be opensource because – well opensource is great – and probably we would need to tweak things a bit
It’s called GalleryServer and basically is an embedded http server which takes all .jpg files from a folder (configurable) and offers you some handy tool urls which respons with JSON data for you to work with. I’ve written a very small html user interface with a bit of javascript (using the great html5 kickstart) that allows you to see all available days and get a nice thumbnail overview of each day – when you click on it it opens the full-size image in a new window.
It’s pretty fast because it’s not actively resizing the images – instead it’s taking the thumbnail picture from the original jpg file which the camera placed there during storing the picture. It’s got some caching and can be run on any operating system where mono / .net is available – which is probably anything – even the RaspberryPi.
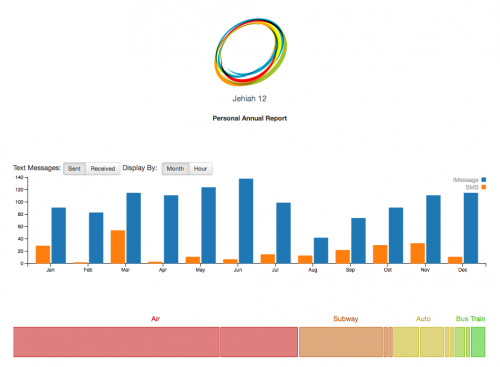
The report for 2012 is in! Since 2008 Jehiah Czebotar is monitoring his daily life and he is compiling a report from that data for everyone to read. He self says that this is a hat tip to Nicholas Felton who himself is releasing beautiful yearly reports of statistics around his life.
I am a fan of those nice graphics and statistics about the life. It really gives you insights that you wouldn’t be able to get otherwise. Especially with my own home automation and self-monitoring ambitions it’s quite a load of new ideas coming in from these nice graphics.
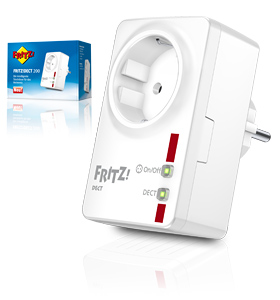
Usually the actors that allow you to switch power on/off and who measure power usage use the 434Mhz or 868Mhz wireless bands to communicate with their base station. Now the german manufacturer AVM came up with a solution that allows you to switch on/off (with an actual button on the device itself and wireless!) and to measure the power consumption of the devices connected to it.
The unspectacular it looks the spectacular are the features:
switch up to 2300 watts / 10 ampere
use different predefined settings to switch on/off or even use Google Calendar to tell it when to switch
measure the energy consumption of connected devices
it uses the european DECT standard to communicate with a Fritz!Box base station (which is a requirement)
For around 50 Euro it’s quite an investment but maybe I’ll give it a shot – especially the measurement functionality sounds great. Since I do not have one yet I don’t know anything about how to access it through third party software (h.a.c.s.?)
And once again some smart people put their heads together and came up with something that will revolutionize your world. Well it’s ‘just’ home automation but indeed it looks very very promising. Especially the human-machine interface through speech recognition. First of all let’s start with a short introductory video:
“CastleOS is an integrated software suite for controlling the automation equipment in your home – an operating system for your castle, if you will. The first piece of the suite is what we call the “Core Service” – it acts as the central controller for the whole system. This runs on any relatively recent Windows computer (or more specifically, the computer that has an Insteon PLM or USB stick plugged in to it), and creates a network connection to both your home automation devices, and the second piece of the integrated suite – the remote access apps like the HTML5 app, Kinect voice control app, and future Android/iOS apps.” (from the CastleOS page)
So it’s said to be an all-in-one system that controls power-outlets and devices through it’s core service and offering the option to add Kinect based speech recognition to say things like “Computer, Lights!”.
Unfortunately it comes with quite high and hard requirements when it comes to hardware it’s compatible with. A kinect possible exists in your household but I doubt that you got the Insteon hardware to control out devices with.
That seems to be the main problem of all current home automation solutions – you just have to have the according hardware to use them. It’s not quite possible to use anything and everything in a standardized way. Maybe it’s time to have a “home plug’n’play” specification set-up for all hard- and software vendors to follow?
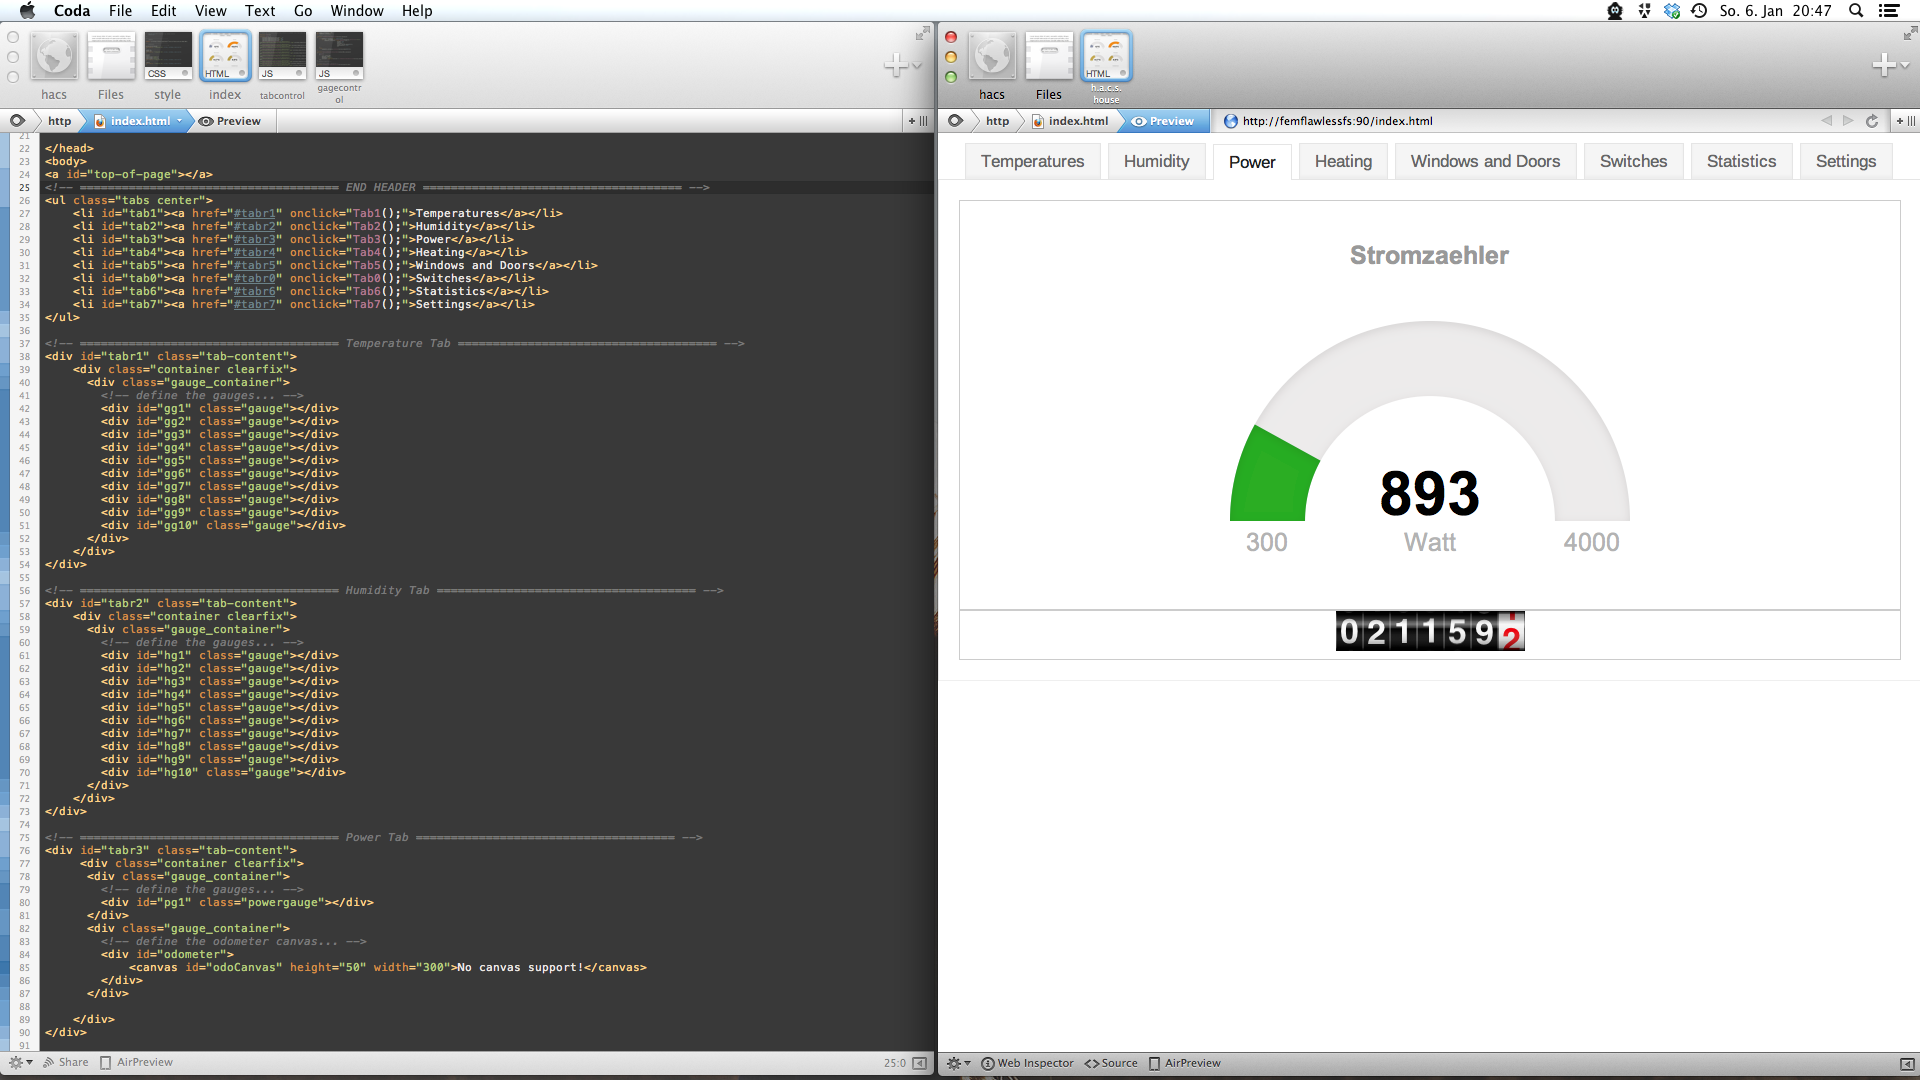
Slow is the right word to describe my html and javascript learning-by-doing progress right now. I have chosen the h.a.c.s. user interface as a valid project to learn html and javascript up to a point where I can start to write useable websites with it. The h.a.c.s. ui seemed to be a good choice because it’s at the moment only used by my family and they are a bunch of battle-proven beta testers.
So first a small video to get an idea what I am implementing right now:
So all you can see is SVG and HTML rendered stuff – made with the help of awesome javascript libraries, as there are:
I plan to add a lot more – like for swiping gestures. So this will be – just like h.a.c.s – a continuous project. Since I switched to OS X entirely at home I use the great Coda2 to write and debug the code. It helps a lot to have two browser set-up because for some reason I still not feel that well with the WebKit Web Inspector.
Another great feature of Coda2 is the AirPreview – which means it will preview your current page in the editor on an iOS device running DietCoda – oh how I love those automations.
So I reached the first goal set for myself for the user interface: It’s doing the things the old UI did and it’s maintainable in addition. I am still struggling with javascript here and there – mainly because the debugging and tracing is oh-so-difficult (or I am to slow understanding).
If you got any recommendation for a javascript editor that can handle multiple includes and debugging (step-by-step, …) and good tracing for events please comment!
I am using some Raspberry Pis to monitor the areas around the house. Mainly because it’s awesome to see how many animals are roaming around in your garden throughout the day. On the Pi I am using the current Debian image and motion to interface with an USB webcam.
Now I wanted to include sensory data into the webcam images – like the current temperature. The nice thing about h.a.c.s. is that it can deliver every sensors data in nice and easy to use JSON. The only challenge now is to get the number into motion.
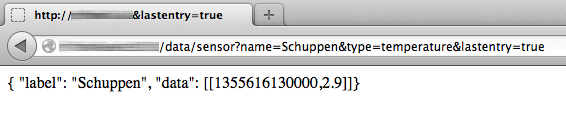
First of all I need to get the URL together where I can access sensor data for the right sensor. In this case it’s the sensor called “Schuppen” – an outdoor sensor measuring the current temperature around the house.
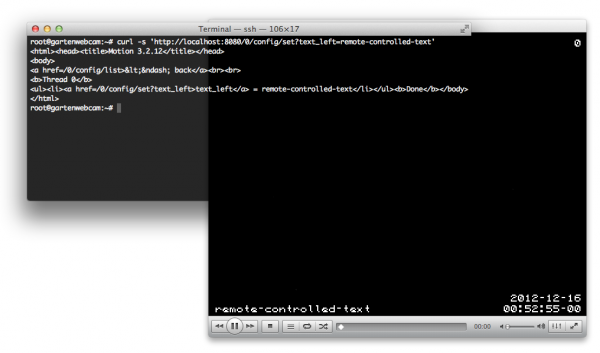
Now there is an easy way to ‘feed’ data into a running motion instance. Motion offers a control port and allows to set the text_left and text_right properties. Doing a simple GET request there allows us to set the text to – in this example – “remote-controlled-text”:
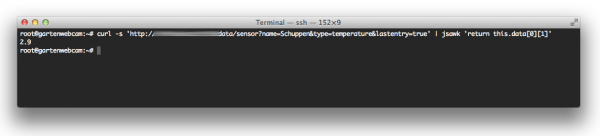
So – that’s how the text is set – now how to get the temperature value, and just that, out of the JSON response of h.a.c.s.? Easy – use jsawk!
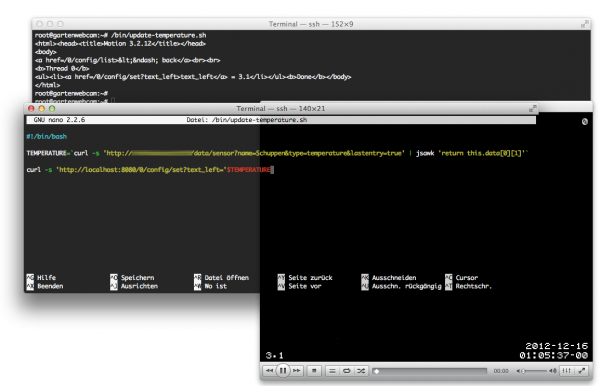
With all that a very small shell script is quickly hacked:
If you want to copy that into your editor, here’s the code:
Isn’t technology great when it brings families closer together, even when they are thousand miles apart?
Home automation does not only mean that you are going to flip some switches and sensor away in every imaginable way. It also means creativity. And being creative with the functionalities at hand is really what makes home automation so interesting.
It’s those creative ways that adds use to the nerdy home automation switches and sensors. It’s what adds practicality.
Good Night Lamp is such a creative solution that makes use of home automation hardware and the internet. To understand the concept, watch a video:
“The Good Night Lamp is a family of connected lamps that lets you communicate the act of coming back home to your loved ones, remotely.”
Well I don’t know if it really needs specialized hardware like those Good Night Lamp products. But certainly if you have some sensory and the ability to flip switches it is fairly easy to come up with workflows and things that should happen when the circumstances are right. In fact I do not believe in highly specialized products like a single-purpose lamp. But I do believe, if those lamps are connected to a network and if you can access them through some sort of API, that those types of products will pave the way to a connected world we only know from science fiction yet.
Another good solution to this is the long promised IP capable light bulb. Engineers were using the “light bulb with an ip adress” as an example for IPv6 for years now. And it seems that the time has come when we really want to assign an ip adress to every lightbulb in our home.
LIFX is a good start concept and in a couple of months there will be more manufacturers who are offering networked light bulb solutions.
I was asked if it would be possible to get the ELV MAX! Cube interfacing functionality outside of h.a.c.s. – maybe as a library. Sure! That is possible. And to speed up things I give you the ELV MAX! Cube C# Library called: MAXSharp
It’s a plain and simple library without much dependencies – in fact there’s only some threading and the FastSerializer. Since I am using this library with h.a.c.s. as well I did not remove the serializer implementation.
There’s a small demo program included which is called MAXSharpExample. The library itself contains the abstractions necessary to get information from the ELV MAX! Cube. It does not contain functionality to control the cube – if you want to add, feel free it’s all open sourced and I would love to see pull requests!
The architecture is based upon polling – I know events would make a cleaner view but for various reasons I am using queues in h.a.c.s. and therefore MAXSharp does as well. The example application spins up the ELV MAX interfacing / handling thread and as soon as you’re connected you can access all house related information and get diff-events from the cube.
Workflows are important – and having a lot of switching possiblities and even more sensors that measure things it begins to become important to be able to implement workflows behind all that hardware.
It’s nice to be able to switch light on and of when you want to. But isn’t it even better to have some sort of workflow behind all sorts of triggers. Think of the possibilities!
If this then that is a service to help you define very simple workflows:
Want an example?
It knows a lot of ‘this’ and a lot of ‘that’. So give it a try or even better, add your own home automation software as ‘this’ and ‘that’ :-)
In times when mobile phone cameras produce pictures of 2 MBytes each and decent DSLR cameras produce pictures in the range of more than 20 Mbytes each – not speaking of the various sensors around the house the question of how all of this is going to be stored is an interesting one.
Prices for mass storage is dropping for years and sized of hard disks are getting bigger and bigger. 3 Tbyte drives are fairly cheap now. Cheap enough to consider serious redundancy even for home use.
Having that home automation hobby and having very specific needs when it comes to home entertainment or even watching TV (we don’t watch live-tv…) we have a relatively huge demand for storage space. That way we are already storing over 10 Tbyte of data, fully encrypted, redundant and backed-up.
Our file server infrastructure grew with the needs over the years.
It started way back in 2003 when I set-up the first fileserver for my apartment back then. It was a fairly huge 19 inch case with 5 hard disks (100 Gbyte each). This machine was filled in 2005 and needed replacement.
We’re in IDE land back then. Because the system hardware died on me due to a power surge all the disks and a new mainboard were seated in a new case with room for a lot of disks.
One interesting detail might be that I consistently used Windows Server for that purpose.
The machine always wasn’t just a fileserver. It was smtp, imap, nntp and media server all the time. That lead to a growing demand of CPU and memory resources. It started with an 800 Mhz AMD Athlon (which died quickly) and for the next years to come I used a 2.8 Ghz Intel Pentium 4. Everything started with Windows Server 2003 – bought in the Microsoft Store when I was a Microsoft employee.
Diskspace demand kept growing and in 2009 a new case, new mainboard + memory and new disks where due.
Since 2009 a Core4Quad Q9550 with 2.8 Ghz and 16 Gbyte of Memory is the heart of our fileserver. Since we’re frequently live-transcoding video streams to feed iPads and iPhones around the house that machine has plenty of grunt to feed the demand. We can have 2 iPhones and 2 iPads playing 720p content without getting stutters. Back in 2009 we also switched to a mixed IDE and SATA setup as you can see in the picture:
Plenty of room when the new case arrived – it was getting crowded just 2 years later in 2011. Every seat was taken – which means 13 disks are in that case and 1 attached through USB.
That adds up to more than 16 Tbyte of raw storage. In 2011 we also upgraded to Windows Server 2008. We never lost a bit with that operating system, not under the heaviest load and even through serious hardware malfunctions. A lot of disks of those 13 died throughout the years: Almost 1 every 2 months was replaced – most of them through extended waranties – of course we have a spare always ready to take the place. Only one time I had to rush to a store to get a replacement drive when two disks failed short after each other. That’s why there’s that 2 Tbyte drive in the 1.5 Tbyte compound…
So it’s getting full again. Since that case isn’t really holding more disks and replacing them is getting harder because of the tight fit the idea was born to now add a bigger case but to just add a NAS/SAN which holds between 6 to 8 disks at once, comes with it’s own redundancy management and exports one big iSCSI volume.
That said a network card was added to the fileserver and a QNAP TS-859 Pro+ 8-bay appliance was bought. This one is a shiny black device which uses less power then an aditional case with extra cpu and memory would have use and after calculating through a number of combinations it’s even the cheapest solution for an 8 drive set-up.
After some intensive testing it seems that the iSCSI approach is the most robust one. Since I am just done with testing the appliance the next step is to buy drives. So stay tuned!
It’s been some weeks since I wrote a status update on the ELV MAX! cube protocol reverse engineering and integration into my own home automation project called h.a.c.s..
So first of all I want to give a short overview over what has been achieved so far:
I wrote a C# library, highly influenced by a PHP implementation from the domotica forum, which allows you to continuesly get status information from the ELV MAX! cube with current (1.3.6) firmware. It is tested so far with a fairly big set-up for the ELV MAX! cube (see below)
I was able to integrate that library into my own home automation project called h.a.c.s. – There the ELV MAX! cube is just another device, alongside a EzControl XS1 and a SolarLog 500. The cube is monitored using my library and diff-sets as well as status information are stored automatically with the h.a.c.s. built-in mechanisms. In fact you can access for example the window shutter contact information just like you would with any other door contact in the EzControl XS1.
You can use events coming from the ELV MAX! cube to create new events – how about switching off/on devices when opening/closing windows?
Every bit of information from all integrated sensor monitoring and actor handling devices come together in h.a.c.s.
I started the reverse engineering with just one shutter contact and one thermostat. After all my test were successful I went for the big package and ordered some more sensors. This is how the setup is currently configured:
ELV MAX! set-up
I’ve learned a lot of interesting things about the ELV MAX! cube hardware and software. One is that you need to be ready for surprised. The documentation of the cube tells you the following:
Did you spot the funny fact? 50 devices – we’re well below that limit. 10 rooms – holy big mansion batman! We’re well over that. How is that possible? Well take it as a fact – you can create more than 10 rooms. And that is very handy. I’ve created 13 rooms and there are probably more to come because those shutter contacts are quite cheap and can be used for various other home automation sensory games. The tool to set-up and pair those sensors just came up with a notice that said “Oh well, you want to create more than 10 rooms? If you’re sure that you want that we allow you to, but hey, don’t blame us!”. Cool move ELV! – As of now I haven’t found any downside of having more than 10 rooms.
All my efforts started with firmware version 1.3.5. This firmware seemed to have some severe memory leaks – because just by retrieving the current configuration information every 10 seconds the device would stop communicating after more then 48 hours. Only a reboot could revive it – sometimes amnesia set in which led to a house roundtrip for me.
With some changes in the library (like keeping the connection open as long as possible) and a new firmware version 1.3.6. the cube was way more cooperative and hasn’t crashed for about 1 month now (with 10 seconds update times).
So what does my library do? It is designed to run in it’s own thread. When it’s started it opens a connection to the cube and retrieves the current status and configuration information. Those informations are stored in an object called “House”. This house consists of multiple rooms – and those rooms are filled with window shutter contacts and thermostats. All information related to those different intances are stored along with them. The integration into h.a.c.s. allows the library to generate sensor and actor events (like when a temperature changes, a window opens/closes) which are passed back to h.a.c.s. and handled in the big event loop there.
With all that ELV MAX! cube data I wanted to plug a quite nice tool that I am using in the iPhone and the iPad. It’s called “Moni4home” and it allows you to control the EzControl XS1 directly. Because it’s only accessing the EzControl XS1 I used h.a.c.s. to “inject” additional sensor data into the standard EzControl XS1 data. So basically data flow is like this: iPad app accesses h.a.c.s. which acts as a proxy. h.a.c.s. retrieves the EzControl XS1 sensor and actor data and injects additional virtual sensors like those from the ELV MAX! cube. h.a.c.s. then sends that beefed up data to the iPad app. Voilá!
After the successful integration of the ELV MAX! cube I’ve started to work on the next bit of networking home automation equipment in my house – a solar panel data logger called “Solar-Log 500”. This device monitors two solar power inverters and stores the sensory data.
Solar-Log 500 built-in statistics page
“Funny” story first: this device has the same problem like the ELV MAX! cube. When you start to poll it every 10 seconds (or less) it just stops operating after about 20 hours. Bear in mind: In case of the Solar-Log I just http-get a page that looks like this in the browser:
And by doing so every 10 seconds the device stops working. I am using the current firmware – so one workaround for that issue is to planable reboot the Solar-Log at a time when there is no sun and therefore nothing to log or monitor.
Beside that it’s a fairly easy process: Get that information, log it. Done.
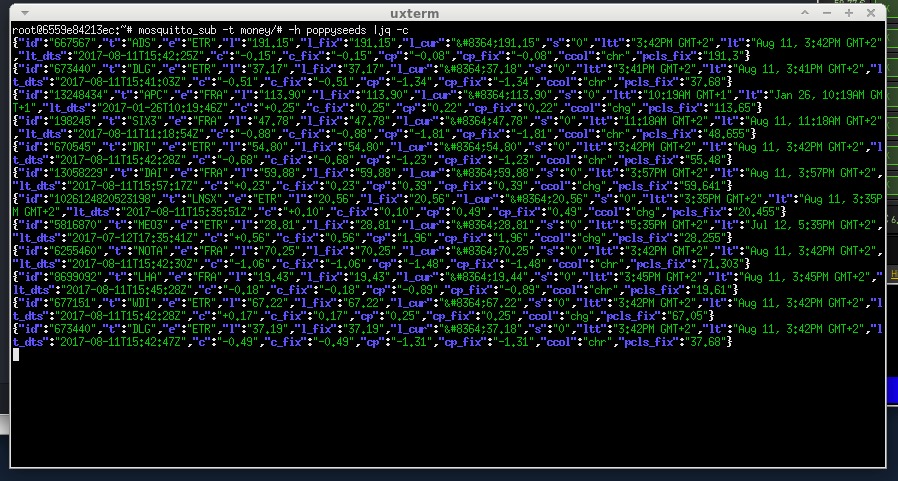
that’s how the console output of h.a.c.s. looks like with all sensors and devices active (Mozilla+Wilma are the two aquaria :-))
So there you have it – h.a.c.s. interfacing with three different devices and roughly 100 sensors and actors over 434mhz/868mhz, wireless and wired network. There’s still more to come!
A lot of people seem to dive into home automation these days. Apparently Andreas is also at the point of starting his own home automation project. Good to know that he also is using the EzControl XS1 and in the future maybe even the ELV MAX! cube. Party on Andreas!
It’s a common use case: you’ve got some JSON formatted data and you want to interface with it using your favourite programming language C#. You can write the appropriate classes yourself, or you could use the fabulous json2csharp helper page.


 You have to get Airplay hardware (like the Airport Express/Extreme,…) and attach it physically to one of the inputs of your SONOS Set-Up. Typically you will need a SONOS Play:5 which has an analog input jack.