EFI boot app in C#

Zero-Sharp is using the CoreRT runtime to very impressively demonstrate how to get down to bare-metal application operation using C#. It compiles programs into native code…

Everything you wanted to know about making C# apps that run on bare metal, but were afraid to ask:

A complete EFI boot application in a single .cs file.

Michal Stehovsky on Twitter

This is seriously impressive and the screenshot says it all:

a very cool “Hello World“.

OpenSource drawing: Krita

I just recently learned about Krita. An open source drawing application that allows you to… oh well… do free-hand drawings.

Krita is a FREE and open source painting tool designed for concept artists, illustrators, matte and texture artists, and the VFX industry. Krita has been in development for over 10 years and has had an explosion in growth recently. It offers many common and innovative features to help the amateur and professional alike. See below for some of the highlighted features.

Krita highlights

Taking a look at the gallery yields that I cannot draw. Frustration about that is limited because there’s so much nice drawings to gaze at!

Also this is a multi-platform application. It’s available for Windows, macOS and for Linux.

intuitive shell command explanations

You want or you have to use shells – command line interfaces. And it’s something that always leads to stackoverflow / google sessions. Or you’re studying man-pages for hours.

But there’s a better way to view and understand these man-pages. There’s explainshell.com. Here is an example of what it can do:

As you can see it not only takes one command and shows you the meaning/function of a parameter. But it takes complex structured commands and unfolds it for you nicely onto a web page. Even the harder examples:

bringing the thinclient back

I had to solve a problem. The problem was that I did not wanted to have the exact same session and screen shared across different work places/locations simultaneously. From looking at the same screen from a different floor to have the option to just walk over to the lab-desk solder some circuits together and have the very same documents opened already and set on the screens over there.

One option was to use a tablet or notebook and carry it around. But this would not solve the need to have the screen content displayed on several screens simultaneously.

Also I did not want to rely on the computing power of a notebook / tablet alone. Of course those would get more powerful over time. But each step would mean I would have to purchase a new one.

Then in a move of desperation I remembered the “old days” when ThinClients used to be the new-kid in town. And then I tried something:

I just recently had moved all house server infrastructure over to Linux and Docker. So what would keep me from utilizing the computing power of that one beefy server in the basement to host all of my desktop needs?

It turns out: Nothing really. Docker is well prepared to host desktop environments. With a bit of tweaking and TigerVNC Xvnc I was able to pre-configure the most current Ubuntu to start my preferred Mate desktop environment in a container and expose it through VNC.

If you wanted to replicate this I would recommend this repository as a starting point.

Even better I found that the RaspberryPi single board computers come with a free pre-licensed and accelerated version of RealVNC.

So I took one of those RaspberryPis, booted up the Raspbian Desktop lite and connected to the dockers VNC port. It all worked just like that.

this is the RaspberryPi client with the windowed docker container VNC session

The screenshot above holds an additional information for you. I wanted sound! Video works smooth up to a certain size of the moving video – after all those RaspberryPis only come with sub Gbit/s wired networking. But to get sound working I had to add some additional steps.

First on the RaspberryPI that you want to output the sound to the speakers you need to install and set-up pulseaudio + paprefs. When you configure it to accept audio over the network you can then configure the client to do so.

In the docker container a simple command would then redirect all audio to the network:

pax11publish -e -S thinclient

Just replace “thinclient” with the ip or hostname of your RaspberryPI. After a restart Chrome started to play audio across the network through the speakers of the ThinClient.

Now all my screens got those RaspberryPIs attached to them and with Docker I can even run as many desktop environments in parallel as I wish. And because VNC does not care about how many connections there are made to one session it means that I can have all workplaces across the house connected to the same screen seeing the same content at the same time.

And yes: The UI and overall feel is silky smooth. And since VNC adapts to some extend to the available bandwidth by changing the quality of the image even across the internet the VNC sessions are very much useable. Given that there’s only 1 port for video and 1 port for audio it’s even possible to tunnel those sessions across to anywhere you might need them.

waking up to another dying hard disk – upgrade time!

At our house I am running a medium-sized operation when it comes to all the storage and in-house / home-automation needs of the family.

This is done by utilizing several products from QNAP, Synology and a custom built server infrastructure that does most of the heavy-lifting using Docker.

This morning I woke up to an eMail stating that one of the mirrored drives in the machine is reporting read-errors.

Since this drive is part of a larger array of spinning-rust style hard disks just replacing it would work but due to the life-time of those drives I am not particularly interested in more replacing in the very near future. So a more general approach seems right.

63083 lifetime hours = 2628 days = 7.2 years powered up

You can see what I mean. This drive is old. Very old. And so are its mates. Actually this is the newest drive of another 6 or so 1.5TB and 1TB drives in this array.

Since this redundant array in fact is still quite small and not fully used as most storage intensive non service-related disk space demands have moved to iSCSI and other means it’s not the case anymore that so many disks, so well redundant with so little disk space are needed anymore. Actual current space utilization seems about 20% of the available 2TB volume.

Time for an upgrade! Taking a look in the manual of the mainboard I had replaced 2 years ago I found that this mainboard does have dual NVMe m.2 ports. From which I can boot according to that same manual.

So I thought: Let’s start with replacing the boot drives and the /var/lib docker portions with something fast.

To my surprise Samsung is building 1 TB NVMe M.2 SSDs to a price I expected to be much higher.

Nice! So let me reeport back when this shipped and I can start the re-set-up of the operating system and docker environment. Which by all fairness should be straight forward. I will upgrade from Ubuntu 16.04 LTS to 18.04 LTS in the same step – and the only more complex things I expect to happen is the boot-from-ZFS(on Linux) and iSCSI set-up of the machine.

If you got any tips or best-practice, let me know.

I just have started the catch-up on what happpened in the last 2 years to ZFS on Linux. My initial decision to use Linux 2 years ago as the main driver OS and Ubuntu as the distribution was based upon the exepectation to not have this as my hobby in the next years. And that expectation was fulfilled by Ubuntu 16.04 LTS.

Join me implementing a neural network to improve accuracy of an OpenSource indoor location tracking system

To all techies reading this:

GIST: I am looking for interested hackers who want to help me implement a neural network that improves the accuracy of bluetooth low energy based indoor location tracking.

Longer version:

I am currently applying the last finishing touched to a house wide bluetooth low energy based location tracking system. (All of which will be opensourced)

The system consists of 10+ ESP-32 Arduino compatible WiFi/Bluetooth system-on-a-chip. At least one per room of a house.

These modules are very low powered and have one task: They scan for BLE advertisements and send the mac and manufacturer data + the RSSI (signal strength) over WiFi into specific MQTT topics.

There is currently a server component that takes this data and calculates a probable location of a seen bluetooth low energy device (like the apple watch I am wearing…). It currently is using a calibration phase to level in on a minimum accuracy. And then simple calculation matrices to identify the most probable location.

This all is very nice but since I got interested in neural networks and KI development – and I think many others might as well – I am asking here for also interested parties to join the effort.

I do have an existing set-up as well as gigabytes of log data.

I know about previous works like „Indoor location tracking system using neural network based on bluetooth

Now I am totally new to the overal concepts and tooling and I start playing with TensorFlow right now.

If you want to join, let me know by commenting!

Source: http://ieeexplore.ieee.org/document/7754772/

use case #3 – sonos auto bookmarker for audiobooks and podcasts

So you’re listening to this audio book for a while now, it’s quite long but really thrilling. In fact it’s too long for you to go through in one sitting. So you pause it and eventually listen to it on multiple devices.

We’ve got SONOS in our house and we’re using it extensively. Nice thing, all that connected goodness. It’s just short of some smart features. Like remembering where you paused and resuming a long audio book at the exact position you stopped the last time. Everytime you would play a different title it would reset the play-position and not remember where you where.

With some simple steps the house will know the state of all players it has. Not only SONOS but maybe also your VCR or Mediacenter (later use-case coming up!).

Putting together the strings and you get this:

Whenever there’s a title being played longer than 10 minutes and it’s paused or stopped the smart house will remember who, where and what has been played and the position you’ve been at.

Whenever that person then is resuming playback the house will know where to seek to. It’ll resume playback, on any system that is supported at that exact position.

Makes listening to these things just so much easier.

Bonus points for a mobile app that does the same thing but just on your phone. Park the car, go into the house, audiobook will continue playback, just now in the house instead of the car. The data is there, why not make use of it?

p.s.: big part of that I’ve opensourced years ago: https://github.com/bietiekay/sonos-auto-bookmarker

How to weigh your cat! – the IoT version

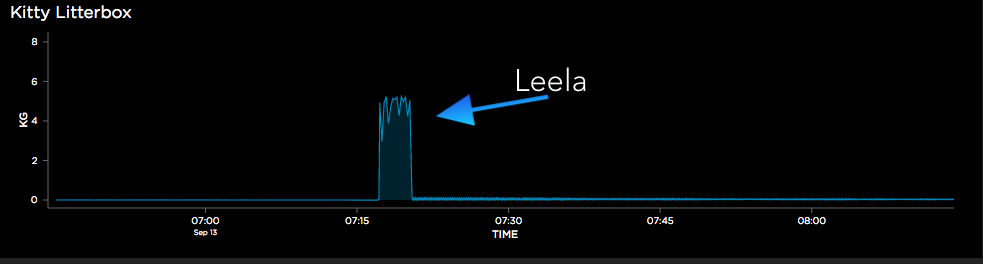
This is Leela. She is a 7 year old lilac white British short hair cat that lives with us. Leela had a sister who used to live with us as well but she developed a heart condition and passed away last year. Witnessing how quickly such conditions develop and evaluate we thought that we can do something to monitor Leelas health a bit to just have some sort of pre-alert if something is changing.

Kid in a Candystore

As this Internet of Things is becoming a real thing these days I found myself in a candy store when I’ve encountered that there are a couple of really really cheap options to get a small PCB with input/output connectors into my house WiFi network.

One of the main actors of this story is the so called ESP8266. A very small and affordable system-on-a-chip that allows you to run small code portions and connect itself to a wireless network. Even better it comes with several inputs that can be used to do all sorts of wonderful things.

And so it happened that we needed to know the weight of our cat. She seemed to get a bit chubby over time and having a point of reference weight would help to get her back in shape. If you every tried to weigh a cat you know that it’s much easier said than done.

The alternative was quickly brought up: Build a WiFi-connected scale to weigh her litter box every time she is using it. And since I’ve recently bought an evaluation ESP8266 I just had to figure out how to build a scale. Looking around the house I’ve found a broken human scale (electronics fried). Maybe it could be salvaged as a part donor?

A day later I’ve done all the reading on that there is a thing called “load-cell”. Those load cells can be bought in different shapes and sizes and – when connected to a small ADC they deliver – well – a weight value.

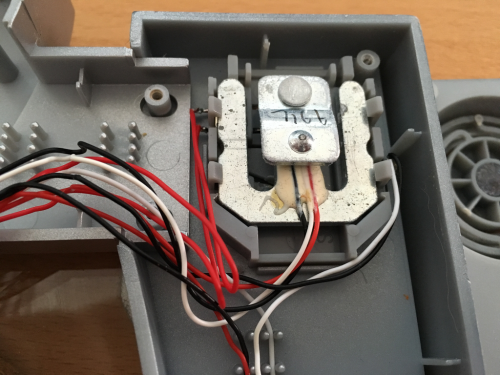
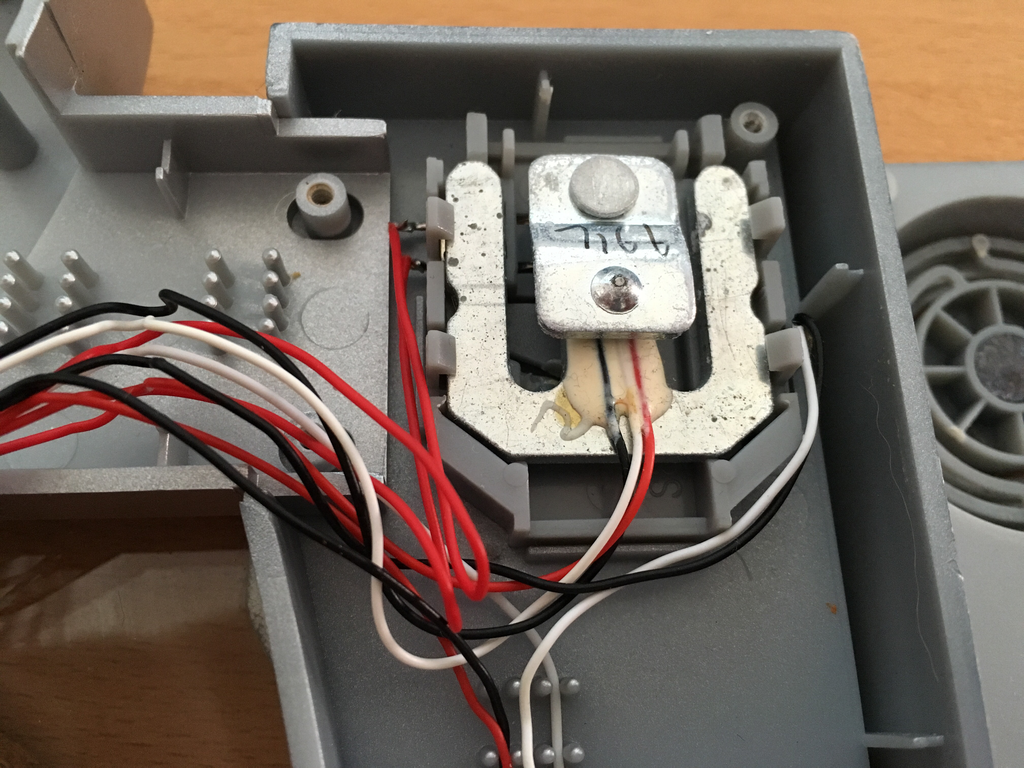
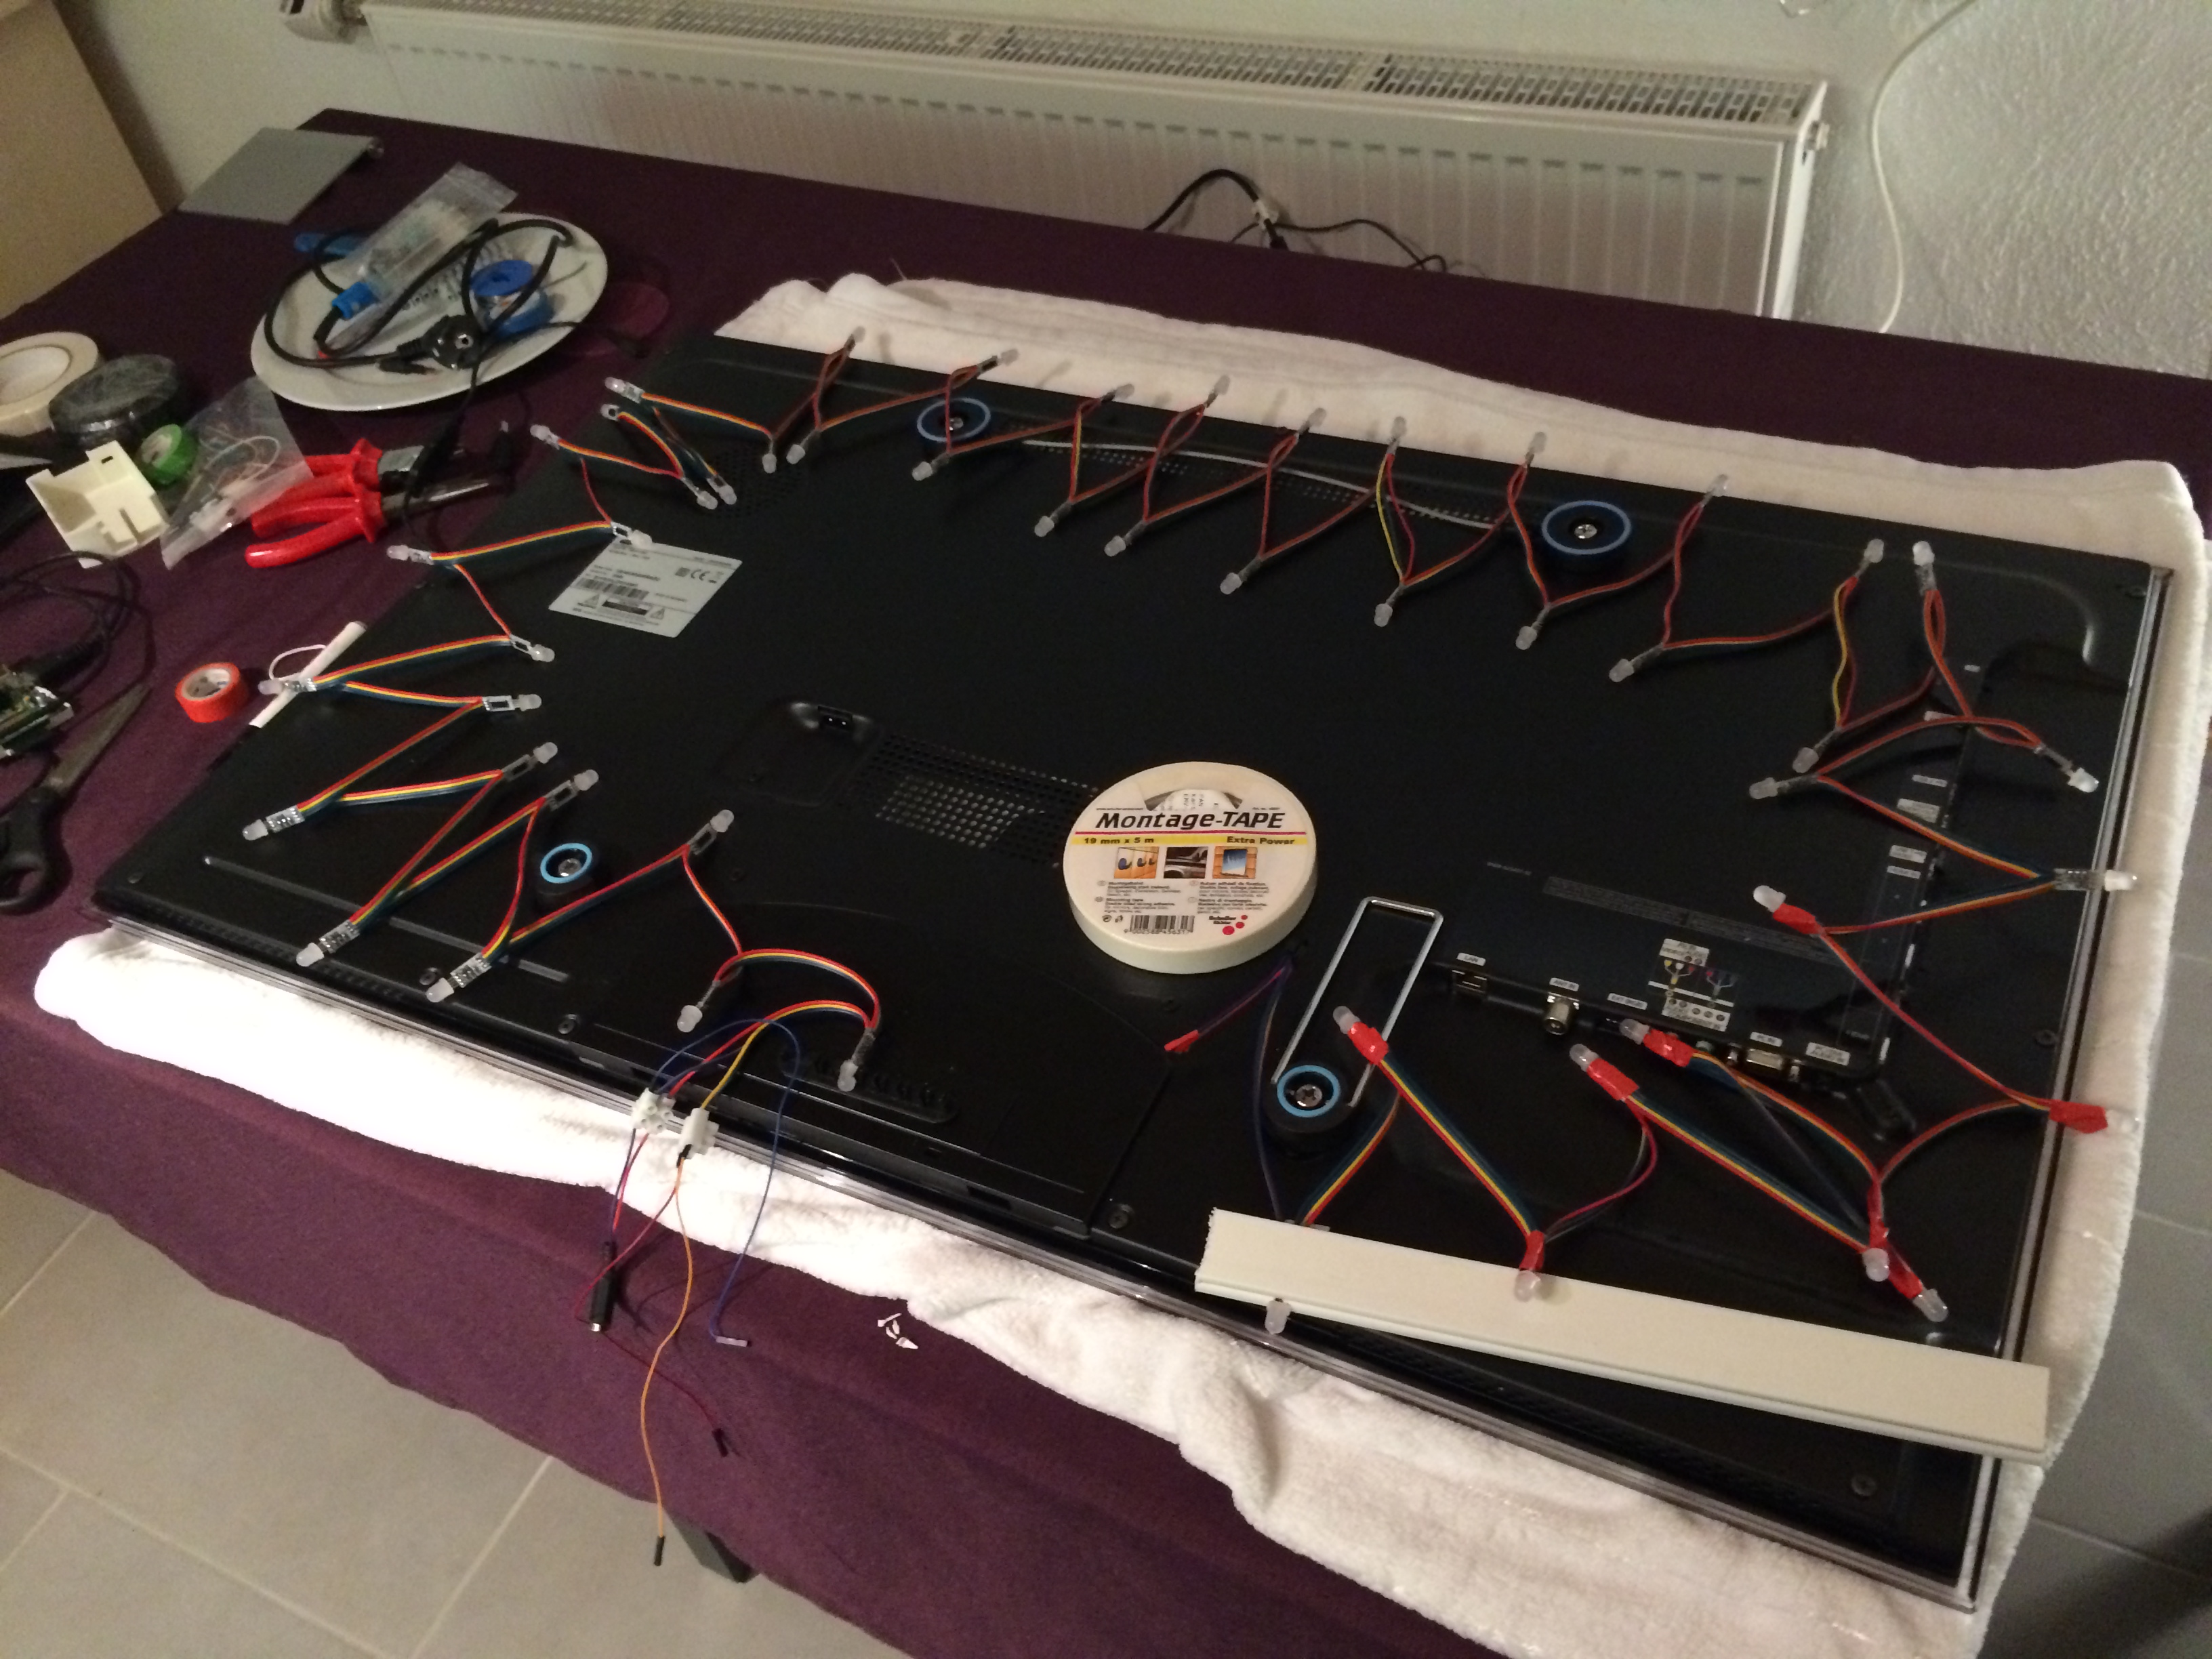
I cracked the human scale open and tried to see what was broken. It luckily turned out to have completely fried electronics but the load-cells where good to go.

Look at this load cell:
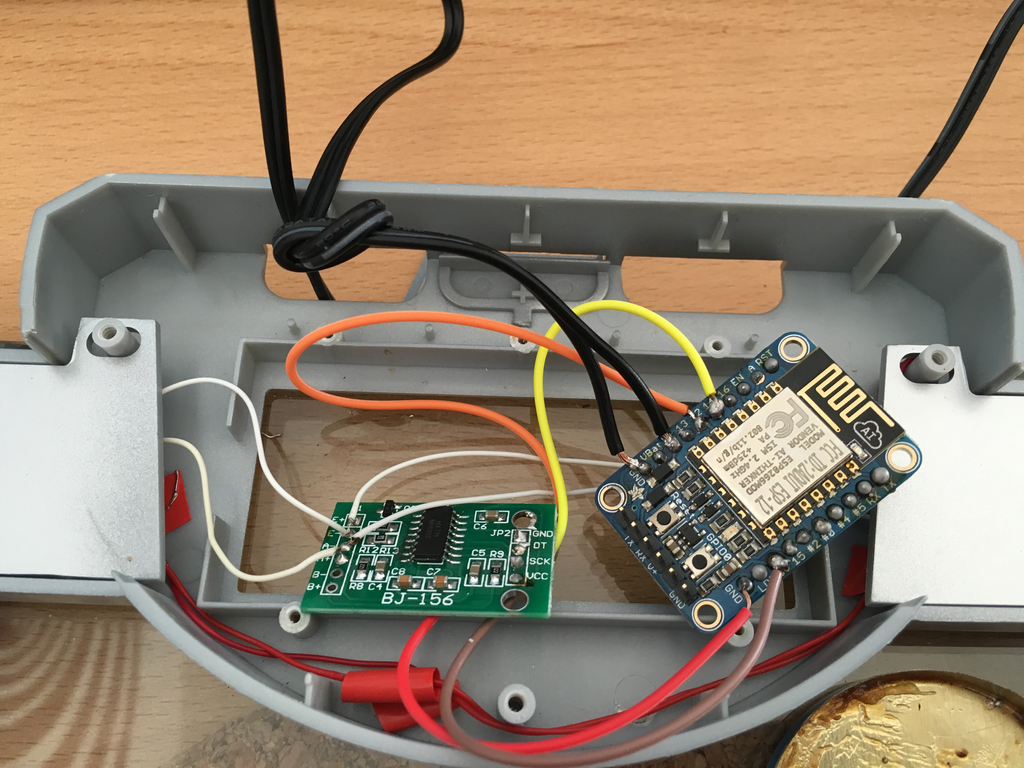
Hardware

That brought down the part list of this project to:

  • an ESP8266 – an Adafruit Huzzah in my case
  • a HX711 ADC board to amplify and prepare the signal from the load-cells
  • a human scale with just enough space in the original case to fit the new electronics into and connect everything.

The HX711 board was the only thing I had to order hardware wise – delivered the next day and it was a matter of soldering things together and throwing in a small Arduino IDE sketch.

My soldering and wiring skills are really sub-par. But it worked from the get-go. I was able to set-up a small Arduino sketch and get measurements from the load-cells that seemed reasonable.

Now the hardware was all done – almost too easy. The software would be the important part now. In order to create something flexible I needed to make an important decision: How would the scale tell the world about it’s findings?

Software

Two basic options: PULL or PUSH?

Pull would mean that the ESP8266 would offer a webservice or at least web-server that exposes the measurements in one way or the other. It would mean that a client needs to poll for a new number in regular intervals.

Push would mean that the ESP8266 would connect to a server somewhere and whenever there’s a meaningful measurement done it would send that out to the server. With this option there would be another decision of which technology to use to push the data out.

Now a bit of history: At that time I was just about to re-implement the whole house home automation system I was using for the last 6 years with some more modern/interoperable technologies. For that project I’ve made the decision to have all events (actors and sensors) as well as some additional information being channeled into MQTT topics.

Let’s refer to Wikipedia on this:

“MQTT1 (formerly MQ Telemetry Transport) is an ISO standard (ISO/IEC PRF 20922) publish-subscribe-based “lightweight” messaging protocol for use on top of the TCP/IP protocol. It is designed for connections with remote locations where a “small code footprint” is required or the network bandwidth is limited. The publish-subscribe messaging pattern requires a message broker. Thebroker is responsible for distributing messages to interested clients based on the topic of a message. Andy Stanford-Clark and Arlen Nipper of Cirrus Link Solutions authored the first version of the protocol in 1999.”

Something build for oil-pipelines can’t be wrong for your house – can it?

So MQTT uses the notation of a “topic” to sub-address different entities within it’s network. Think of a topic as just a simple address like “house/litterbox/weight”. And with that topic MQTT allows you to set a value as well.

The alternative to MQTT would have been things like WebSockets to push events out to clients. The decision for the home-automation was done towards MQTT and so far it seems to have been the right call. More and more products and projects available are also focussing on using MQTT as their main message transport.

For the home automation I had already set-up a demo MQTT broker in the house – and so naturally the first call for the litterbox project was to utilize that.

The folks of Adafruit provide the MQTT library with their hardware and within minutes the scale started to send it’s measurements into the “house/litterbox/weight” topic of the house MQTT broker.

Some tweaking and hacking later the litterbox was put together and the actual litterbox set on-top.

Since Adafruit offers platform to also send MQTT messages towards and create neat little dashboards I have set-up a little demo dashboard that shows a selection of data being pushed from the house MQTT broker to the Adafruit.io MQTT broker.

These are the raw values which are sent into the weight topic:

You can access it here: https://io.adafruit.com/bietiekay/stappenbach

So the implementation done and used now is very simple. On start-up the ESP8622 initialises and resets the weight to 0. It’ll then do frequent weight measurements at the rate it’s configured in the source code. Those weight measurements are being monitored for certain criteria: If there’s a sudden increase it is assumed that “the cat entered the litterbox”. The weight is then monitored and averaged over time. When there’s a sudden drop of weight below a threshold that last “high” measurement is taken as the actual cat weight and sent out to a /weight topic on MQTT. The regular measurements are sent separately to also a configurable MQTT topic.

You can grab the very ugly source code of the Arduino sketch here: litterbox_sourcecode

And off course with a bit of logic this would be the calculated weight topic:

Of course it is not enough to just send data into MQTT topics and be done with it. Of course you want things like logging and data storage. Eventually we also wanted to get some sort of notification when states change or a measurement was taken.

MQTT, the cloud and self-hosted

Since MQTT is enabling a lot of scenarios to implement such actions I am going to touch just the two we are using for our house.

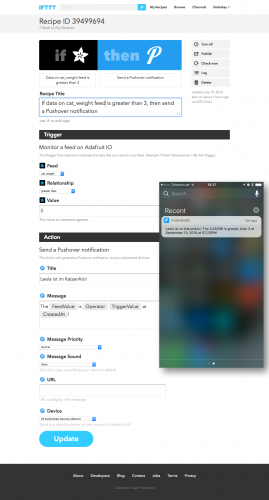
  1. We wanted to get a push notification to our phones whenever a weight measurement was taken – essentially whenever the cat has done something in the litterbox. The easiest solution: Set-Up a recipe on If This Than That (IFTTT) and use PushOver to send out push notifications to whatever device we want.
  2. To log and monitor in some sort of a dashboard the easiest solution seemed to be Adafruits offer. Of course hosted inside our house a combination of InfluxDB to store, Telegraf to gather and insert into InfluxDB and Chronograf to render nice graphs was the best choice.

Since most of the above can be done in the cloud (as of: outside the house with MQTT being the channel out) or inside the house with everything self-hosted. Some additional articles will cover these topics on this blog later.

There’s lots of opportunity to add more logic but as far as our experiments and requirements go we are happy with the results so far – we now regularly get a weight and the added information of how often the cat is using her litterbox. Especially for some medical conditions this is quite interesting and important information to have.

Debugging Linux: Latency heatmaps

“Odd patterns of I/O latency can be hidden by line graphs and summary statistics, and revealed by histograms and heat maps. In my previous post I showed my Linux iosnoop tool, which can trace block device I/O along with timestamps and latency. This information can be visualized, revealing any odd patterns.”

Bildschirmfoto 2014-07-27 um 12.55.50

Source: http://www.brendangregg.com/blog/2014-07-23/linux-iosnoop-latency-heat-maps.html

Nitrous – full IDE in your browser – with Collaboration!

“Nitrous is a backend development platform which helps software developers save time by cutting out the repetitive parts of creating development environments and automating them.

Once you create your first development environment, there are many features which will make development easier.”

Bildschirmfoto 2014-07-06 um 11.38.49

So what you’re getting is:

  • a virtual machine operated for you and set-up with a single click
  • A full-featured IDE in your browser
  • Code-Collaboration by inviting others to edit your project
  • a debugging environment in which you can test-run and work with your code

Here are some screenshots to get you a feel for it:

Source: https://www.nitrous.io/

Scaling Linux: Perfomance Tools and Measurements


If you ever experienced a missmatch between the performance you expected from a server or application running on Linux you probably started to debug your way into it why the applications performance is not on the expected levels.

With Linux being very mature you get an enormous amounts of helpers and interfaces to debug the performance aspects of the operating system and the applications.

Want to see proof? Here – a map of almost all the thingies and interfaces you got:linuxperftools

Thankfully Brendan Gregg put together a page with videos and further links to drill into those interfaces and methods above.

Source: http://www.brendangregg.com/linuxperf.html

How to get a list of all recent Podcasts on SONOS

I am using an external podcast download tool to stay updated on all podcasts I subscribed to. For this purpose SubSonic is a good choice – actually for a lot more also.

Screen Shot 2014-07-02 at 18.56.52

One of the quirks of the SONOS products is that Podcasts are not really well supported. In fact there is no support at all.

So I wrote a tool that extends the SONOS players with the functionality to “remember” play positions within audiobooks and podcasts. Now what’s left to properly have podcasts supported is a view of the most recently updated podcasts. Wouldn’t it be nice to have a “Folder View” in the SONOS controller of what’s new across all the different podcasts you are subscribed to?

Now here’s the trick:

Use a small script on any RaspberryPi in the house to dynamically create hardlinks to the podcasts files in a “Recently Updated Podcasts” folder.

The script is something like this:

find /where-your-podcasts-are/ -type f -printf ‘%TY-%Tm-%Td %TT %p\n’ | sort | tail -n 25 | cut -c 32- | sed -e “s/^/ln \”/” -e “s/$/\”/” -e “s/$/ \”\/recentPodcasts\/\”/” | sh

This short line will go through all folders and subfolders in /where-your-podcasts-are/ and then create Hardlinks in /recentPodcasts to the most recent 25 files.

That way, and when /recentPodcasts/ is made accessible to your SONOS controllers, you’ll have something like this:

Screen Shot 2014-07-02 at 19.17.24

Source 1: http://www.subsonic.org
Source 2: play position bookmarker

Boblight Alternative: Hyperion

After setting up Boblight on two TVs in the house – one with 50 and one with 100 LEDs – I’ve used it for the last 5 months on a daily basis almost.

First of all now every screen that does not come with “added color-context” on the wall seems off. It feels like something is missing. Second of all it has made watching movies in a dark room much more enjoyable.

The only concerning factor of the past months was that the RaspberryPi does not come with a lot of computational horse-power and thus it has been operating at it’s limits all the time. With 95-99% CPU usage there’s not a lot of headroom for unexpected bitrate spikes and what-have-you.

So from time to time the Pis where struggling. With 10% CPU usage for the 50 LEDs and 19% CPU usage for the 100 LEDs set-up there was just not enough CPU power for some movies or TV streams in Full-HD.

Hyperion

So since even overclocking only slightly improved the problem of Boblight using up the precious CPU cycles for a fancy light-show I started looking around for alternatives.

“Hyperion is an opensource ‘AmbiLight’ implementation controlled using the RaspBerry Pi running Raspbmc. The main features of Hyperion are:

  • Low CPU load. For a led string of 50 leds the CPU usage will typically be below 1.5% on a non-overclocked Pi.
  • Json interface which allows easy integration into scripts.
  • A command line utility allows easy testing and configuration of the color transforms (Transformation settings are not preserved over a restart at the moment…).
  • Priority channels are not coupled to a specific led data provider which means that a provider can post led data and leave without the need to maintain a connection to Hyperion. This is ideal for a remote application (like our Android app).
  • HyperCon. A tool which helps generate a Hyperion configuration file.
  • XBMC-checker which checks the playing status of XBMC and decides whether or not to capture the screen.
  • Black border detector.
  • A scriptable effect engine.
  • Generic software architecture to support new devices and new algorithms easily.

More information can be found on the wiki or the Hyperion topic on the Raspbmc forum.”

Especially the Low CPU load did raise interest in my side.

Setting Hyperion up is easy if you just follow the very straight-forward Installation Guide. On Raspbmc the set-up took me 2 minutes at most.

If you got everything set-up on the Pi you need to generate a configuration file. It’s a nice JSON formatted config file that you do not need to create on your own – Hyperion has a nice configuration tool. Hypercon:

Screen Shot 2014-06-28 at 08.52.51

So after 2 more minutes the whole thing was set-up and running. Another 15 minutes of tweaking here and there and Hyperion replaced Boblight entirely.

What have I found so far?

  1. Hyperions network interfaces are much more controllable than those from Boblight. You can use remote clients like on iPhone / Android to set colors and/or patterns.
  2. It’s got effects for screen-saving / mood-lighting!
  3. It really just uses a lot less CPU resources. Instead of 19% CPU usage for 100 LEDs it’s down to 3-4%. That’s what I call a major improvement
  4. The processing filters that you can add really add value. Smoothing everything so that you do not get bright flashed when content flashes on-screen is easy to do and really helps with the experience.

All in all Hyperion is a recommended replacement for boblight. I would not want to switch back.

Source 1: Setting up Boblight
Source 2: https://github.com/tvdzwan/hyperion/wiki/Installation

MOSH (Mobile Shell) – fixing SSH for everyone

How many times did you experience a connection loss on your terminal window in the last week? Yeah I know – like everytime you close the lid of your notebook and move to a different place. So like a dozen times every day.

And everytime you reconnect to your servers and you use things like screen to keep your terminals open and your programs running while you’re disconnected.

On the other hand – did you ever curse the internet gods while you tried to do a very important check or bugfix to a machine whilst on a train or mobile roaming network? It’s not what I would call fun-times. When there are no constant disconnects the lag is just infuriating. MOSH also solves this since it’s predicting and responding way faster then vanilla SSH. Your terminal becomes useable again!

So there’s now MOSH to the rescue:

Remote terminal application that allows roaming, supports intermittent connectivity, and provides intelligent local echo and line editing of user keystrokes.
Mosh is a replacement for SSH. It’s more robust and responsive, especially over Wi-Fi, cellular, and long-distance links.
Mosh is free software, available for GNU/Linux, FreeBSD, Solaris, Mac OS X, and Android.

[youtube]http://www.youtube.com/watch?v=XsIxNYl0oyU[/youtube]

Install it on your servers and your clients and never lose a connection again.

Source 1: http://www.gnu.org/software/screen/
Source 2: http://mosh.mit.edu

IPv6 native root server has problems with OpenFire Jabber / XMPP Server to Server

I was setting up a new root-server machine and went for the Debian 7 minimal set-up. Thankfully the root-server provider I am using (hetzner) is connected with IPv4 and IPv6 natively. Awesome stuff!

If you’re using an IPv6 native set-up these days you STILL have to be cautious about possible side-effects with software having bugs and not knowing how to deal with these ginormous ip adresses.

So there’s a well known Jabber / XMPP server that I am using for some years now without any issues. I was even using it on native IPv6 connected machines earlier.

But with the fresh and clean set-up of Debian 7 and IPv6 by the hoster several problems started bubbling up.

1: the ‘there can only be one ipv*’ problem

Turns out that the debian team decided to set a system setting by default that lets IPv6 aware applications bind to IPv6 only. Good thing, you can disable it by adding this to your sysctl.conf:

net.ipv6.bindv6only=0

2: the ‘who resolves first is right’ problem

When you get a IPv6 native machine it might have a resolv.conf consisting of IPv4 and IPv6 name servers. And don’t worry: Everything is going to be all-right as long as the software you’re planning to use is perfectly capably dealing with the answers of both types of servers. The IPv4 ones will default to the A records, the IPv6 ones to the AAAA record.

Now there’s OpenFire. A stable and easy to use XMPP / Jabber server implementation. It’s based upon Java and I am running it with Java 7 on my Debian machine.

Unfortunately in the current 3.9.1 version of OpenFire there’s a bug that leads to Server-to-Server XMPP connections not working when they resolv to IPv6. So for example your Google-Talk contacts won’t work at all.

The bug itself is rather stupid: Seems that OpenFire expects an IPv4 adress from the DNS lookup and crashes on an IPv6 adress.

The solution is as easy as the bug is stupid: Remove the IPv6 defaulting nameservers from your resolv.conf.

# nameserver config
nameserver 2xx.xxx.yyy.99
nameserver 2xx.xxx.yyy.100
nameserver 2xx.xxx.yyy.98
nameserver 8.8.8.8
nameserver 8.8.4.4
#nameserver 2axx:yyy:0:zzzz::add:9898
#nameserver 2axx:yyy:0:zzzz::add:9999
#nameserver 2axx:yyy:0:zzzz::add:1010

Source 1: defaulting to net.ipv6.bindv6only=1
Source 2: http://community.igniterealtime.org/thread/51902

How to install NodeJS and NPM on the RaspberryPi without getting “Illegal Instruction” error messages

I tried a couple of times to compile NodeJS on the RaspberryPi and failed miserably. It not only takes ages to compile NodeJS on the Pi. After the successful compile and install run most of the time running it just results in an error message “Illegal Instruction” or “Ungültiger Maschinencode”.

Now there’s a pretty easy way to do that on your own. Run these commands:

wget http://node-arm.herokuapp.com/node_latest_armhf.deb

After the download is finished successfully you can install it by running this as root:

sudo dpkg -i node_latest_armhf.deb

This will have installed a relatively new NodeJS built as well as NPM on your RaspberryPi. Don’t panic when NPM is slower than you would expect… just be patient.

Enjoy!

setting up boblight with a Raspberry Pi and RaspBMC

Some might know AmbiLight – a great invention by Philips that projects colored light around a TV screen based upon the contents shown. It’s a great addition to a TV but naturally only available with Philips TV sets.

Not anymore. There are several open-source projects that allow you to build your very own AmbiLight clone. I’ve built one using a 50-LEDs WS2801 stripe, a 5V/10A power supply, a RaspberryPi, and the BobLight integration in RaspBMC (this is a nice XBMC distribution for the Pi).

Boblight is a collection of tools for driving lights connected to an external controller.

Its main purpose is to create light effects from an external input, such as a video stream (desktop capture, video player, tv card), an audio stream (jack, alsa), or user input (lirc, http). Boblight uses a client/server model, where clients are responsible for translating an external input to light data, and boblightd is responsible for translating the light data into commands for external light controllers.”

The hardware to start with looks like this:

pre_requisites

I’ve fitted some heat-sinks to the Pi since the additional load of controlling 50 LEDs will add a little bit of additional CPU usage which is desperately needed when playing Full HD High-Bitrate content.

The puzzle pieces need to be put together as described by the very good AdaFruit diagram:

diagramAs you can see the Pi is powered directly through the GPIO pins. You’re not going to use the MicroUSB or the USB ports to power the Pi. It’s important that you keep the cables between the Pi and the LEDs as short as possible. When I added longer / unshielded cables everything went flickering. You do not want that – so short cables it is :-)

leds

When you look at aboves picture closely you will find a CO and DO on the PCB of the LED. on the other side of the PCB there’s a CI and DI. Guess what: That means Clock IN and Clock OUT and Data IN and Data OUT. Don’t be mistaken by the adapter cables the LED stripes comes with. My Output socket looked damn close to something I thought was an Input socket. If nothing seems to work on the first trials – you’re holding it wrong! Don’t let the adapters fitted by the manufacturer mislead you.

Depending on the manufacturer of your particular LED stripe there are layouts different from the above image possible. Since RaspBMC is bundled with Boblight already you want to use something that is compatible with Boblight. Something that allows Boblight to control each LED in color and brightness separately.

I opted for WS2801 equipped LEDs. This pretty much means that each LED sits on it’s own WS2801 chip and that chip takes commands for color and brightness. There are other options as well – I hear that LDP8806 chips also work with Boblight.

My power supply got a little big to beefy – 10 Amps is plenty. I originally planned to have 100 LEDs on that single TV. Each LED at full white brightness would consume 60mA  – which brings us to 6Amps for a 100 – add to that the 2 Amps for the PI and you’re at 8A. So 10A was the choice.

To connect to the Pi GPIO Pins I used simple jumper wires. After a little bit of boblightd compilation on a vanilla Raspbian SD card (how-to here). Please note that with current RaspBMC versions you do not need to compile Boblight yourself – I’ve just taken for debugging purposes as clean Raspbian Image and compiled it myself to do some boblight-constant tests. Boblight-constant is a tool that comes with Boblight which allows you to set all LEDs to one color.

If everything is right, it should look like this:

working_first_timeNow everything depends on how your LED stripes look like and how your TVs backside looks like. I wanted to fit my setup to a 42″ Samsung TV. This one already is fitted with a Ultra-Slim Wall mount which makes it pretty much sitting flat on the wall like a picture. I wanted the LEDs to sit right on the TVs back and I figured that cable channels when cut would do the job pretty nicely.

To get RaspBMC working with your setup the only things you need to do are:

  1. Enable Boblight support in the Applications / RaspBMC tool
  2. Login to your RaspBMC Pi through SSH with the user pi password raspberry and copy your boblight.conf file to /etc/boblight.conf.

The configuration file can be obtained from the various tutorials that deal with the boblight configuration. You can choose the hard way to create a configuration or a rather easy one by using the boblight configuration tool.

I’ve used the tool :-)

Boblight Config ToolNow if everything went right you don’t have flickering, the TV is on the wall and you can watch movies and what-not with beautiful light effects around your TV screen. If you need to test your set-up to tweak it a bit more, go with this or this.

result_1

Source 1: http://en.wikipedia.org/wiki/Ambilight
Source 2: http://www.raspberrypi.org/
Source 3: https://code.google.com/p/boblight/
Source 4: http://www.raspbmc.com/
Source 5: http://learn.adafruit.com/light-painting-with-raspberry-pi/hardware
Source 6: How-To-Compile-Boblight
Source 7: Boblight Config Generator
Source 8: Boblight Windows Config Creation Tool
Source 9: Test-Video 1
Source 10: Test-Video 2

when DVB-T is not interesting, use the hardware for fun and SDR!

SDR – or Software Defined Radio is relatively cheap and fun way to dive deeper into radio communication.

“Software-defined radio (SDR) is a radio communication system where components that have been typically implemented in hardware (e.g. mixers, filters, amplifiers, modulators/demodulators, detectors, etc.) are instead implemented by means of software on a personal computer or embedded system. While the concept of SDR is not new, the rapidly evolving capabilities of digital electronics render practical many processes which used to be only theoretically possible.” (Wikipedia)

So with cheap hardware it’s possible to receive radio transmissions on all sorts of frequencies and modulations. Since everything after the actual “receiving stuff”-phase happens in software the things you can do are sort of limitless.

Now what about the relatively cheap factor? – The hardware you’re going to need to start with this is a DVB-T USB stick widely available for about 25 Euro. The important feature you’re going to look for is that it comes with a Realtek RTL2832U chip.

“The RTL2832U is a high-performance DVB-T COFDM demodulator that supports a USB 2.0 interface. The RTL2832U complies with NorDig Unified 1.0.3, D-Book 5.0, and EN300 744 (ETSI Specification). It supports 2K or 8K mode with 6, 7, and 8MHz bandwidth. Modulation parameters, e.g., code rate, and guard interval, are automatically detected.

The RTL2832U supports tuners at IF (Intermediate Frequency, 36.125MHz), low-IF (4.57MHz), or Zero-IF output using a 28.8MHz crystal, and includes FM/DAB/DAB+ Radio Support. Embedded with an advanced ADC (Analog-to-Digital Converter), the RTL2832U features high stability in portable reception.” (RealTek)

You’ll find this chip in all sorts of cheap DVB-T USB sticks like this one:

3948543_b6f7670bc7
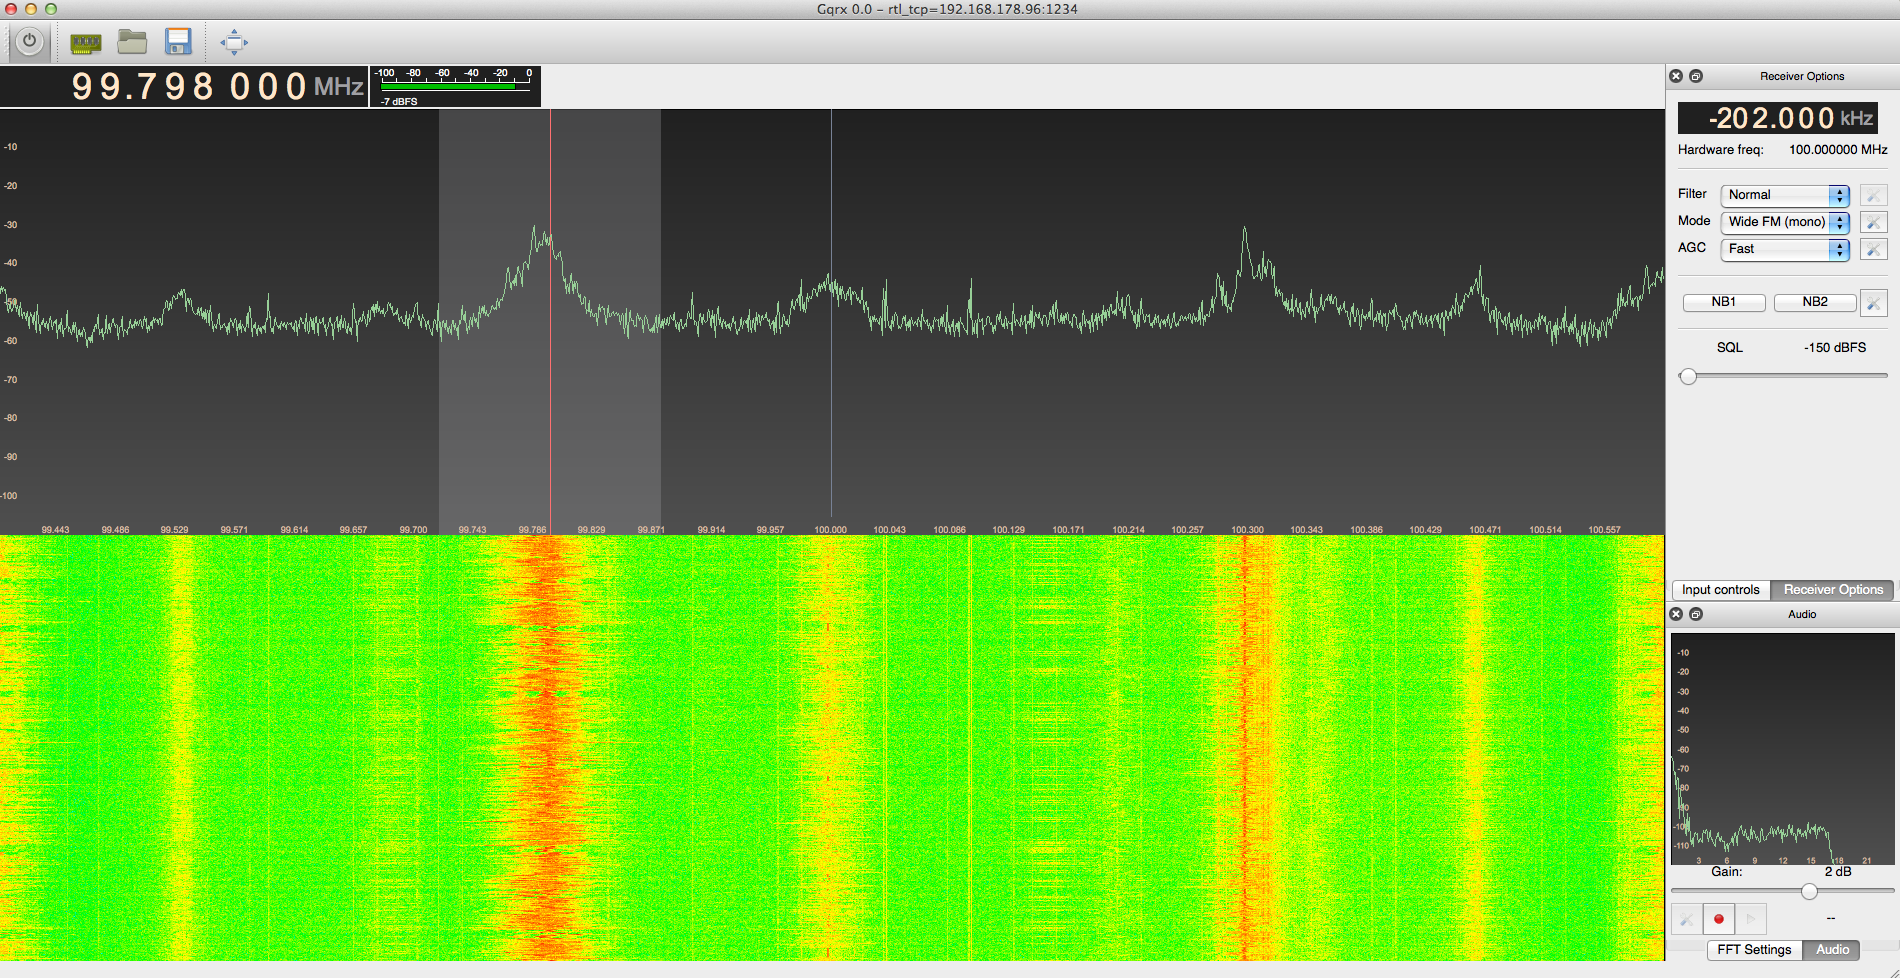
To use the hardware directly you can use open source software which comes pre-packaged with several important/widely used demodulator moduls like AM/FM. Gqrx SDR is available for all sorts of operating systems and comes with a nice user interface to control your SDR hardware.

The neat idea about SDR is that you, depending on the capabilities of your SDR hardware, are not only tuned into one specific frequency but a whole spectrum several Mhz wide. With my device I get roughly a full 2 Mhz wide spectrum out of the device allowing me to see several FM stations on one spectrum diagram and tune into them individually using the demodulators:

Bildschirmfoto 2013-11-01 um 23.28.56The above screenshot shows the OS X version of Gqrx tuned into an FM station. You can clearly see the 3 stations that I can receive in that Mhz range. One very strong signal, one very weak and one sort of in the middle. By just clicking there the SDR tool decodes this portion of the data stream / spectrum and you can listen to a FM radio station.

Of course – since those DVB-T sticks come with a wide spectrum useable – mine comes with an Elonics E4000 tuner which allows me to receive – more or less useable – 53 Mhz to 2188 Mhz (with a gap from 1095 to 1248 Mhz).

Whatever your hardware can do can be tested by using the rtl_test tool:

root@berry:~# rtl_test -t
Found 1 device(s):
0:  Terratec T Stick PLUS

Using device 0: Terratec T Stick PLUS
Found Elonics E4000 tuner
Supported gain values (14): -1.0 1.5 4.0 6.5 9.0 11.5 14.0 16.5 19.0 21.5 24.0 29.0 34.0 42.0
Benchmarking E4000 PLL…
[E4K] PLL not locked for 52000000 Hz!
[E4K] PLL not locked for 2189000000 Hz!
[E4K] PLL not locked for 1095000000 Hz!
[E4K] PLL not locked for 1248000000 Hz!
E4K range: 53 to 2188 MHz
E4K L-band gap: 1095 to 1248 MHz

Interestingly when you plug the USB stick into an Raspberry Pi and you follow some instructions you can use the Raspberry Pi as an SDR server allowing you to place it on the attic while still sitting comfortably at your computer downstairs to have better reception.

If you want to upgrade your experience with more professional hardware – and in fact if you got a sender license – you can take a look at the HackRF project which currently is creating a highly sophisticated SDR hardware+software solution:

jawbreaker-fd0-145436

Source 1: http://www.realtek.com.tw/products/productsView.aspx?Langid=1&PFid=35&Level=4&Conn=3&ProdID=257
Source 2: http://gqrx.dk/
Source 3: www.hamradioscience.com/raspberry-pi-as-remote-server-for-rtl2832u-sdr/
Source 4: http://ossmann.blogspot.de/2012/06/introducing-hackrf.html
Source 5: https://github.com/mossmann/hackrf

putting h.a.c.s. (or other) sensory data into a motion based webcam image

I am using some Raspberry Pis to monitor the areas around the house. Mainly because it’s awesome to see how many animals are roaming around in your garden throughout the day. On the Pi I am using the current Debian image and motion to interface with an USB webcam.

Now I wanted to include sensory data into the webcam images – like the current temperature. The nice thing about h.a.c.s. is that it can deliver every sensors data in nice and easy to use JSON. The only challenge now is to get the number into motion.

First of all I need to get the URL together where I can access sensor data for the right sensor. In this case it’s the sensor called “Schuppen” – an outdoor sensor measuring the current temperature around the house.

Bildschirmfoto 2012-12-16 um 00.37.37

Now there is an easy way to ‘feed’ data into a running motion instance. Motion offers a control port and allows to set the text_left and text_right properties. Doing a simple GET request there allows us to set the text to – in this example – “remote-controlled-text”:

Bildschirmfoto 2012-12-16 um 00.52.56

So – that’s how the text is set – now how to get the temperature value, and just that, out of the JSON response of h.a.c.s.? Easy – use jsawk!

Bildschirmfoto 2012-12-16 um 01.02.07

With all that a very small shell script is quickly hacked:

Bildschirmfoto 2012-12-16 um 01.05.38

If you want to copy that into your editor, here’s the code:

#!/bin/bash
TEMPERATURE=`curl -s 'http://hacs/data/sensor?name=Schuppen&type=temperature&lastentry=true' | jsawk 'return this.data[0][1]'`
curl -s 'http://localhost:8080/0/config/set?text_left='$TEMPERATURE

Localhost port 8080 is the port and adress of the motion control server .

To have the webcam updated regularly, I added it to crontab and from now on the current temperature is in every webcam image – hurray!

Source 1: motion
Source 2: jsawk

Blogroll: Nerdcore NC-Sources OPML

A couple of days ago the well known and much read Nerdcore weblog author created a page he calls NC-Sources which lists all the sources he has in his RSS reader to get new information from. As you can imagine, this is pure gold for those who want to get interesting links to all-nerd pages.

Unfortunately NC-Sources is just available as a web-page which lists the name and the RSS feed URL. You cannot import that into your RSS Reader to use it for your own informational needs.

Here I am to the rescue. I’ve taken all the URLs from that NC Source page. That resulted in a file that lists the page url and the rss-feed url in alternating lines. A short trip to the command line and the use of awk helped to filter just the rss-feed urls to a new file and that was filled into an opml generator.

So now you can download the OPML file to import it into your own RSS reader. Get it here.

Source 1: NC-Sources
Source 2: NC-Sources OPML File
Source 3: OPMLBuilder

a delicious raspberry pi

Just a couple of days ago – after a waiting time of more than half a year – my personal raspberry pi board arrived. Fantastic!

It’s small. Oh yes, it’s very very small.

What is the Raspberry Pi you may ask:

“The Raspberry Pi is a credit-card sized computer that plugs into your TV and a keyboard. It’s a capable little PC which can be used for many of the things that your desktop PC does, like spreadsheets, word-processing and games. It also plays high-definition video. We want to see it being used by kids all over the world to learn programming.”

For under 40 Euro you get a huge choice of I/O interfaces like USB, Ethernet, HDMI, Audio and Multi Purpose IO pins you can play with if you’re into hardware hacking. This small card is running a fully blown linux and because it has a dedicated graphics core which can hardware decode and encode 1080p h264 it’s definitely a good choice for a home mediacenter (yes, XBMC runs on it.)

It draws so little power that you could use solar panels to power it. It’s all open and sourced and I will use it for a couple of things in the household. Like a cheap Airplay node. Or a more intelligent sensor node for home automation. This thing seriously rocks – finally a device to play with – with reasonable horse-power.

Source 1: http://www.raspberrypi.org
Source 2: http://www.raspbmc.com

configuring the nano editor to my needs…

Configuring your favourite Editor on OSX (or Linux, or anywhere else) is important – since nano is my editor of choice I wanted to use it’s syntax highlighting capabilities. Easy as pie as it turned out:

I started with a .nanorc file from this guy and modified it to recognize some of my frequent file-types (like .cs files).

You can download my nanorc.tar – just extract it and put it into your user home directory.

Source 1: http://talk.maemo.org/showthread.php?t=68421
Source 2: http://www.nano-editor.org/dist/v2.2/nano.html#Nanorc-Files
Source 3: nanorc.tar

das außer-Haus Backup

Irgendwie werden es auch privat immer immer mehr Daten – mit immer zunehmender Geschwindigkeit… Alle paar Jahre tausche ich bei uns im Haushalt die Festplatten/Speicherlösung komplett aus – was zwar immer wieder mal eine Investitions bedeutet, gleichzeitig aber auch dafür sorgt dass Daten nicht irgendwelchen ungünstigen mechanischen, chemischen oder magnetischen Effekten zum Opfer fallen… Ja so etwa alle zwei Jahre wird alles einmal umkopiert… Das dauerte beim letzten Mal zwar gut eine Woche, aber naja so ist das eben…

Aus vielerlei Grund haben wir auch für einen Haushalt recht viel Bedarf an Speicherplatz – teilweise wohl auch weil meine Frau Photographin ist – aber ich als “werf-nix-weg”-Typ werd da auch einen guten Anteil dran haben…

Herr über alle unsere Festplatten (kein Witz, die Rechner bei uns haben ihre Festplatten eigentlich nur um booten zu können) ist seit jeher ein einzelner Rechner welcher ebenso alle paar Jahre komplett ausgetauscht wird. Dieser Rechner verwaltet im Moment zwischen 12-15 Festplatten verschiedener Größe – Hauptarbeit wird zur Zeit durch drei separate (gewachsene) RAID-5 Volumes erledigt…

Nebenbei: Nein ich kann/will da kein RAID-6 fahren ohne entweder Linux zu verwenden (was aus verschiedenen Gründen nicht geht) oder einen Hardware-Controller zu verwenden, was nach einschlägigen Erfahrungen querbeet durch alle möglichen Hardware RAID Controller ausfällt.

Dem ganzen Festplattenstapel liegt dann ein Standard-PC mit Windows Server 2008 zugrunde – zum einen weil ich so eine Lizenz noch herumliegen hatte und zum anderen weil ich in über 10 Jahren File-Server Erfahrungen sammeln noch nie auch nur ein Byte unter Windows verloren habe. Zusätzlich habe ich einen riesigen Haufen Software welche Windows-only ist ud sozusagen ständig laufen muss um Sinn zu machen (Mail-Server Puffer, Newsserver Mirror, Musik und Video Streaming Server, Medienbibliothek, Videorekorder,…

Diese drei großen RAID Volumes schnappt sich dann Truecrypt und ver- und entschlüsselt zuverlässig vor sich hin – im Endeffekt gibt es kein Byte Daten im Haushalt welches nicht verschlüsselt wäre. Gut für uns.

So ein RAID verhindert nun ja aber nicht dass dennoch oben genannte ungünstige Effekte eintreten und man mal eine oder mehrere Defekte zu beklagen hat. Im Normalfall tauscht man die defekte Festplatte, resynct das RAID und alles funktioniert weiter ohne dass man Daten verloren hätte. Allerdings ist das ja kein Backup. Das ist nur eine erste Absicherung gegen mögliche Defekte.

Getreu folgendem kurzen Musikstück:

RAID ist kein Backup

… ist ein RAID eben kein Backup. Backups erledigt bei mir eine Sammlung von Scripten welche jeweils in festen Abständen Vollbackups und Differenz-Backups erstellt. Da kommt dann ein Haufen 1 Gbyte großer Dateien raus welche dann anschliessend per RSync in mühevoller (und dank funktionierendem QoS unbemerkt) Arbeit außer Haus geschafft werden. Die Komplett-Backups dauern aufgrund der großen Menge einfach ewig lang und lassen sich recht einfach dadurch beschleunigen dass man sozusagen das Backup physisch auf einer externen Festplatte zum Server trägt…die Differenz-Backups sind dann meist immer recht flott durchgelaufen. Speicherplatz im Internet wird ja auch immer billiger und so haben wir auch immer ein gutes Off-Site Backup unserer Daten…

Für Windows gibt es neben den üblichen Cygwin Ports von rsync auch eine gute GUI Version namens DeltaCopy. Das Ding kopiert zuverlässig und auch wenn mal der DSL Router rebootet oder hängt nimmt er selbständig die Kopierarbeit wieder auf sobald Netz wieder verfügbar ist.

Damit DeltaCopy seine Daten irgendwo abladen kann wird auf der Gegenstelle natürlich ein rsync Server vorrausgesetzt. Die Konfiguration eines solchen ist nicht sonderlich kompliziert – im Grunde muss man nur rsync installieren und die rsyncd.conf Datei anpassen. Zusätzlich dazu muss man eine Konfigurationsdatei anlegen in welchem nach dem Schema “Benutzername:Passwort” entsprechend die Nutzeraccounts angegeben werden – das wars eigentlich schon. Rsync ist sehr robust und vor allem auch gut für geringere Bandbreiten geeignet. Wenn sich an einer Datei nur wenige Bytes geändert haben müssen auch nur die geänderten Bytes übertragen werden.

Source 1: http://www.speichergurke.de
Source 2: http://www.aboutmyip.com/AboutMyXApp/DeltaCopy.jsp
Source 3: http://de.wikipedia.org/wiki/Rsync

Shairport – someone reversed an AirPort Express

Low Latency Network Audio was a dream for the past years (see an article of 2005 and 2008) and with AirPlay it’s finally there.

I am using the Apple AirPlay technology for several years now… after it got implemented into iOS it’s just fantastic to have the option to have whatever sound source I want to playing loud and clear in any room I want to…

Okay it’s not quite as sophisticated as the sonos solution regarding the control of multiple music sources in multiple rooms but it get’s the job done in an apartment.

So back to the topic: Apple integrated the AirPlay technology into their wireless base station “AirPort Express”. Basically AirPlay is a piece of software which receives an encrypted audio stream over the network and outputs the stream to the SPDIF or audio jack.

Back in 2005 there already was an emulator of this protocol called “Fairport” but Apple decided to encrypt the AirPlay traffic. This led to the problem that the encryption key was unkown because it’s baked into the AirPort Express firmware. And this is where the good news start:

“My girlfriend moved house, and her Airport Express no longer made it with her wireless access point. I figured it’d be easy to find an ApEx emulator – there are several open source apps out there to play to them. However, I was disappointed to find that Apple used a public-key crypto scheme, and there’s a private key hiding inside the ApEx. So I took it apart (I still have scars from opening the glued case!), dumped the ROM, and reverse engineered the keys out of it.”

So to keep things short: Someone got an AirPort Express, dumped the firmware, extracted the AirPlay encryption keys and wrote an emulator of the AirPlay protocol which uses the key. Voilá!

ShairPort is available in source code on the site of the guy and obviously it’s unsure if Apple will react by changing the encryption key in the future. But for the time being it works as advertised:

I took one of my computers and followed the instructions to update perl, install Macports and then run ShairPort. So when ShairPort is run it looks not as appealing as expected:

Notably  it uses IPv6 to communicate between iTunes and ShairPort… Oh I almost forgot to show how it looks in iTunes:

On another side note: It works on Linux, Windows and Mac OS X :-)

Source 1: Apple AirPlay
Source 2: Sonos
Source 3: Apple AirPort Express
Source 4: ShairPort

modifying OS X terminal to make it more useable…

Using OS X for the daily work is getting easier every day. And most of the time I am doing work using the Terminal.app.

So there are some configuration changes necessary to make it even more useable…

  1. Edit /etc/bashrc and add some alias and color definitions
    1. alias ll=”ls -hfG”
    2. alias la=”ls -ahfG”
    3. export LSCOLORS=fxfxcxdxbxegedabagacad
  2. custom color schemes can be defined using the lscolors tool
  3. install screen (using MacPorts for example) and setup a ~/.screenrc
    1. Download a sample .screenrc

Source 1: http://geoff.greer.fm/lscolors/
Source 2: http://www.macports.org/
Source 3: ScreenRC.tar

great SIP Softphone for Linux and Windows

Thank goodness I can uninstall X-Lite! At sones we are using a SIP based telephony solution. And therefore some times a SIP softphone application is needed along with the obligatory hardware SIP telephones. Till today the only half-working software I knew for that task was X-Lite. But a colleague told me today that there is a better software which not even looks better but also works better than X-Lite.

It’s called “Ekiga” and it’s a GTK based open source application which can run on Windows and Linux. It looks clean and therefore nice and works great.

A special tip from me: Abort the Welcome Wizard because the only thing it does is registering you with ekigas’ own services.

Capture

Source: http://ekiga.org/

Mono 2.8 released!

Hurray! Finally the 2.8 version of Mono – the platform independent open source .NET framework is available as of today. I finally don’t have to recompile the trunk every now and then to get my bits running Smiley

The Major Highlights according to the release notes are:

  • C# 4.0
  • Defaults to the 4.0 profile.
  • New Garbage Collection engine
  • New Frameworks:
    • Parallel Framework
    • System.XAML
  • Threadpool exception behavior has changed to match .NET 2.0
    • potentially a breaking change for a lot of Mono-only software
    • See information below in the "Runtime" section.
  • New Microsoft open sourced frameworks bundled:
    • System.Dynamic
    • Managed Extensibility Framework
    • ASP.NET MVC 2
    • System.Data.Services.Client (OData client framework)
  • Performance
    • Large performance improvements
    • LLVM support has graduated to stable
      • Use mono-llvm command to run your server loads with the LLVM backend
  • Preview of the Generational Garbage Collector
  • Version 2.0 of the embedding API
  • WCF Routing
  • .NET 4.0’s CodeContracts
  • Removed the 1.1 profile and various deprecated libraries.
  • OpenBSD support integrated
  • ASP.NET 4.0
  • Mono no longer depends on GLIB

Oh – they even linked my benchmark article.

Source: http://www.mono-project.com/Release_Notes_Mono_2.8

How To strip those TFS Source Control references from Visual Studio Solutions

Every once in a while you download some code and fire up your Visual Studio and find out that this particular solution was once associated to a team foundation server you don’t know or have a login to. Like when you download source code from CodePlex and you get this “Please type in your username+password for this CodePlex Team Foundation Server”.

Or maybe you’re working on your companies team foundation server and you want to put some code out in the public. You surely want to get rid of these Team Foundation Server bindings.

There’s a fairly complicated way in Visual Studio to do this but since I was able to produce unforseen side effects I do not recommend it.

So what I did was looking into those files a Visual Studio Solution and Project consists of. And I found that there are really just a few files that hold those association information. As you can see in the picture below there are several files side by side to the .sln and .csproj files – like that .vssscc and .vspscc file. Even inside the .csproj and .sln file there are hints that lead to the team foundation server – so obviously besides removing some files a tool would have to edit some files to remove the tfs association.

strip-files

So I wrote such a tool and I am going release it’s source code just beneath this article. Have fun with it. It compiles with Visual Studio and even Mono Xbuild – actually I wrote it with Monodevelop on Linux ;) Multi-platform galore! Who would have thought of that in the founding days of the .NET platform?

Bildschirmfoto-StripTeamFoundationServerInformation - Main.cs - MonoDevelop

So this is easy – this small tool runs on command line and takes one parameter. This parameter is the path to a folder you want to traverse and remove all team foundation server associations in. So normally I take a check-out folder and run the tool on that folder and all its subfolders to remove all associations.

So if you want to have this cool tool you just have to click here: Sourcecode Download

Using Windows Deployment Services (WDS) to install Linux over Network (PXE)

Developing software is hard work – especially when you target several operating systems. One task that you have to perform quite often would be to deploy a new installation of an operating system as fast as possible on a test machine.

Doing this with Windows is easy – you can use the Windows Deployment Services to bootstrap Windows onto almost every machine which can boot over ethernet using PXE. Everything needed to make WDS work on a Windows Boot-Image is located on that image. Since it’s that easy I won’t dive into more detail here.

What I want to show in greater detail is how you can use WDS to deploy even Linux over your network.

Step 1: Get PXELINUX

What’s needed to boot Linux over a network is a dedicated PXE Boot Loader. This one is called PXELINUX and can be downloaded here.

“PXELINUX is a SYSLINUX derivative, for booting Linux off a network server, using a network ROM conforming to the Intel PXE (Pre-Execution Environment) specification.”

On the homepage of PXELINUX is also a short tutorial which files you need and where to copy them.

Step 2: Setup WDS with PXELINUX

I suppose you got your WDS Installation up and running and you are able to deploy Windows. If that’s the case you can go to your WDS Server Management Tool and right-click on the server name – in my case “fileserver.sones”. If you select “Properties” in the context menu you would see the properties windows like in the screenshot below:

wds_pxelinux

You have to change the Boot-Loader from the standard Windows BootMgr to the newly downloaded PXELINUX bootloader. Since this bootloader comes with it’s own set of config files you can edit this config file to allow booting into Windows.

Step 3: Edit PXELINUX configuration filewds-pxelinux-2 

The first entry I made into the boot menu of the PXELINUX boot loader is the “Install Windows…” entry. Since the first thing the users will see after booting is the PXELINUX loader menu they need to be able to continue to their Windows Installation. Since this Windows Installation cannot be handled by the PXELINUX loader you have to define a boot menu entry which looks a lot like this:

LABEL wds
MENU LABEL Install Windows…
KERNEL pxeboot.0

To add OpenSuSE to the menu you would add an entry looking like this:

LABEL opensuse
MENU LABEL Install OpenSuSE 11.x
kernel /Linux/opensuse/linux
append initrd=/Linux/opensuse/initrd splash=silent showopts

The paths given in the above entry should be altered according to the paths you’re using in your installation. I took the /Linux/opensuse/ files from the network install dvd images of OpenSuSE.

wds-pxelinux-3

That’s basically everything there is about the installation of Linux (Debian works accordingly) over PXE and WDS.

And finally this is what it should look like if everything worked great:


Source 1: http://en.wikipedia.org/wiki/Preboot_Execution_Environment
Source 2: http://syslinux.zytor.com/wiki/index.php/PXELINUX

Turning Linux ISO Images into bootable USB sticks

Today was Linux-Distribution-ISO-Install-Day. And it turned out that the only existing external DVD drive was fubar.

So what to do? We had a spare USB stick and it turns out that you can quite easily convert that USB stick into a bootable Linux-Distribution-Install-USB-Stick. Awesome!

Just download the tool called “UNetbootin”, start it and you can turn virtually any ISO Distribution Image into an USB Stick that boots and installs that ISO:

 screenshot

Source: http://unetbootin.sourceforge.net/

Welcome to the world of tomorrow!

So here we are on a new blog engine. It took me the better part of two days to do the Migration of 2,869 posts and 2,732 comments, a lot of pictures and movie files.

I will write an article on this but for now only two captures images from the migration:

php-xpath
yeah PHP rocks!

regex-magic 
had to do some regex action to do the url rewrites