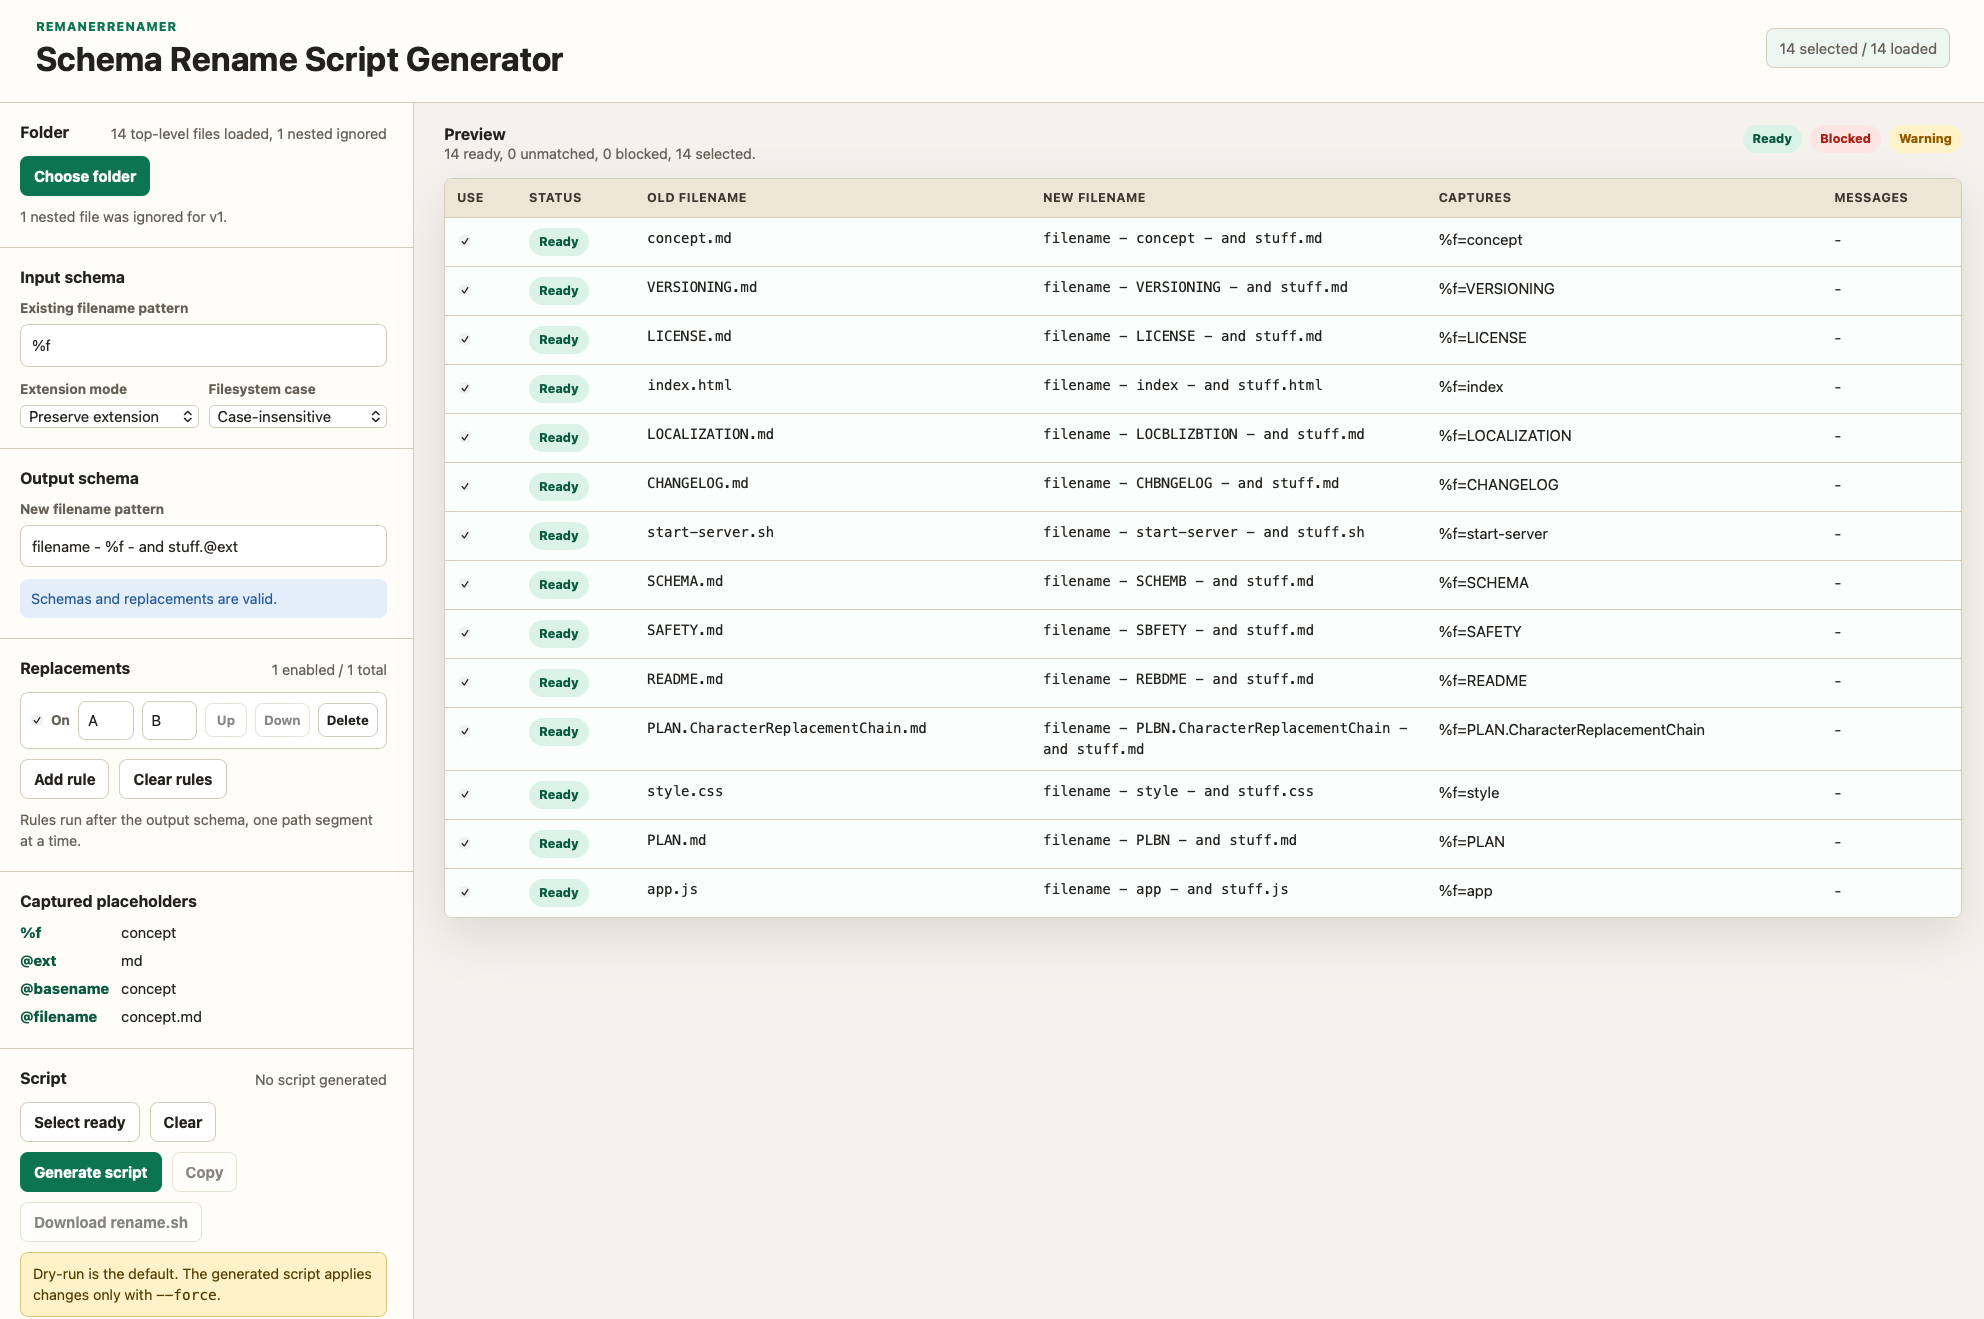
I am finding myself regularly in the position to have to rename lots of files. Like they all have a common naming scheme now but I need them to have another naming scheme or even be distributed into their separate folders.
I’ve found that there are many tools and even your average Explorer, Finder and whatnot does seem to get smarter in renaming file groups these days.
But all of those are rather platform specific and mostly not powerful enough. Then there are renaming tools which are quite powerful, like Rename Master, but those are, well. Very very platform specific and need a certain operating system to work.
With a „little bit of data sharing“ signed-off just about a couple of seconds after you paid your purchase a PDF file of the receipt you would have gotten at the cashier is in your eMail inbox.
That receipt is a fairly small PDF file looking just like the paper-receipt would have looked like. Additionally you can opt out of the paper receipt – which means less wasted paper as it‘s not even printed out at the cashir.
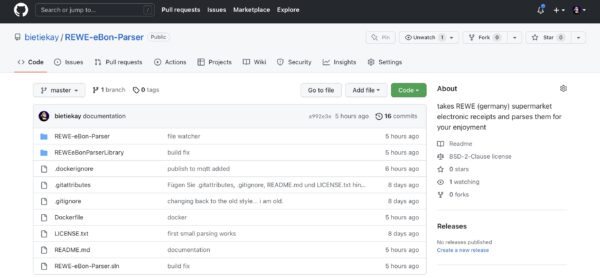
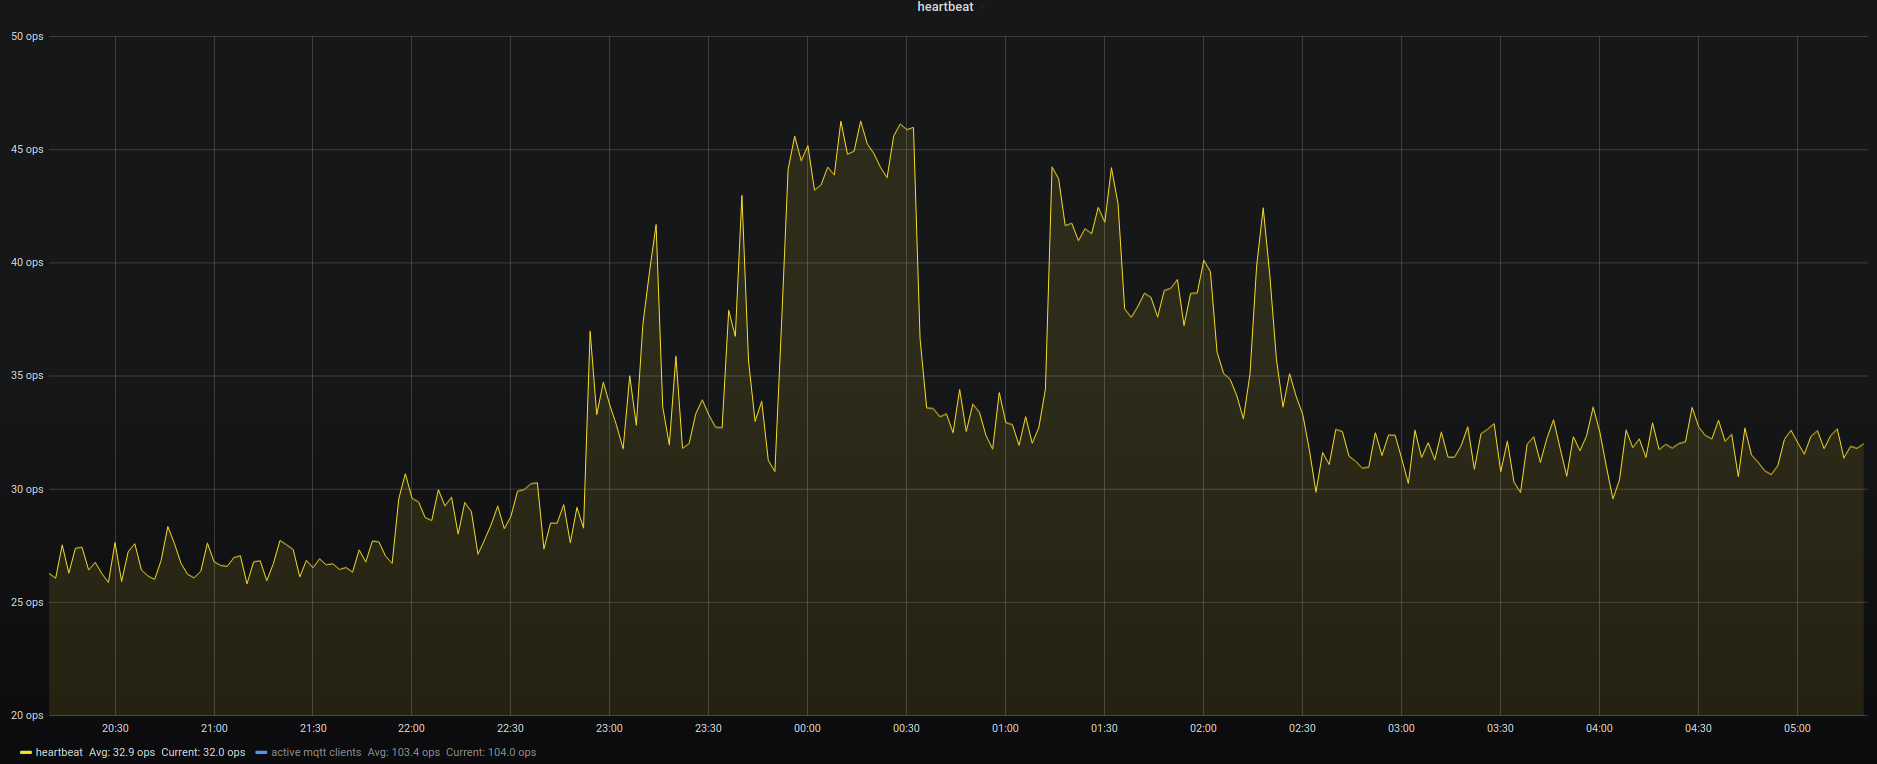
I had accumulated two years of groceries shopping – over 100 receipts until I finally sat down and coded a parser that takes the pdf-receipt, parses it and publishes the results to respective MQTT topics.
When you start the program this way it’ll go through all pdf files in the directory you point it at. If it finds REWE eBons it will read and parse them in.
It will then order the eBons by date and output all of them in the correct timely order to MQTT.
Then it will start watching the directory for any changes and new files. It’ll pick up those files automatically, read them in and send the data to MQTT of the receipt date is newer than the last one seen and sent.
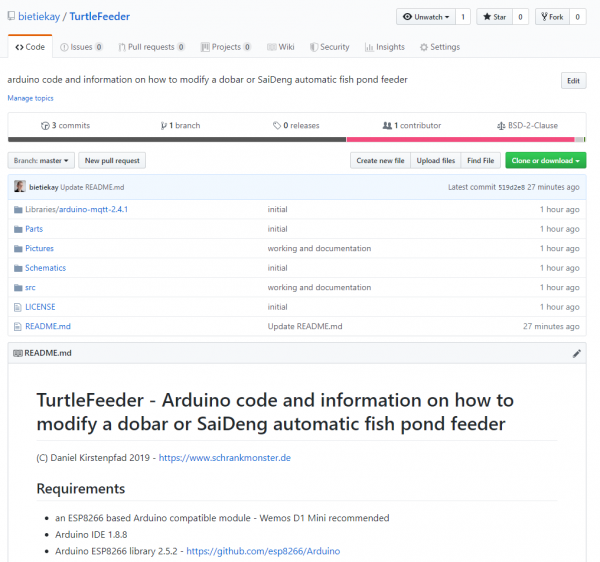
I‘ve wrapped all of it so it would come with a Dockerfile and can be run anywhere where you‘ve got docker up and running.
Now what do I do with this you may ask?
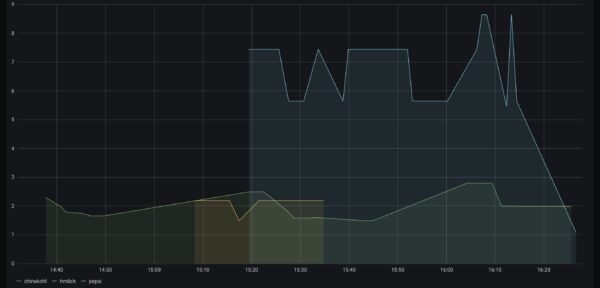
Let me show you an example:
cabbage, milk and pepsi prices plotted out… ignore the hour times – this is from a test import
How I use this is: the tool is running all the time and watching a directory. Whenever a new .PDF file shows up in this directory it will automatically be parsed and it‘s contents pushed out through MQTT. Each item essentially in it‘s own separate topic with price, quantities etc.
Using a combination of Telegraf (to get the data from MQTT to InfluxDB) and InfluxDB (to store time-series) and Grafana (to query and show graphs).
This way it‘s trivial to plot the price development of groceries you regularly purchase. It‘s easy to see what you might have missed.
I am still drilling into the data and there‘s lots of things you can do with it.
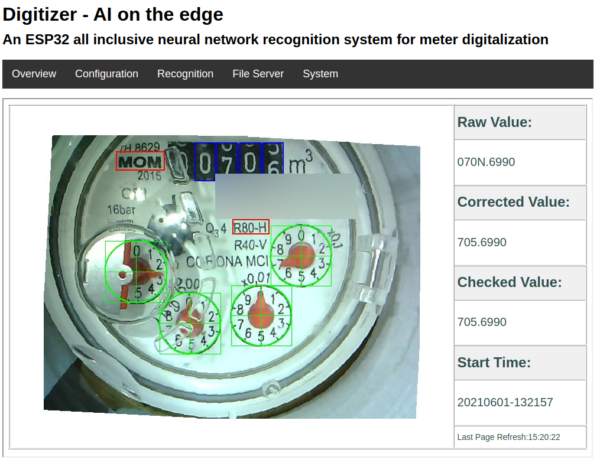
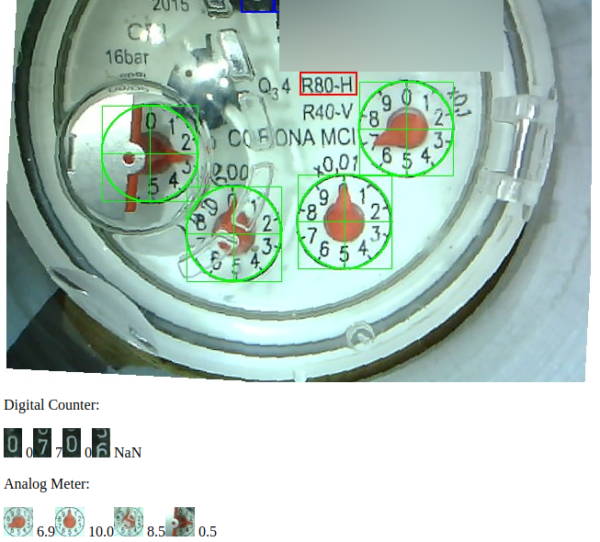
The only meter in our house that I was not yet able to read out automatically was the water meter.
With the help of a great open source project by the name of AI-on-the-edge and an ESP32-Camera Module it is quite simple to regularly take a picture of the meter, convert it into a digital read-out and send it away through MQTT.
The process is quite simple and straightforward.
Flash the ready made Firmware image to the module
Configure the WiFi using a SD card
Put the module directly over the meter
Connect to it and setup the reference points and the meter recognition marks
As you can see above all the recognition is done on the ESP32 module with its 4MByte of RAM.
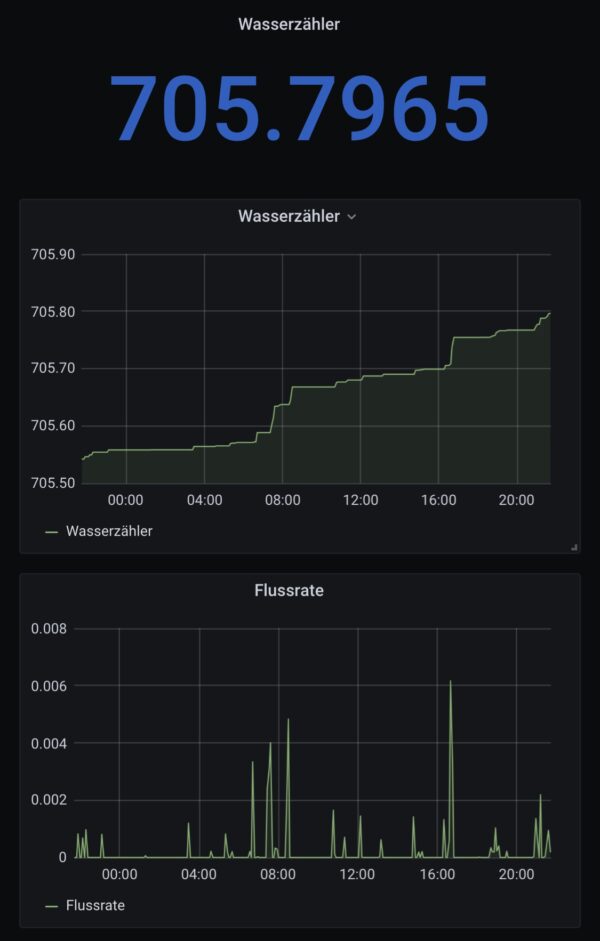
With the data sent through MQTT it’s easy to draw nice graphs:
For some weeks now I am working on the design of something that is being built within the next couple of weeks out of wood and metal (and electronics).
It’s hopefully going to be as nice as I dream it up… What could it be?
I did this design based upon some pixel-material and pictures I’ve gathered around the internets – and took a lot of inspiration from them.
Although I had to create everything in vectors from those small pixel templates… But now everything above is going to be printed on vinyl in glorious vectors – no pixeljunk.
When you are dealing with IoT protocols, especially at hobby-level, you probably came across the MQTT protocol and the challenge to have all those different devices that are supposed to be connected actually get connected – preferably using the MQTT protocol.
Recently this little project came to my attention:
OpenMQTTGateway project goal is to concentrate in one gateway different technologies, decreasing by the way the number of proprietary gateways needed, and hiding the different technologies singularity behind a simple & wide spread communication protocol: MQTT.
OpenMQTTGateway support very mature technologies like basic 433mhz/315mhz protocols & infrared (IR) so as to make your old dumb devices “smart” and avoid you to throw then away. These devices have also the advantages of having a lower cost compared to Zwave or more sophisticated protocols. OMG support also up to date technologies like Bluetooth Low Energy (BLE) or LORA.
Every once in a while I need to take an image or duplicate an SSD/SDCard/Harddisk. And it’s gotten quite complicated to get the proper formatting and alignment when you want to achieve certain things.
For example creating a EFI compatible bootable USB stick is not as straight forward as one would think.
For all other cases I am using the HDDGuru tool on Windows.
HDD Raw Copy Tool is a utility for low-level, sector-by-sector hard disk duplication and image creation.
Supported interfaces: S-ATA (SATA), IDE (E-IDE), SCSI, SAS, USB, FIREWIRE.
Big drives (LBA-48) are supported.
Supported HDD/SSD Manufacturers: Intel, OCZ, Samsung, Kingston, Maxtor, Hitachi, Seagate, Samsung, Toshiba, Fujitsu, IBM, Quantum, Western Digital, and almost any other not listed here.
The program also supports low-level duplication of FLASH cards (SD/MMC, MemoryStick, CompactFlash, SmartMedia, XD) using a card-reader.
HDD Raw Copy tool makes an exact duplicate of a SATA, IDE, SAS, SCSI or SSD hard disk drive. Will also work with any USB and FIREWIRE external drive enclosures as well as SD, MMC, MemoryStick and CompactFlash media.
Current generations of RaspberryPi single board computers (from 3 up) already got WiFi on-board. Which is great and can be used, in combination with the internal ethernet or even additional network interfaces (USB) to create a nice wired/wireless router. This is what this RaspAP project is about:
This project was inspired by a blog post by SirLagz about using a web page rather than ssh to configure wifi and hostapd settings on the Raspberry Pi. I began by prettifying the UI by wrapping it in SB Admin 2, a Bootstrap based admin theme. Since then, the project has evolved to include greater control over many aspects of a networked RPi, better security, authentication, a Quick Installer, support for themes and more. RaspAP has been featured on sites such as Instructables, Adafruit, Raspberry Pi Weekly and Awesome Raspberry Pi and implemented in countless projects.
As you might know by now I am re-implementing MyFitnessPal functionality into my own application to be deeper integrated with kitchen hardware and my own personal use-cases rather than to be an add infested subscription based 3rd party applilcation.
So the development of this is ongoing, but I wanted to note down some progress and explanation.
Let’s start with explaining the name: Tabemono.
It does really mean something – and as some might have guessed – in japanese:
Implementing the UI from the UX has proven to be as challenging as expected.
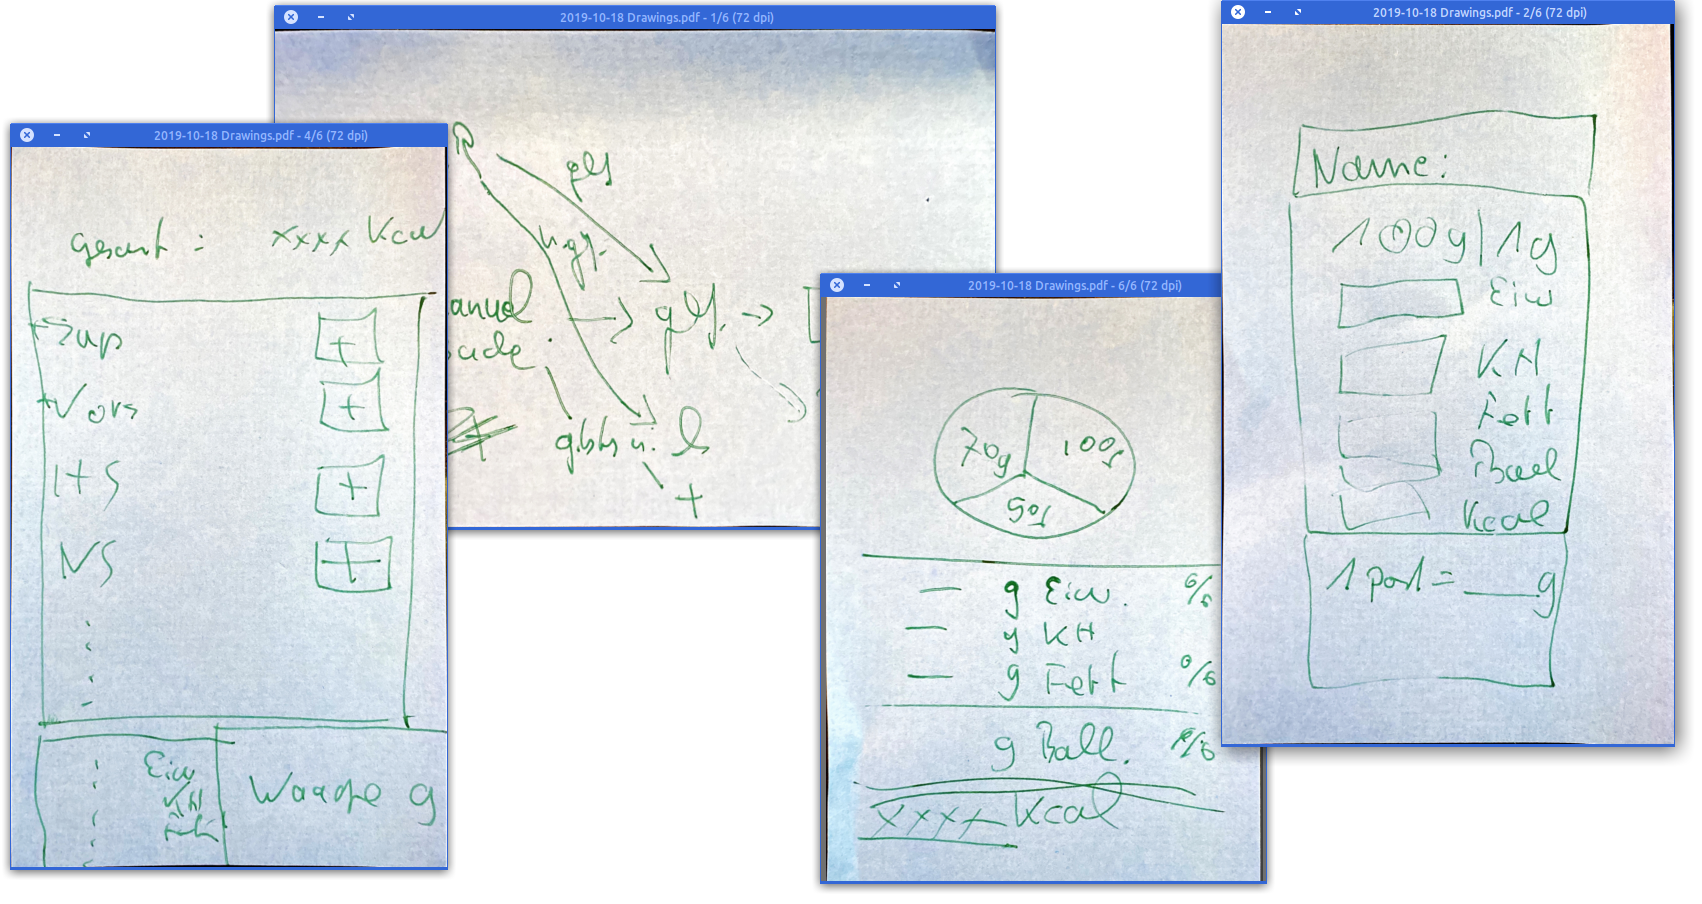
When we started to toss around the idea of re-implementing our food-tracking-needs we started with a simple scribble on post-it notes.
This quickly led to a digital version of this to better reflect what we wanted to happen during the different steps of use…
It wasn’t nice but it did act as an reminder of what we wanted to achieve.
The first thing we learned here was that this will all evolve while we are working on it.
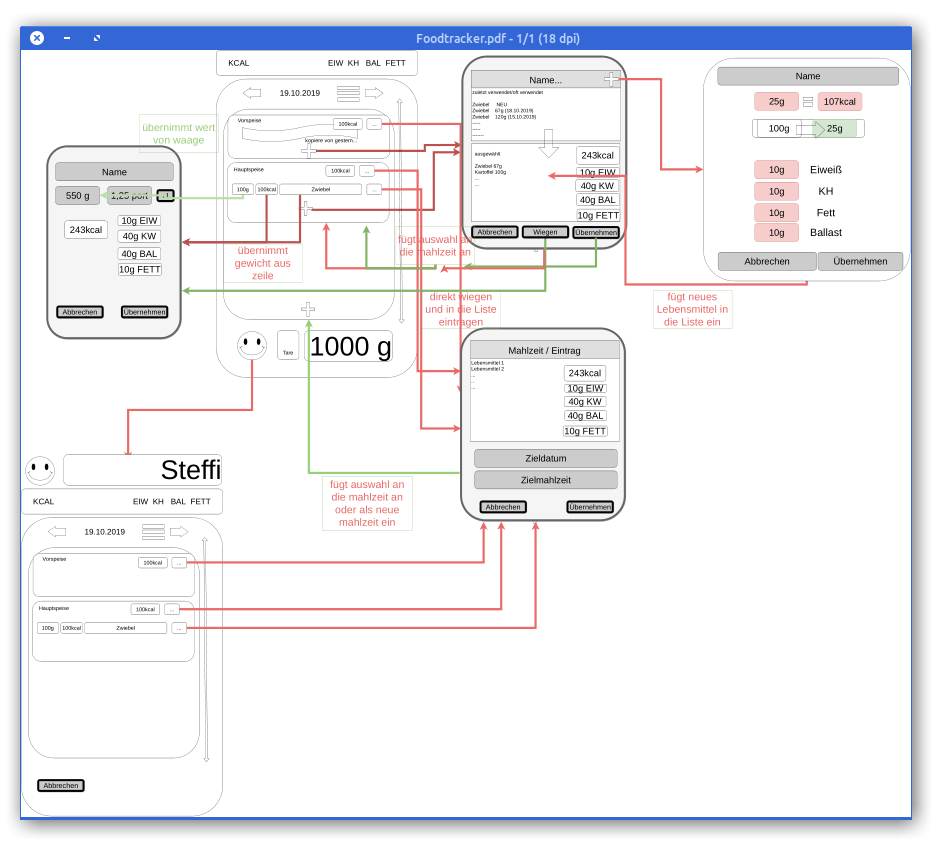
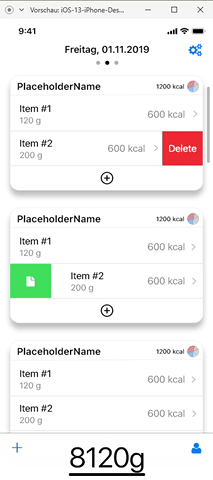
So during a long international flight I’ve spent the better part of 11 hours on getting the above drawing into something resembling an iOS user interface mock-up. With the help of the (free for 1 private project) Adobe XD I clicked along and after 10 hours, this was the video I did of the click-dummy:
Since then I’ve spend maybe 1 more day and started the SwiftUI based implementation of the actual iOS application.
And this brought the first revelation: There are so many ideas that might make sense on paper and in a click-dummy. But only because those are just tools and not reality. It’s absolutely crucial to really DO the things rather than imagine them.
And so the second revelation came: If I had an advise to any product manager or developer out there: Go on and pick a project and try to go full-circle.
You ain’t full stack if you’re missing out on the understanding of the work and skill that your team members have and need.
There is a free and well integrated OpenVPN client for iOS devices already. And as much as this one works quite well it’s also lacking some comfort features that are now made available through alternative iOS client implementations of OpenVPN.
OpenVPN is an open-source commercial software that implements virtual private network techniques to create secure point-to-point or site-to-site connections in routed or bridged configurations and remote access facilities. It uses a custom security protocol that utilizes SSL/TLS for key exchange.
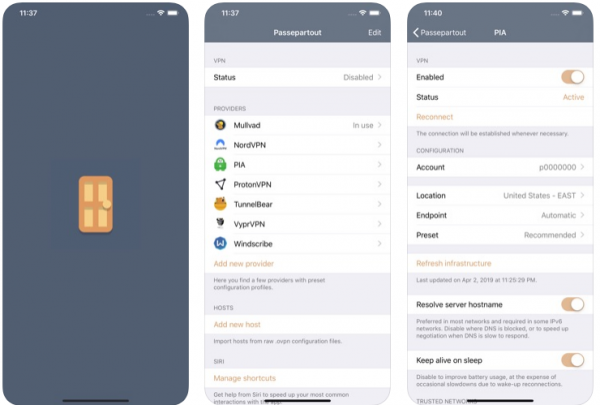
Meet Passepartout. The iOS OpenVPN client that comes with lots of comfort features. Of main interest for me is that Passepartout is aware of the connection you’re currently using and can adopt it’s VPN tunnel status accordingly.
Passepartout is a smart OpenVPN client perfectly integrated with the iOS platform. Passepartout is the only app you need for both well-known OpenVPN providers and your personal OpenVPN servers.
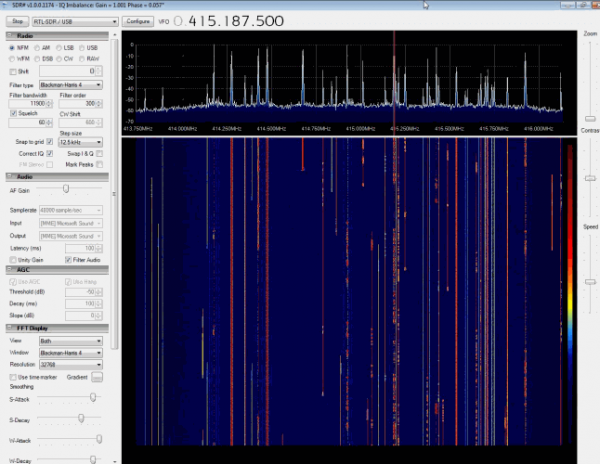
RTL-SDR is a very cheap ~$25 USB dongle that can be used as a computer based radio scanner for receiving live radio signals in your area (no internet required). Depending on the particular model it could receive frequencies from 500 kHz up to 1.75 GHz. Most software for the RTL-SDR is also community developed, and provided free of charge.
The origins of RTL-SDR stem from mass produced DVB-T TV tuner dongles that were based on the RTL2832U chipset. With the combined efforts of Antti Palosaari, Eric Fry and Osmocom (in particular Steve Markgraf) it was found that the raw I/Q data on the RTL2832U chipset could be accessed directly, which allowed the DVB-T TV tuner to be converted into a wideband software defined radio via a custom software driver developed by Steve Markgraf. If you’ve ever enjoyed the RTL-SDR project please consider donating to Osmocom via Open Collective as they are the ones who developed the drivers and brought RTL-SDR to life.
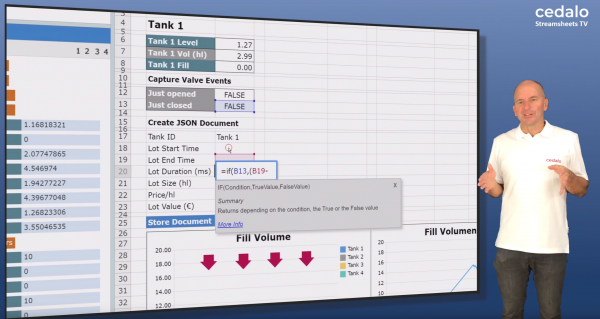
Streamsheets is, similar to NodeRed, a tool to step in between MQTT data coming in and something being done with it. Just other than NodeRed it is not based on flows but on a spreadsheet that executes in it’s entirety everytime a step is made.
Streamsheets are a new spreadsheet technology specifically designed for real-time data stream processing and the opportunities of digitization and the Industrial IoT.
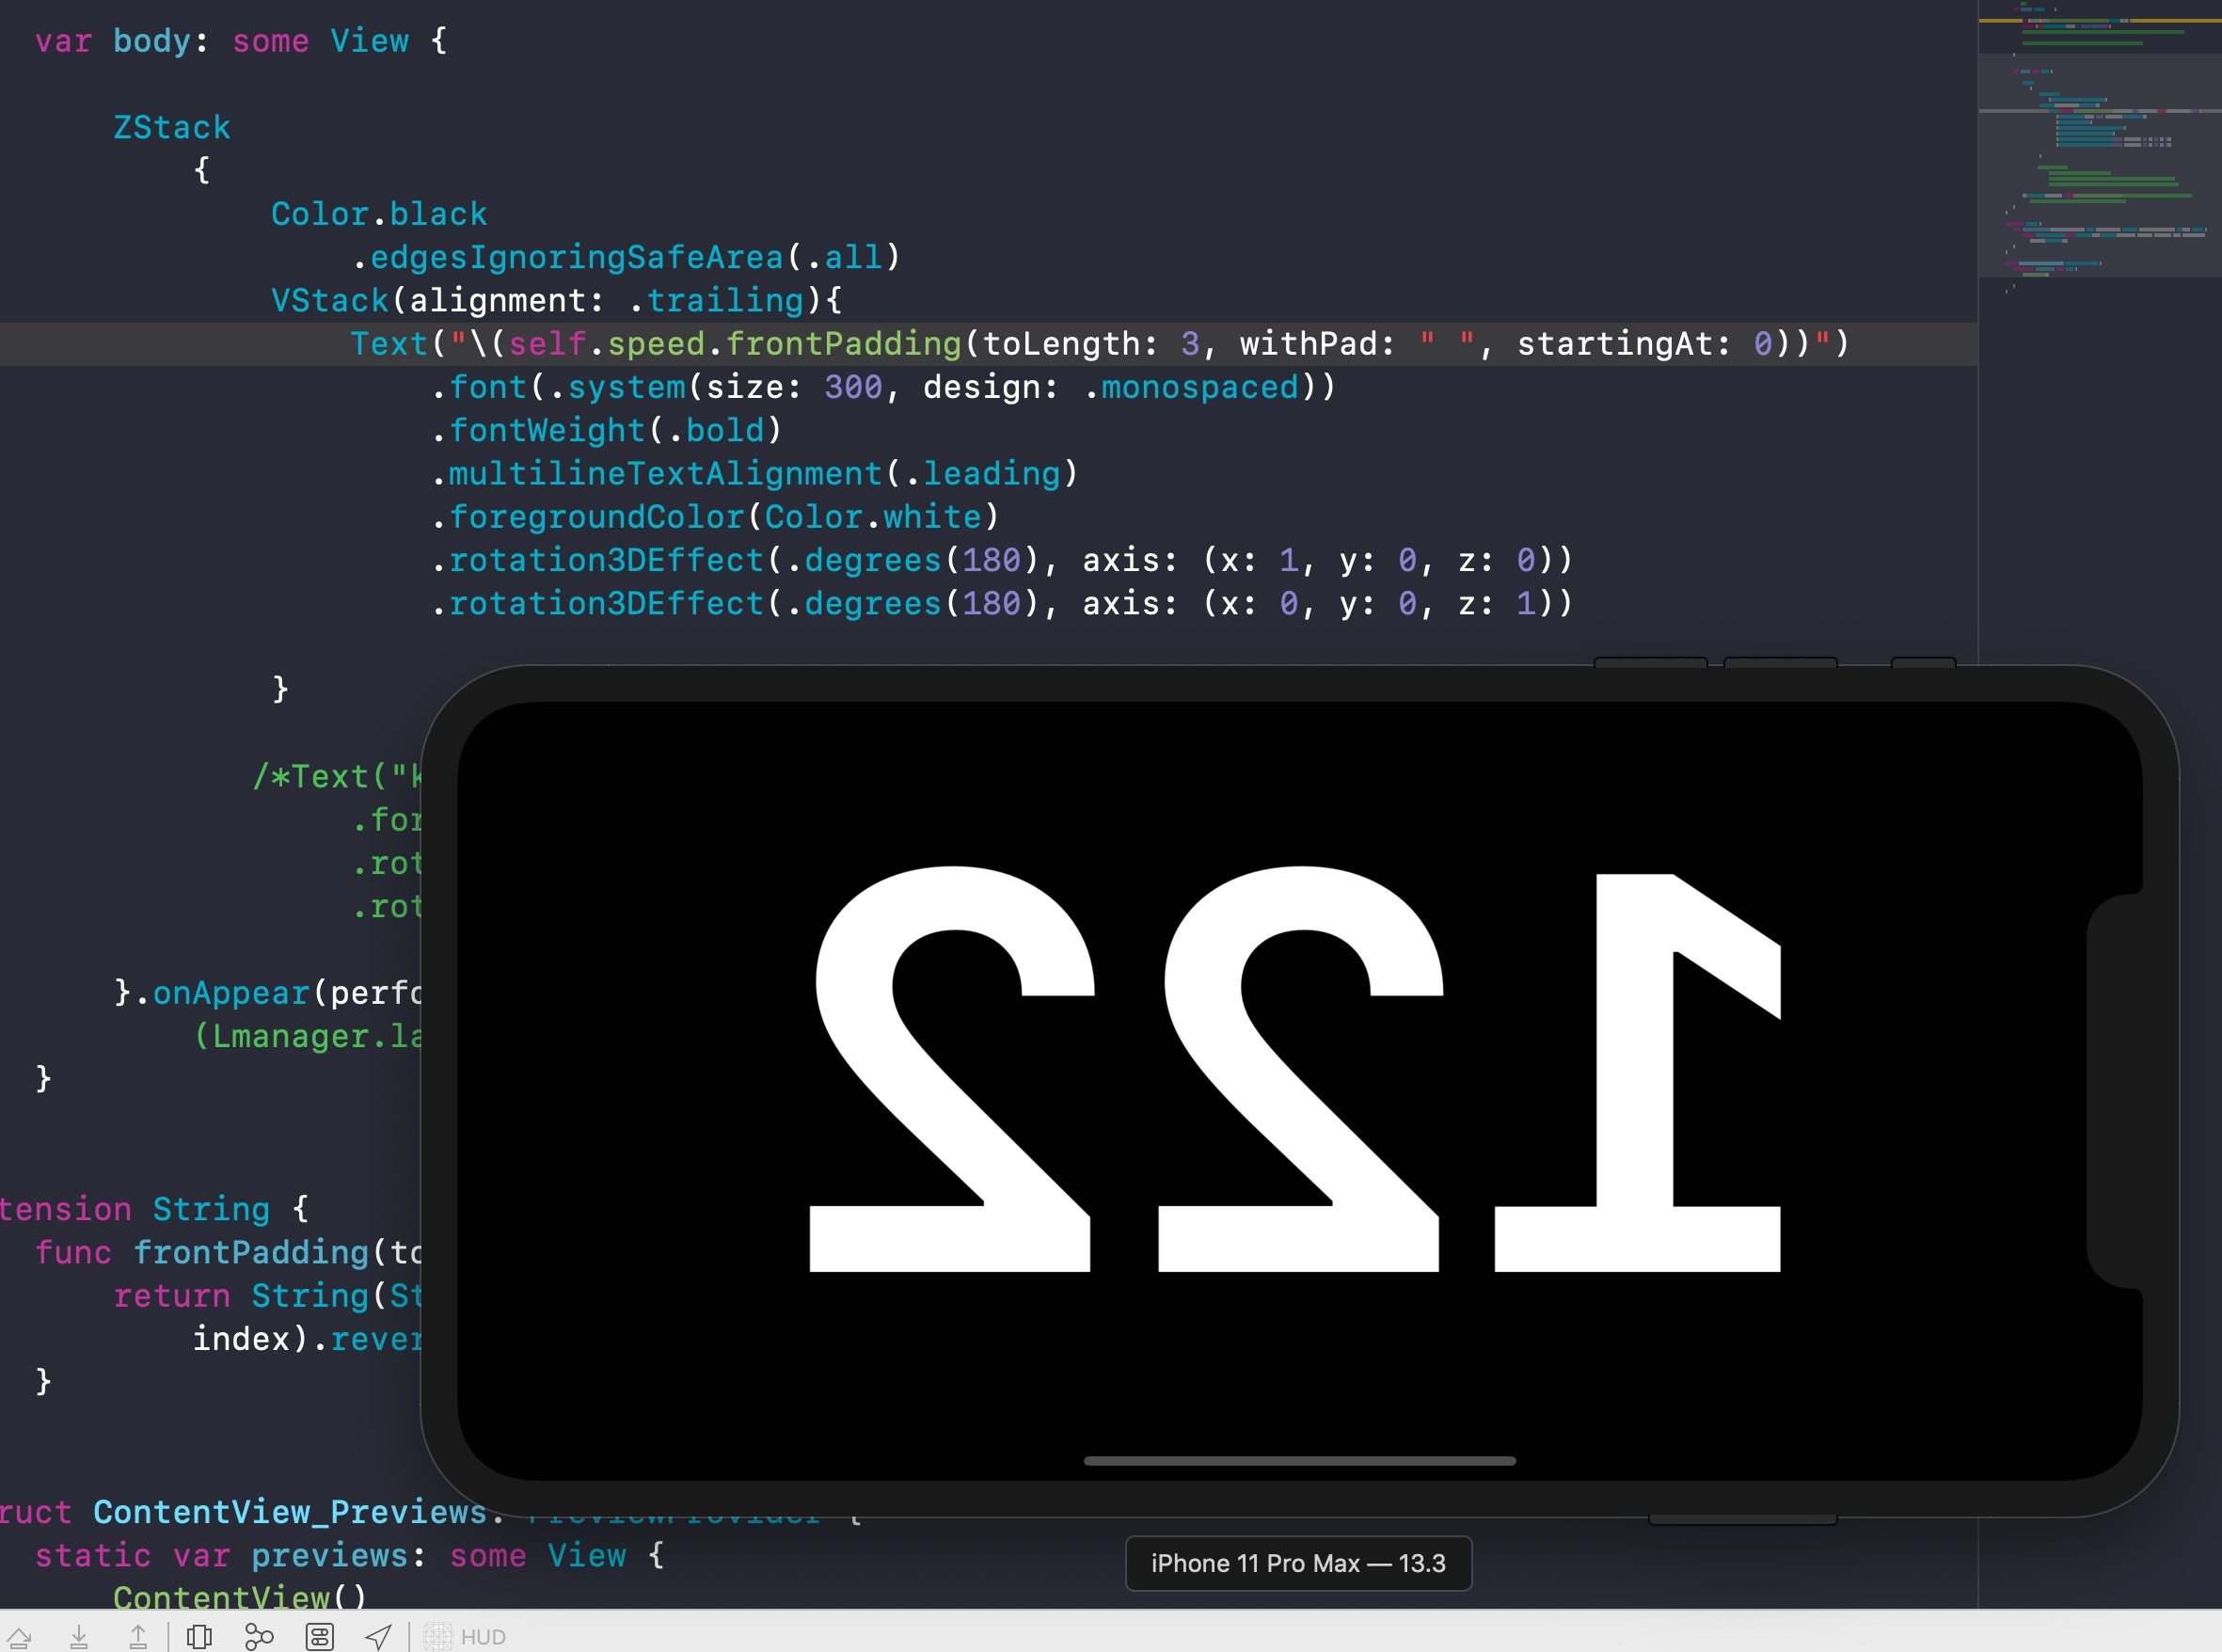
Since I am back at developing the Head-Up-Display app I was writing about in February (yeah, mornings got darker again!) I want to leave this nice looking Odometer Javascript library here:
Odometer is a Javascript and CSS library for smoothly transitioning numbers. See the demo page for some examples.
Odometer’s animations are handled entirely in CSS using transforms making them extremely performant, with automatic fallback on older browsers.
Well, it’s about time to do something about MyFitnessPal. In our family we’re using their service by the daily. But just for logging. No reports, no further features used.
But still, we were using it for quite a time now:
almost 5 years logged every-single-day.
The service has started to roll out ads for some time now in their apps. There are only iOS / Android apps available. And a mediocre website.
Just recently they started to announce that their freeservice will restrict how many years back are going to be stored. From those 5 years we will loose 3.
In addition the whole integration has never gotten to a point where I would have decided to upgrade to the paid premium version. No functionality ever got added. No interfacing with scales, no optimizations for UI/UX, …
But they now reduce the functionalities and service and want me to cough up a bit of money:
I am not generally against subscriptions. But I am not getting 9,99 Euro of value out of the service. A shared google sheet would almost achieve parity. And the price itself is just not value based. For 2 Euro I probably would not feel the urge to move on. For 9,99 (times 2 for 2 accounts) make me move.
So I’ve sat down with my wife and we scribbled up some things we want to have in a replacement. The content and feature-set is agreed. Now I’ll throw up a prototype app.
It’ll be integrated with the MQTT scales. And with the flow we came up with we hopefully will reduce the interactions dramatically over MyFitnessPal. And it’ll never stop saving history. And I’ll learn something new.
If you, like me, are looking into new emerging tools and technologies you might also look at Wireguard.
WireGuard® is an extremely simple yet fast and modern VPN that utilizes state-of-the-art cryptography. It aims to be faster, simpler, leaner, and more useful than IPsec, while avoiding the massive headache. It intends to be considerably more performant than OpenVPN. WireGuard is designed as a general purpose VPN for running on embedded interfaces and super computers alike, fit for many different circumstances. Initially released for the Linux kernel, it is now cross-platform (Windows, macOS, BSD, iOS, Android) and widely deployable. It is currently under heavy development, but already it might be regarded as the most secure, easiest to use, and simplest VPN solution in the industry.
This guide will walk you through how to setup WireGuard in a way that all your client outgoing traffic will be routed via another machine (server). This is ideal for situations where you don’t trust the local network (public or coffee shop wifi) and wish to encrypt all your traffic to a server you trust, before routing it to the Internet.
If you, like me, once every while need to type the same again and again it might also get tired for you as it got for me.
A specific example: I very frequently need to have the current date available to be entered.
May it be because I need to name a file correctly, prepending it with the current date, or because I need it to refer to a specific date in a text I am currently typing.
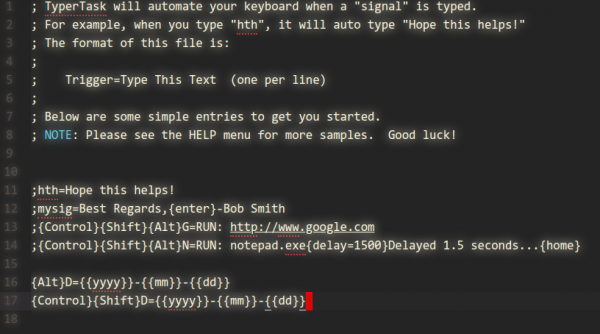
The common scheme for dates I am using is YYYY-MM-DD. The 24th of September 2019 becomes 2019-09-24.
click to download
For when I am on Windows I am using a small utility called “TyperTask” to have a system wide shortcut available to me that will enter the current date with the press of a button.
As you can see in the screenshot above. By simply adding / editing the TXT file you will be able to specify new shortcuts. In the above case ALT+D or STRG+SHIFT+D will generated my desired date text pattern.
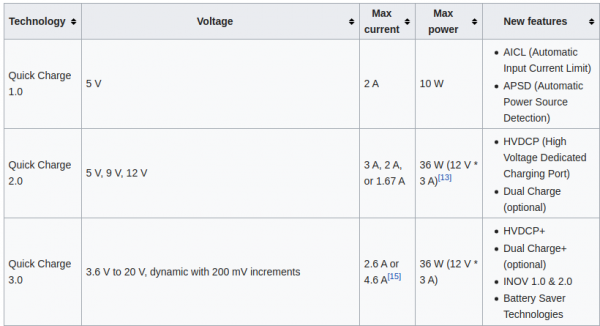
You might have asked yourself how it is that some phones charge up faster than others. Maybe the same phone charges at different speed when you’re using a different cable or power supply. It even might not charge at all.
There is some very complicated trickery in place to make those cables and power supplies do things in combination with the active devices like phones. Many of this is implemented by standards like “Quick Charge”:
Quick Charge is a technology found in QualcommSoCs, used in devices such as mobile phones, for managing power delivered over USB. It offers more power and thus charges batteries in devices faster than standard USB rates allow. Quick Charge 2 onwards technology is primarily used for wall adaptors, but it is also implemented in car chargers and powerbanks (For both input and output power delivery).
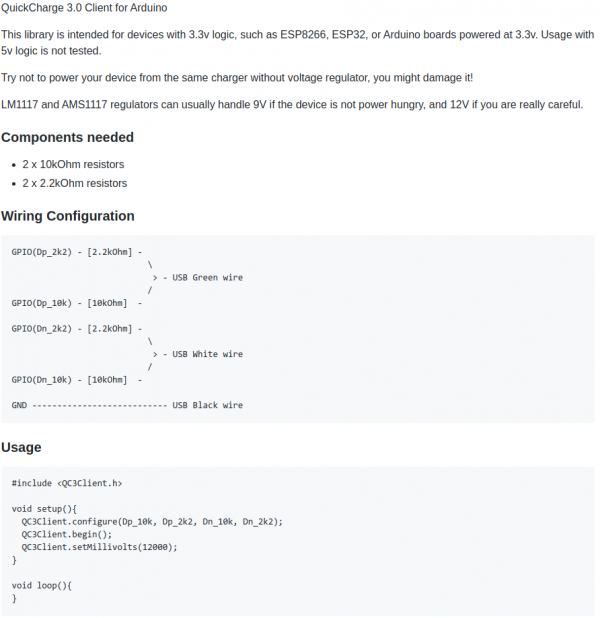
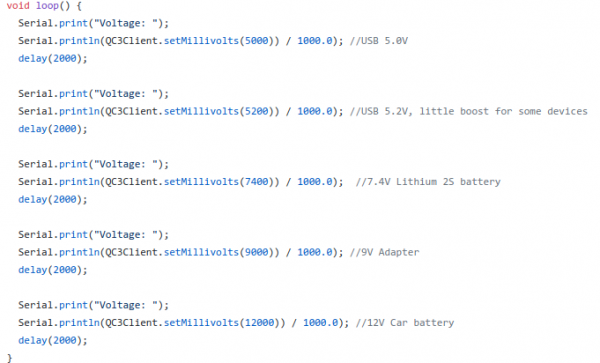
So in a nutshell: If you are able to speak the quick charge protocol, and with the right cable and power supply, you are able to get anything between 3.6 and 20V out of such a combination by just telling the power supply to do so.
This is great for maker projects in need of more power. There’s lots of things to consider and be cautious about.
We’ve got several quite big fish tanks in our house. Mainly used by freshwater turtles.
say Hi! to Wilma.
These turtles need to be fed every once in a while. And while this is not an issue normally it’s an issue if you leave the house for travel for an extended period of time.
Of course there are humans checking on everything in the house regularly but as much as can be automated should and will be automated in our household. So the requirement wa to have the turtle feeding automated.
To achieve this is would be necessary to have a fixed amount of turtle food be dispensed into the tanks on a plan and with some checks in the background (like water quality and such).
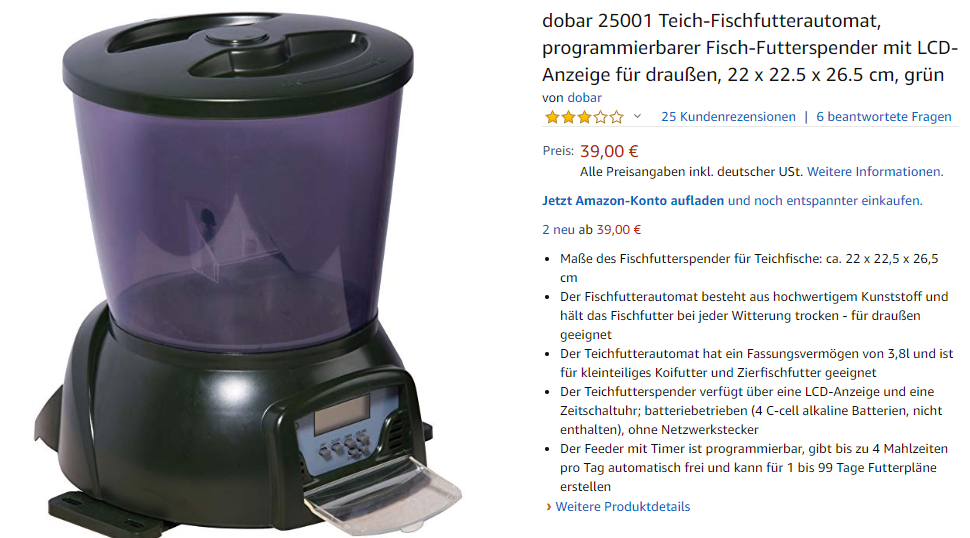
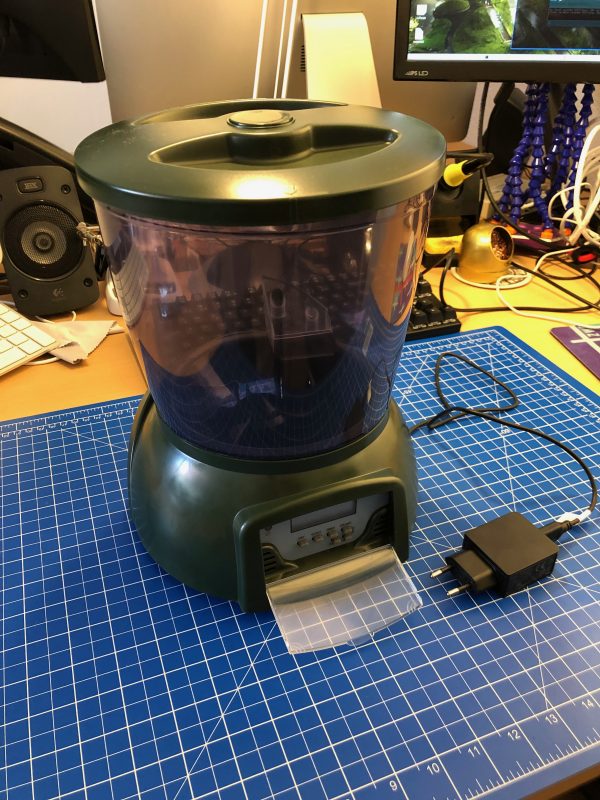
It’s been quite a hassle to come up with a plan how the hardware should look like and work. And ultimately i’ve settled on retrofitting an off-the-shelf fish pond feeder to become controllable through MQTT.
The pond feeder I’ve found and used is this one:
It’s not really worth linking to a specific product detail page as this sort of feeder is available under hundreds of different names. It always looks the same and is priced right around the same.
If you want to build this yourself, you want one that looks like the above. I’ve bought 3 of them and they all seem to come out of the same factory somewhere in China.
Anyway. If you got one you can easily open it up and start modifying it.
Hardware
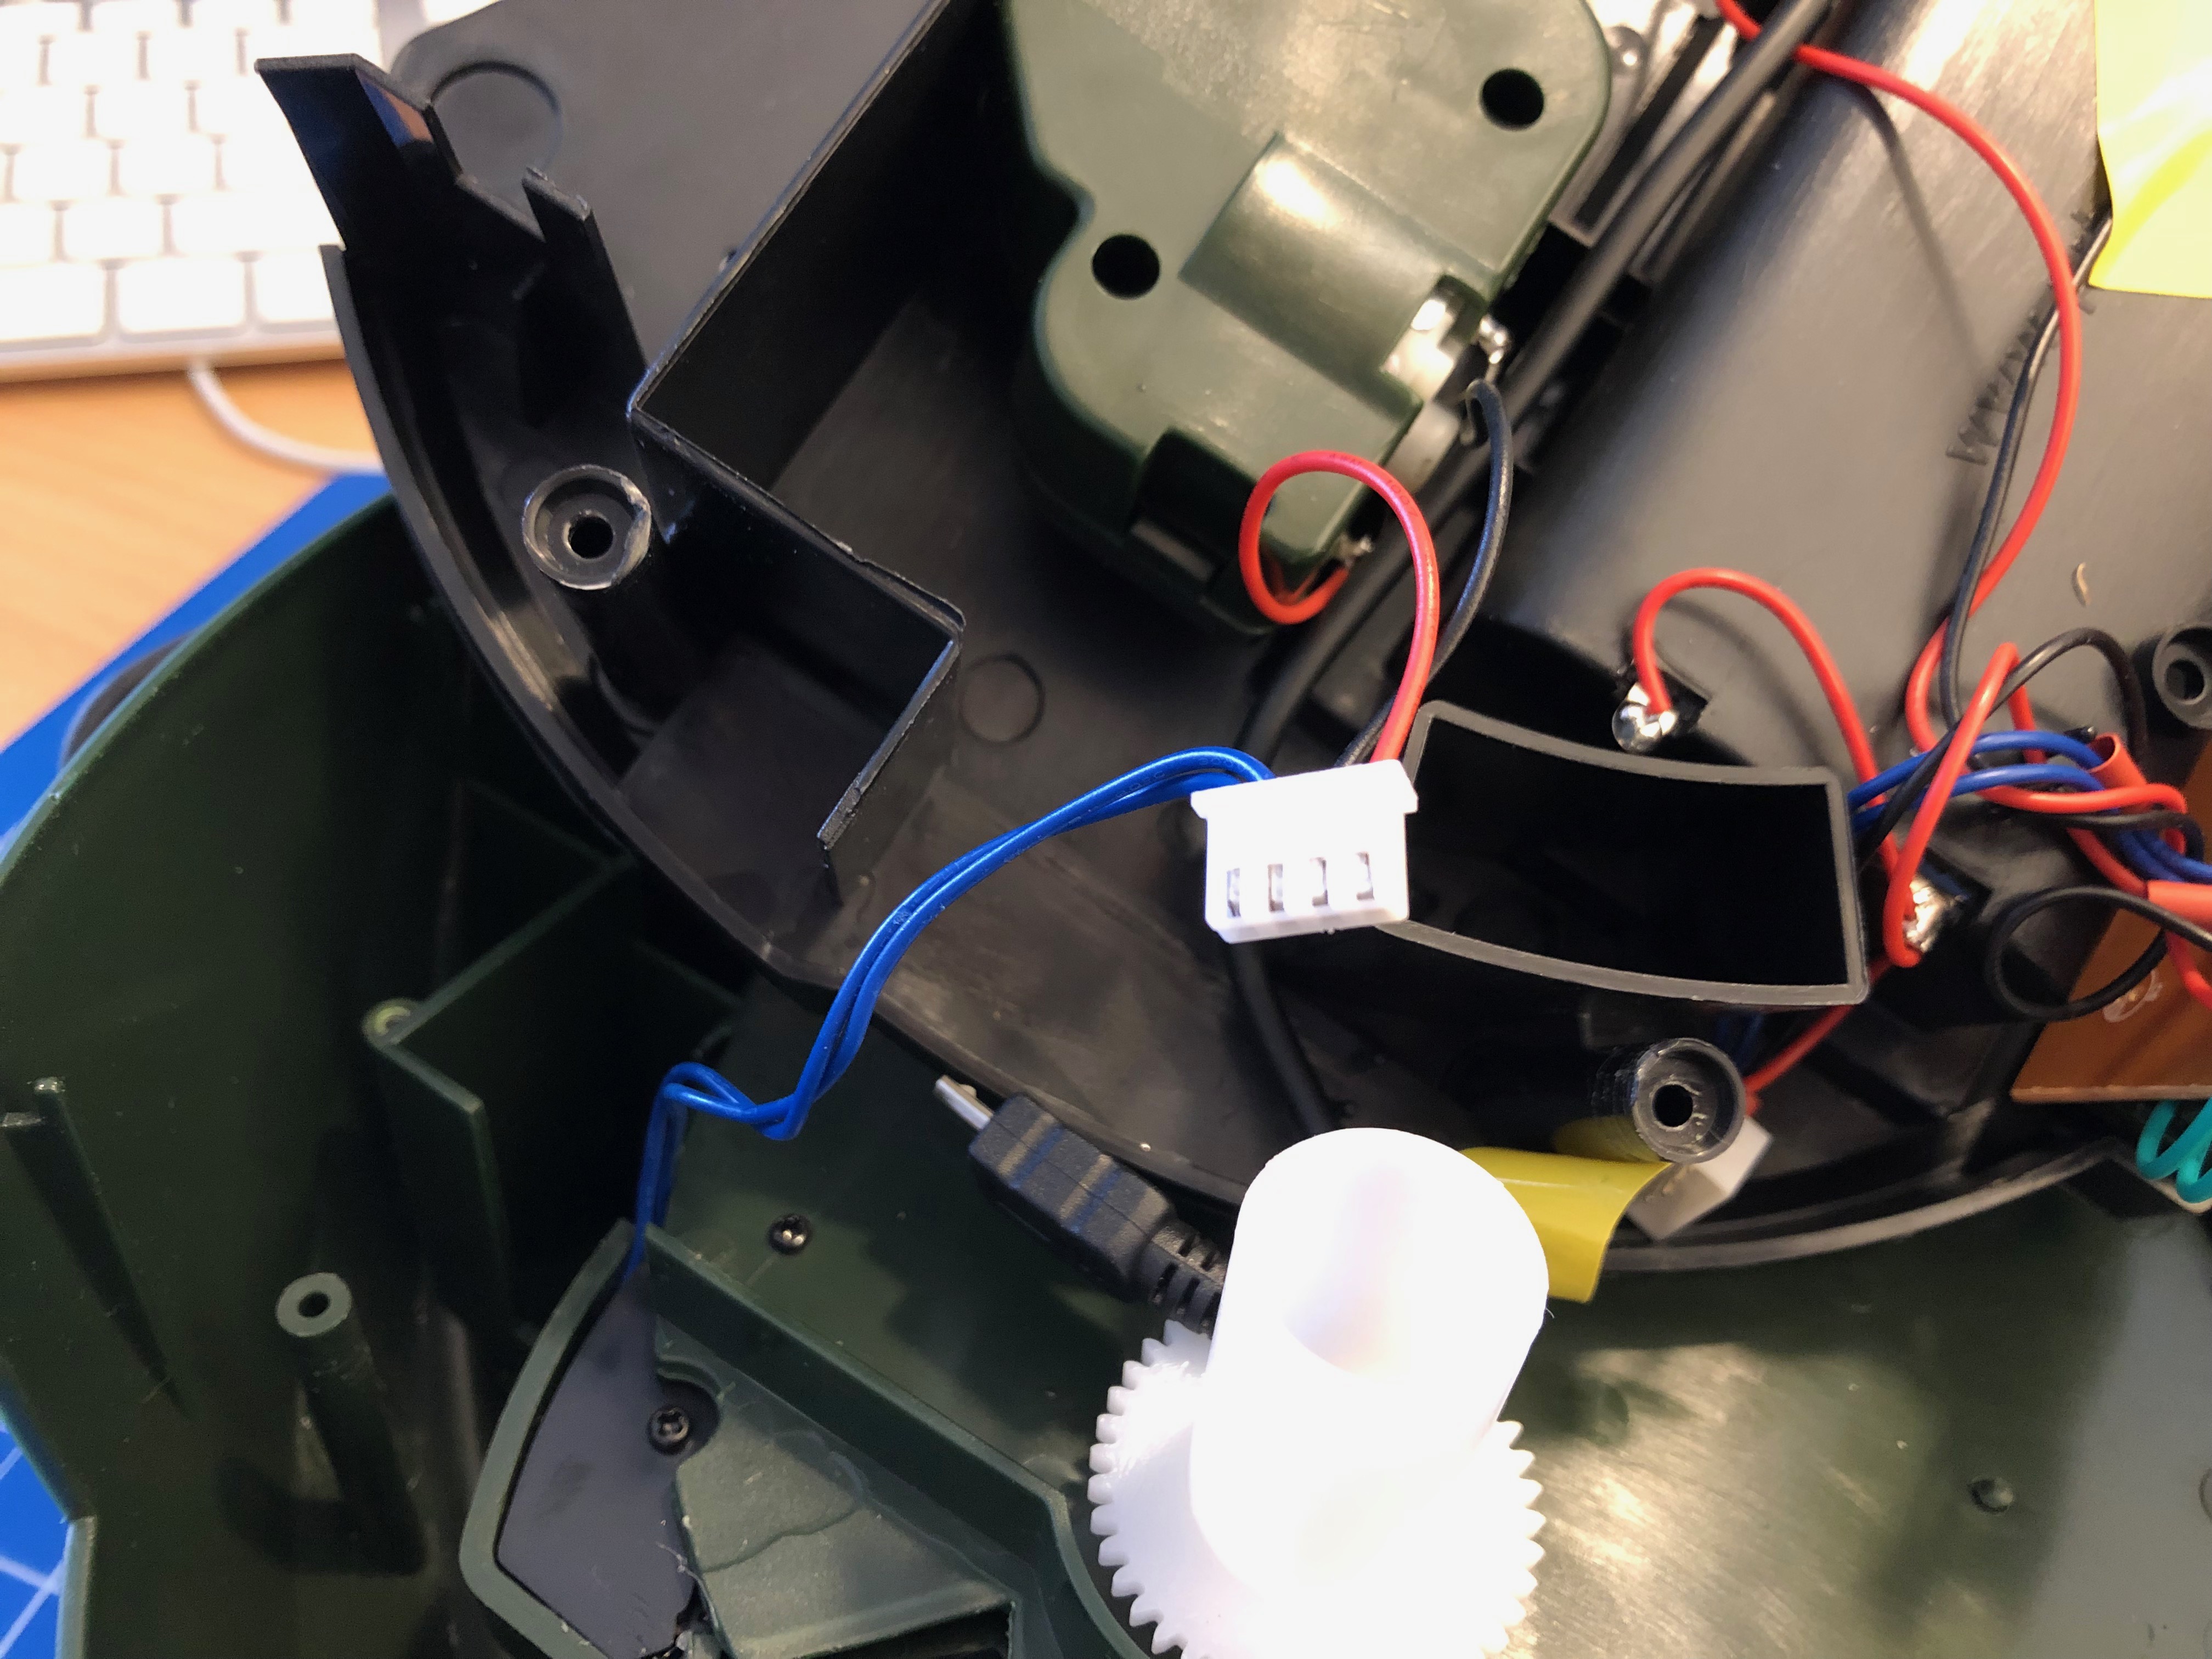
the wheel is turned by a DC motor and the switch is triggered by the wheels fins
I’ve added a connector to the switch and the motor cables for quick connect
The functional principle of the feeder is rather simple:
turn the feeder wheel
take the micro-switch status in account – when it’s pressed down the wheel must be pushing against it
turn it until the micro-switch is not pressed anymore
turn some more until it’s pressed again
Simple. Since the switch-status is not known on power loss / reboot a calibration run is necessary (even with the factory electronics) every time it boots up.
After opening the feeder I’ve cut the two cables going to the motor as well as the micro-switch cables. I’ve added a 4-Pin JST-XH connector to both ends. So I can reconnect it to original state if desired.
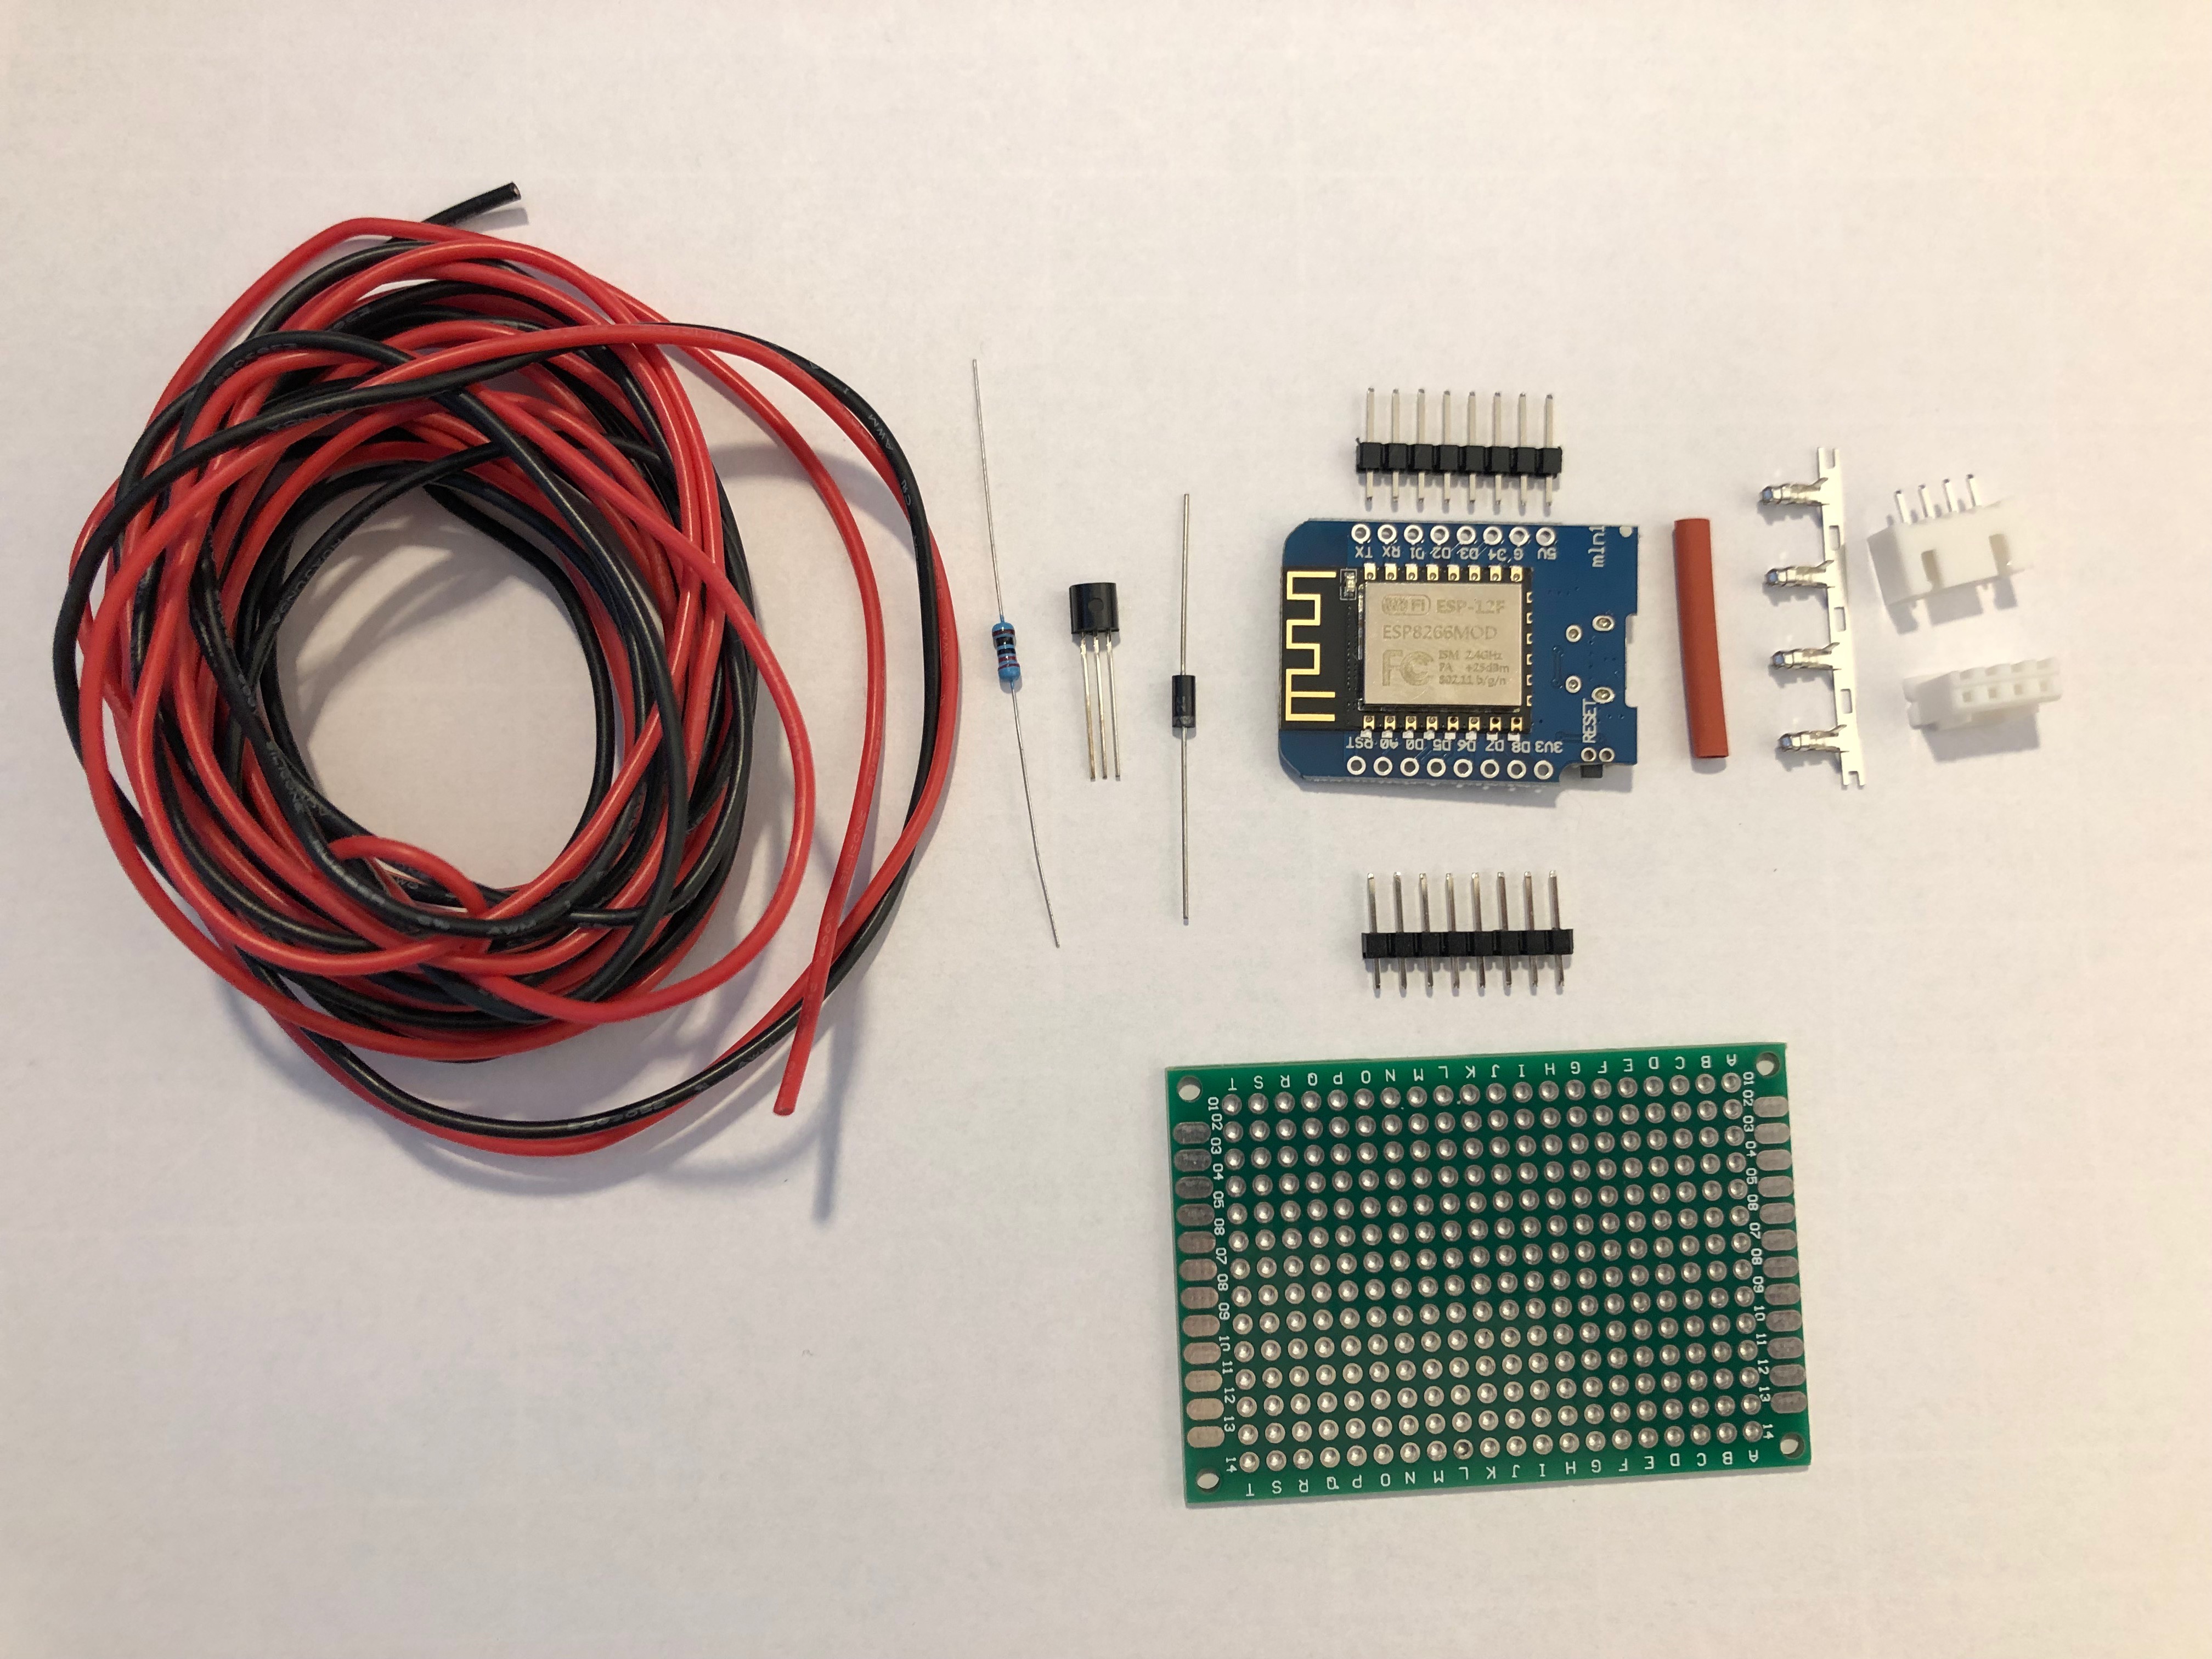
These are all the parts needed:
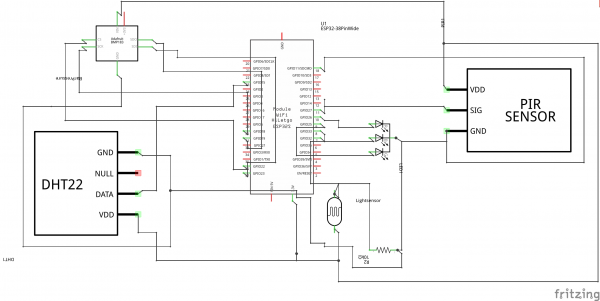
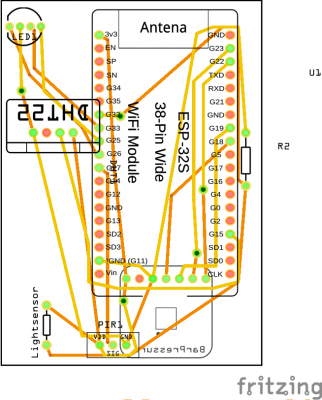
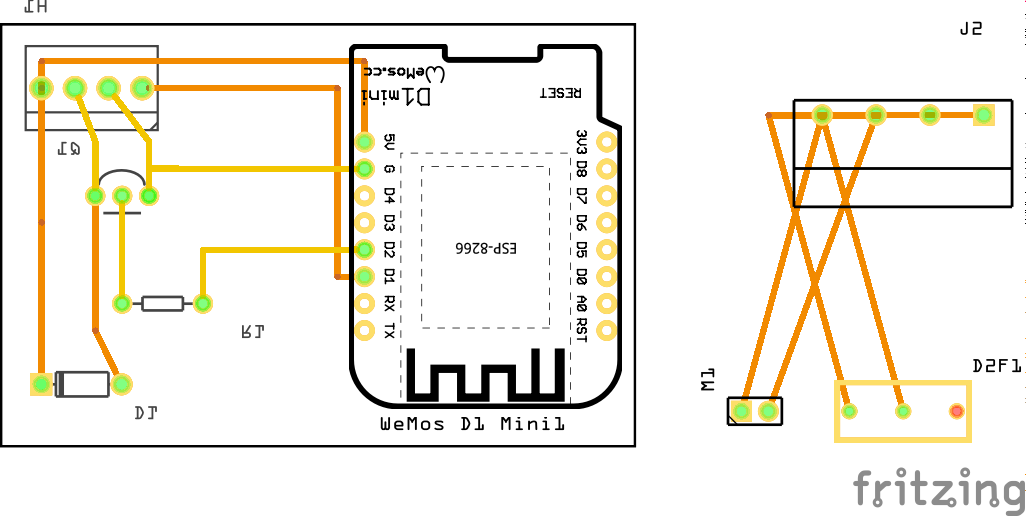
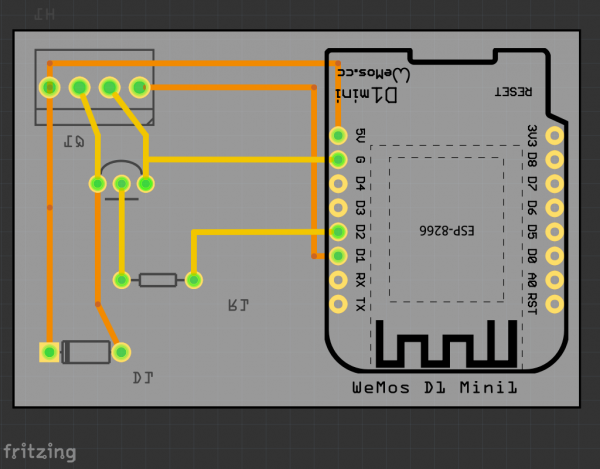
I am using a Wemos D1 Mini and a couple of additional components apart from the prototype board:
A PN2222 NPN transistor, a rectifier diode 1N4007 and a 220 Ohm resistor.
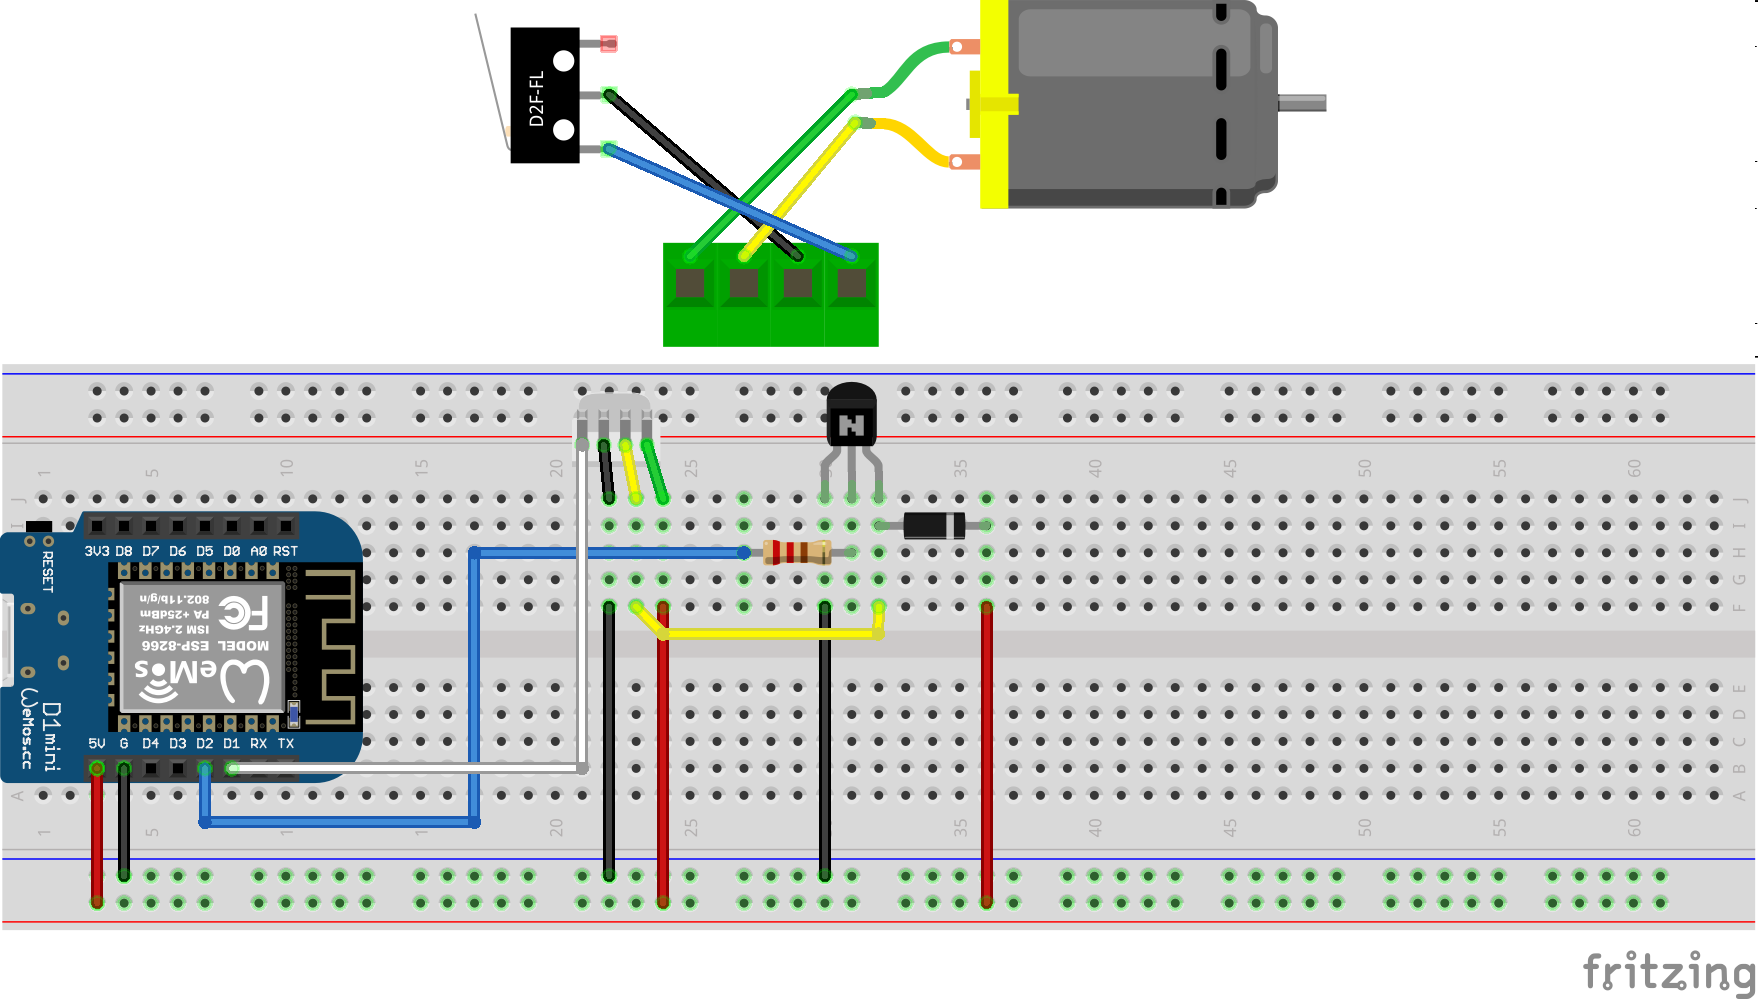
I’ve connected everything according to this schematic I’ve drawn with Fritzing:
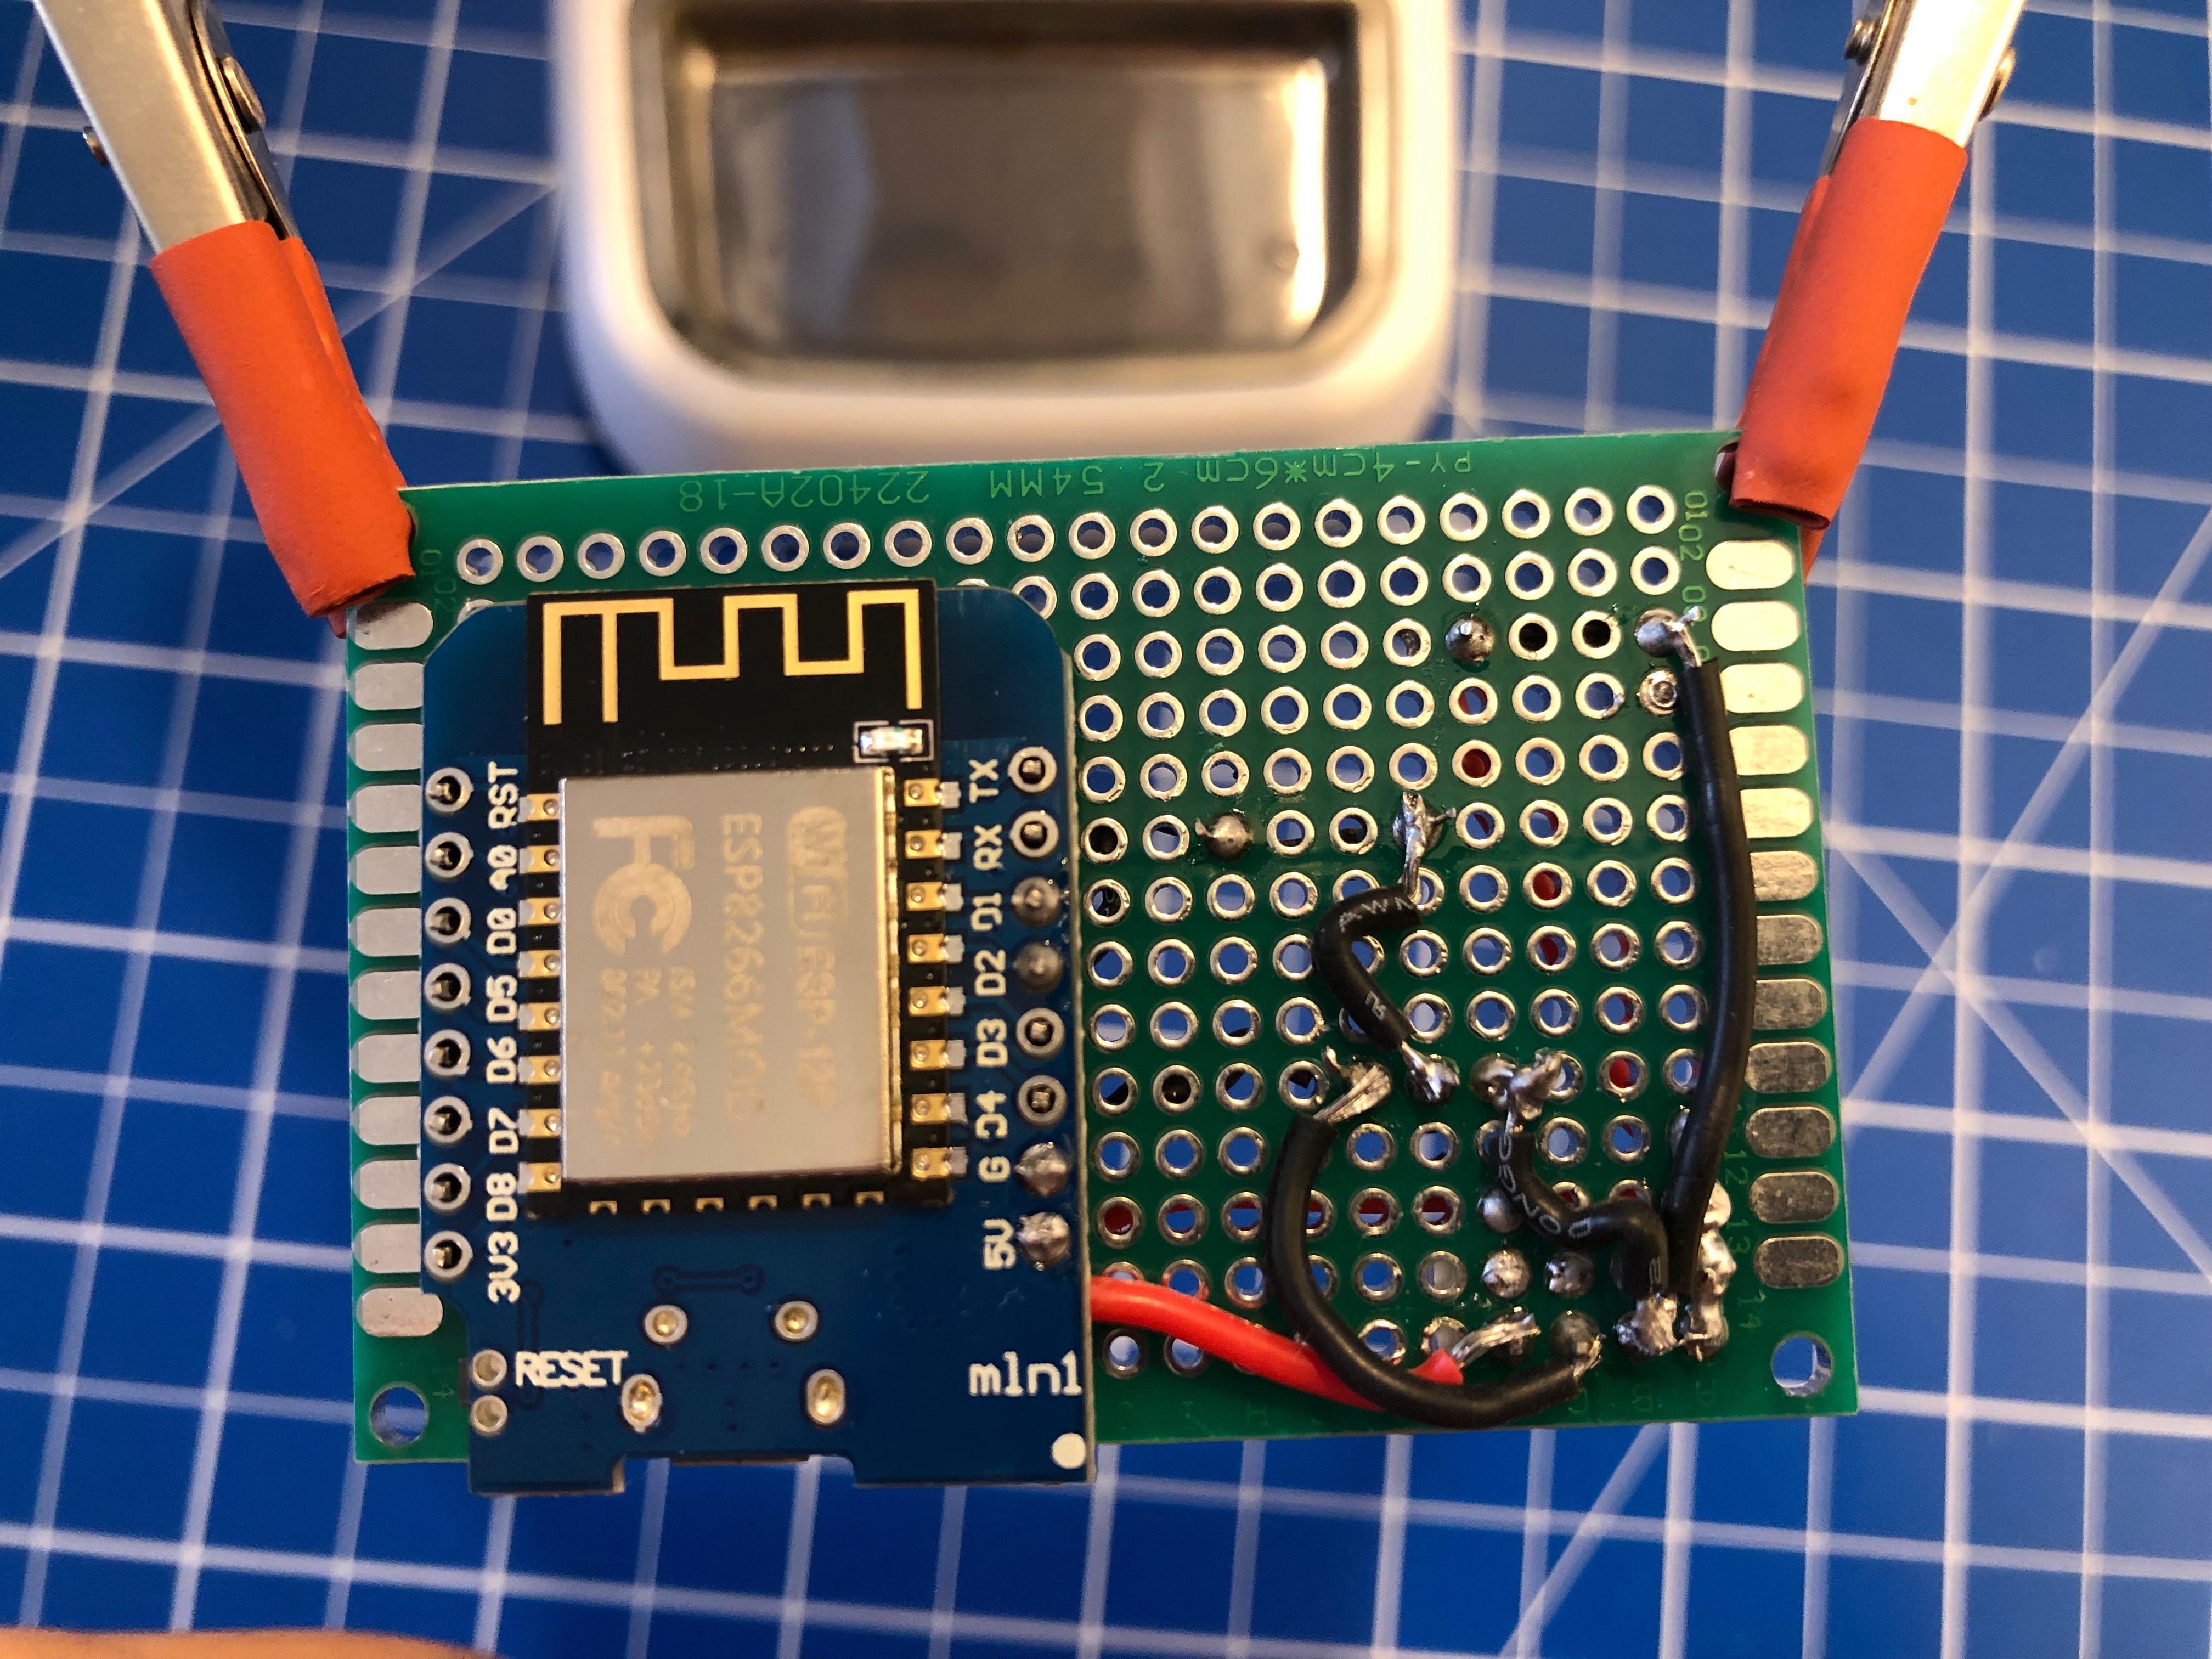
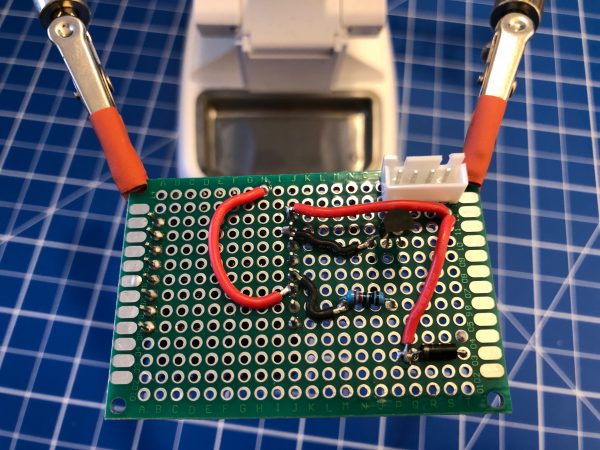
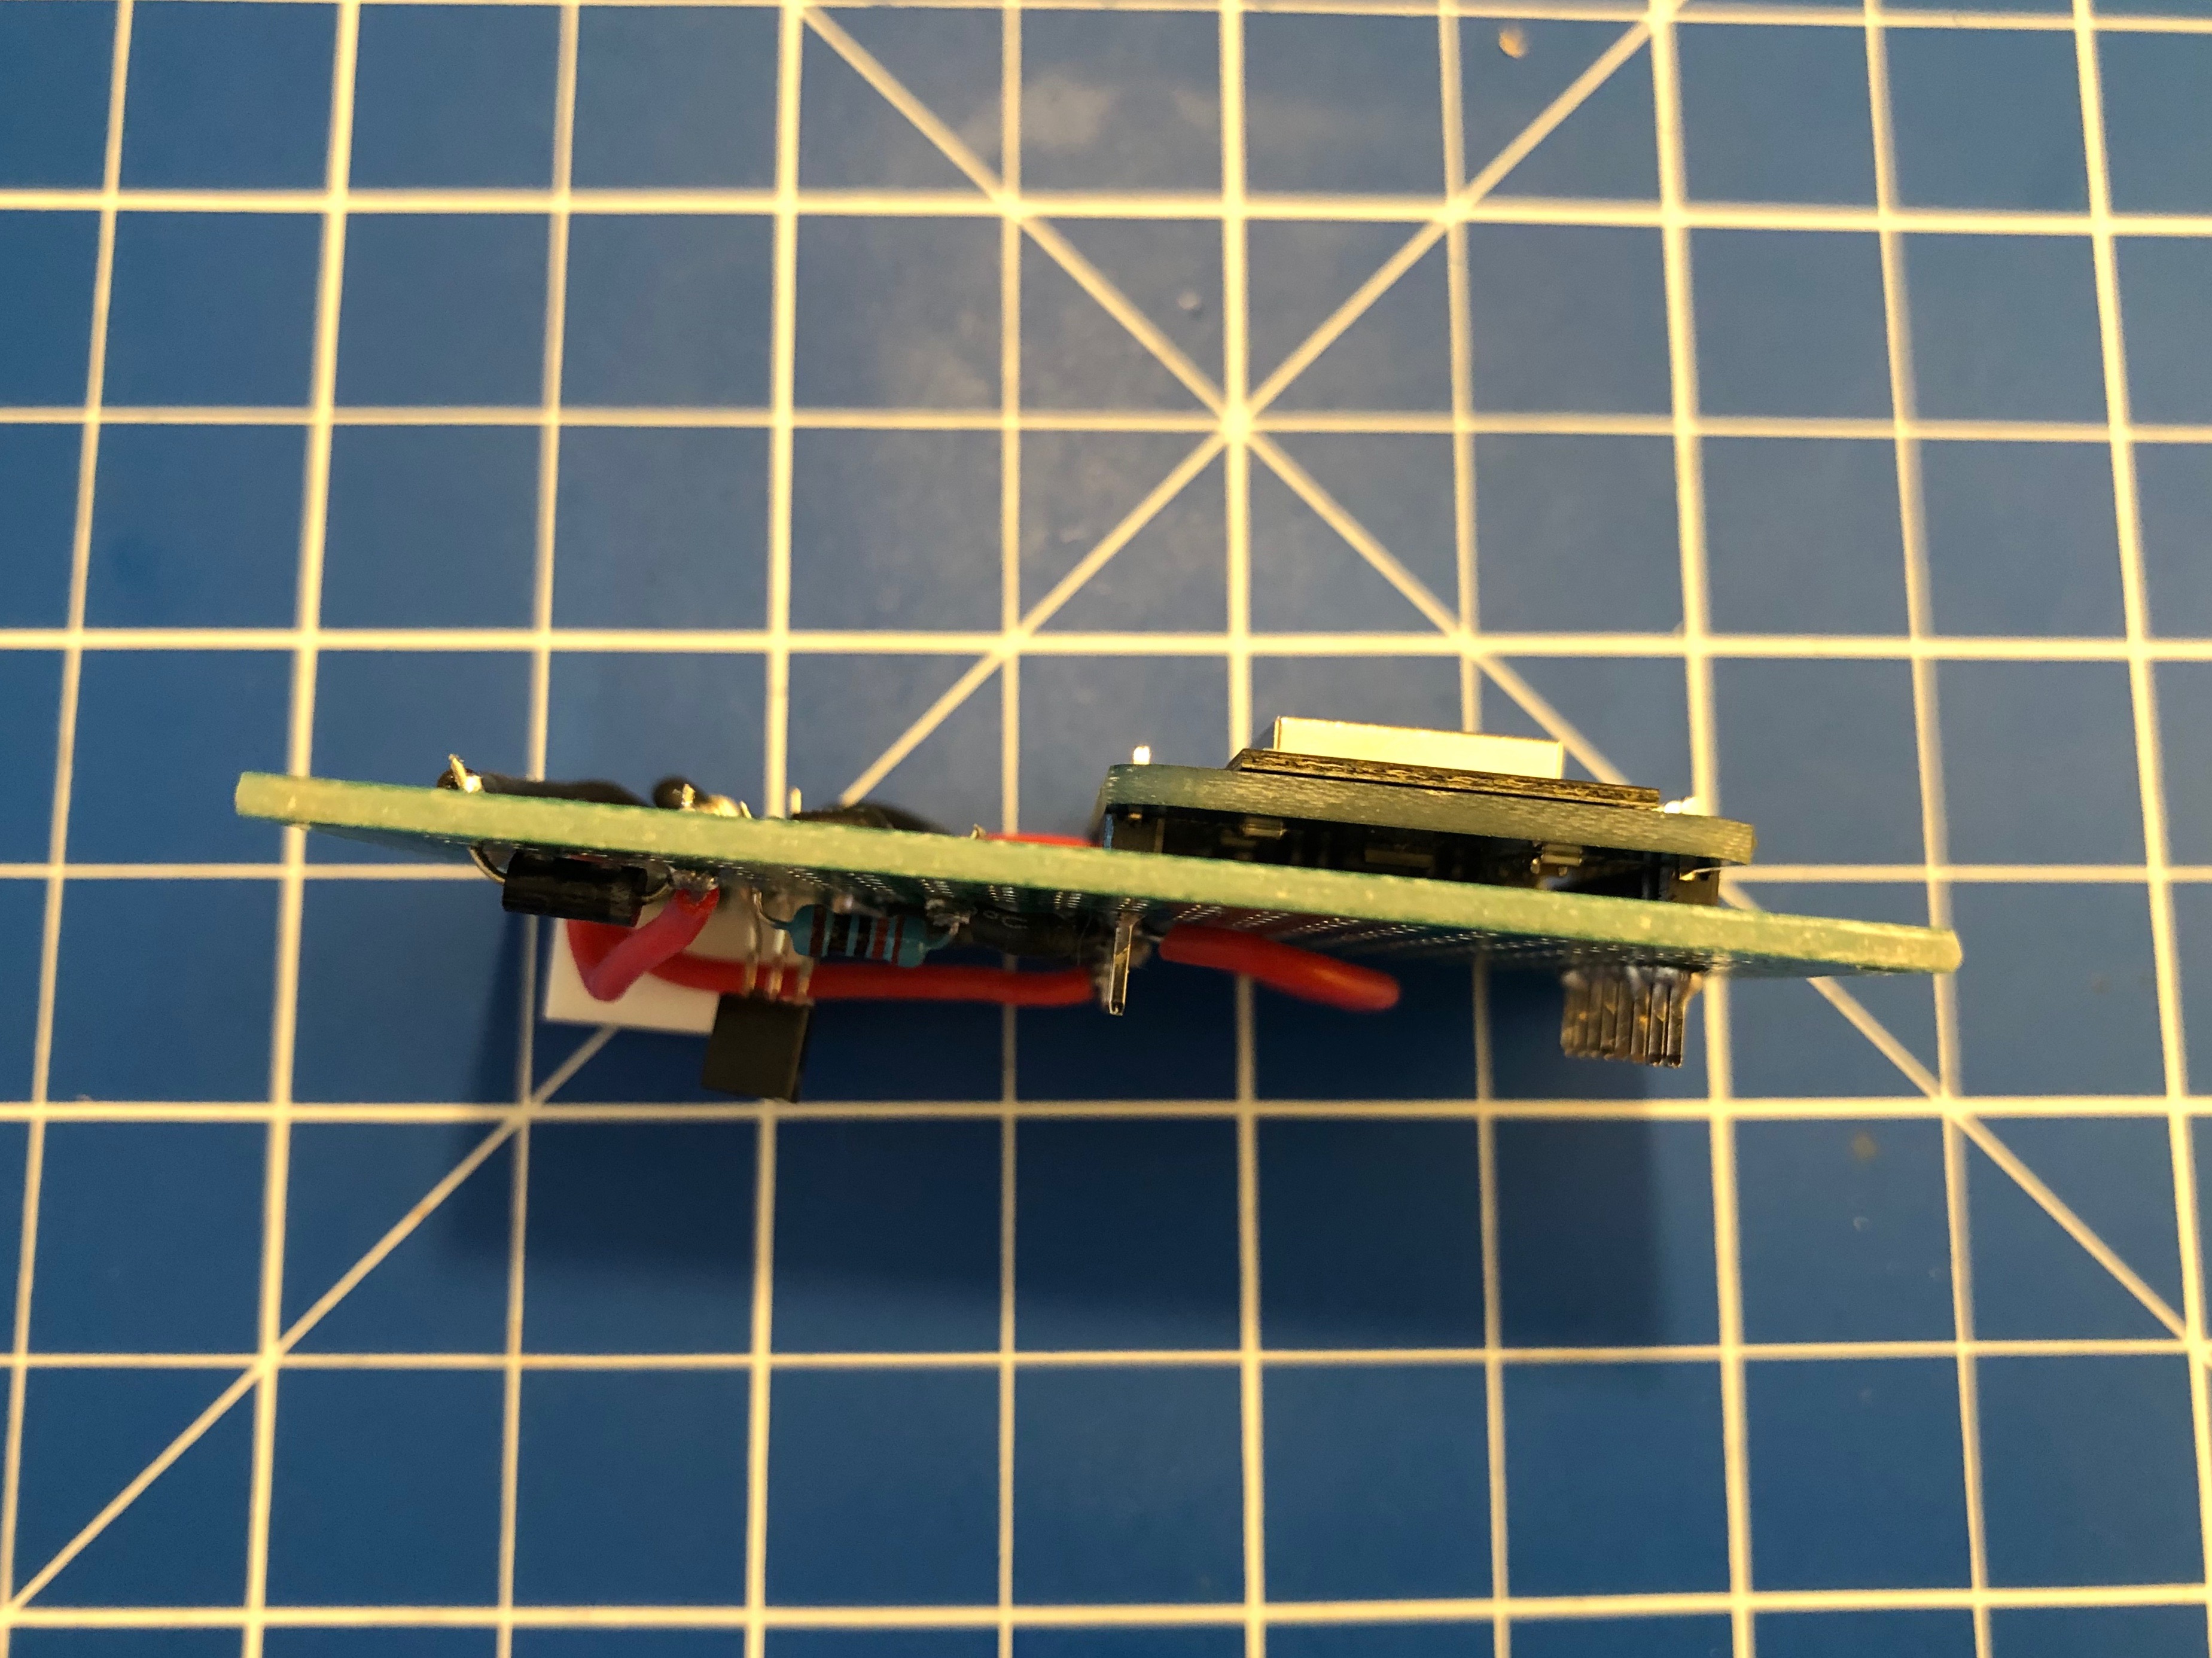
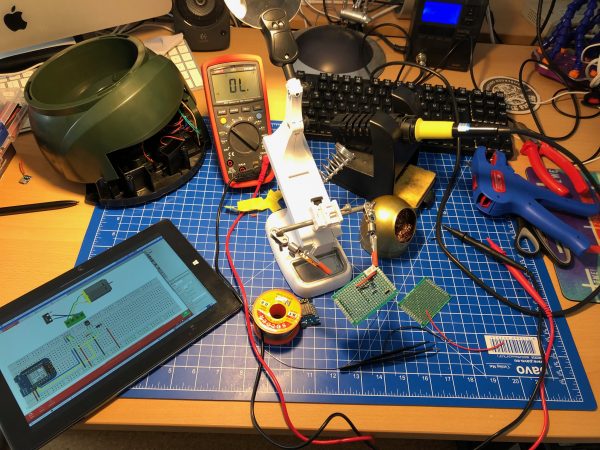
I’ve then prototyped away and put everything on the PCB. Of course with very limited solderig skill:
As you can see the JST-XH connector on Motor+Switch can now be connected easily to the PCB with all the parts.
Make sure you check polarity and that you did correctly hook up the motor and switch.
When done correctly the PCB (I’ve used 40mm x 60mm prototype pcb) and all cables will fit into the case. There’s plenty of room and I’ve put it to the side of it. I’ve also directly connected an USB cable to the USB port of the Wemos D1 Mini. As long as you put at least 1A into it it will all work.
Software
Since the Wemos D1 Mini sports an ESP8266 and is well supported by Arduino it was clear to me to use Arduino IDE for the software portion of this project.
To get everything running you need to modify the .ino file in the src folder like so:
Configuration
What you need to configure:
the output pins you have chosen – D1+D2 are pre-configured
WiFi SSID + PASS
MQTT Server (IP(+Username+PW))
MQTT Topic prefix
Commands that can be sent through mqtt to the /feed topic.
MQTT topics and control
There are overall two MQTT topics:
$prefix/feeder-$chipid/state This topic will hold the current state of the feeder. It will show a number starting from 0 up. When the feeder is ready it will be 0. When it’s currently feeding it will be 1 and up – counting down for every successfull turn done. There is an safety cut-off for the motor. If the motor is longer active than configured in the MaximumMotorRuntime variable it will shut-off by itself and set the state to -1.
$prefix/feeder-$chipid/feed This topic acts as the command topic to start / control the feeding process. If you want to start the process you would send the number of turns you want to happen. So 1 to 5 seems reasonable. The feeder will show the progress in the /state topic. You can update the amount any time to shorten / lengthen the process. On the very first feed request after initial power-up / reboot the feeder will do a calibration run. This is to make sure that all the wheels are in the right position to work flawlessly.
All in all there are 3 of these going to be running in our household and the feeding is going to be controlled either by Alexa voice commands or through Node-Red automation.
I am running most of my in-house infrastructure based on Docker these days…
Docker is a set of platform-as-a-service (PaaS) products that use operating-system-level virtualization to deliver software in packages called containers.Containers are isolated from one another and bundle their own software, libraries and configuration files; they can communicate with each other through well-defined channels.
All containers are run by a single operating-system kernel and are thus more lightweight than virtual machines.
And given the above definition it’s fairly easy to create and run containers of things like command-line tools and background servers/services. But due to the nature of Docker being “terminal only” by default it’s quite hard to do anything UI related.
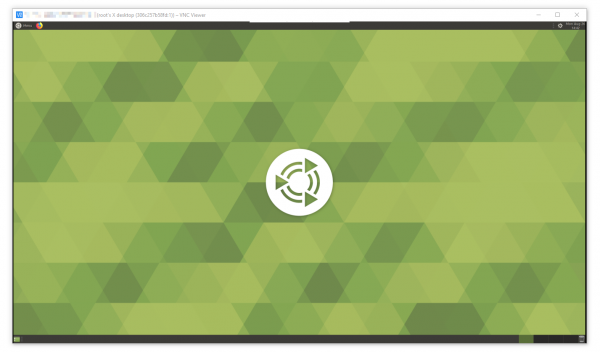
But there is a way. By using the VNC protocol to get access to the graphical user interface we can set-up a container running a fully-fledge Linux Desktop and we can connect directly to this container.
I am using something I call “throw-away linux desktop containers” all day every day for various needs and uses. Everytime I start such a container this container is brand-new and ready to be used.
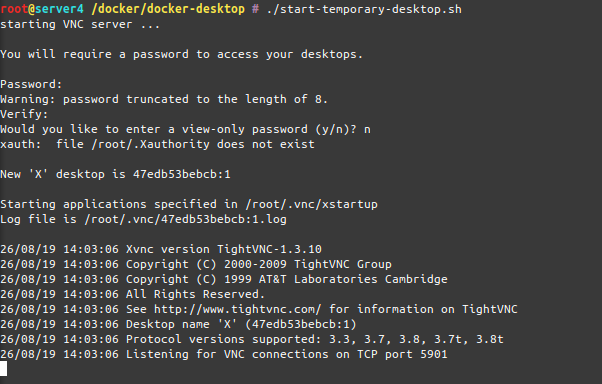
Actually when I start it the process looks like this:
As you can see when the container starts-up it asks for a password to be set. This is the password needed to be entered when the VNC client connects to the container.
And when you are connected, this is what you get:
this is what you see after connecting to the desktop container by VNC
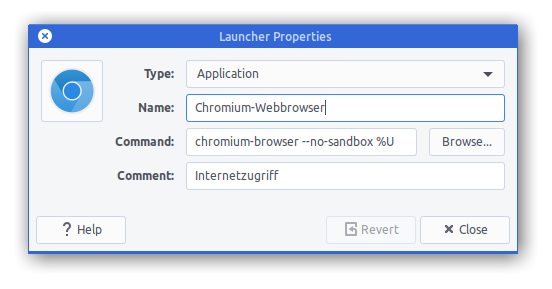
I am sharing my scripts and Dockerfile with you so you can use it yourself. If you put a bit more time into it you can even customize it to your specific needs. At this point it’s based on Ubuntu 18.04 and starts-up a ubuntu-mate desktop environment in it’s default configuration.
When you log into the container it will log you in as root – but effectively you won’t be able to really screw around with the host machine as the container is still isolating you from the host. Nevertheless be aware that the container has some quirks and is run in extended privileges mode.
Chromium will be pre-installed as a browser but you will find that it won’t start up. That’s because Chromium won’t start up if you attempt a start as root user.
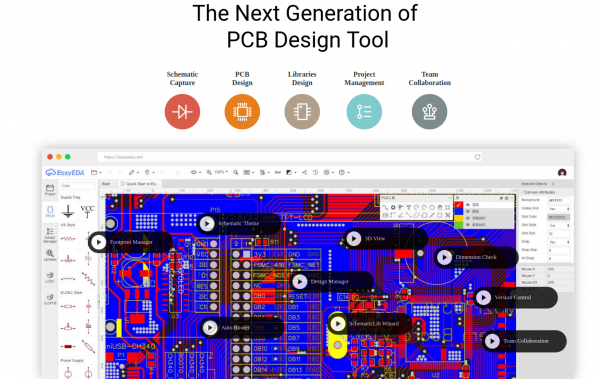
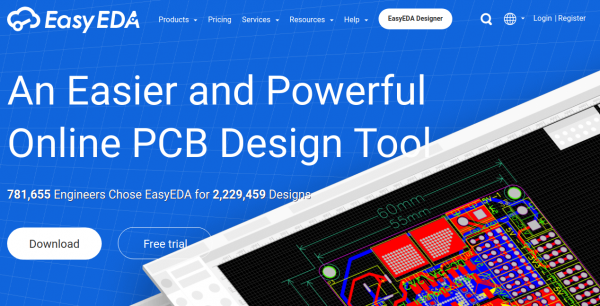
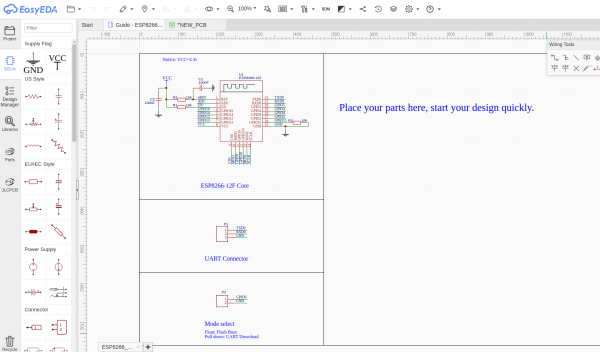
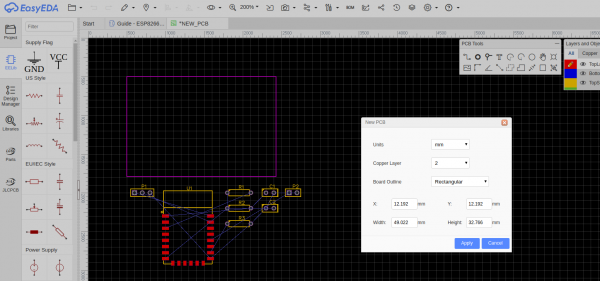
Maybe you want to give EasyEDA a try as it’s in-browser experience is better than anything I had come across so far. Granted I am not doing PCBs regularly but nevertheless – whenever I tried with the programs I’ve got recommended it wasn’t as straight forward as it is with this tool.
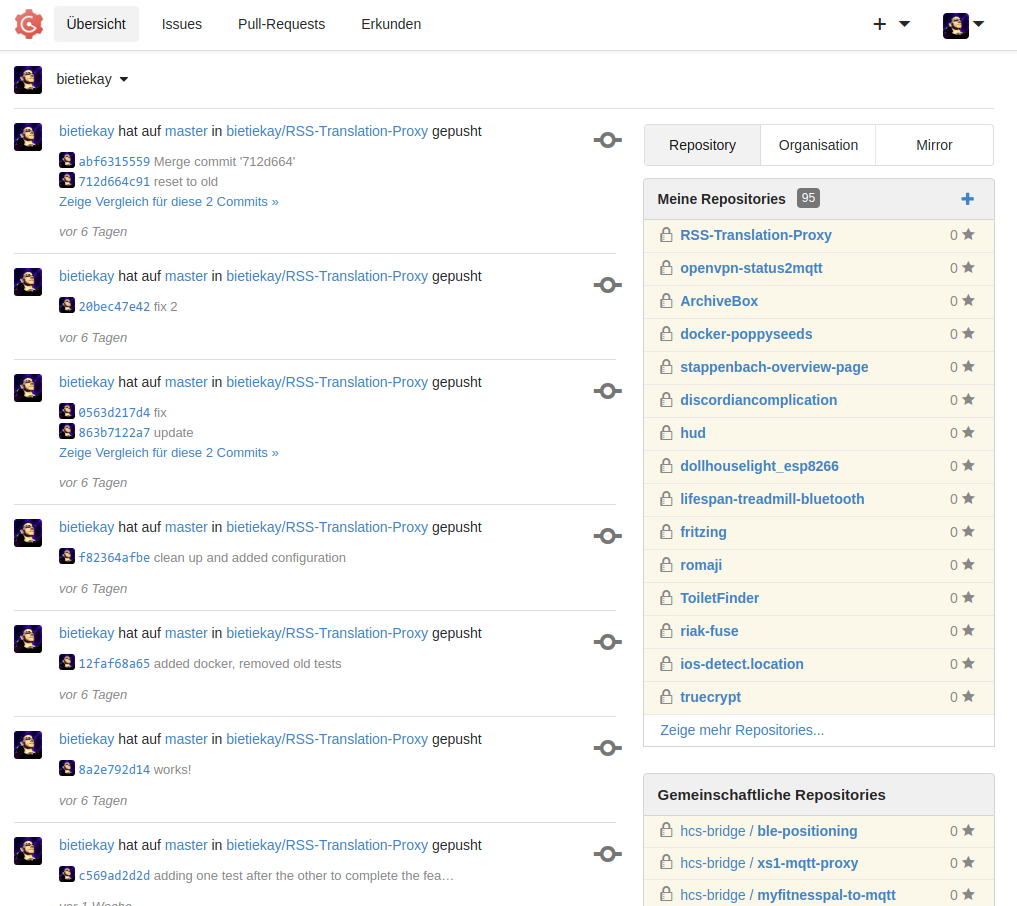
As people around me discuss what to go for in regards to manage their growing number of private GIT repositories I joined their discussion.
A couple of years ago I assessed how I would want to store my collection of almost 100 GIT private repositories and all those cloned mirrors I want to keep for archival and sentimental reasons.
An option was to pay for GitHub. Another option, which most seemed to prefer, was going for a local Gitlab set-up.
All seemed not desirable. Like chaining my workflows to GitHub as a provider or adopting a new hobby to operate and maintain a private GitLab server. And as it might have become easier to operate a GitLab server with the introduction of container management systems. But I’ve always seemed to have to update to a new version when I actually wanted to use it.
So this was when I had to make the call for my own set-up about 4 years ago. We were using a rather well working GitLab set-up for work back then. But it all seemed overkill to me also back then.
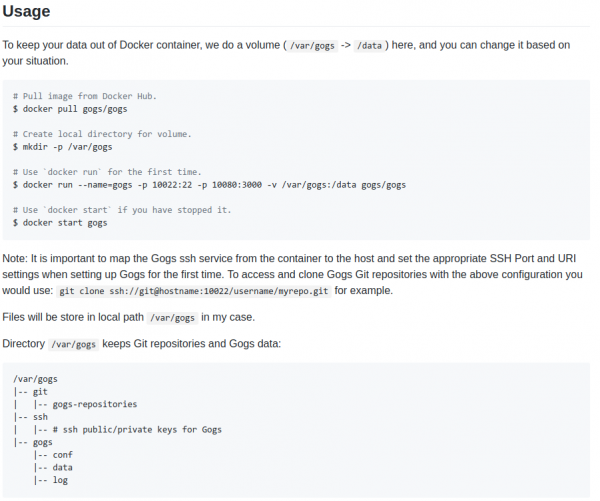
It runs with one command, the only dependency is two file system directories with (a) the settings of gogs and (b) your repositories.
It’ll deploy as literally a SINGLE BINARY without any other things to consider. With the provided dockerfile you are up and running in seconds.
It has never let me down. It’s running and providing it’s service. And that’s the end of it.
I am using it, as said, for 95 private repositories and a lot of additionally mirrored GIT repositories. Gogs will support you by keeping those mirrors in sync for you in the background. It’s even multi-user multi-organization.
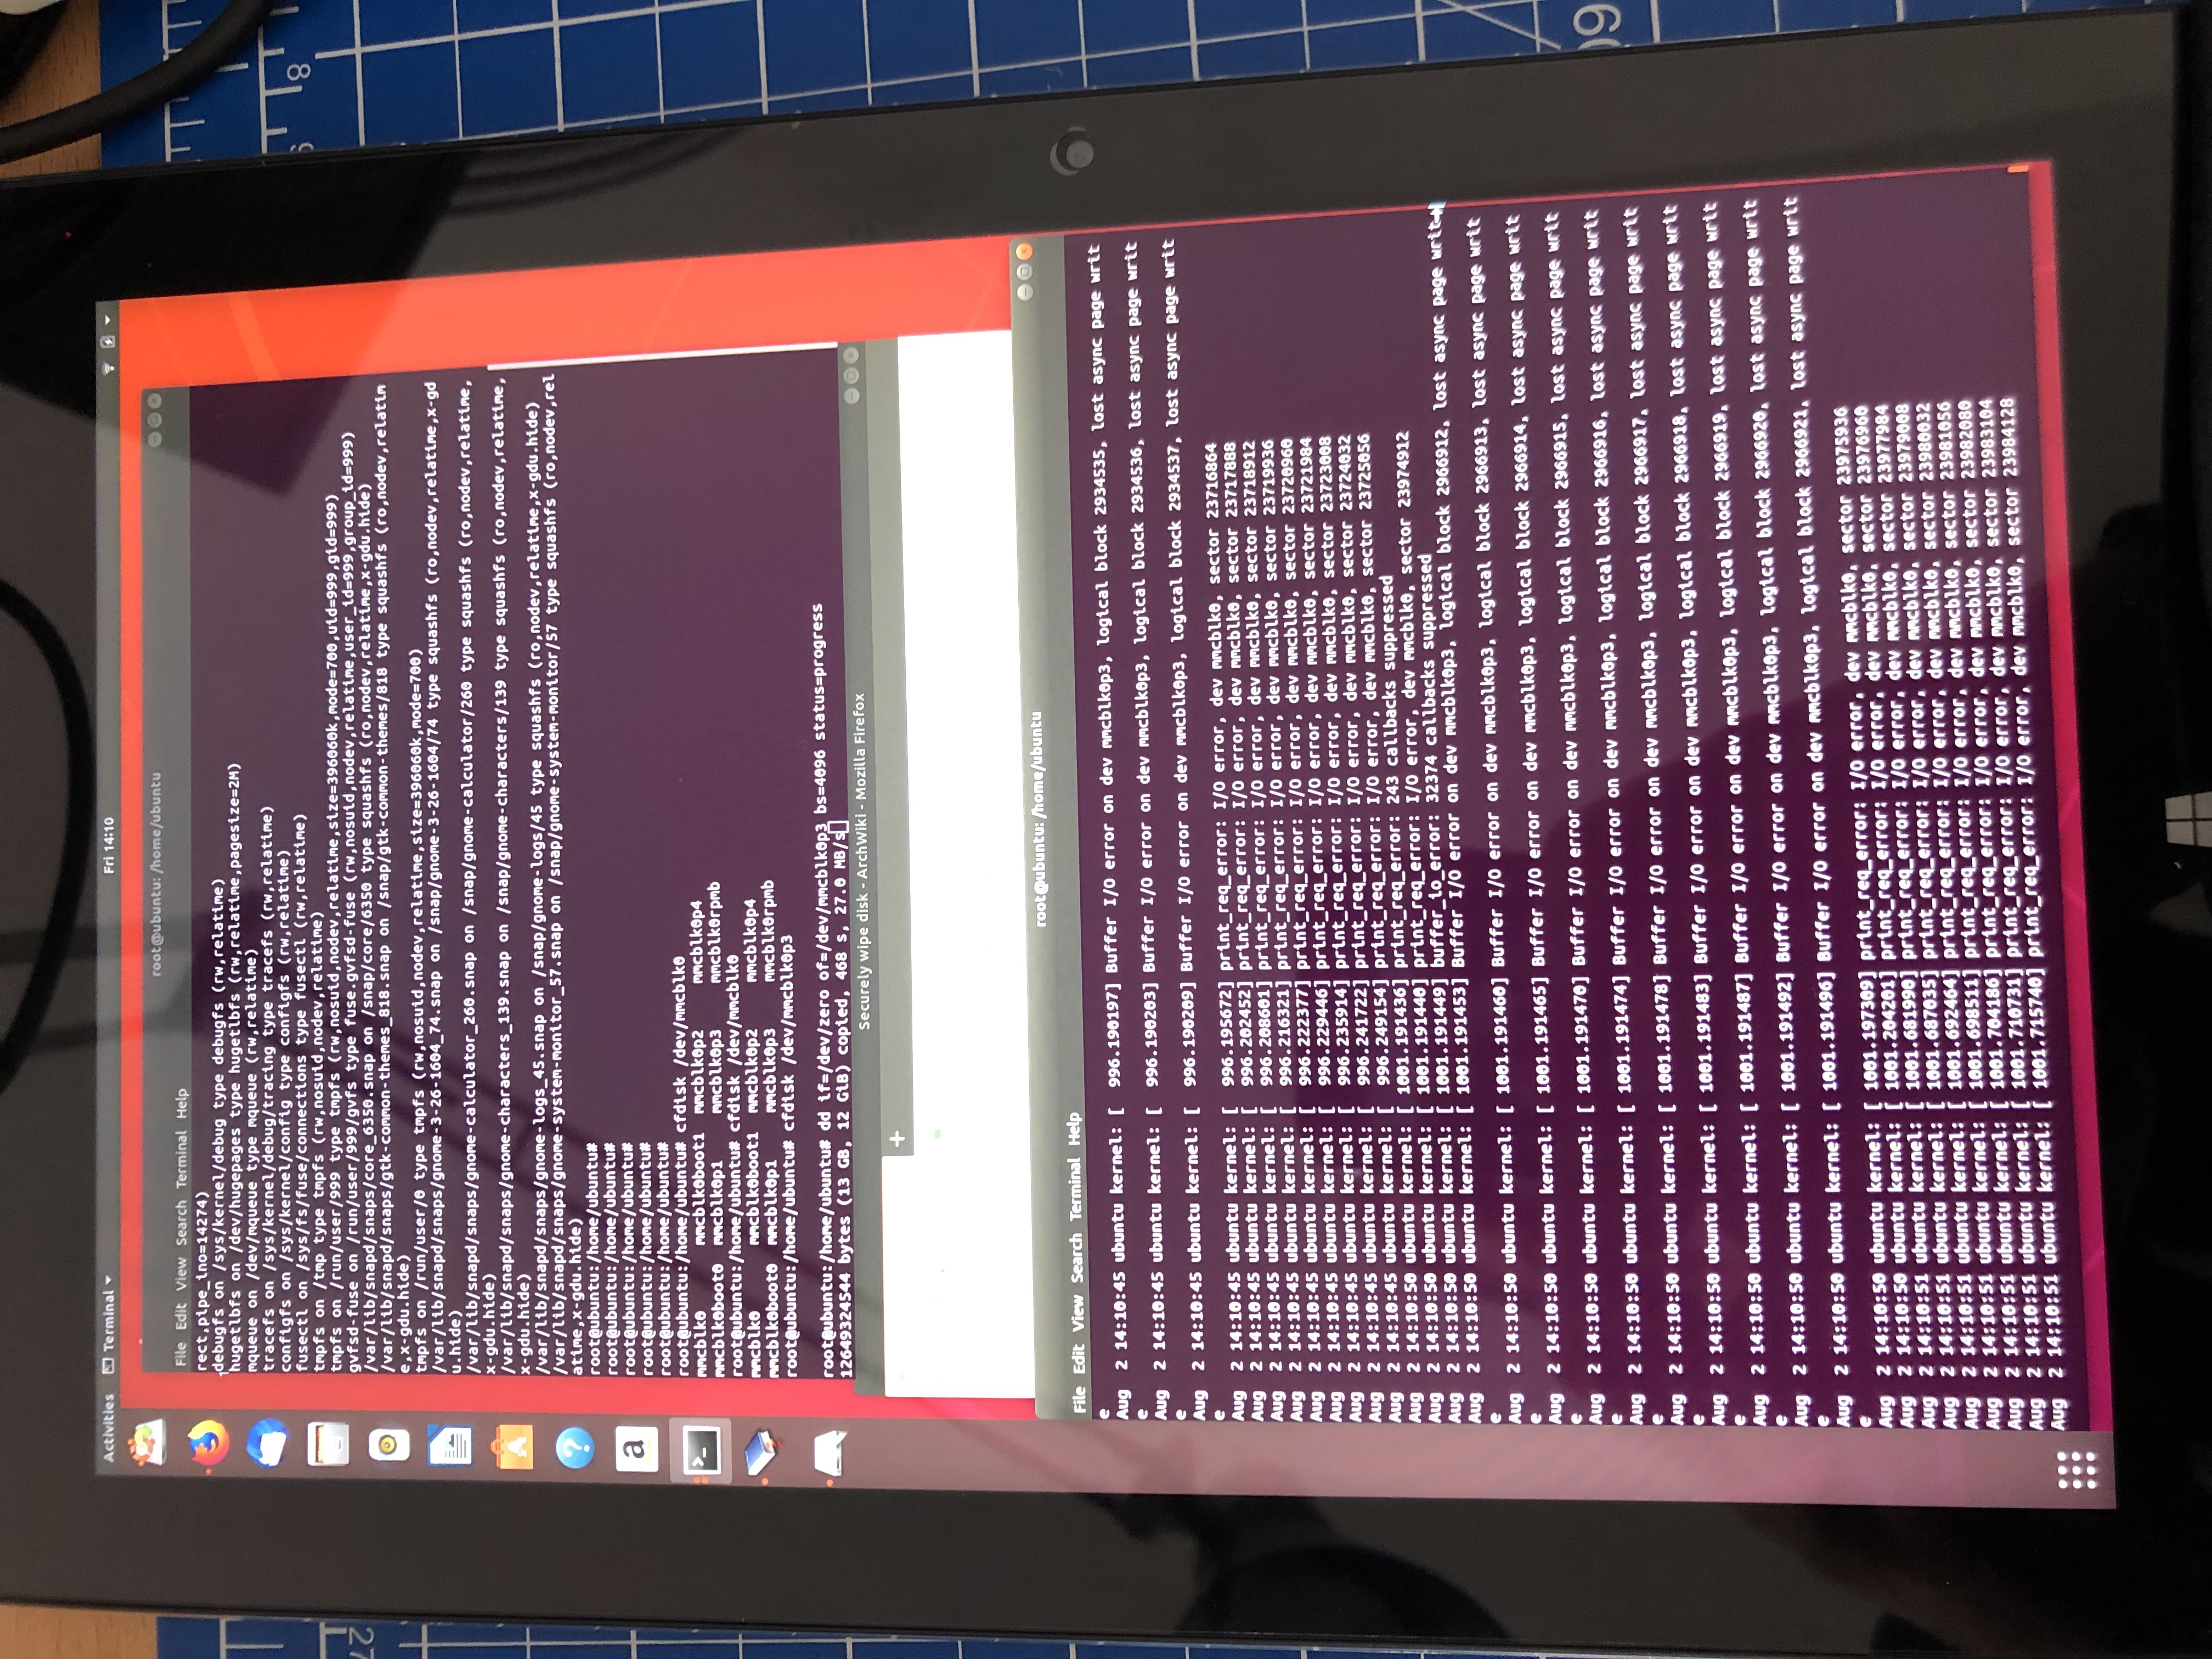
The firecracker exploded. Apparently after 2 weeks of usage of the Chuwi Hi10 Air the eMMC flash is malfunctioning.
In a totally strange way: Every byte on the eMMC can be read, seemingly. Even Windows 10 boots. But after a while it will hang and blue screen. Apparently because it tries to write to the eMMC and when those writes fail and pile up in the caches at some point the system calls it quits.
Anyhow: It means that no byte that is right now on this eMMC can be deleted / overwritten but only be read.
The great chinese support is really helpful and offered to replace the device free of charge right away. That’s very nice! But I came to the conclusion that I cannot send the device in, because:
It contains a full set of synched private data that I cannot remove by all means because the freaking soldered-on eMMC flash is broken.
The recipient of this broken tablet in china would be able to read all my data and I could not do anything about it.
Only an extremely small fraction of data is on there unencrypted. Only that much I hadn’t yet switched on encryption on during the initial set-up I was still doing on the device. And that little piece of data already is what won’t let me send out the device.
Now, what can we learn from this? We can learn: Never ever ever work with anything, even during set-up, without full encryption.
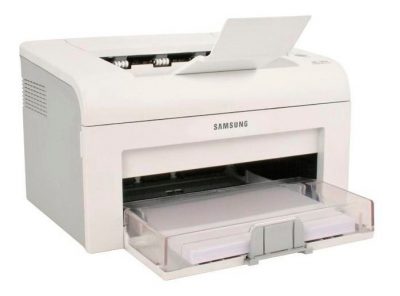
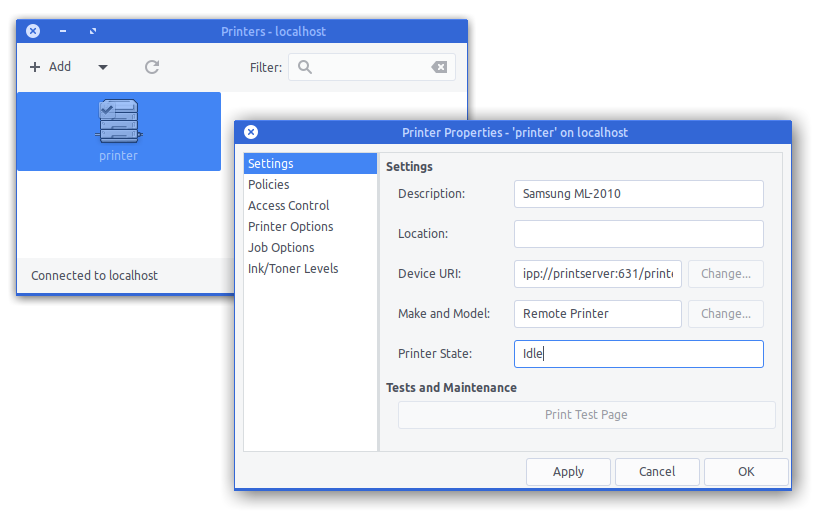
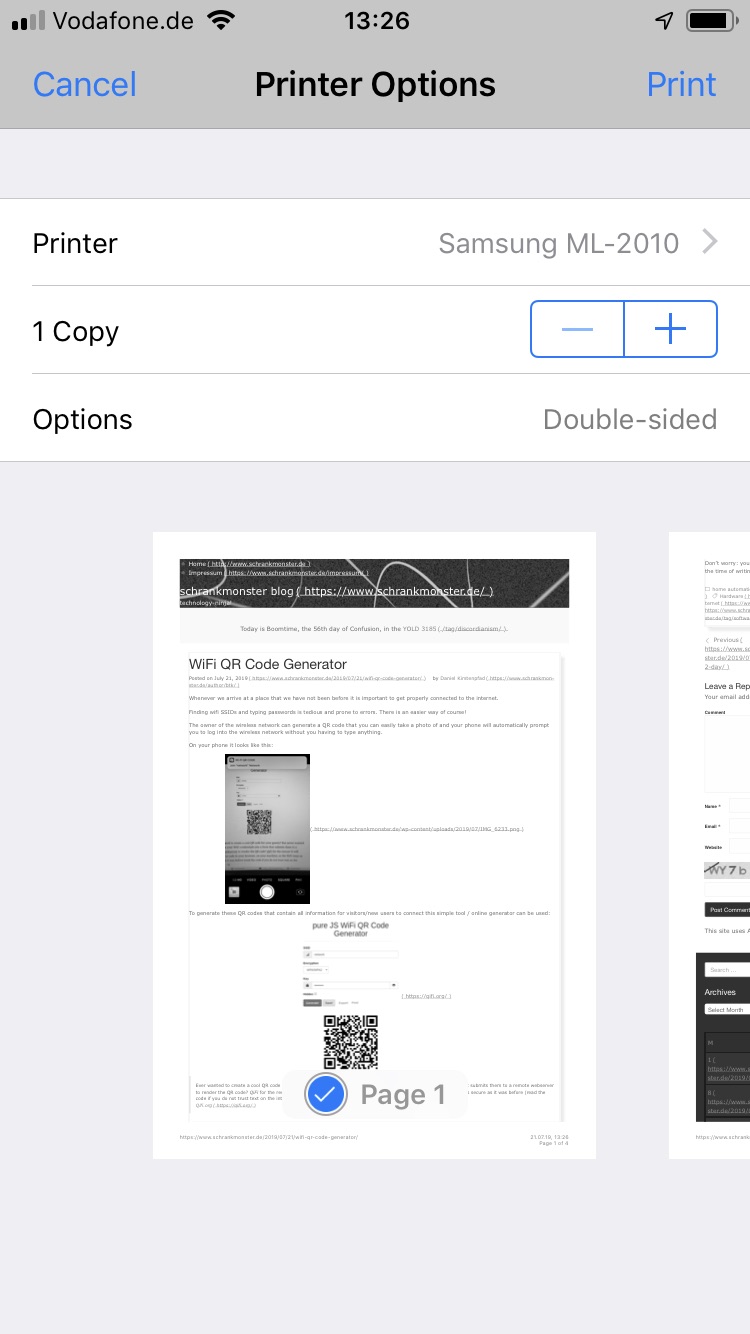
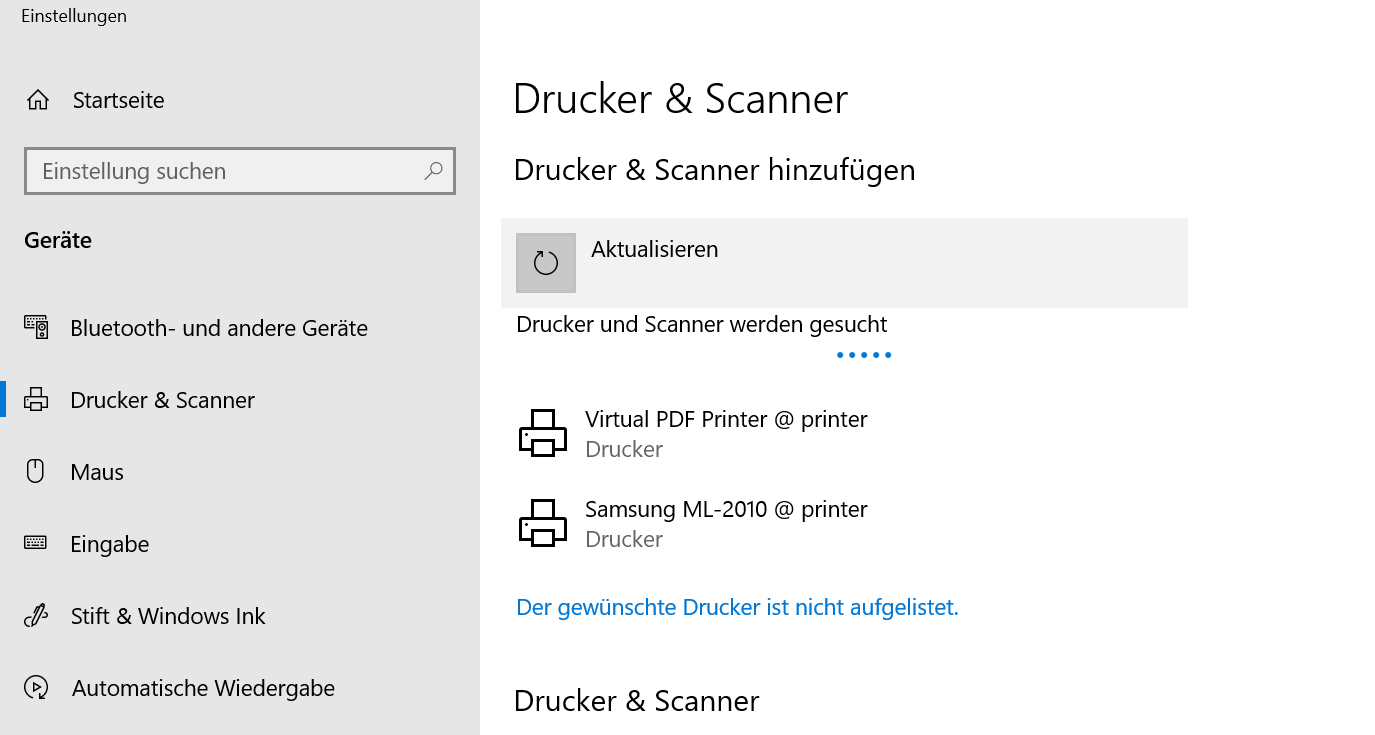
In 2007 I had become proud owner of a Samsung ML-2010 mono laser printer. It’s done a great job ever since and I can recall changing the toner just once so far.
So you can tell: I am not a heavy printer user. Every so often I gotta print out a sheet of paper to put on a package or to fill out a form. A laser printer is the perfect fit for this pattern as it’s toner is not going-bad or evaporating like ink does in ink-printers.
So I still like the printer and it’s in perfect working condition. I’ve just recently filled up the toner for almost no money. But – but this printer needs to be physically connected to the computer that wants to print.
As the usage patterns have significantly changed in the last 12 years this printer needs to be brought into todays networked world.
Replacing it with a new printer is not an option. All printers I could potentially purchase are both more expensive to purchase and the toner is much more expensive to refill. No-can-do.
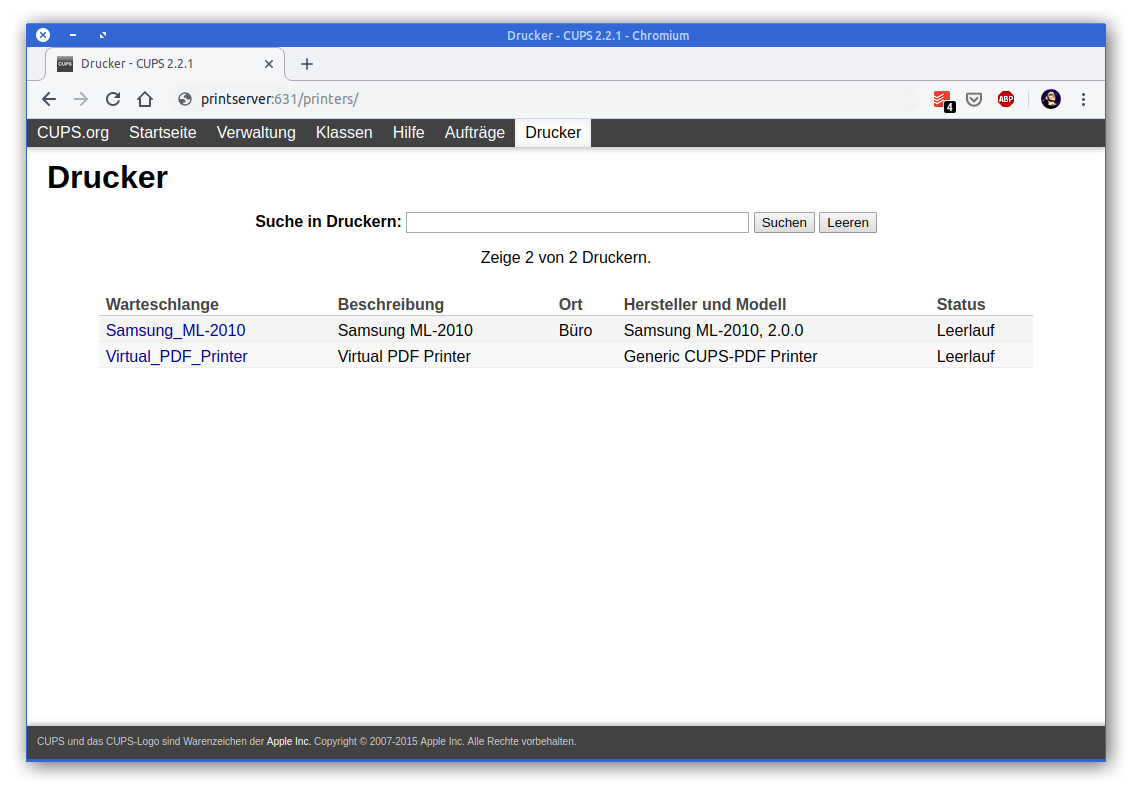
If only there was an easy way to get the printer network ready. Well, turns out, there is!
First let’s start introducing an opensource project: CUPS
CUPS (formerly an acronym for Common UNIX Printing System) is a modular printing system for Unix-like computer operating systems which allows a computer to act as a print server. A computer running CUPS is a host that can accept print jobs from client computers, process them, and send them to the appropriate printer.
A good, cheap and energy-efficient way to run a CUPS host is a Raspberry Pi. I do own several first-generation models that have been replaced by much more powerful ones in the previous years.
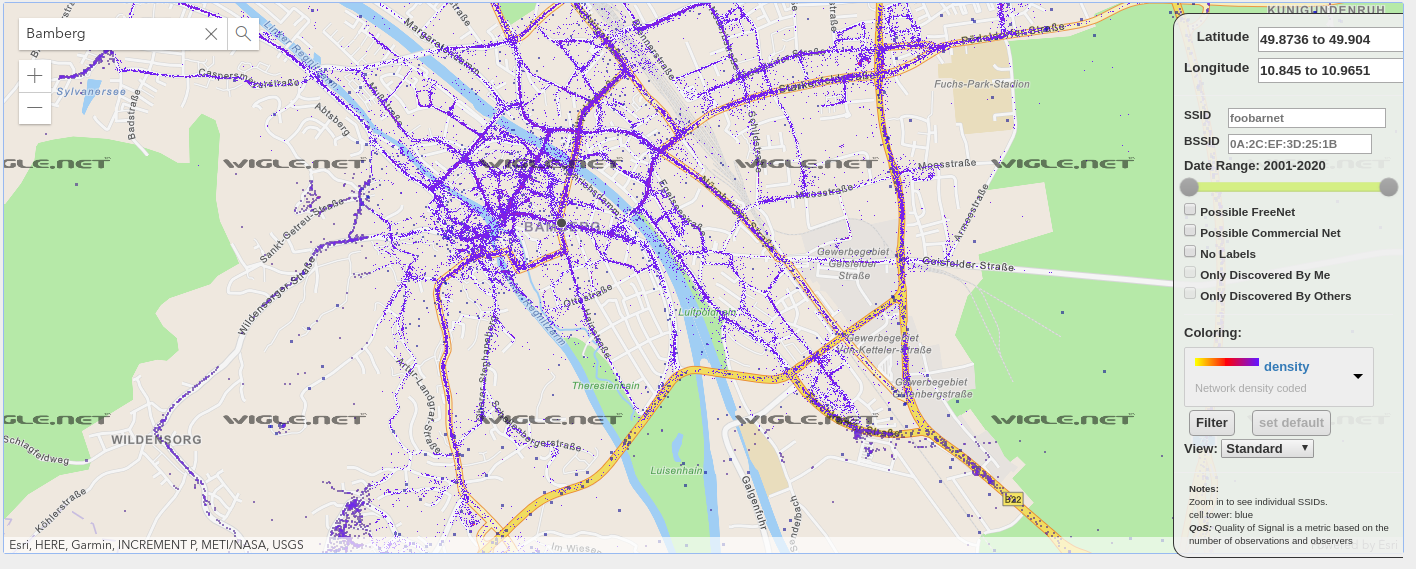
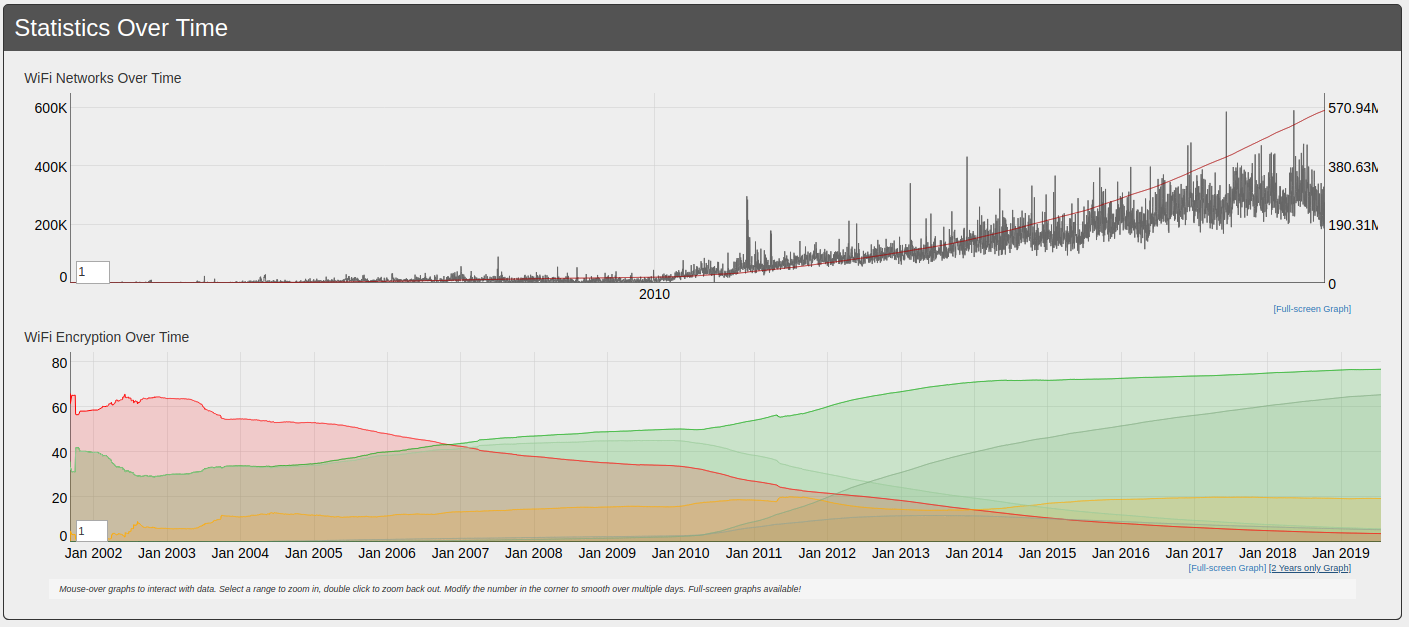
When you work with wireless networks and you do programming and mobile app development that works with things like user location you might find this useful.
Take thousands of users and you’ve got the worlds wifi networks mapped…
WiGGLE (Wireless Geographic Logging Engine) is a project which takes wireless network data + location and puts it into a big database. On top of storage it’s giving you access to that data.
We consolidate location and information of wireless networks world-wide to a central database, and have user-friendly desktop and web applications that can map, query and update the database via the web.
So what’s my use-case? Apart from the obvious I will make use of this by finding out more about those fellow travelers around me. Many people probably to the same as me: Travel with a small wifi / 4g access point. Whenever this accesspoints shows up in scans the path will be traceable.
I am curious to see which access point around me is in the million-mile club yet…