I am back again and developing some smaller APIs for my own use.
As I am learning a new programming language and framework (SwiftUI) and for my little learning project I need to also implement a server backend. Implementing a RESTful service is quite straight-forward but for testing and UI prototyping I actually want to do some testing before really setting up the server side.
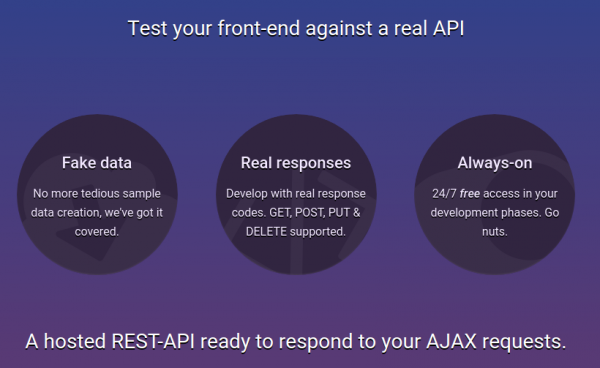
To easily test RESTful calls without actually implementing anything I found that Reqres is a quite useful tool to have in the toolbelt:
Apart from some pre-set-up API endpoints with dummy data (like users, …) it also features a request mirror service.
With that you can simply throw a JSON document into the general direction of Reqres and it will put a timestamp on it and return it right away.
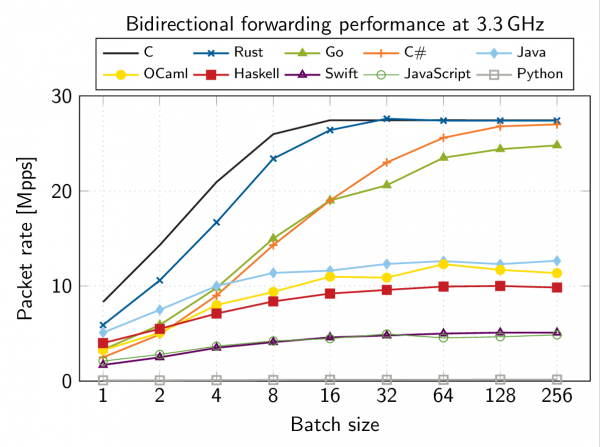
User space network drivers on Linux are often used in production environments to improve the performance of network-heavy applications. However, their inner workings are not clear to most programmers who use them. ixy aims to change this by providing a small educational user space network driver, which is gives a good overview of how these drivers work, using only 1000 lines of C code. While the language C is a good common denominator, which many developers are familiar with, its syntax is often much more dicult to read than that of more modern languages and makes the driver seem more complex than it actually is.
For this thesis I created a C# version of ixy, named ixy.cs, which utilizes the more modern syntax and additional safety of the C# programming language in order to make user space network driver development even more accessible. The viability of C# for driver programming will be analyzed and its advantages and disadvantages will be discussed.
The actual implementation (with other programming languages as well) can be found here.
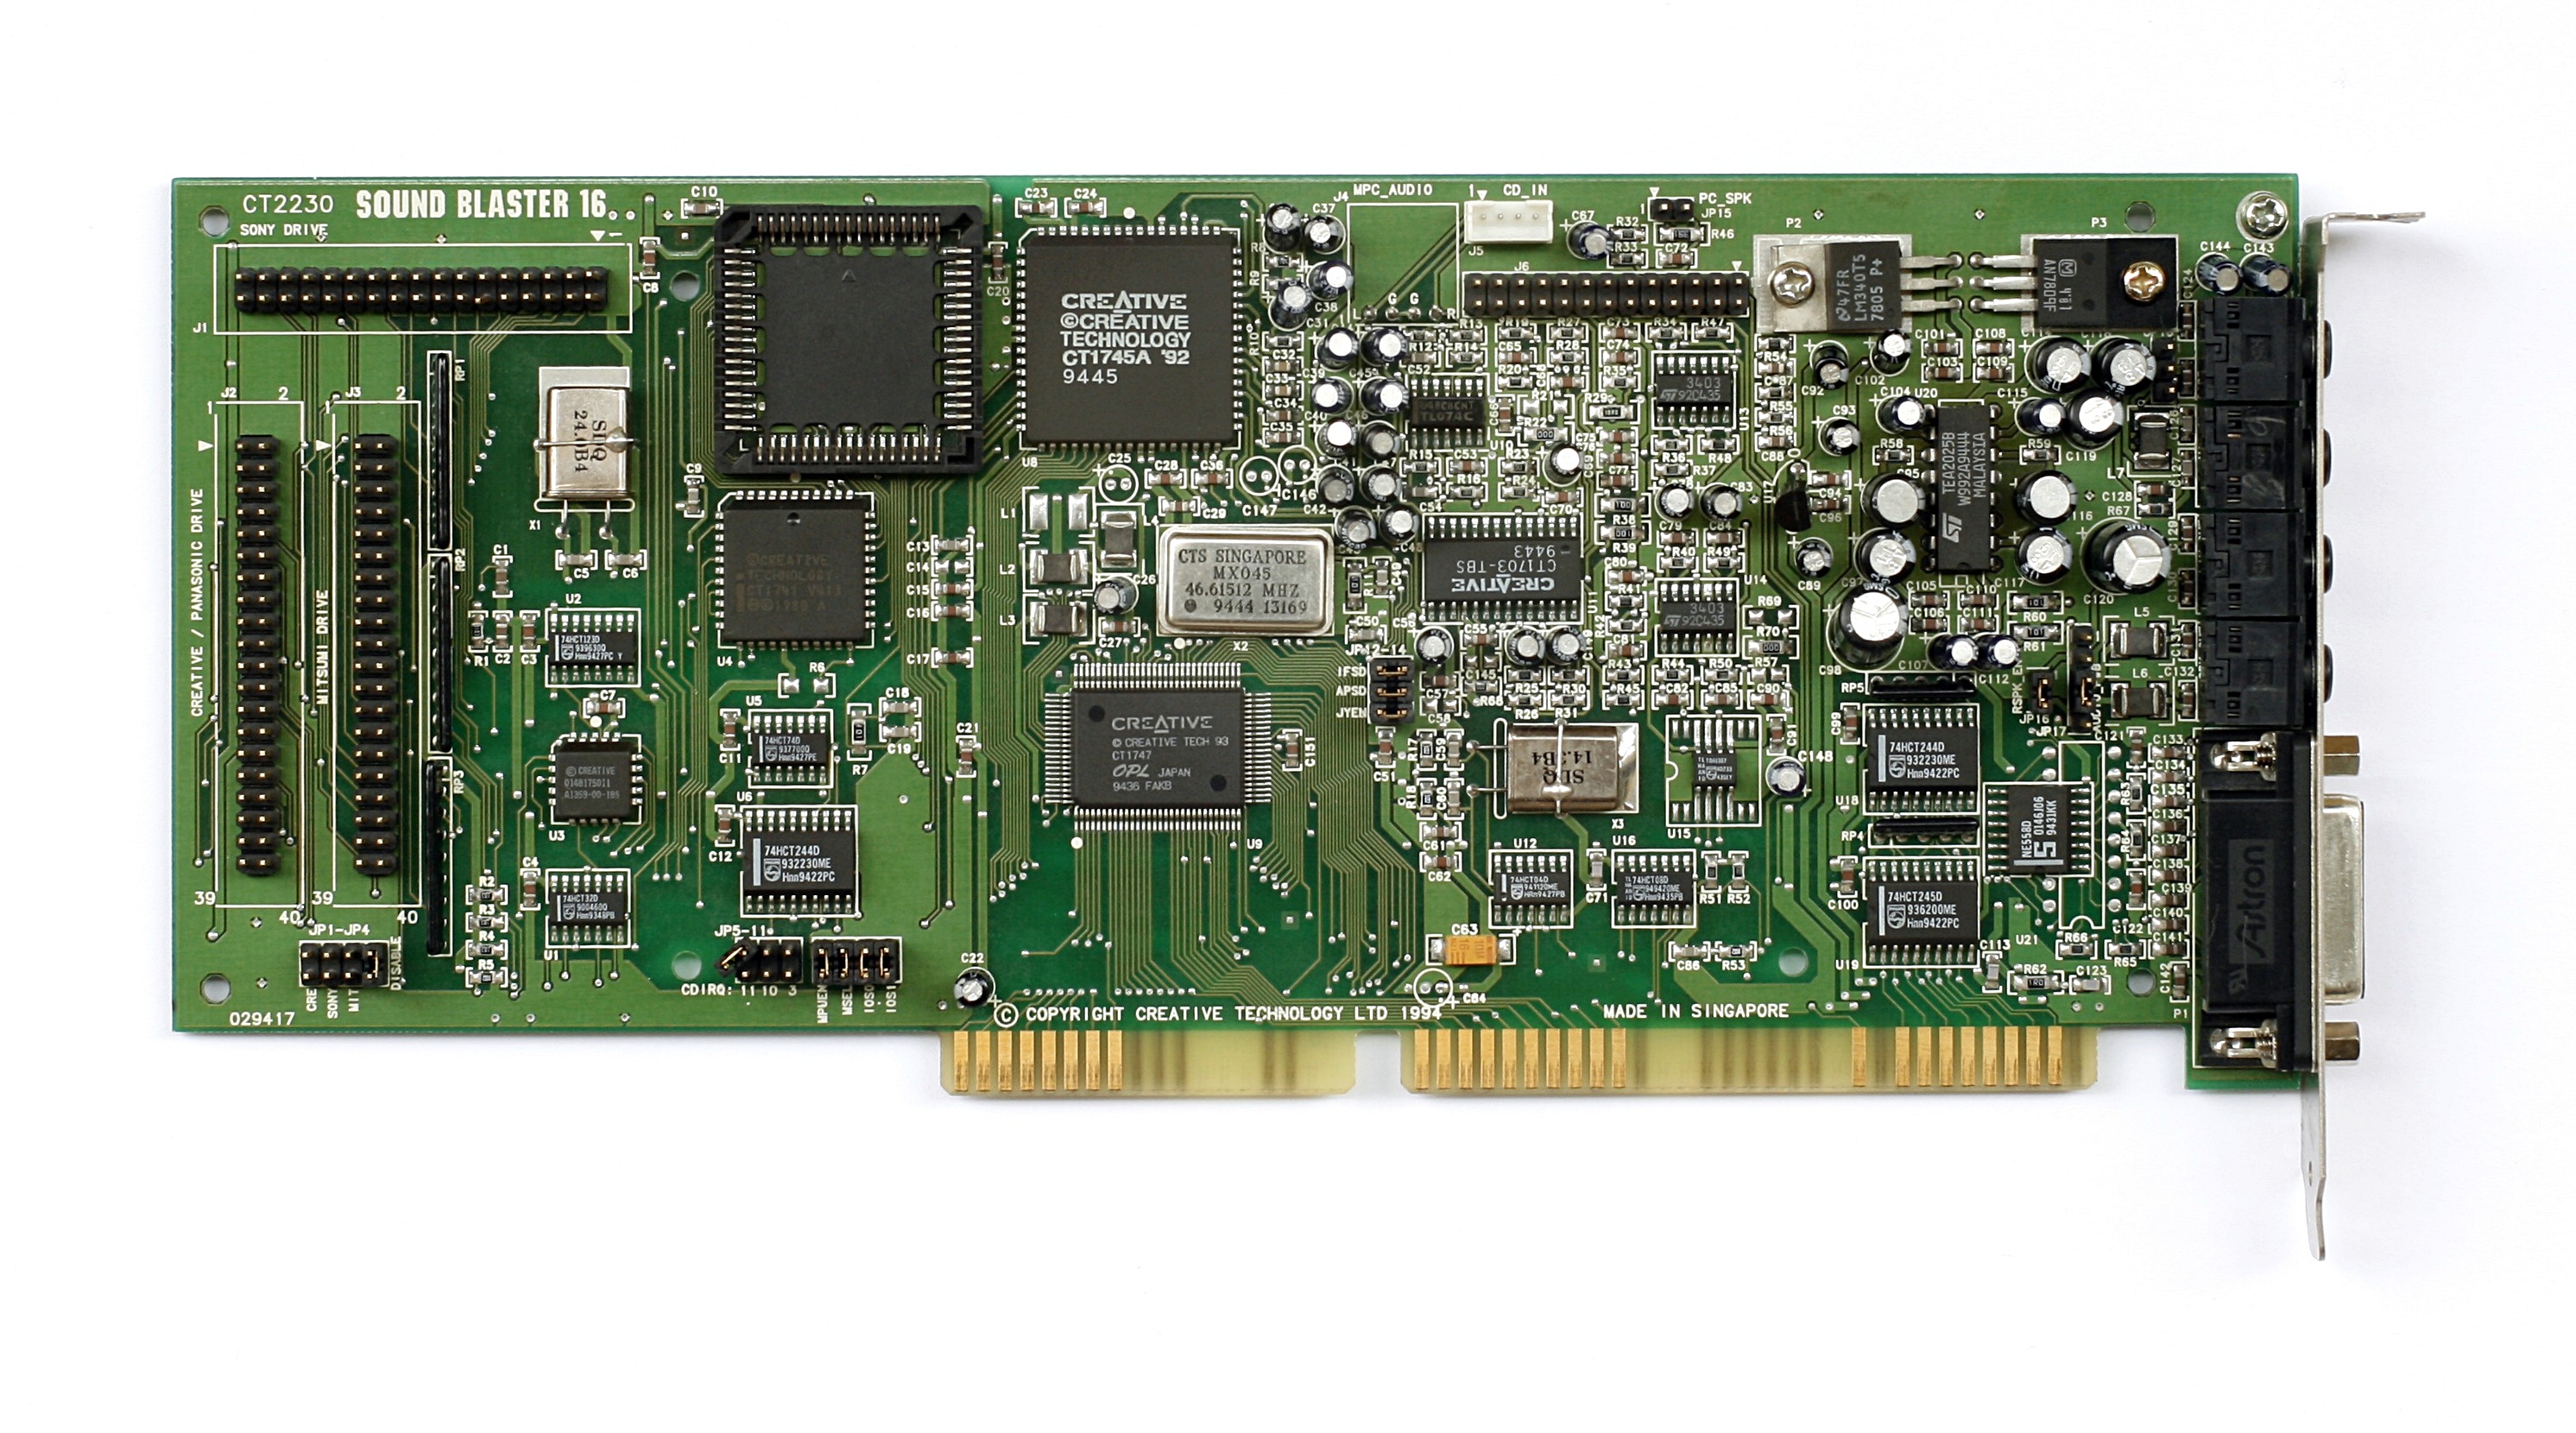
There were several different sound card options back in the days and all sounded a bit different.
A sound card (also known as an audio card) is an internal expansion card that provides input and output of audio signals to and from a computer under control of computer programs. The term sound card is also applied to external audio interfaces used for professional audio applications.
With the synthesizers and audio processing each series and make produced a distinctive sound. Some of us want to bring these sounds back. But keeping the (old) hardware running is an increasingly difficult task.
For example: The interface used by the above mentioned Sound Blaster 16 card is the ISA bus interface. This interface was introduced in 1981 and replaced in 1993. If you want to hear how such a sound card sounds today you would have to run hardware from this time period.
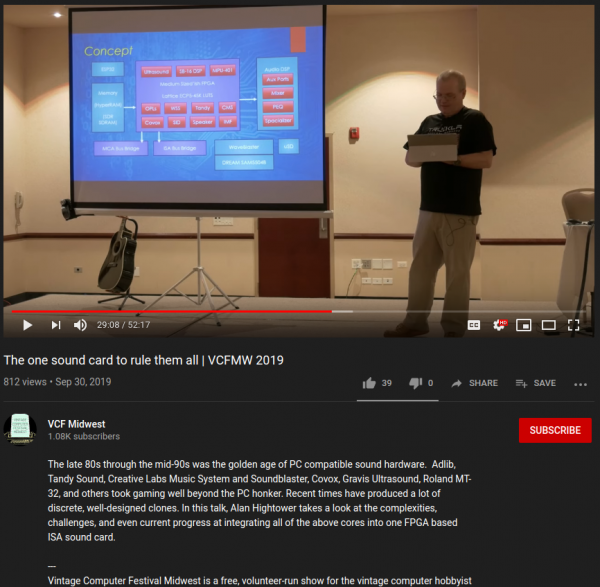
But some people are working towards getting at least some authentic sound back.
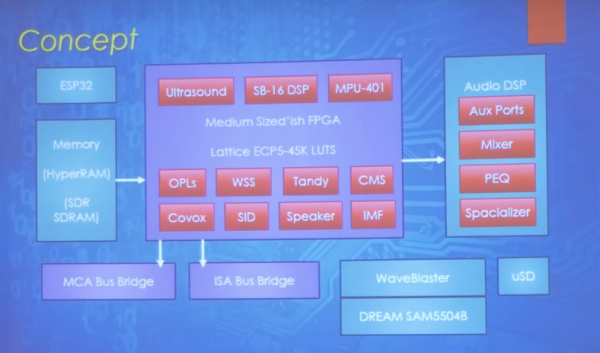
In this talk, Alan Hightower takes a look at the complexities, challenges, and even current progress at integrating all of the above cores into one FPGA based ISA sound card.
This is what the concept would bring if done:
Oh that would be soooooo nice to have all these vintage sound interfaces available and to be able to actually use them for audio output.
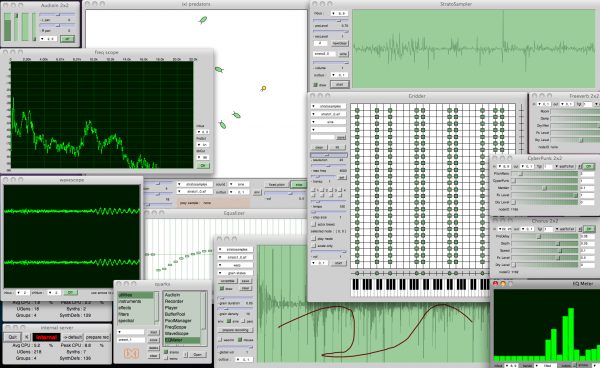
SuperCollider is a platform for audio synthesis and algorithmic composition, used by musicians, artists, and researchers working with sound. It is free and open source software available for Windows, macOS, and Linux.
SuperCollider features three major components:
scsynth, a real-time audio server, forms the core of the platform. It features 400+ unit generators (“UGens”) for analysis, synthesis, and processing.
sclang, an interpreted programming language. It is focused on sound, but not limited to any specific domain. sclang controls scsynth via Open Sound Control.
scide is an editor for sclang with an integrated help system.
If you, like me, are looking into new emerging tools and technologies you might also look at Wireguard.
WireGuard® is an extremely simple yet fast and modern VPN that utilizes state-of-the-art cryptography. It aims to be faster, simpler, leaner, and more useful than IPsec, while avoiding the massive headache. It intends to be considerably more performant than OpenVPN. WireGuard is designed as a general purpose VPN for running on embedded interfaces and super computers alike, fit for many different circumstances. Initially released for the Linux kernel, it is now cross-platform (Windows, macOS, BSD, iOS, Android) and widely deployable. It is currently under heavy development, but already it might be regarded as the most secure, easiest to use, and simplest VPN solution in the industry.
This guide will walk you through how to setup WireGuard in a way that all your client outgoing traffic will be routed via another machine (server). This is ideal for situations where you don’t trust the local network (public or coffee shop wifi) and wish to encrypt all your traffic to a server you trust, before routing it to the Internet.
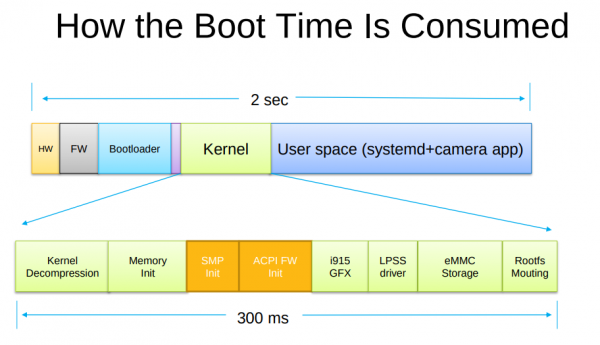
Booting a computer does not happen extremely often in most use-cases, yet it’s a field that has not seen as much optimization and development as others had.
So HEIC does not quite fit yet. But you can make it fit with this on Linux.
Imagemagick and current GIMP installations apparently still don’t come pre-compiled with HEIF support. But you can install a tool to easily convert an HEIC image into a JPG file on the command line.
You might have asked yourself how it is that some phones charge up faster than others. Maybe the same phone charges at different speed when you’re using a different cable or power supply. It even might not charge at all.
There is some very complicated trickery in place to make those cables and power supplies do things in combination with the active devices like phones. Many of this is implemented by standards like “Quick Charge”:
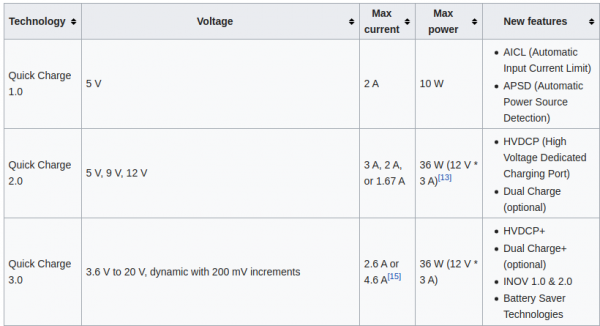
Quick Charge is a technology found in QualcommSoCs, used in devices such as mobile phones, for managing power delivered over USB. It offers more power and thus charges batteries in devices faster than standard USB rates allow. Quick Charge 2 onwards technology is primarily used for wall adaptors, but it is also implemented in car chargers and powerbanks (For both input and output power delivery).
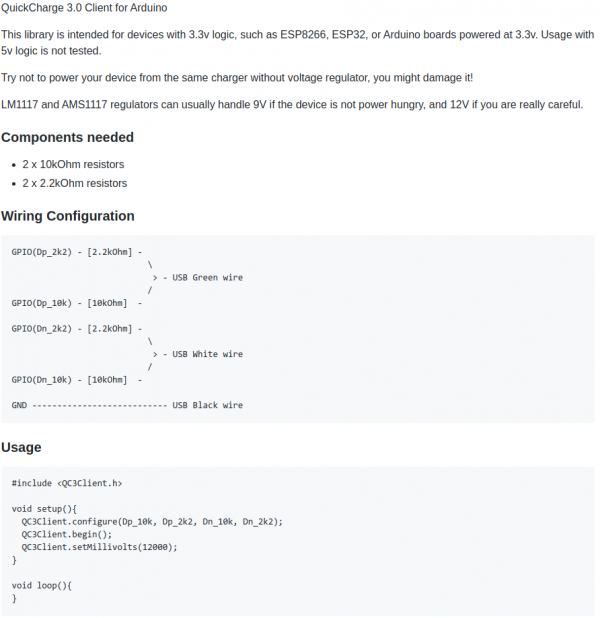
So in a nutshell: If you are able to speak the quick charge protocol, and with the right cable and power supply, you are able to get anything between 3.6 and 20V out of such a combination by just telling the power supply to do so.
This is great for maker projects in need of more power. There’s lots of things to consider and be cautious about.
We’ve got several quite big fish tanks in our house. Mainly used by freshwater turtles.
say Hi! to Wilma.
These turtles need to be fed every once in a while. And while this is not an issue normally it’s an issue if you leave the house for travel for an extended period of time.
Of course there are humans checking on everything in the house regularly but as much as can be automated should and will be automated in our household. So the requirement wa to have the turtle feeding automated.
To achieve this is would be necessary to have a fixed amount of turtle food be dispensed into the tanks on a plan and with some checks in the background (like water quality and such).
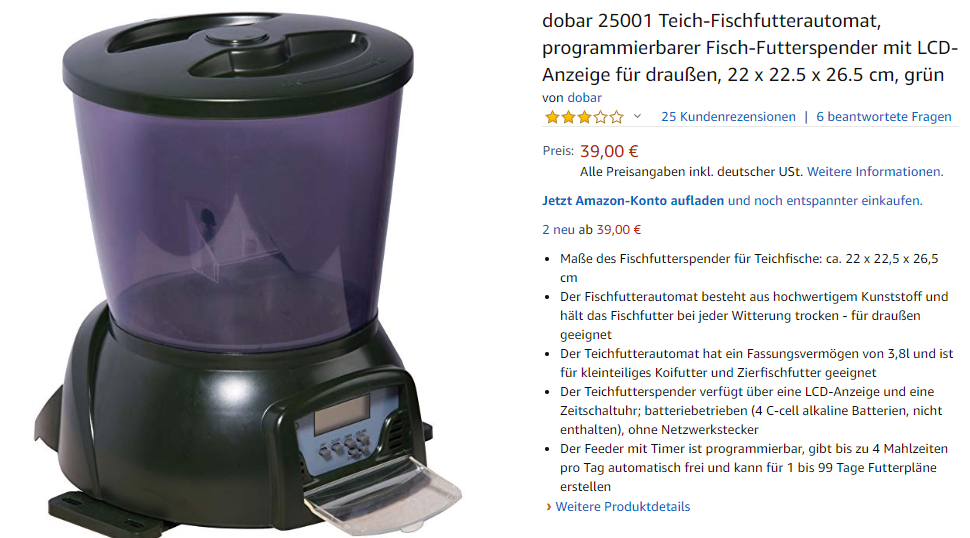
It’s been quite a hassle to come up with a plan how the hardware should look like and work. And ultimately i’ve settled on retrofitting an off-the-shelf fish pond feeder to become controllable through MQTT.
The pond feeder I’ve found and used is this one:
It’s not really worth linking to a specific product detail page as this sort of feeder is available under hundreds of different names. It always looks the same and is priced right around the same.
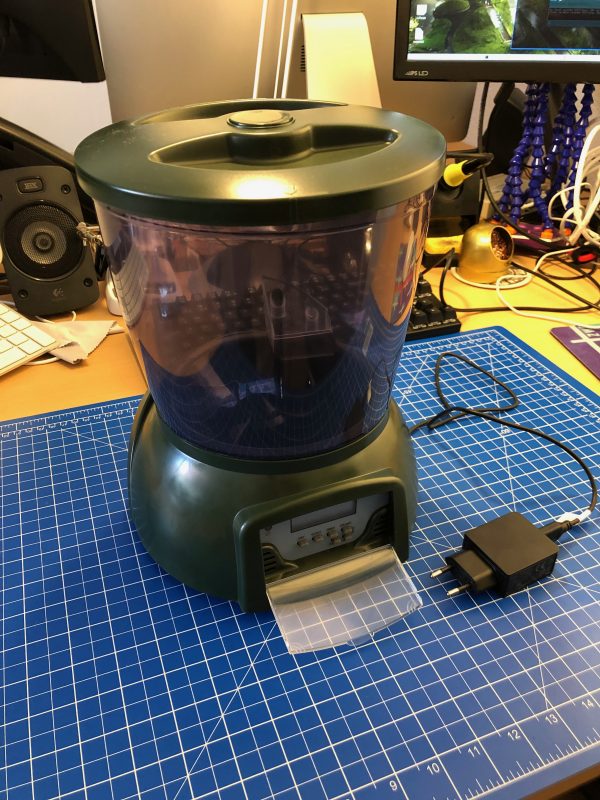
If you want to build this yourself, you want one that looks like the above. I’ve bought 3 of them and they all seem to come out of the same factory somewhere in China.
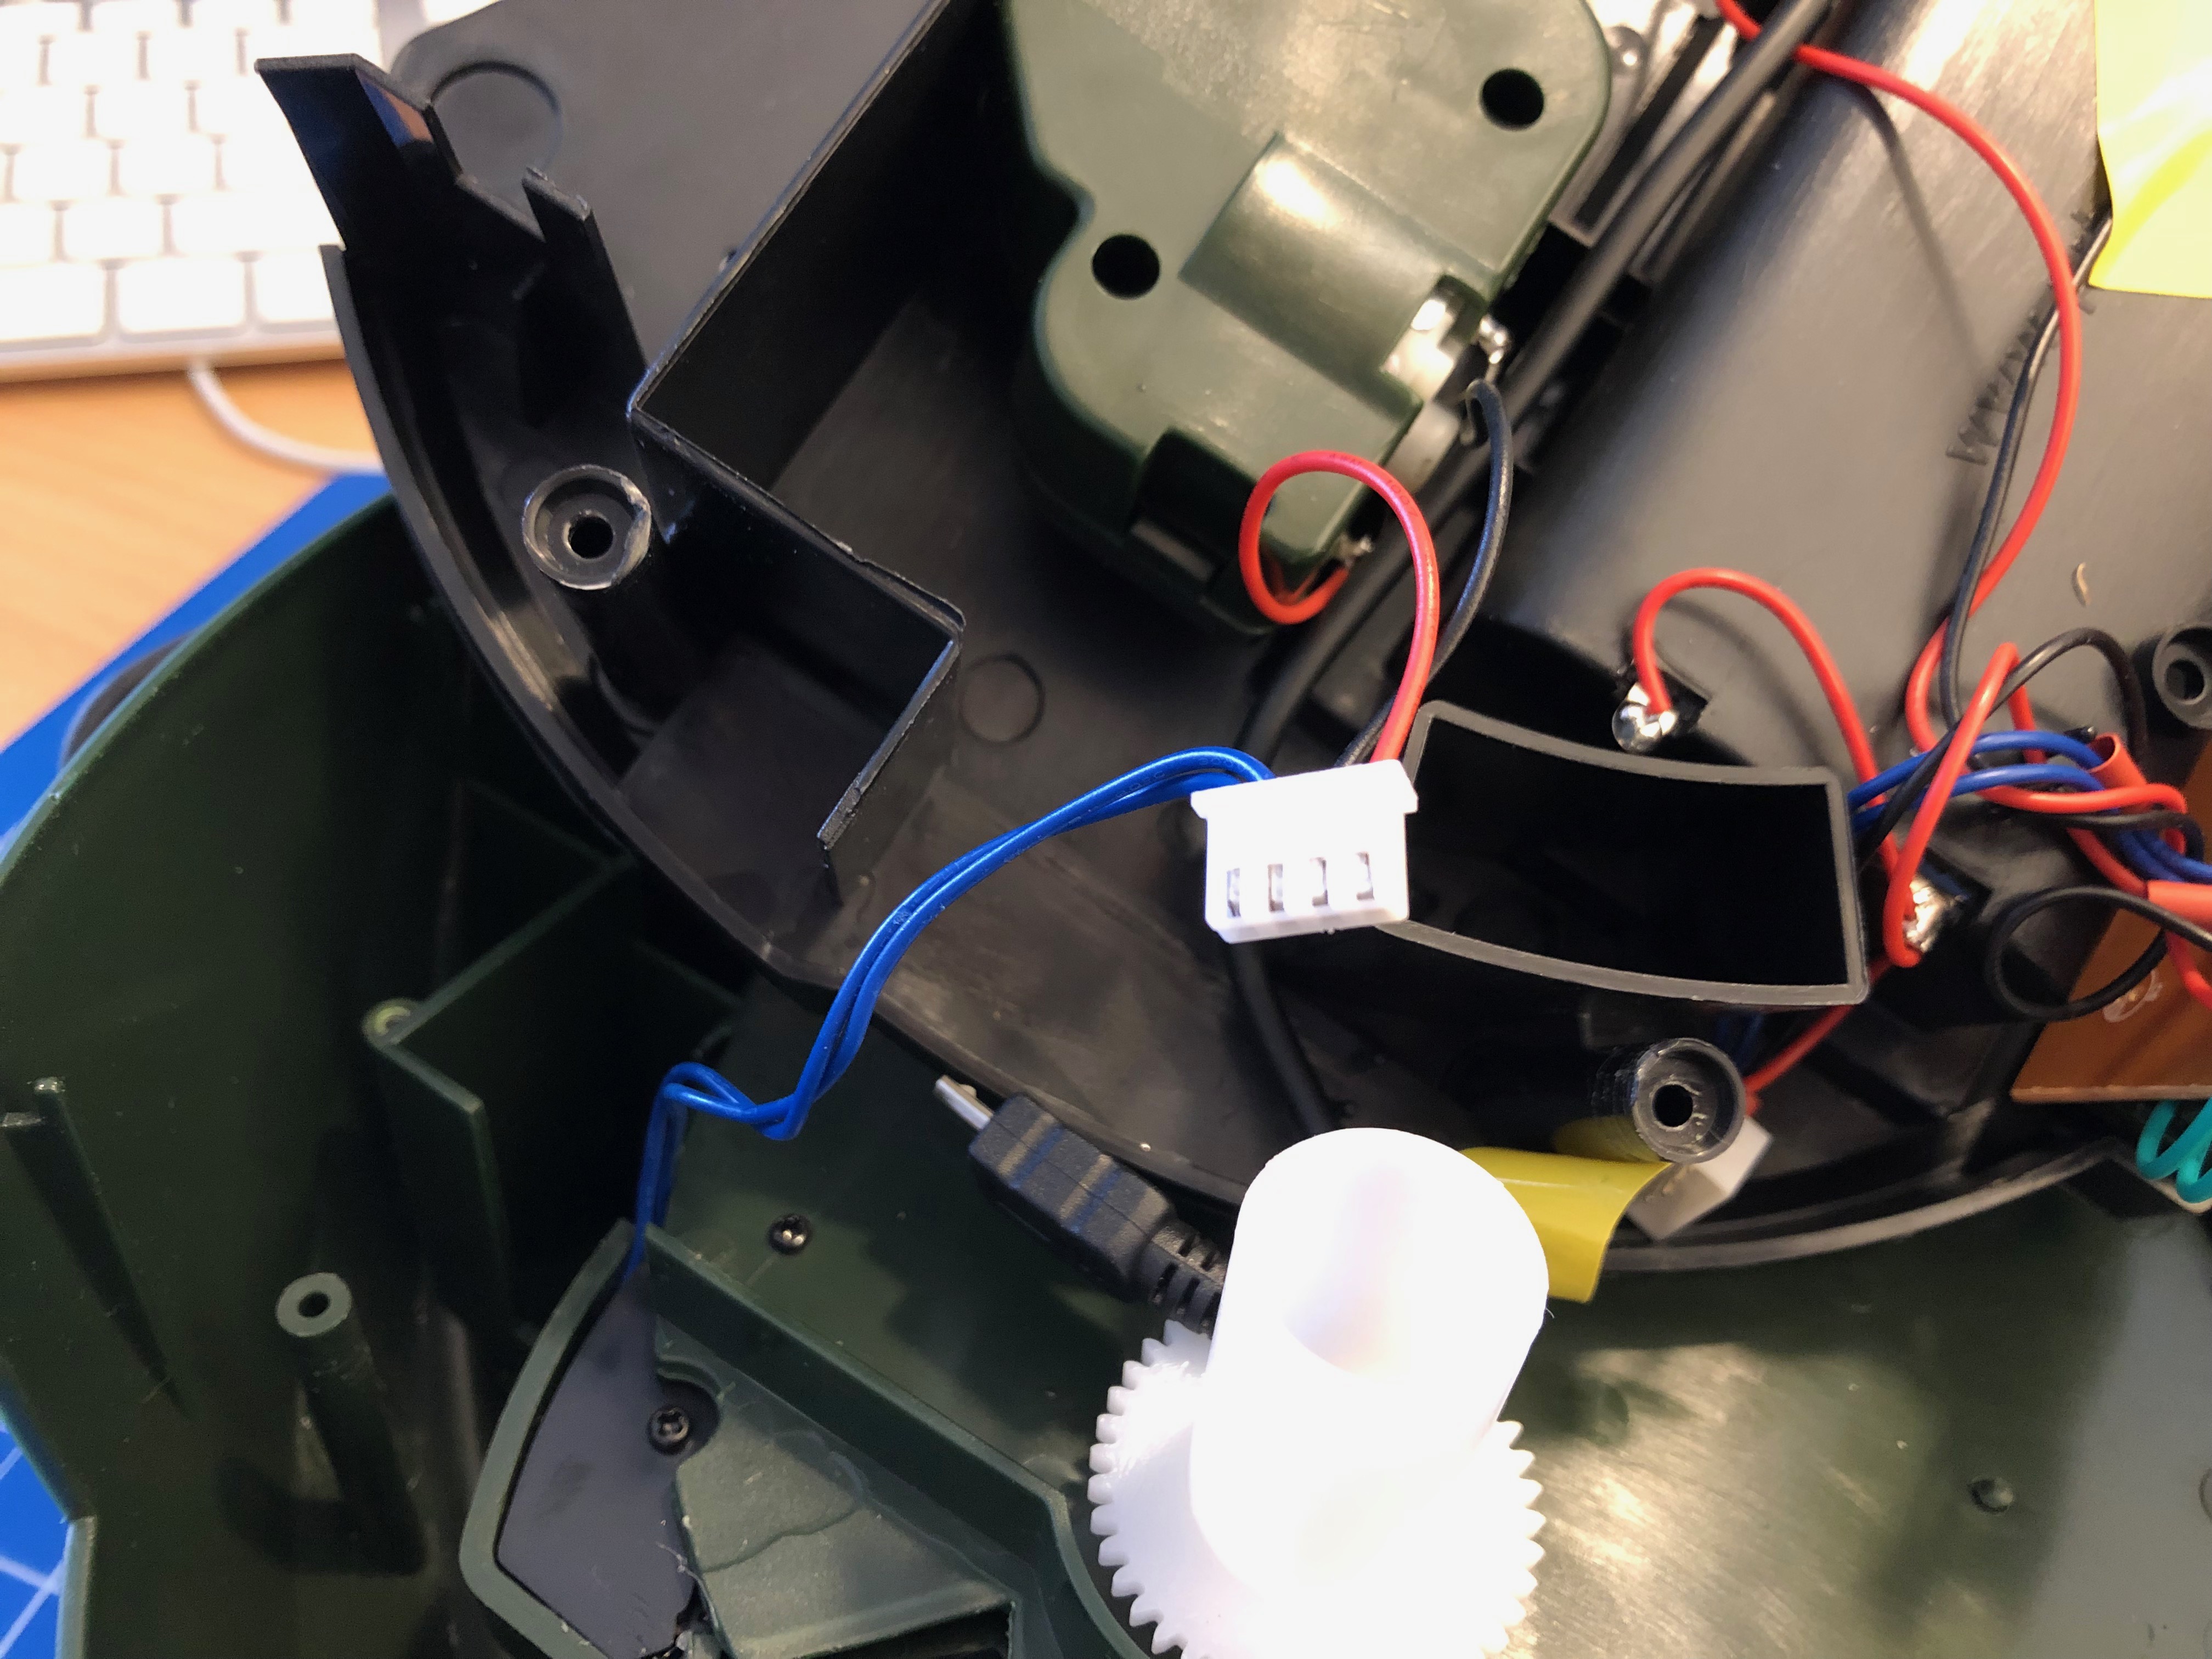
Anyway. If you got one you can easily open it up and start modifying it.
Hardware
the wheel is turned by a DC motor and the switch is triggered by the wheels fins
I’ve added a connector to the switch and the motor cables for quick connect
The functional principle of the feeder is rather simple:
turn the feeder wheel
take the micro-switch status in account – when it’s pressed down the wheel must be pushing against it
turn it until the micro-switch is not pressed anymore
turn some more until it’s pressed again
Simple. Since the switch-status is not known on power loss / reboot a calibration run is necessary (even with the factory electronics) every time it boots up.
After opening the feeder I’ve cut the two cables going to the motor as well as the micro-switch cables. I’ve added a 4-Pin JST-XH connector to both ends. So I can reconnect it to original state if desired.
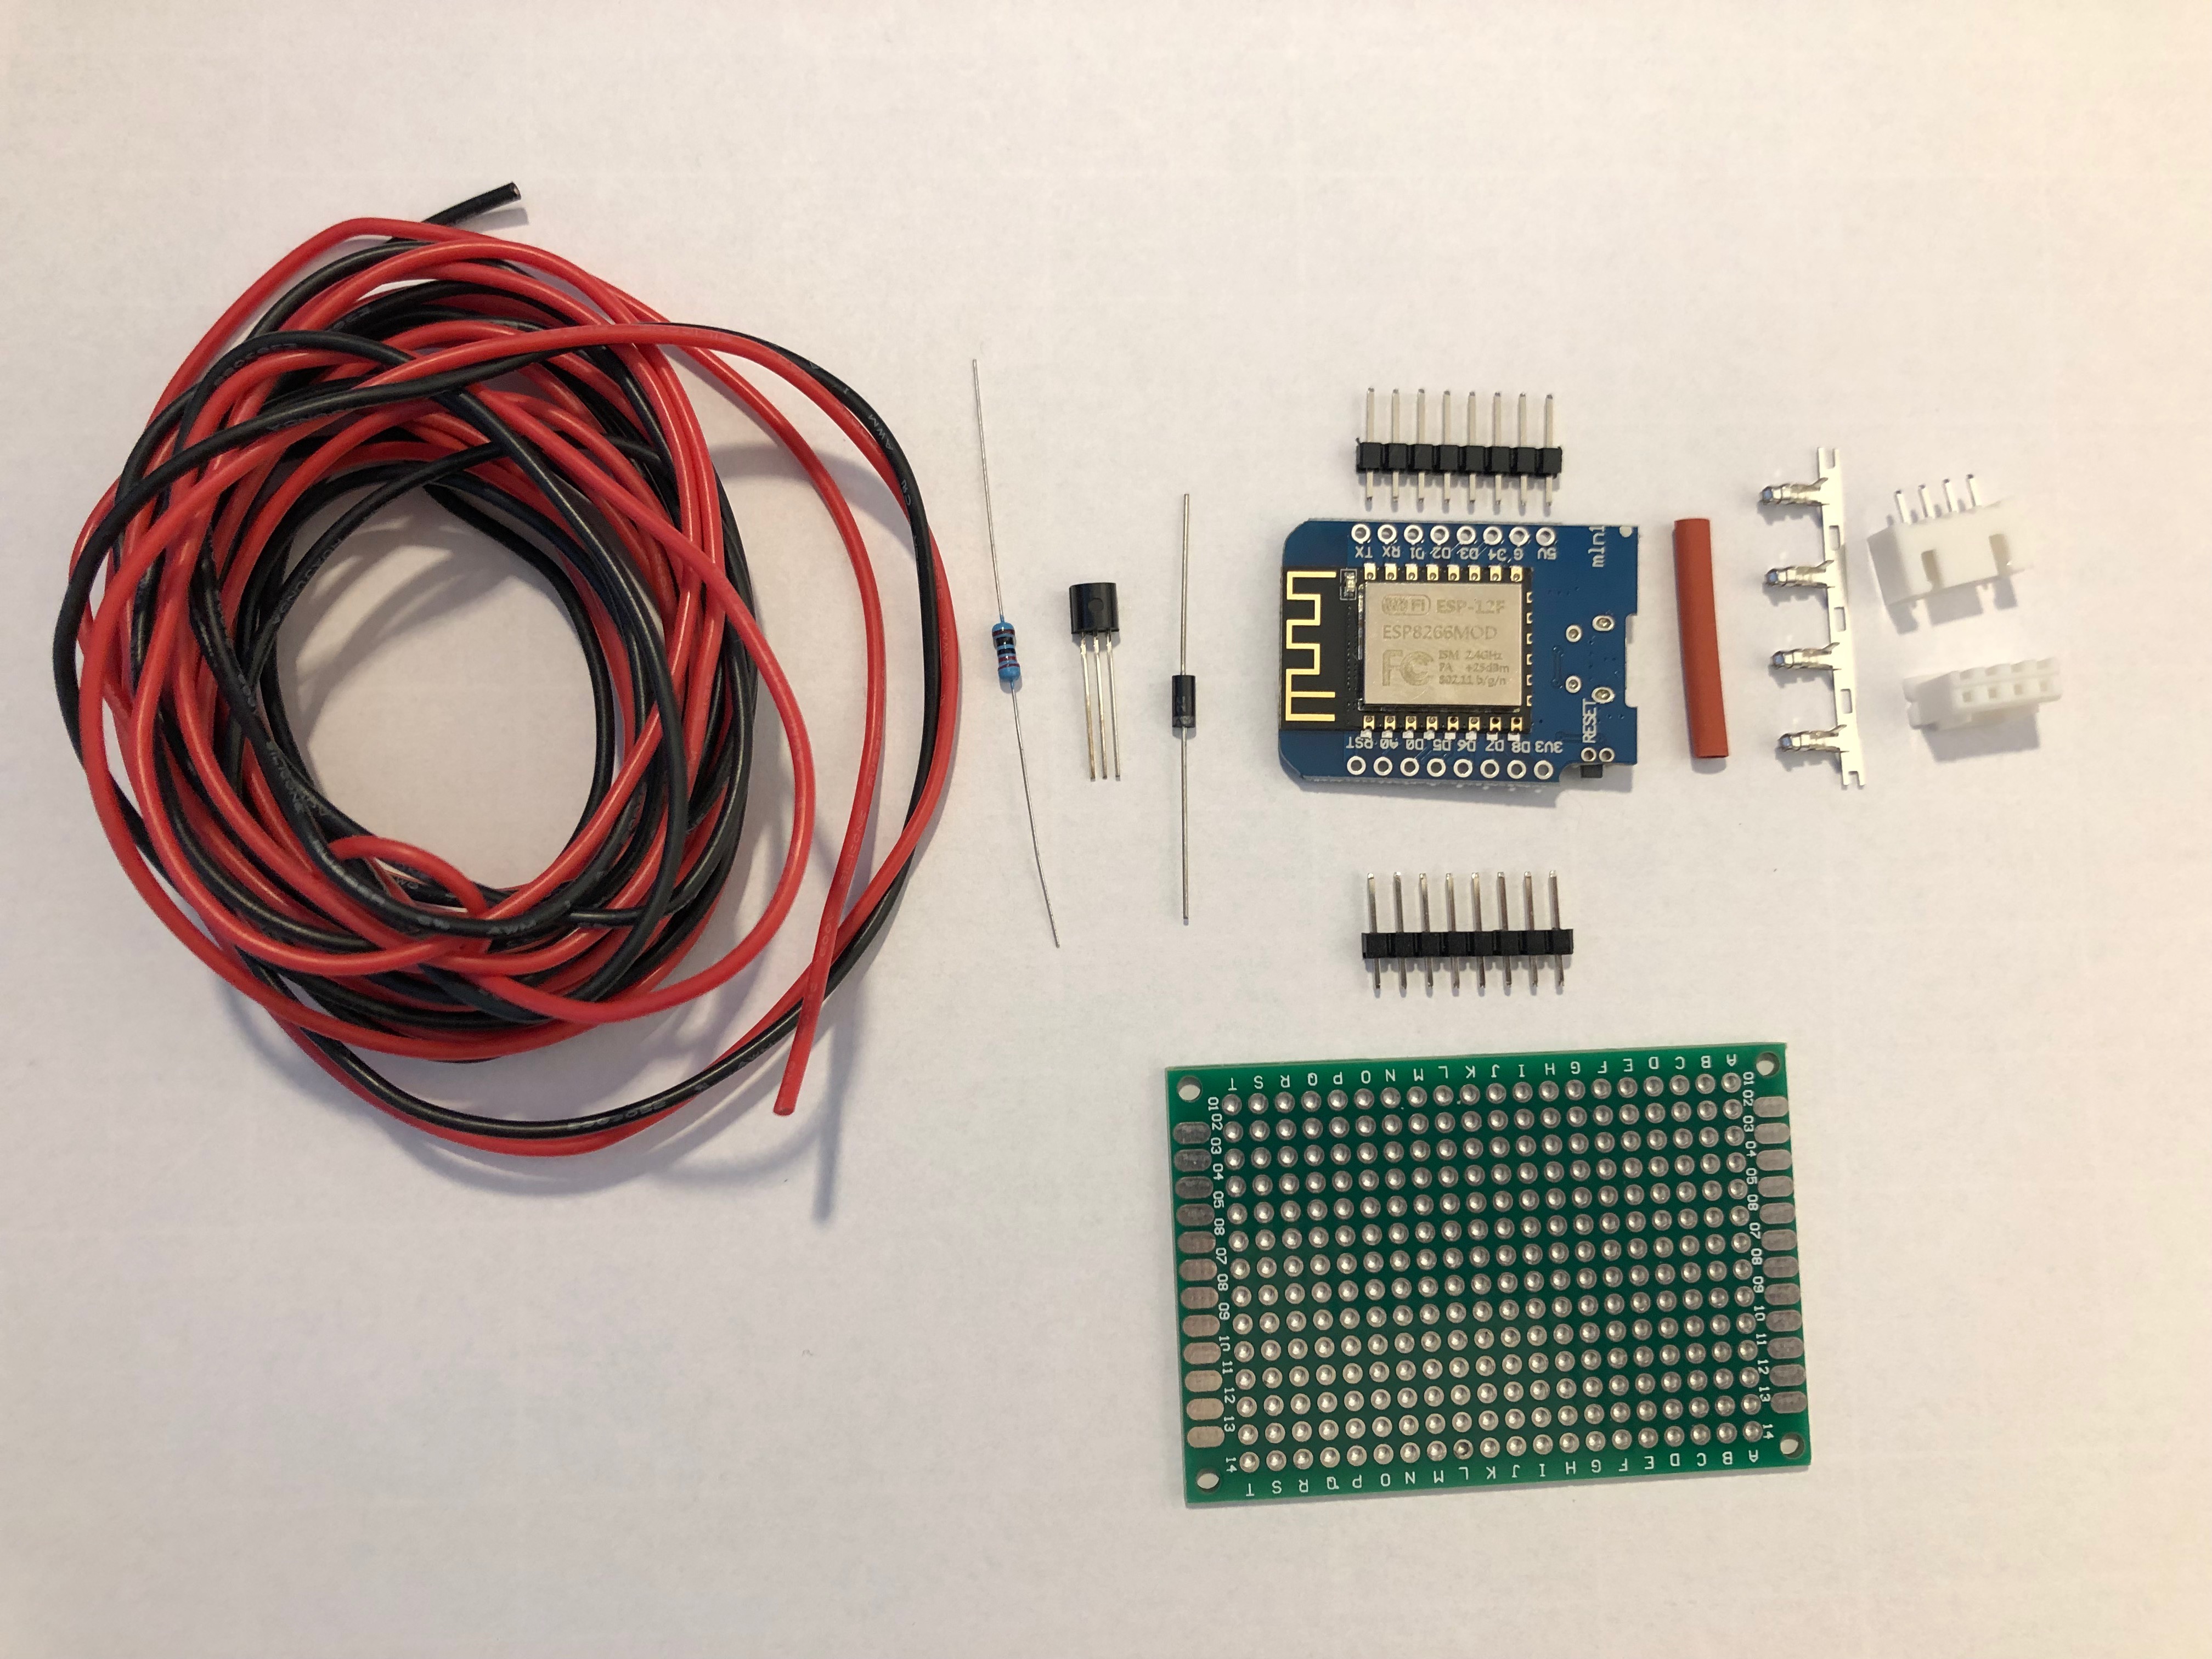
These are all the parts needed:
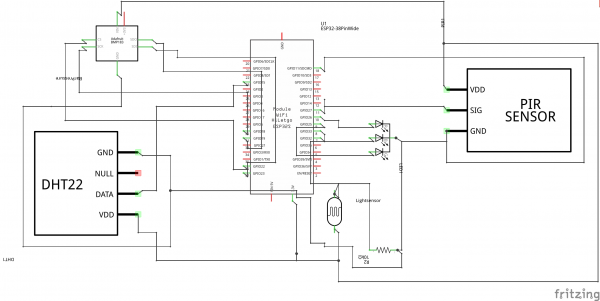
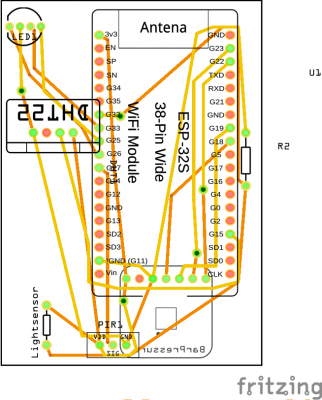
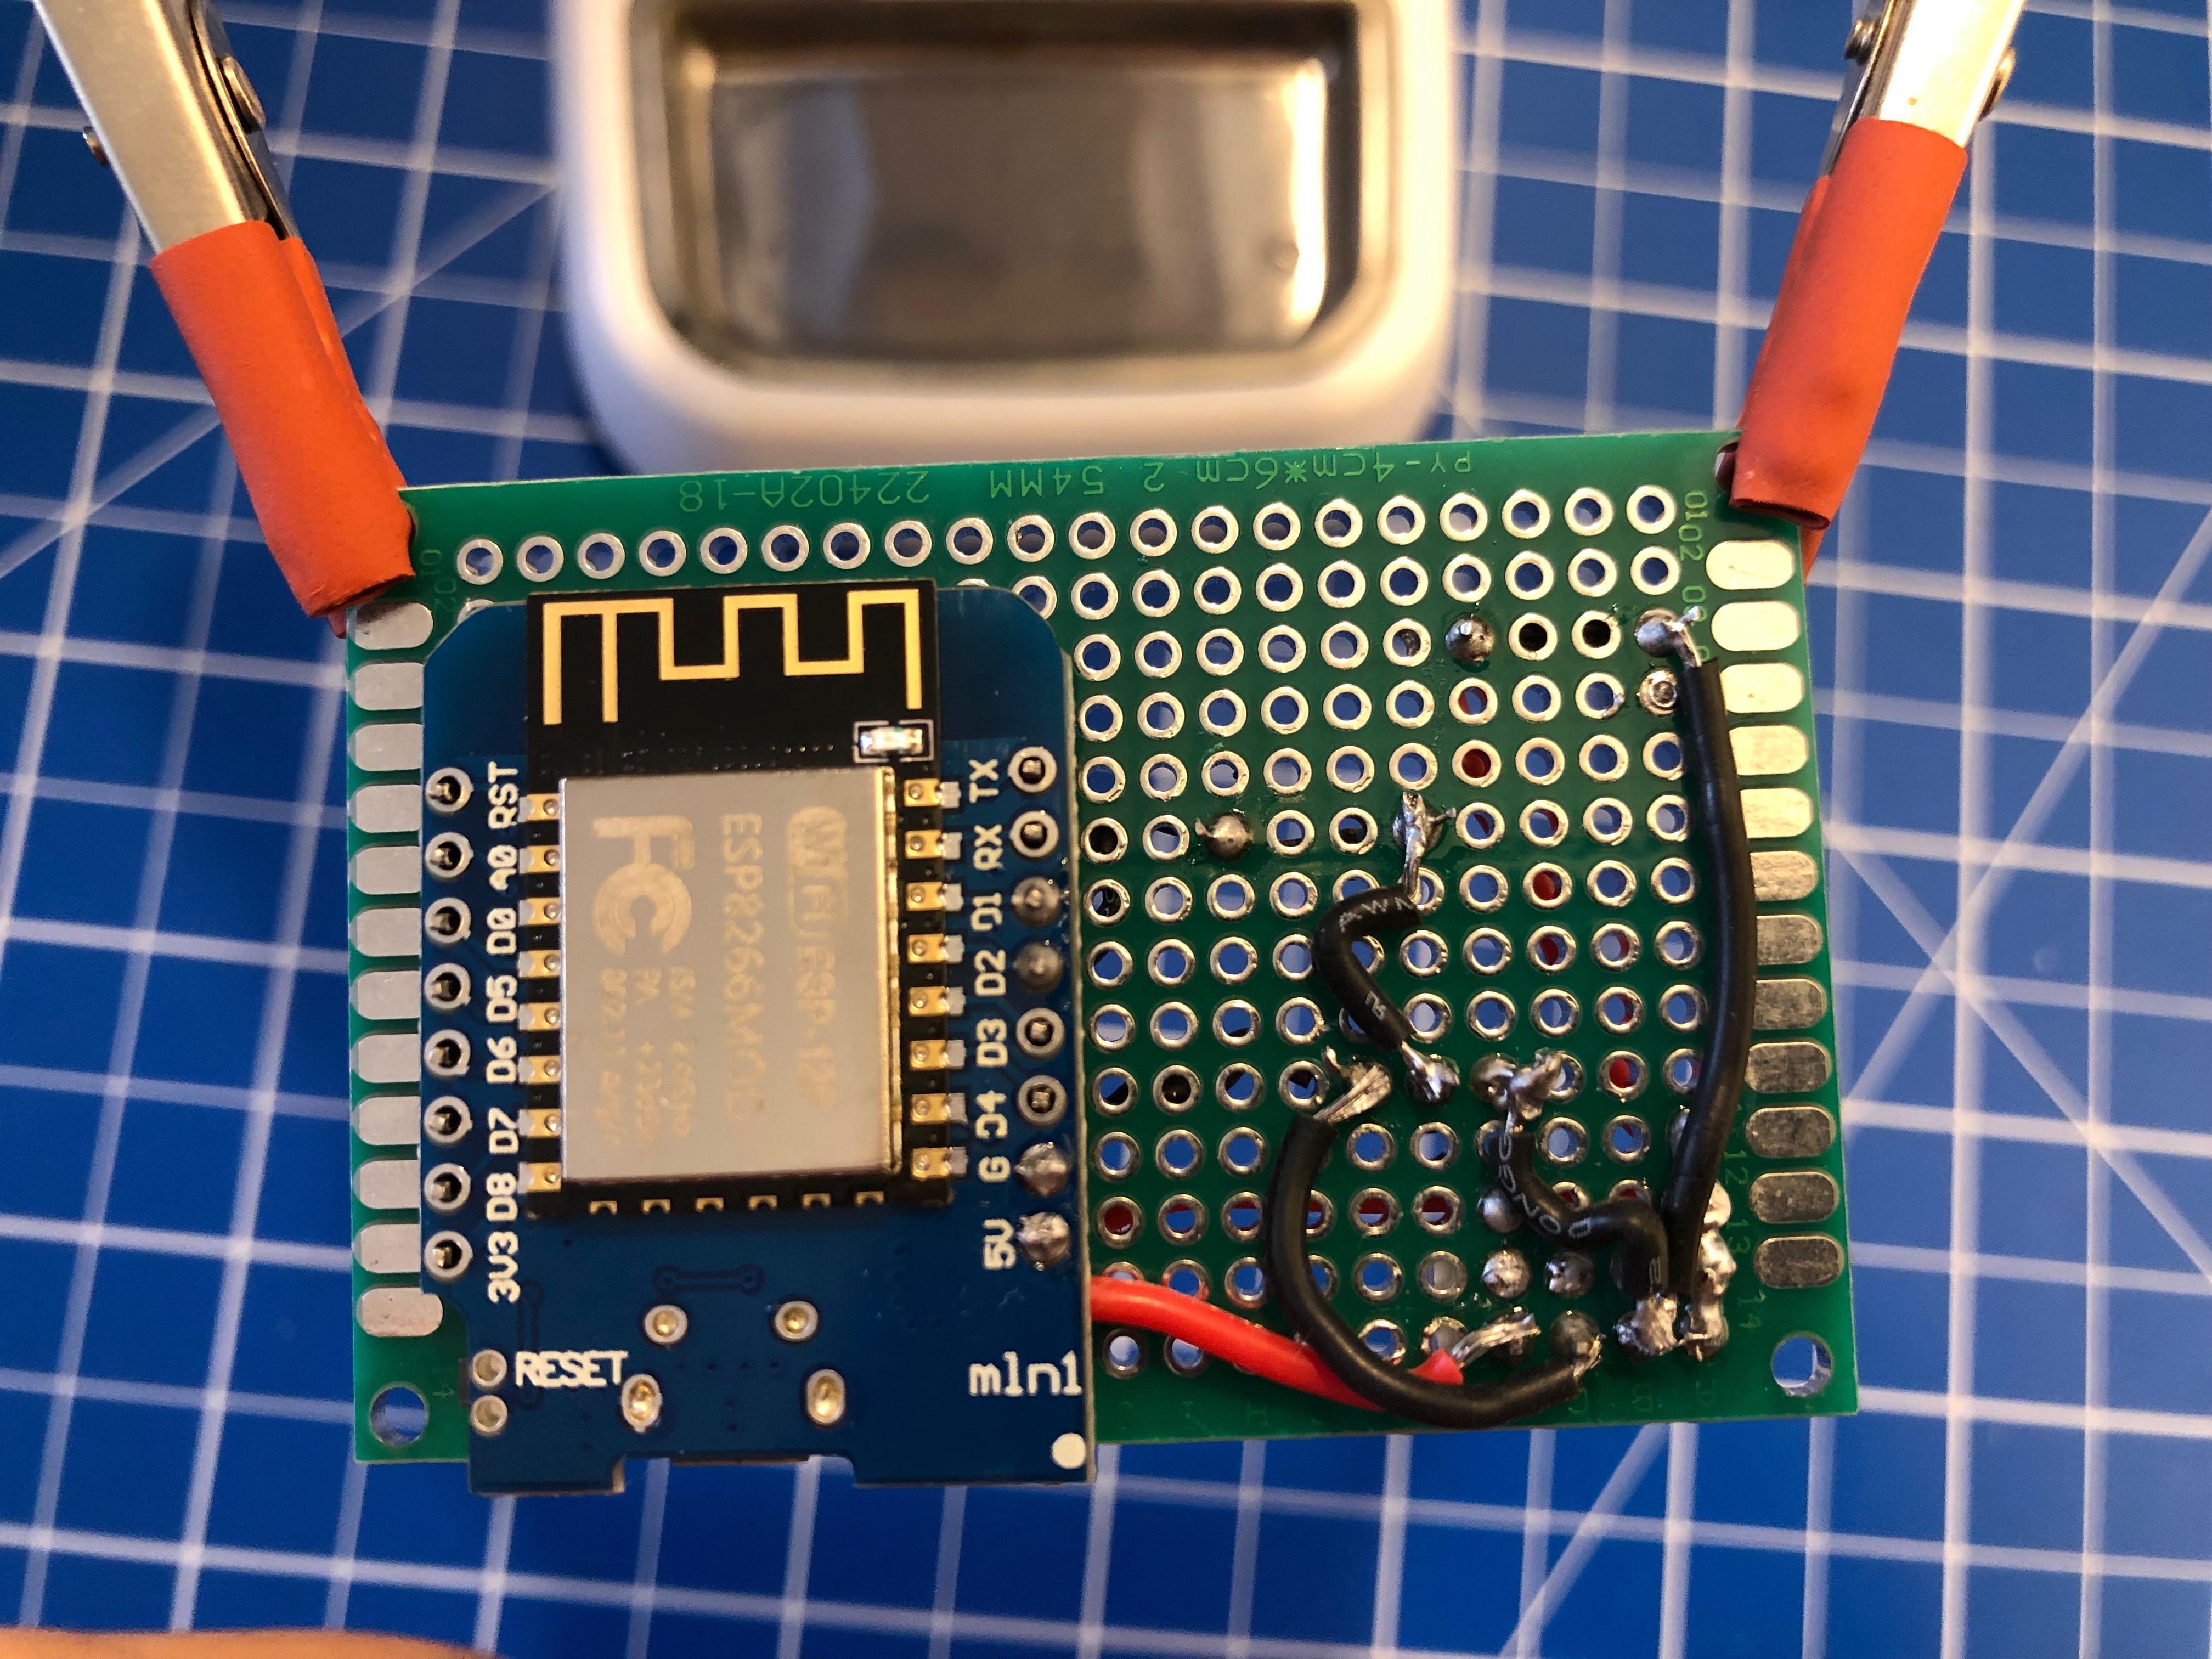
I am using a Wemos D1 Mini and a couple of additional components apart from the prototype board:
A PN2222 NPN transistor, a rectifier diode 1N4007 and a 220 Ohm resistor.
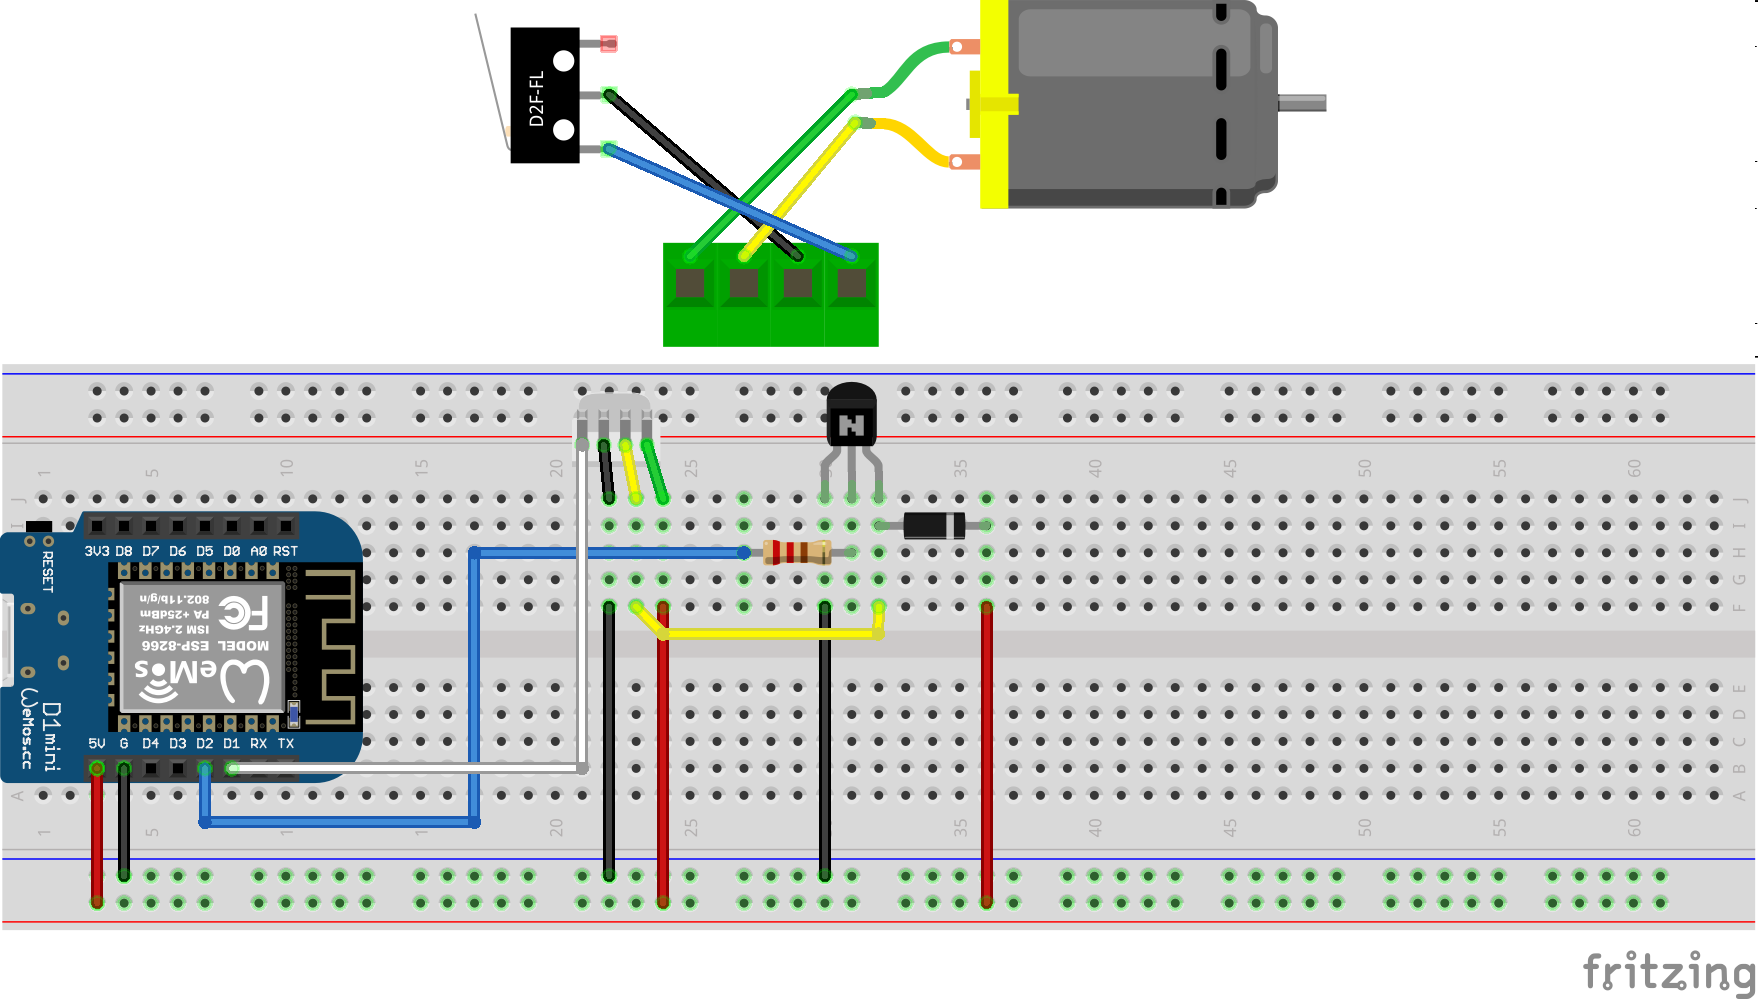
I’ve connected everything according to this schematic I’ve drawn with Fritzing:
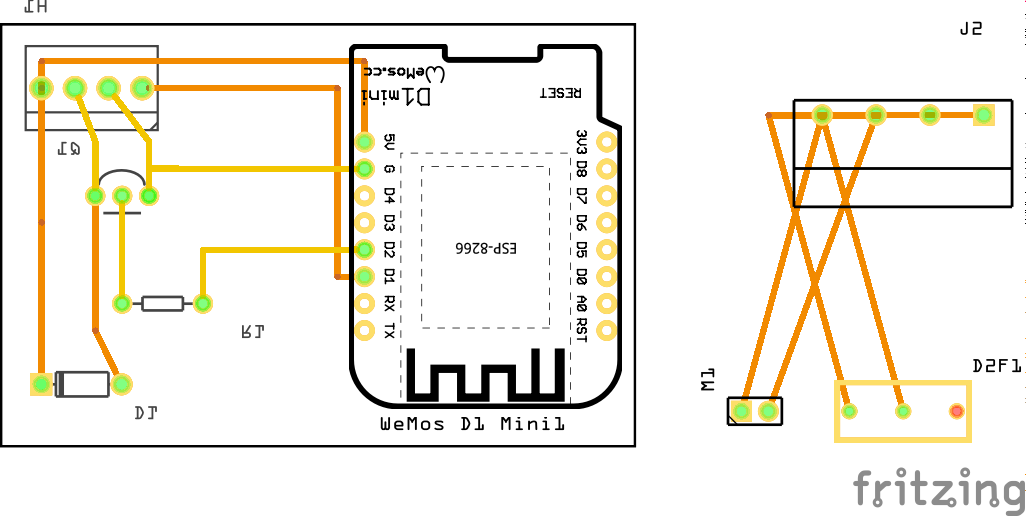
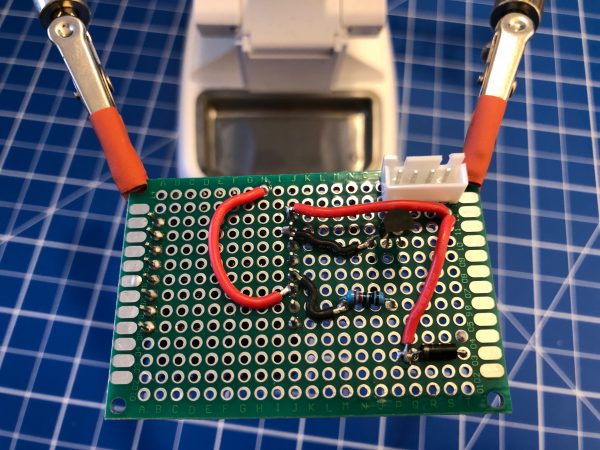
I’ve then prototyped away and put everything on the PCB. Of course with very limited solderig skill:
As you can see the JST-XH connector on Motor+Switch can now be connected easily to the PCB with all the parts.
Make sure you check polarity and that you did correctly hook up the motor and switch.
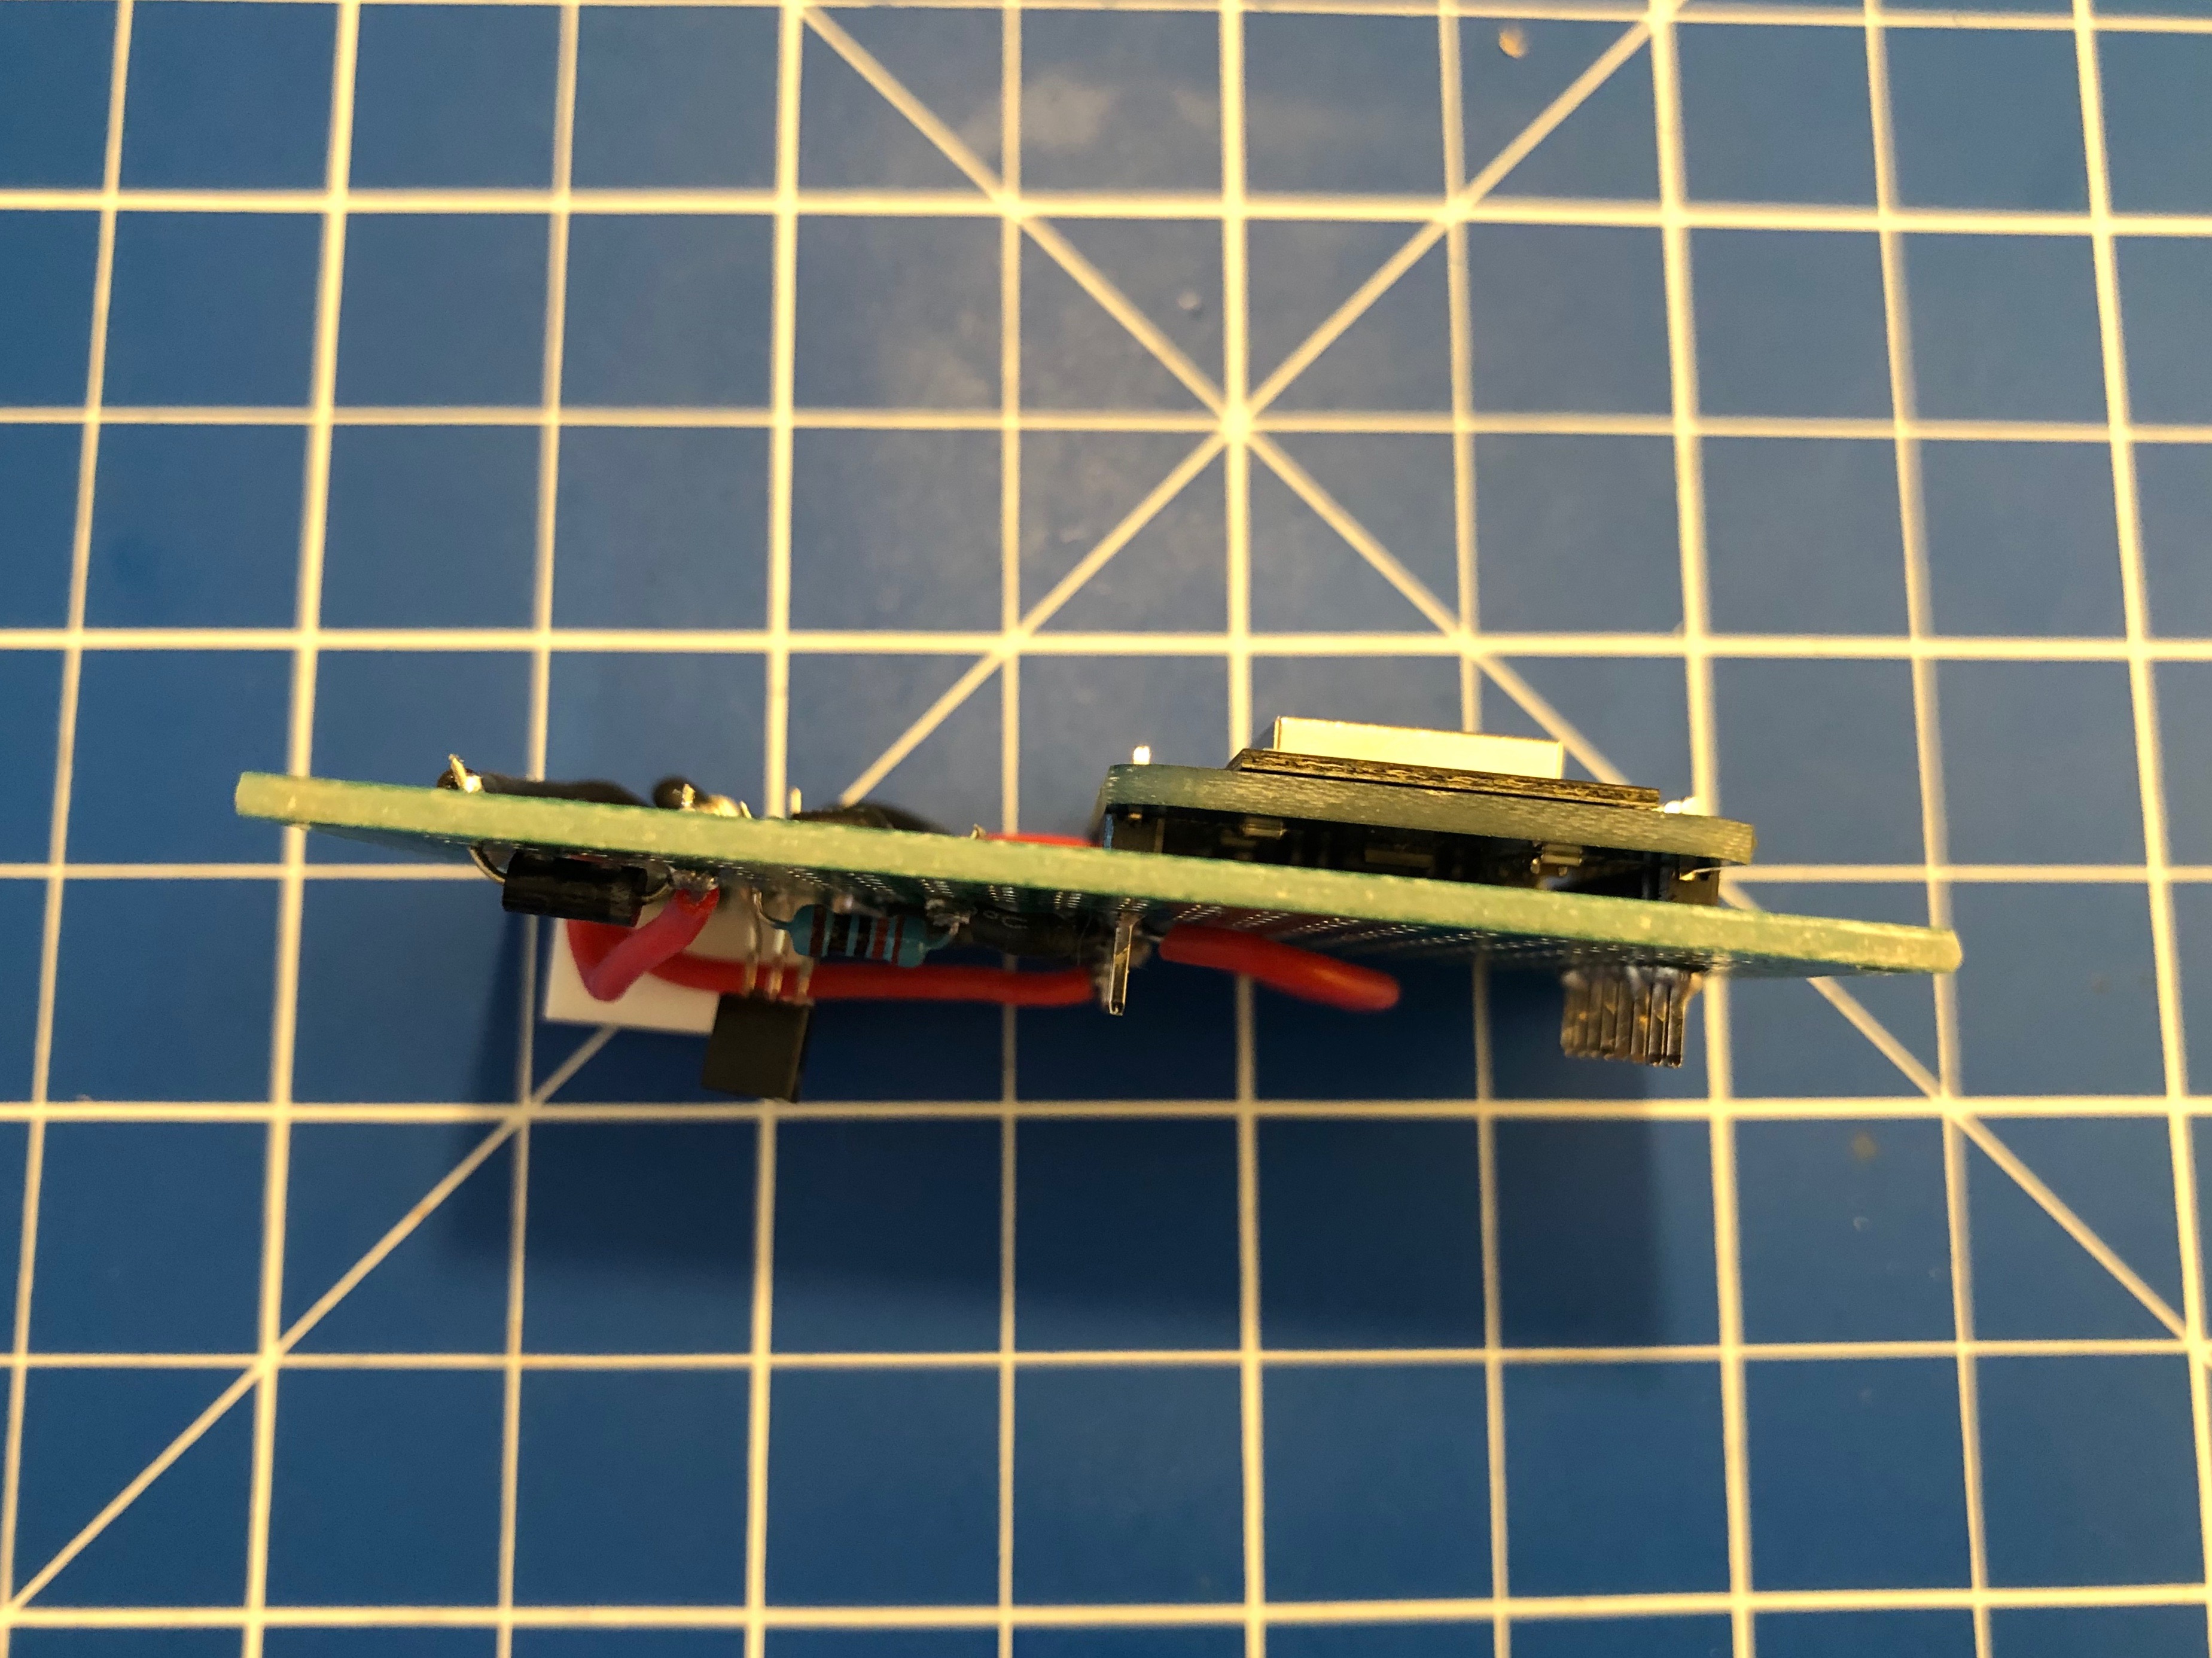
When done correctly the PCB (I’ve used 40mm x 60mm prototype pcb) and all cables will fit into the case. There’s plenty of room and I’ve put it to the side of it. I’ve also directly connected an USB cable to the USB port of the Wemos D1 Mini. As long as you put at least 1A into it it will all work.
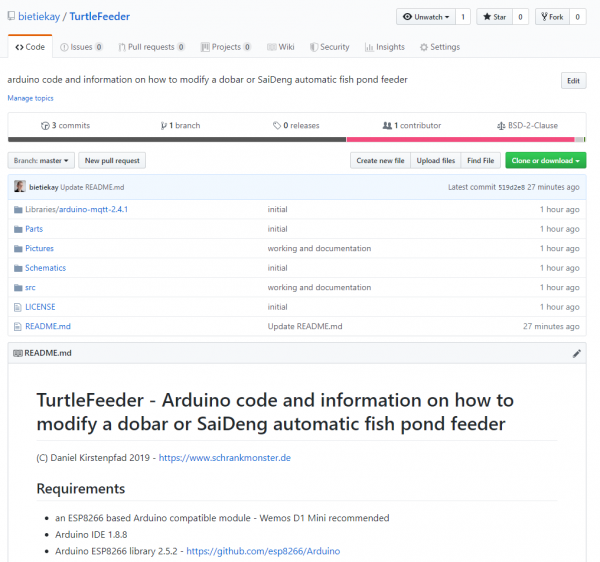
Software
Since the Wemos D1 Mini sports an ESP8266 and is well supported by Arduino it was clear to me to use Arduino IDE for the software portion of this project.
To get everything running you need to modify the .ino file in the src folder like so:
Configuration
What you need to configure:
the output pins you have chosen – D1+D2 are pre-configured
WiFi SSID + PASS
MQTT Server (IP(+Username+PW))
MQTT Topic prefix
Commands that can be sent through mqtt to the /feed topic.
MQTT topics and control
There are overall two MQTT topics:
$prefix/feeder-$chipid/state This topic will hold the current state of the feeder. It will show a number starting from 0 up. When the feeder is ready it will be 0. When it’s currently feeding it will be 1 and up – counting down for every successfull turn done. There is an safety cut-off for the motor. If the motor is longer active than configured in the MaximumMotorRuntime variable it will shut-off by itself and set the state to -1.
$prefix/feeder-$chipid/feed This topic acts as the command topic to start / control the feeding process. If you want to start the process you would send the number of turns you want to happen. So 1 to 5 seems reasonable. The feeder will show the progress in the /state topic. You can update the amount any time to shorten / lengthen the process. On the very first feed request after initial power-up / reboot the feeder will do a calibration run. This is to make sure that all the wheels are in the right position to work flawlessly.
All in all there are 3 of these going to be running in our household and the feeding is going to be controlled either by Alexa voice commands or through Node-Red automation.
Browsers can do many things. It’s probably your main window into the vast internet. Lots of things need visualization. And if you want to know how it’s done, maybe do one yourself, then…
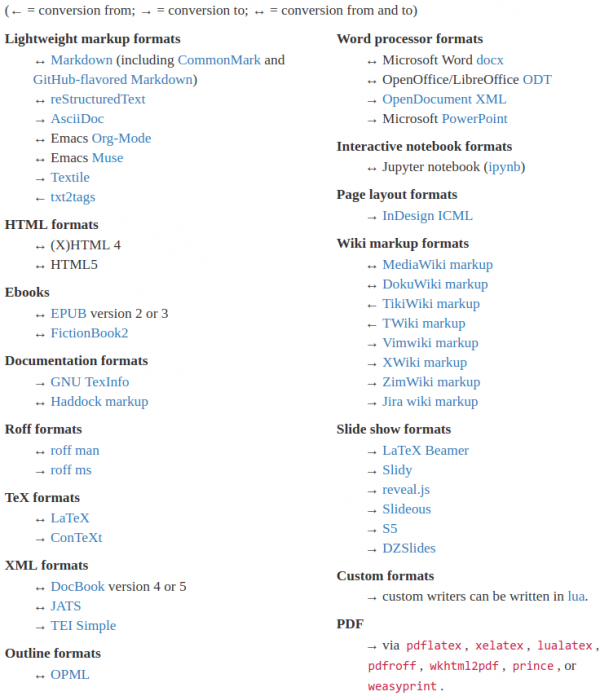
D3.js is a JavaScript library for manipulating documents based on data. D3 helps you bring data to life using HTML, SVG, and CSS. D3’s emphasis on web standards gives you the full capabilities of modern browsers without tying yourself to a proprietary framework, combining powerful visualization components and a data-driven approach to DOM manipulation.
And to further learn what it’s all about, go to Amelia Wattenbergers blog and take a stroll:
So, you want to create amazing data visualizations on the web and you keep hearing about D3.js. But what is D3.js, and how can you learn it? Let’s start with the question: What is D3?
While it might seem like D3.js is an all-encompassing framework, it’s really just a collection of small modules. Here are all of the modules: each is visualized as a circle – larger circles are modules with larger file sizes.
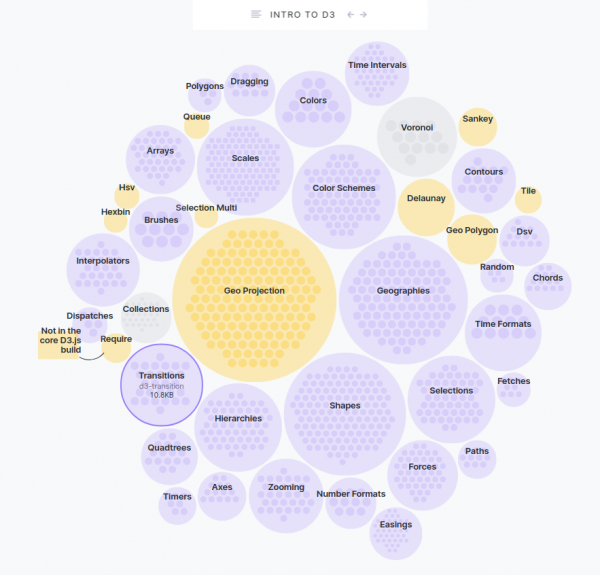
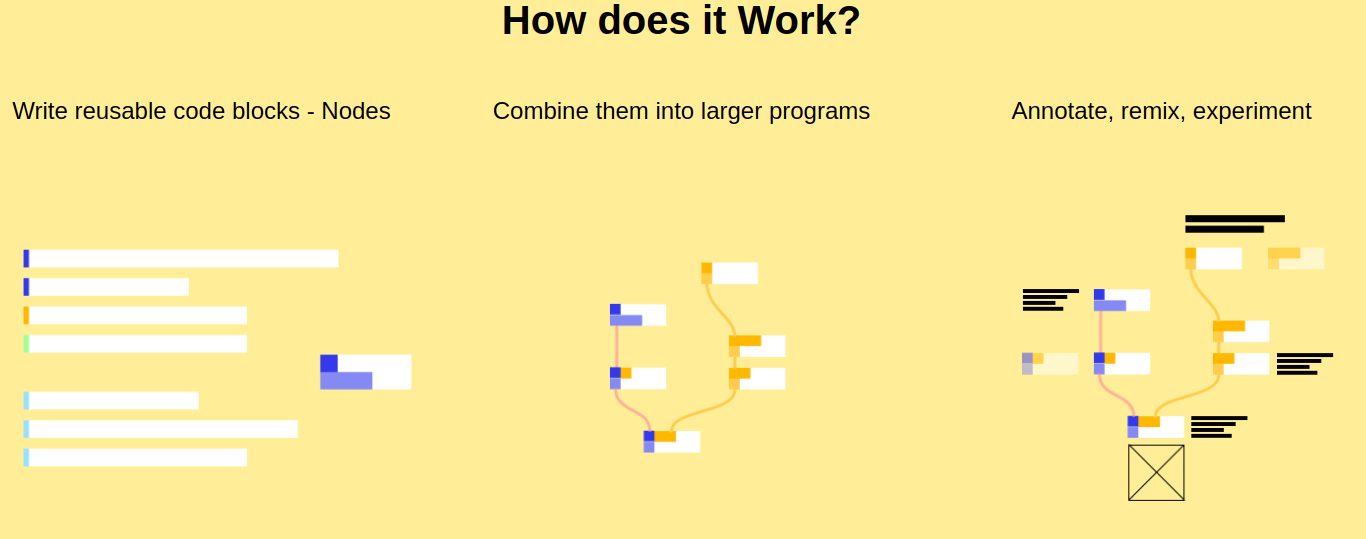
In Nodes you write programs by connecting “blocks” of code. Each node – as we refer to them – is a self contained piece of functionality like loading a file, rendering a 3D geometry or tracking the position of the mouse. The source code can be as big or as tiny as you like. We’ve seen some of ours ranging from 5 lines of code to the thousands. Conceptual/functional separation is usually more important.
Nodes* is a JavaScript-based 2D canvas for computational thinking. It’s powered by the npm ecosystem and lives on the web. We take inspiration from popular node-based tools but strive to bring the visual interface and textual code closer together while also encouraging patterns that aid the programmer in the prototype and exploratory stage of their process. *(not to be confused with node.js)
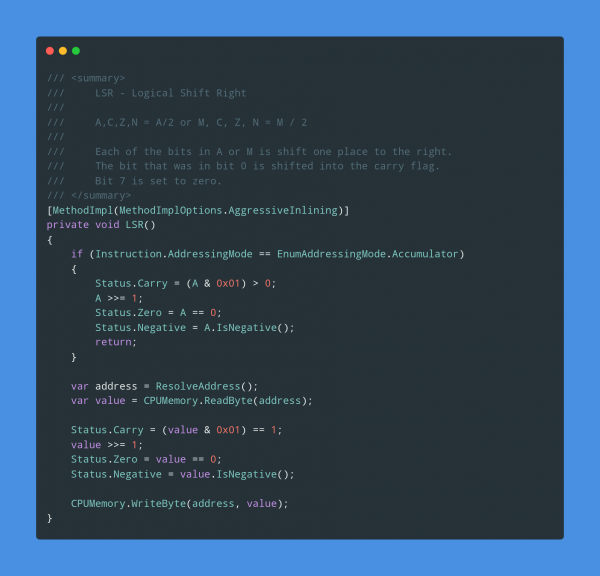
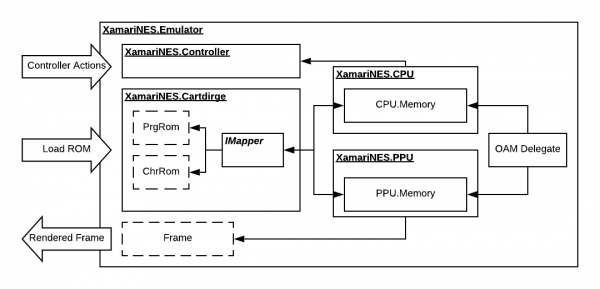
XamariNES is a cross-platform Nintendo Emulator using .Net Standard written in C#. This project started initially as a nighits/weekend project of mine to better understand the MOS 6502 processor in the original Nintendo Entertainment System. The CPU itself didn’t take long working on it a couple hours here and there. I decided once the CPU was completed, how hard could it be just to take it to next step and do the PPU? Here we are a year later and I finally think I have the PPU in a semi-working state.
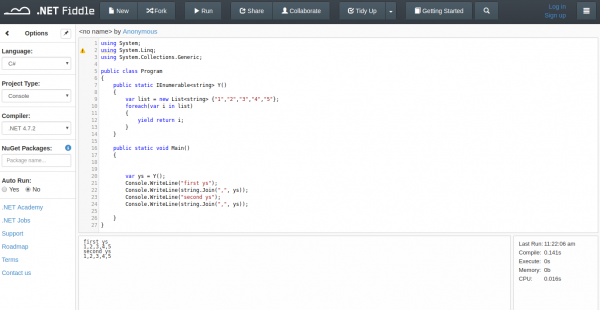
If you ever wanted to start looking at and understand emulation this might be a starting point for you. With the high-level C# being used to describe and implement actual existing hardware – like the NES CPU:
Implementation of the Logical Shift Right opcode of the MOS6502 cpu
The author does the full circle and everything you’d expect from a simple working emulator is there:
I am running most of my in-house infrastructure based on Docker these days…
Docker is a set of platform-as-a-service (PaaS) products that use operating-system-level virtualization to deliver software in packages called containers.Containers are isolated from one another and bundle their own software, libraries and configuration files; they can communicate with each other through well-defined channels.
All containers are run by a single operating-system kernel and are thus more lightweight than virtual machines.
And given the above definition it’s fairly easy to create and run containers of things like command-line tools and background servers/services. But due to the nature of Docker being “terminal only” by default it’s quite hard to do anything UI related.
But there is a way. By using the VNC protocol to get access to the graphical user interface we can set-up a container running a fully-fledge Linux Desktop and we can connect directly to this container.
I am using something I call “throw-away linux desktop containers” all day every day for various needs and uses. Everytime I start such a container this container is brand-new and ready to be used.
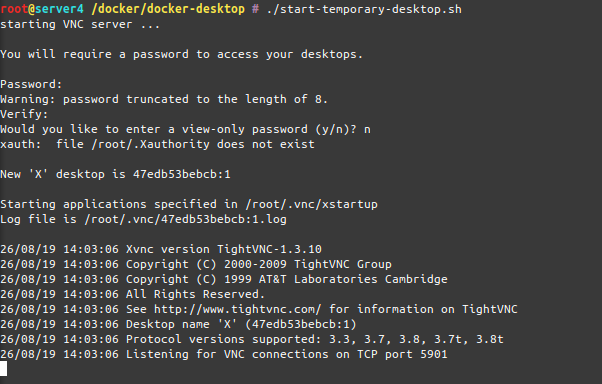
Actually when I start it the process looks like this:
As you can see when the container starts-up it asks for a password to be set. This is the password needed to be entered when the VNC client connects to the container.
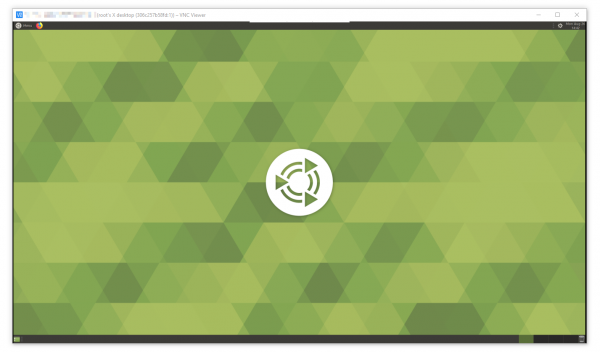
And when you are connected, this is what you get:
this is what you see after connecting to the desktop container by VNC
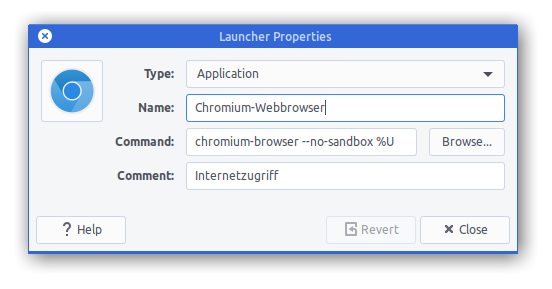
I am sharing my scripts and Dockerfile with you so you can use it yourself. If you put a bit more time into it you can even customize it to your specific needs. At this point it’s based on Ubuntu 18.04 and starts-up a ubuntu-mate desktop environment in it’s default configuration.
When you log into the container it will log you in as root – but effectively you won’t be able to really screw around with the host machine as the container is still isolating you from the host. Nevertheless be aware that the container has some quirks and is run in extended privileges mode.
Chromium will be pre-installed as a browser but you will find that it won’t start up. That’s because Chromium won’t start up if you attempt a start as root user.
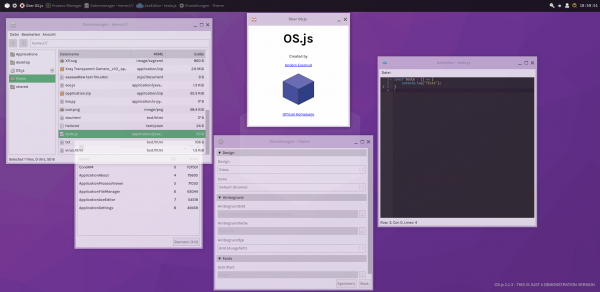
OS.js is an open-source JavaScript Web Desktop implementation for your browser with a fully-fledged window manager, Application APIs, GUI toolkits and filesystem abstraction.
It really does implement a lot of what an operating system UI and portions of the backends are supposed to be. It looks quite funky and there are applications to this. Of course it’s open source
I want all electron Apps to start existing there so I can call all of them with just a browser from anywhere.
As people around me discuss what to go for in regards to manage their growing number of private GIT repositories I joined their discussion.
A couple of years ago I assessed how I would want to store my collection of almost 100 GIT private repositories and all those cloned mirrors I want to keep for archival and sentimental reasons.
An option was to pay for GitHub. Another option, which most seemed to prefer, was going for a local Gitlab set-up.
All seemed not desirable. Like chaining my workflows to GitHub as a provider or adopting a new hobby to operate and maintain a private GitLab server. And as it might have become easier to operate a GitLab server with the introduction of container management systems. But I’ve always seemed to have to update to a new version when I actually wanted to use it.
So this was when I had to make the call for my own set-up about 4 years ago. We were using a rather well working GitLab set-up for work back then. But it all seemed overkill to me also back then.
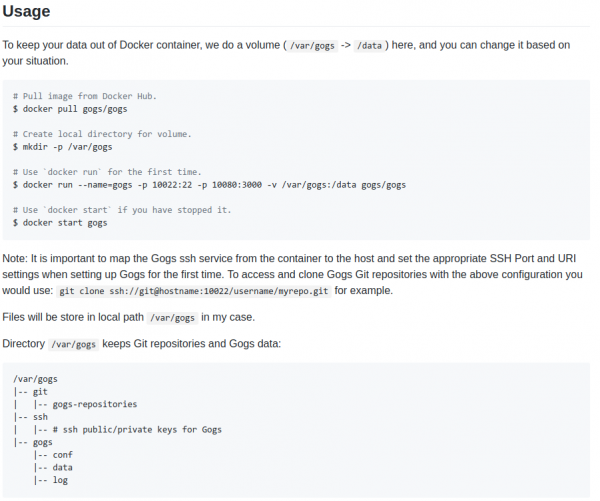
It runs with one command, the only dependency is two file system directories with (a) the settings of gogs and (b) your repositories.
It’ll deploy as literally a SINGLE BINARY without any other things to consider. With the provided dockerfile you are up and running in seconds.
It has never let me down. It’s running and providing it’s service. And that’s the end of it.
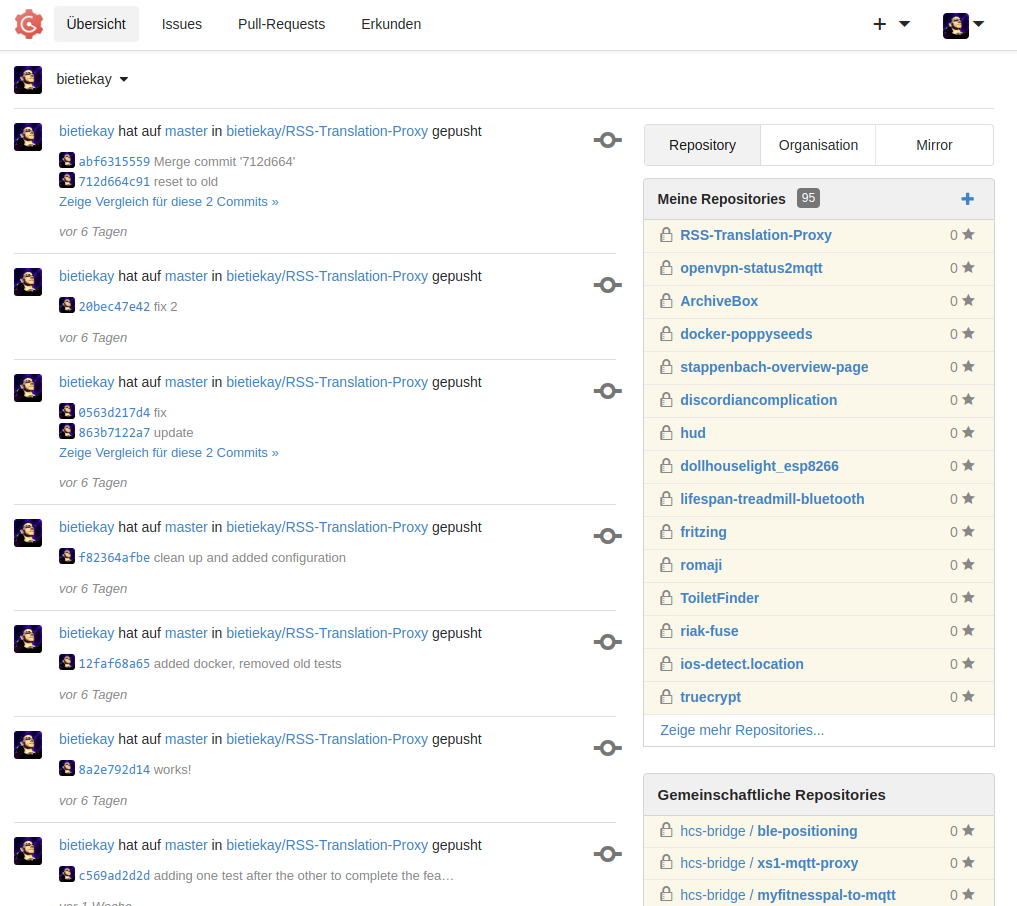
I am using it, as said, for 95 private repositories and a lot of additionally mirrored GIT repositories. Gogs will support you by keeping those mirrors in sync for you in the background. It’s even multi-user multi-organization.
When you are writing code the patterns seem to repeat every once in a while. Not only the patterns but also the occasion you are going to apply certain code styles and methods while developing.
To support a developer with this creative work the tedious and repetitious tasks of typing out what is thought can be supported by machine learning.
Chances are your favourite IDE already supports an somehow AI driven code autocomplete feature. And if it does not, read on as there are ways to integrate products like TabNine into any editor you can think of…
Visual Studio IntelliCode is a set of AI-assisted capabilities that improve developer productivity with features like contextual IntelliSense, argument completion, code formatting, and style rule inference.
IntelliCode augments existing developer workflows with machine-learning services that provide an understanding of code and its context. It’s applicable for C#, C++ (in preview), JavaScript/TypeScript (in preview), and XAML code today, and will be updated in the future to support more languages.
Of course there are some new contenders to the scene, like TabNine:
TL;DR: TabNine is an autocompleter that helps you write code faster. We’re adding a deep learning model which significantly improves suggestion quality. You can see videos below and you can sign up for it here.
Deep TabNine requires a lot of computing power: running the model on a laptop would not deliver the low latency that TabNine’s users have come to expect. So we are offering a service that will allow you to use TabNine’s servers for GPU-accelerated autocompletion. It’s called TabNine Cloud, …
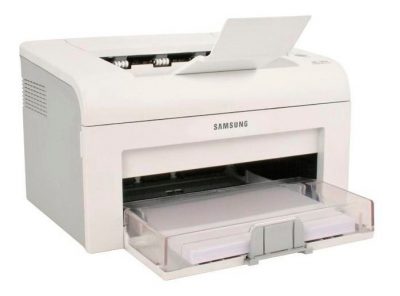
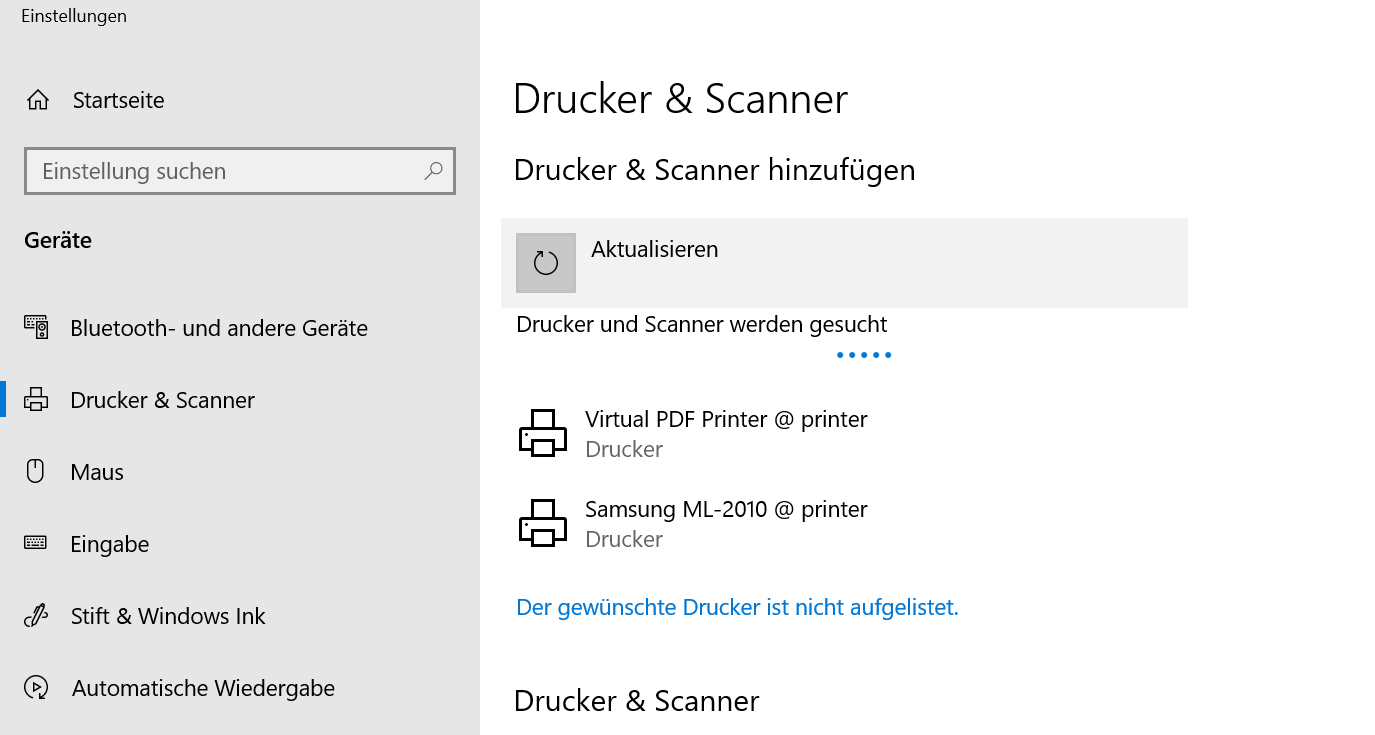
In 2007 I had become proud owner of a Samsung ML-2010 mono laser printer. It’s done a great job ever since and I can recall changing the toner just once so far.
So you can tell: I am not a heavy printer user. Every so often I gotta print out a sheet of paper to put on a package or to fill out a form. A laser printer is the perfect fit for this pattern as it’s toner is not going-bad or evaporating like ink does in ink-printers.
So I still like the printer and it’s in perfect working condition. I’ve just recently filled up the toner for almost no money. But – but this printer needs to be physically connected to the computer that wants to print.
As the usage patterns have significantly changed in the last 12 years this printer needs to be brought into todays networked world.
Replacing it with a new printer is not an option. All printers I could potentially purchase are both more expensive to purchase and the toner is much more expensive to refill. No-can-do.
If only there was an easy way to get the printer network ready. Well, turns out, there is!
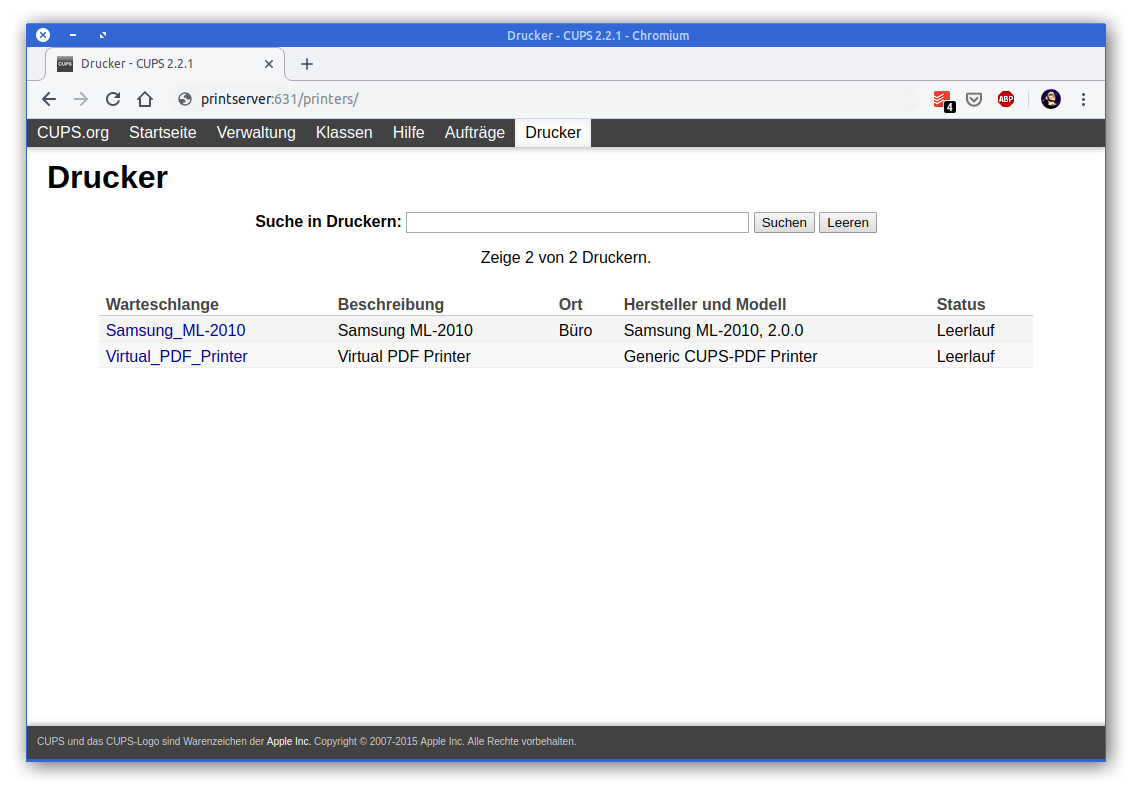
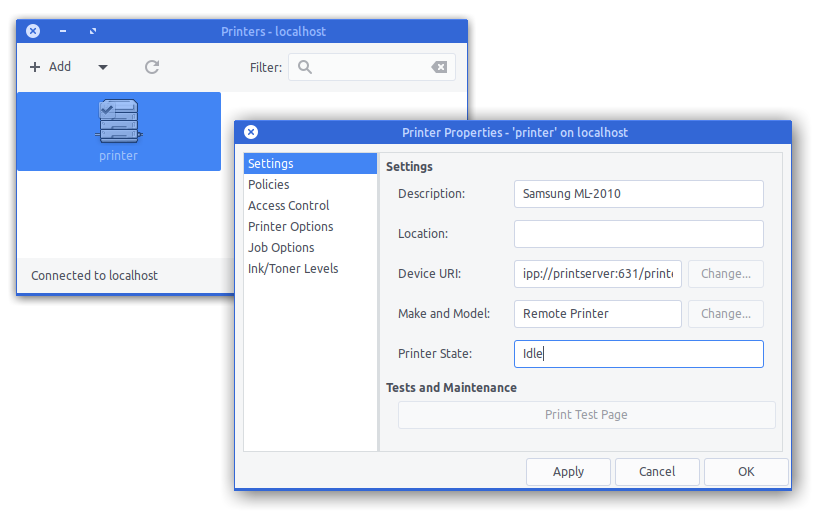
First let’s start introducing an opensource project: CUPS
CUPS (formerly an acronym for Common UNIX Printing System) is a modular printing system for Unix-like computer operating systems which allows a computer to act as a print server. A computer running CUPS is a host that can accept print jobs from client computers, process them, and send them to the appropriate printer.
A good, cheap and energy-efficient way to run a CUPS host is a Raspberry Pi. I do own several first-generation models that have been replaced by much more powerful ones in the previous years.
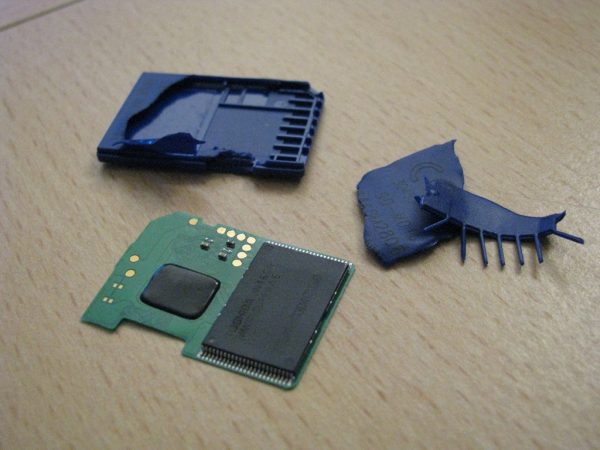
Mass storage hardware breaks all the time. Sometimes it’s hardware that breaks, but sometimes it’s the software that breaks. If it’s the software (or own talent) that made the data go boom, TestDisk is a tool you should know about.
DISCLAIMER: If the data you are trying so recover is actually worth anything you might want to reserve to a professional data recovery service rather than trying to train-on-the-job.
TestDisk is powerful free data recovery software! It was primarily designed to help recover lost partitions and/or make non-booting disks bootable againwhen these symptoms are caused by faulty software: certain types of viruses or human error (such as accidentally deleting a Partition Table). Partition table recovery using TestDisk is really easy.
TestDisk can
Fix partition table, recover deleted partition
Recover FAT32 boot sector from its backup
Rebuild FAT12/FAT16/FAT32 boot sector
Fix FAT tables
Rebuild NTFS boot sector
Recover NTFS boot sector from its backup
Fix MFT using MFT mirror
Locate ext2/ext3/ext4 Backup SuperBlock
Undelete files from FAT, exFAT, NTFS and ext2 filesystem
Copy files from deleted FAT, exFAT, NTFS and ext2/ext3/ext4 partitions.
TestDisk has features for both novices and experts. For those who know little or nothing about data recovery techniques, TestDisk can be used to collect detailed information about a non-booting drive which can then be sent to a tech for further analysis. Those more familiar with such procedures should find TestDisk a handy tool in performing onsite recovery.
And if you give up, think about writing an article of you actually digging deeper:
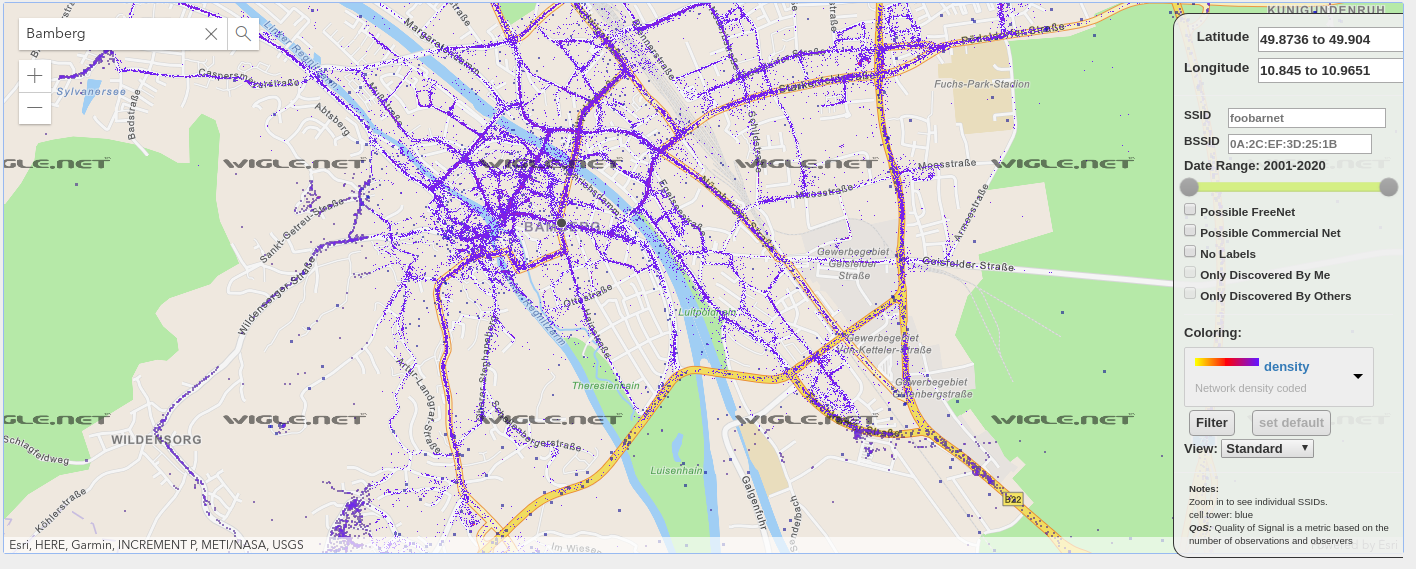
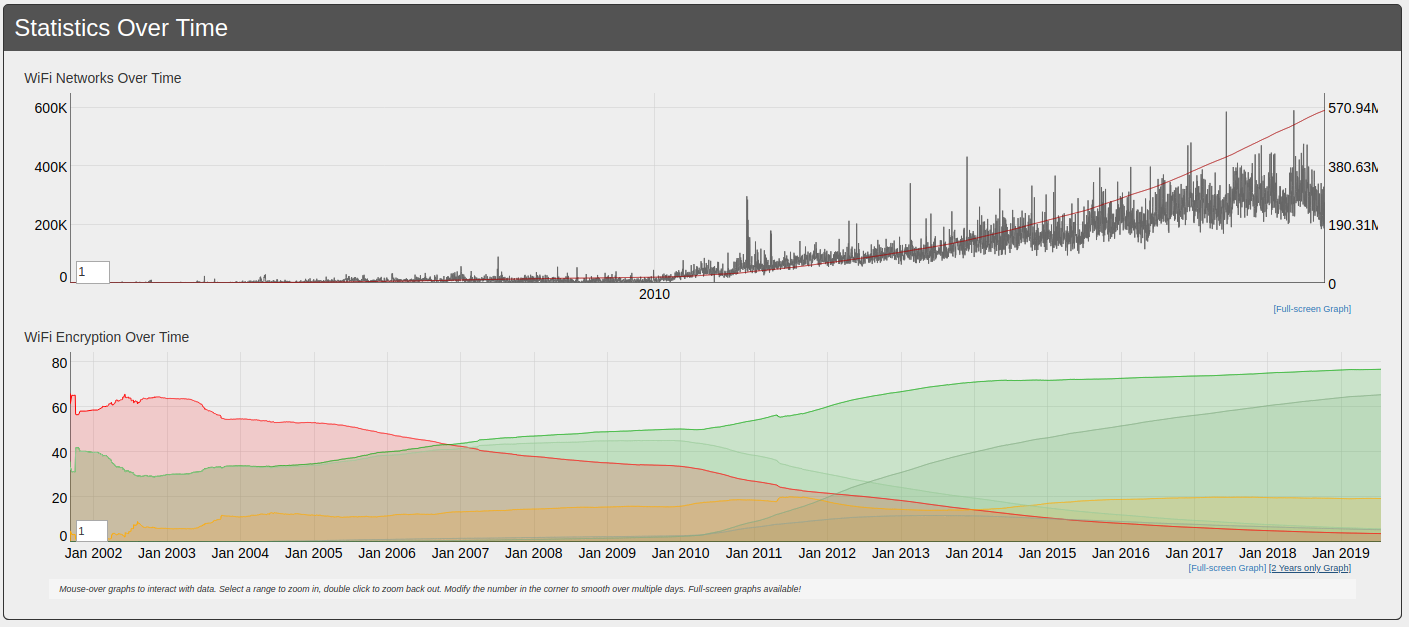
When you work with wireless networks and you do programming and mobile app development that works with things like user location you might find this useful.
Take thousands of users and you’ve got the worlds wifi networks mapped…
WiGGLE (Wireless Geographic Logging Engine) is a project which takes wireless network data + location and puts it into a big database. On top of storage it’s giving you access to that data.
We consolidate location and information of wireless networks world-wide to a central database, and have user-friendly desktop and web applications that can map, query and update the database via the web.
So what’s my use-case? Apart from the obvious I will make use of this by finding out more about those fellow travelers around me. Many people probably to the same as me: Travel with a small wifi / 4g access point. Whenever this accesspoints shows up in scans the path will be traceable.
I am curious to see which access point around me is in the million-mile club yet…
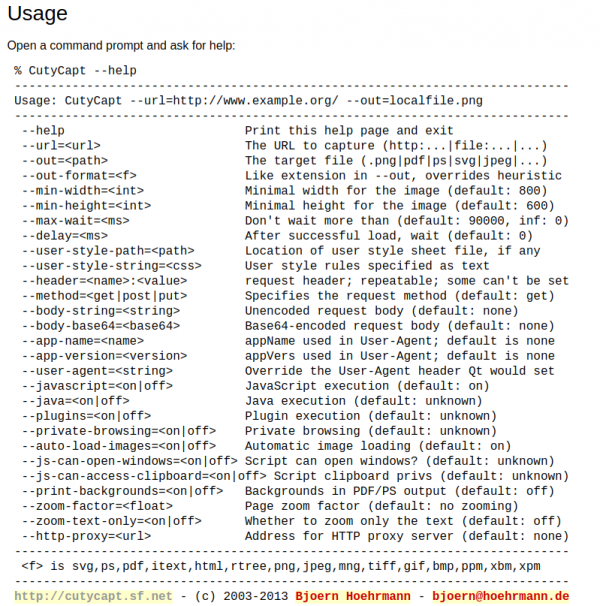
Think of this: You want to capture a whole, multi-scroll-pages, web-page into one image.
This can be difficult without the right tools. It surely will be a lot of work to accomplish a 10th of thousand pixel height screenshot put together from multiple single screenshots…
CutyCapt is there to help! It’s a command line tool encapsulating the very powerful WebKit browser engine to render a full page and then create a single file screenshot of the whole page for you.
By example, this is what it did when told to screenshot this website:
In search of alternatives to the traditional centralized hosted social networks a lot of smart people have started to put time and thought into what is called “the-federation”.
The Federation refers to a global social network composed of nodes that talk to each other. Each of them is an installation of software which supports one of the federated social web protocols.
The PixelFed project seems to gain some traction as apparently the first documentation and sources are made available.
PixelFed is a federated social image sharing platform, similar to instagram. Federation is done using the ActivityPub protocol, which is used by Mastodon, PeerTube, Pleroma, and more. Through ActivityPub PixelFed can share and interact with these platforms, as well as other instances of PixelFed.
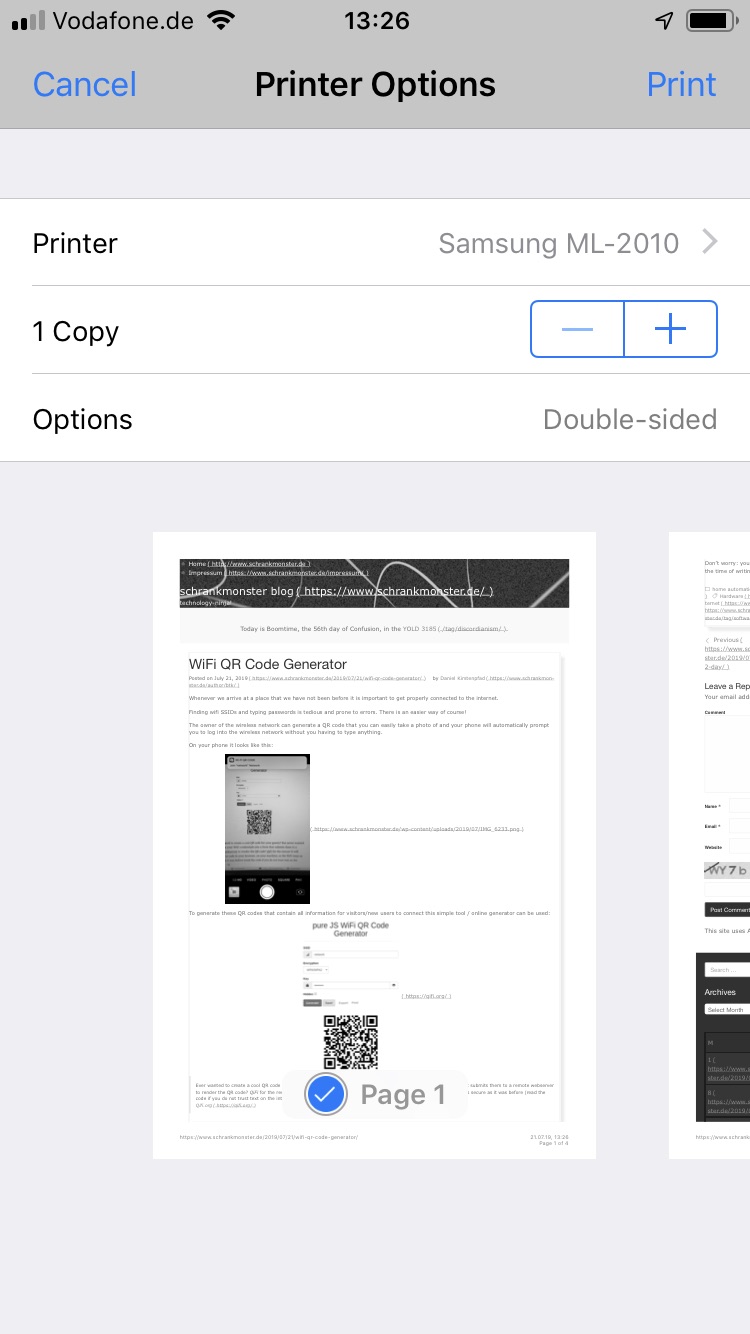
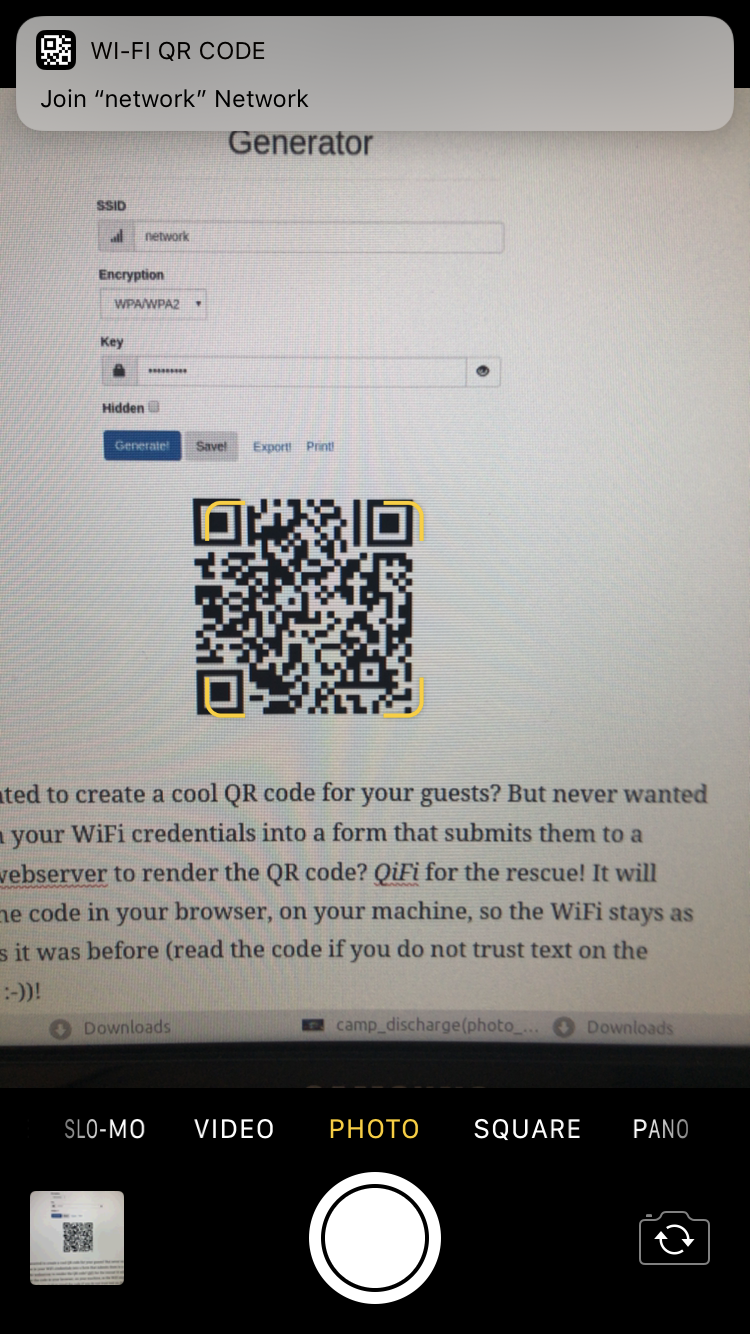
Whenever we arrive at a place that we have not been before it is important to get properly connected to the internet.
Finding wifi SSIDs and typing passwords is tedious and prone to errors. There is an easier way of course!
The owner of the wireless network can generate a QR code that you can easily take a photo of and your phone will automatically prompt you to log into the wireless network without you having to type anything.
On your phone it looks like this:
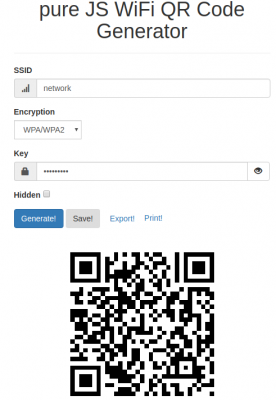
To generate these QR codes that contain all information for visitors/new users to connect this simple tool / online generator can be used:
Ever wanted to create a cool QR code for your guests? But never wanted to type in your WiFi credentials into a form that submits them to a remote webserver to render the QR code? QiFi for the rescue! It will render the code in your browser, on your machine, so the WiFi stays as secure as it was before (read the code if you do not trust text on the internet :-))!
Don’t worry: your access point information is not transferred over the internet. As this is open source at the time of writing the data was held in HTML 5 local storage on the local browser only and not transferred out.
For big parts of my VPN needs I use OpenVPN. Especially on iOS devices the deep integration just works. Even to a degree that you enable the VPN once and the device will transparently keep it up / reestablish connections when required.
OpenVPN protocol has emerged to establish itself as a de- facto standard in the open source networking space with over 50 million downloads. OpenVPN is entirely a community-supported OSS project which uses the GPL license.
I am using the dockerized version of OpenVPN. From there I’ve got several ways to get telemetry data (like connections, traffic, …) out of it. One way is the management interface provided by OpenVPN. Another way is by using the default openvpn-status.log file.
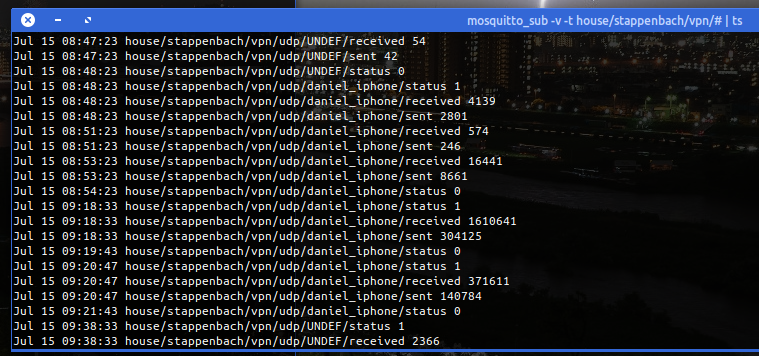
Since the easiest way out-of-the-box was to use the logfile I sat down and wrote a little 2mqtt bridge for the contents of the logfile.
It’s also dockerized so you can easily set it up by pointing the openvpn-status.log to the right volume/mount-point.
When done it’ll produce MQTT messages like this:
The set-up and start-up is rather simple:
docker run -d --restart=always --volume /openvpnstatus2mqttconfiglocation/:/configuration --volume /openvpnstatusloglocation/:/openvpn openvpn-status2mqtt
MQTT Broker, Topic-Prefix and so on are configured with the .json configuration file found along the project.
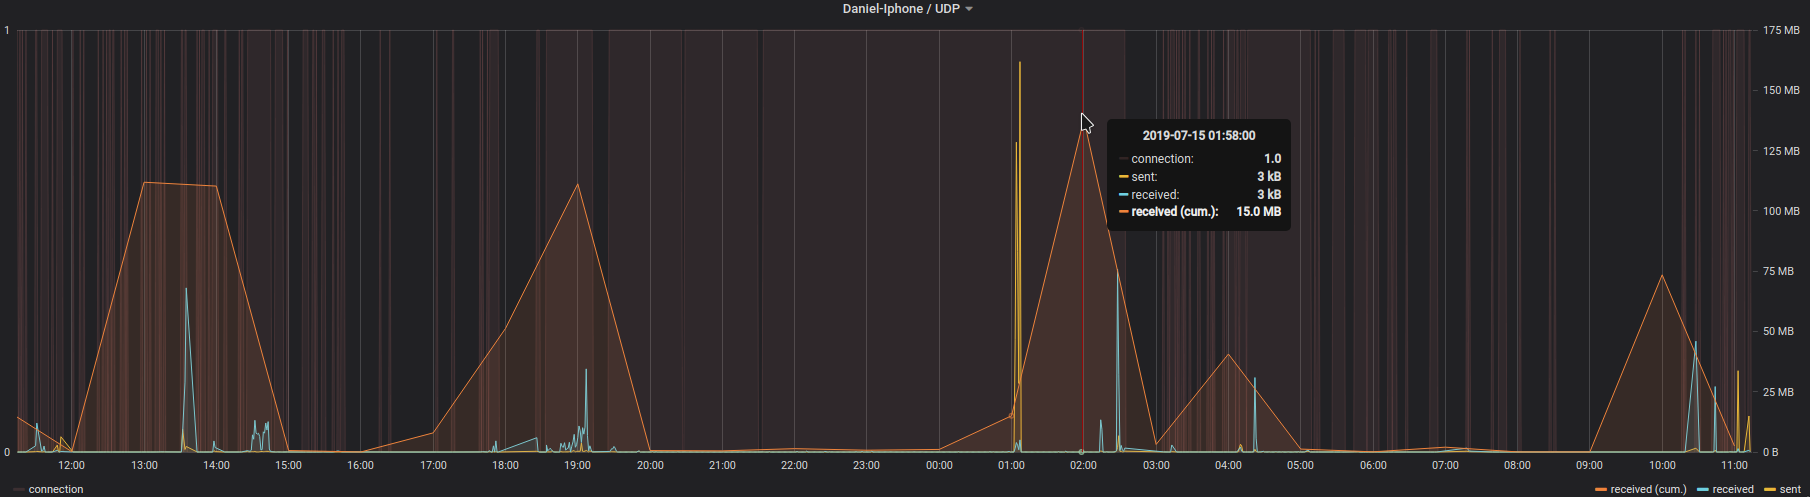
The immediate outcome of this is that with the always-on VPN I am now getting statistics about, for example, the data consumption of my iPhone.
The big traffic spike at 1 AM is the backup that my iPhone does every night. Very interesting also how often the connection is closed and opened again even without me using the phone…
How to build security into your software? It’s always simple to find examples where things gone wrong. Where security was compromised and things did not work out as the software authors envisioned.
As always there are new concepts and operating systems being implemented.
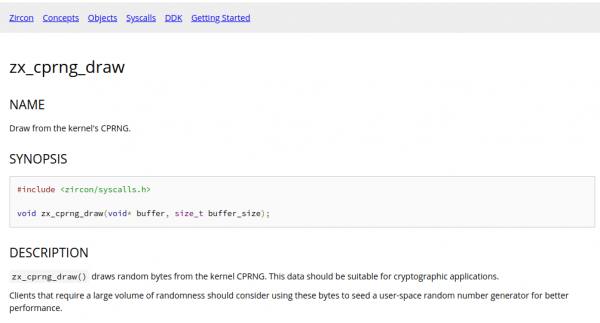
A particularly interesting example of security software design can be observed here:
Fuchsia is an open source capability-based operating system currently being developed by Google.
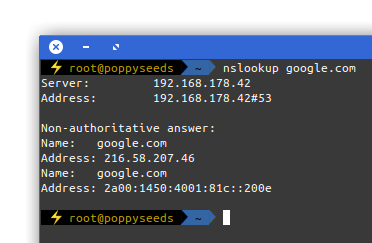
Picture yourself in this situation. You connect to a network and nothing works. Except for this:
It is quite common to have DNS working in networks while everything else is not. Sometimes the network requires a log-in to give you access to a small portion of the internet.
Now, with the help of a tool called iodine, you can get access to the full internet with only DNS working in your current network:
iodine lets you tunnel IPv4 data through a DNS server. This can be usable in different situations where internet access is firewalled, but DNS queries are allowed.
It runs on Linux, Mac OS X, FreeBSD, NetBSD, OpenBSD and Windows and needs a TUN/TAP device. The bandwidth is asymmetrical with limited upstream and up to 1 Mbit/s downstream.
Setting it up is a bit of work but given that you are anyway having access to a well connected server on the free portion of the internet it can be easily done.