The 50th Day of the Season of Bureaucracy. The Fluxday marking the approach of the Season of The Aftermath.
Aftermath (season)
Simple Windows Text Expander
If you, like me, once every while need to type the same again and again it might also get tired for you as it got for me.
A specific example: I very frequently need to have the current date available to be entered.
May it be because I need to name a file correctly, prepending it with the current date, or because I need it to refer to a specific date in a text I am currently typing.
The common scheme for dates I am using is YYYY-MM-DD. The 24th of September 2019 becomes 2019-09-24.
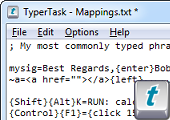
For when I am on Windows I am using a small utility called “TyperTask” to have a system wide shortcut available to me that will enter the current date with the press of a button.
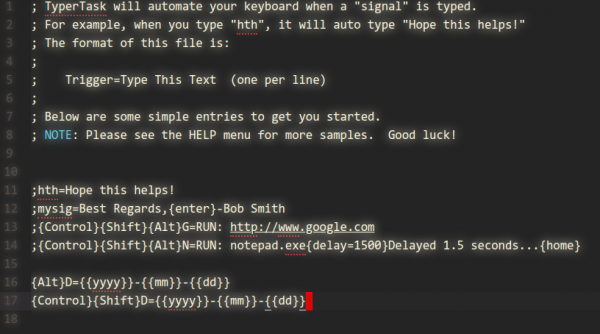
As you can see in the screenshot above. By simply adding / editing the TXT file you will be able to specify new shortcuts. In the above case ALT+D or STRG+SHIFT+D will generated my desired date text pattern.
It’s freeware. It’s from a company that ceased to exist. It’s 60kbyte. Download while supply lasts.
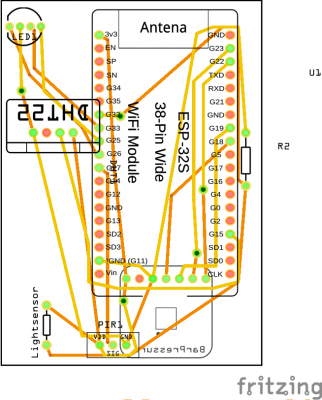
Multi-Sensor board progress
Still working on these…
Still lots of errors and challenges to positioning and casing. It works electrically and in software. Does not yet fit into a case.
It’s supposed to get you these sensors accomodated:
- barometric pressure
- temperature
- humidity
- PIR motion
- light intensity
- bluetooth scan/BLE connectivity
- Wifi scan / Wifi connectivity
And a RGB LED as output. All powered by USB and an ESP32.
Dark Mode
As iOS 13 has introduced a system wide dark mode into my workflow I had a good reason to give the CSS of this website a little spin.
Depending on your system settings this website now supports Dark Mode.
Hack-the-Planet Podcast: Episode 006
Episode 006: “Monitoring Release Pipeline” ist fertig und steht bald zum Download und zeit-sourveränem anhören bereit.
Auf der Homepage, im Feed und auf YouTube:
Diesmal unterhält Andreas sich mit mir über:
- Traefik: https://traefik.io/
- Drive In Briefkästen: https://twitter.com/aheil/status/1173…
- Automated Konbini: https://www.forbes.com/sites/akikokat…
- Neue Packstationen: https://www.golem.de/news/deutsche-po…
- Arduino Aquarium Futter Automat: https://www.schrankmonster.de/2019/09…
- Louis Rossmann Macbook Repairs: https://www.youtube.com/user/rossmann…
- Make Buch: https://www.dpunkt.de/buecher/12488/9…
- Icinga: www.icinga.com
- SONOS Auto Bookmarker: https://github.com/bietiekay/sonos-au…
- TOTP – Time based one-time password: https://en.wikipedia.org/wiki/Time-ba…
- 1Password: https://1password.com/
- Enpass: https://www.enpass.io/
- ODroid GO: https://wiki.odroid.com/odroid_go/odr…
- ODroid Go: https://www.hardkernel.com/shop/odroi…
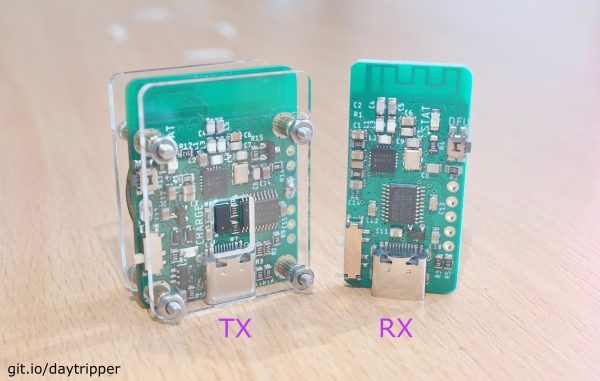
Laser Tripwire
Do you always slack off on your computer and worry about getting busted?Not anymore because Daytripper is here to save the day!
daytripper

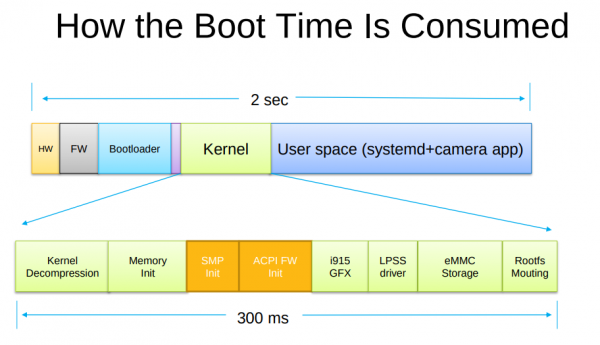
Booting Faster (with Linux).
Booting a computer does not happen extremely often in most use-cases, yet it’s a field that has not seen as much optimization and development as others had.
Find a very interesting presentation on the topic: How to make Linux boot faster here. The presentation was held at the Linux Plumbers Conference 2019.
Convert HEIC to JPEG or PNG
If you own a modern age phone it’s very likely that it will store the photos you take in a wonderful format called HEIC – or “High Efficiency Image File Format (HEIF)”.
Now the issue with this format is that your average toolchain is based upon things like Portable Network Graphics (PNG), JPEG and maybe GIF or Scalable Vevtor Graphics (SVG).
So HEIC does not quite fit yet. But you can make it fit with this on Linux.
Imagemagick and current GIMP installations apparently still don’t come pre-compiled with HEIF support. But you can install a tool to easily convert an HEIC image into a JPG file on the command line.
apt install libheif-examplesand then the tool heif-convert is your friend.
QuickCharge 3 (QC3) enable your Arduino project
You might have asked yourself how it is that some phones charge up faster than others. Maybe the same phone charges at different speed when you’re using a different cable or power supply. It even might not charge at all.
There is some very complicated trickery in place to make those cables and power supplies do things in combination with the active devices like phones. Many of this is implemented by standards like “Quick Charge”:
Quick Charge is a technology found in QualcommSoCs, used in devices such as mobile phones, for managing power delivered over USB. It offers more power and thus charges batteries in devices faster than standard USB rates allow. Quick Charge 2 onwards technology is primarily used for wall adaptors, but it is also implemented in car chargers and powerbanks (For both input and output power delivery).
Wikipedia: Quick Charge
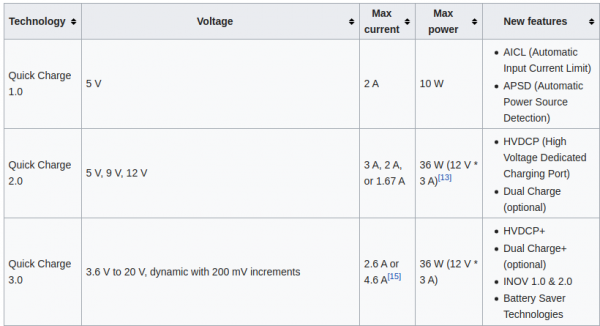
So in a nutshell: If you are able to speak the quick charge protocol, and with the right cable and power supply, you are able to get anything between 3.6 and 20V out of such a combination by just telling the power supply to do so.
This is great for maker projects in need of more power. There’s lots of things to consider and be cautious about.
“Speaking” the protocol just got easier though. You can take this open source library and “power up your project”:
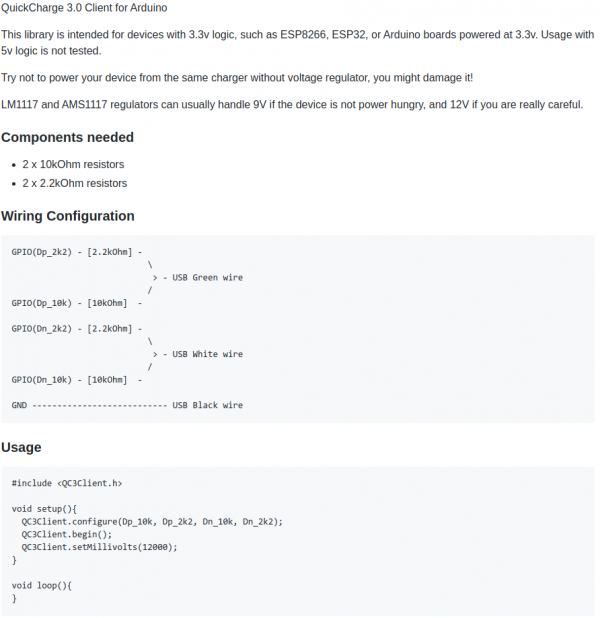
The above mentioned usage-code will give you 12V output from the power supply. Of course you can also do…:
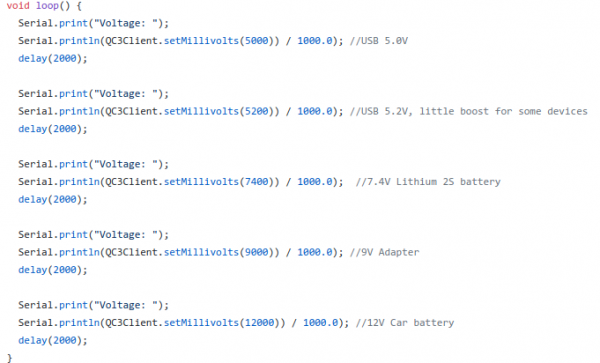
Be aware that your project needs to be aware of the (higher) voltage. It’s really not something you should just try. But you knew that.
More on Quick Charge also here.
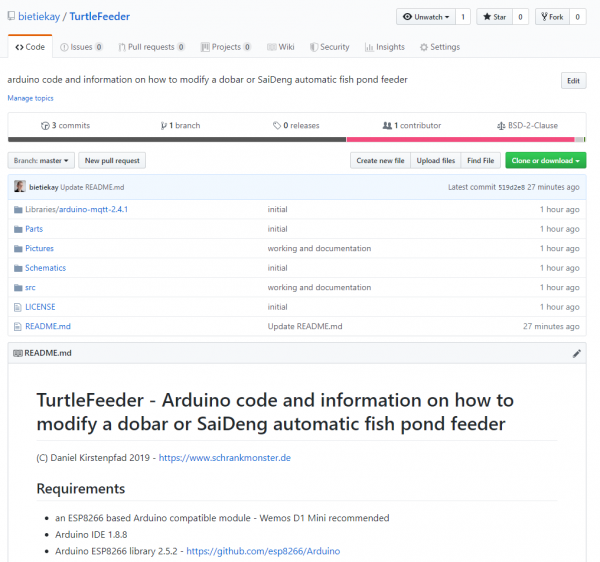
smart arduino fish pond feeder: TurtleFeeder
We’ve got several quite big fish tanks in our house. Mainly used by freshwater turtles.
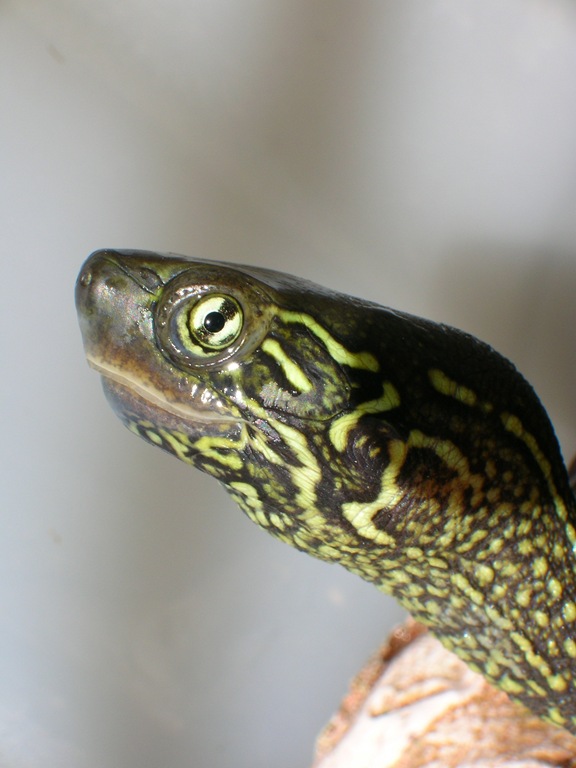
These turtles need to be fed every once in a while. And while this is not an issue normally it’s an issue if you leave the house for travel for an extended period of time.
Of course there are humans checking on everything in the house regularly but as much as can be automated should and will be automated in our household. So the requirement wa to have the turtle feeding automated.
To achieve this is would be necessary to have a fixed amount of turtle food be dispensed into the tanks on a plan and with some checks in the background (like water quality and such).
It’s been quite a hassle to come up with a plan how the hardware should look like and work. And ultimately i’ve settled on retrofitting an off-the-shelf fish pond feeder to become controllable through MQTT.
The pond feeder I’ve found and used is this one:
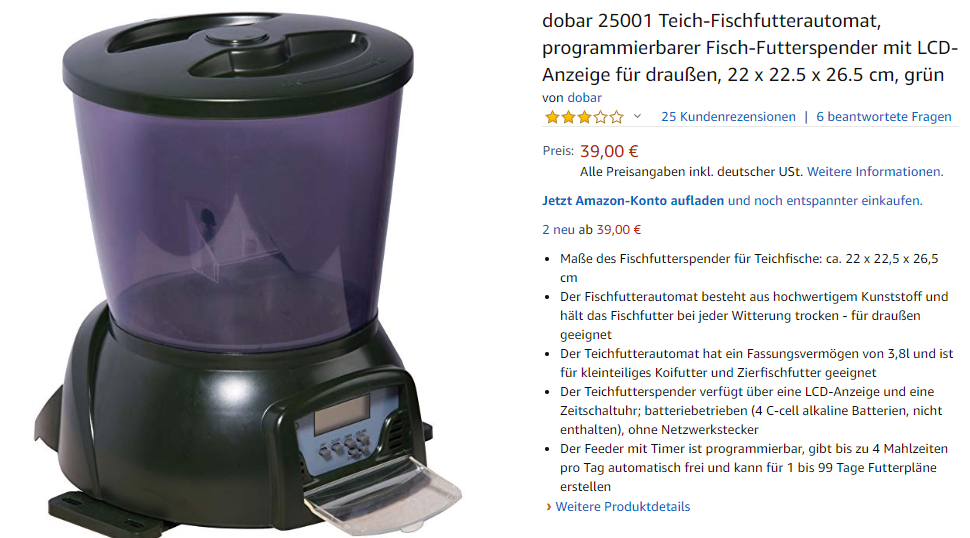
It’s not really worth linking to a specific product detail page as this sort of feeder is available under hundreds of different names. It always looks the same and is priced right around the same.
If you want to build this yourself, you want one that looks like the above. I’ve bought 3 of them and they all seem to come out of the same factory somewhere in China.
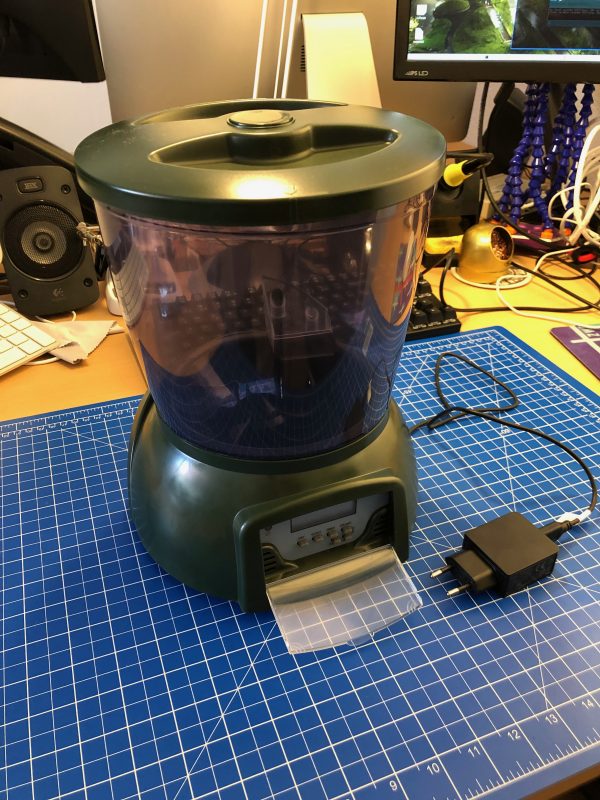
Anyway. If you got one you can easily open it up and start modifying it.
Hardware
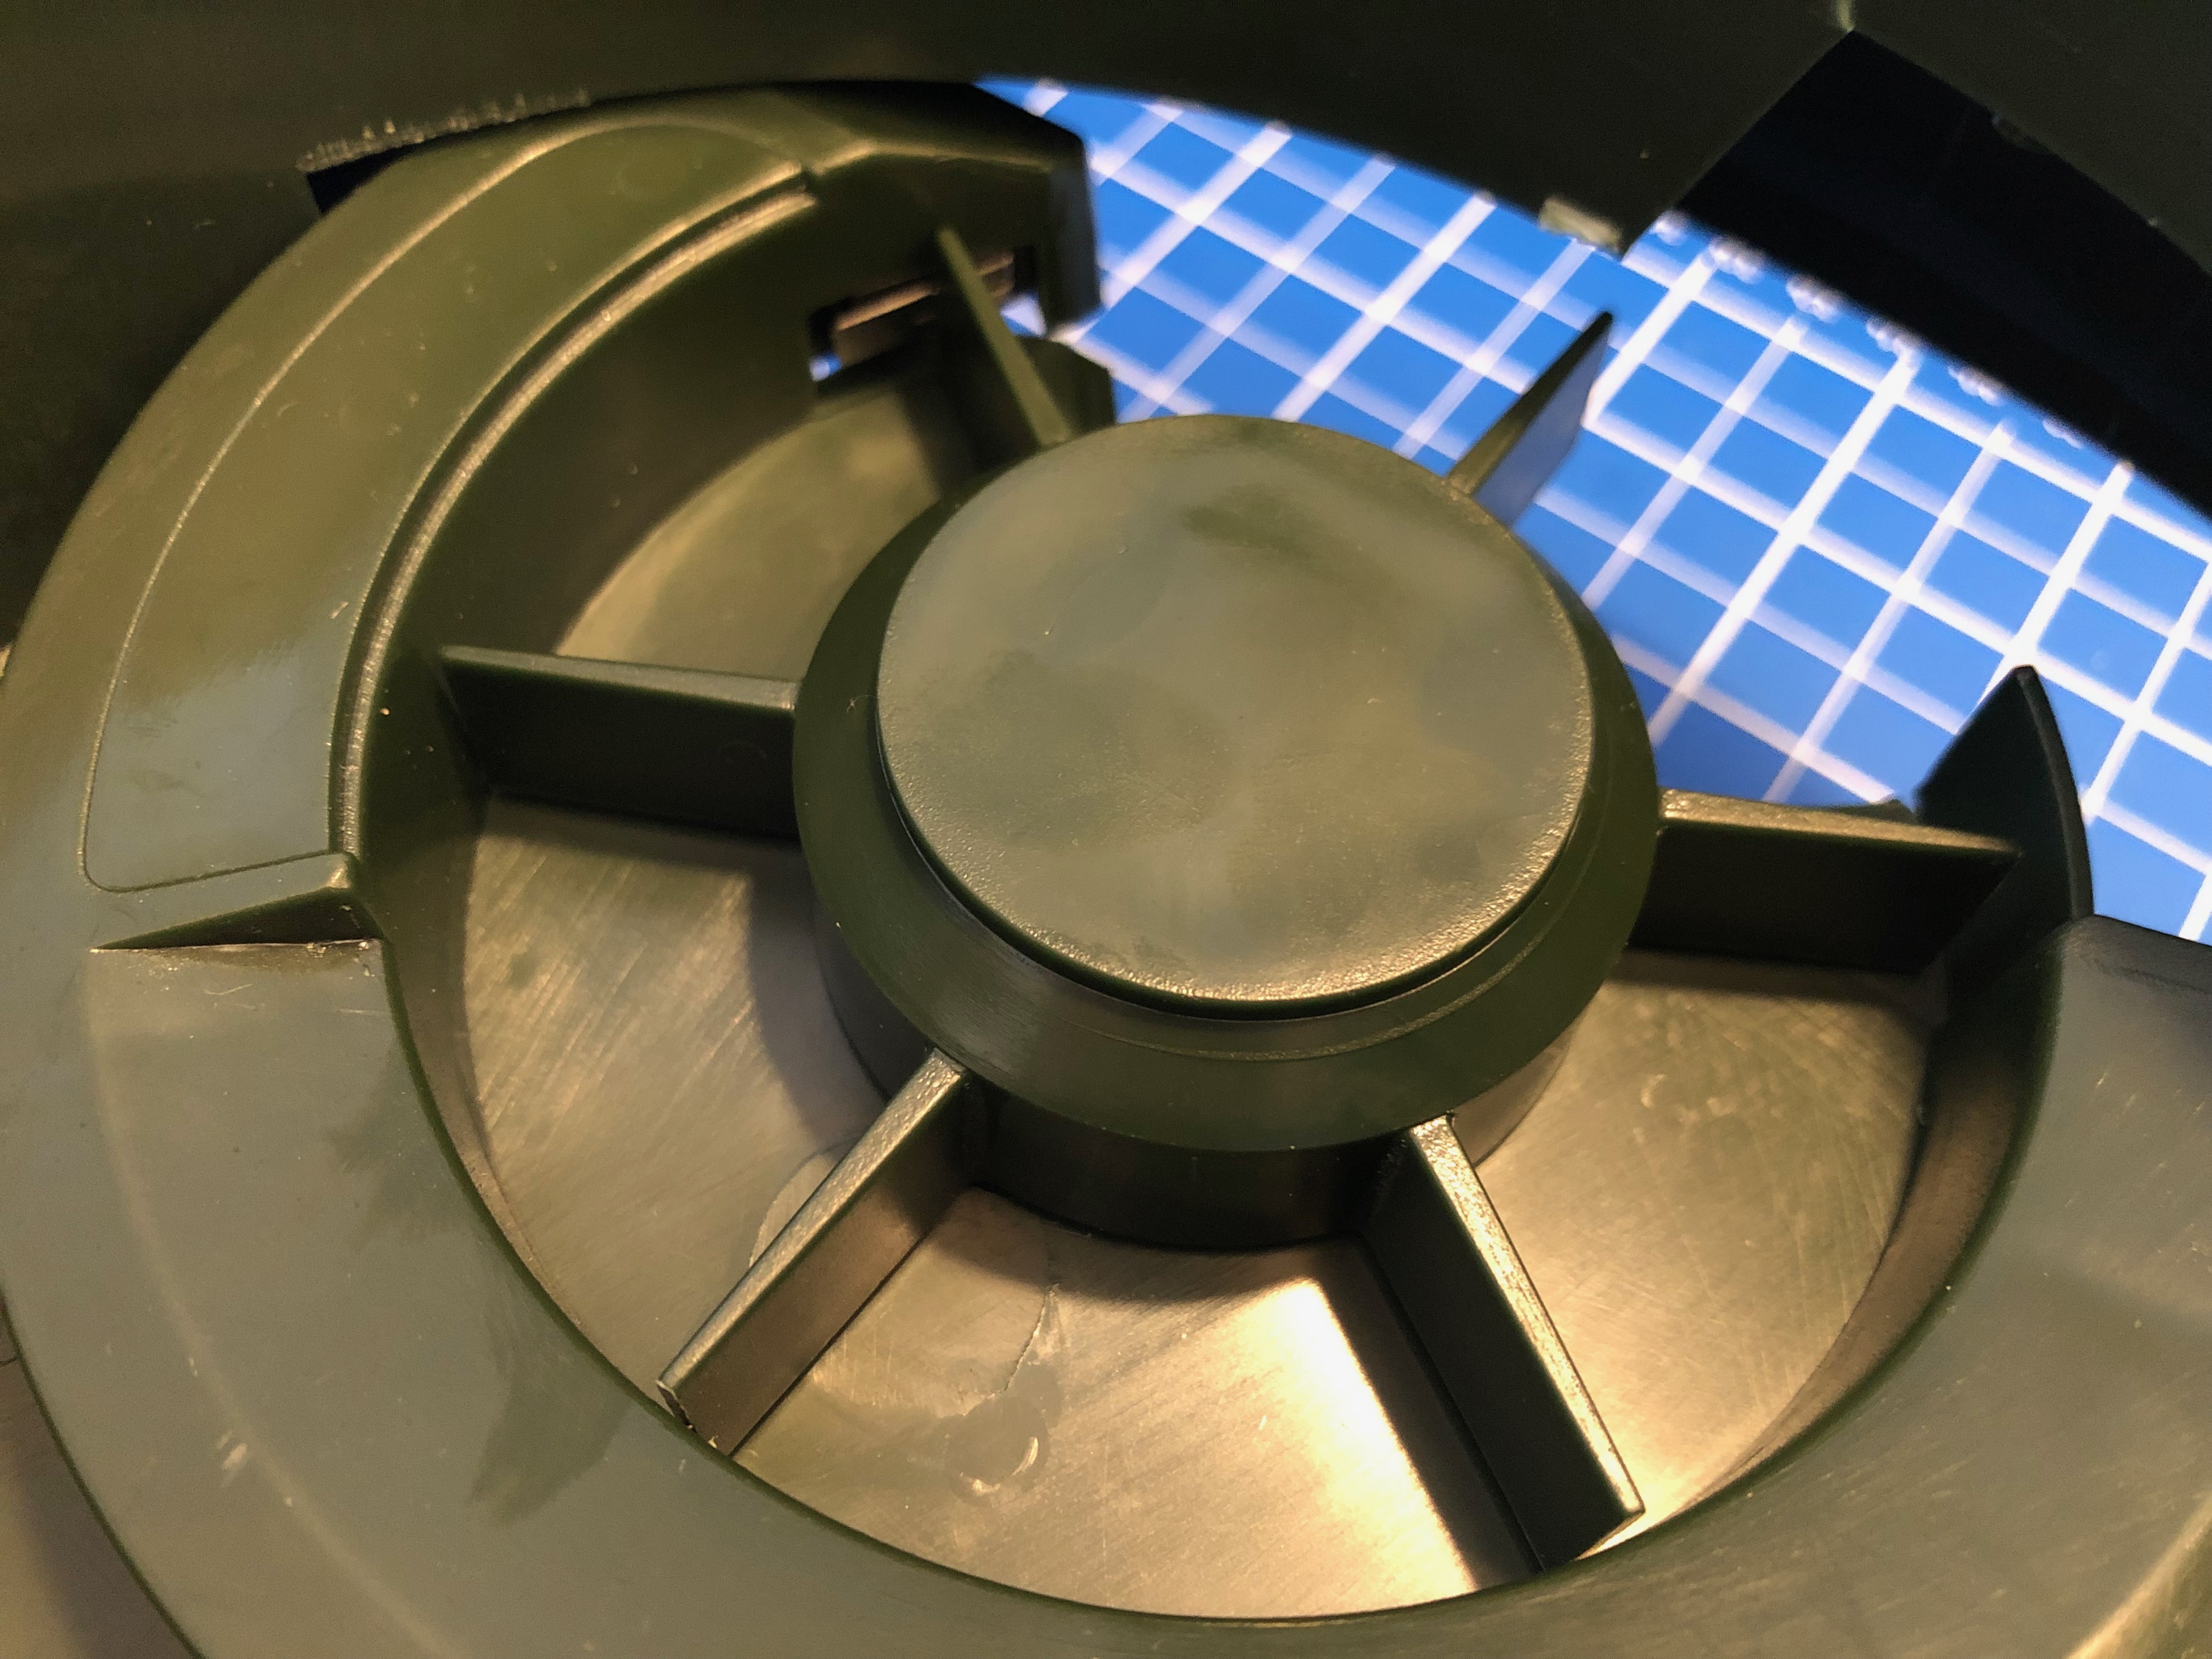
The functional principle of the feeder is rather simple:
- turn the feeder wheel
- take the micro-switch status in account – when it’s pressed down the wheel must be pushing against it
- turn it until the micro-switch is not pressed anymore
- turn some more until it’s pressed again
Simple. Since the switch-status is not known on power loss / reboot a calibration run is necessary (even with the factory electronics) every time it boots up.
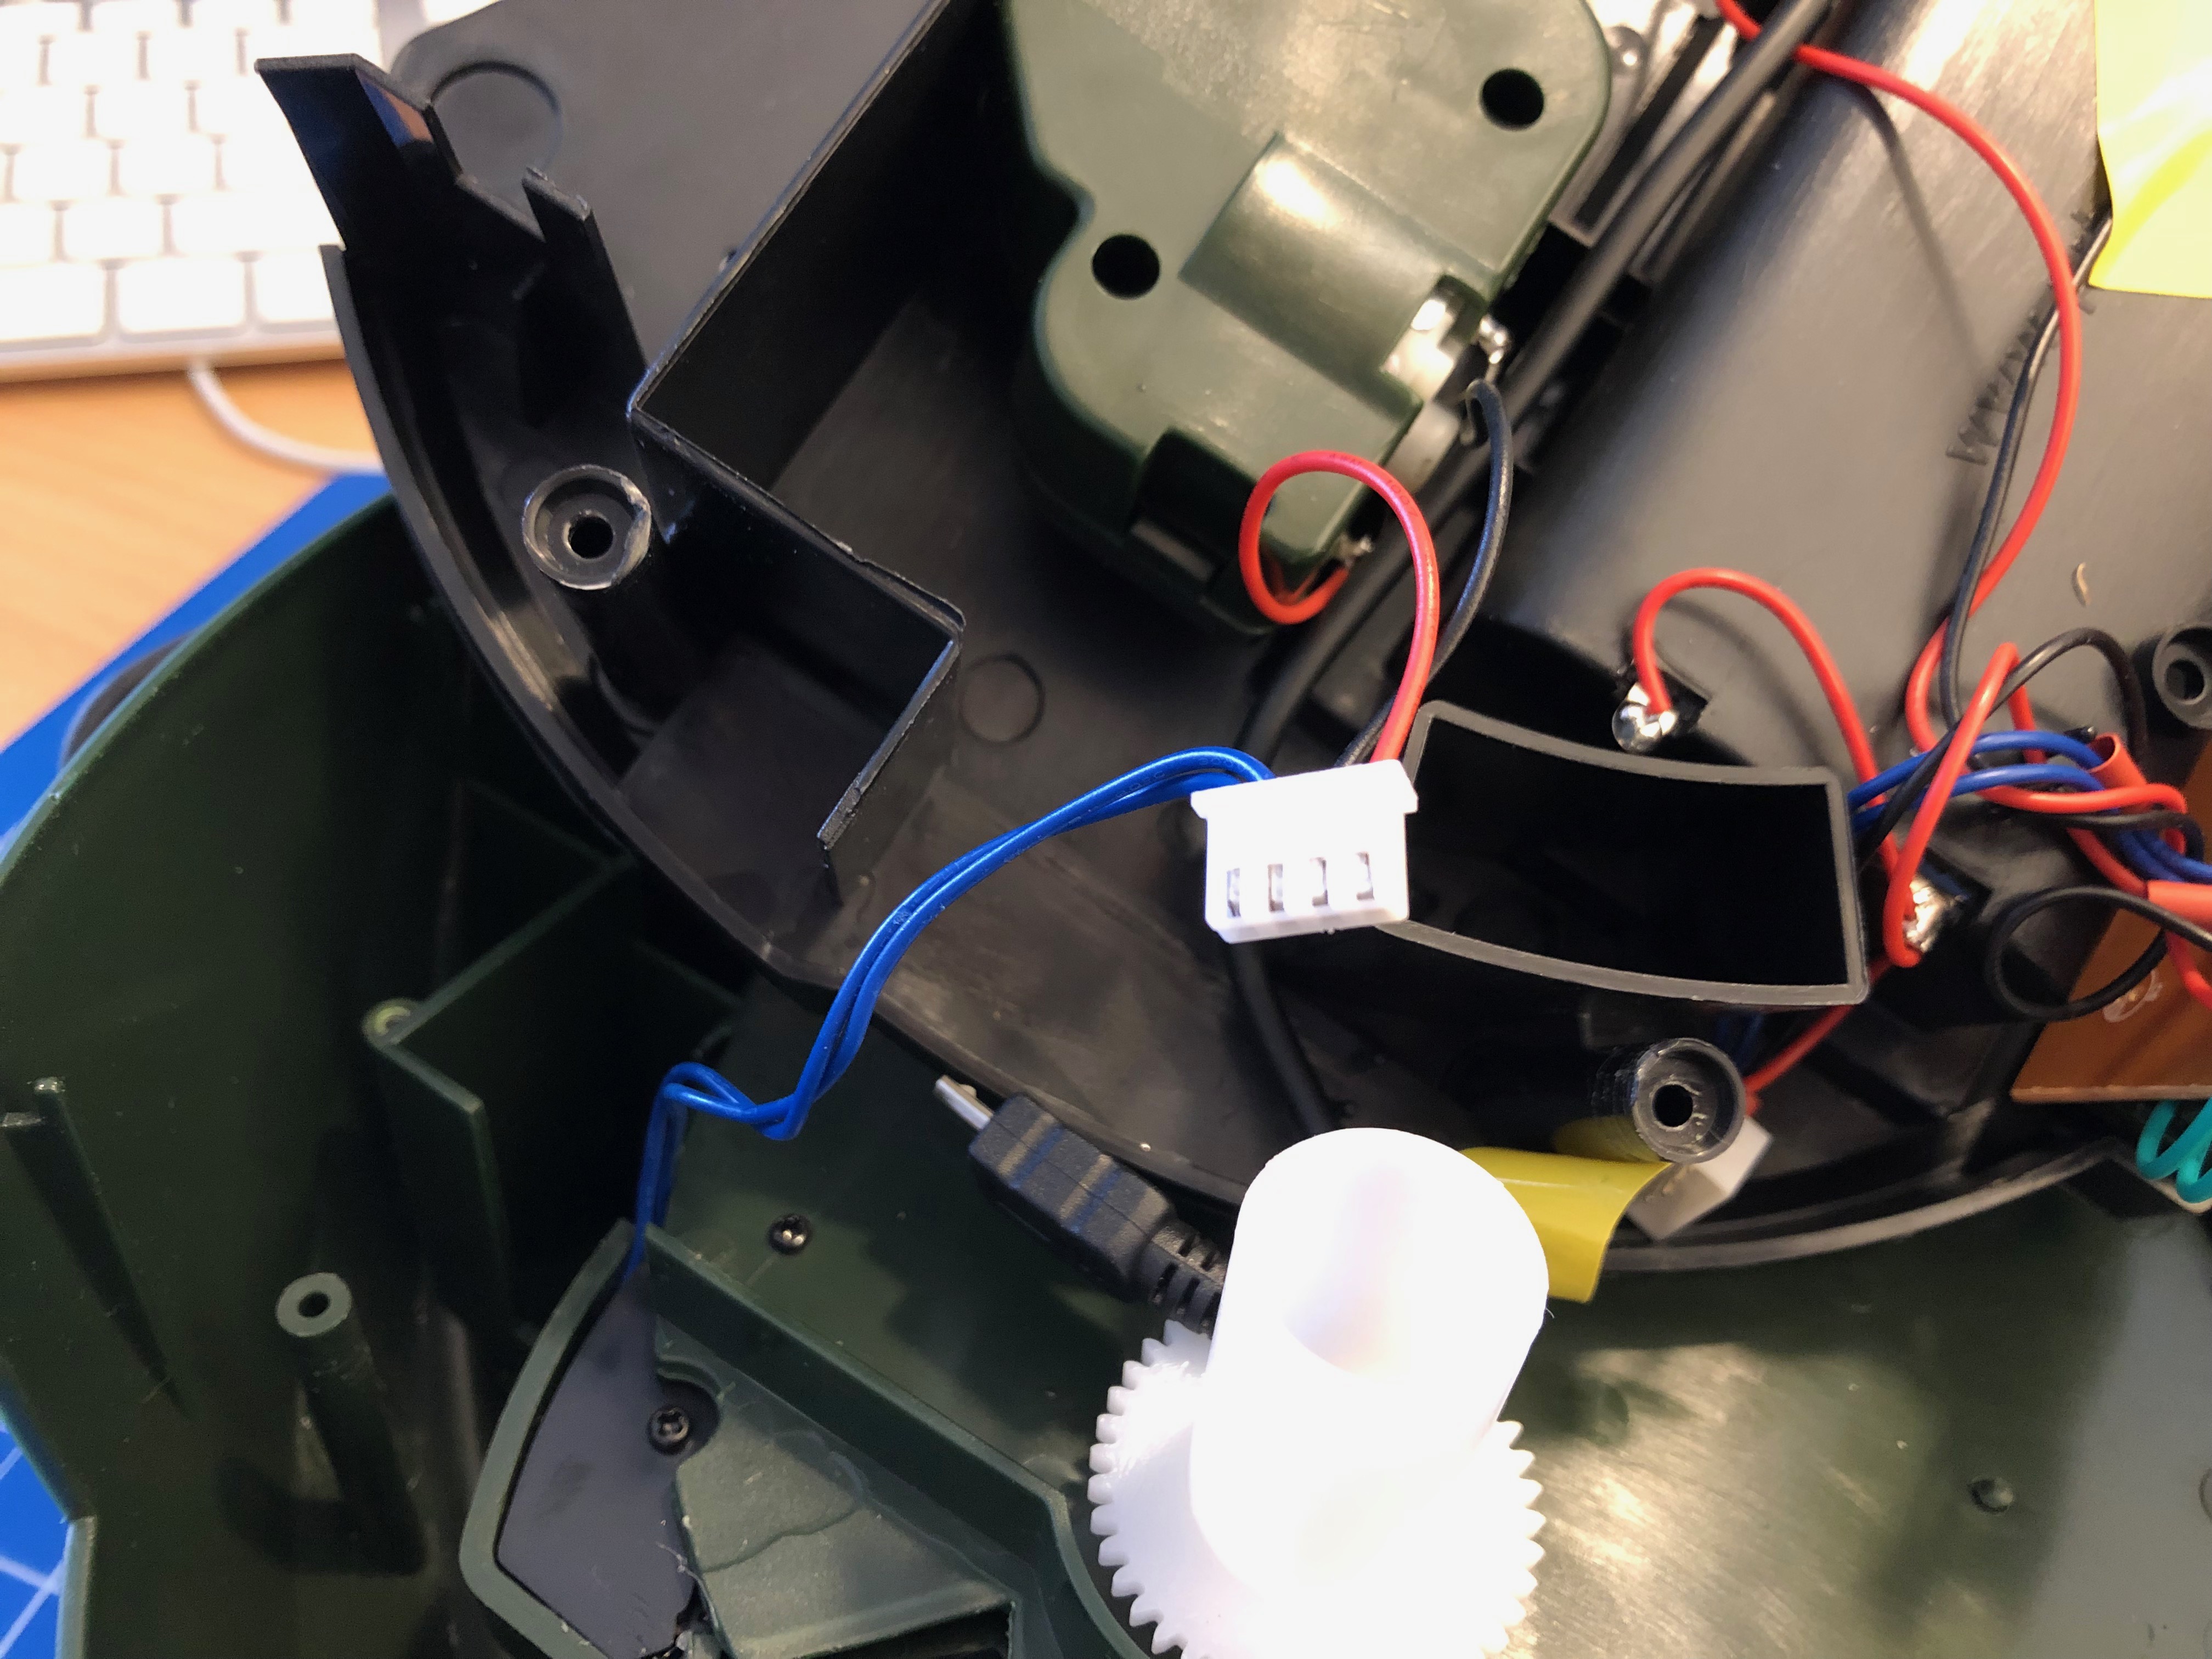
After opening the feeder I’ve cut the two cables going to the motor as well as the micro-switch cables. I’ve added a 4-Pin JST-XH connector to both ends. So I can reconnect it to original state if desired.
These are all the parts needed:
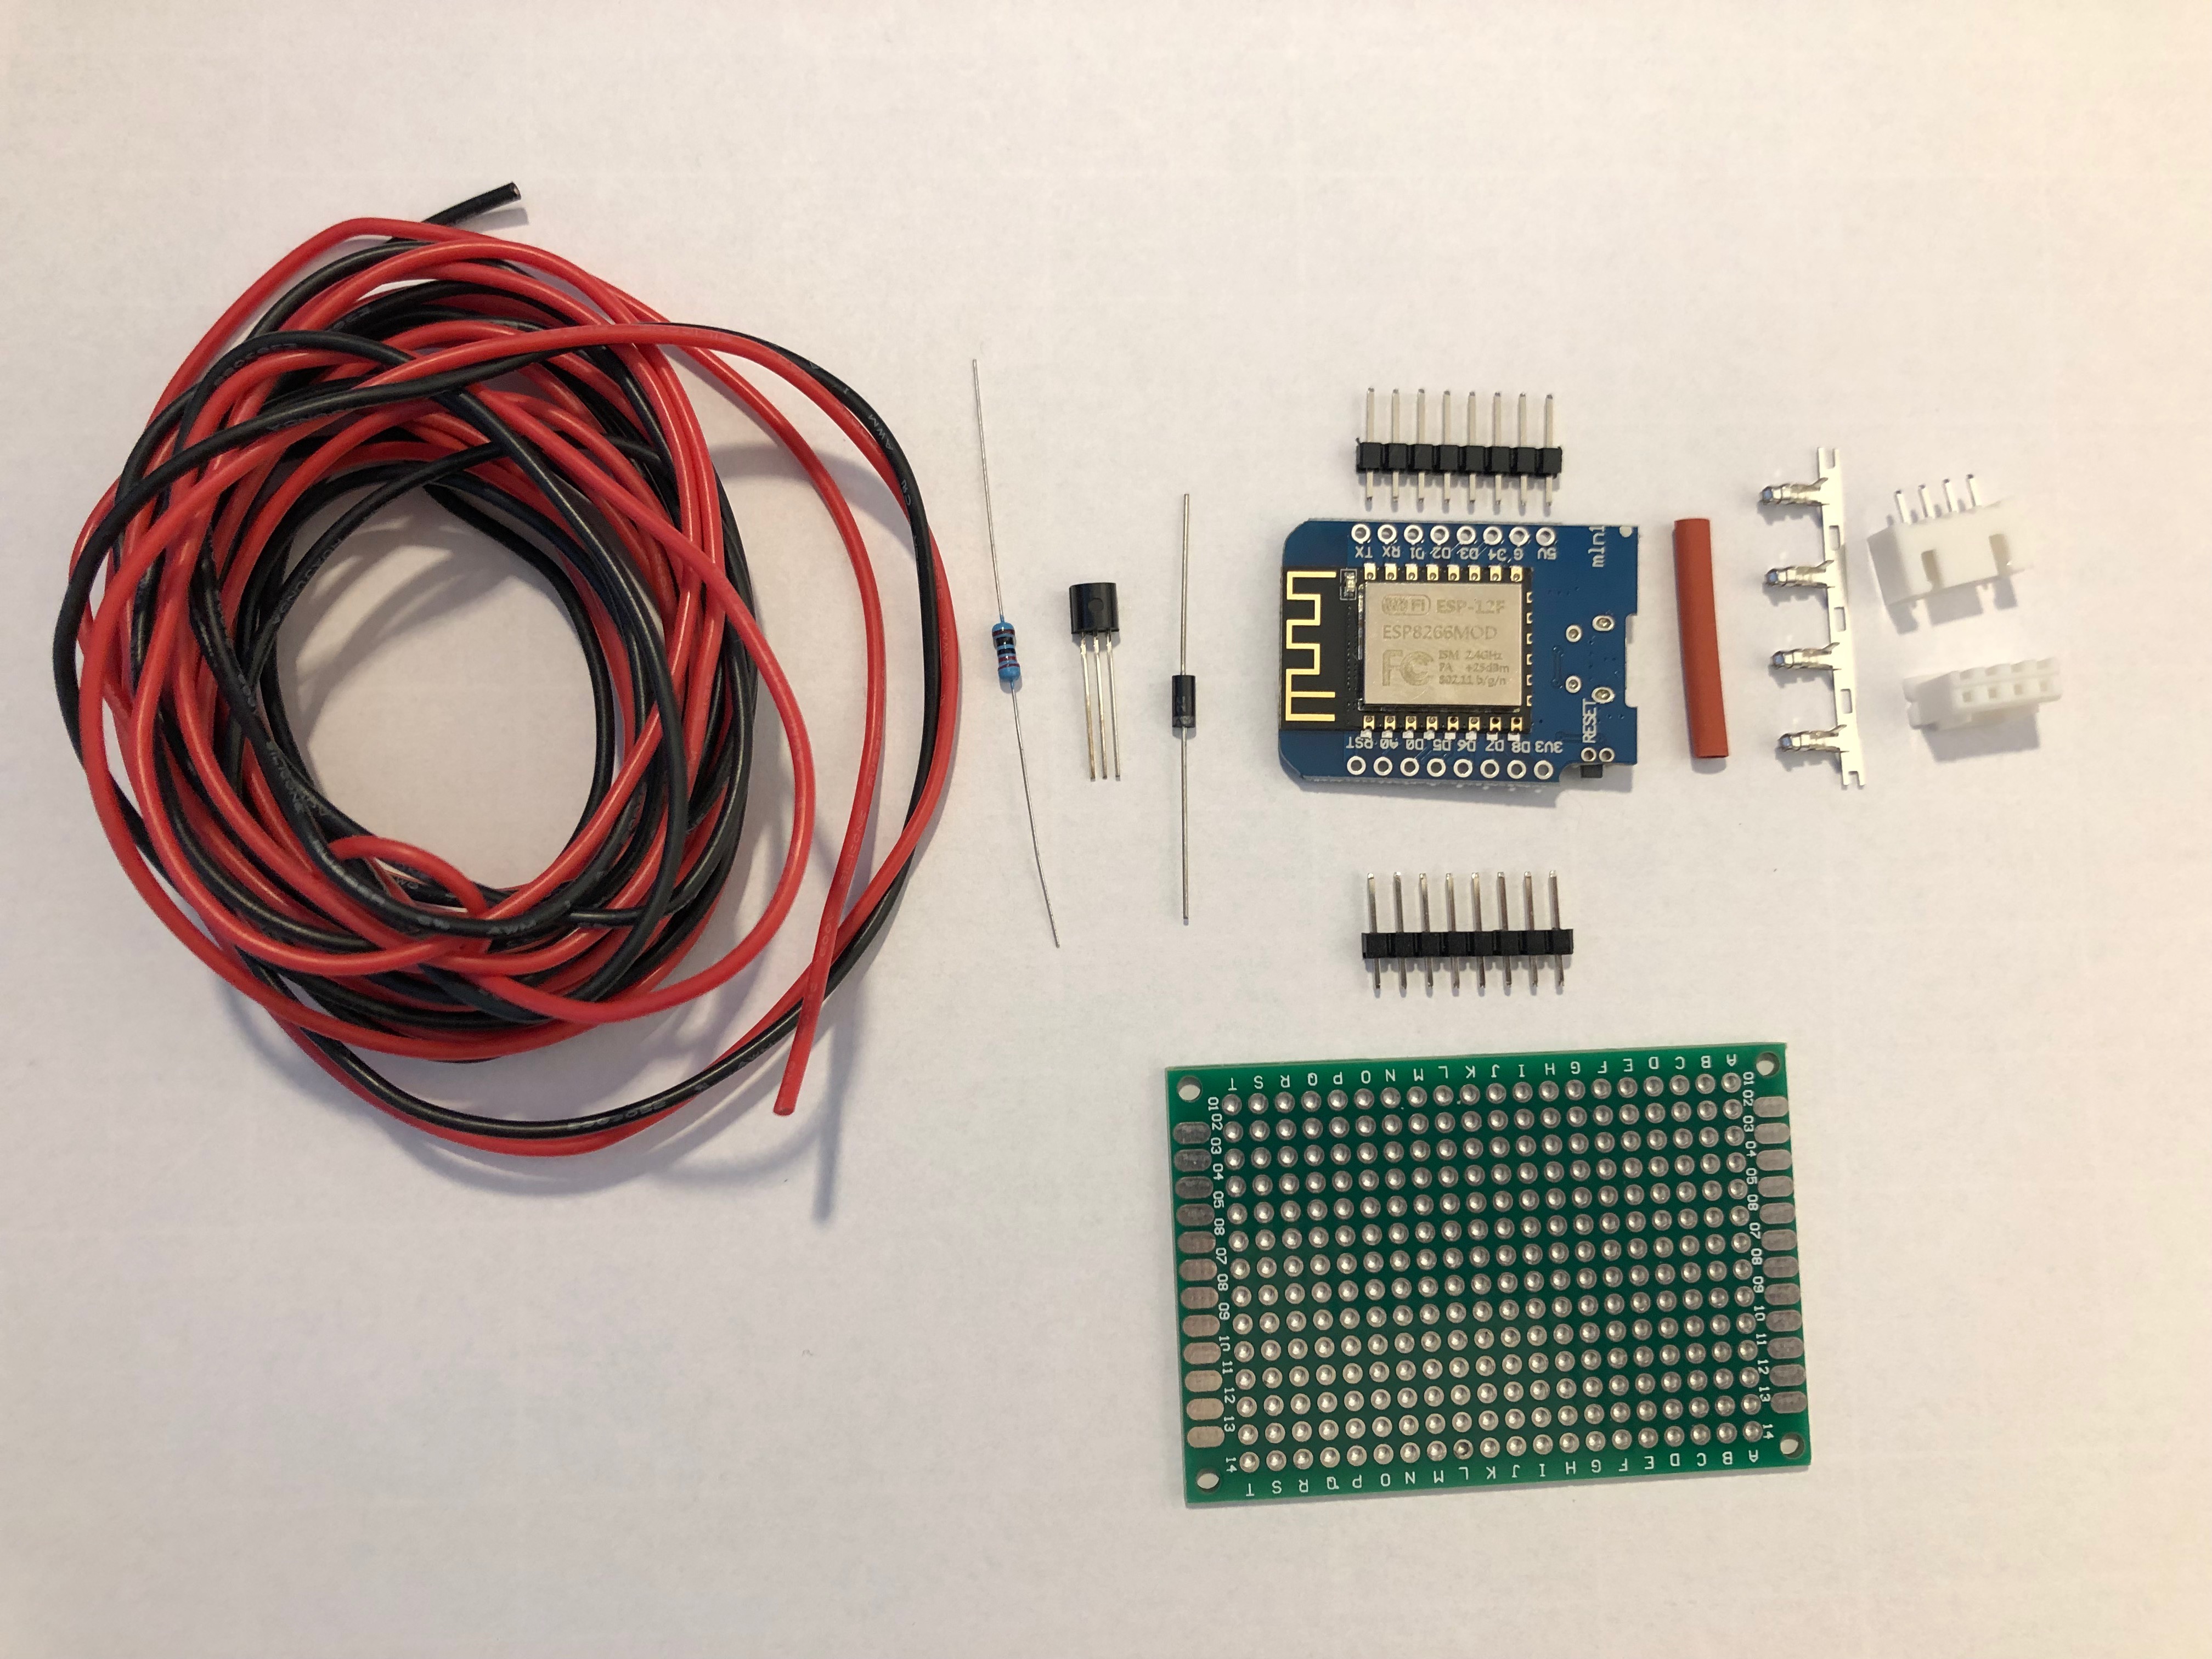
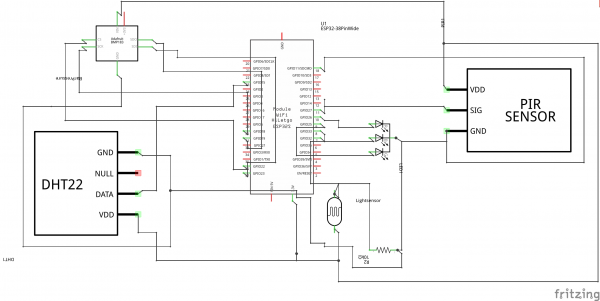
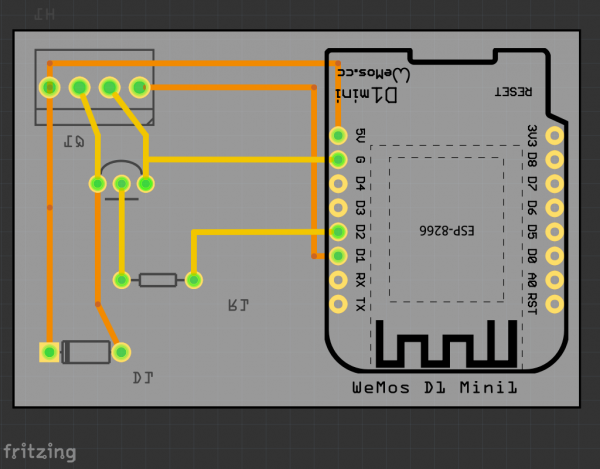
I am using a Wemos D1 Mini and a couple of additional components apart from the prototype board:
A PN2222 NPN transistor, a rectifier diode 1N4007 and a 220 Ohm resistor.
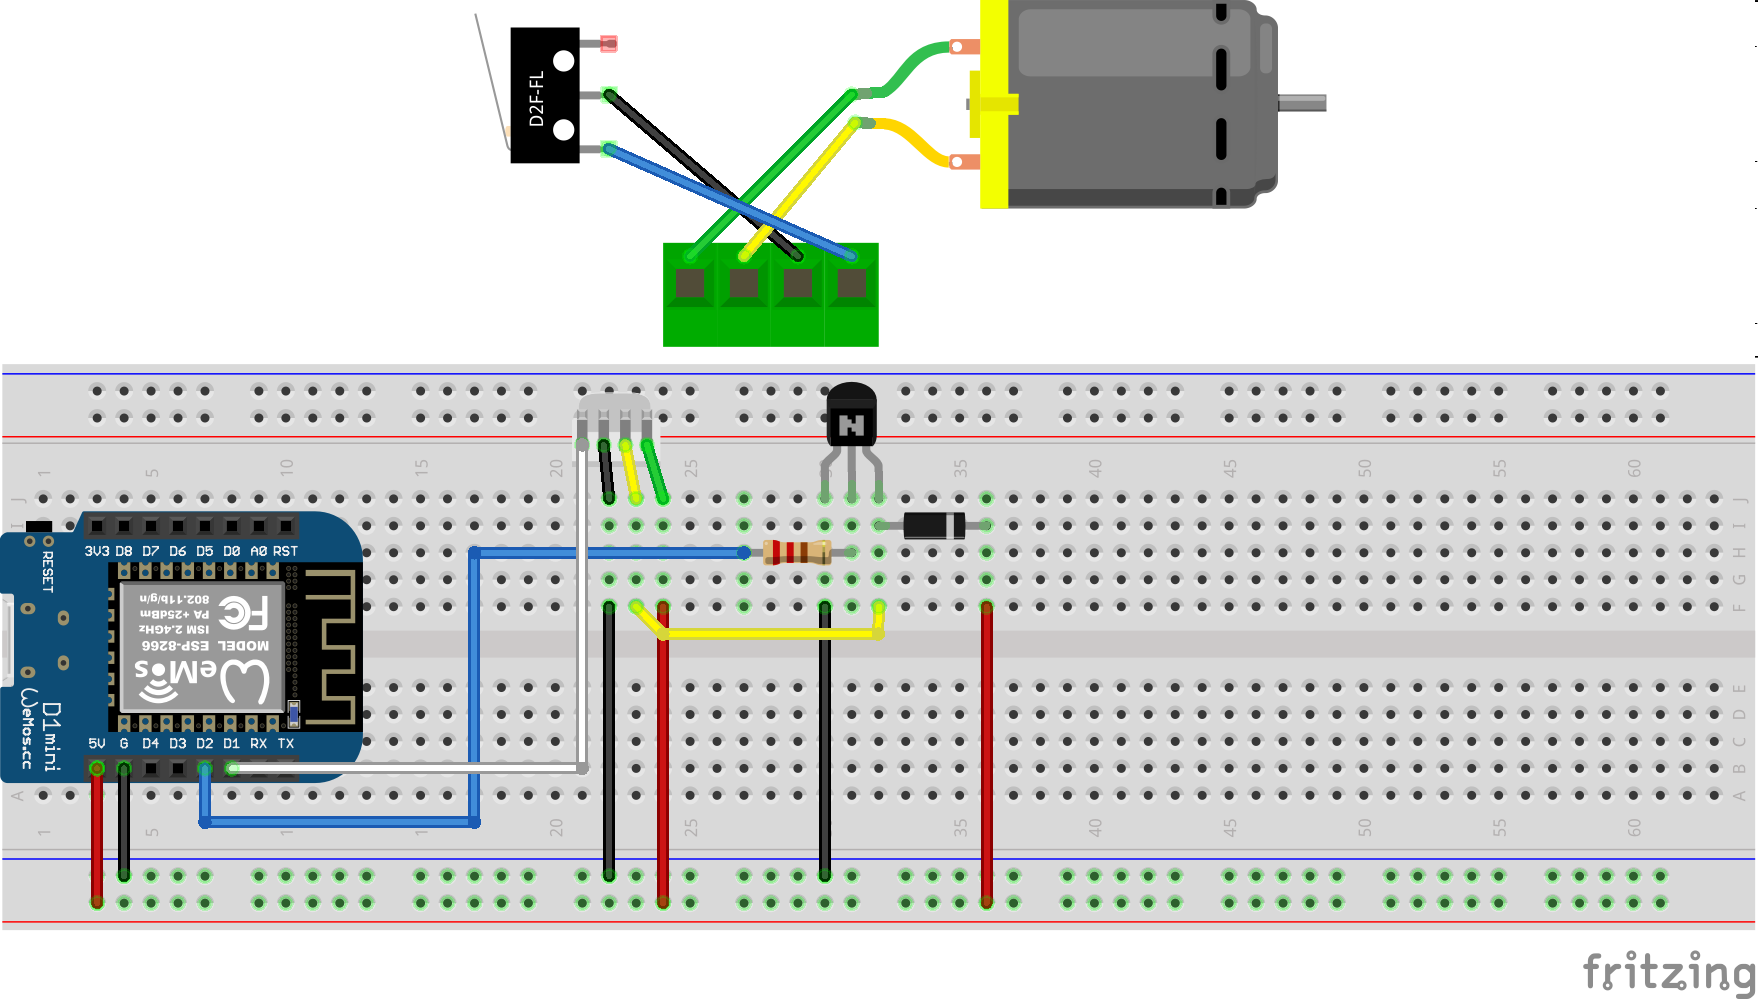
I’ve connected everything according to this schematic I’ve drawn with Fritzing:
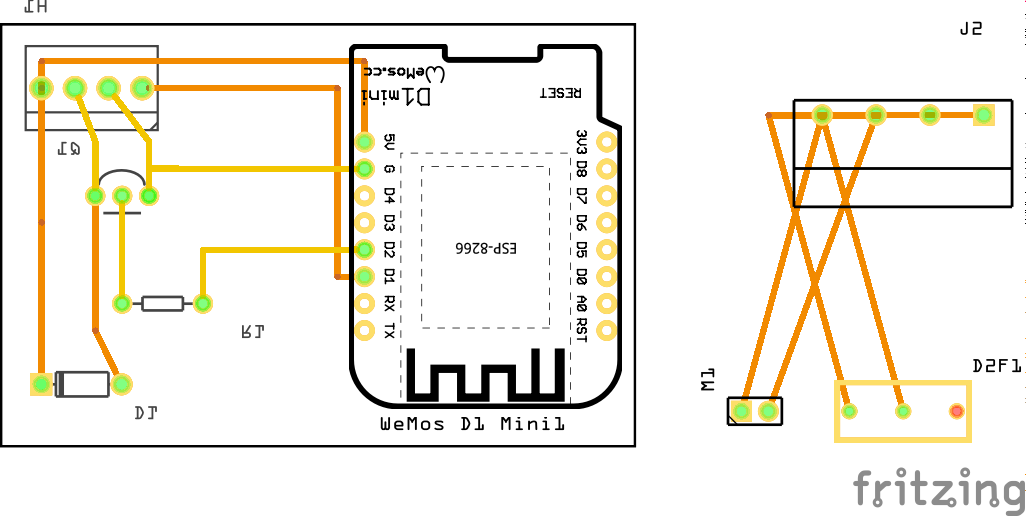
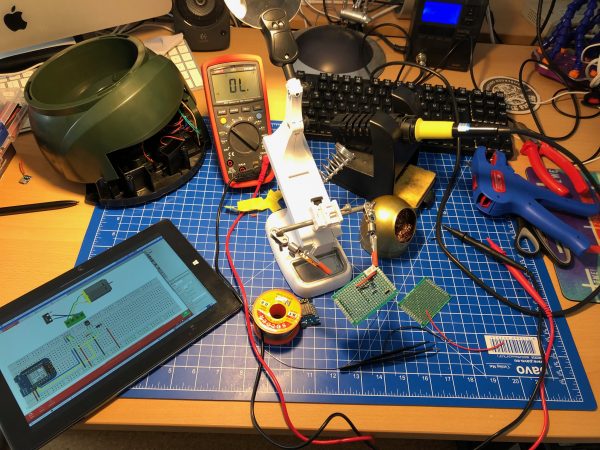
I’ve then prototyped away and put everything on the PCB. Of course with very limited solderig skill:
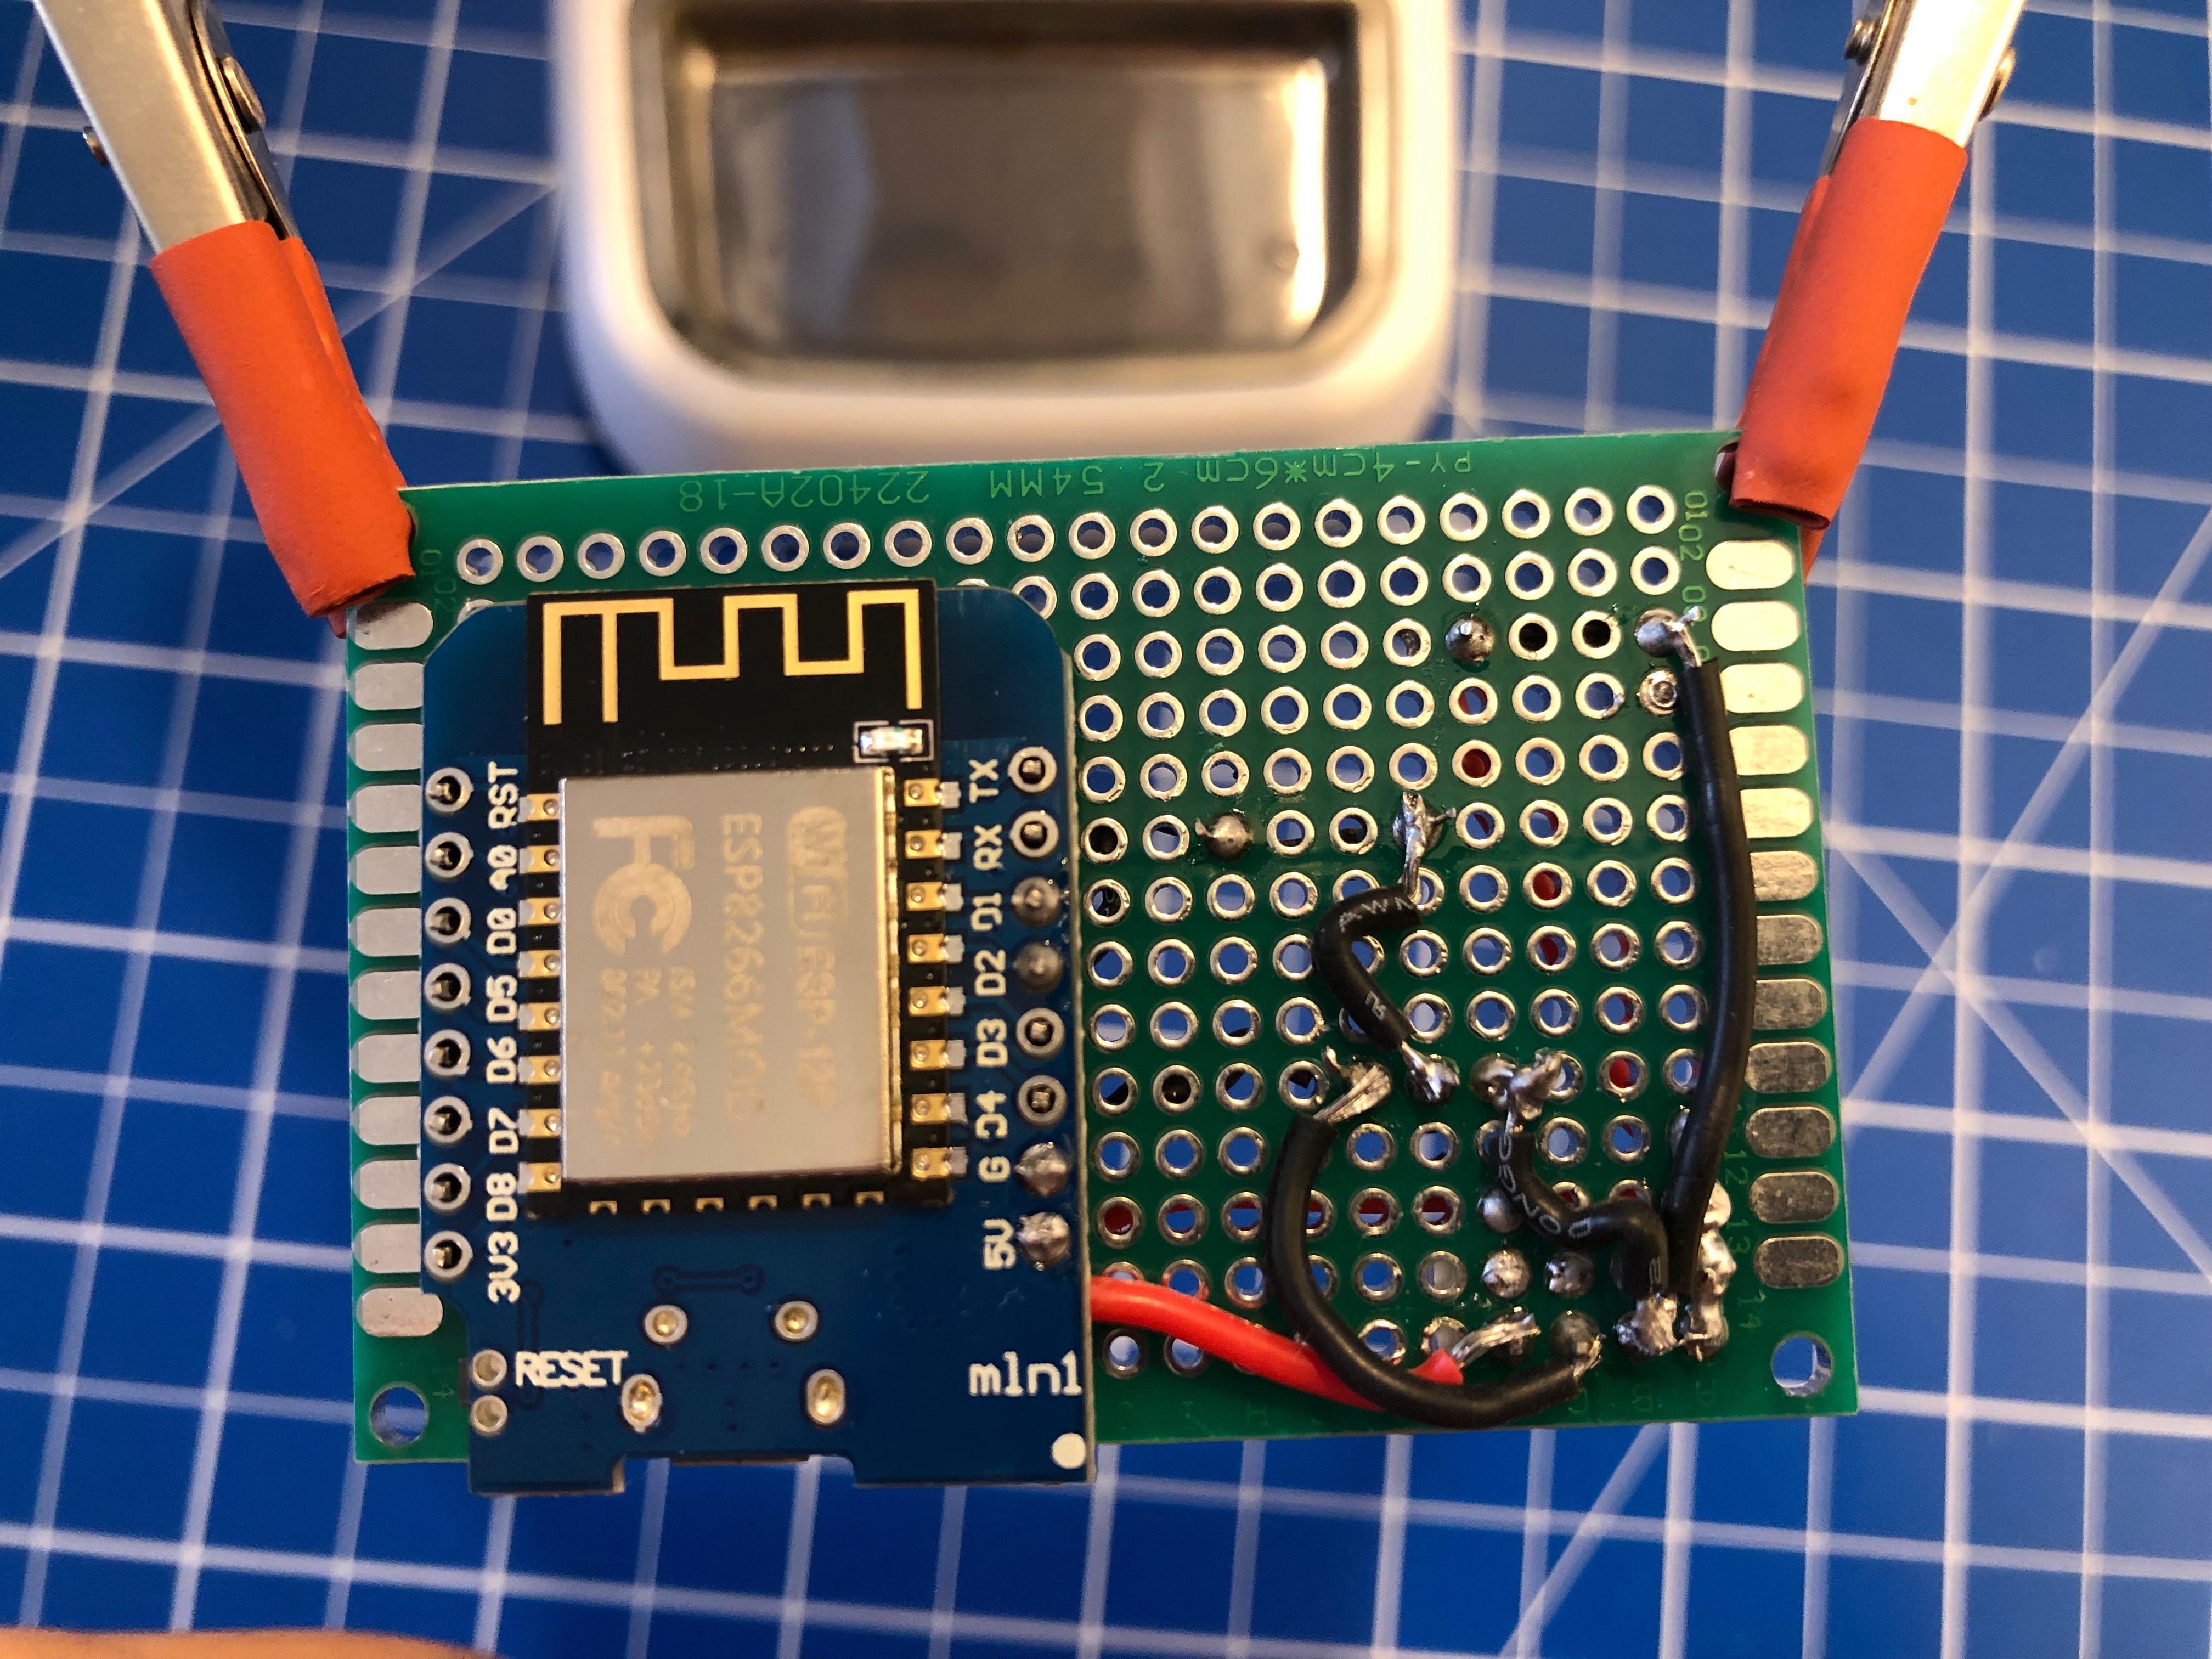
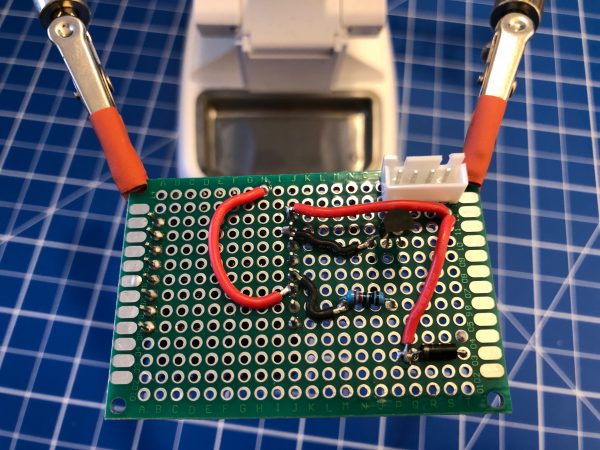
As you can see the JST-XH connector on Motor+Switch can now be connected easily to the PCB with all the parts.
Make sure you check polarity and that you did correctly hook up the motor and switch.
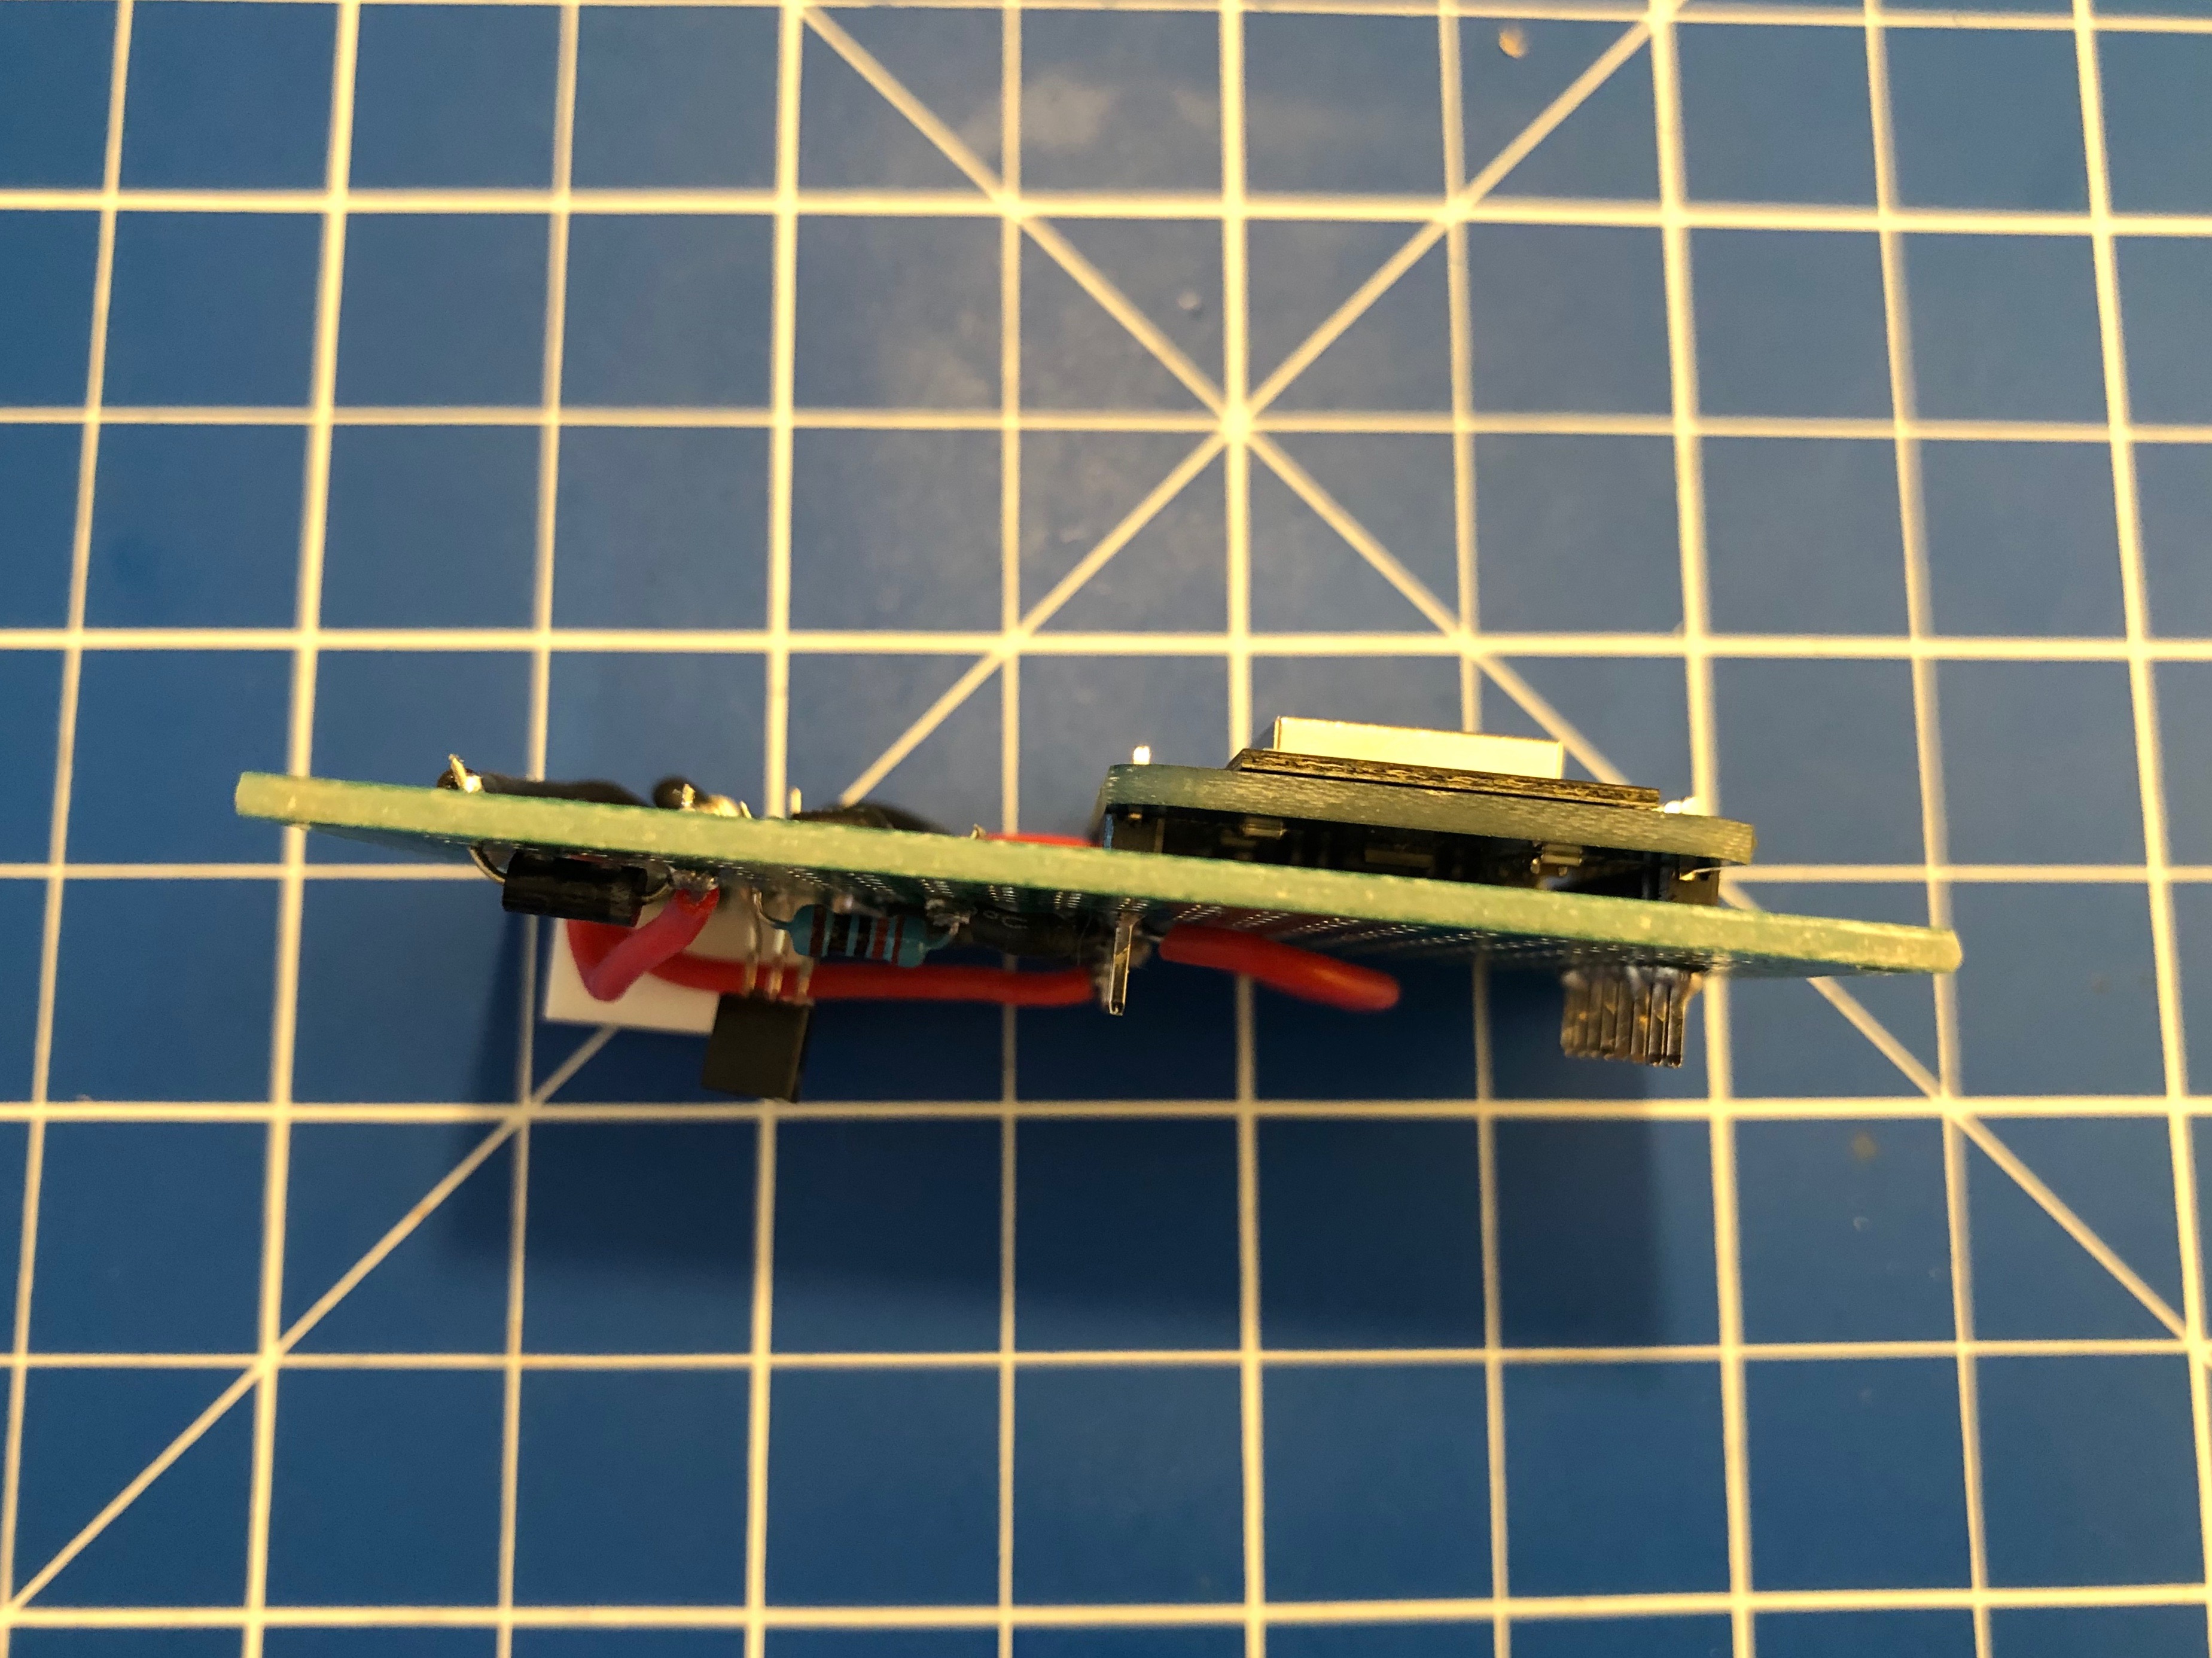
When done correctly the PCB (I’ve used 40mm x 60mm prototype pcb) and all cables will fit into the case. There’s plenty of room and I’ve put it to the side of it. I’ve also directly connected an USB cable to the USB port of the Wemos D1 Mini. As long as you put at least 1A into it it will all work.
Software
Since the Wemos D1 Mini sports an ESP8266 and is well supported by Arduino it was clear to me to use Arduino IDE for the software portion of this project.
Of course everything, from schematics to the sourcecode is available as open source.
To get everything running you need to modify the .ino file in the src folder like so:
Configuration
What you need to configure:
- the output pins you have chosen – D1+D2 are pre-configured
- WiFi SSID + PASS
- MQTT Server (IP(+Username+PW))
- MQTT Topic prefix
Commands that can be sent through mqtt to the /feed topic.
MQTT topics and control
There are overall two MQTT topics:
- $prefix/feeder-$chipid/state
This topic will hold the current state of the feeder. It will show a number starting from 0 up. When the feeder is ready it will be 0. When it’s currently feeding it will be 1 and up – counting down for every successfull turn done. There is an safety cut-off for the motor. If the motor is longer active than configured in the MaximumMotorRuntime variable it will shut-off by itself and set the state to -1. - $prefix/feeder-$chipid/feed
This topic acts as the command topic to start / control the feeding process. If you want to start the process you would send the number of turns you want to happen. So 1 to 5 seems reasonable. The feeder will show the progress in the /state topic. You can update the amount any time to shorten / lengthen the process. On the very first feed request after initial power-up / reboot the feeder will do a calibration run. This is to make sure that all the wheels are in the right position to work flawlessly.
So if you want to make it start feeding 3 times:
mosquitto_pub -t house/stappenbach/feeder/feeder-00F3B839/feed -m 3
And if you want to see the state of the feeder:
mosquitto_sub -v -t house/stappenbach/feeder/feeder-00F3B839/state
All in all there are 3 of these going to be running in our household and the feeding is going to be controlled either by Alexa voice commands or through Node-Red automation.
Hack-the-Planet Podcast: Episode 005
Turtle Feeder is coming.
I am still working on it – but it is coming together nicely. During the next vacation our fish tanks are going to be well fed.

More soon.
convert text formats
If you need to convert files from one markup format into another, pandoc is your swiss-army knife
https://pandoc.org/
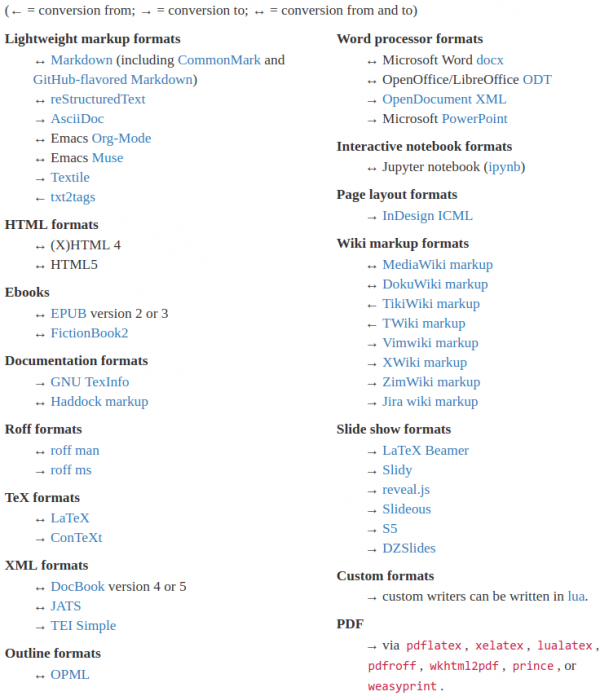
Of course it’s open source – and of course there’s a docker image for it.
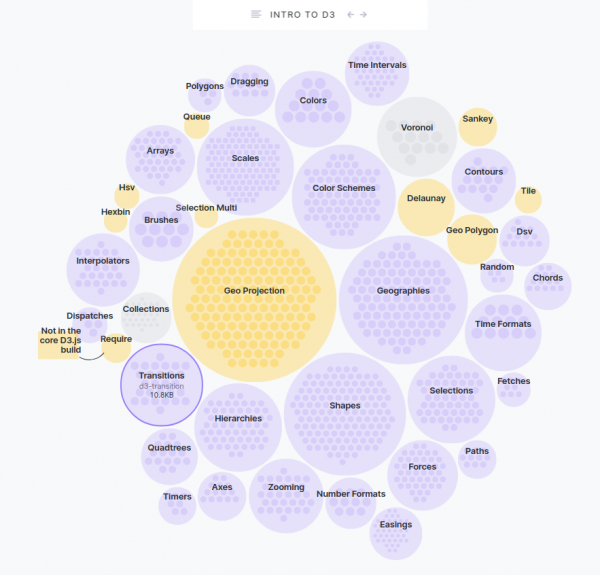
An Introduction to D3.js
Browsers can do many things. It’s probably your main window into the vast internet. Lots of things need visualization. And if you want to know how it’s done, maybe do one yourself, then…
D3.js is a JavaScript library for manipulating documents based on data. D3 helps you bring data to life using HTML, SVG, and CSS. D3’s emphasis on web standards gives you the full capabilities of modern browsers without tying yourself to a proprietary framework, combining powerful visualization components and a data-driven approach to DOM manipulation.
D3.js
And to further learn what it’s all about, go to Amelia Wattenbergers blog and take a stroll:
So, you want to create amazing data visualizations on the web and you keep hearing about D3.js. But what is D3.js, and how can you learn it? Let’s start with the question: What is D3?
An Introduction to D3.js
While it might seem like D3.js is an all-encompassing framework, it’s really just a collection of small modules. Here are all of the modules: each is visualized as a circle – larger circles are modules with larger file sizes.
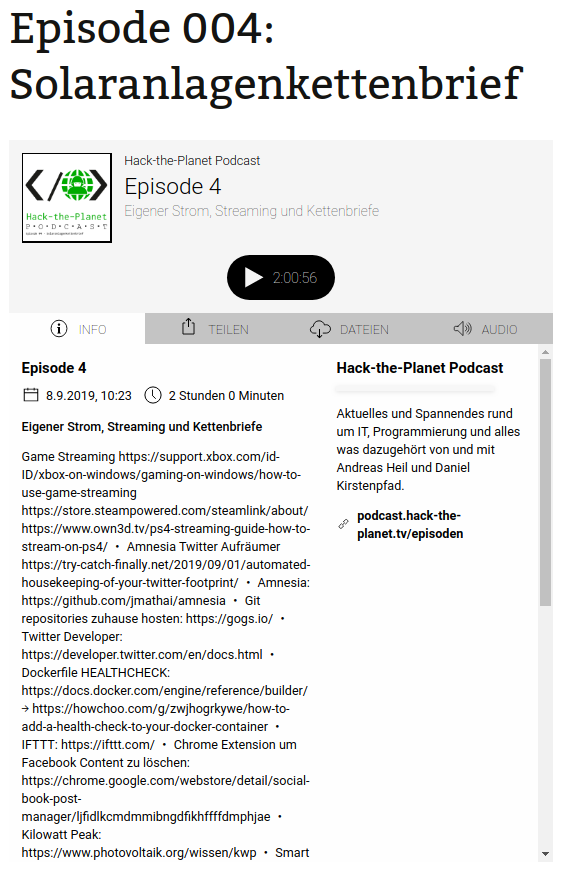
Hack-The-Planet Podcast: Episode 004
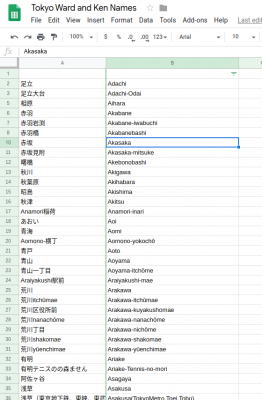
text replacements for Tokyo ward and kens on iOS and macOS
I am having a hard time learning japanese and reading/writing the kanji especially.
Having to write japanese city names frequently (for example when doing searches) I still do remember the spoken out version of the name but I do not quite yet remember the kanji version. Also I do not want to switch back and forth in keyboard languages.
For this, especially in macOS and iOS there is a nice way around this. With the built-in “Text Replacement” feature of your Mac or iPhone/iPad you can easily mass-import a mapping between the romanized version of a word and the japanese written out kanji version of that word.
While you are typing then you will be presented with recommendation text replacements, effectively the kanjis of what you’ve just tried to write.

Unfortunately I do not know a way how to mass-import these text-replacements on iOS.
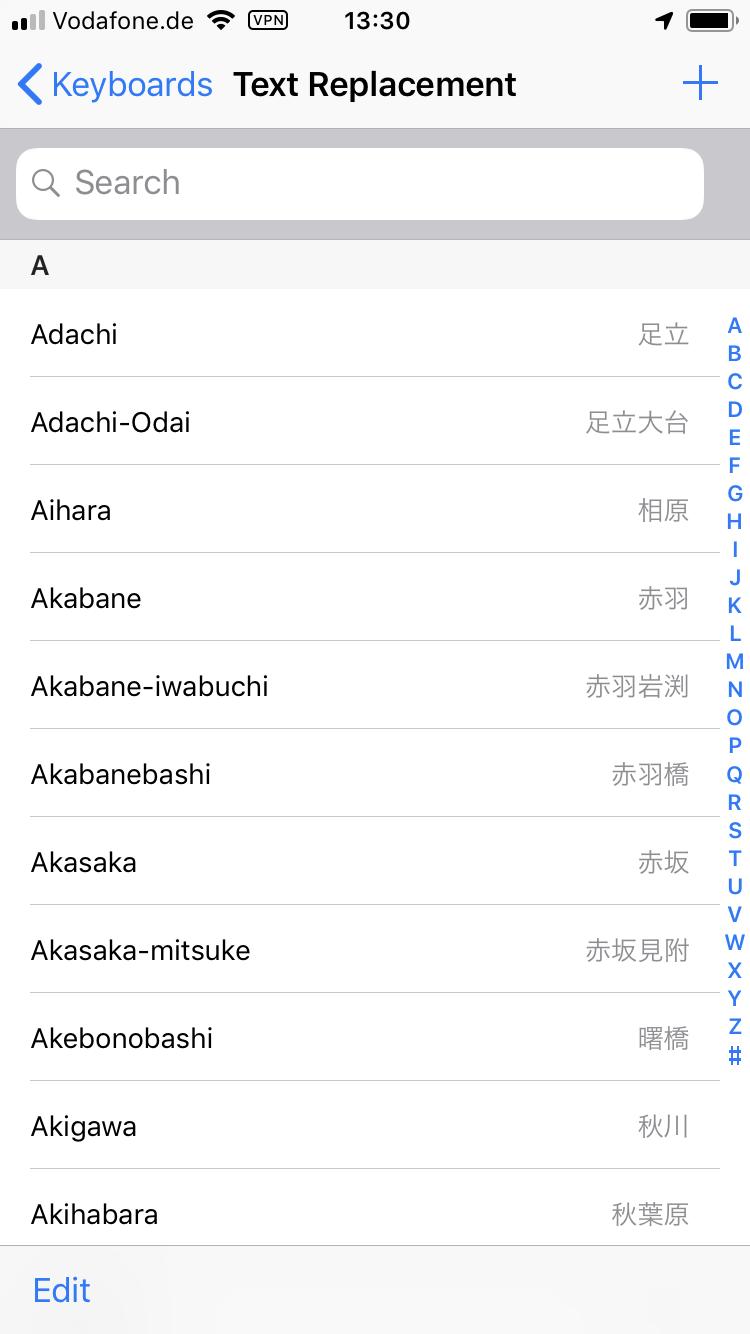
But if you own a macOS computer and you have it synced over iCloud with your mobile phone or tablet you will likely be able to open the text replacement pane in your system settings and import this plist file into it. Simply drag the file (after unzipping the ZIP file) into the text replacement window.
Download the Tokyo-Text-Replacement.zip file. Extract it (double clicking). And drag the .plist file into the Text Replacement Window.
For you to derive your own files you can find the raw data, a list of all designated Ken and Ward names in Tokyo here:
nodes – a new way to create with code
In Nodes you write programs by connecting “blocks” of code. Each node – as we refer to them – is a self contained piece of functionality like loading a file, rendering a 3D geometry or tracking the position of the mouse. The source code can be as big or as tiny as you like. We’ve seen some of ours ranging from 5 lines of code to the thousands. Conceptual/functional separation is usually more important.
Nodes.io
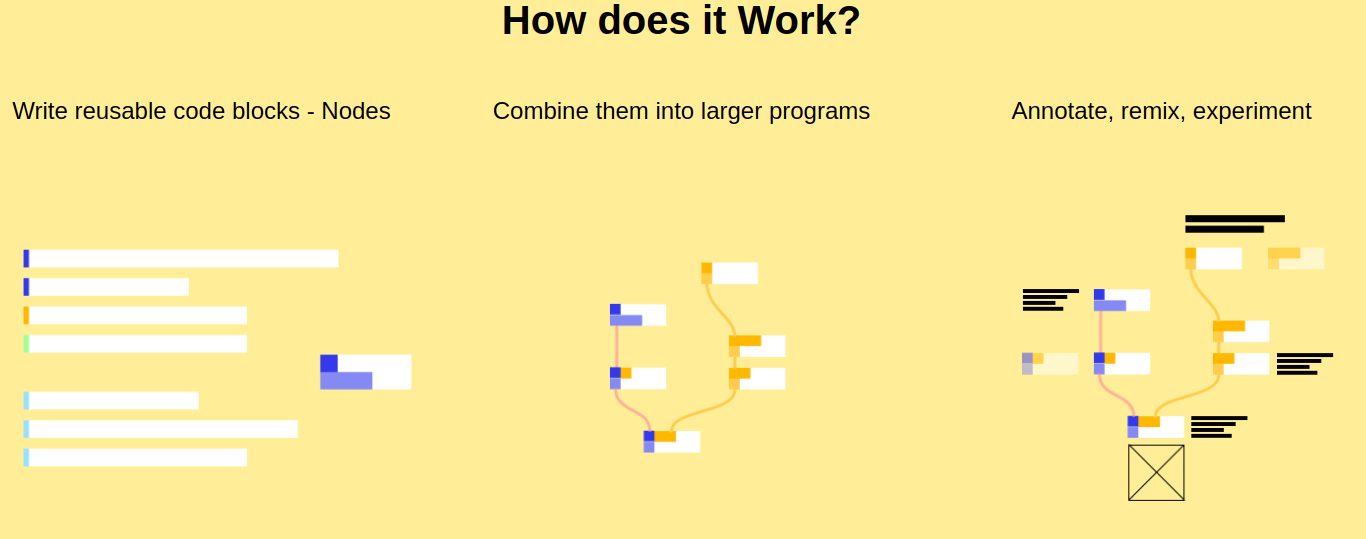
Nodes* is a JavaScript-based 2D canvas for computational thinking. It’s powered by the npm ecosystem and lives on the web. We take inspiration from popular node-based tools but strive to bring the visual interface and textual code closer together while also encouraging patterns that aid the programmer in the prototype and exploratory stage of their process.
*(not to be confused with node.js)
the appropriate case for your hackintosh
It’s been a year since Zenvent posted this:
Created a custom case for my hackintosh, it resembles a minified Power Mac G5. I have uploaded the parts to Thingiverse in case you’d like to make one of your own.
https://www.zenvent.com/blog/hackintosh/

A Hackintosh (a portmanteau of “Hack” and “Macintosh”), is a computer that runs macOS on a device not authorized by Apple, or one that no longer receives official software updates.
https://en.wikipedia.org/wiki/Hackintosh
Hang around Buresloth!
The 27th Day of the Season of Bureaucracy: The Day of the Sloth, Holy Day of Slothage. Kick back. Hang around. Grow Moss.
Sloth-day
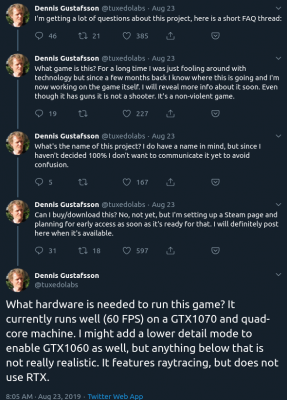
Raytraced Voxel Physics
The amount of computing power available in todays hardware is reaching levels where raytracing and high detail physics simulations are in reach.
Dennis Gustafsson shared on his Twitter and blog some insights and videos of his experiments and implementations. Be astonished:
Hack-The-Planet Podcast: Episode 003
Wir haben wieder etwas aufgenommen. Der Release heute ab 15 Uhr wie gewohnt hier und hier sogar mit Live-Chat.
Diesmal geht es um:
- Scanner Pro auf iOS – https://apps.apple.com/us/app/scanner-pro/id333710667
- Scanbot auf iOS – https://scanbot.io/en/index.html
- Abo-Modelle bei Software und Diensten
- RING Kamera und Überwachungssystem – https://de-de.ring.com/
- Canary Indoor Camera – https://canary.is/
- Surveillance Station – https://www.synology.com/en-global/surveillance
- Ring has more than 400 police “partnerships” – https://arstechnica.com/tech-policy/2019/08/ring-has-more-than-400-police-partnerships-company-finally-says/
- Jumbo Privacy – https://blog.jumboprivacy.com/ – App Store: https://apps.apple.com/us/app/jumbo-privacy/id1454039975?ls=1
- Tim Berners-Lee Projekt “Solid”: https://solid.mit.edu/ – https://en.wikipedia.org/wiki/Solid_(web_decentralization_project) – https://solid.inrupt.com/how-it-works
- Ubuntu – https://ubuntu.com/
- Throw-Away Remote VNC Linux Desktop in a Docker container – https://www.schrankmonster.de/2019/08/27/a-throw-away-linux-desktop-in-a-container/
- Virtual Network Computing – https://en.wikipedia.org/wiki/Virtual_Network_Computing
- Stephen Wolfram – https://blog.stephenwolfram.com/
- Speed of Light in Medium – https://en.wikipedia.org/wiki/Speed_of_light
cross-platform NES emulator written in C#

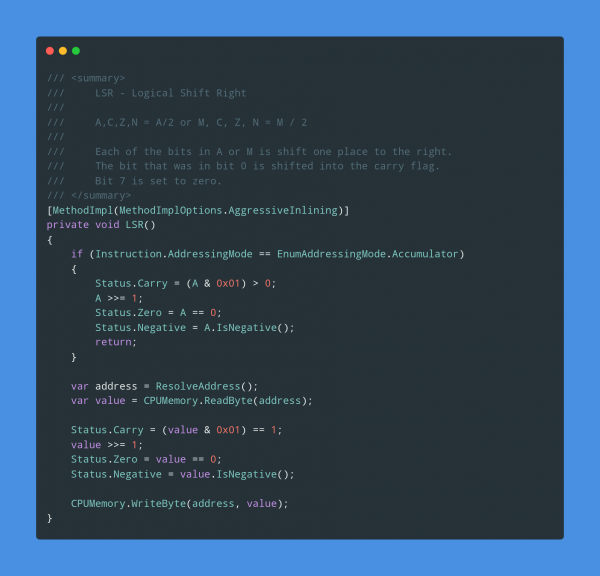
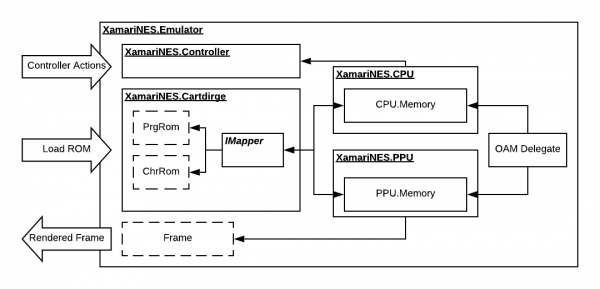
XamariNES is a cross-platform Nintendo Emulator using .Net Standard written in C#. This project started initially as a nighits/weekend project of mine to better understand the MOS 6502 processor in the original Nintendo Entertainment System. The CPU itself didn’t take long working on it a couple hours here and there. I decided once the CPU was completed, how hard could it be just to take it to next step and do the PPU? Here we are a year later and I finally think I have the PPU in a semi-working state.
XamaiNES
If you ever wanted to start looking at and understand emulation this might be a starting point for you. With the high-level C# being used to describe and implement actual existing hardware – like the NES CPU:
The author does the full circle and everything you’d expect from a simple working emulator is there:
Functional Threshold Power
I am cycling for fun and for the effect it has on my body and well-being. I do about 30km of cycling every day on average.
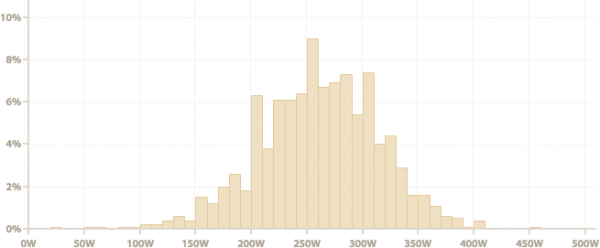
After my first stationary trainer broke I bought a new one with the capability to measure wattage and also to apply resistance measured by the watt.
After looking at my average speeds, heart-rates and times on the device I was able to build a quite detailed understanding of the broader picture. What effects my power output and what does not. The effects of nutrition and health to what the body will deliver while being asked the exact same power output curve than the last time.
In a nutshell the numbers tell me that I am usually at a mediocre wattage of 150W constant load doing about 40 km/h average. My reserves usually allow me to go for 1-2 hours without a break doing this.
So far so good. Now I’ve found out from more serious cyclers that there’s something like “Functional Threshold Power“. I do regular have tests at the doctors to check for any heart-rate issues.
Reading about this Functional Threshold Power my curiousity is sparked.
How much could I do? Should I even go for measuring it?
a throw-away remote VNC linux desktop in a docker container
I am running most of my in-house infrastructure based on Docker these days…
Docker is a set of platform-as-a-service (PaaS) products that use operating-system-level virtualization to deliver software in packages called containers. Containers are isolated from one another and bundle their own software, libraries and configuration files; they can communicate with each other through well-defined channels.
All containers are run by a single operating-system kernel and are thus more lightweight than virtual machines.
Wikipedia: Docker
And given the above definition it’s fairly easy to create and run containers of things like command-line tools and background servers/services. But due to the nature of Docker being “terminal only” by default it’s quite hard to do anything UI related.
But there is a way. By using the VNC protocol to get access to the graphical user interface we can set-up a container running a fully-fledge Linux Desktop and we can connect directly to this container.
I am using something I call “throw-away linux desktop containers” all day every day for various needs and uses. Everytime I start such a container this container is brand-new and ready to be used.
Actually when I start it the process looks like this:
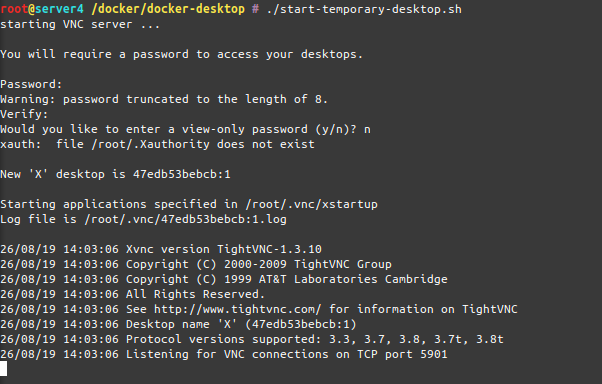
As you can see when the container starts-up it asks for a password to be set. This is the password needed to be entered when the VNC client connects to the container.
And when you are connected, this is what you get:
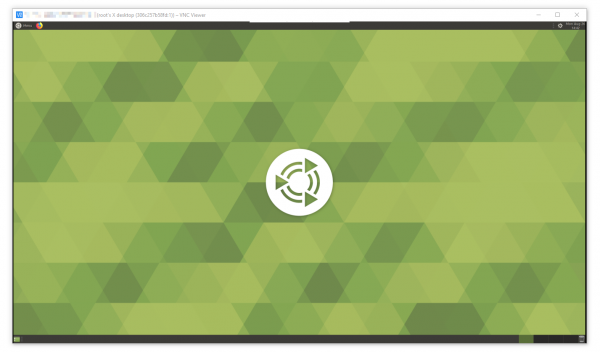
I am sharing my scripts and Dockerfile with you so you can use it yourself. If you put a bit more time into it you can even customize it to your specific needs. At this point it’s based on Ubuntu 18.04 and starts-up a ubuntu-mate desktop environment in it’s default configuration.
When you log into the container it will log you in as root – but effectively you won’t be able to really screw around with the host machine as the container is still isolating you from the host. Nevertheless be aware that the container has some quirks and is run in extended privileges mode.
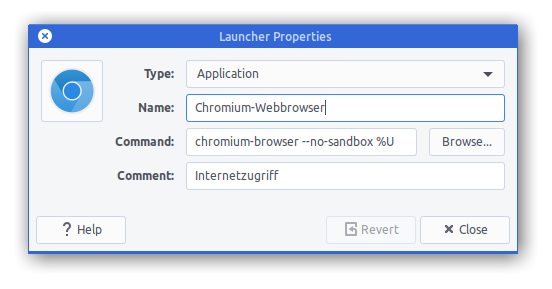
Chromium will be pre-installed as a browser but you will find that it won’t start up. That’s because Chromium won’t start up if you attempt a start as root user.
The workaround:
Now get the scripts and container here and build it yourself!
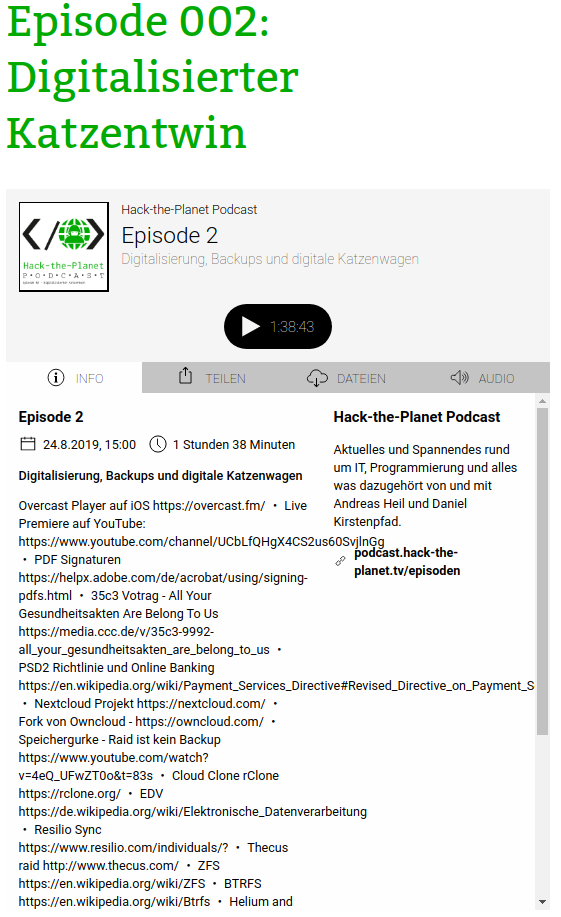
Hack-The-Planet Podcast: Episode 002