Do you always slack off on your computer and worry about getting busted?Not anymore because Daytripper is here to save the day!
daytripper
Do you always slack off on your computer and worry about getting busted?Not anymore because Daytripper is here to save the day!
daytripper
Booting a computer does not happen extremely often in most use-cases, yet it’s a field that has not seen as much optimization and development as others had.
Find a very interesting presentation on the topic: How to make Linux boot faster here. The presentation was held at the Linux Plumbers Conference 2019.
You might have asked yourself how it is that some phones charge up faster than others. Maybe the same phone charges at different speed when you’re using a different cable or power supply. It even might not charge at all.
There is some very complicated trickery in place to make those cables and power supplies do things in combination with the active devices like phones. Many of this is implemented by standards like “Quick Charge”:
Quick Charge is a technology found in QualcommSoCs, used in devices such as mobile phones, for managing power delivered over USB. It offers more power and thus charges batteries in devices faster than standard USB rates allow. Quick Charge 2 onwards technology is primarily used for wall adaptors, but it is also implemented in car chargers and powerbanks (For both input and output power delivery).
Wikipedia: Quick Charge
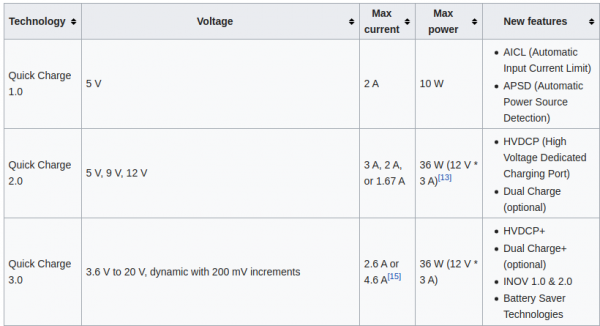
So in a nutshell: If you are able to speak the quick charge protocol, and with the right cable and power supply, you are able to get anything between 3.6 and 20V out of such a combination by just telling the power supply to do so.
This is great for maker projects in need of more power. There’s lots of things to consider and be cautious about.
“Speaking” the protocol just got easier though. You can take this open source library and “power up your project”:
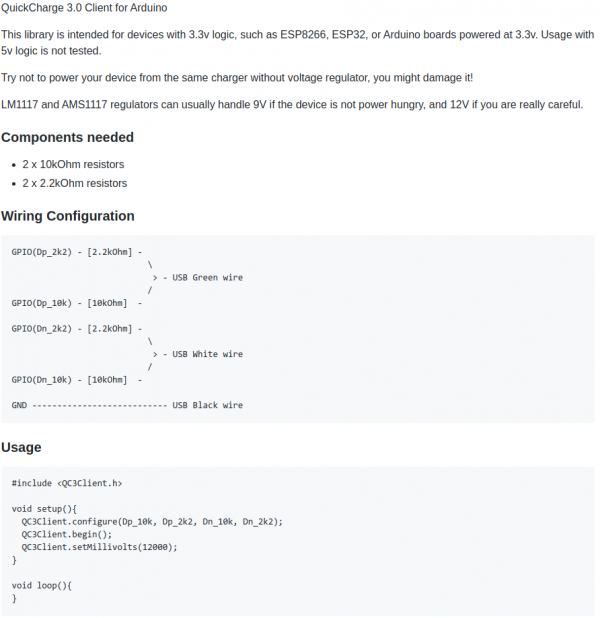
The above mentioned usage-code will give you 12V output from the power supply. Of course you can also do…:

Be aware that your project needs to be aware of the (higher) voltage. It’s really not something you should just try. But you knew that.
More on Quick Charge also here.
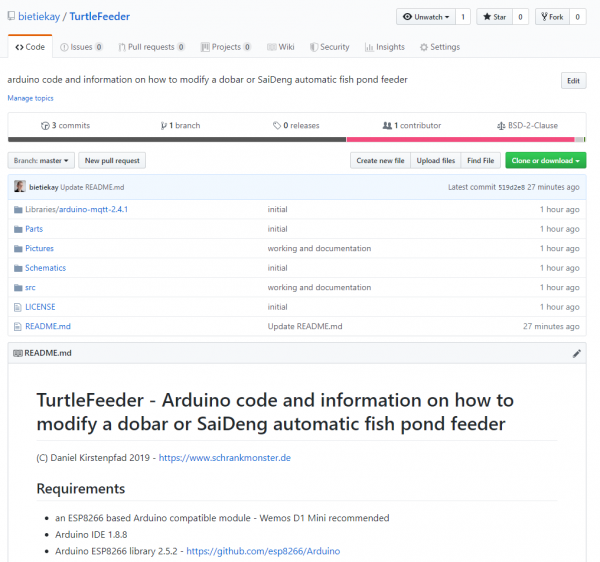
We’ve got several quite big fish tanks in our house. Mainly used by freshwater turtles.

These turtles need to be fed every once in a while. And while this is not an issue normally it’s an issue if you leave the house for travel for an extended period of time.
Of course there are humans checking on everything in the house regularly but as much as can be automated should and will be automated in our household. So the requirement wa to have the turtle feeding automated.
To achieve this is would be necessary to have a fixed amount of turtle food be dispensed into the tanks on a plan and with some checks in the background (like water quality and such).
It’s been quite a hassle to come up with a plan how the hardware should look like and work. And ultimately i’ve settled on retrofitting an off-the-shelf fish pond feeder to become controllable through MQTT.
The pond feeder I’ve found and used is this one:
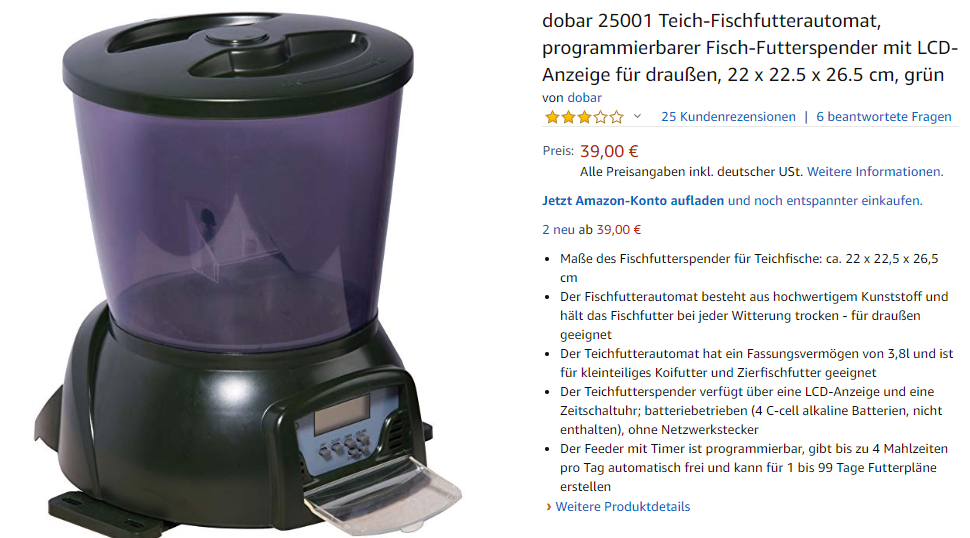
It’s not really worth linking to a specific product detail page as this sort of feeder is available under hundreds of different names. It always looks the same and is priced right around the same.
If you want to build this yourself, you want one that looks like the above. I’ve bought 3 of them and they all seem to come out of the same factory somewhere in China.
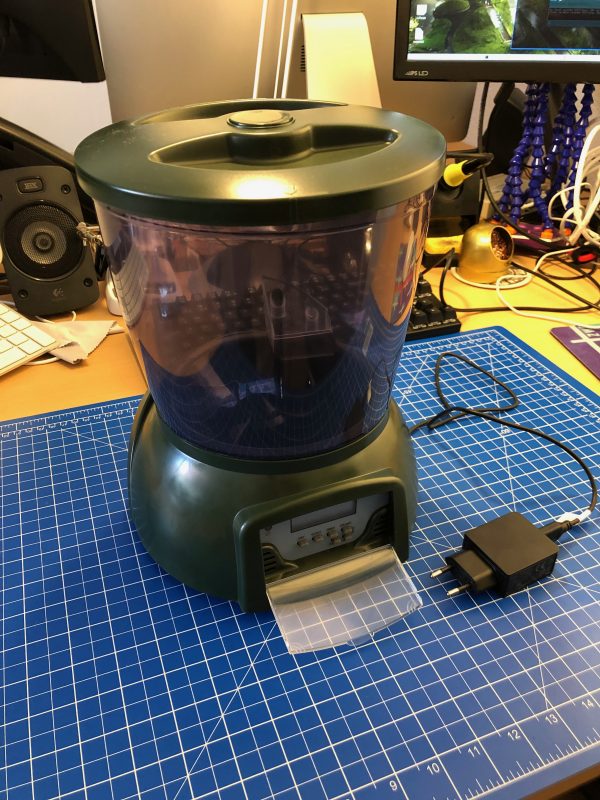
Anyway. If you got one you can easily open it up and start modifying it.
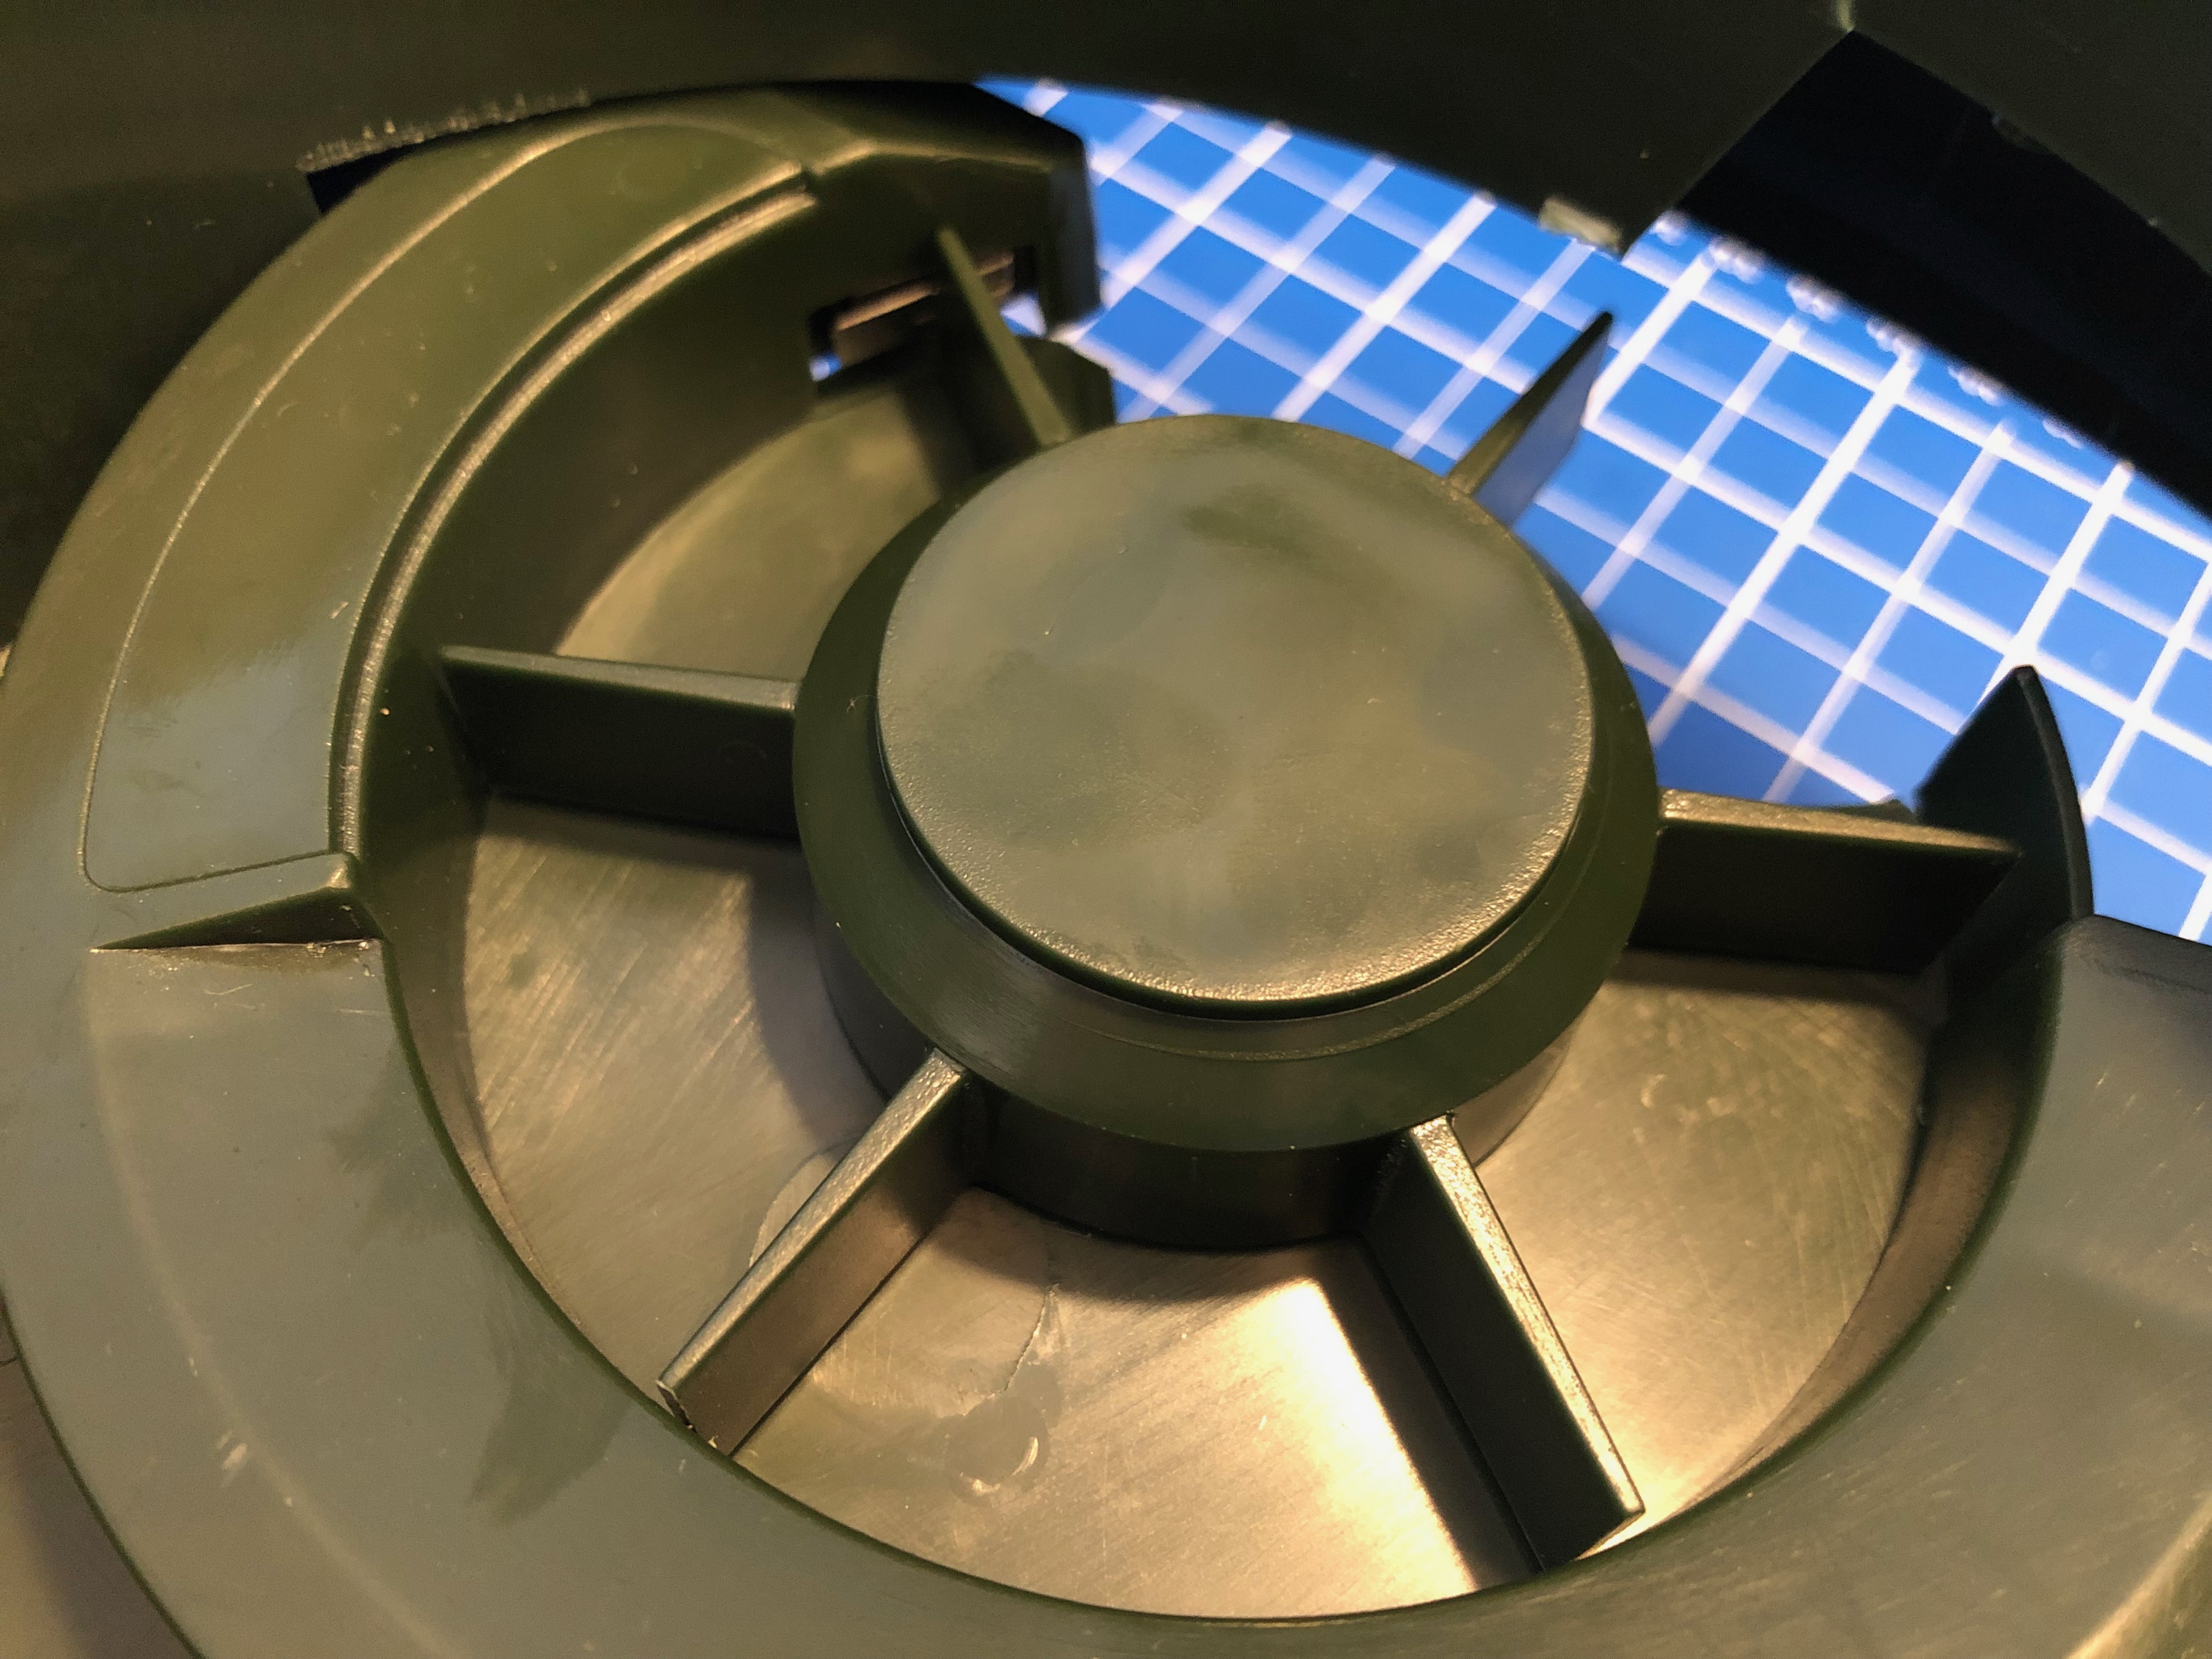
The functional principle of the feeder is rather simple:
Simple. Since the switch-status is not known on power loss / reboot a calibration run is necessary (even with the factory electronics) every time it boots up.
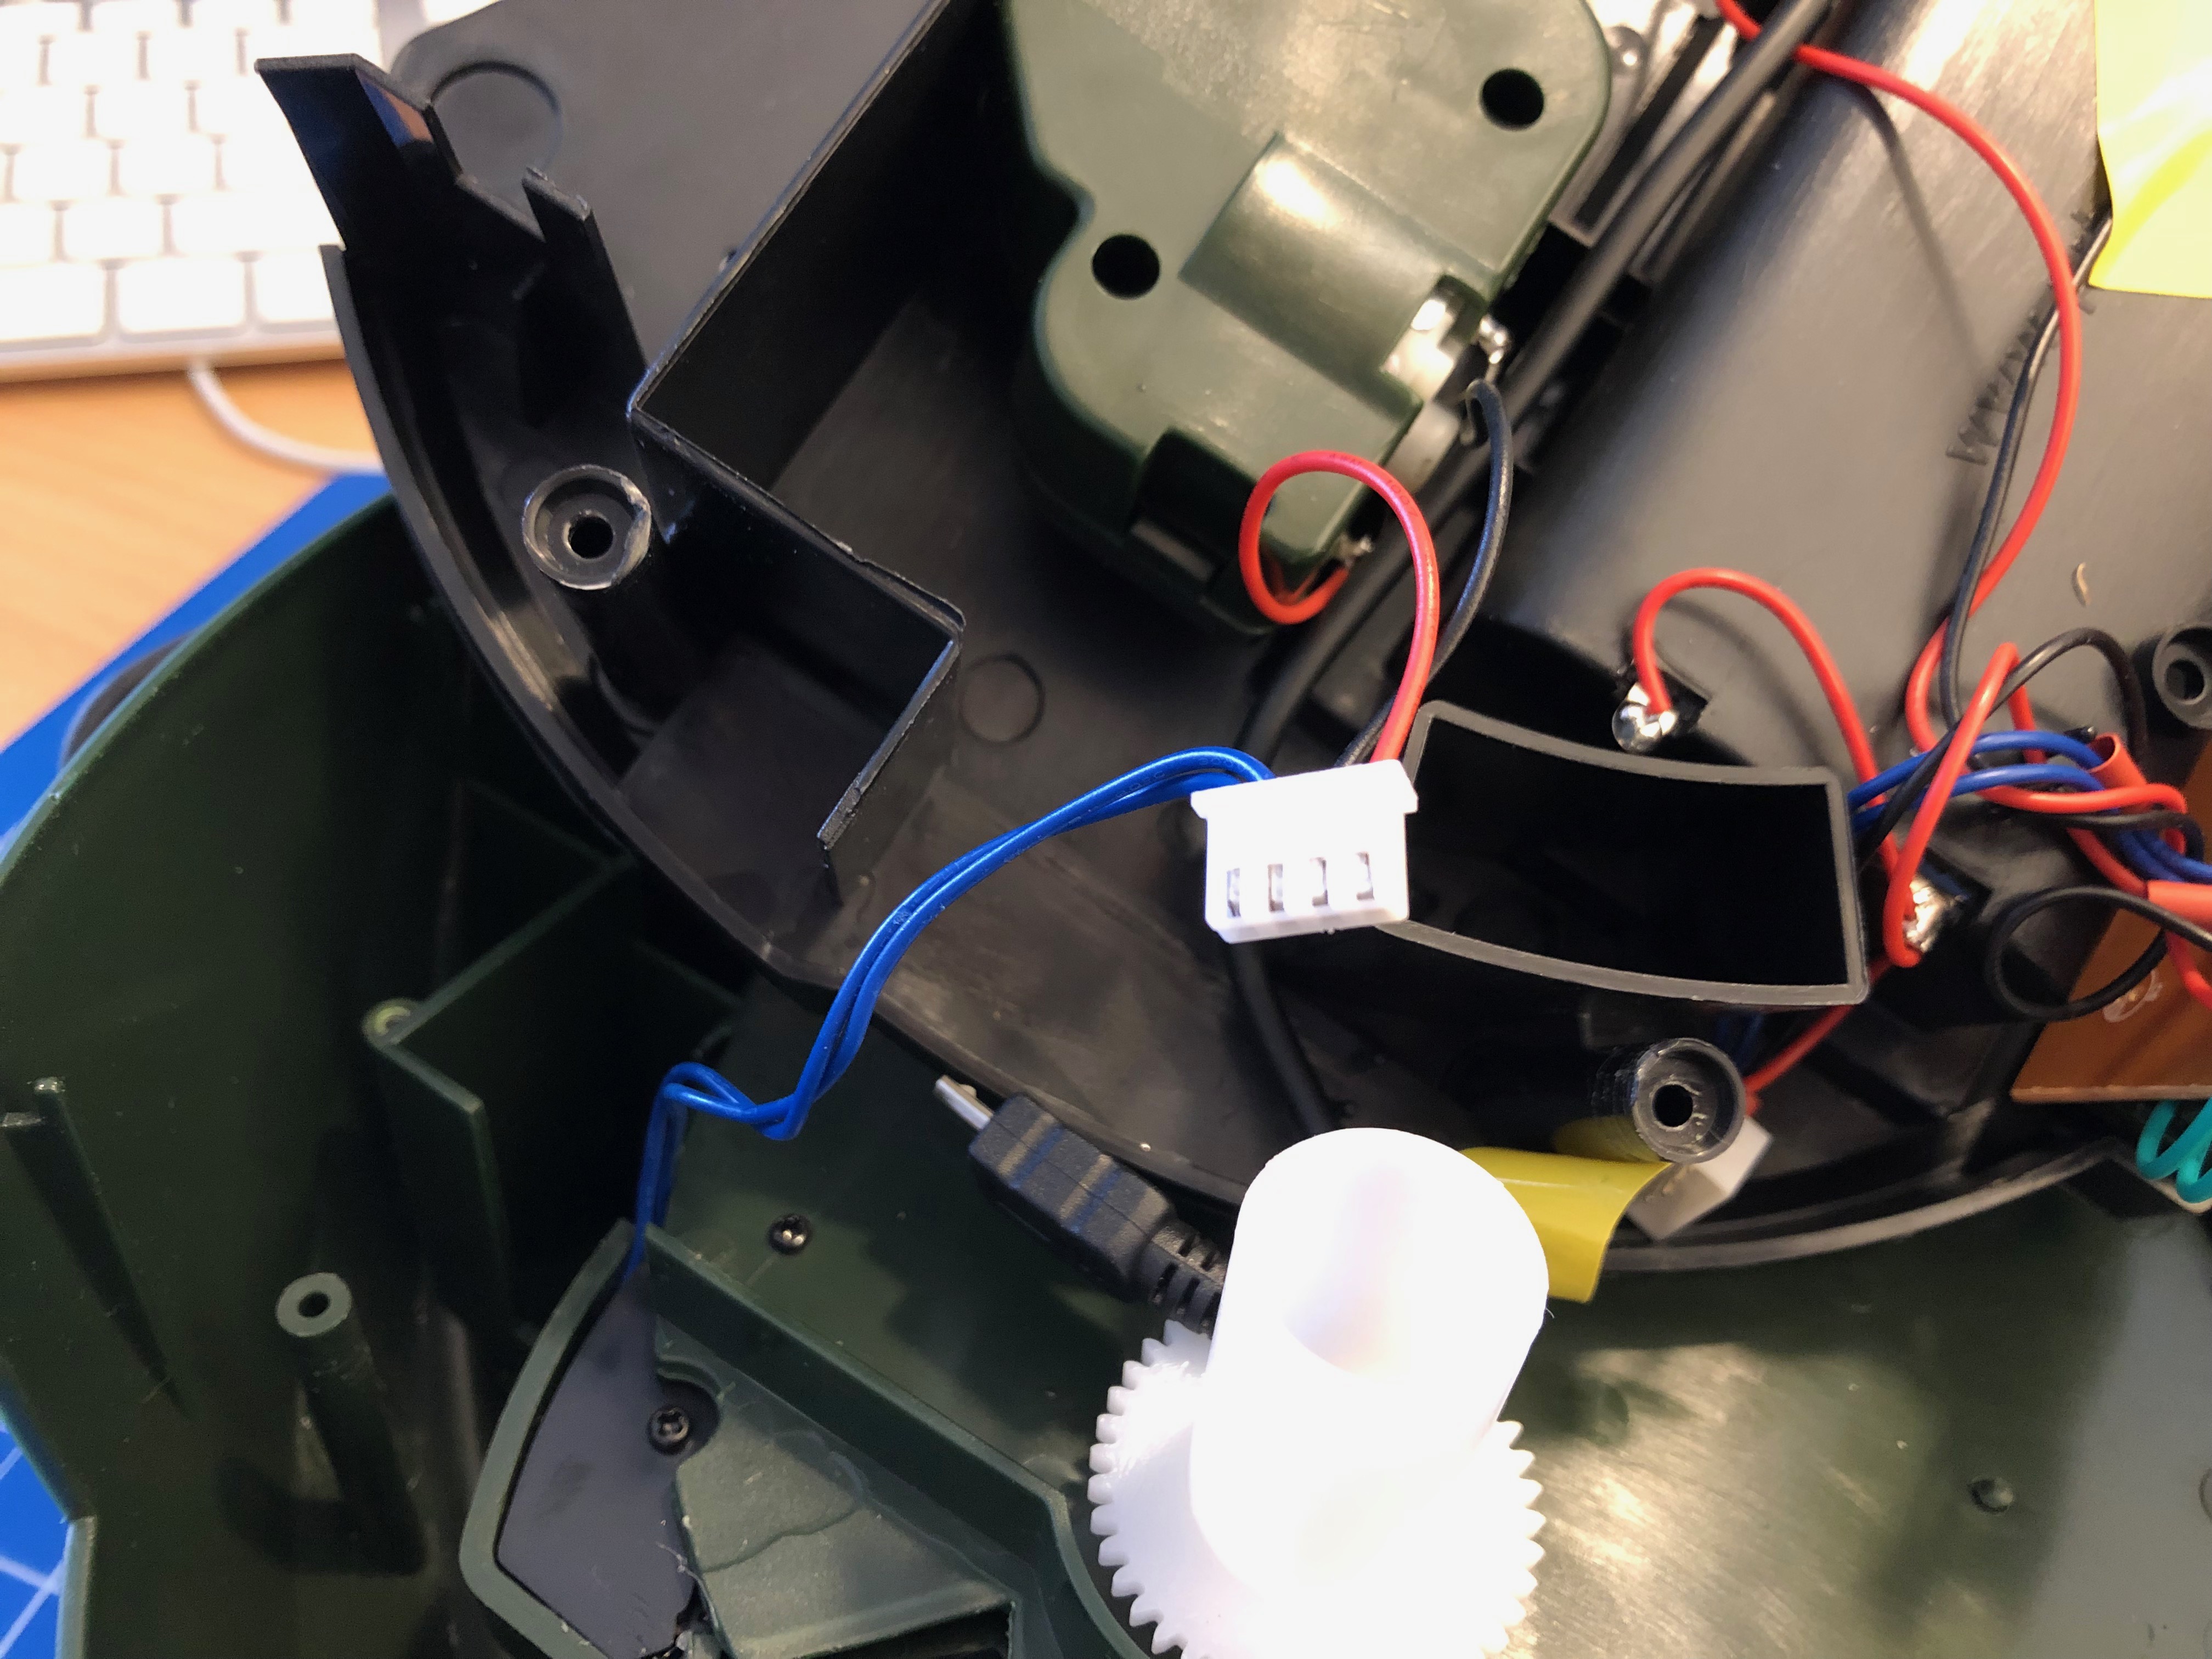
After opening the feeder I’ve cut the two cables going to the motor as well as the micro-switch cables. I’ve added a 4-Pin JST-XH connector to both ends. So I can reconnect it to original state if desired.
These are all the parts needed:
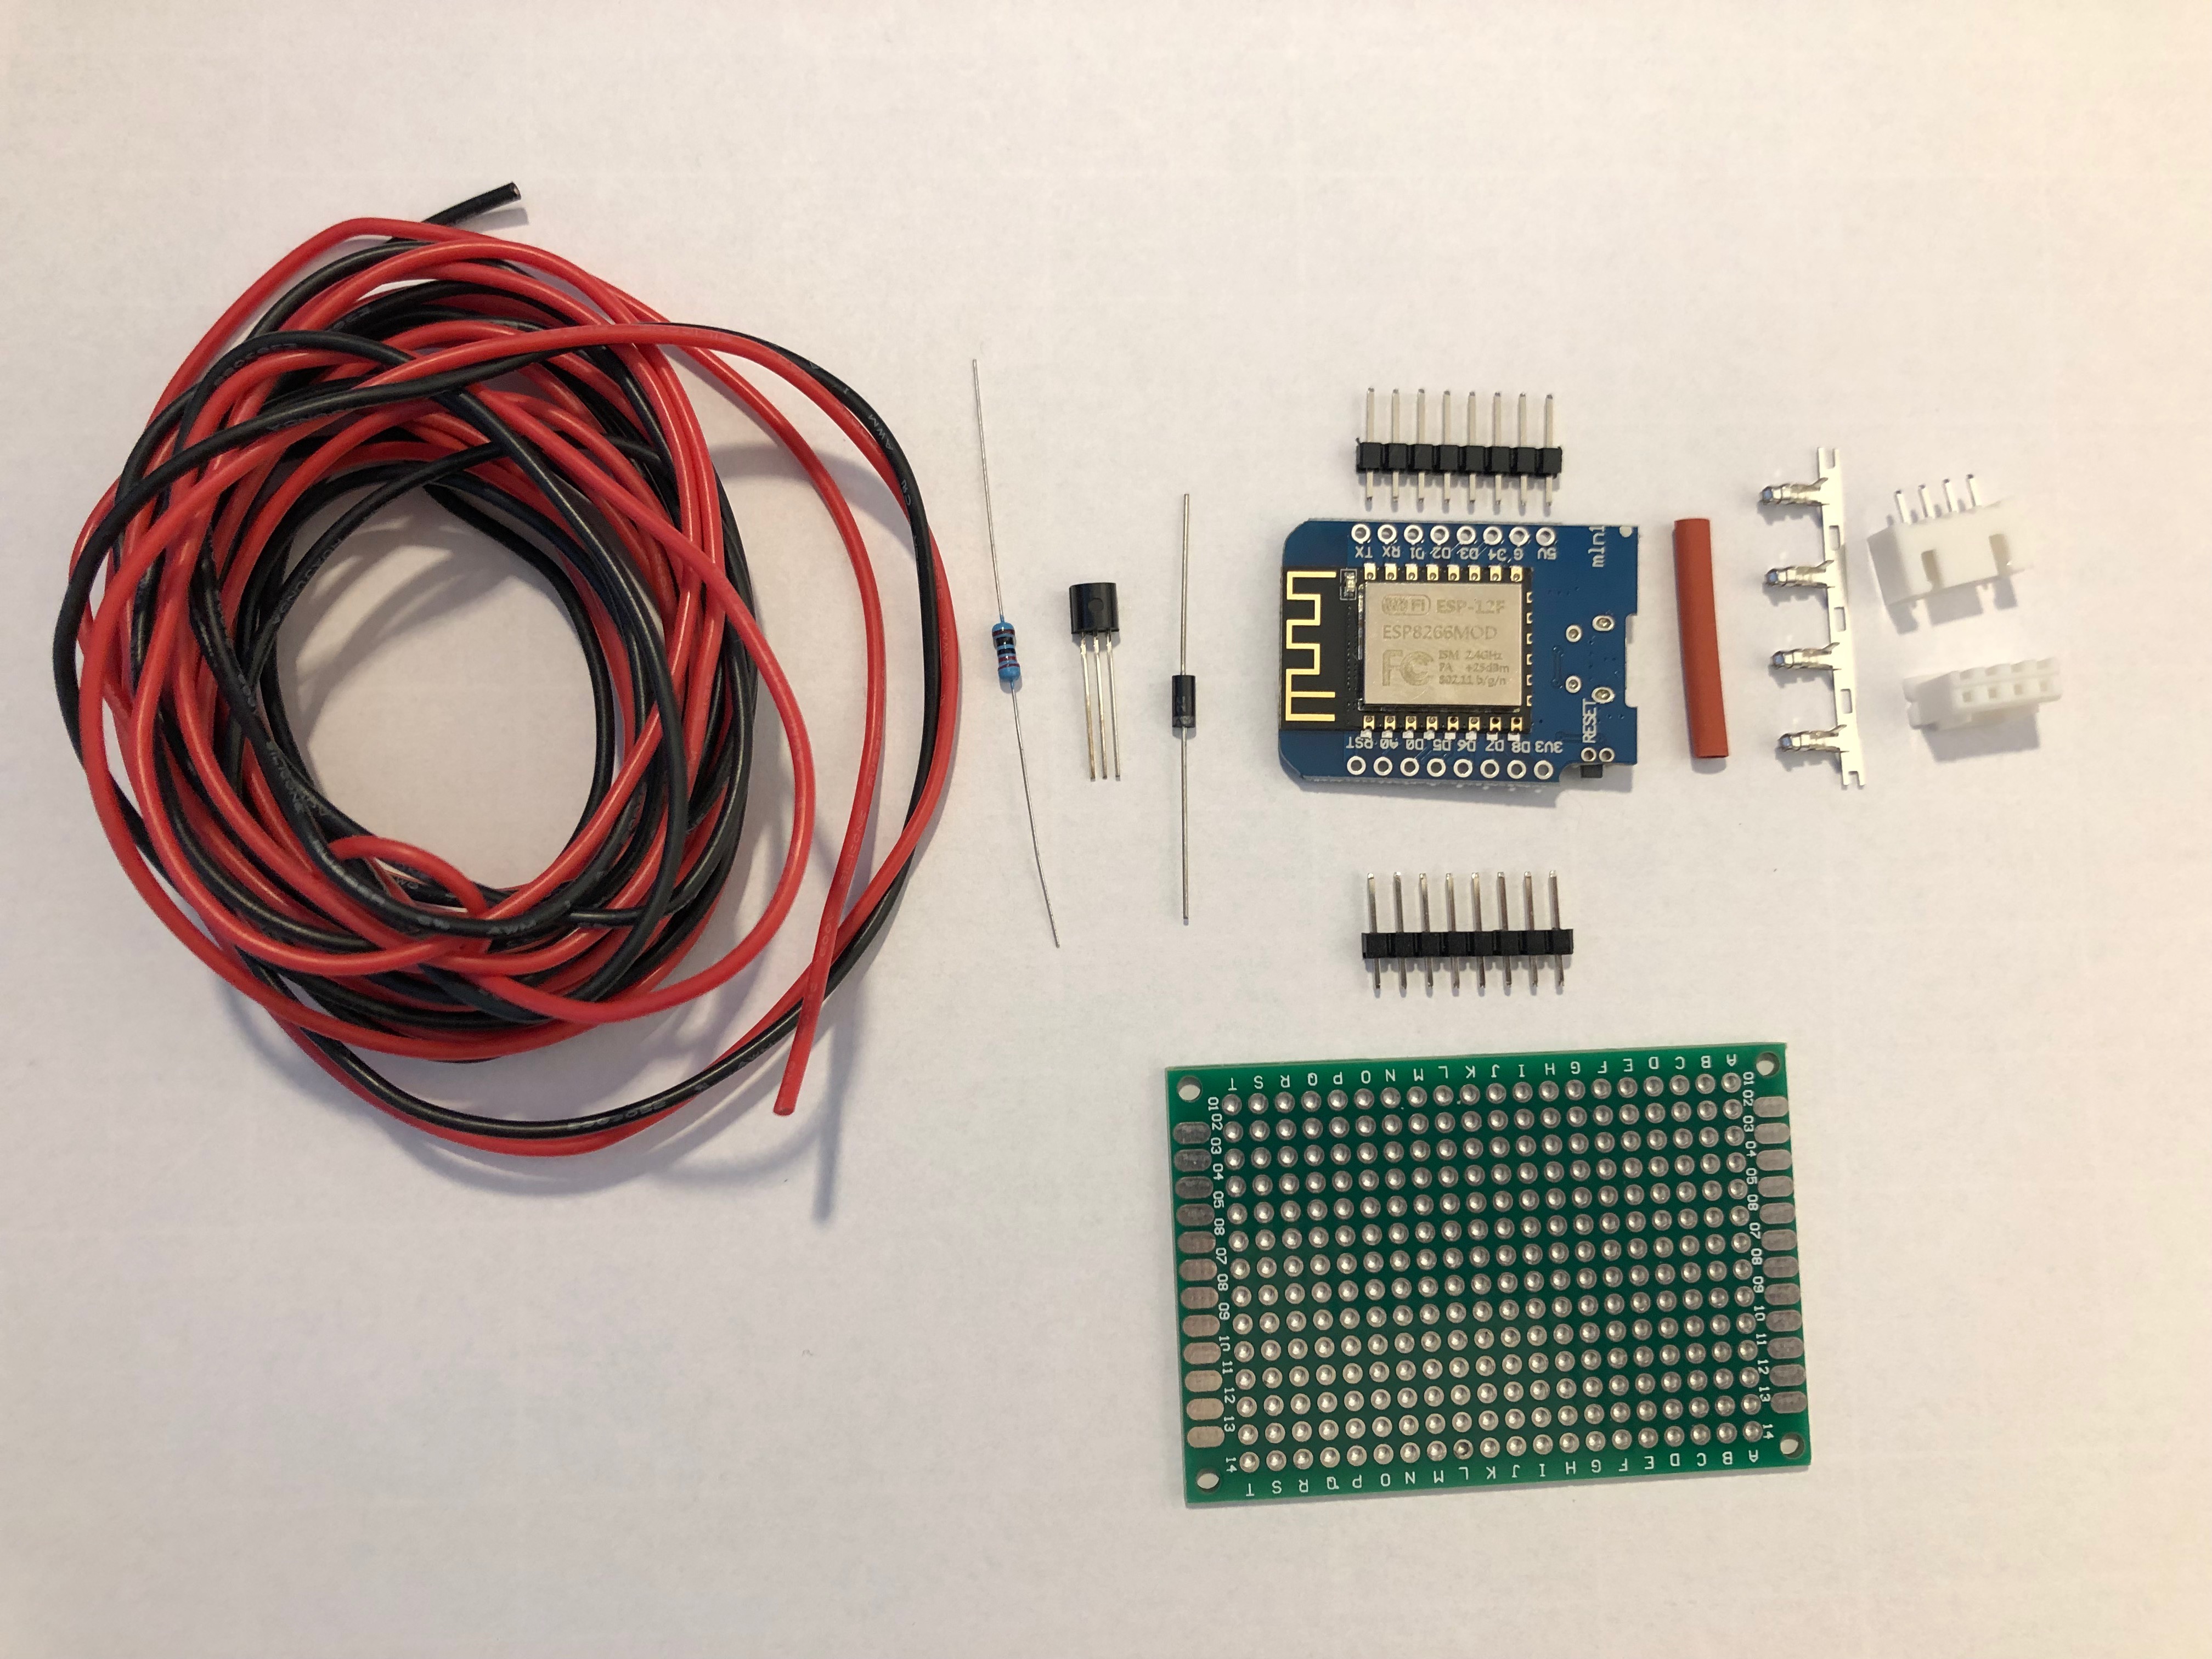
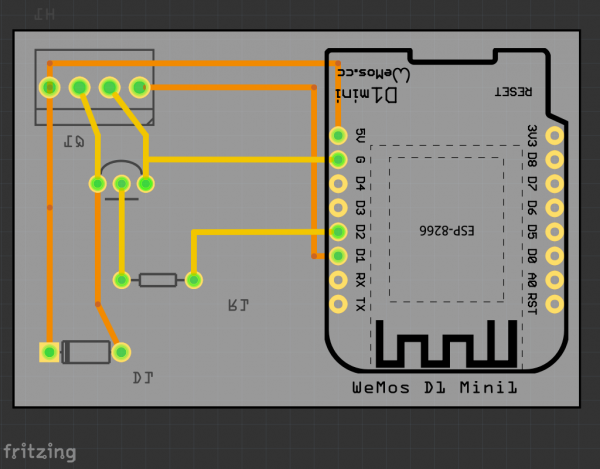
I am using a Wemos D1 Mini and a couple of additional components apart from the prototype board:
A PN2222 NPN transistor, a rectifier diode 1N4007 and a 220 Ohm resistor.
I’ve connected everything according to this schematic I’ve drawn with Fritzing:
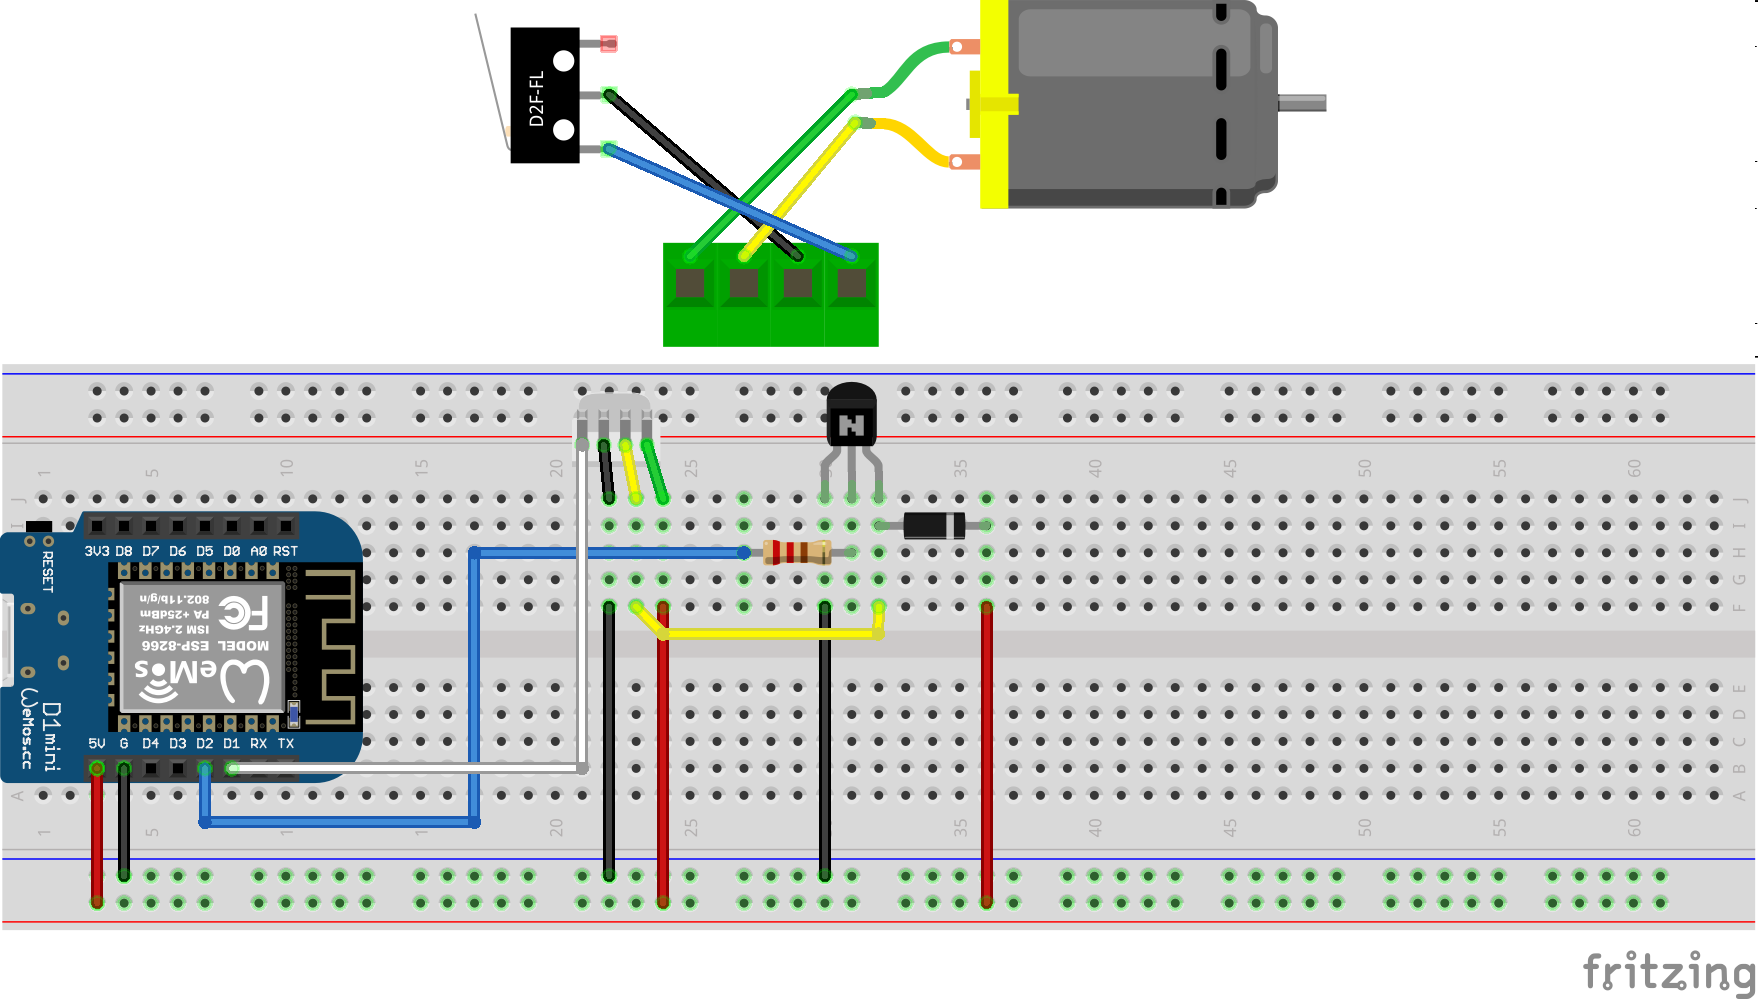
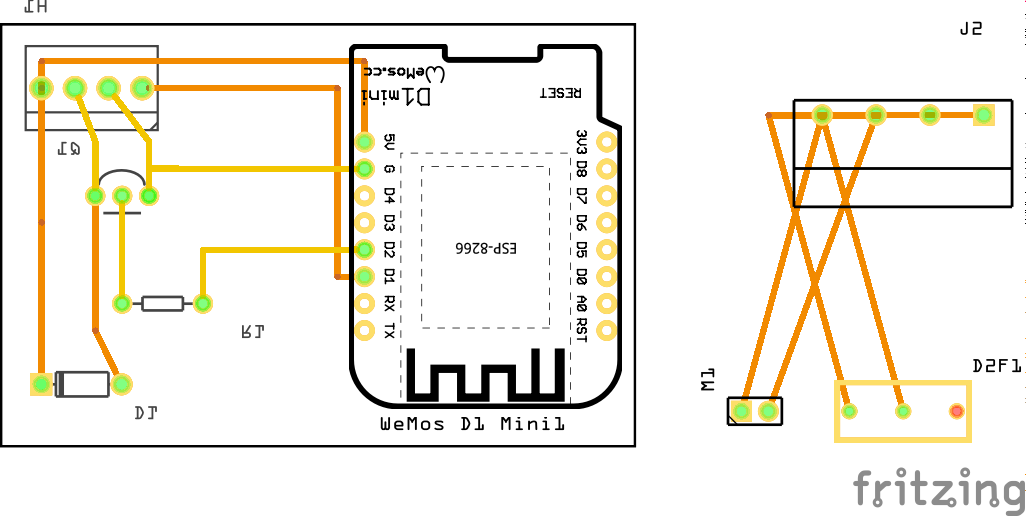
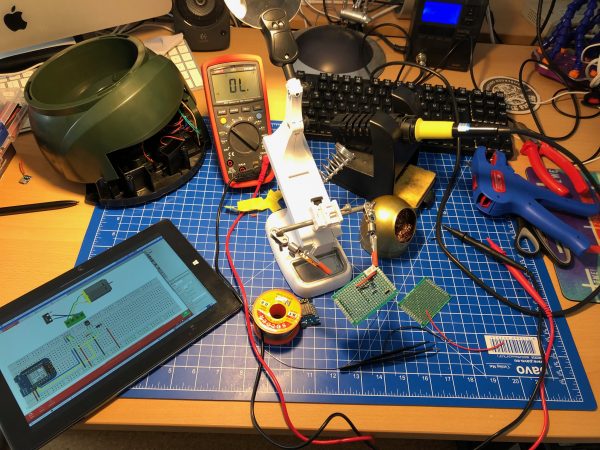
I’ve then prototyped away and put everything on the PCB. Of course with very limited solderig skill:
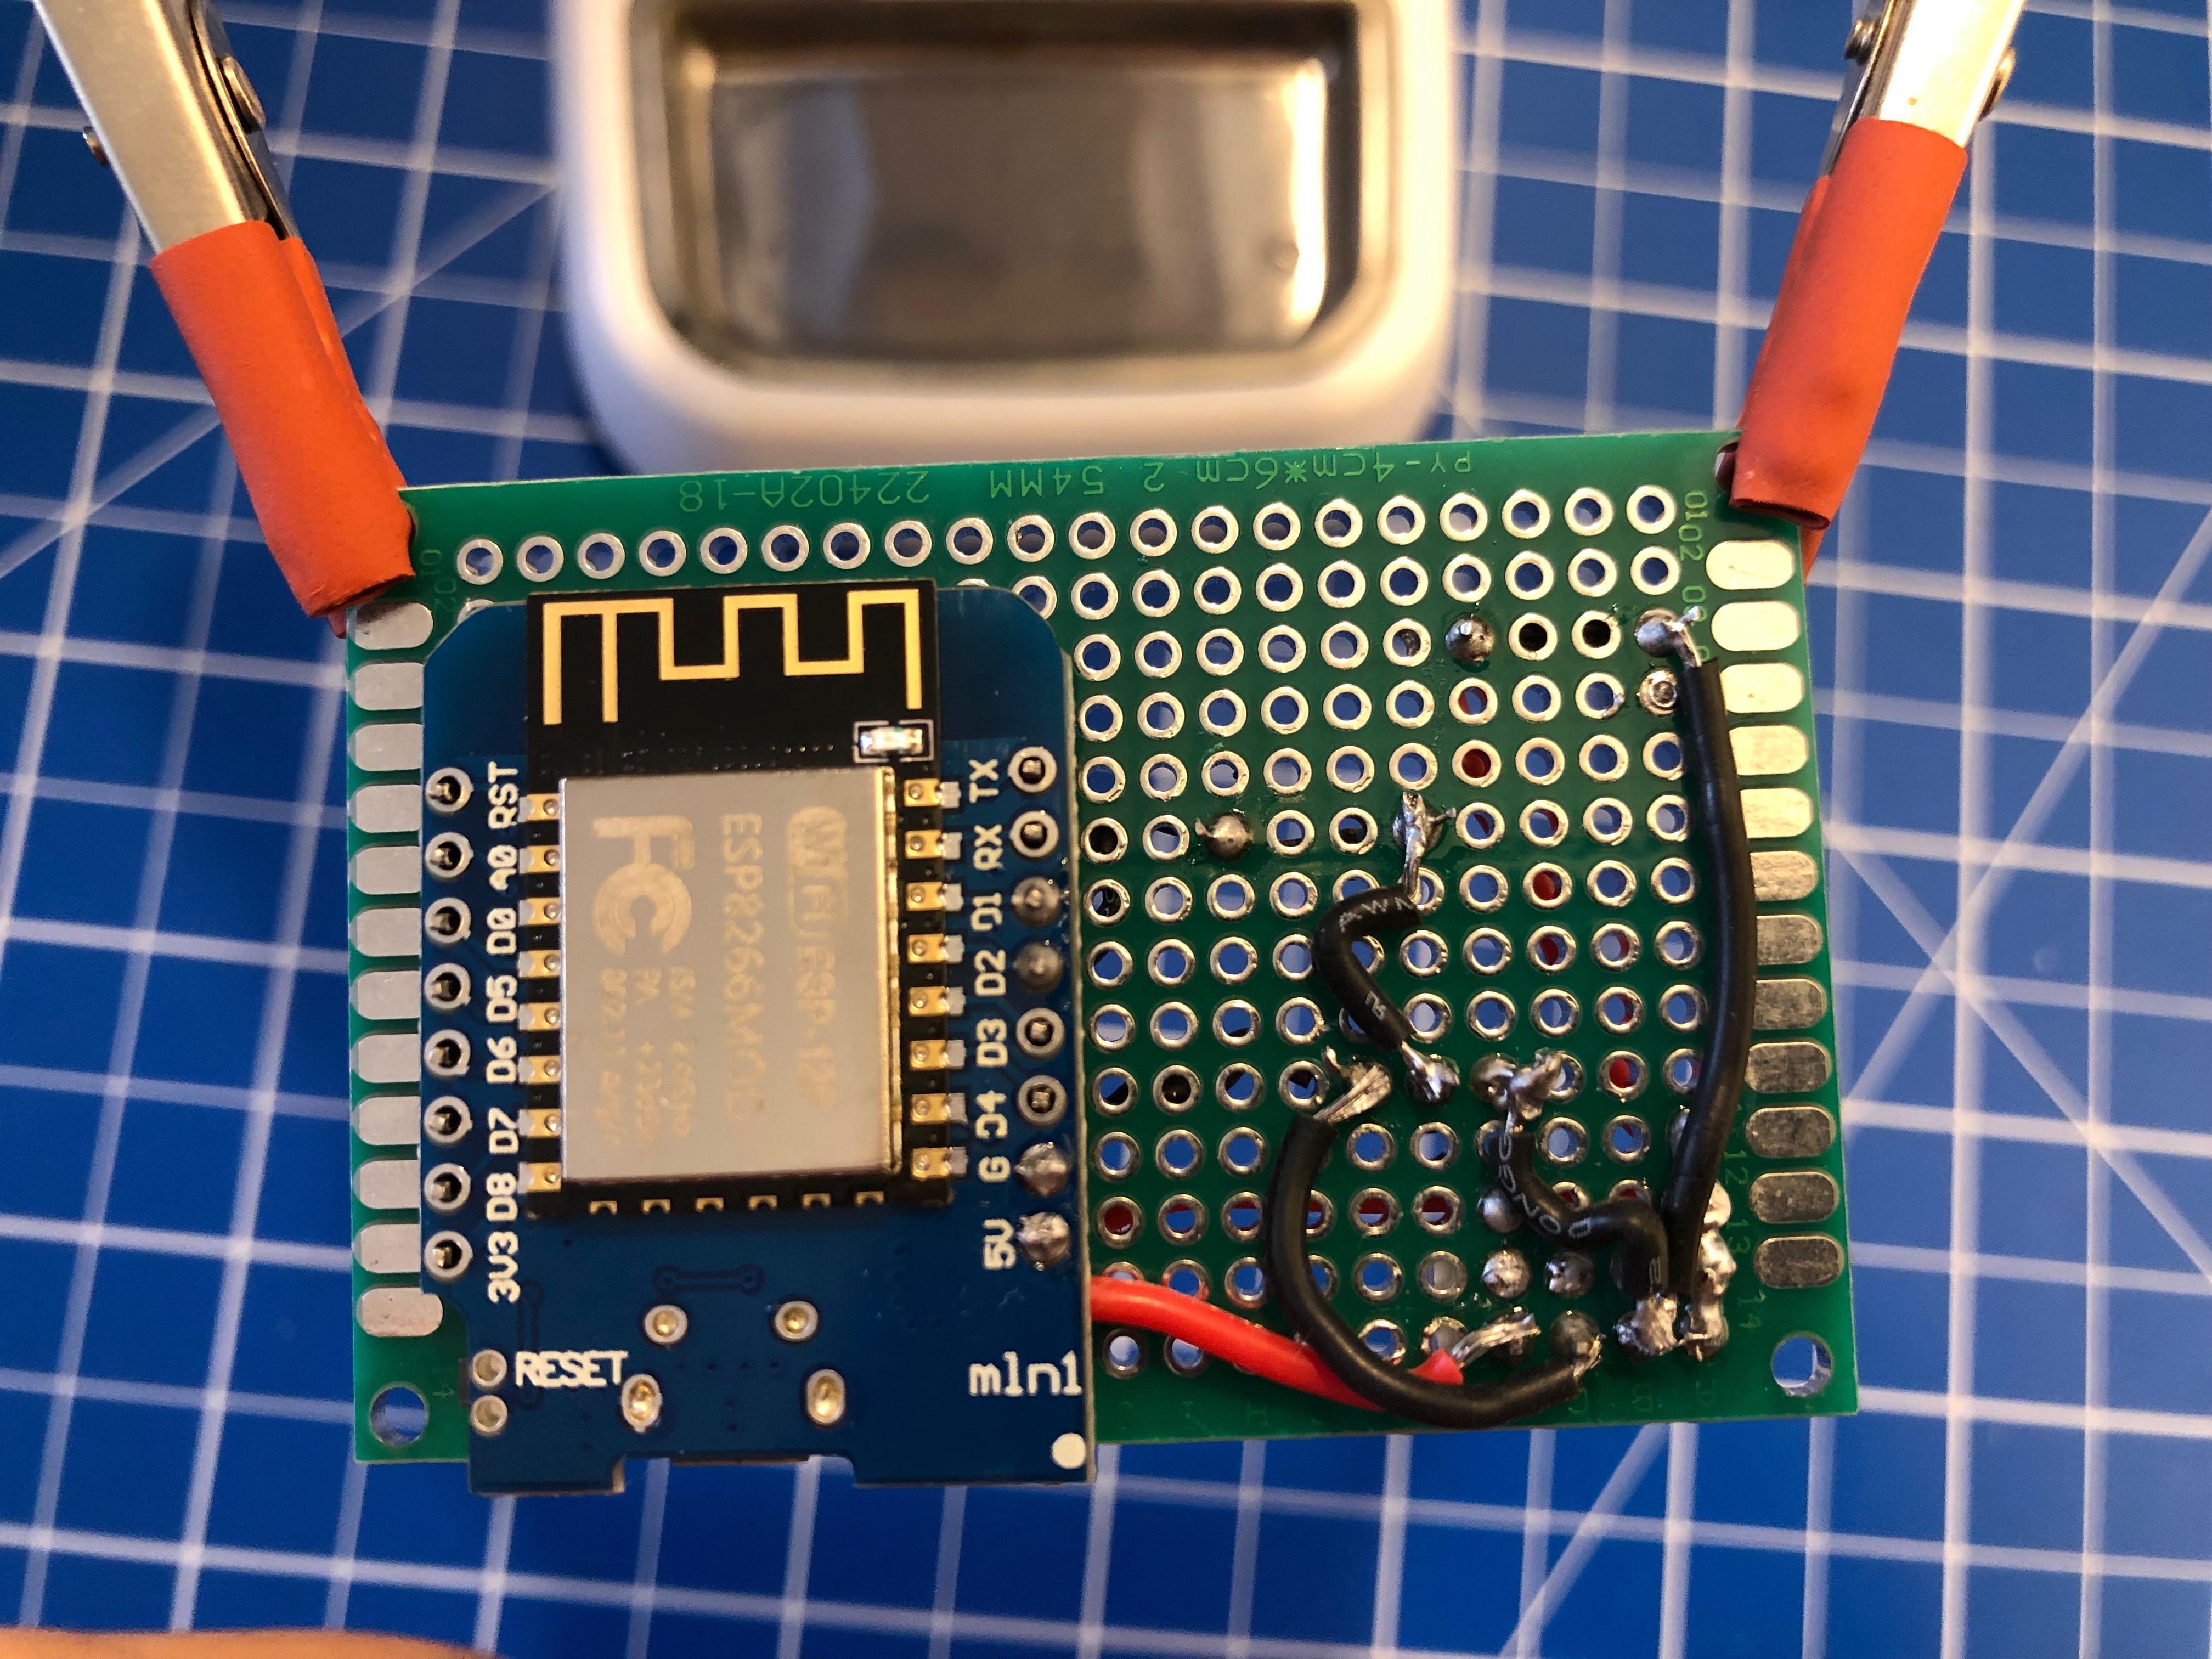
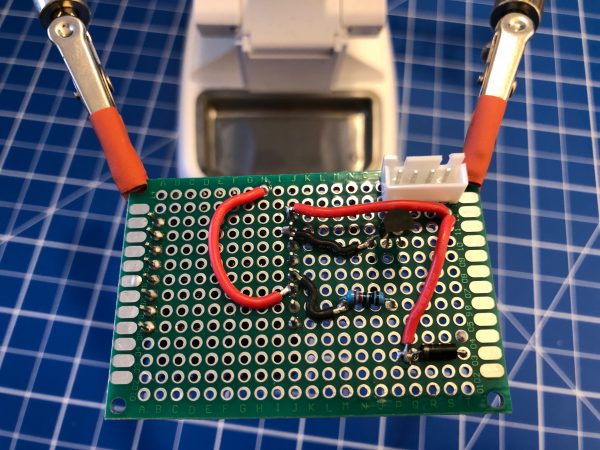
As you can see the JST-XH connector on Motor+Switch can now be connected easily to the PCB with all the parts.
Make sure you check polarity and that you did correctly hook up the motor and switch.
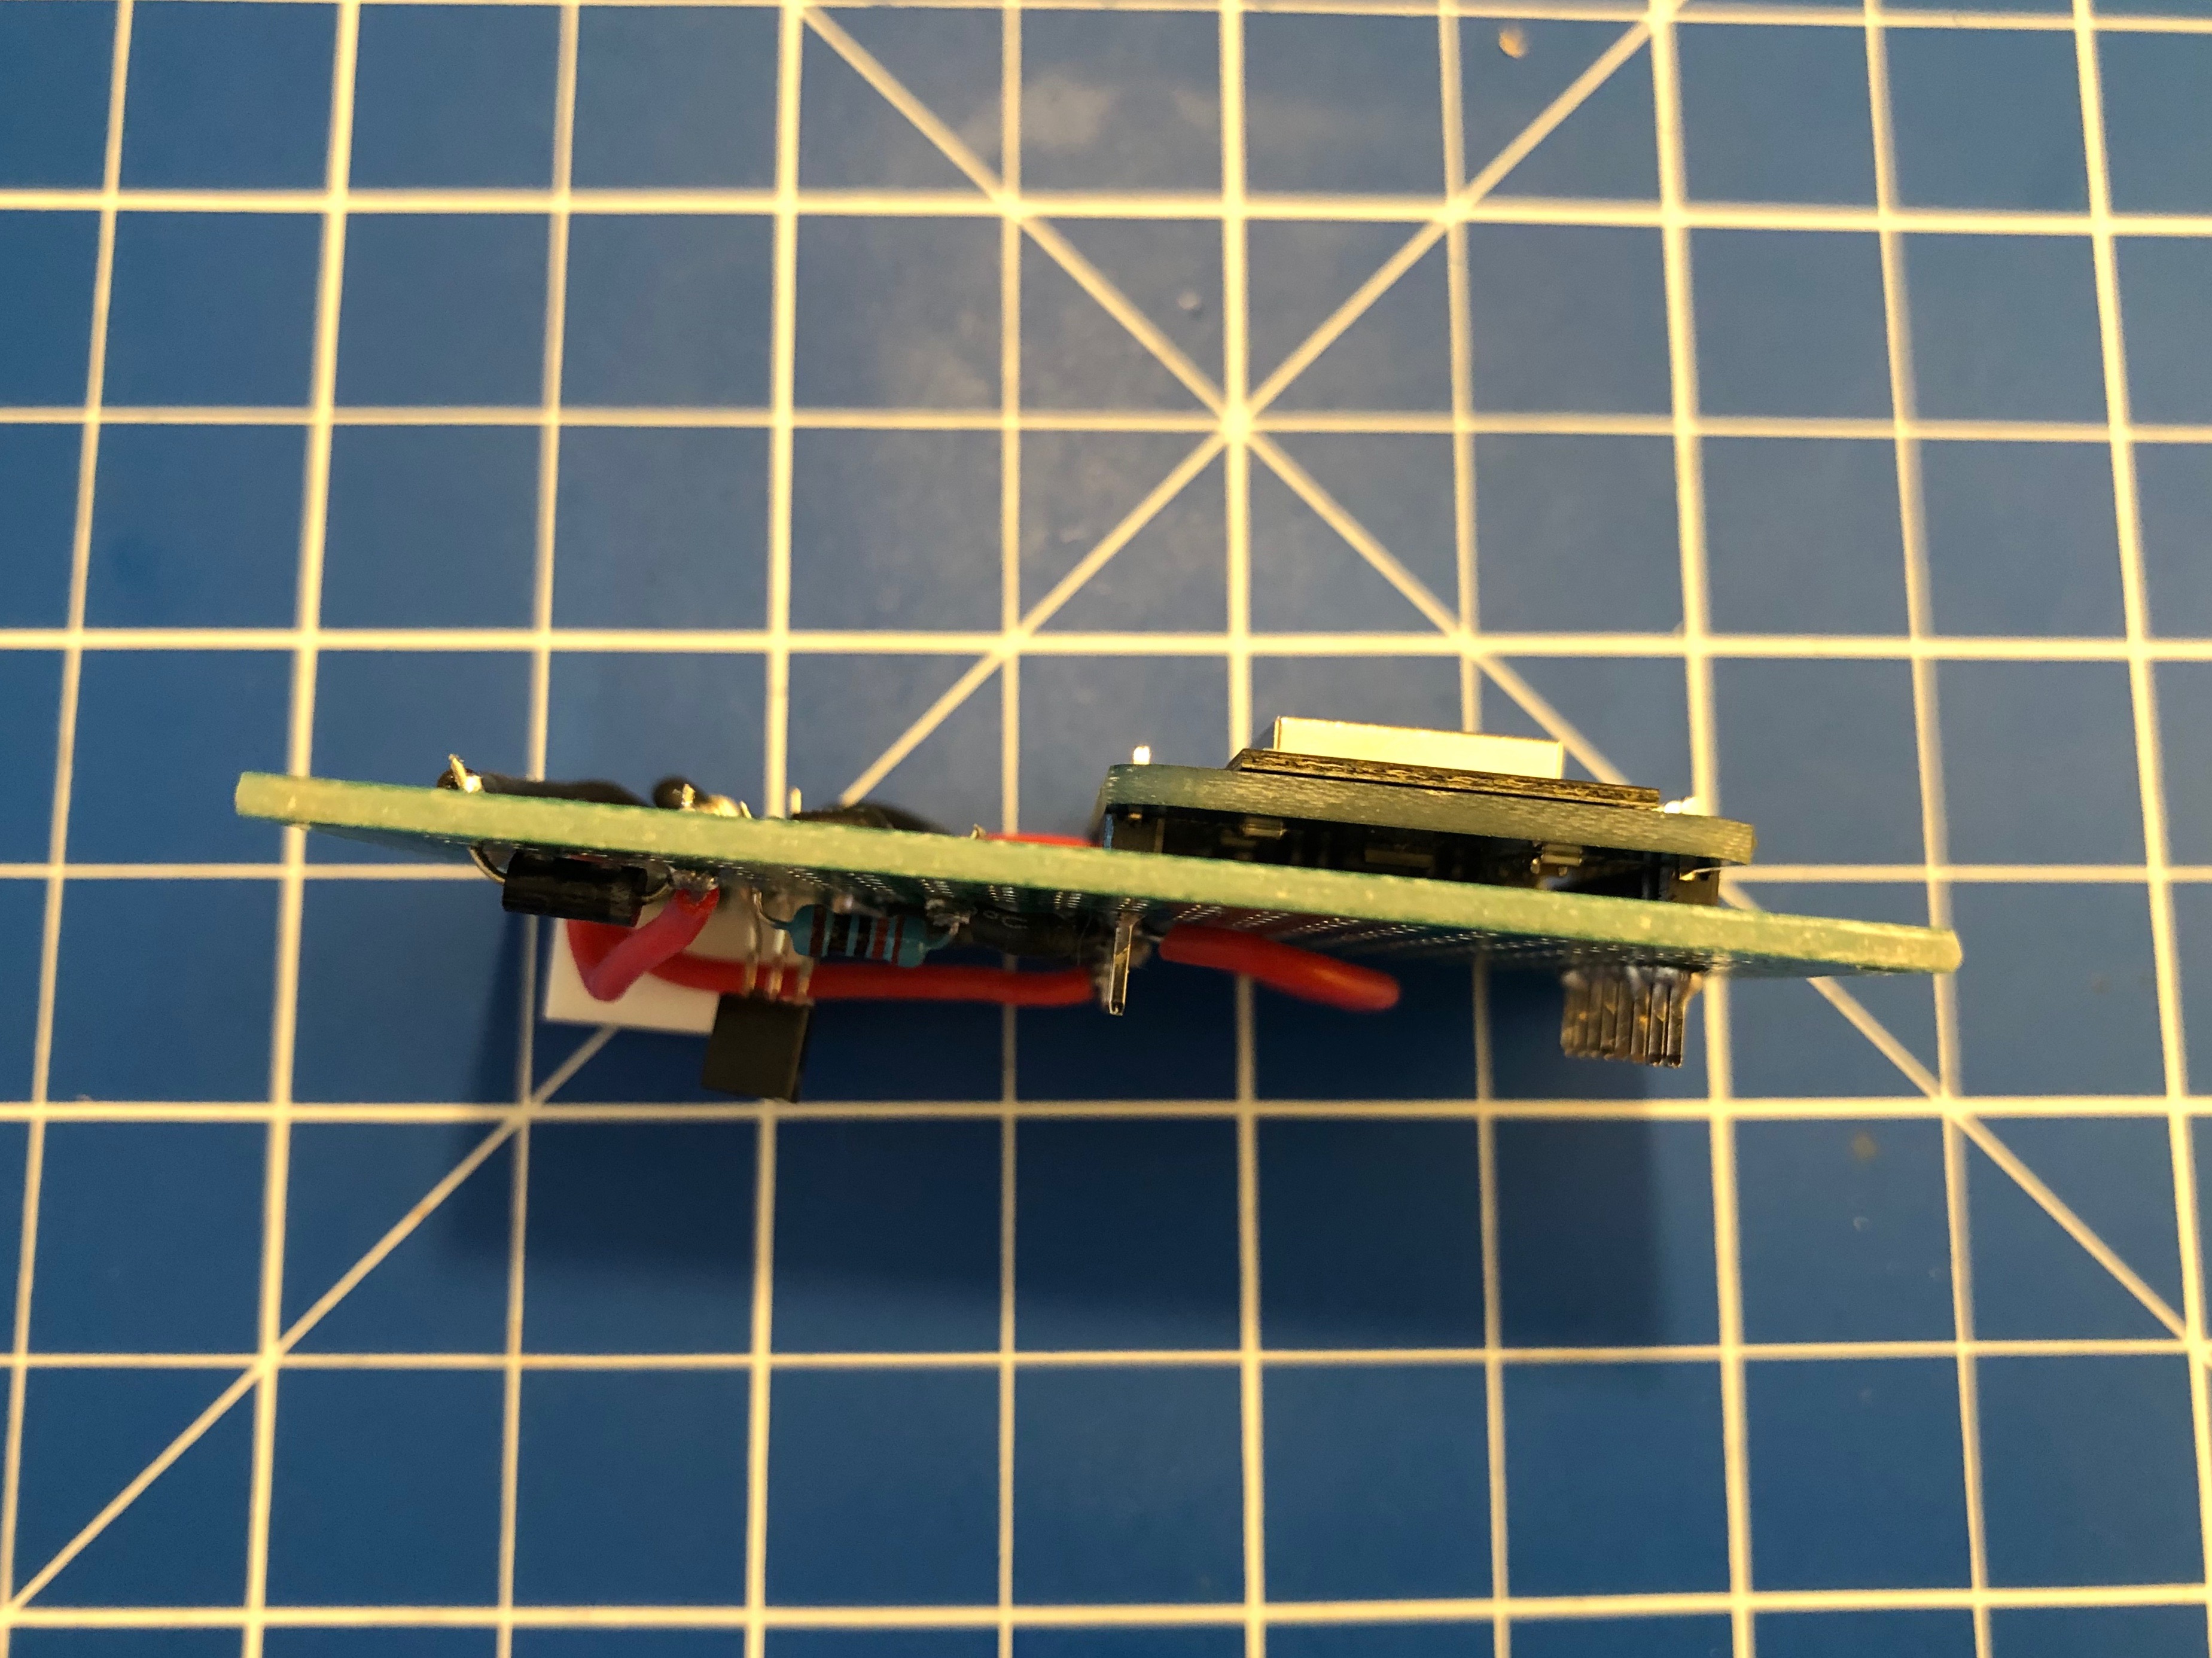
When done correctly the PCB (I’ve used 40mm x 60mm prototype pcb) and all cables will fit into the case. There’s plenty of room and I’ve put it to the side of it. I’ve also directly connected an USB cable to the USB port of the Wemos D1 Mini. As long as you put at least 1A into it it will all work.
Since the Wemos D1 Mini sports an ESP8266 and is well supported by Arduino it was clear to me to use Arduino IDE for the software portion of this project.
Of course everything, from schematics to the sourcecode is available as open source.
To get everything running you need to modify the .ino file in the src folder like so:
What you need to configure:
Commands that can be sent through mqtt to the /feed topic.
There are overall two MQTT topics:
So if you want to make it start feeding 3 times:
mosquitto_pub -t house/stappenbach/feeder/feeder-00F3B839/feed -m 3
And if you want to see the state of the feeder:
mosquitto_sub -v -t house/stappenbach/feeder/feeder-00F3B839/state
All in all there are 3 of these going to be running in our household and the feeding is going to be controlled either by Alexa voice commands or through Node-Red automation.
I am still working on it – but it is coming together nicely. During the next vacation our fish tanks are going to be well fed.

More soon.
It’s been a year since Zenvent posted this:
Created a custom case for my hackintosh, it resembles a minified Power Mac G5. I have uploaded the parts to Thingiverse in case you’d like to make one of your own.
https://www.zenvent.com/blog/hackintosh/

A Hackintosh (a portmanteau of “Hack” and “Macintosh”), is a computer that runs macOS on a device not authorized by Apple, or one that no longer receives official software updates.
https://en.wikipedia.org/wiki/Hackintosh
I am cycling for fun and for the effect it has on my body and well-being. I do about 30km of cycling every day on average.
After my first stationary trainer broke I bought a new one with the capability to measure wattage and also to apply resistance measured by the watt.
After looking at my average speeds, heart-rates and times on the device I was able to build a quite detailed understanding of the broader picture. What effects my power output and what does not. The effects of nutrition and health to what the body will deliver while being asked the exact same power output curve than the last time.
In a nutshell the numbers tell me that I am usually at a mediocre wattage of 150W constant load doing about 40 km/h average. My reserves usually allow me to go for 1-2 hours without a break doing this.
So far so good. Now I’ve found out from more serious cyclers that there’s something like “Functional Threshold Power“. I do regular have tests at the doctors to check for any heart-rate issues.
Reading about this Functional Threshold Power my curiousity is sparked.
How much could I do? Should I even go for measuring it?

The CCCamp 2019 has just started and you can join the live streaming anytime.

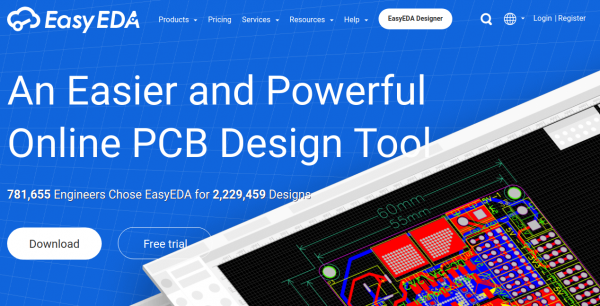
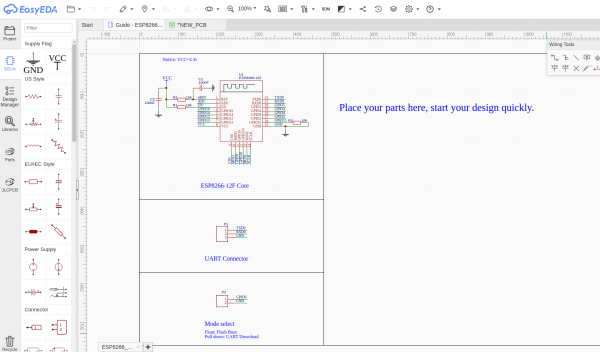
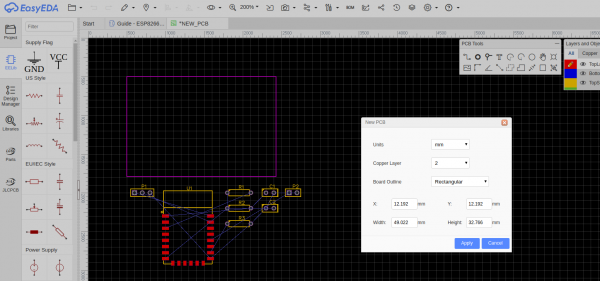
Once every while when you make things you actually need to make things. Things like PCBs – printed circuit boards to hold and wire your chips.
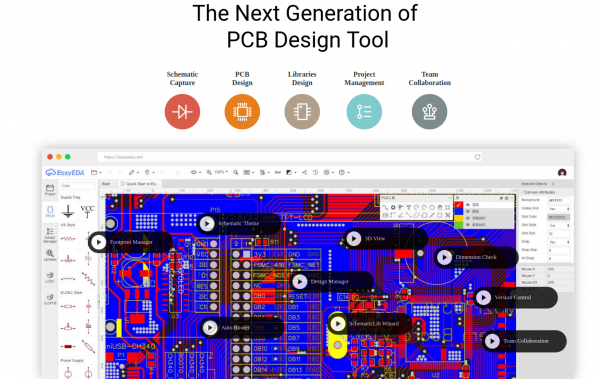
Maybe you want to give EasyEDA a try as it’s in-browser experience is better than anything I had come across so far. Granted I am not doing PCBs regularly but nevertheless – whenever I tried with the programs I’ve got recommended it wasn’t as straight forward as it is with this tool.
When you are writing code the patterns seem to repeat every once in a while. Not only the patterns but also the occasion you are going to apply certain code styles and methods while developing.
To support a developer with this creative work the tedious and repetitious tasks of typing out what is thought can be supported by machine learning.
Chances are your favourite IDE already supports an somehow AI driven code autocomplete feature. And if it does not, read on as there are ways to integrate products like TabNine into any editor you can think of…
Visual Studio IntelliCode is a set of AI-assisted capabilities that improve developer productivity with features like contextual IntelliSense, argument completion, code formatting, and style rule inference.
IntelliCode augments existing developer workflows with machine-learning services that provide an understanding of code and its context. It’s applicable for C#, C++ (in preview), JavaScript/TypeScript (in preview), and XAML code today, and will be updated in the future to support more languages.
Visual Studio IntelliCode
Of course there are some new contenders to the scene, like TabNine:
TL;DR: TabNine is an autocompleter that helps you write code faster. We’re adding a deep learning model which significantly improves suggestion quality. You can see videos below and you can sign up for it here.
TabNine
Deep TabNine requires a lot of computing power: running the model on a laptop would not deliver the low latency that TabNine’s users have come to expect. So we are offering a service that will allow you to use TabNine’s servers for GPU-accelerated autocompletion. It’s called TabNine Cloud, …
TabNine
The firecracker exploded. Apparently after 2 weeks of usage of the Chuwi Hi10 Air the eMMC flash is malfunctioning.
In a totally strange way: Every byte on the eMMC can be read, seemingly. Even Windows 10 boots. But after a while it will hang and blue screen. Apparently because it tries to write to the eMMC and when those writes fail and pile up in the caches at some point the system calls it quits.
Anyhow: It means that no byte that is right now on this eMMC can be deleted / overwritten but only be read.
The great chinese support is really helpful and offered to replace the device free of charge right away. That’s very nice! But I came to the conclusion that I cannot send the device in, because:
It contains a full set of synched private data that I cannot remove by all means because the freaking soldered-on eMMC flash is broken.
The recipient of this broken tablet in china would be able to read all my data and I could not do anything about it.
Only an extremely small fraction of data is on there unencrypted. Only that much I hadn’t yet switched on encryption on during the initial set-up I was still doing on the device. And that little piece of data already is what won’t let me send out the device.
Now, what can we learn from this? We can learn: Never ever ever work with anything, even during set-up, without full encryption.
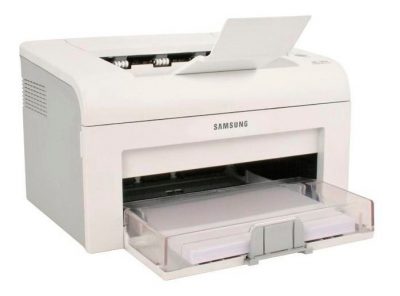
The nicest display I own :-)
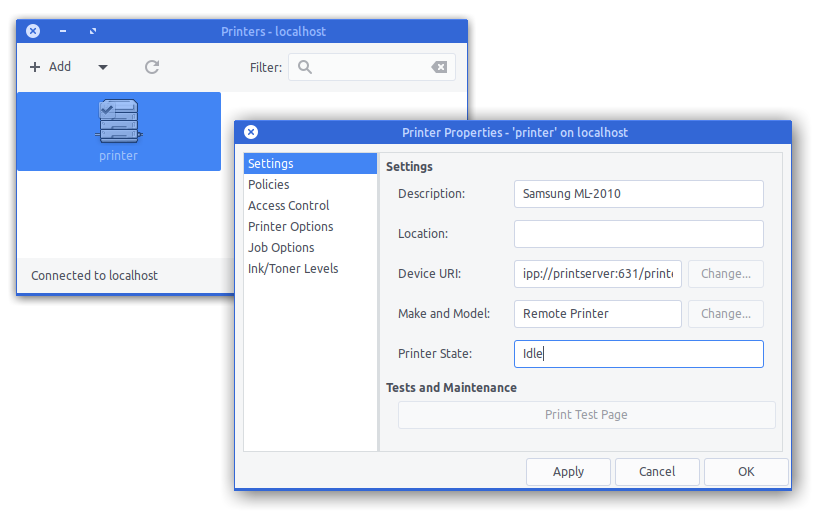
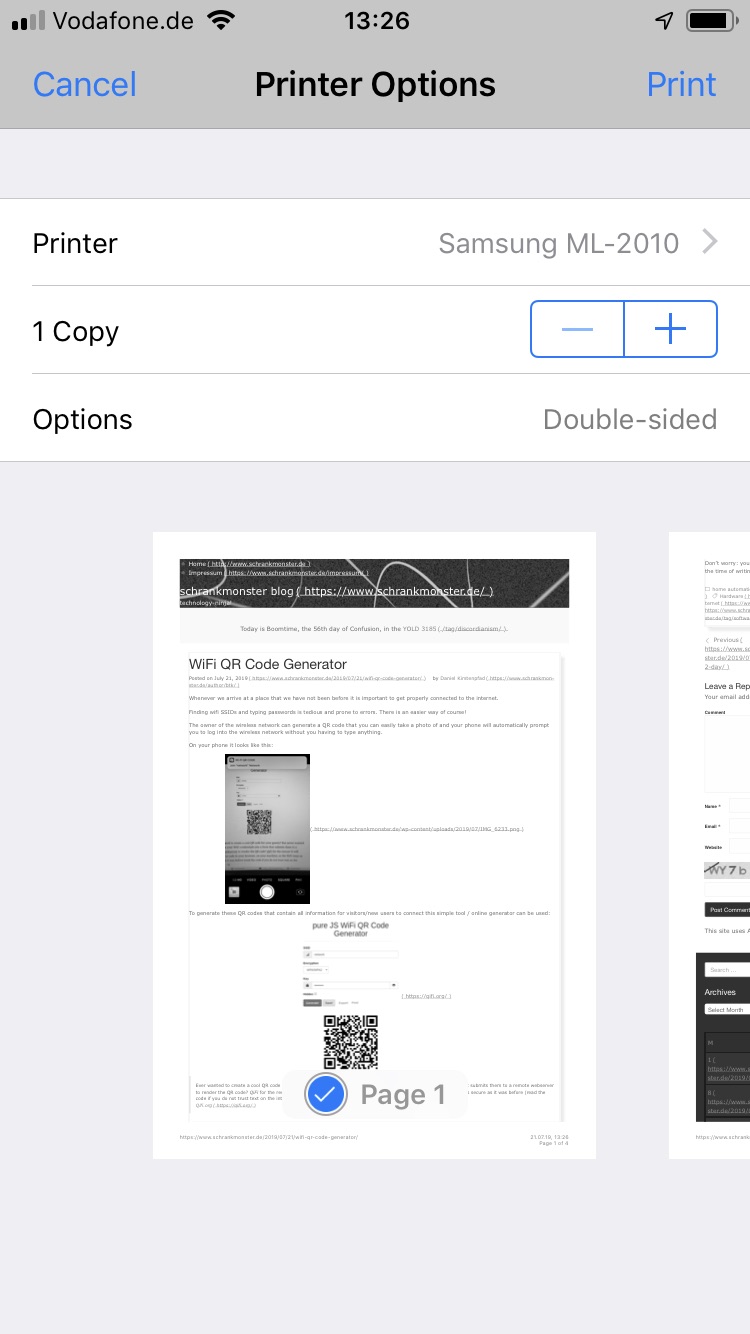
In 2007 I had become proud owner of a Samsung ML-2010 mono laser printer. It’s done a great job ever since and I can recall changing the toner just once so far.
So you can tell: I am not a heavy printer user. Every so often I gotta print out a sheet of paper to put on a package or to fill out a form. A laser printer is the perfect fit for this pattern as it’s toner is not going-bad or evaporating like ink does in ink-printers.
So I still like the printer and it’s in perfect working condition. I’ve just recently filled up the toner for almost no money. But – but this printer needs to be physically connected to the computer that wants to print.
As the usage patterns have significantly changed in the last 12 years this printer needs to be brought into todays networked world.
Replacing it with a new printer is not an option. All printers I could potentially purchase are both more expensive to purchase and the toner is much more expensive to refill. No-can-do.
If only there was an easy way to get the printer network ready. Well, turns out, there is!
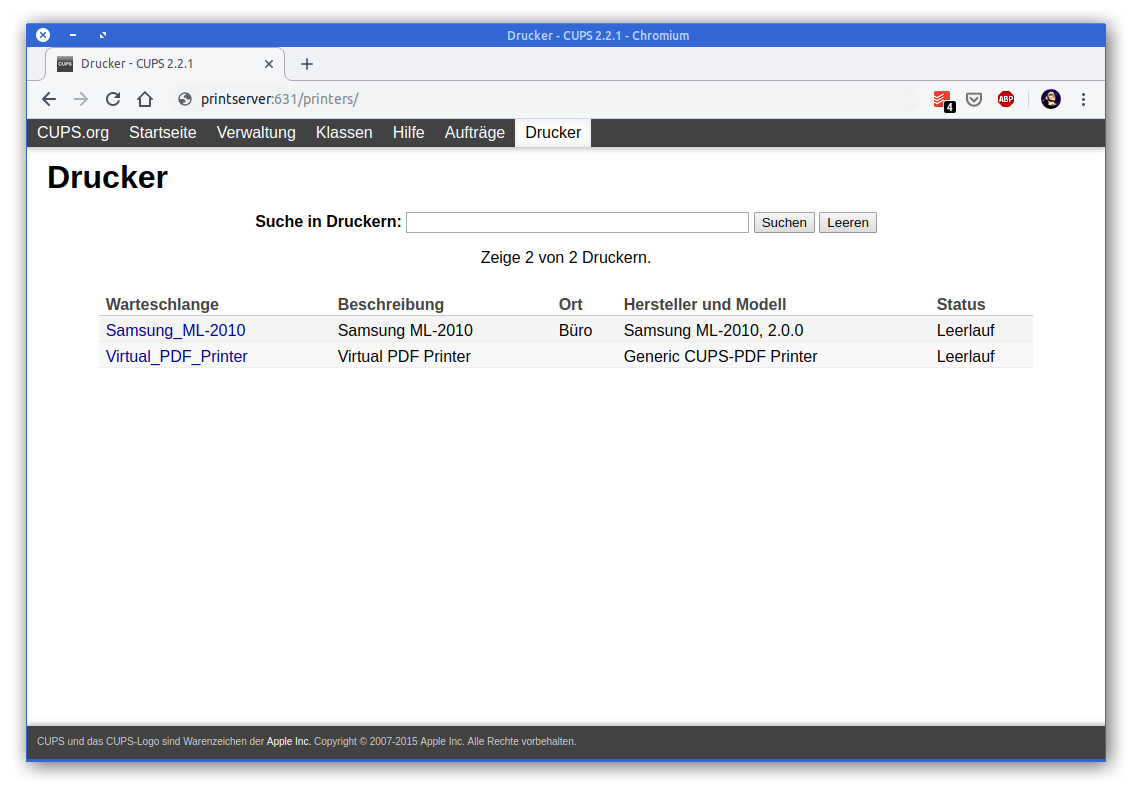
First let’s start introducing an opensource project: CUPS
CUPS (formerly an acronym for Common UNIX Printing System) is a modular printing system for Unix-like computer operating systems which allows a computer to act as a print server. A computer running CUPS is a host that can accept print jobs from client computers, process them, and send them to the appropriate printer.
Wikipedia
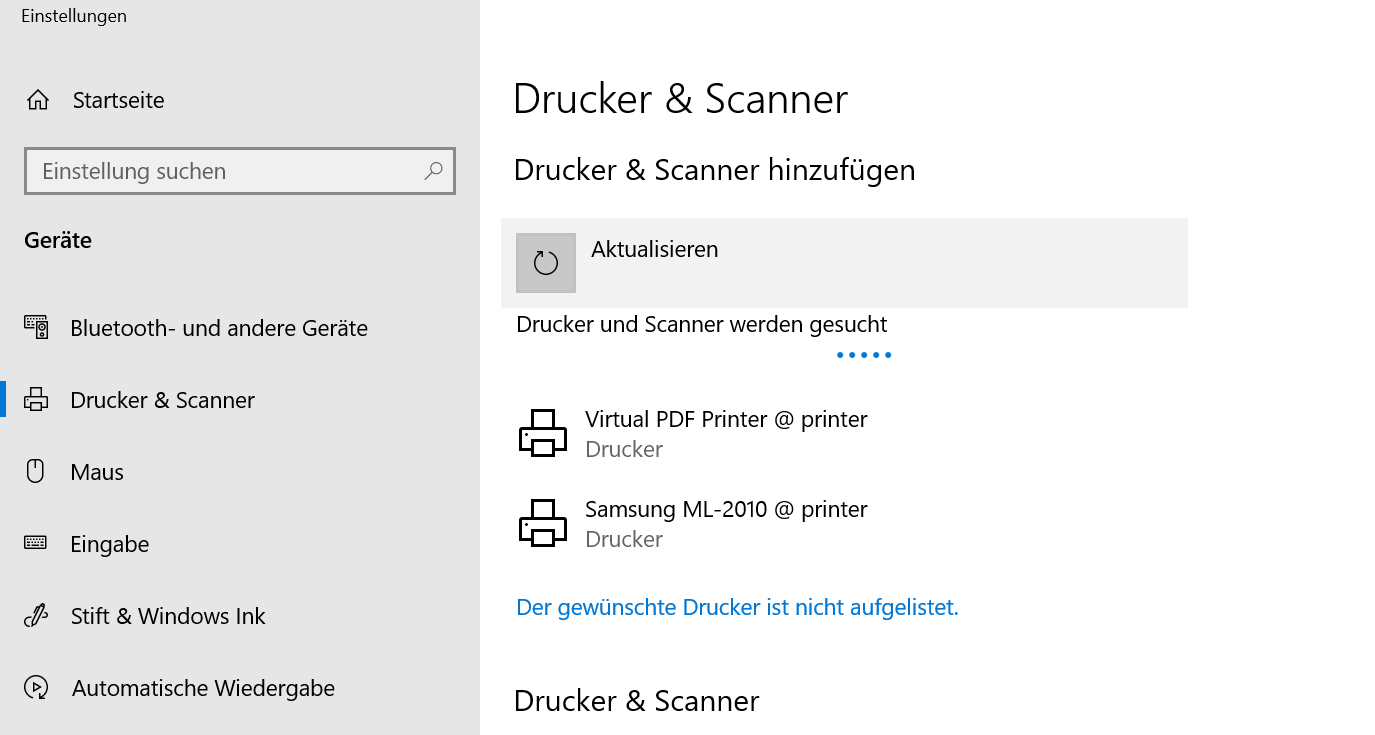
A good, cheap and energy-efficient way to run a CUPS host is a Raspberry Pi. I do own several first-generation models that have been replaced by much more powerful ones in the previous years.
So I’ve taken one Raspberry Pi and did the set-up steps: Installing the Raspberry Pi Print Server Software.
And now – what did I get?
I got a networked Samsung Laser Printer. No thrills, no problems at all.
Tube Time is apparently on the job to extract actual data from ROM images extracted out of chips which seemingly are those of a Creative Labs Sound Blaster 1.0 card.
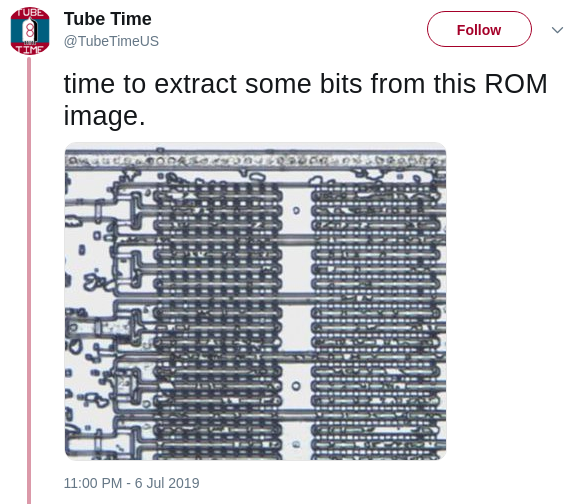
In addition to this excavation work there’s a growing documentation of the inner workings of mentioned Sound Blaster card.
With recent announcements around human brain and brain-machine interface research like Neuralink the topic is seemingly seeing some more investments now.
As this whole topic is special to my heart I am interested in all things brain simulations. Thus here’s my personal “logbook entry” on the re-appearance of this topic:
This leads to one of the arguments for whole-brain simulation: it’ll help us solve the “biological imitation game,” a Turing test-like assay that pits digitally reconstructed brains against real ones. Iterations of the test help select increasingly more accurate models for a given task, which eventually become the most promising ideas for how specific biological networks operate. And because these models are based on mathematical equations, they could become the heart of next-generation AI.
Singularity Hub
There’s also a paper! – Unfortunately I cannot link directly to the paper as it is behind paywalls. Neuralink on the other side was so kind to publish open-access:

Mass storage hardware breaks all the time. Sometimes it’s hardware that breaks, but sometimes it’s the software that breaks. If it’s the software (or own talent) that made the data go boom, TestDisk is a tool you should know about.
DISCLAIMER: If the data you are trying so recover is actually worth anything you might want to reserve to a professional data recovery service rather than trying to train-on-the-job.
Apart from the availability of pre-compiled packages for most operating systems you can also grab a bootable LiveCD when everything seems gone and lost.

The process itself is rather exciting (if you want the data back) and may require a fresh pair of pants upfront, throughout and after.
Thankfully there’s a great wiki and documentation of how to go about the business of data recovery.
TestDisk is powerful free data recovery software! It was primarily designed to help recover lost partitions and/or make non-booting disks bootable again when these symptoms are caused by faulty software: certain types of viruses or human error (such as accidentally deleting a Partition Table). Partition table recovery using TestDisk is really easy.
TestDisk has features for both novices and experts. For those who know little or nothing about data recovery techniques, TestDisk can be used to collect detailed information about a non-booting drive which can then be sent to a tech for further analysis. Those more familiar with such procedures should find TestDisk a handy tool in performing onsite recovery.
And if you give up, think about writing an article of you actually digging deeper:
When you work with wireless networks and you do programming and mobile app development that works with things like user location you might find this useful.
Take thousands of users and you’ve got the worlds wifi networks mapped…
WiGGLE (Wireless Geographic Logging Engine) is a project which takes wireless network data + location and puts it into a big database. On top of storage it’s giving you access to that data.
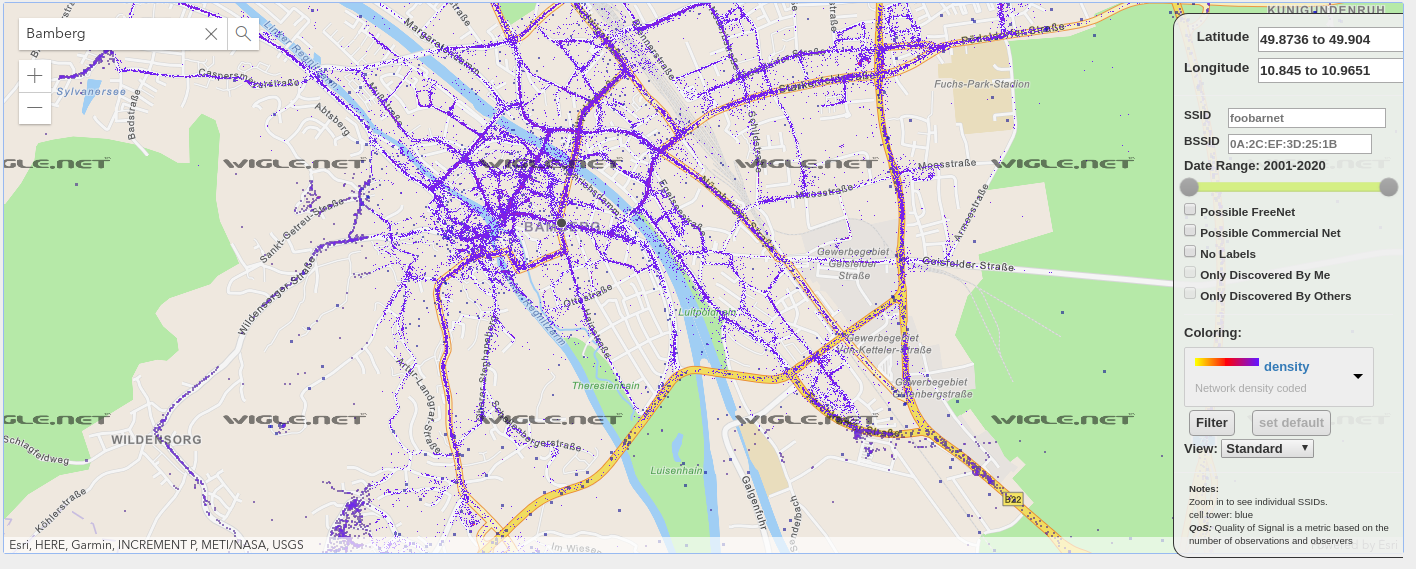
We consolidate location and information of wireless networks world-wide to a central database, and have user-friendly desktop and web applications that can map, query and update the database via the web.
https://wigle.net/faq

So what’s my use-case? Apart from the obvious I will make use of this by finding out more about those fellow travelers around me. Many people probably to the same as me: Travel with a small wifi / 4g access point. Whenever this accesspoints shows up in scans the path will be traceable.
I am curious to see which access point around me is in the million-mile club yet…
Whenever we arrive at a place that we have not been before it is important to get properly connected to the internet.
Finding wifi SSIDs and typing passwords is tedious and prone to errors. There is an easier way of course!
The owner of the wireless network can generate a QR code that you can easily take a photo of and your phone will automatically prompt you to log into the wireless network without you having to type anything.
On your phone it looks like this:
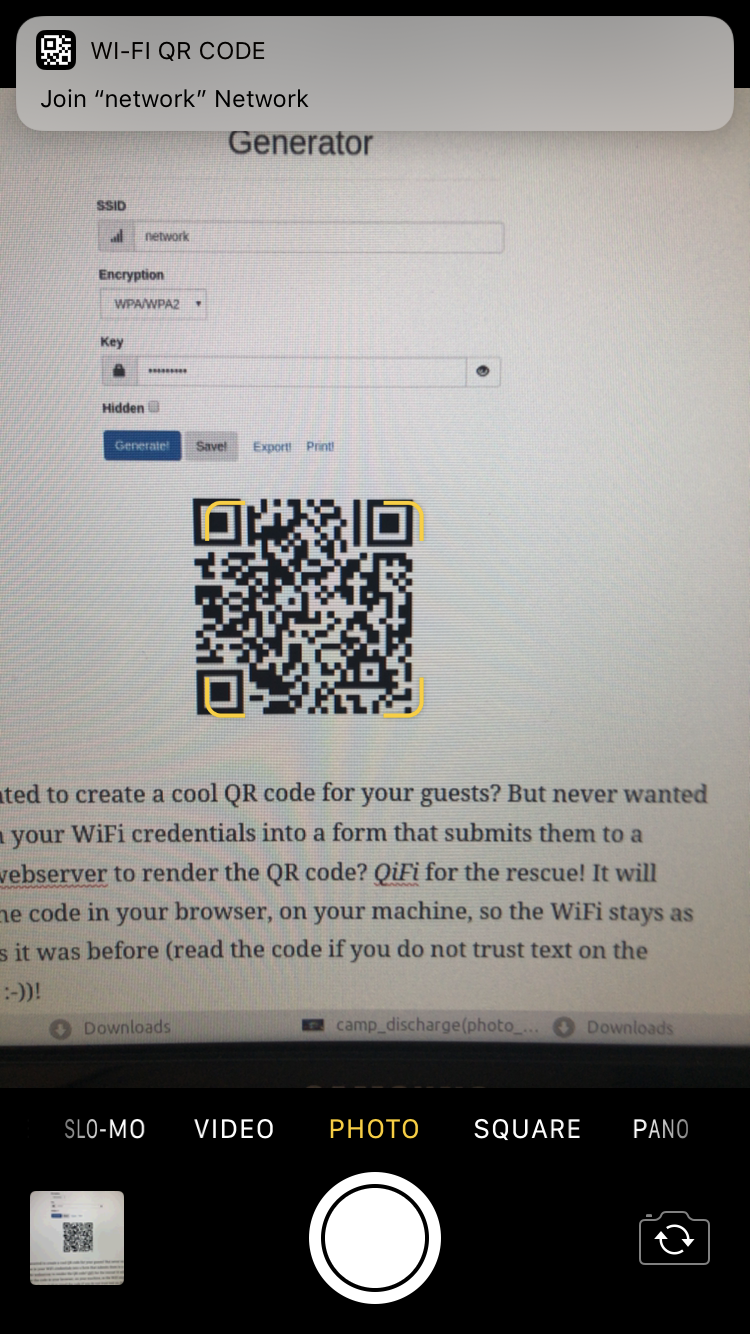
To generate these QR codes that contain all information for visitors/new users to connect this simple tool / online generator can be used:

Ever wanted to create a cool QR code for your guests? But never wanted to type in your WiFi credentials into a form that submits them to a remote webserver to render the QR code? QiFi for the rescue! It will render the code in your browser, on your machine, so the WiFi stays as secure as it was before (read the code if you do not trust text on the internet :-))!
Qifi.org
Don’t worry: your access point information is not transferred over the internet. As this is open source at the time of writing the data was held in HTML 5 local storage on the local browser only and not transferred out.
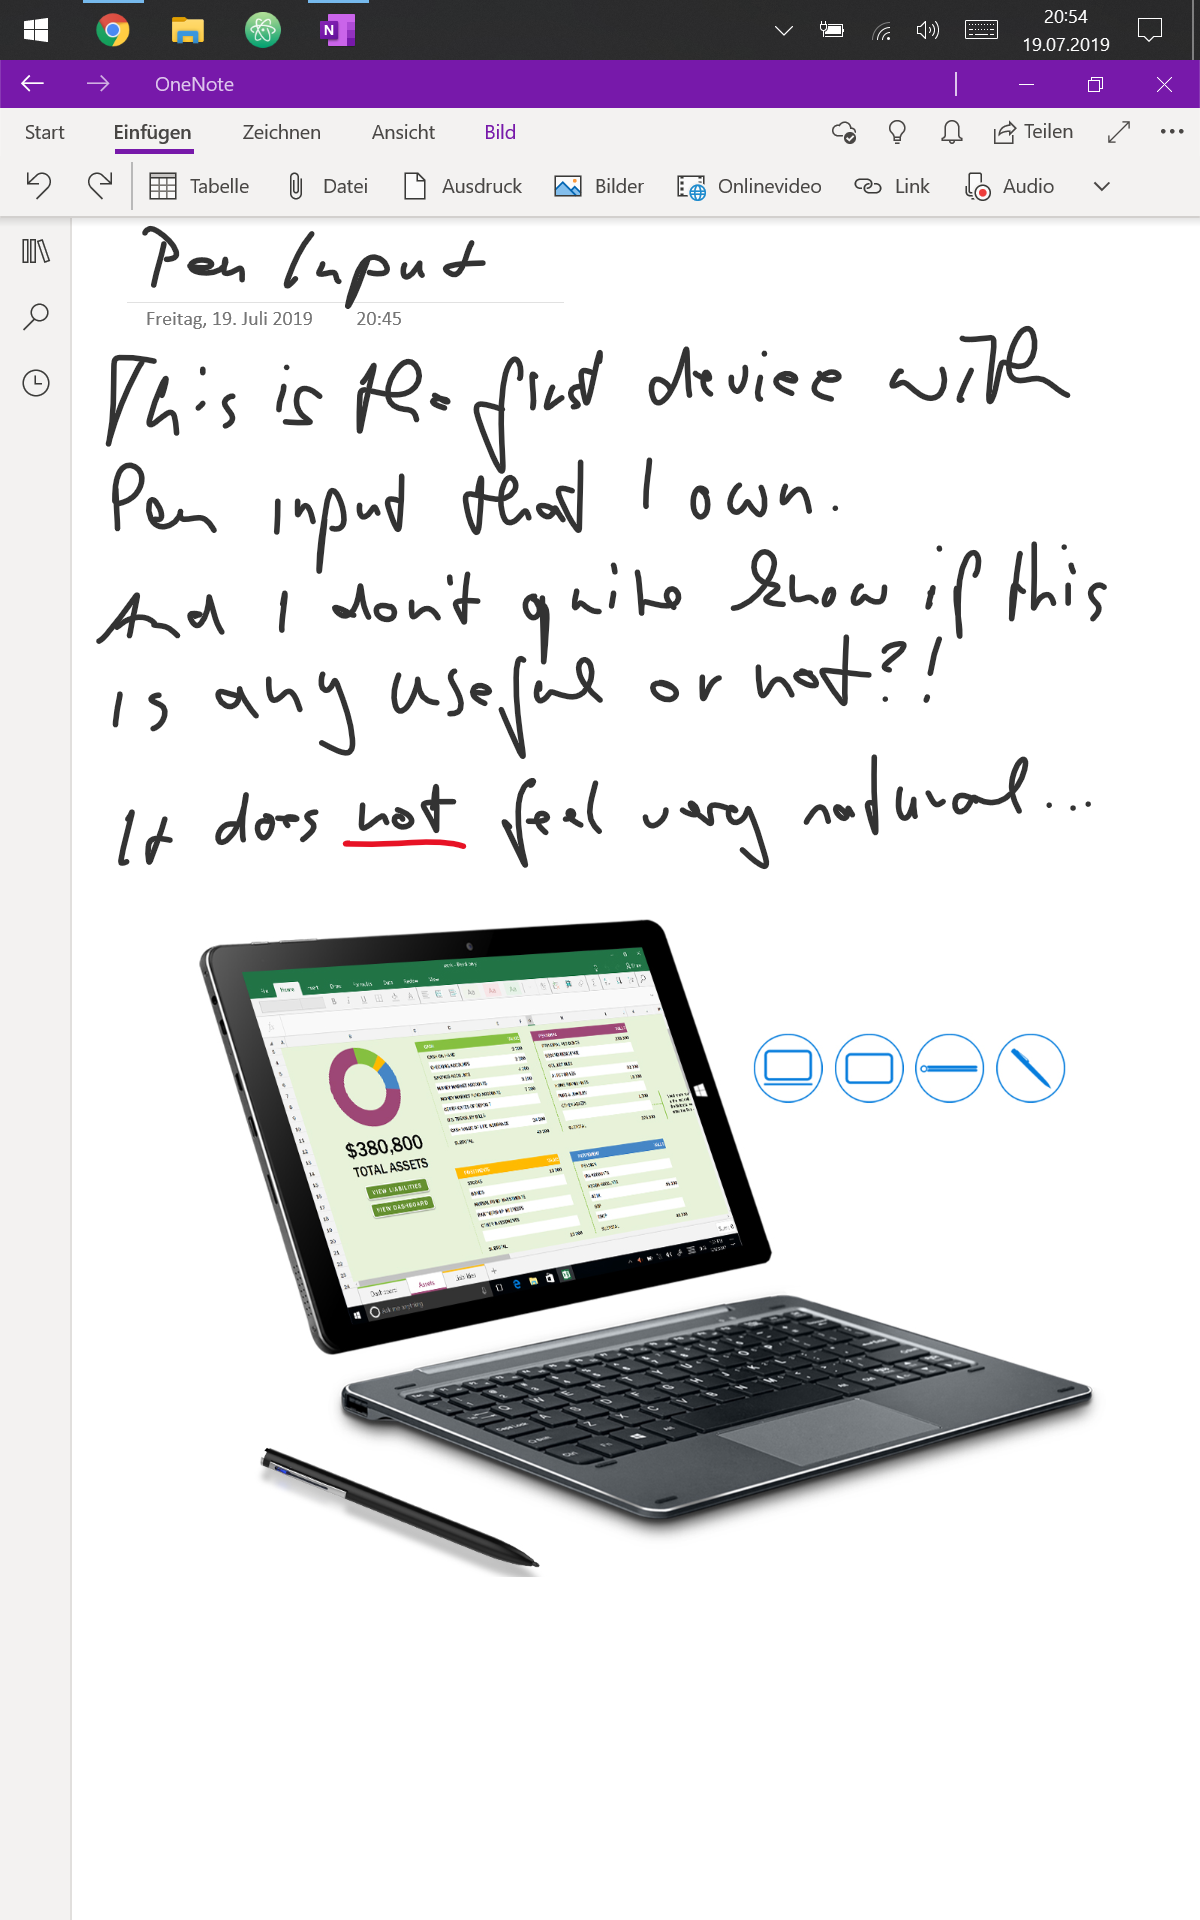
The Android tablets I am using for my kitchen scale display and for myfitnesspal data-entry are aging quite bad and apart from the near-display death of one of the tablets both are not supported and updated anymore.
Using them therefore poses an increasing risk. After one of them almost died on me I was determined to replace them both. Looking at alternatives at the lowest possible price quickly showed that I am not going to get another Android tablet.
Instead I was ready to give a chinese company a chance:
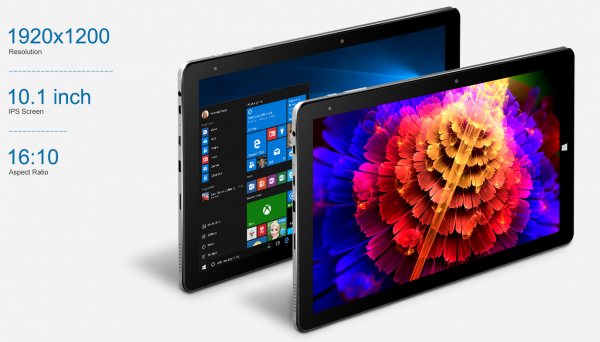
I ordered it on 24th of June and it was delivered today. All in all I’ve paid 136 Euro for the tablet and 45 Euro for the keyboard attachement.
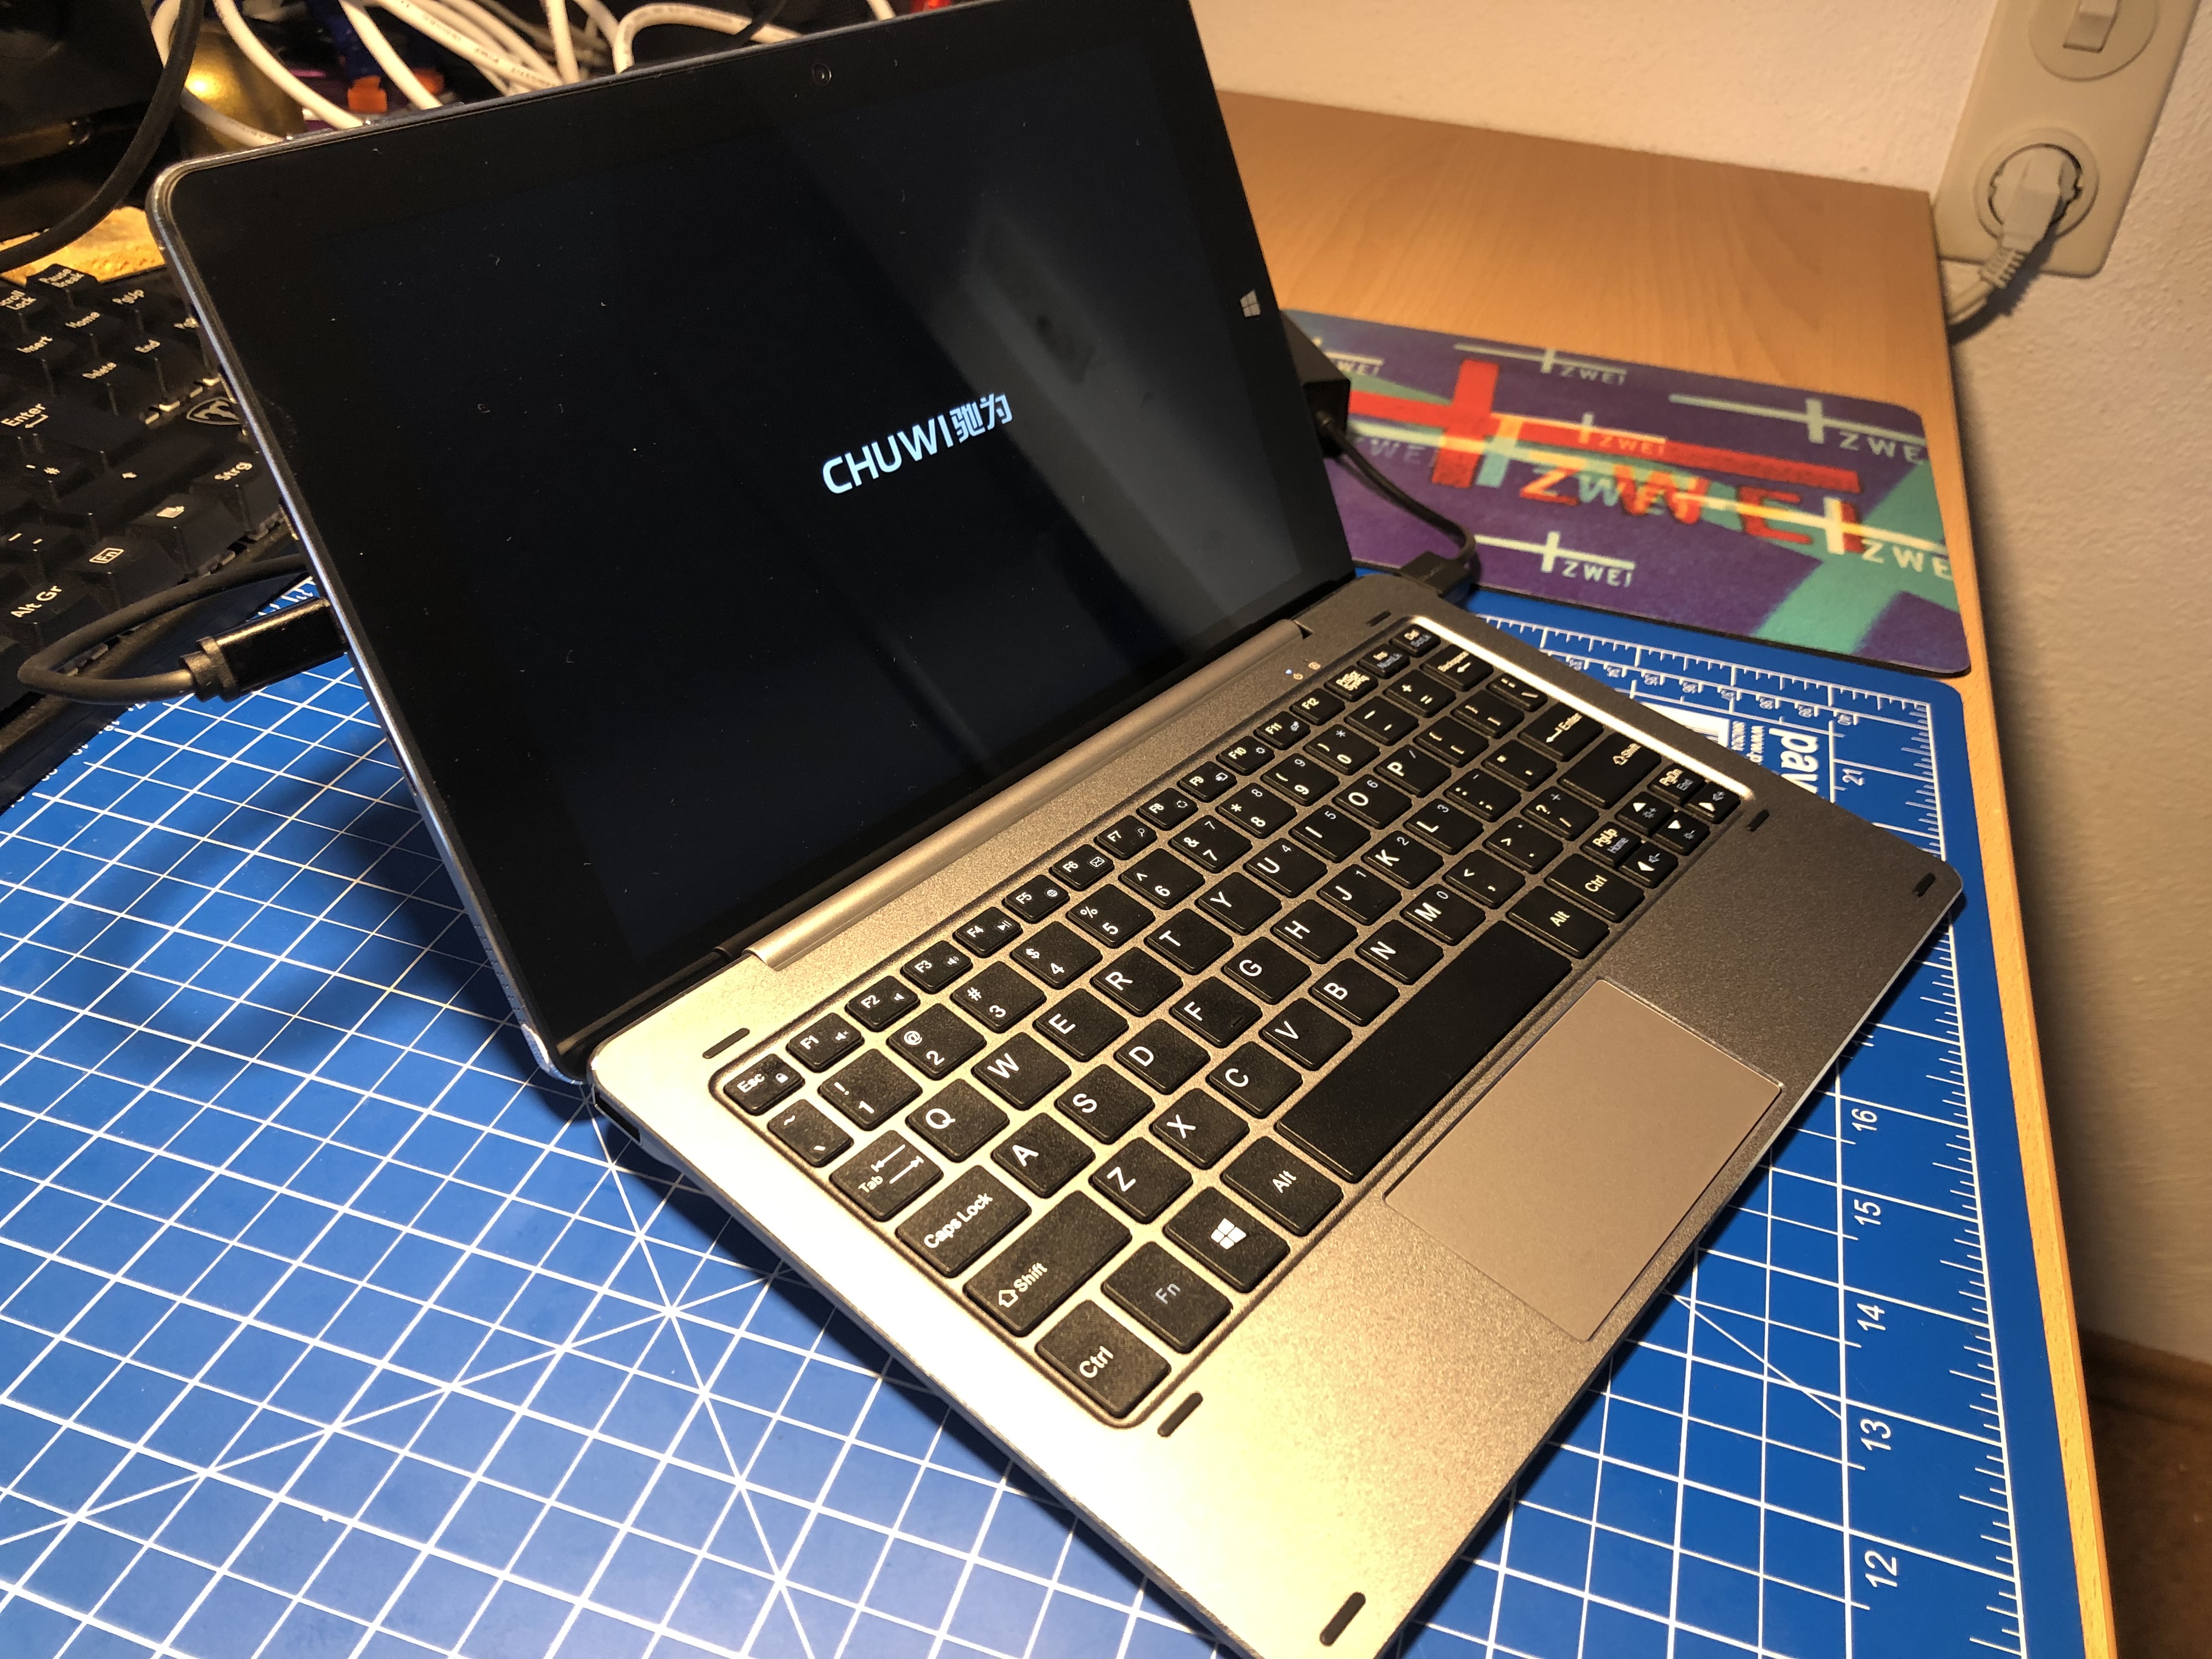
Despite the ridiculously low price this thing is quite impressive. It’s sporting a fast-enough Intel Atom processor with 1.4 ghz and 4 Gbyte of RAM. The 64 Gb of solid-state storage where quickly upgraded by an additional 400 Gb MicroSD card for local data storage.
As of writing this it’s still installing and updating the Windows 10 to 1903 but so far I am beyond impressed.
I’ll write more about the device when I’ve had more time to use it. One word for the keyboard attachement: the keyboard is good-enough. Not great but better than for example that on the Pinebook. The touchpad is very small but works – the thing has a Touchscreen anyway.
Try to wrap your head around this: There are people out there that take the term “Maker” to new levels. People Like Sam Zeloof. He went out and created his very own integrated circuit designs and then he built them. Like the actual silicon, the die, the bonded chip, the IC. The real thing.
Be inspired:
I am very excited to announce the details of my first integrated circuit and share the journey that this project has taken me on over the past year. I hope that my success will inspire others and help start a revolution in home chip fabrication. When I set out on this project I had no idea of what I had gotten myself into, but in the end I learned more than I ever thought I would about physics, chemistry, optics, electronics, and so many other fields. Furthermore, my efforts have only been matched with the most positive feedback and support from the world; I owe a sincere thanks to everyone who has helped me, given me advice, and inspired me on this project. Especially my amazing parents, who not only support and encourage me in any way they can but also give me a space to work in and put up with the electricity costs… Thank you!
Sam Zeloof
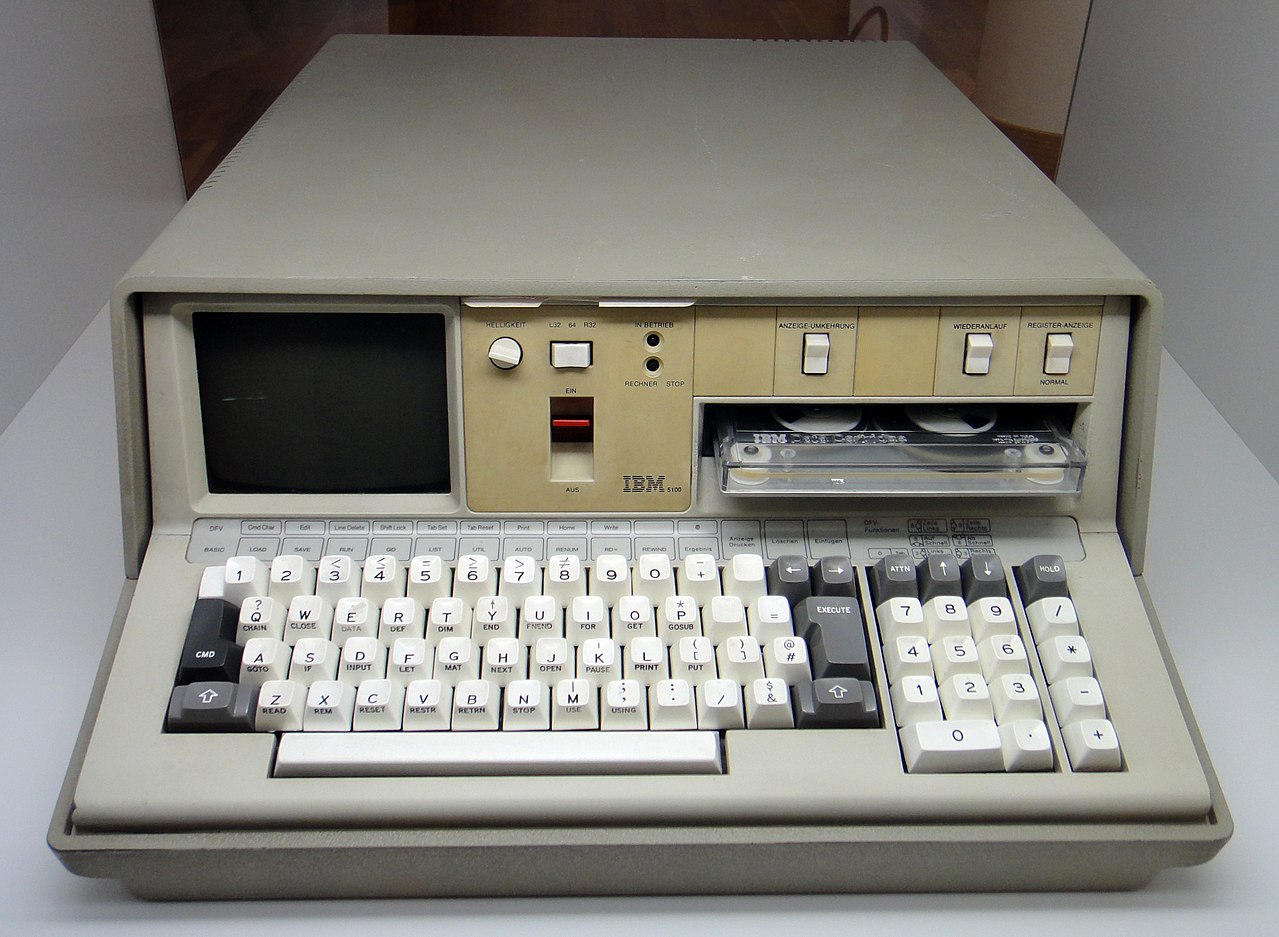
Imagine you’ve got this ancient piece of technology in front of you. You clearly understand how the hardware works and you are even able to emulate the hardware on your modern-world computer.
Unfortunately hardware is only one half of the story. Software is the other half. And software at this time of the past was burned into chips which do not easily give their secret software away.
But let’s start with the hardware:
The IBM 5100 Portable Computer is a portable computer (one of the first) introduced in September 1975, six years before the IBM Personal Computer. It was the evolution of a prototype called the SCAMP (Special Computer APL Machine Portable) that was developed at the IBM Palo Alto Scientific Center in 1973. In January 1978, IBM announced the IBM 5110, its larger cousin, and in February 1980 IBM announced the IBM 5120. The 5100 was withdrawn in March 1982.
When the IBM PC was introduced in 1981, it was originally designated as the IBM 5150, putting it in the “5100” series, though its architecture was not directly descended from the IBM 5100.
And now on to the software:
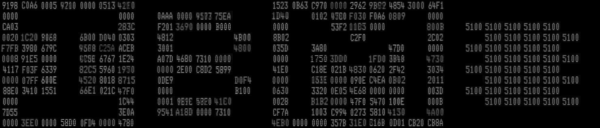
The IBM 5100 portable computer came with some of its built-in programs stored in a read-only memory called the “non-executable ROS”. (ROS = “read-only storage”.) In contrast with the “executable ROS”, which supplies instructions to the 5100’s processor directly, the non-executable ROS is accessed using sequential I/O operations, a bit like a tape.
Most notably, the non-executable ROS holds the interactive interpreters for the APL and BASIC programming languages. These are not “native” 5100 programs but were expressed instead in System/370 mainframe and System/3 minicomputer machine code respectively. The 5100 runs emulator programs for those computers in order to host the interpreters, so perhaps it’s just as well that the non-executable ROS is non-executable.
DATA
So this write-up is all about how the bits where pushed to the screen and recorded as pictures of the said screen. The characters in these pictures then where analyzed and with the help of machine learning the data could be successfully extracted. It is mind-boggling. And it is all on Github.
If there is any discussion or argument about electric mobility these days the topic of range and battery-aging is coming up rather quick.
Every once in a while you also hear these awesome stories about electric cars achieving total-driven-distances outrageously huge compared to combustion engine cars…
But what is it then, how does a battery in an electric car age over time and mileage? Given that car manufacturers seem to settle on a ca. 150.000km total-driven-miles baseline for giving a battery-capacity percentage guarantee. Something like…
The future owners of ID. models won’t need to worry about the durability of their batteries either, as Volkswagen will guarantee that the batteries will retain at least 70 per cent of their usable capacity even after eight years or 160,000 kilometres.
Volkswagen Newsroom
or
Model S and Model X – 8 years (with the exception of the original 60 kWh battery manufactured before 2015, which is covered for a period of 8 years or 125,000 miles, whichever comes first).
Model 3 – 8 years or 100,000 miles, whichever comes first, with minimum 70% retention of Battery capacity over the warranty period.
Model 3 with Long-Range Battery – 8 years or 120,000 miles, whichever comes first, with minimum 70% retention of Battery capacity over the warranty period.
Tesla
So. Guarantees are one thing. Reality another. There’s an interesting user-driven survey set-up where Tesla owners can hand in their cars data thus participate in the survey.

And it yields results (getting updated as you read…):

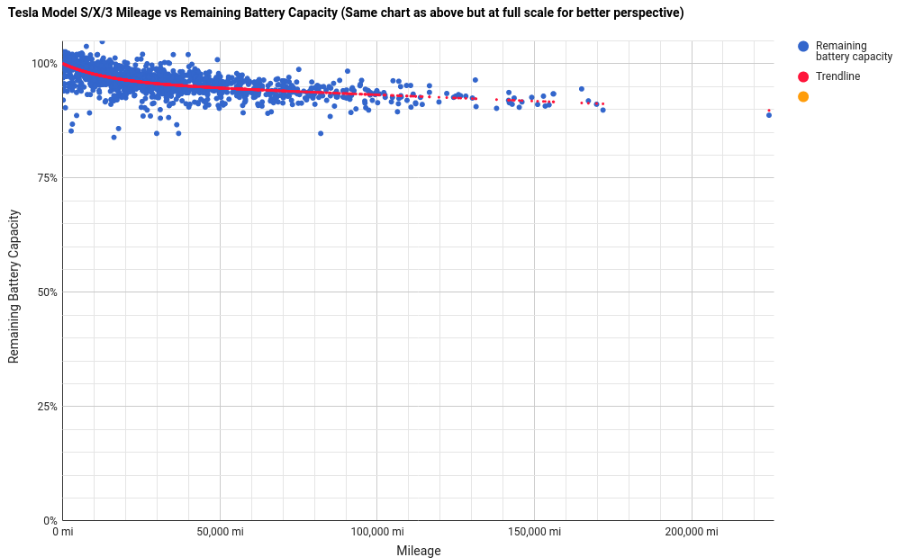
In a nutshell: It seems there is a good chance that your Tesla car might have an above 90% original-specified-battery-capacity after the guaranteed 100.000 miles and even after 150.000 miles (241.000km)…
Good news that is! Given that the average household will do about or less than 20.000 km/year it would mean over 12 years of use and the car still would hold 90% of battery charge. The battery being the most expensive single component on an electric car this is extremely good news as it’s unlikely that the battery will be the reason for the car to be scraped after this mileage.

And to spice things up a bit more:

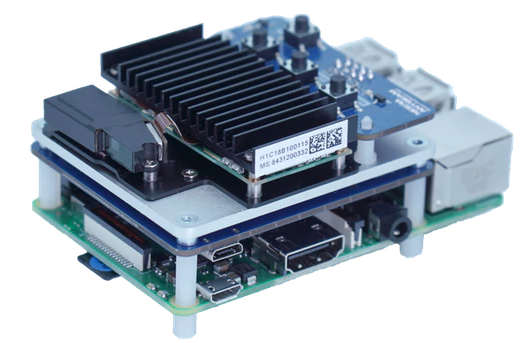
There are new micro-projectors coming and they are looking good. After the first availability of really small and low-power but enough-light LED projectors (see here) manufacturers have apparently added a laser to the equation.
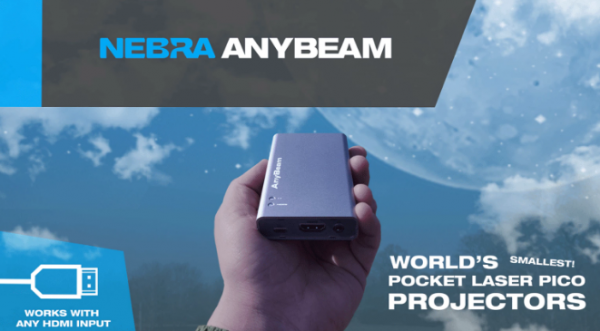
It is said that…
Unlike traditional projectors that constantly need to be focussed, the Nebra AnyBeam picture is always perfect. You can project onto curved or irregular surfaces with ease – perfect if you want to use it on the fly, or if you want to try your hand at a bit of projection mapping!
This thing will be available, according to the Kickstarter, as a all-in-one package with power and HDMI inputs. It’s got 720p inputs. Well. Well really?
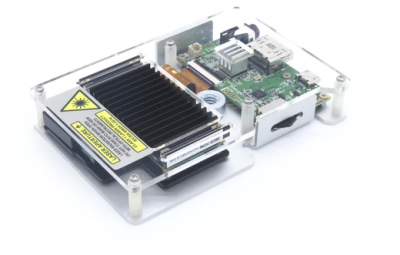
And it will be available to the maker market as a RaspberryPi Hat…
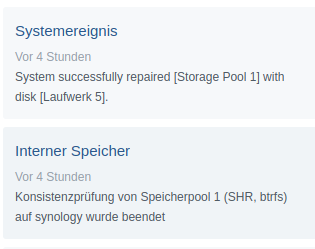
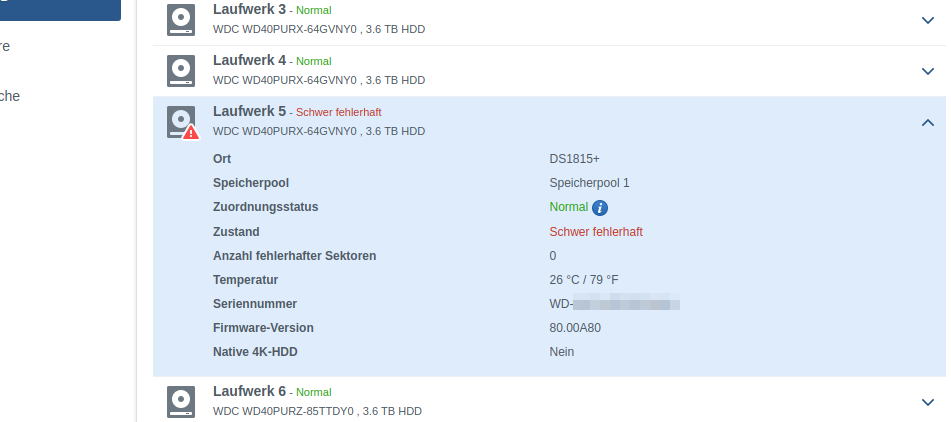
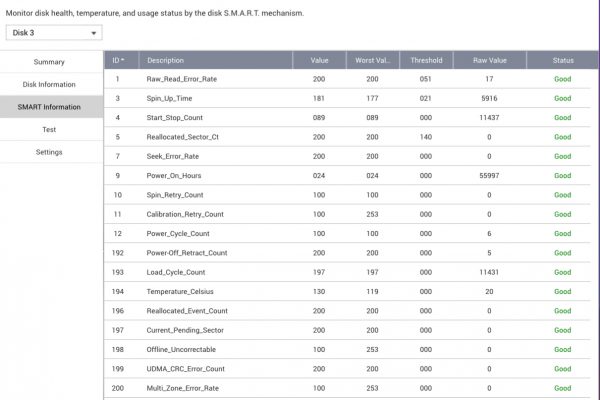
All is good. No data has been harmed in the process. Now drive #8 needs to be replaced.
As the replacement drive for yesterdays hard drive crash was put into place the storage array started to re-silver the newly added empty drive. This process takes a while – about 8 hours for this particular type of array.
Interestingly just 2 minutes into the process another drive dropped a bombshell:
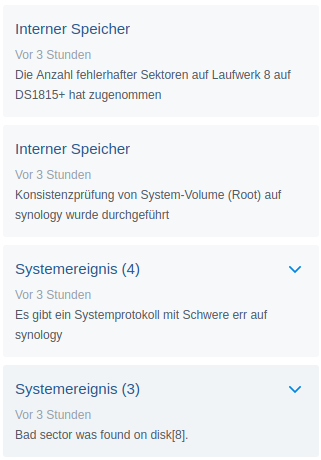
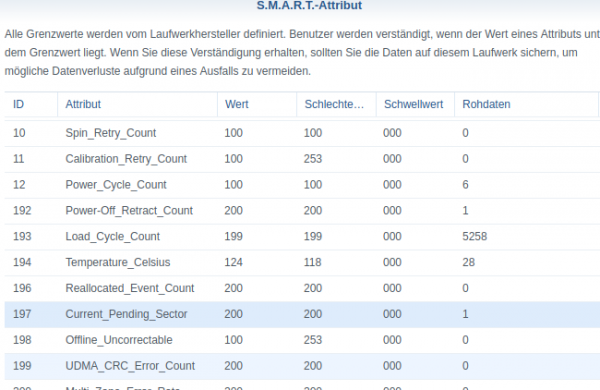
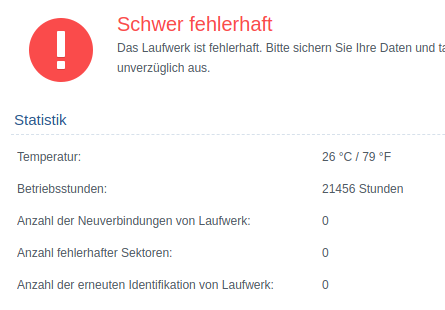
Apparently disk 8 holds together it’s business so far but dropped a couple of parity errors into the equation.
This is bad news. But so far science still is on my side of things and no data has been lost.
But now redundancy is down completely. There’s no redundancy for now – until the replaced hard disk is fully integrated. My policy for these sized drives demands a minimum of 2-disk redundancy and for today this policy saved the day (data).
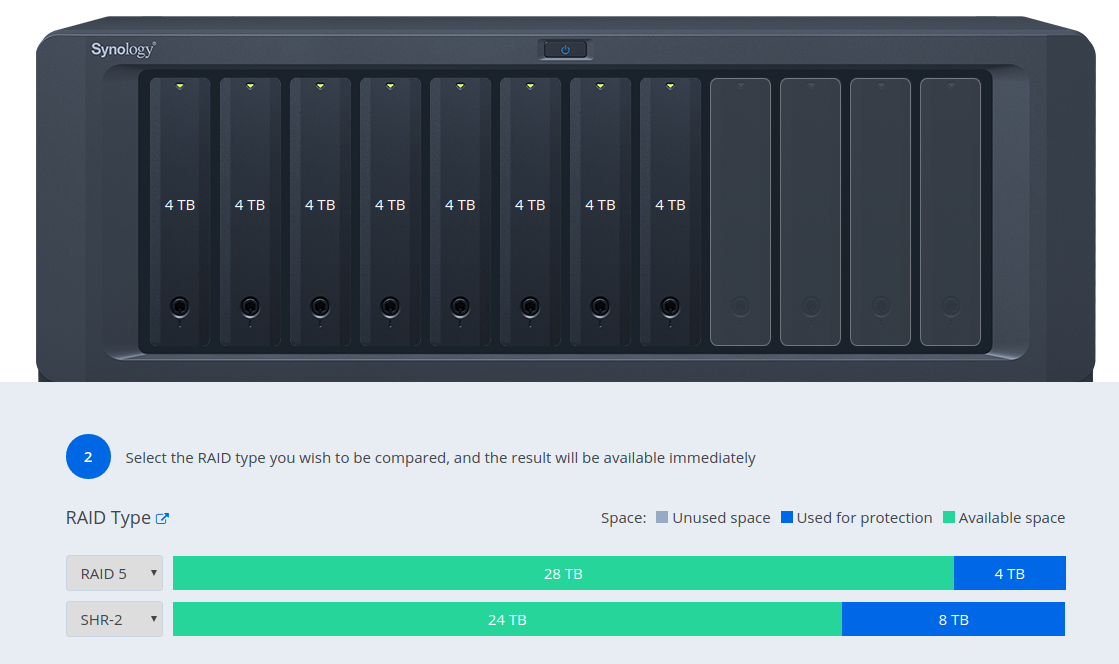
Actually let’s dive a bit into what it’s doing there to achieve 2-disk redundancy:
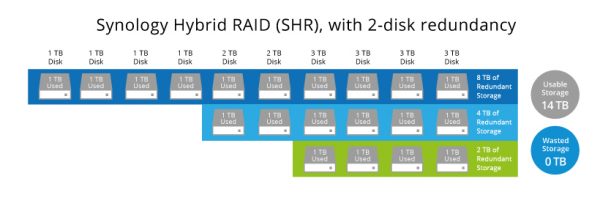
Synology Hybrid RAID (SHR) is an automated RAID management system from Synology, designed to make storage volume deployment quick and easy. If you don’t know much about RAID, SHR is recommended to set up the storage volume on your Synology NAS.
You will learn different types of SHR and their advantages/disadvantages over classic single disk/RAID setups. In the end, you will be able to choose a type of RAID or SHR for the best interest of your storage volume. This article assumes that as the admin of your Synology NAS, you are also an experienced network administrator with a firm grasp of RAID management.
Synology Hybrid Raid
So you trade data redundancy and safety for useable disk space. Here this is compared to traditional RAID 5:
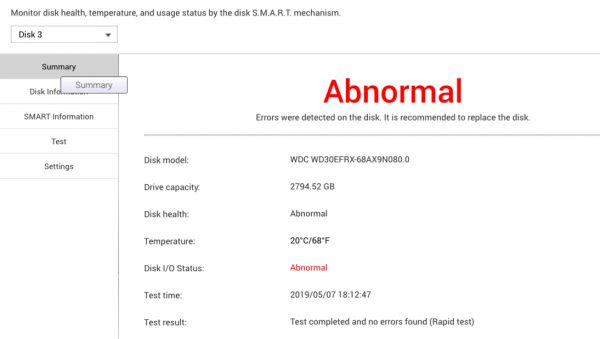
After the sudden death of a hard drive in one of the house’ storage arrays (after 55997 hours of service) beginning of this month it has happened again:
With less than half the runtime of the previously dead disk this one is an early failure. Well within the warranty. Therefore the disk is already en route to be replaced by an RMA (Western Digital RMA process so far is spotless!)
Anyhow: This was a 4 TB drive. It’s in an array with 2-disk redundancy and 8 other drives. So the array still is operating with redundancy right now. Additionally a full backup exists as well as a hot-standby (but slower) offsite mirror.
I am quite confident to not loose data. But this raid-sync is going to take a bit longer. As drives get bigger, syncs get longer.
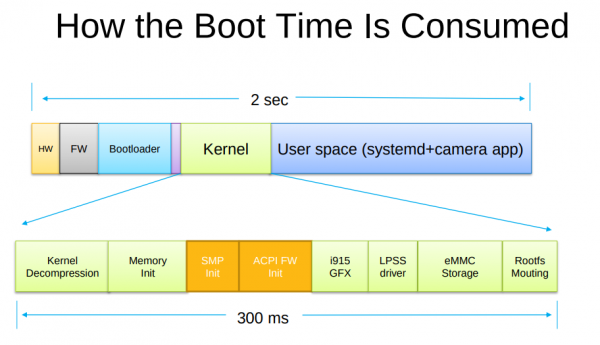
The CPU/hardware related bugs surfacing the last couple of years have mostly been fixed by adjusting the software that is run. Sometimes only by disabling certain features of a CPU or patching the microcode in the CPU itself.
The issue with this is that by fixing these issues features got disabled and workarounds had been introduced that lowered performance. Dramatically so for some use-cases.
By how much? Well it really depends on your CPU and use-cases. But maybe you want to try yourself. If you want to know the most current parameters to pass to your kernel on boot-up to disable all the performance impacting fixes, go here:

It is not recommended to have this in productive use – as you can imagine. Those bugs where fixed for a reason.
Every once in a while a hard drive fails in our house. Since all is setup to tolerate one or more failed drives no data was lost with this incident.
This drive especially gives reason to look back as it is more old with more than 6 years of continuously being powered up.

Suica (スイカ Suika) is a rechargeable contactless smart card, electronic money used as a fare card on train lines in Japan, launched on November 18, 2001. The card can be used interchangeably with JR West’s ICOCA in the Kansai region and San’yō region in Okayama, Hiroshima, and Yamaguchi Prefectures, and also with JR Central’s TOICA starting from spring of 2008, JR Kyushu’s SUGOCA, Nishitetsu’s Nimoca, and Fukuoka City Subway’s Hayakaken area in Fukuoka City and its suburb areas, starting from spring of 2010. The card is also increasingly being accepted as a form of electronic money for purchases at stores and kiosks, especially within train stations. As of October 2009, 30.01 million Suica are in circulation.
https://en.wikipedia.org/wiki/Suica
This time around we really made use of electronic payment and got around using cash whenever possible.
There where only a few occasions when we needed the physical credit card. Of course on a number of tourist spots further away from Tokyo centre cash was still king.
From my first trip to Japan to today a lot has changed and electronic payment was adopted very quickly. Compared to Germany: Lightning fast adoption in Japan!
The single best thing that has happened recently in this regard was that Apple Pay got available in Germany earlier this year. With the iPhone and Watch supporting SUICA already (you can get a card on the phone/watch) the availability of Apple Pay bridged the gap to add money to the SUICA card on the go. As a visitor to Japan you would mostly top up the SUICA card in convenience stores and train stations and mostly by cash. With the Apple Pay method you simply transfer money in the app from your credit card to the SUICA in an instant.

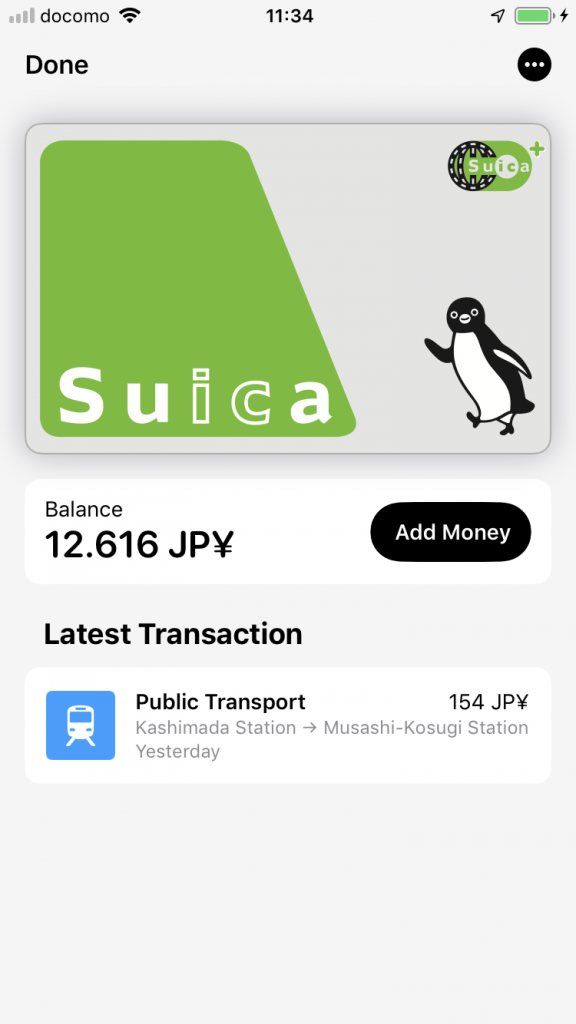
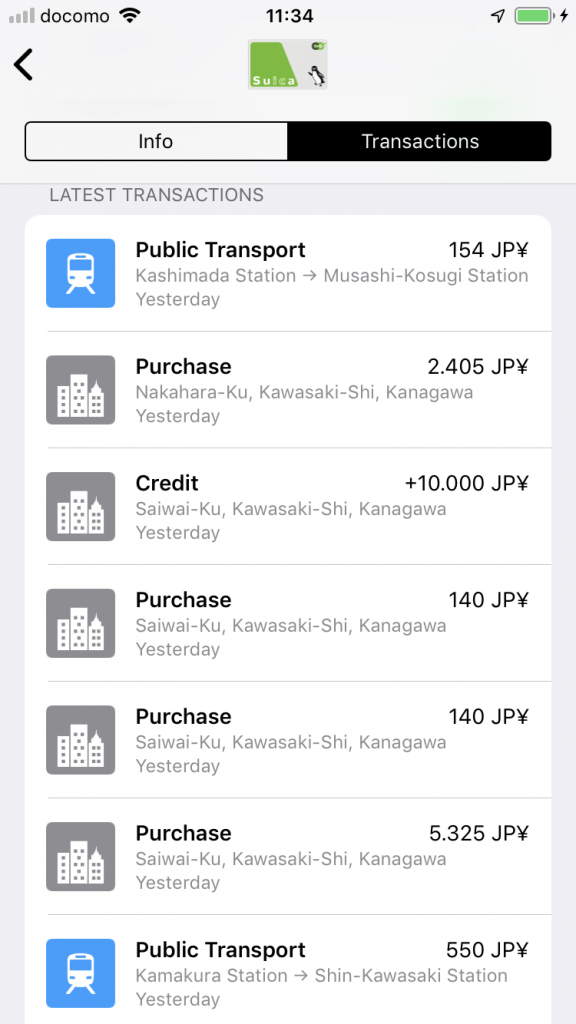

This whole electronic money concept is working end-2-end in Japan. Almost every shop takes it. You wipe your SUICA and be done. And not only for small amounts. Everything up to 20.000 JPY will work (about 150 Euro).
And when you run through a train station gate to pay for your trip it you hold your phone/watch up to the gate while walking past and this is it in realtime screen recorded:

I wish Germany would adopt this faster.
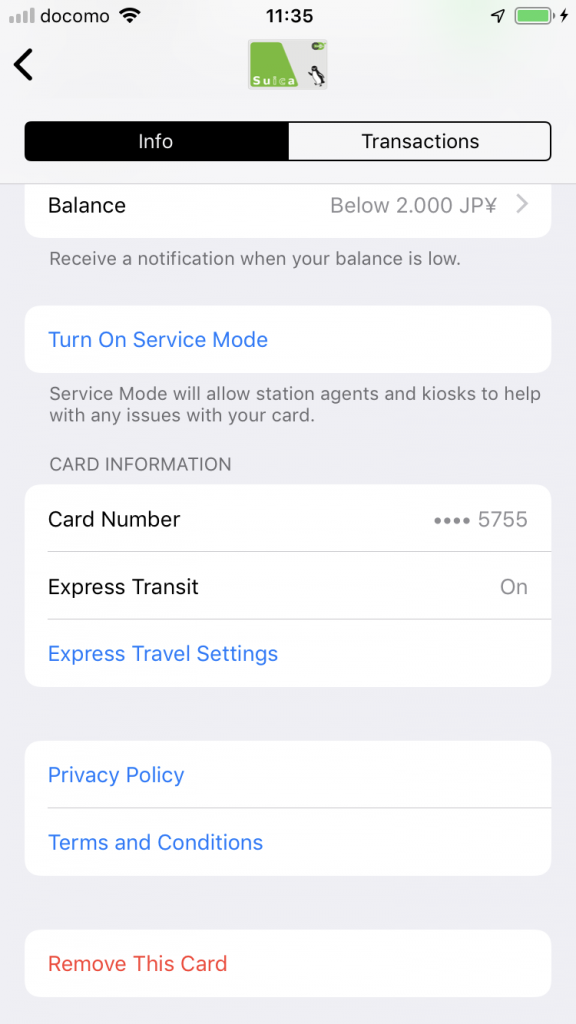
Oh, important fact: This whole SUICA thing is 100% anonymous. You get a card without giving out any information. You can top it up with cash without any link to you.
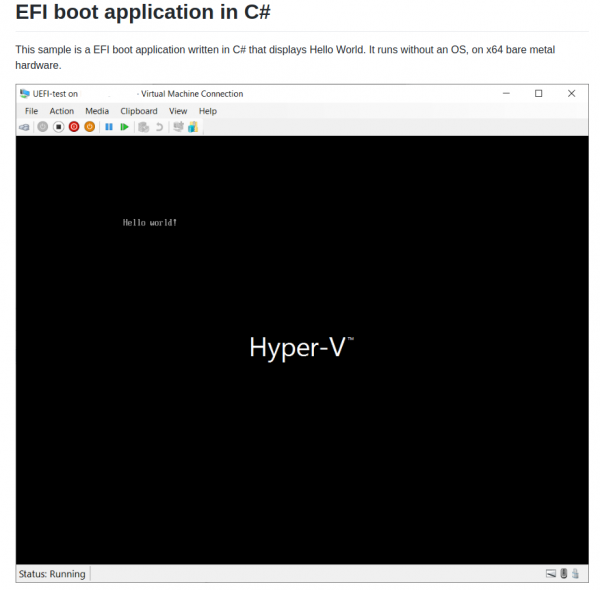
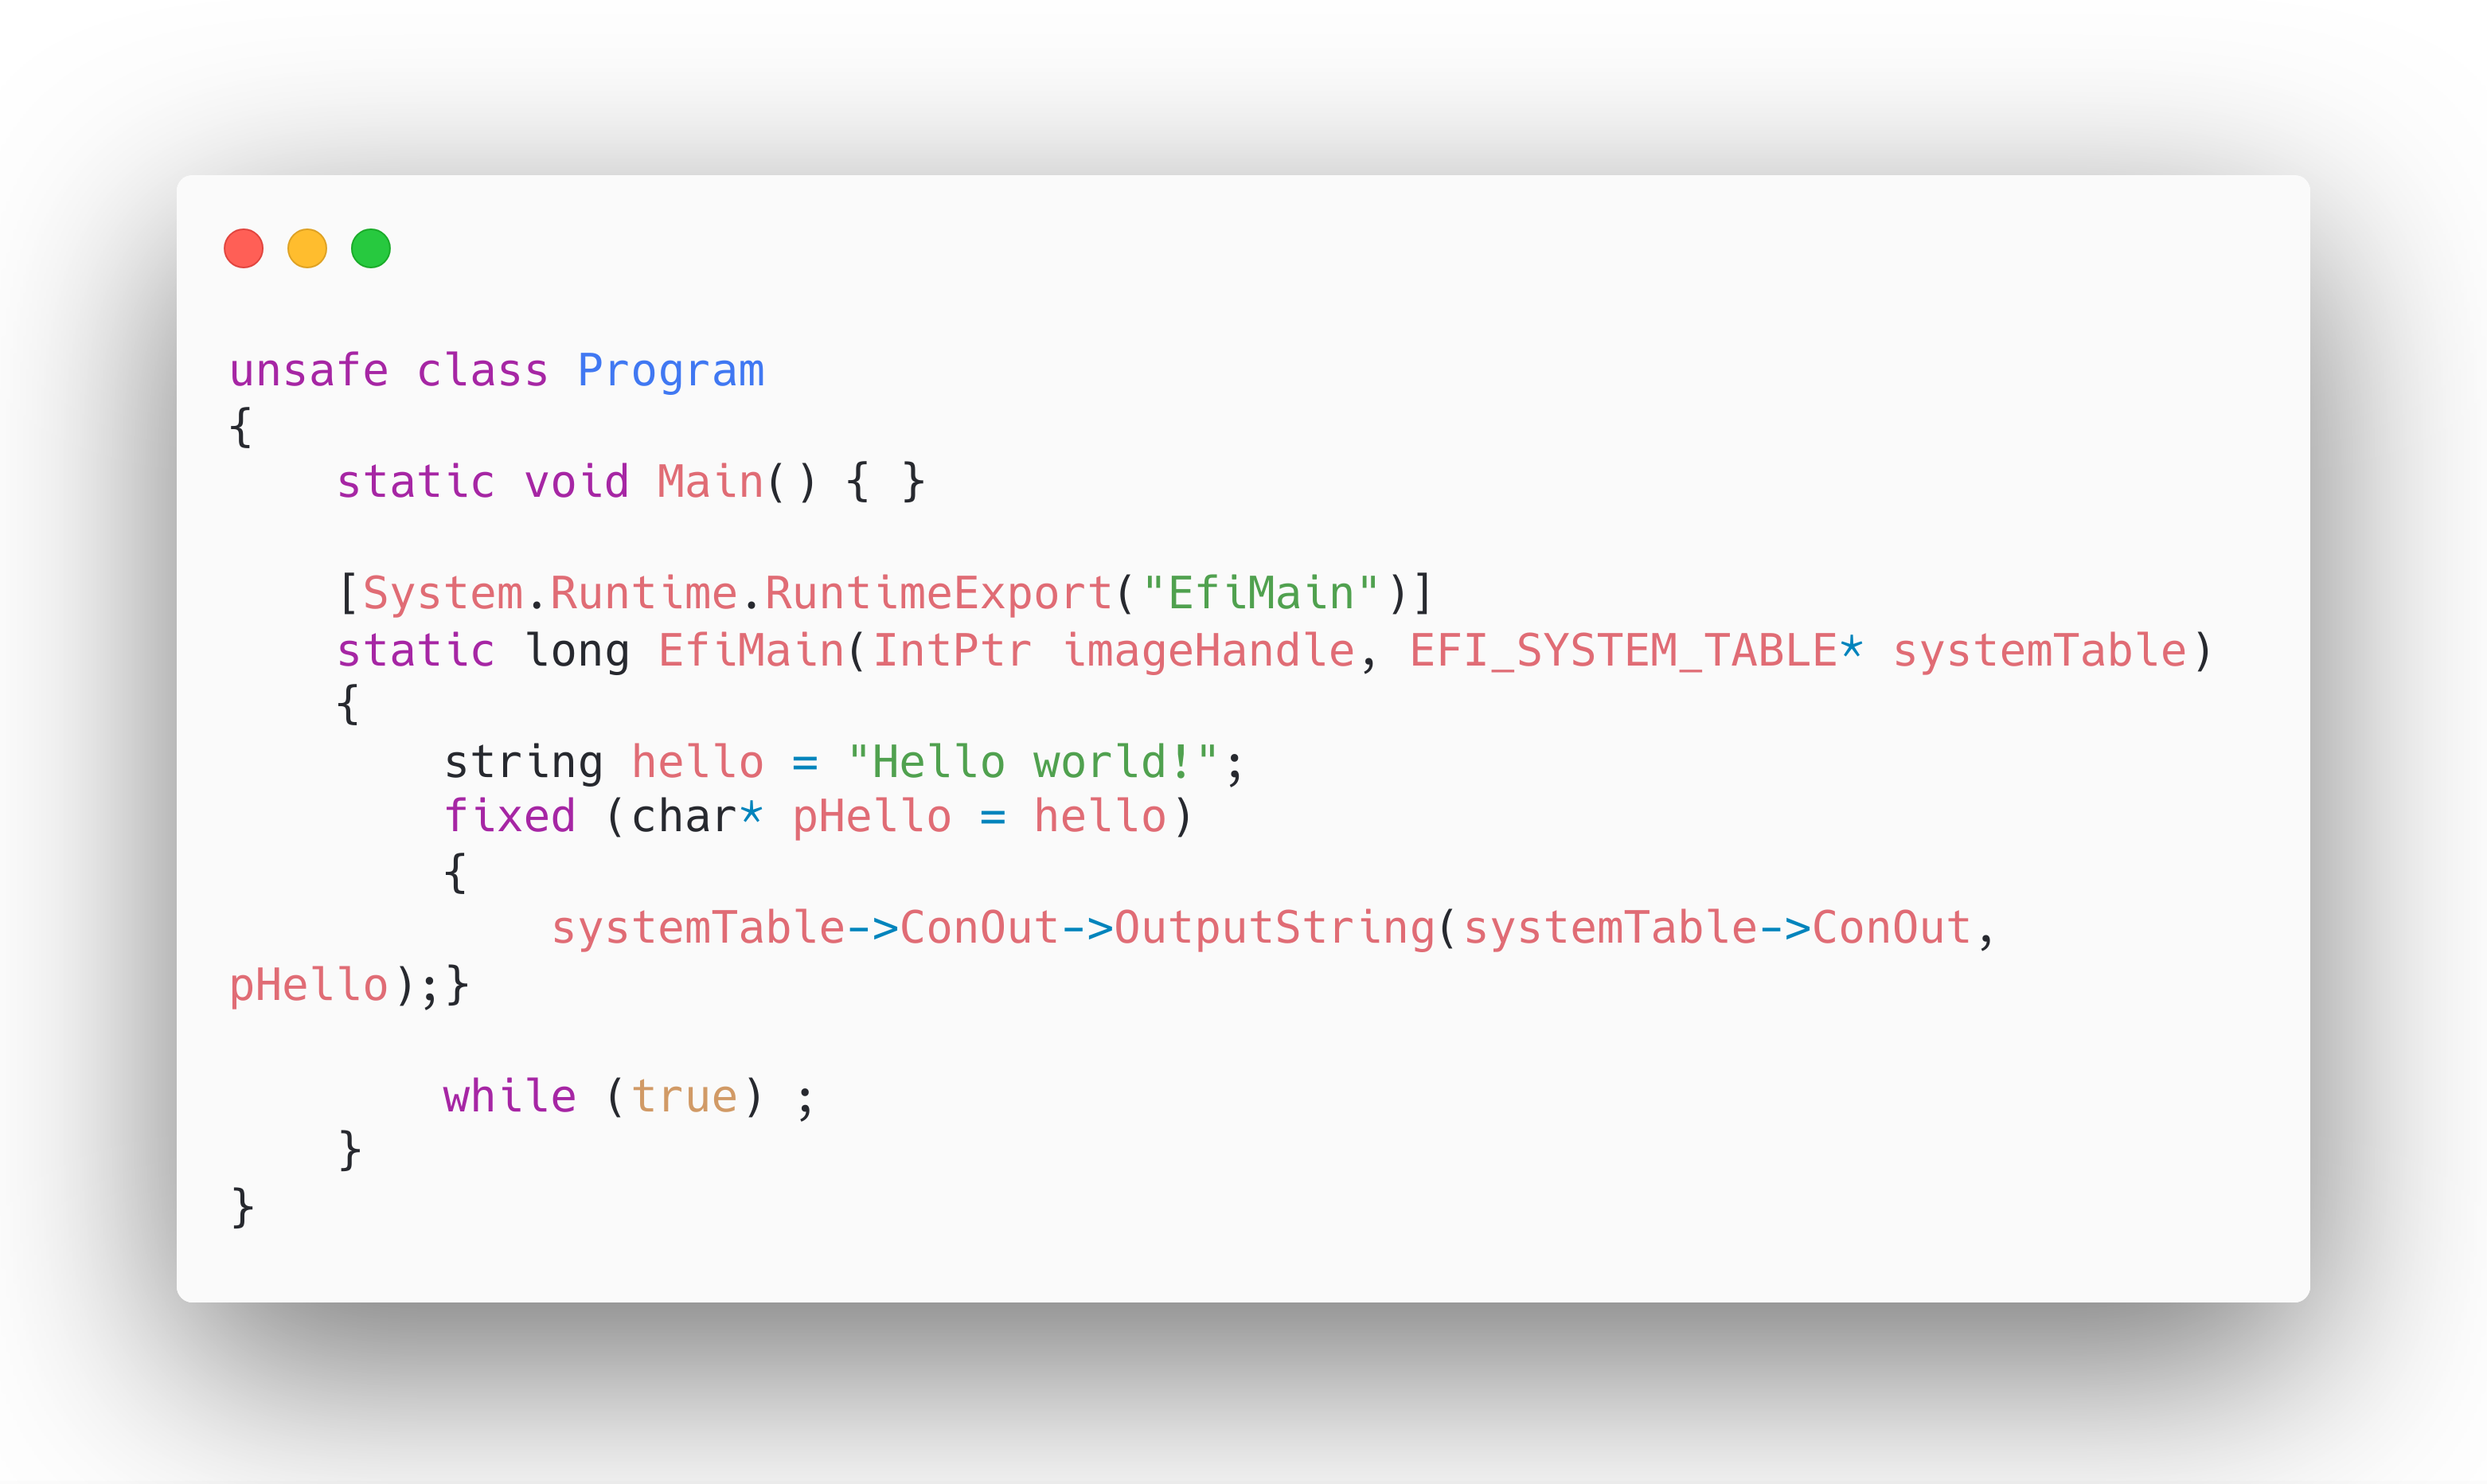
Zero-Sharp is using the CoreRT runtime to very impressively demonstrate how to get down to bare-metal application operation using C#. It compiles programs into native code…
Everything you wanted to know about making C# apps that run on bare metal, but were afraid to ask:
A complete EFI boot application in a single .cs file.
Michal Stehovsky on Twitter
This is seriously impressive and the screenshot says it all: