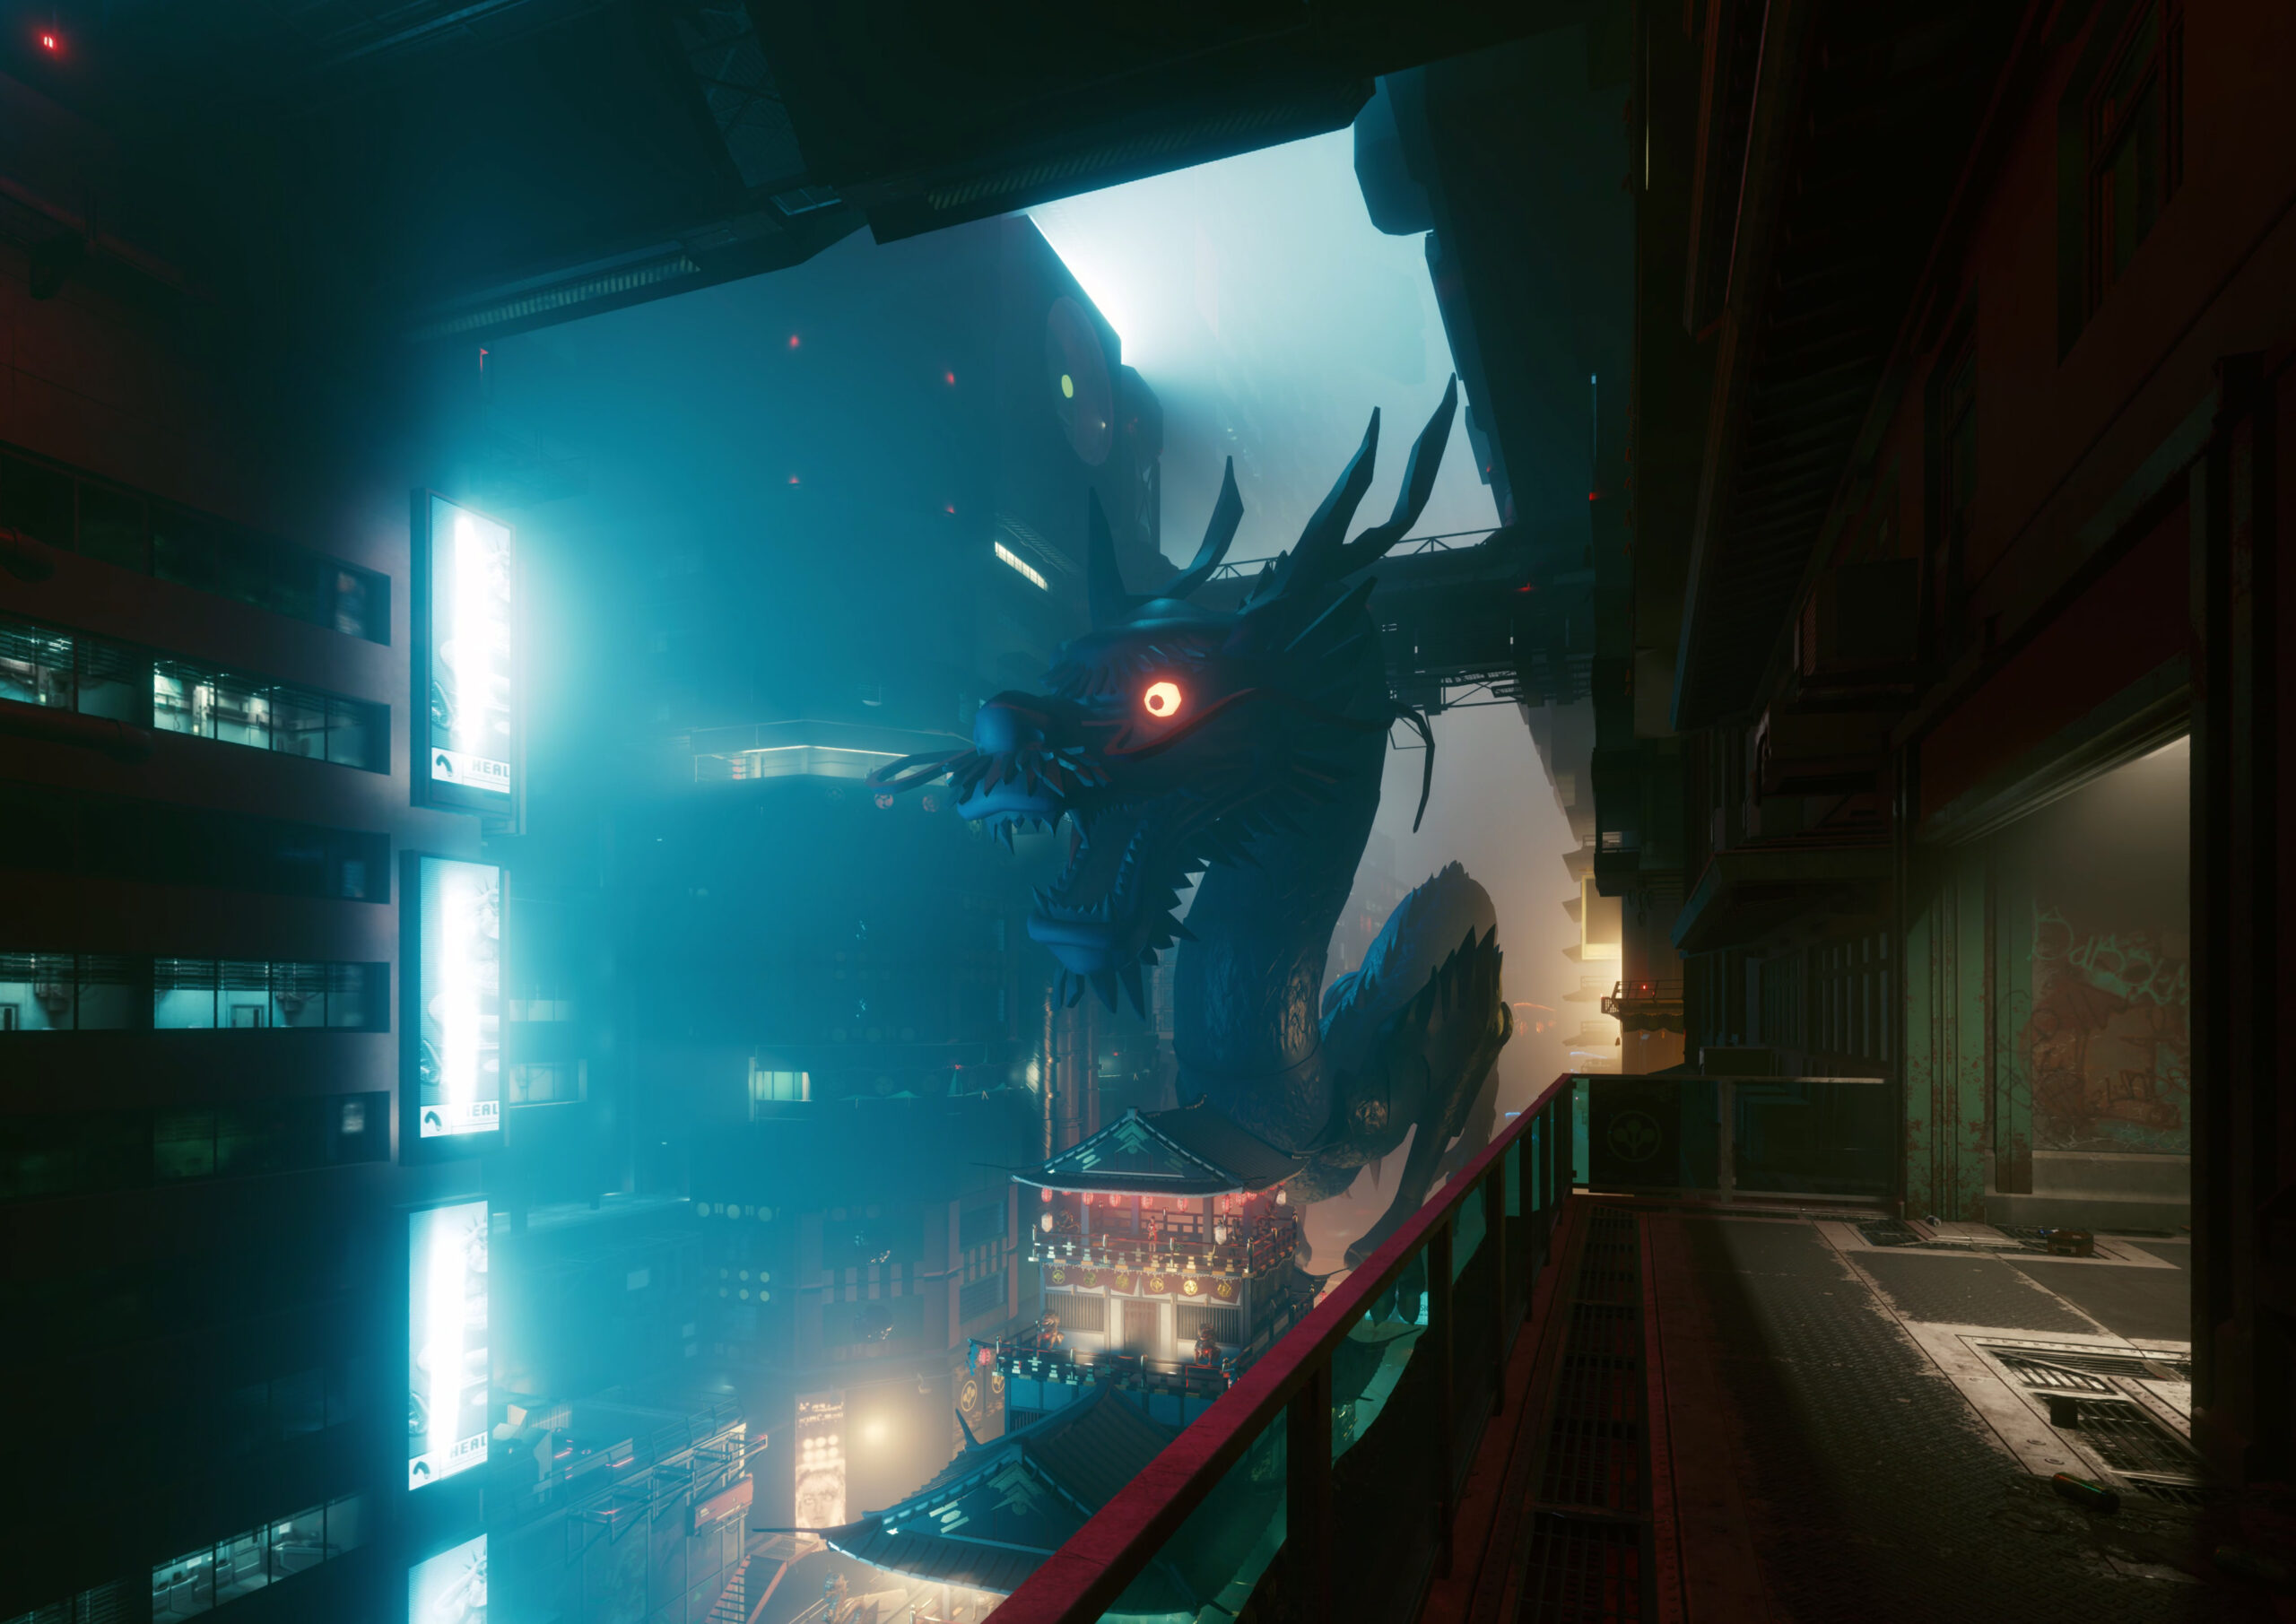
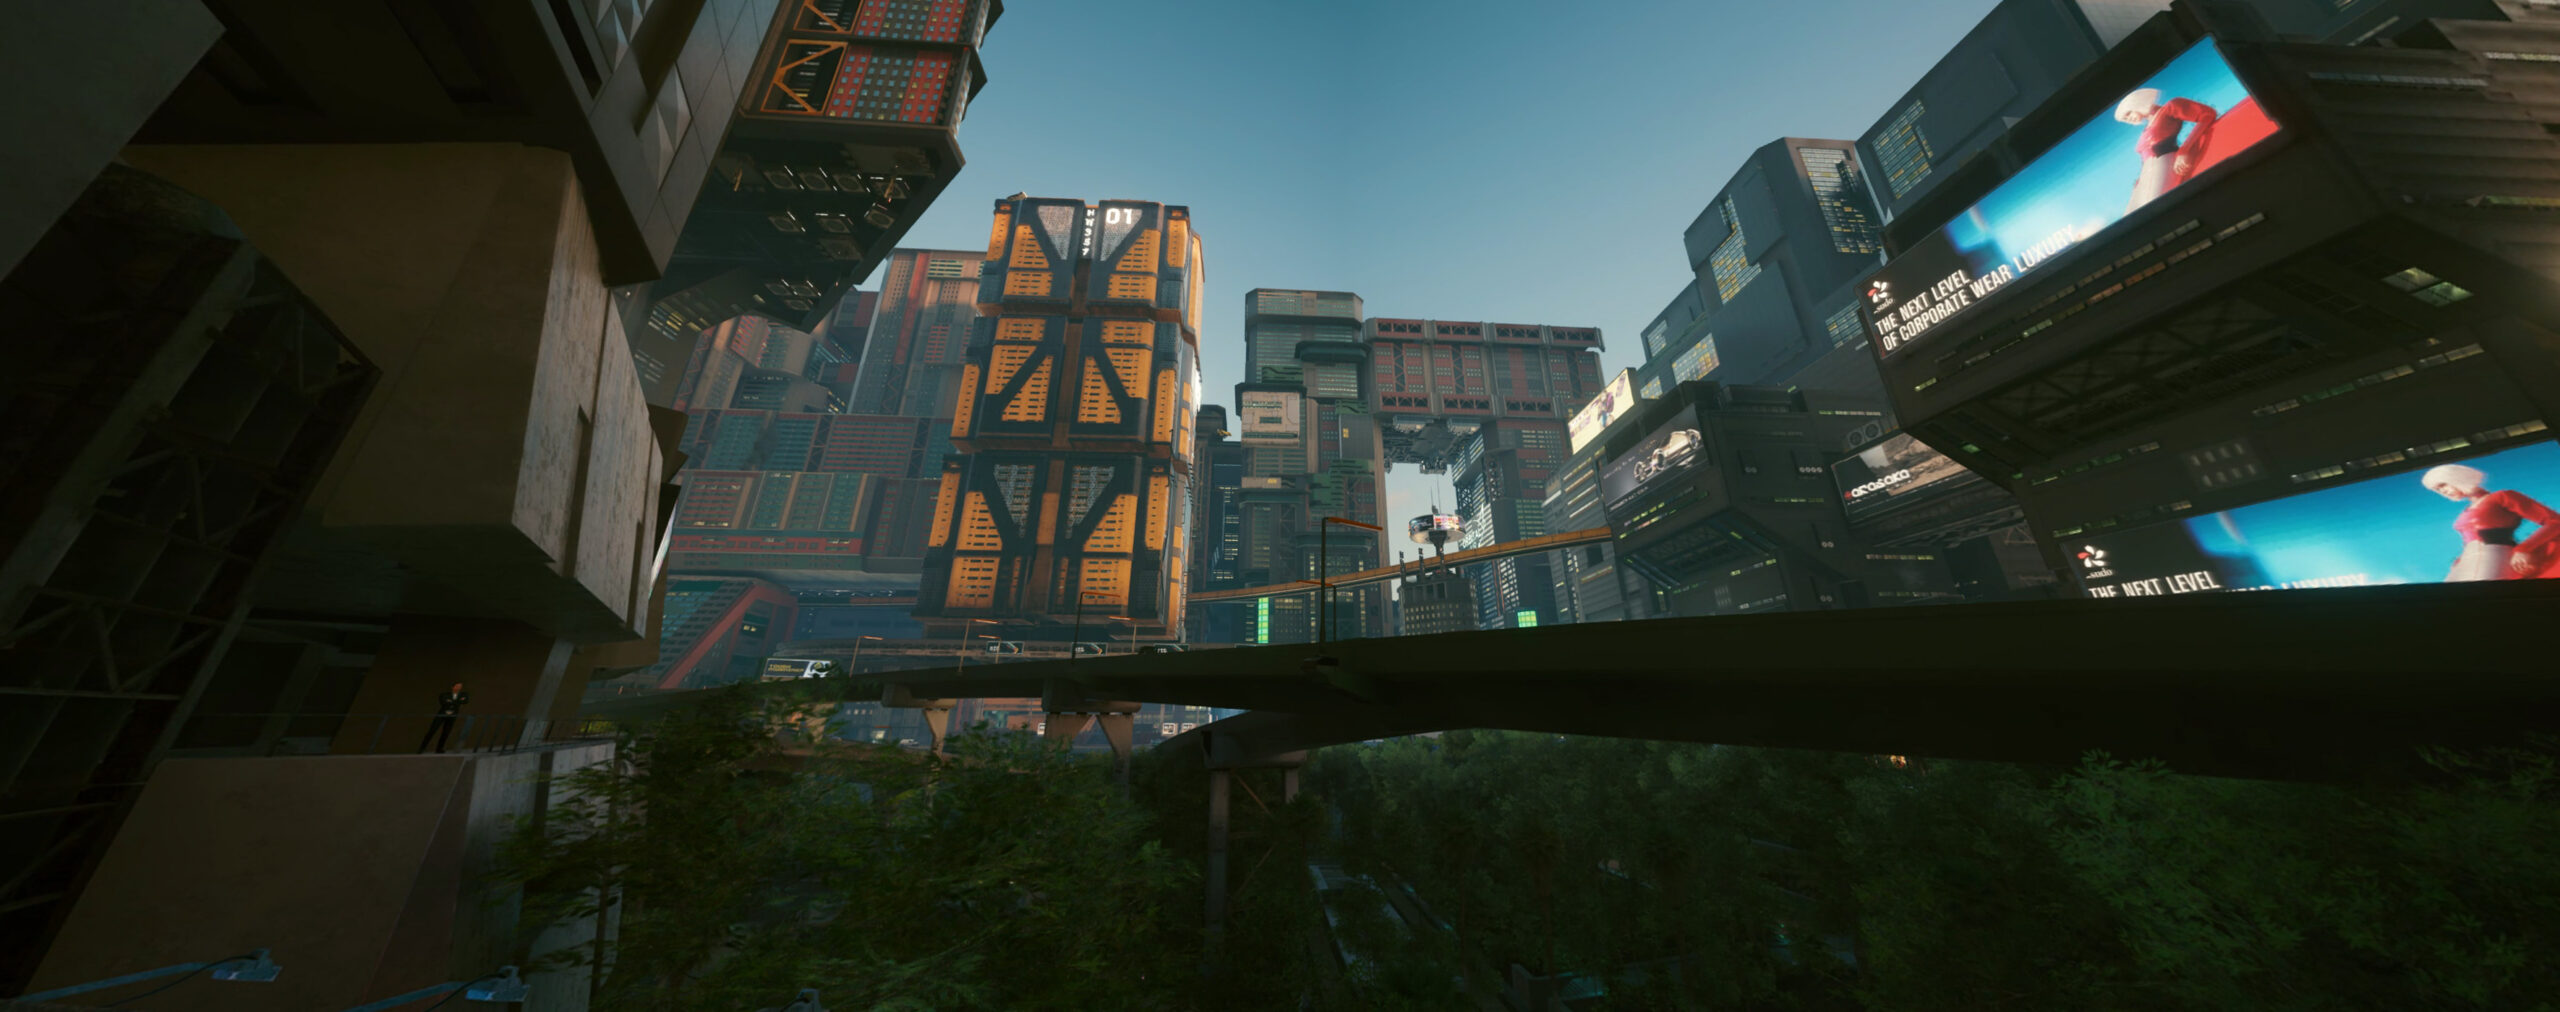
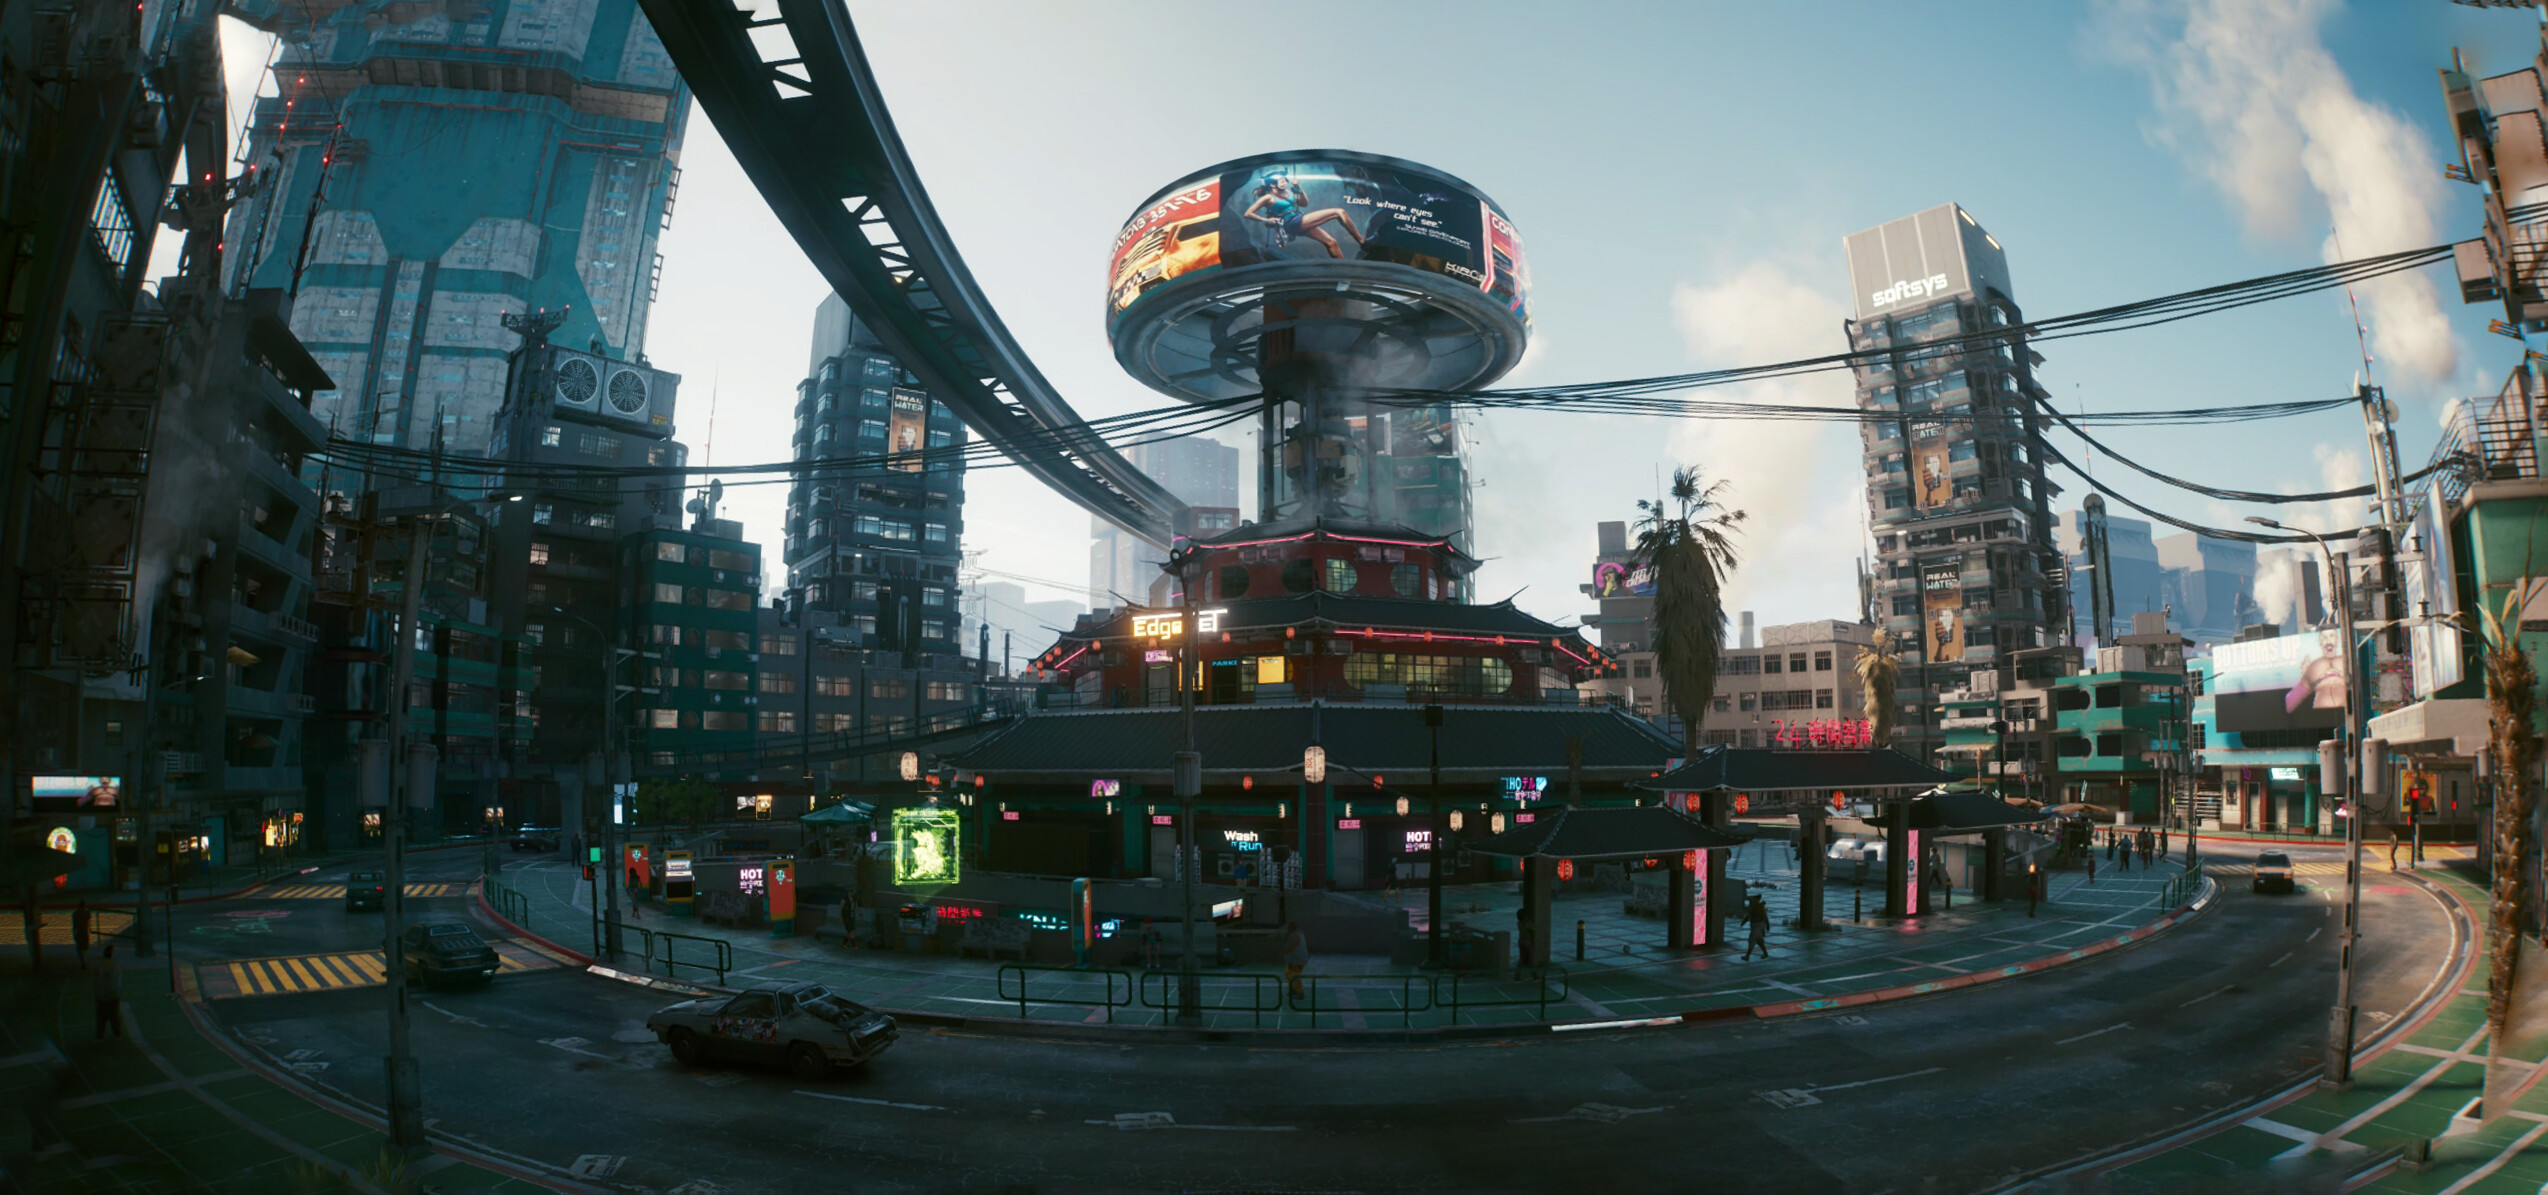
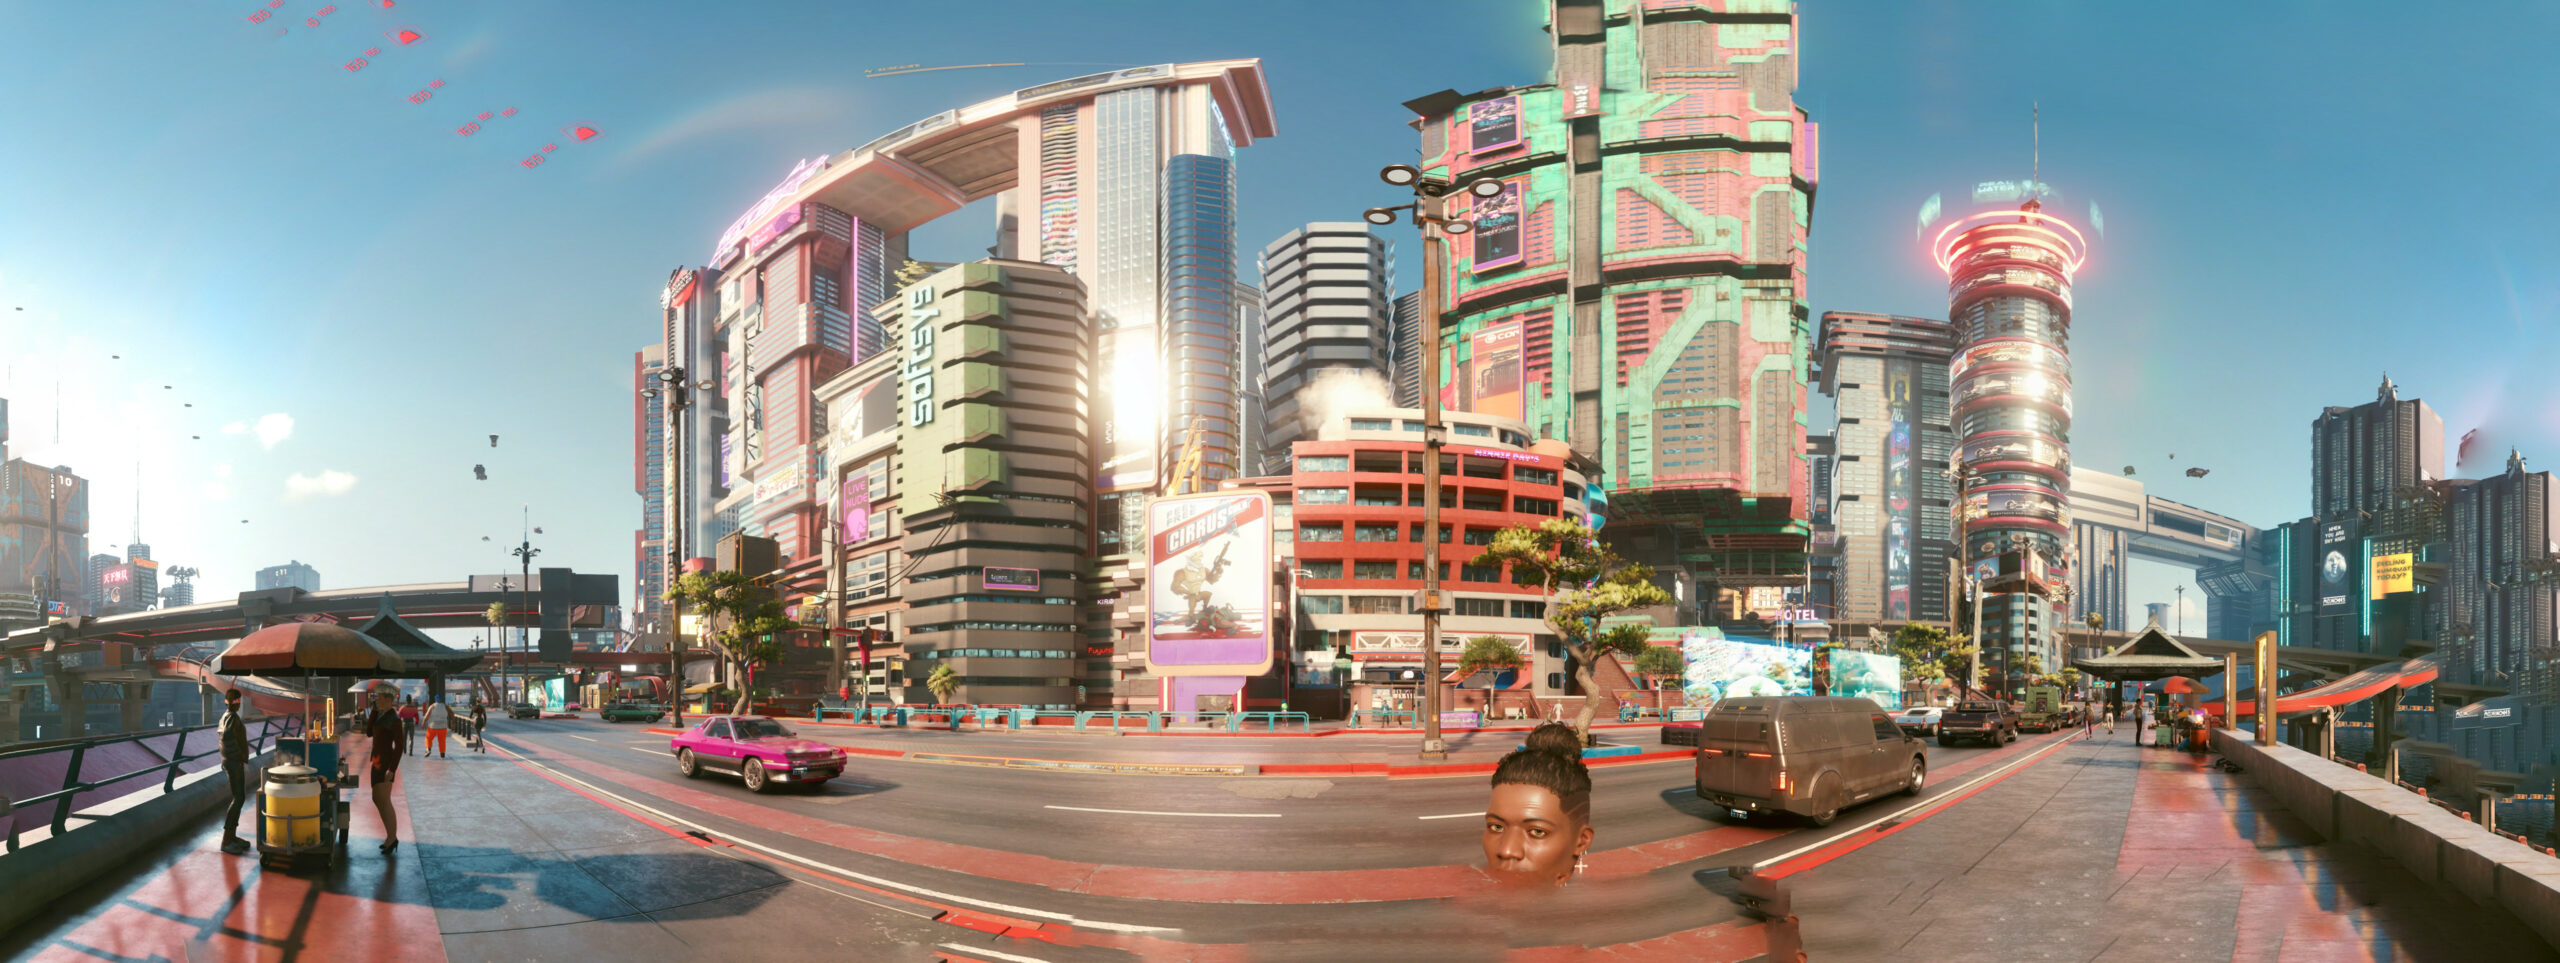
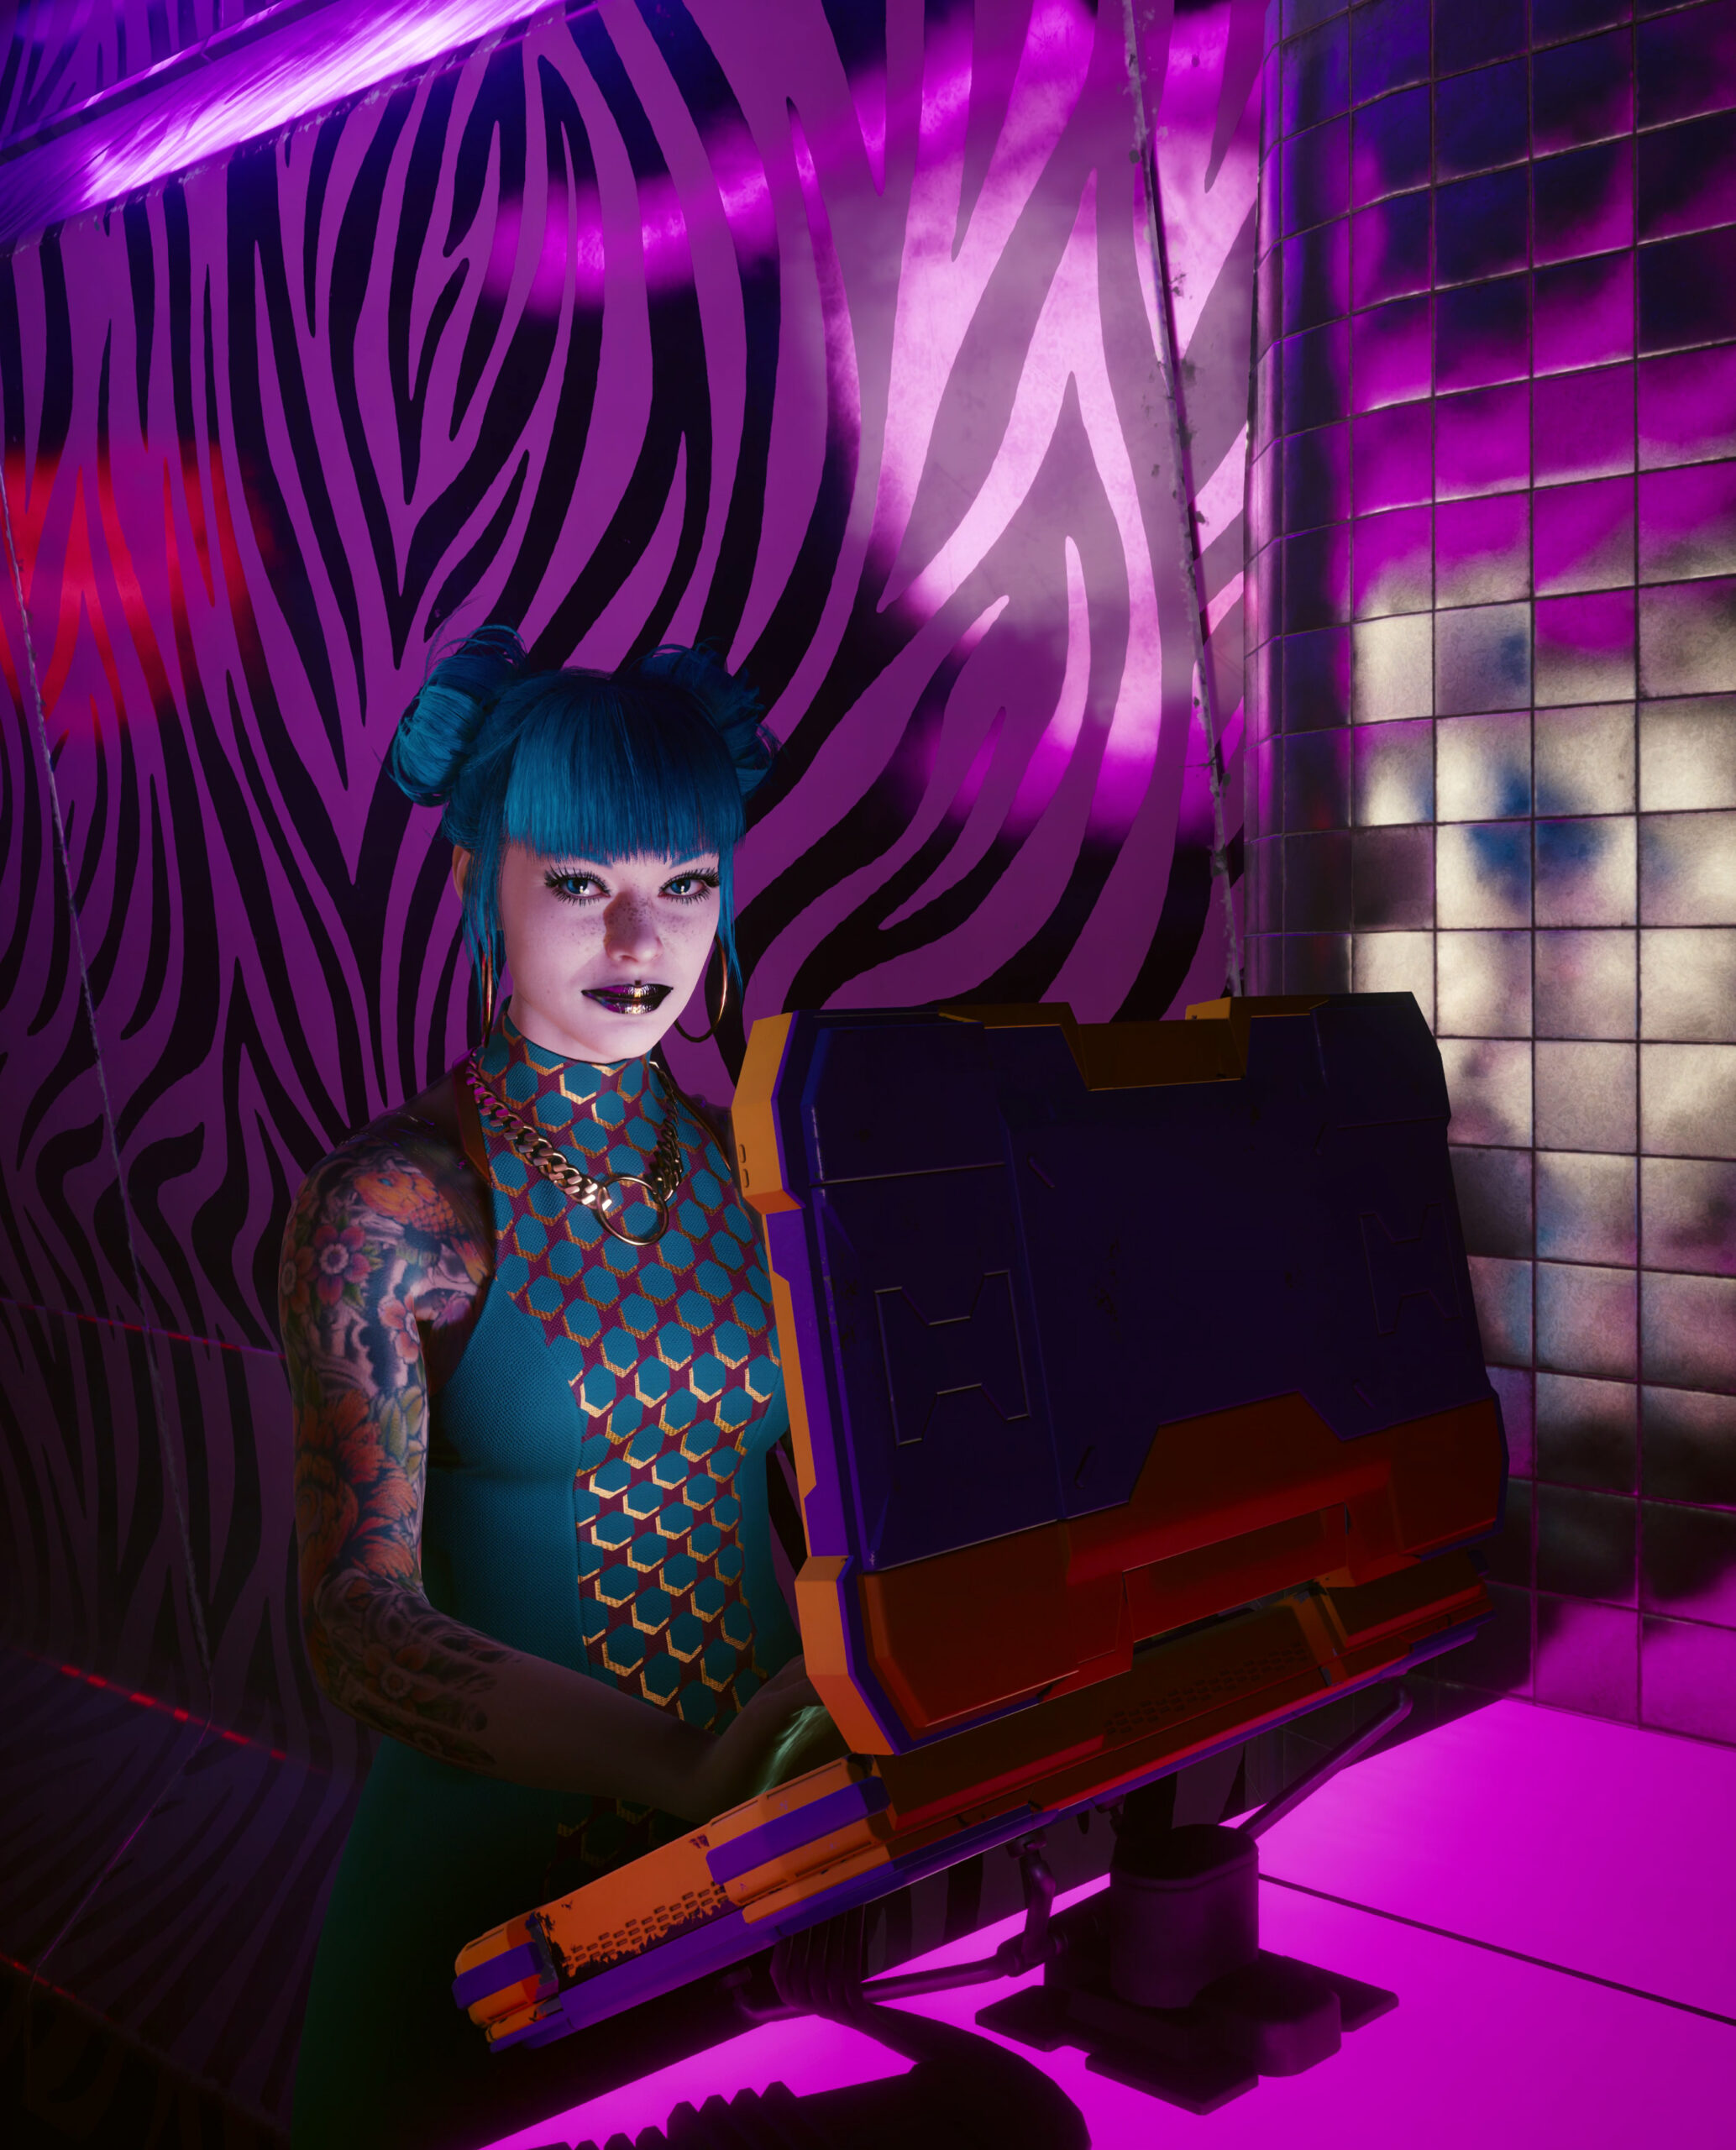
In part 1 I wrote a bit about this great game and shared some screenshots. By now I’ve finished the story and almost all side-quests and I still see it as the best game since years.
Anyway, here are more pictures taken in-game (sometimes stitched):
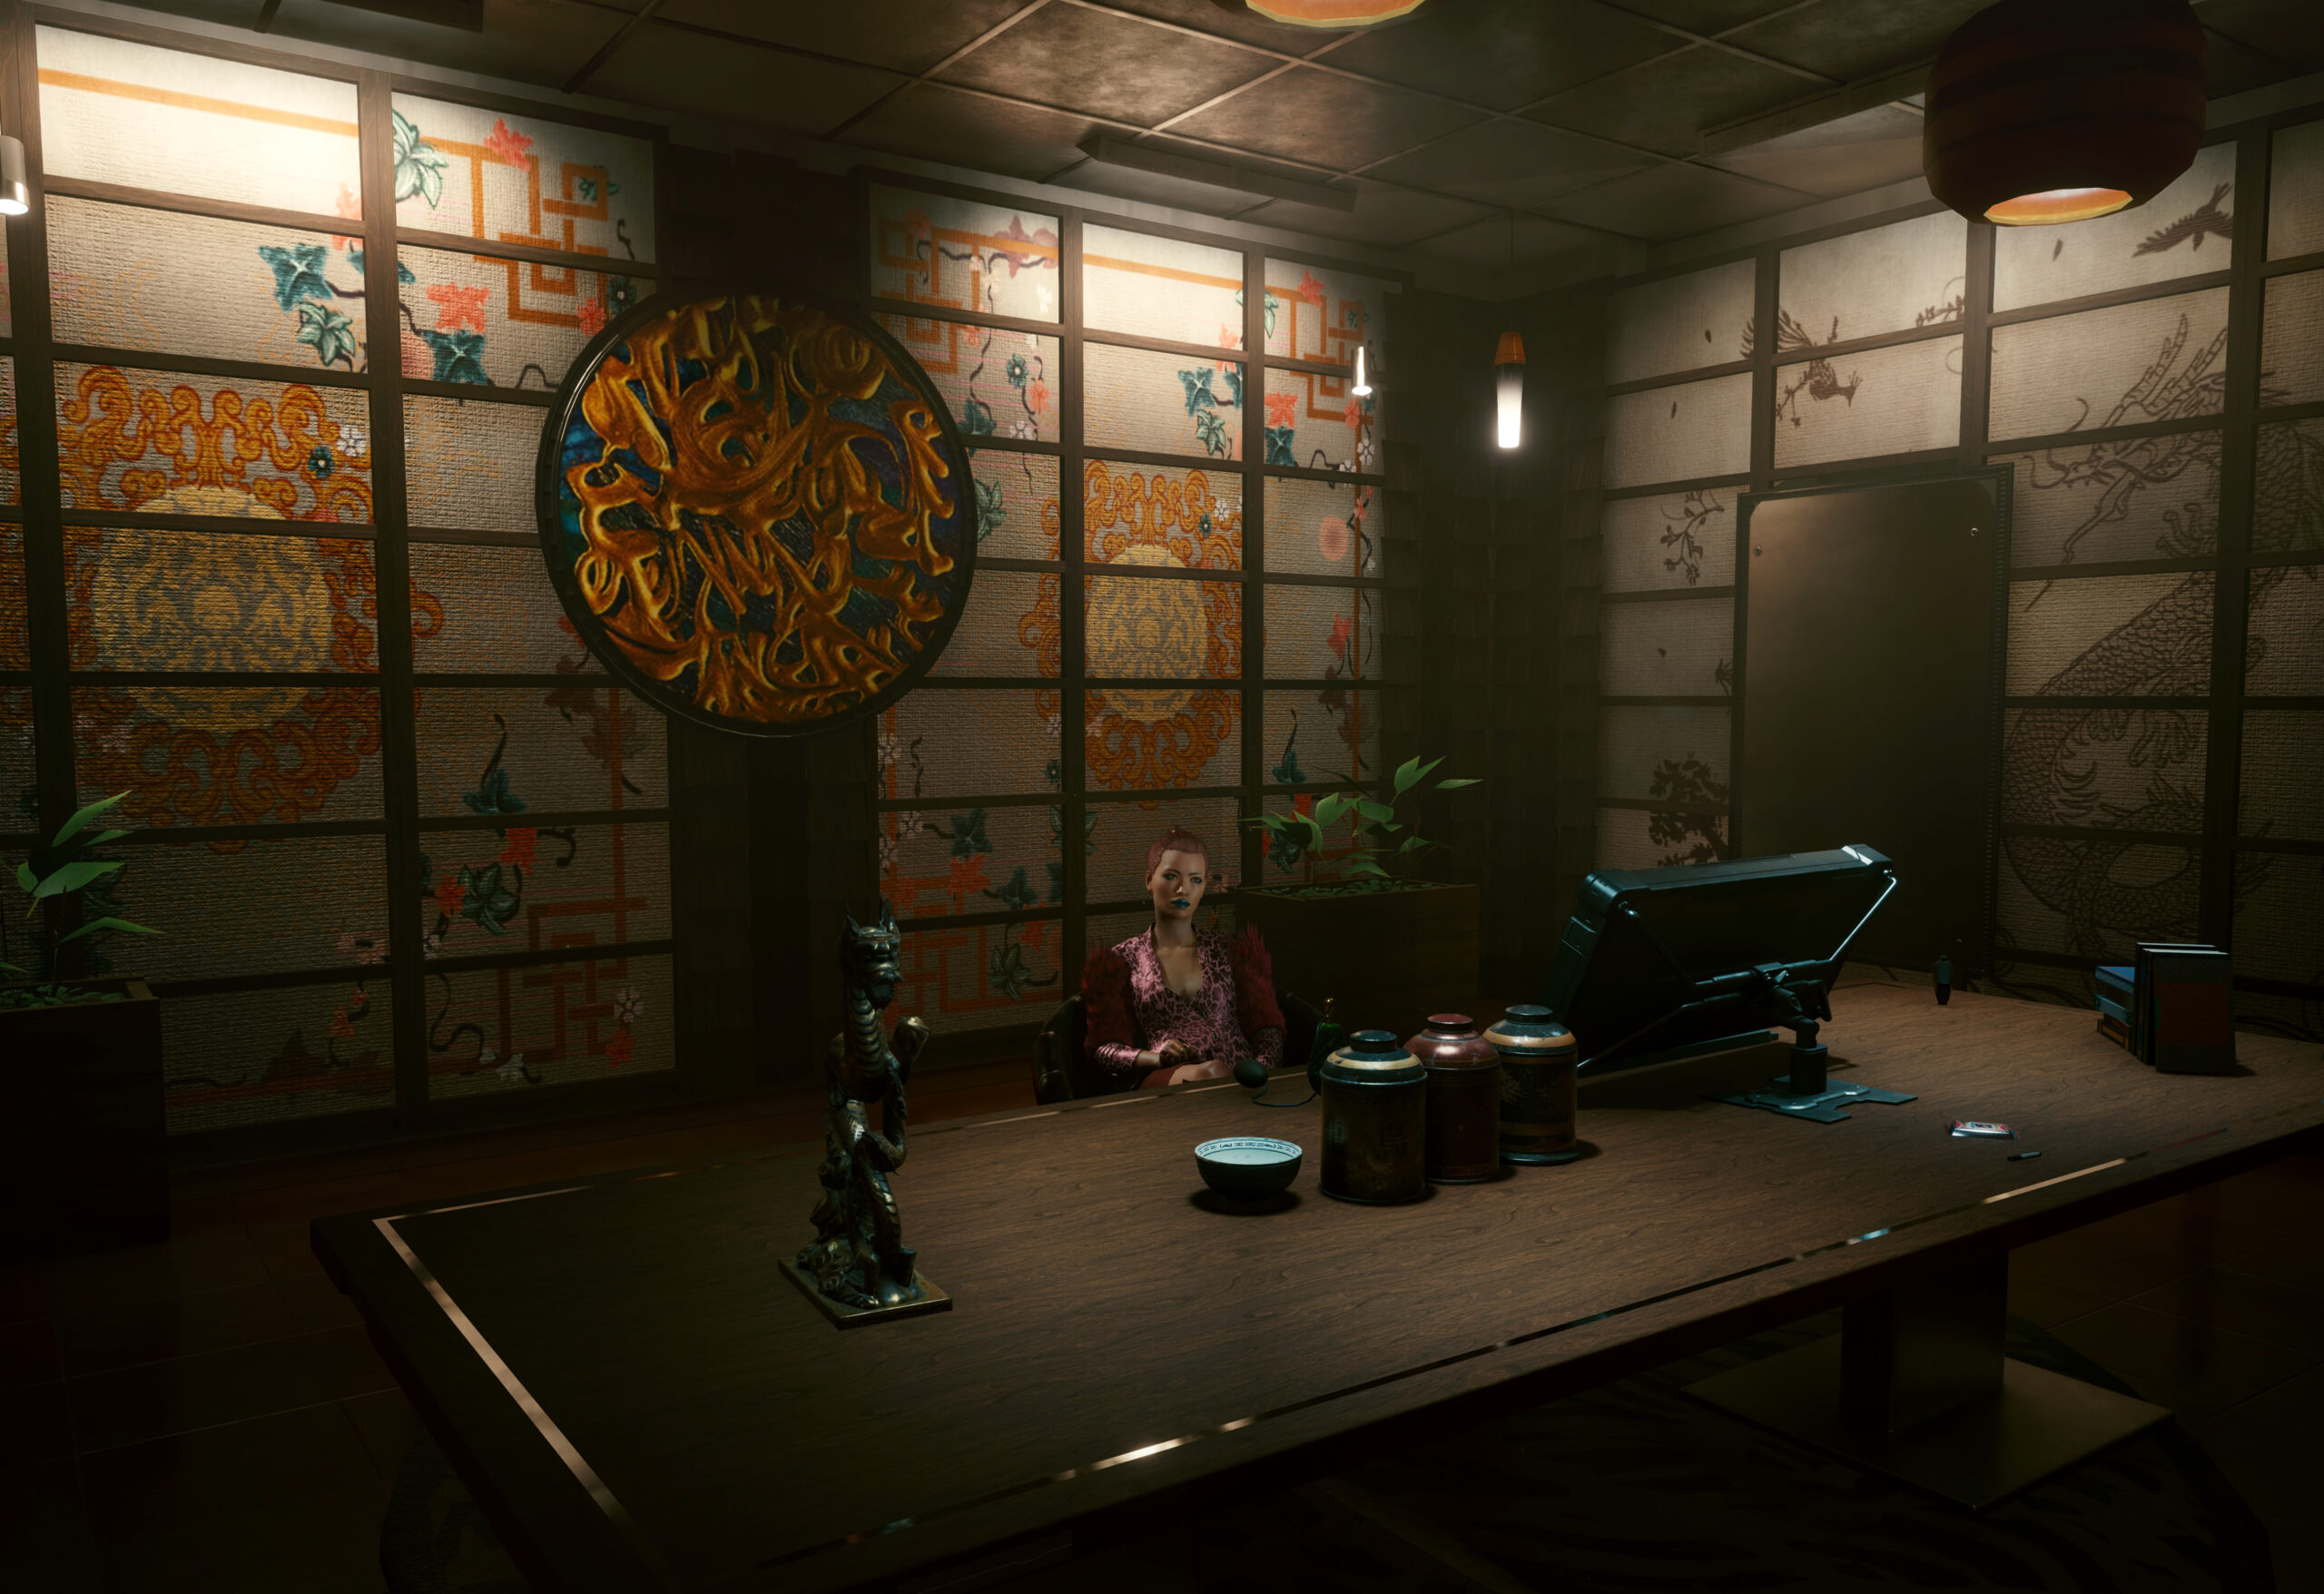
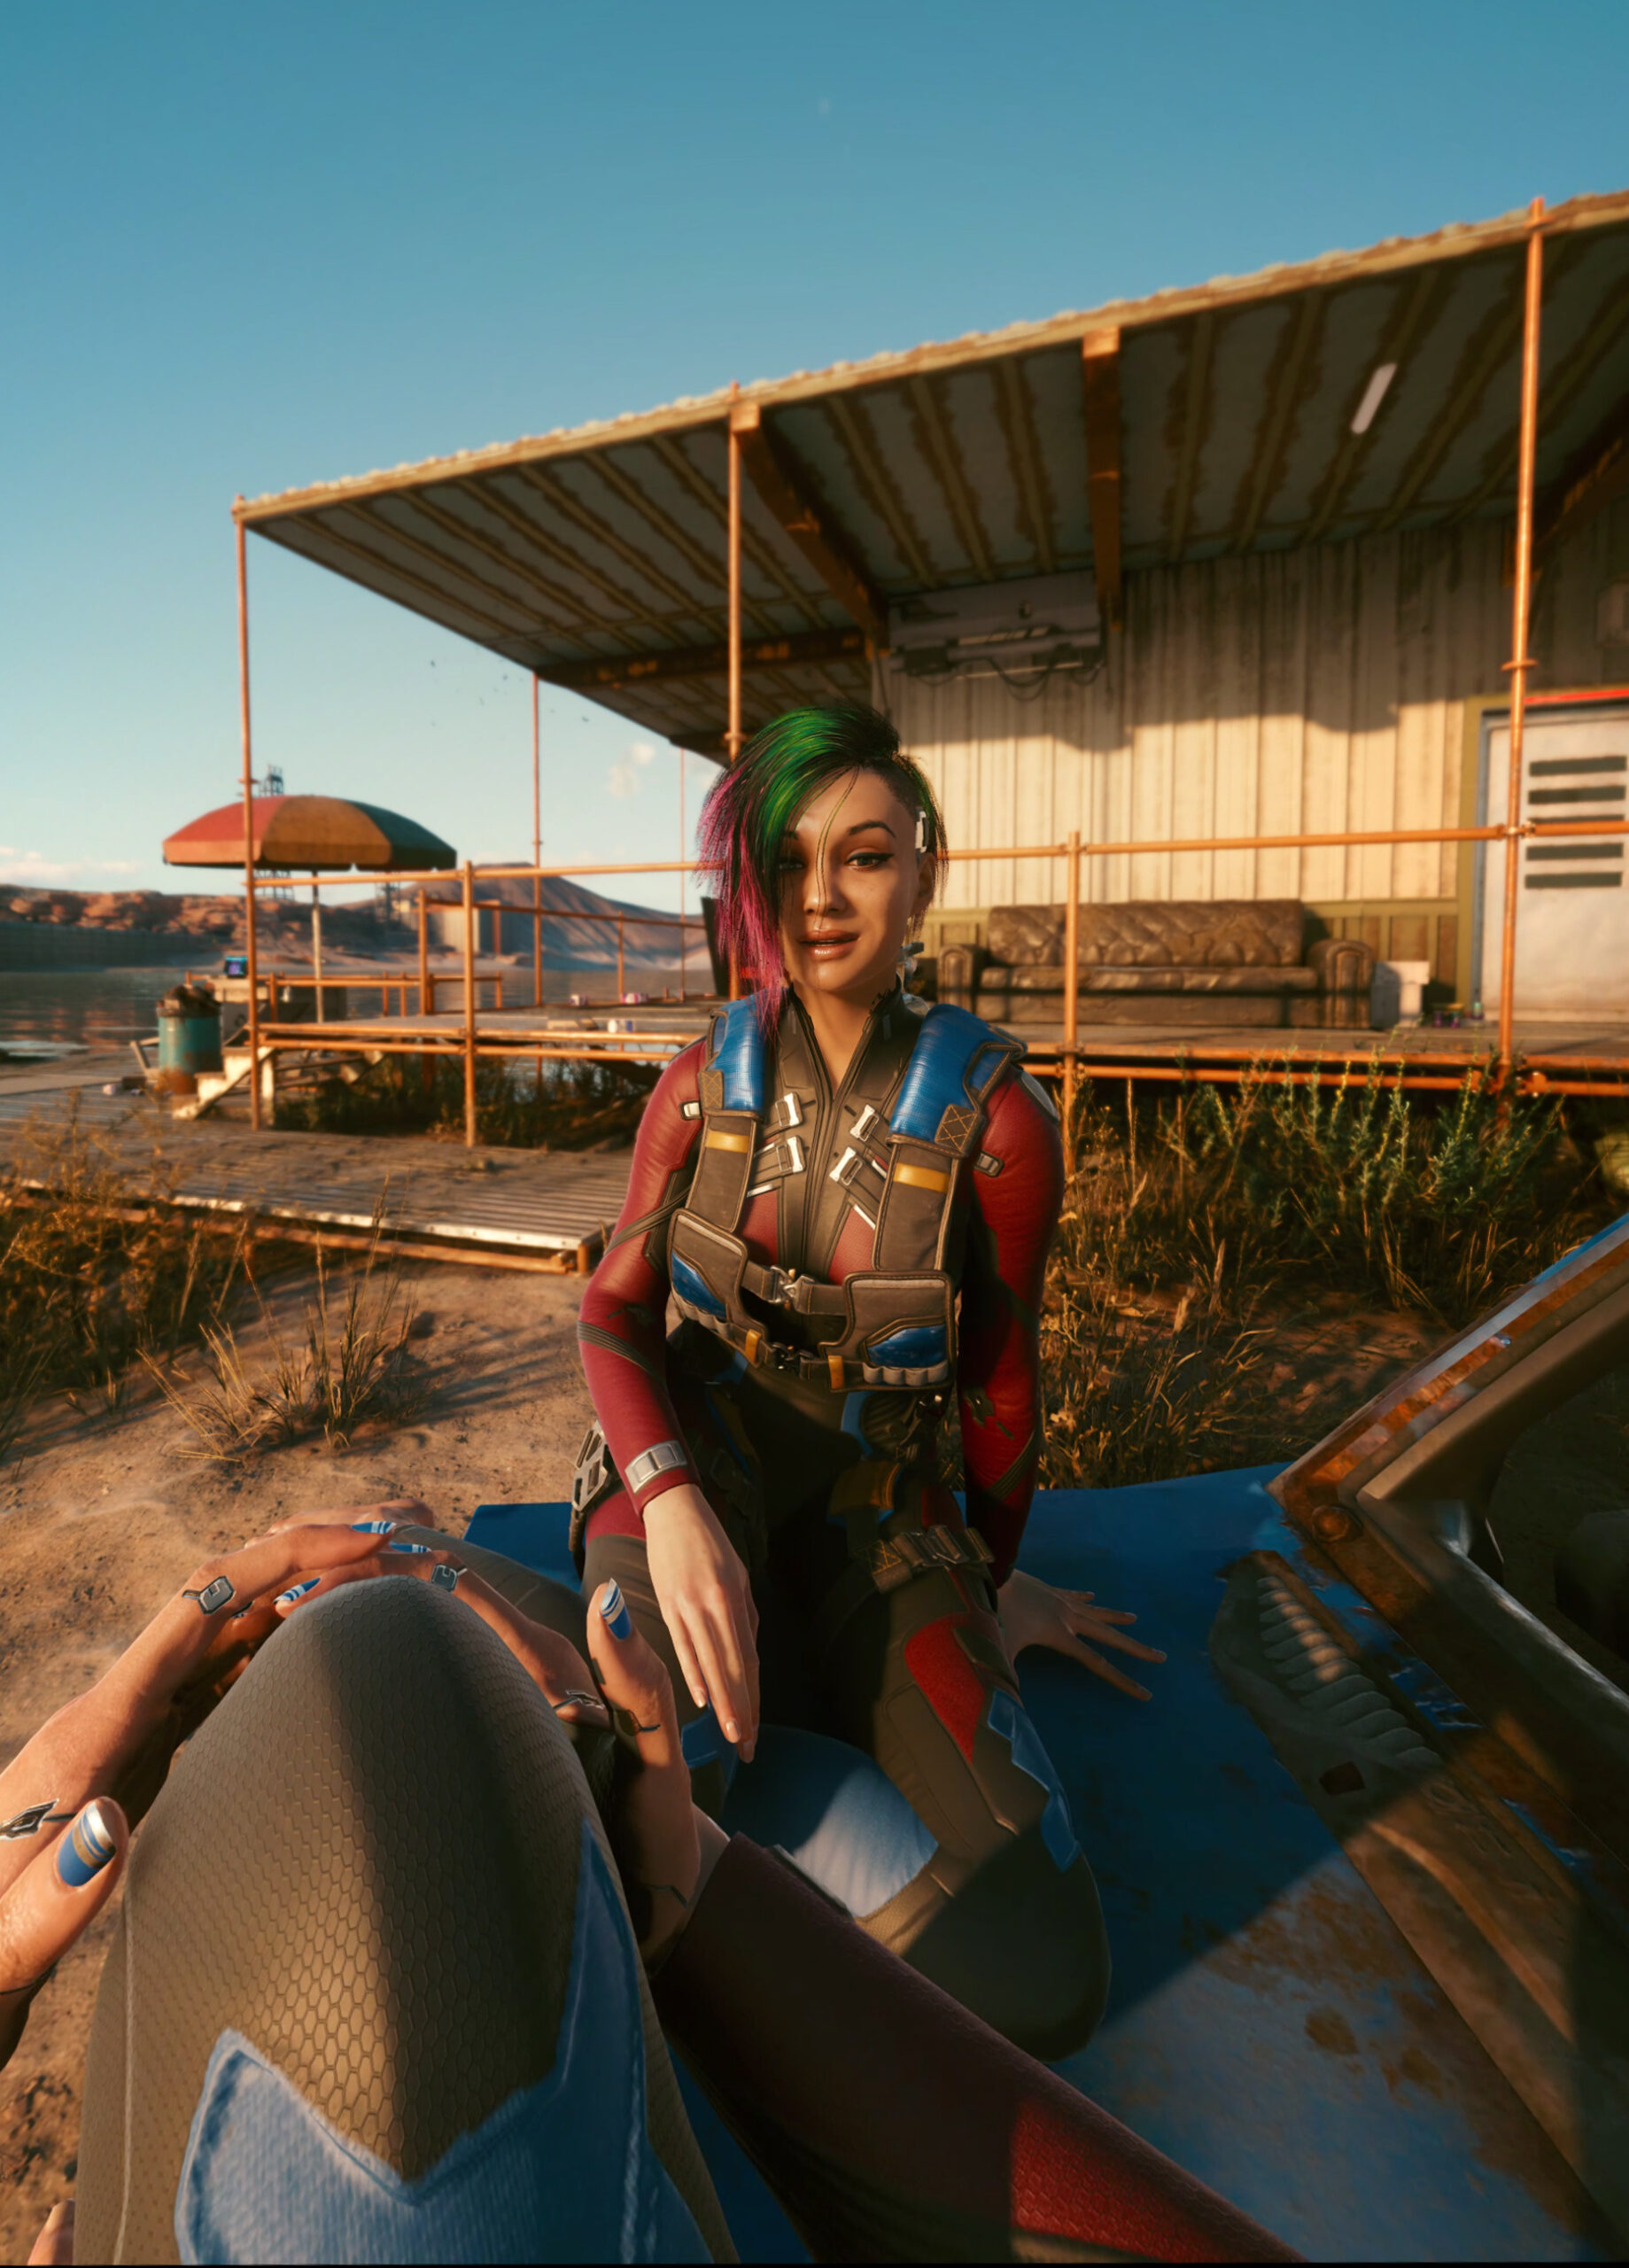
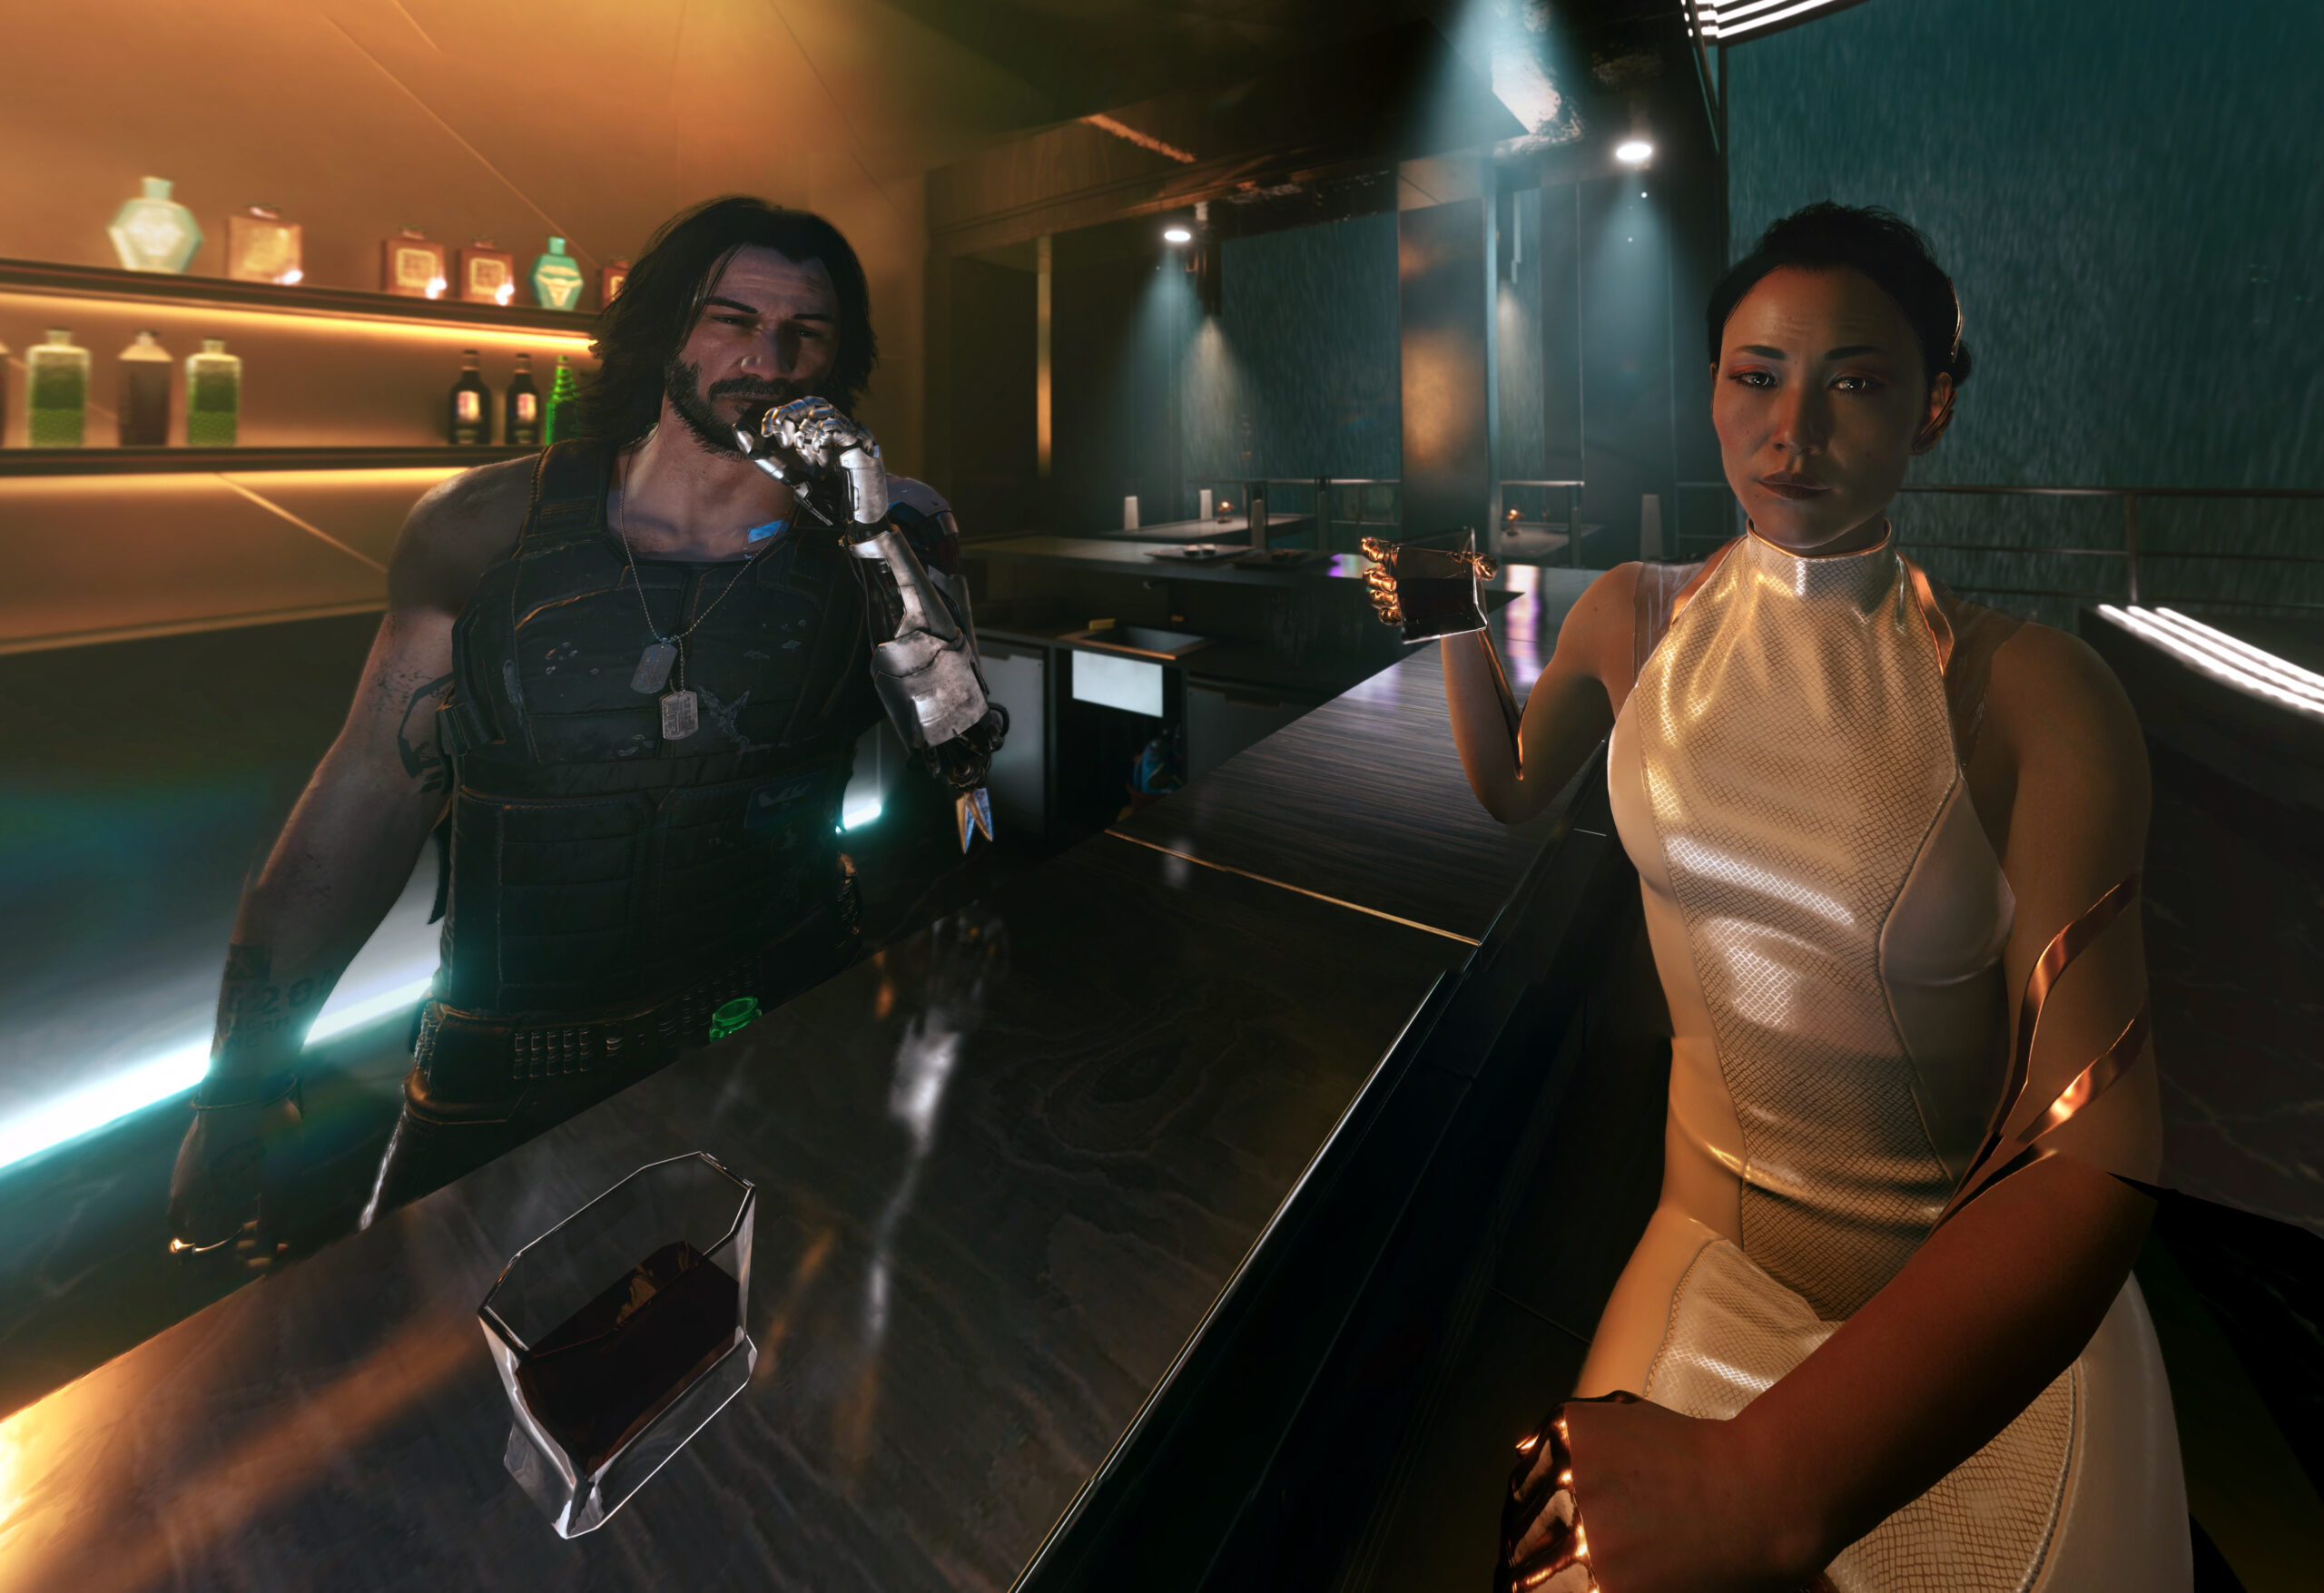
In part 1 I wrote a bit about this great game and shared some screenshots. By now I’ve finished the story and almost all side-quests and I still see it as the best game since years.
Anyway, here are more pictures taken in-game (sometimes stitched):
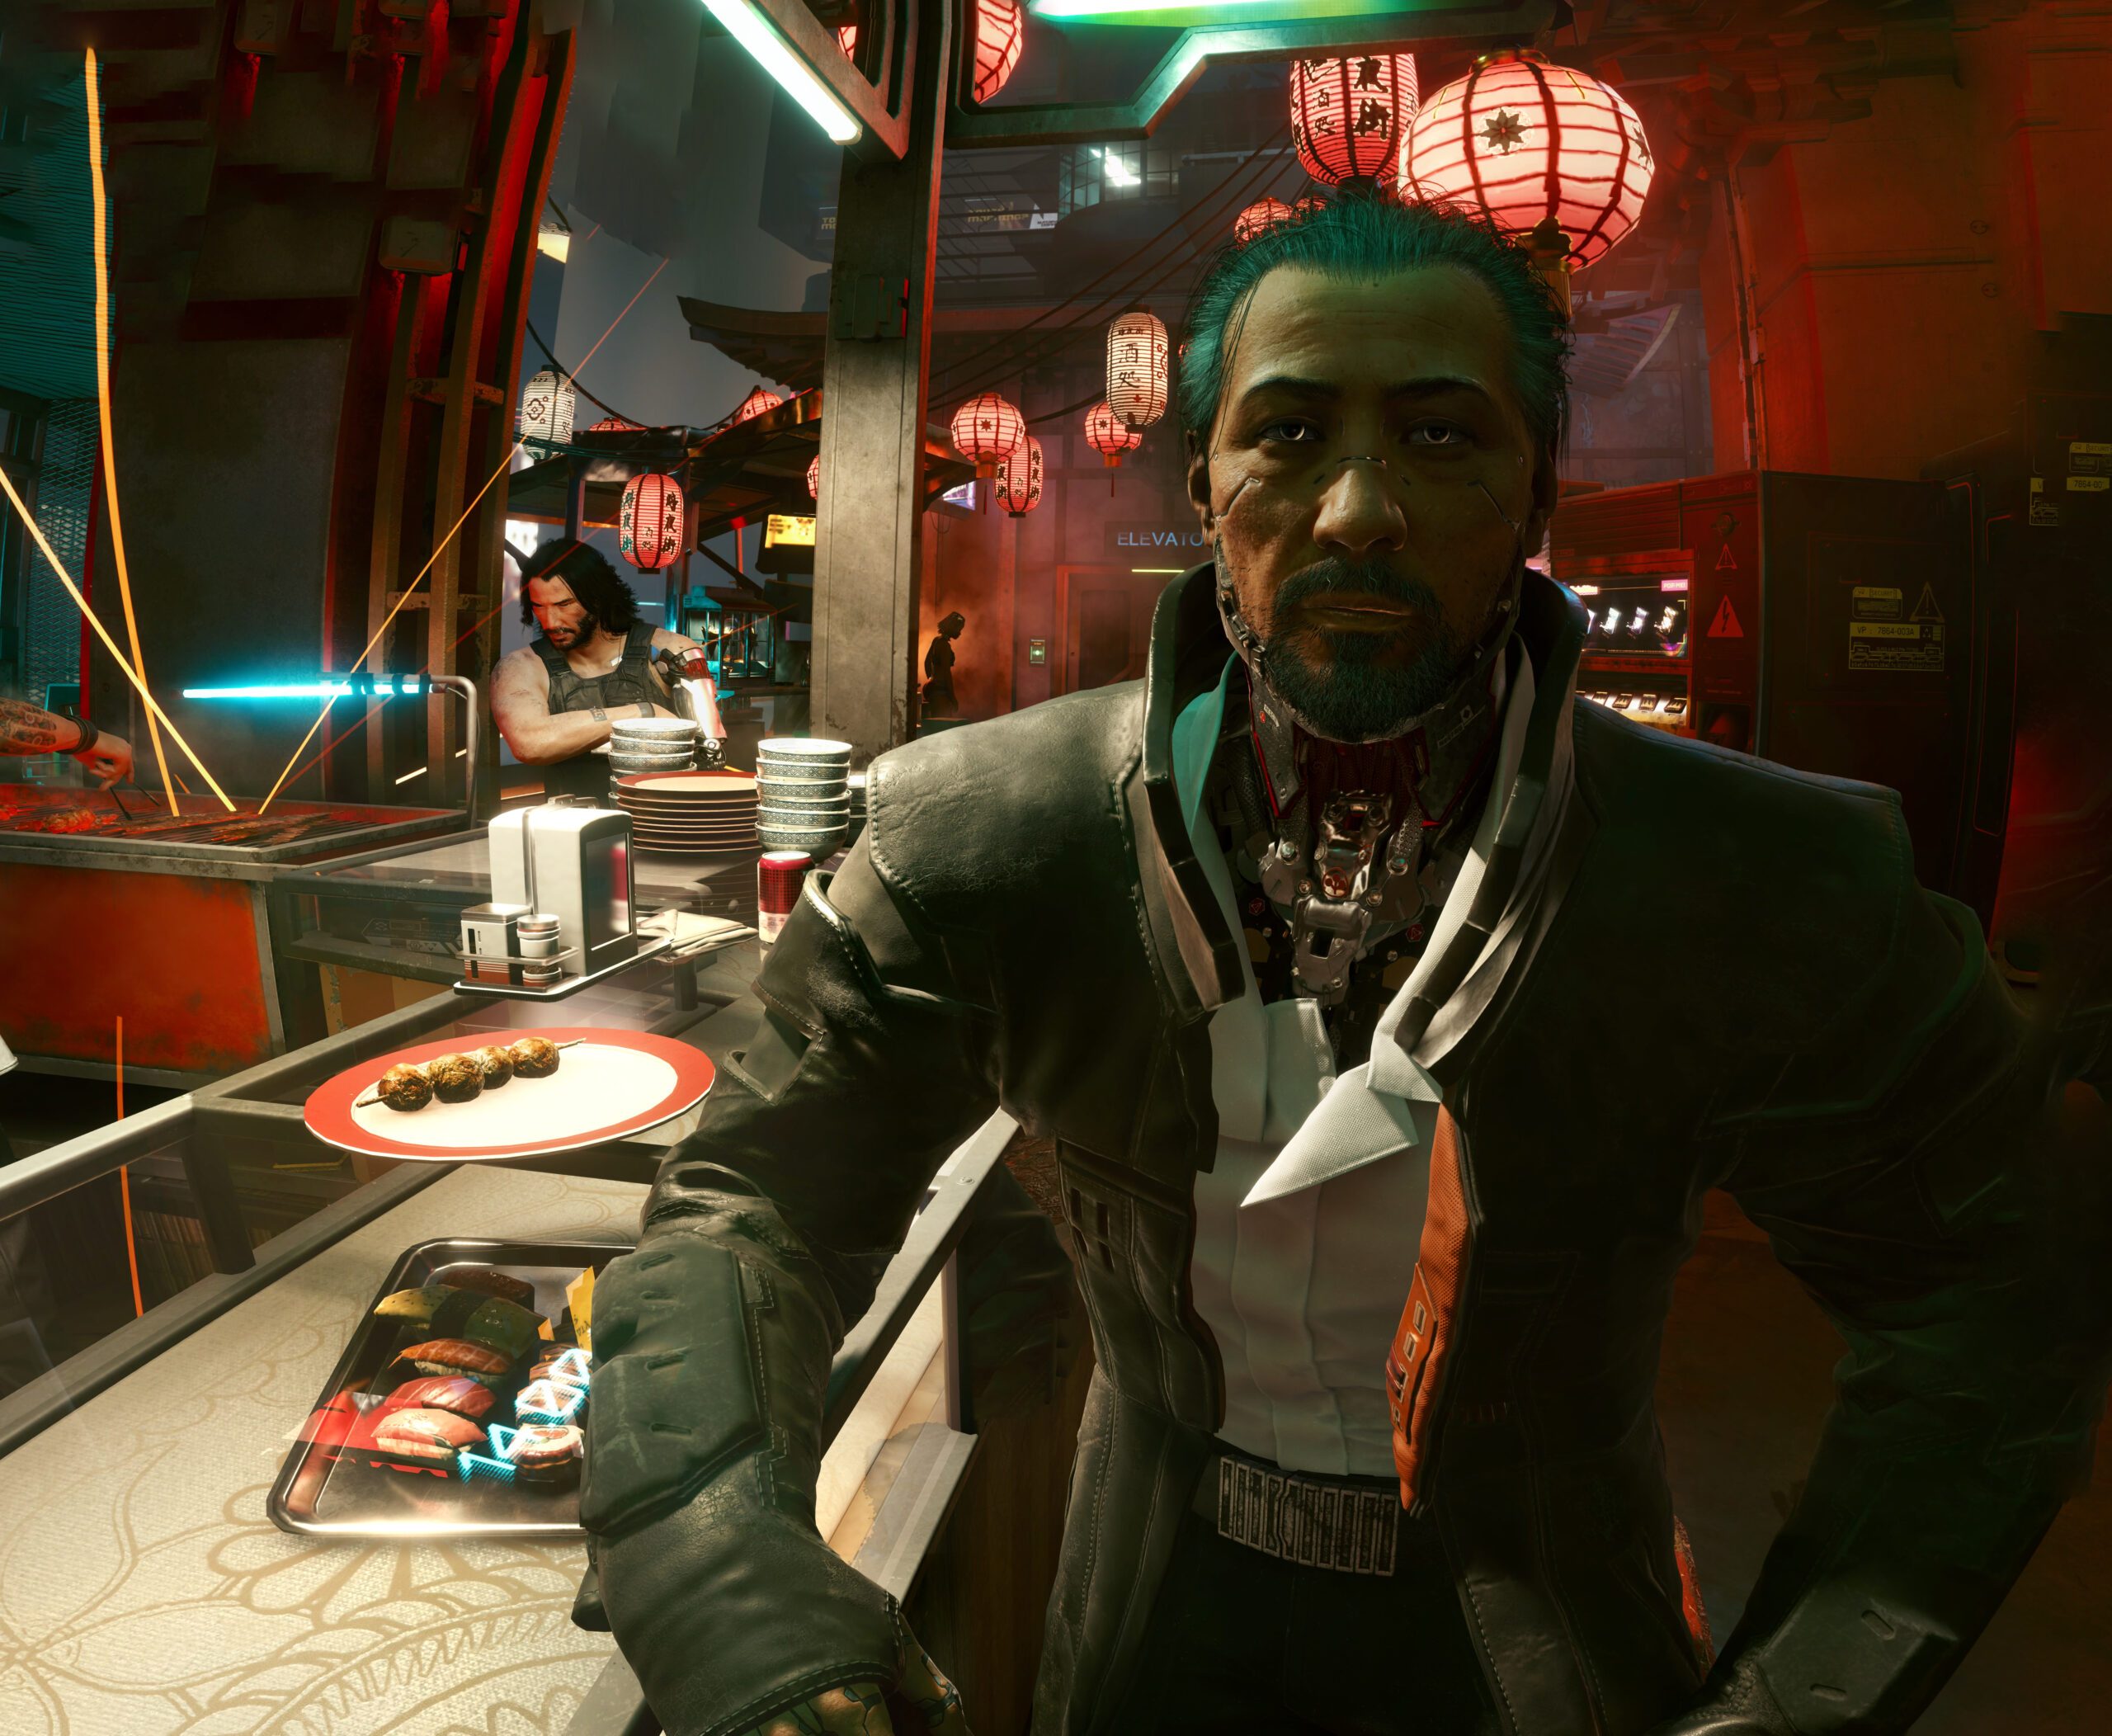
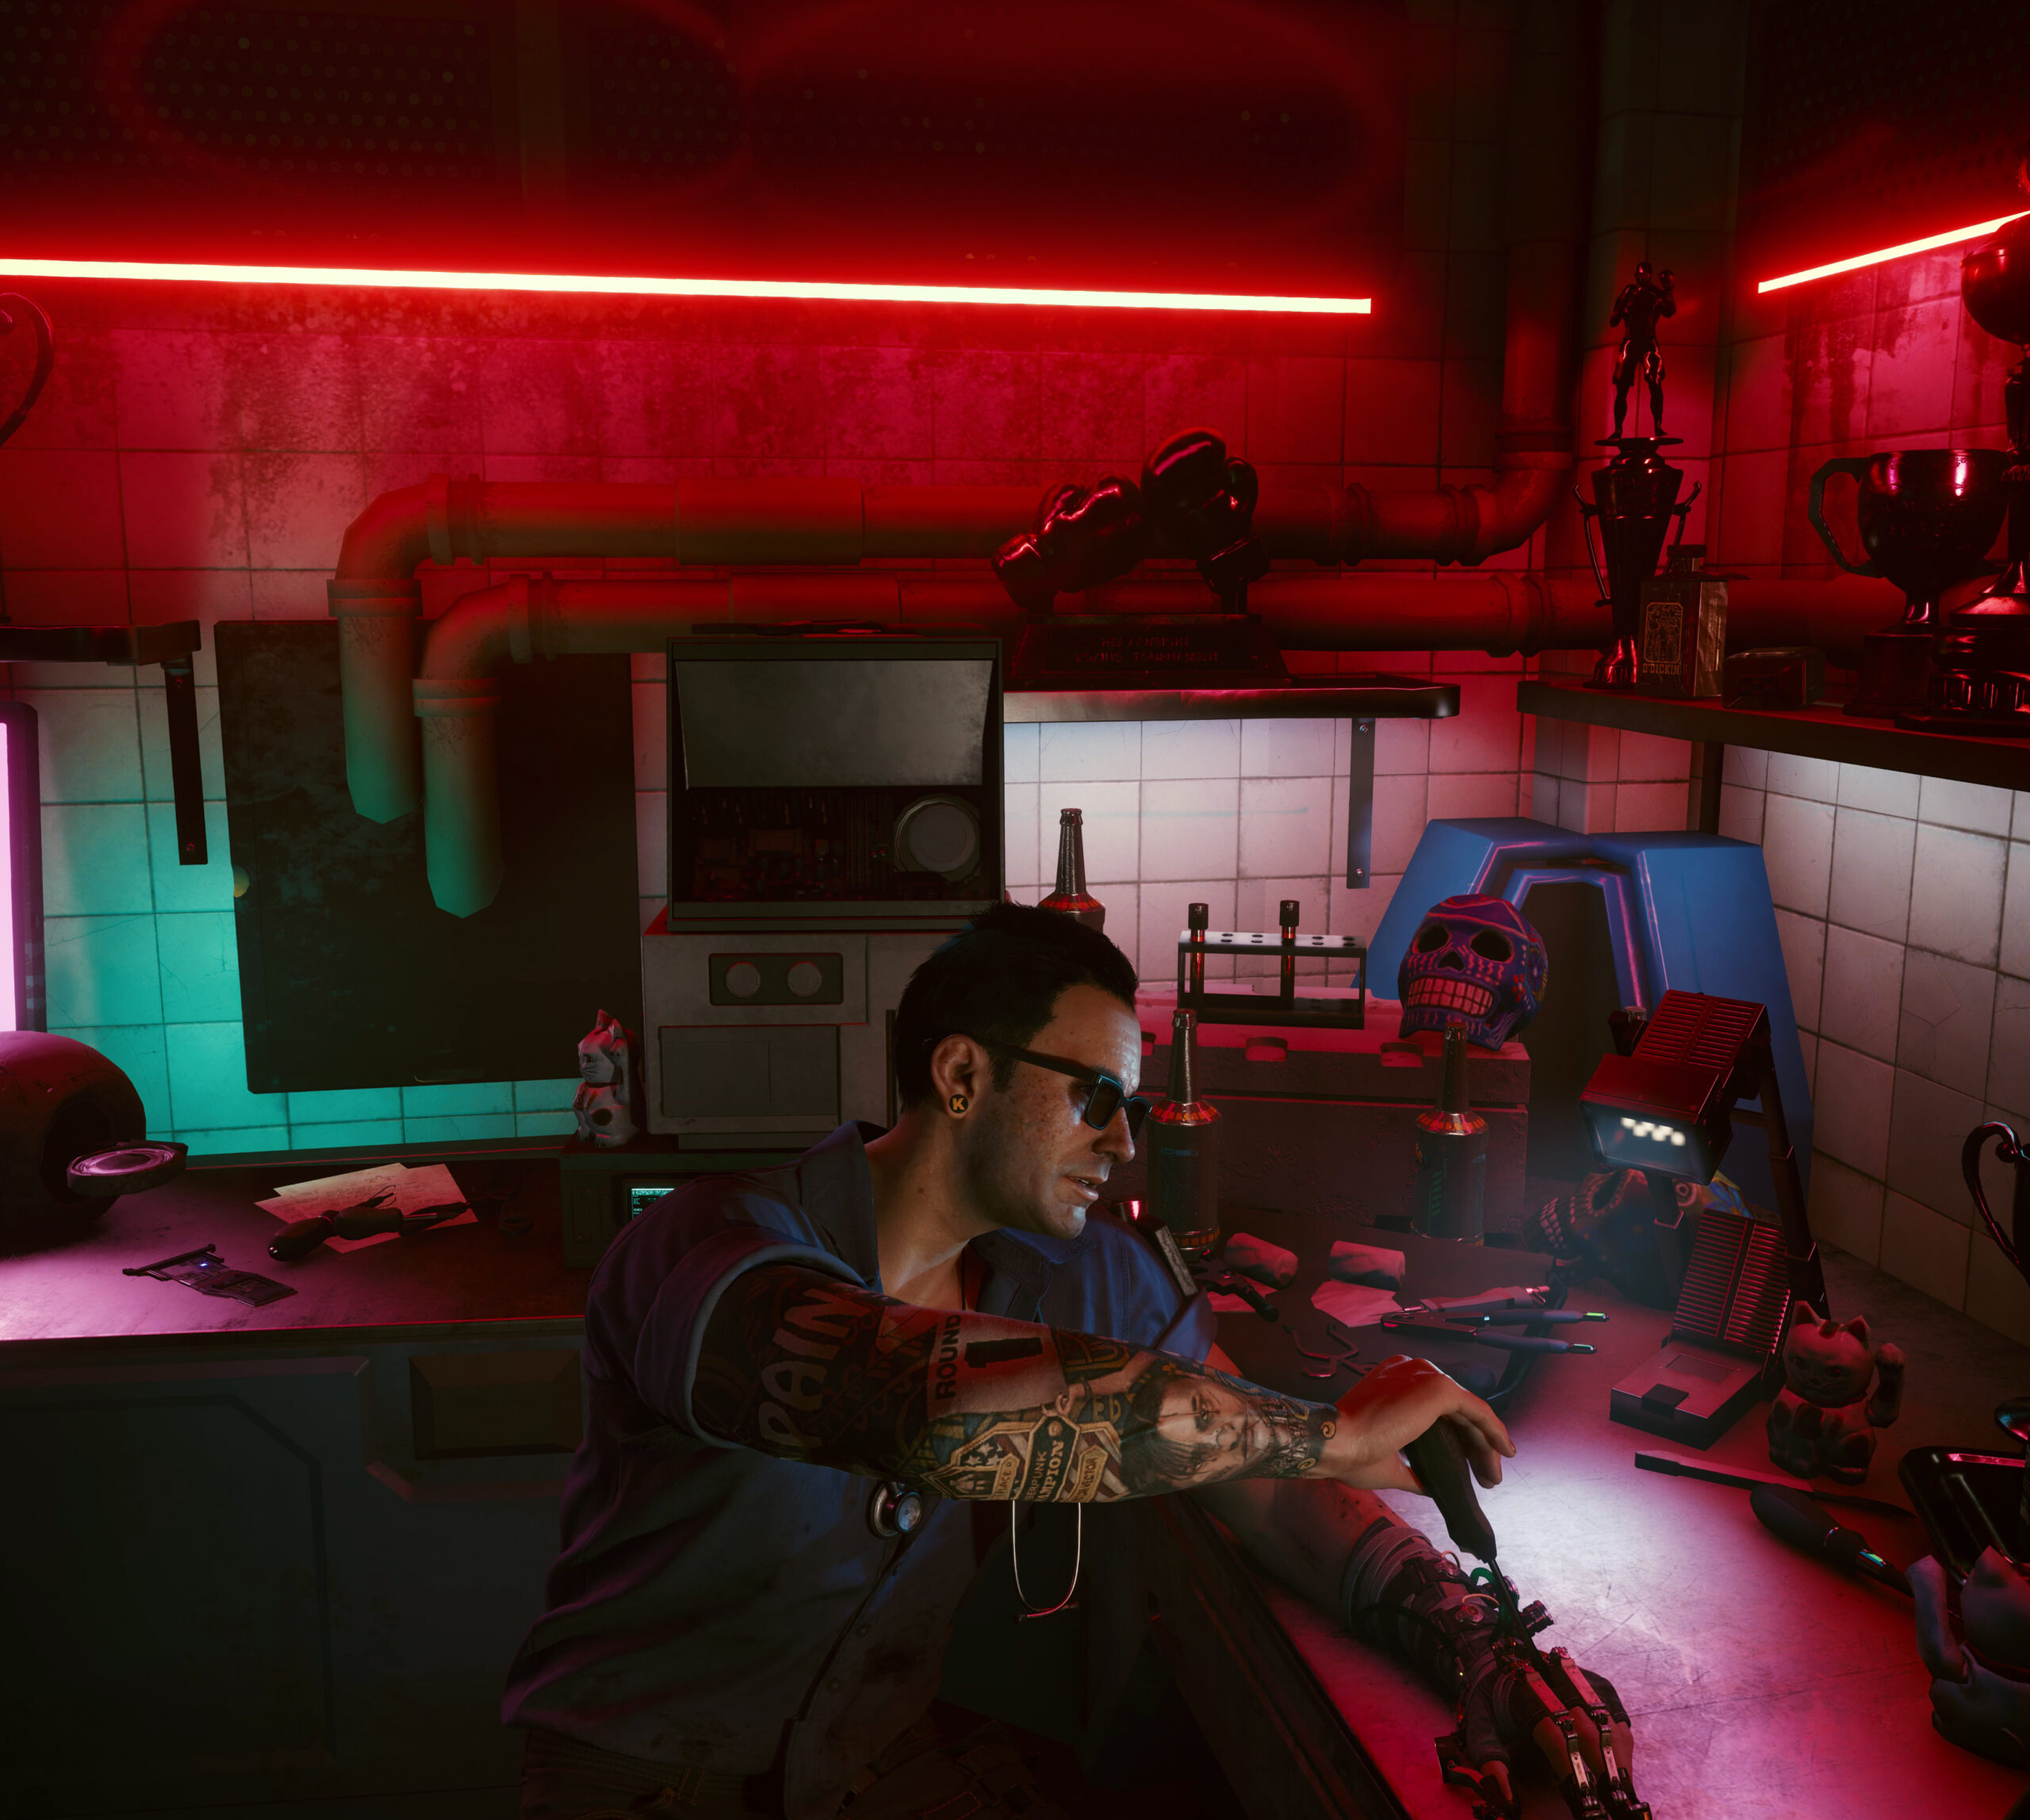
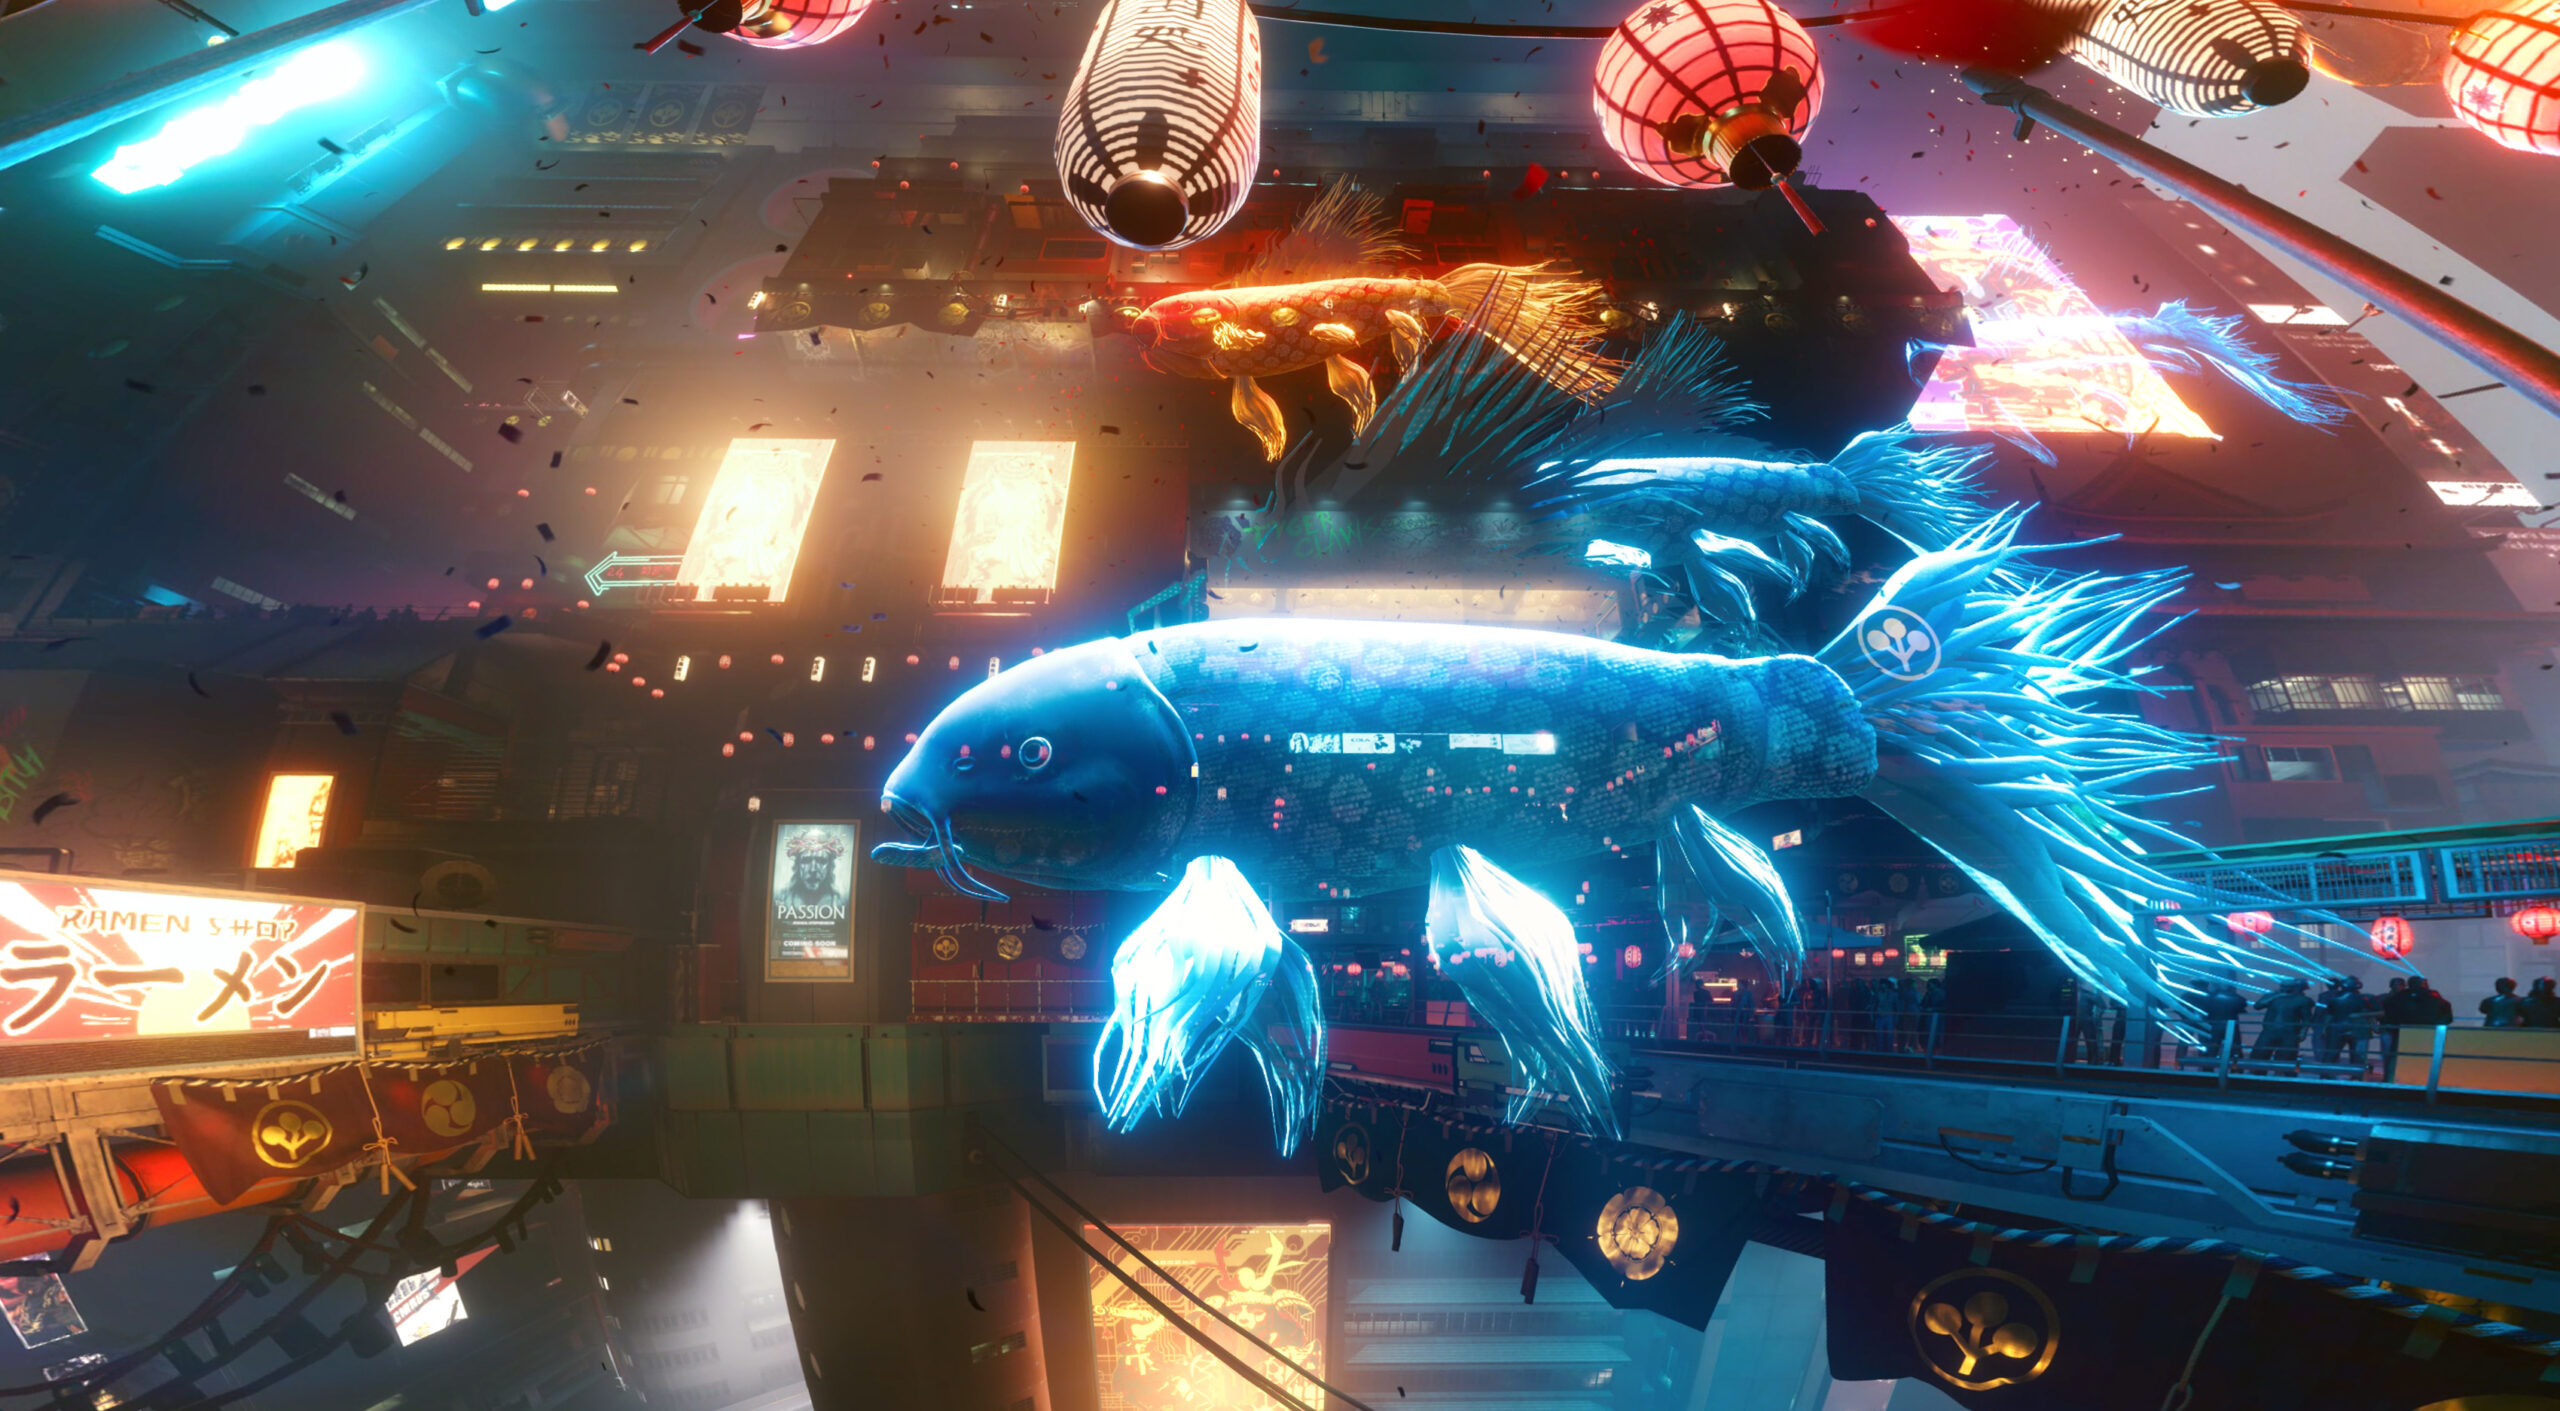
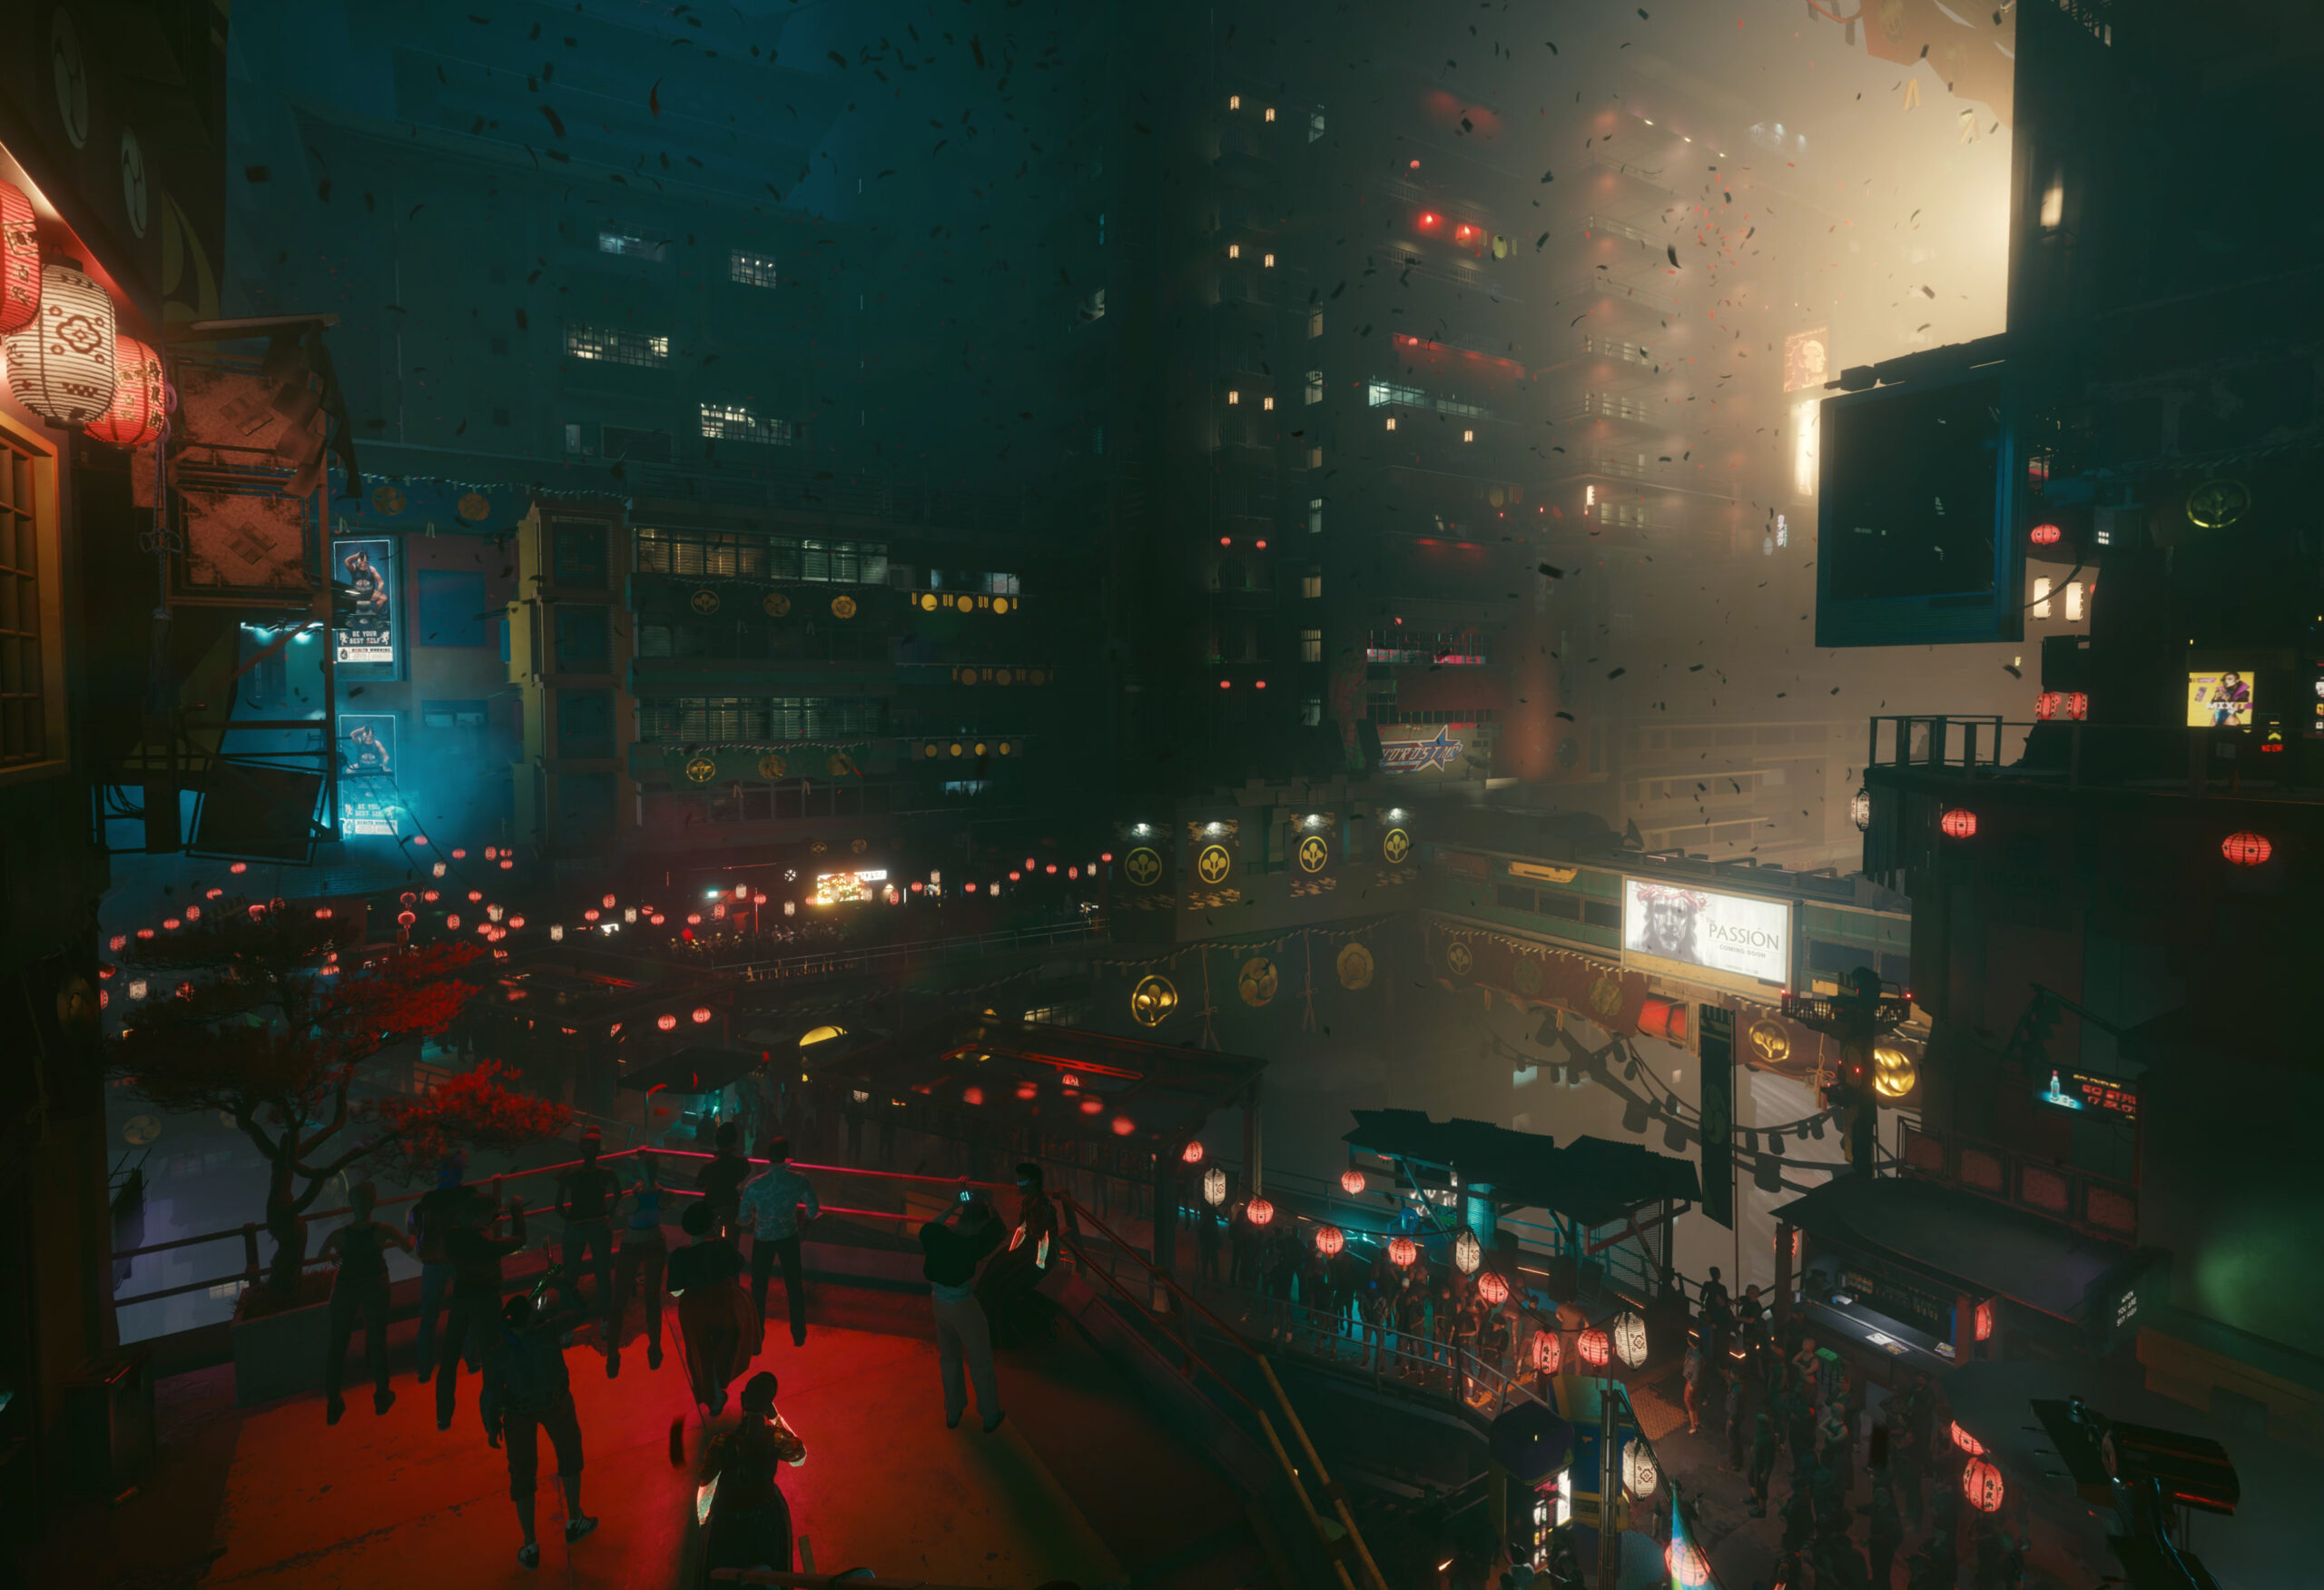
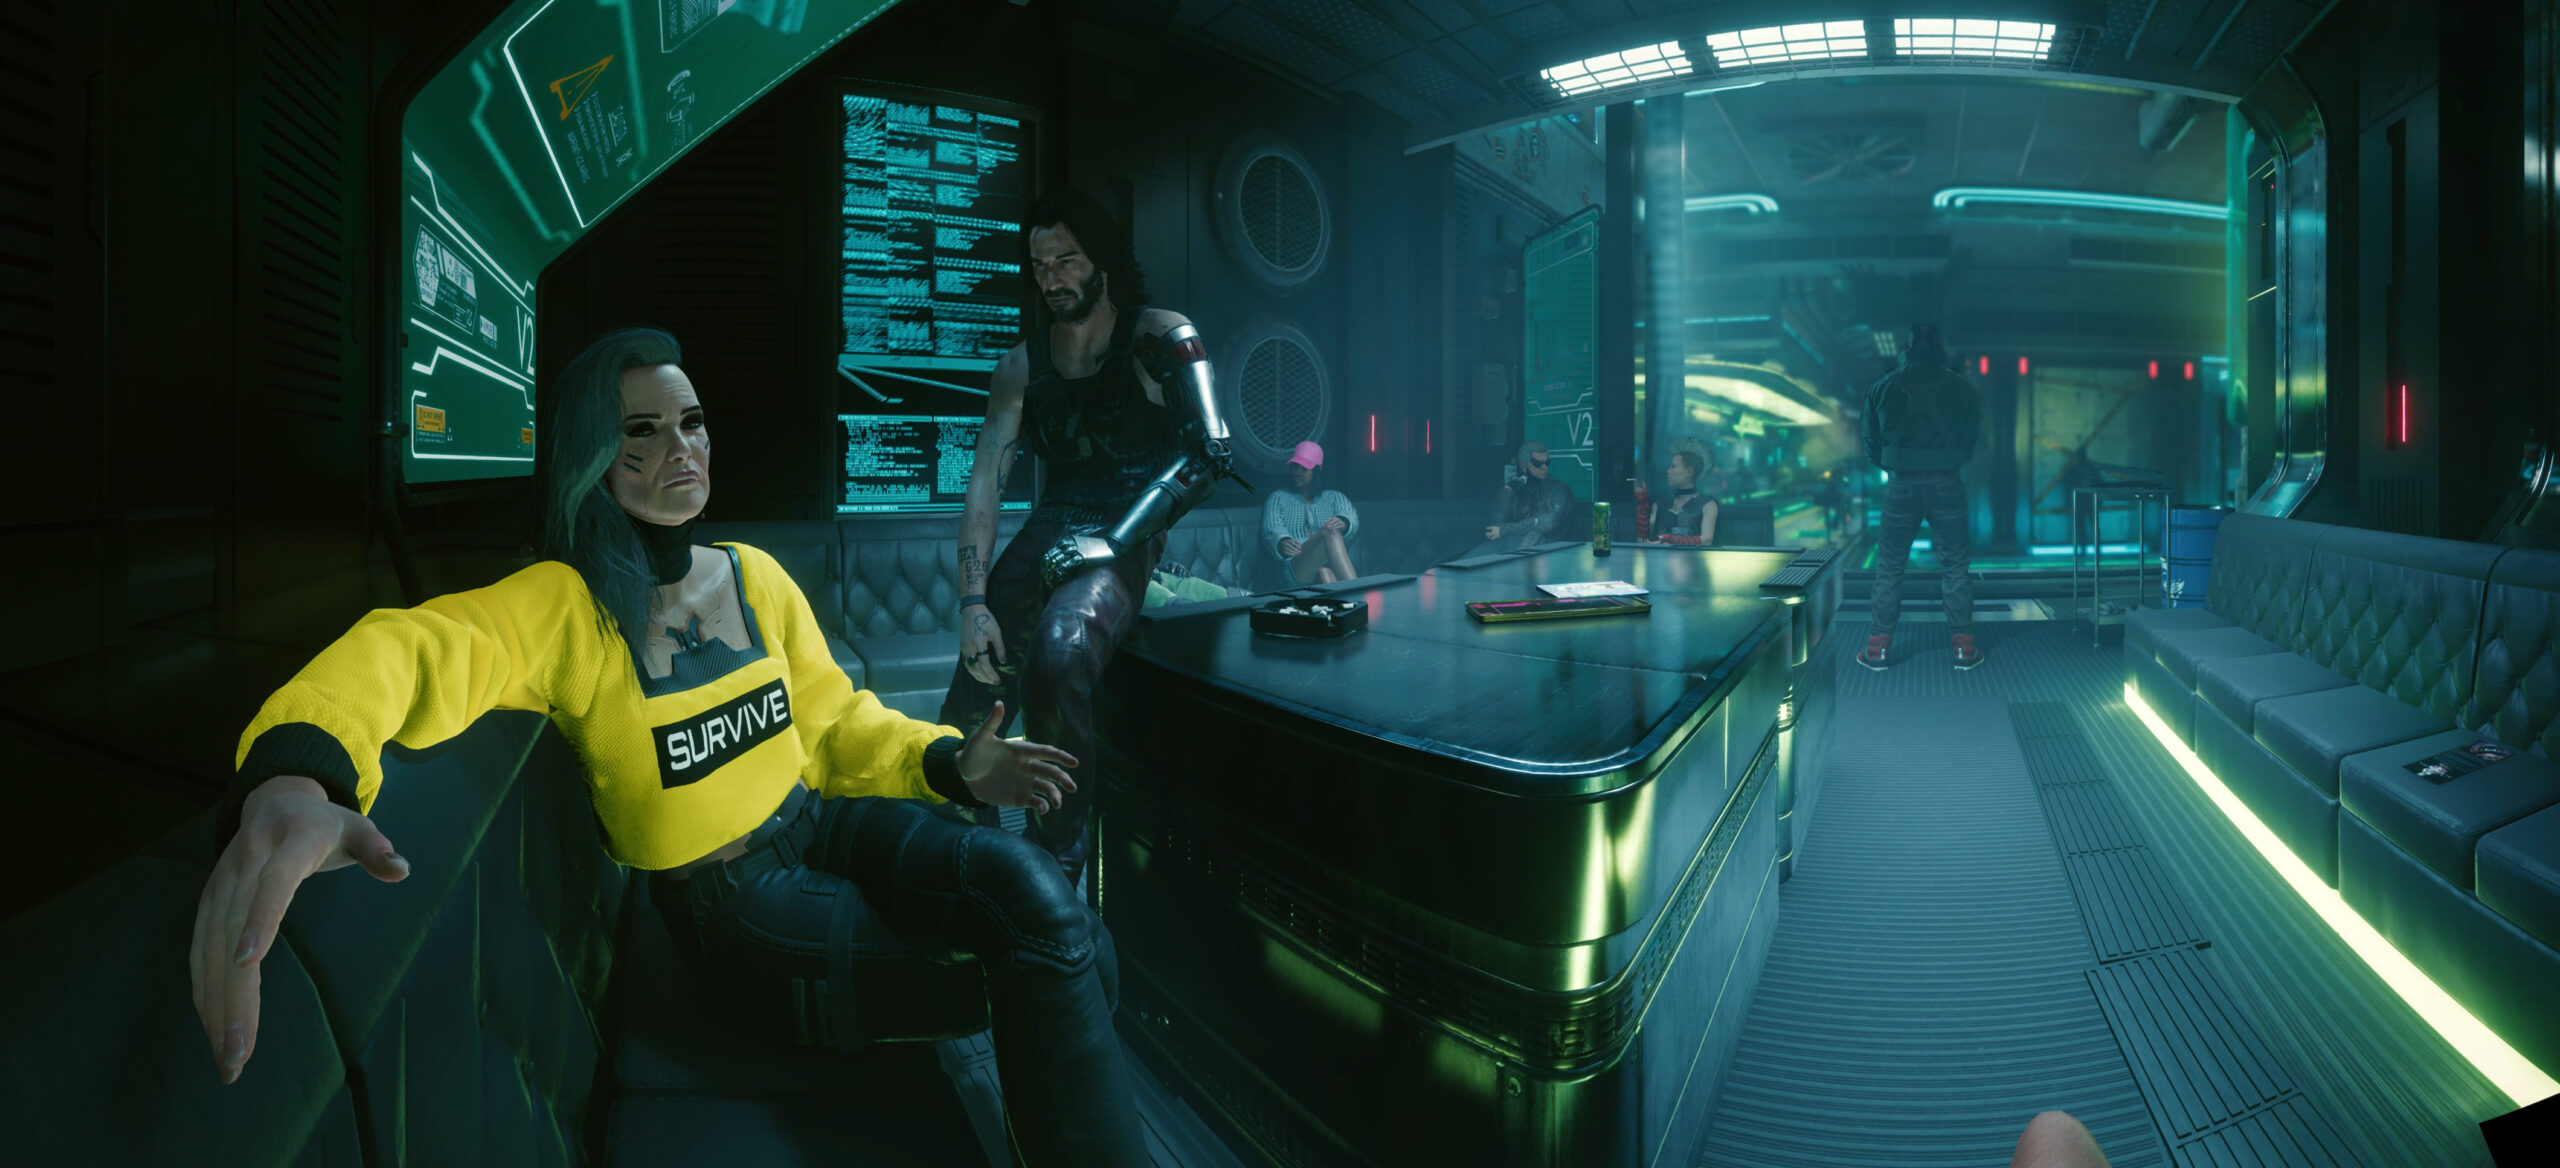
For the first time in the last 10ish years I am back playing a game that really impresses me. The story, the world and the technology of Cyberpunk 2077 really is a step forward.
It’s a first in many aspects for me. I do not own a PC capable enough of playing Cyberpunk 2077 at any quality level. Usually I am playing games on consoles like the Playstation. But for this one I have selected to play on the PC platform. But how?
I am using game streaming. The game is rendered in a datacenter on a PC and graphics card I am renting for the purpose of playing the game. And it simply works great!
So I am playing a next-generation open-world game with technical break-throughs like Raytracing used to produce really great graphics streamed over the internet to my big-screen TV and my keyboard+mouse forwarded to that datacenter without (for me) noticeable lag or quality issues.
The only downside I can see so far is that sooo many people like to play it this way that there are not enough machines (gaming-rigs) available to all the players that want – so there’s a queue in the evening.
But I am doing what I am always doing when I play games. I take screenshots. And if the graphics are great I am even trying to make panoramic views of the in-game graphics. Remember my GTA V and BioShock Infinite pictures?
So here is the first batch of pictures – some stitched together using 16 and more single screenshots. Look at the detail! Again – there are in-game screenshots. Click on them to make them bigger – and right-click open the source to really zoom into them.
Diesmal gehen wir der Frage nach, wie viel Speicherplatz ein 5 Meter PNG File benötigt, das Daniel für seinen DIY Arcarde Automaten gebaut hat, wundern uns über LED-Leuchten an, die wie echter Himmel aussehen sollen und freuen uns über den “Digitalen Alltag als Experiment”.
ASIO4All – http://www.asio4all.org/
Corne Keyboard – https://github.com/foostan/crkbd
Prusa Mini – https://www.prusa3d.com/original-prusa-mini/
Andreas YouTube Kanal: https://www.youtube.com/c/AndreasHeil/featured
Forschungsgemeinschaft elektronische Medien e.V. TU-Ilmenau: http://streaming.fem.tu-ilmenau.de/
Overpass Turbo – https://overpass-turbo.eu/
Overpass API – https://wiki.openstreetmap.org/wiki/Overpass_API
Openstreetmap – https://www.openstreetmap.org
Resilio Sync – https://www.resilio.com/individuals/
Buch Alltag als Experiment – https://www.transcript-verlag.de/978-3-8376-4886-7/digitaler-alltag-als-experiment/
Bürowabe von Panasonic – https://www.golem.de/news/japan-panasonic-bringt-buerowabe-fuers-homeoffice-2008-150435.html
Selbstgebautes Ambilight – https://www.schrankmonster.de/2014/01/12/setting-boblight-raspberry-pi-raspbmc/
Misola LED Tageslichtpanel – https://www.mitsubishielectric.co.jp/news/2020/0204-b.html
Mandalorian Making Of – https://www.indiewire.com/2020/04/mandalorian-documentary-disney-plus-1202225196/
Farbwiedergabeindex CRI – https://de.wikipedia.org/wiki/Farbwiedergabeindex
Retrogames e.V. – https://www.retrogames.info/
Retropie – https://retropie.org.uk/
Bubble Bobble Bartop Arcade built – https://www.schrankmonster.de/2020/08/22/a-self-built-bubble-bobble-bartop-arcade-machine/
LEGO Star Wars 75253 BOOST Droide – https://www.lego.com/en-de/product/droid-commander-75253
Ikea Bygglek – https://zusammengebaut.com/lego-ikea-bygglek-interview-bilder-infos-100595/
Arpanet auf ESP32 – https://de.wikipedia.org/wiki/Arpanet
PH_0x17 baut Arpanet auf ESP32 – https://twitter.com/PH_0x17
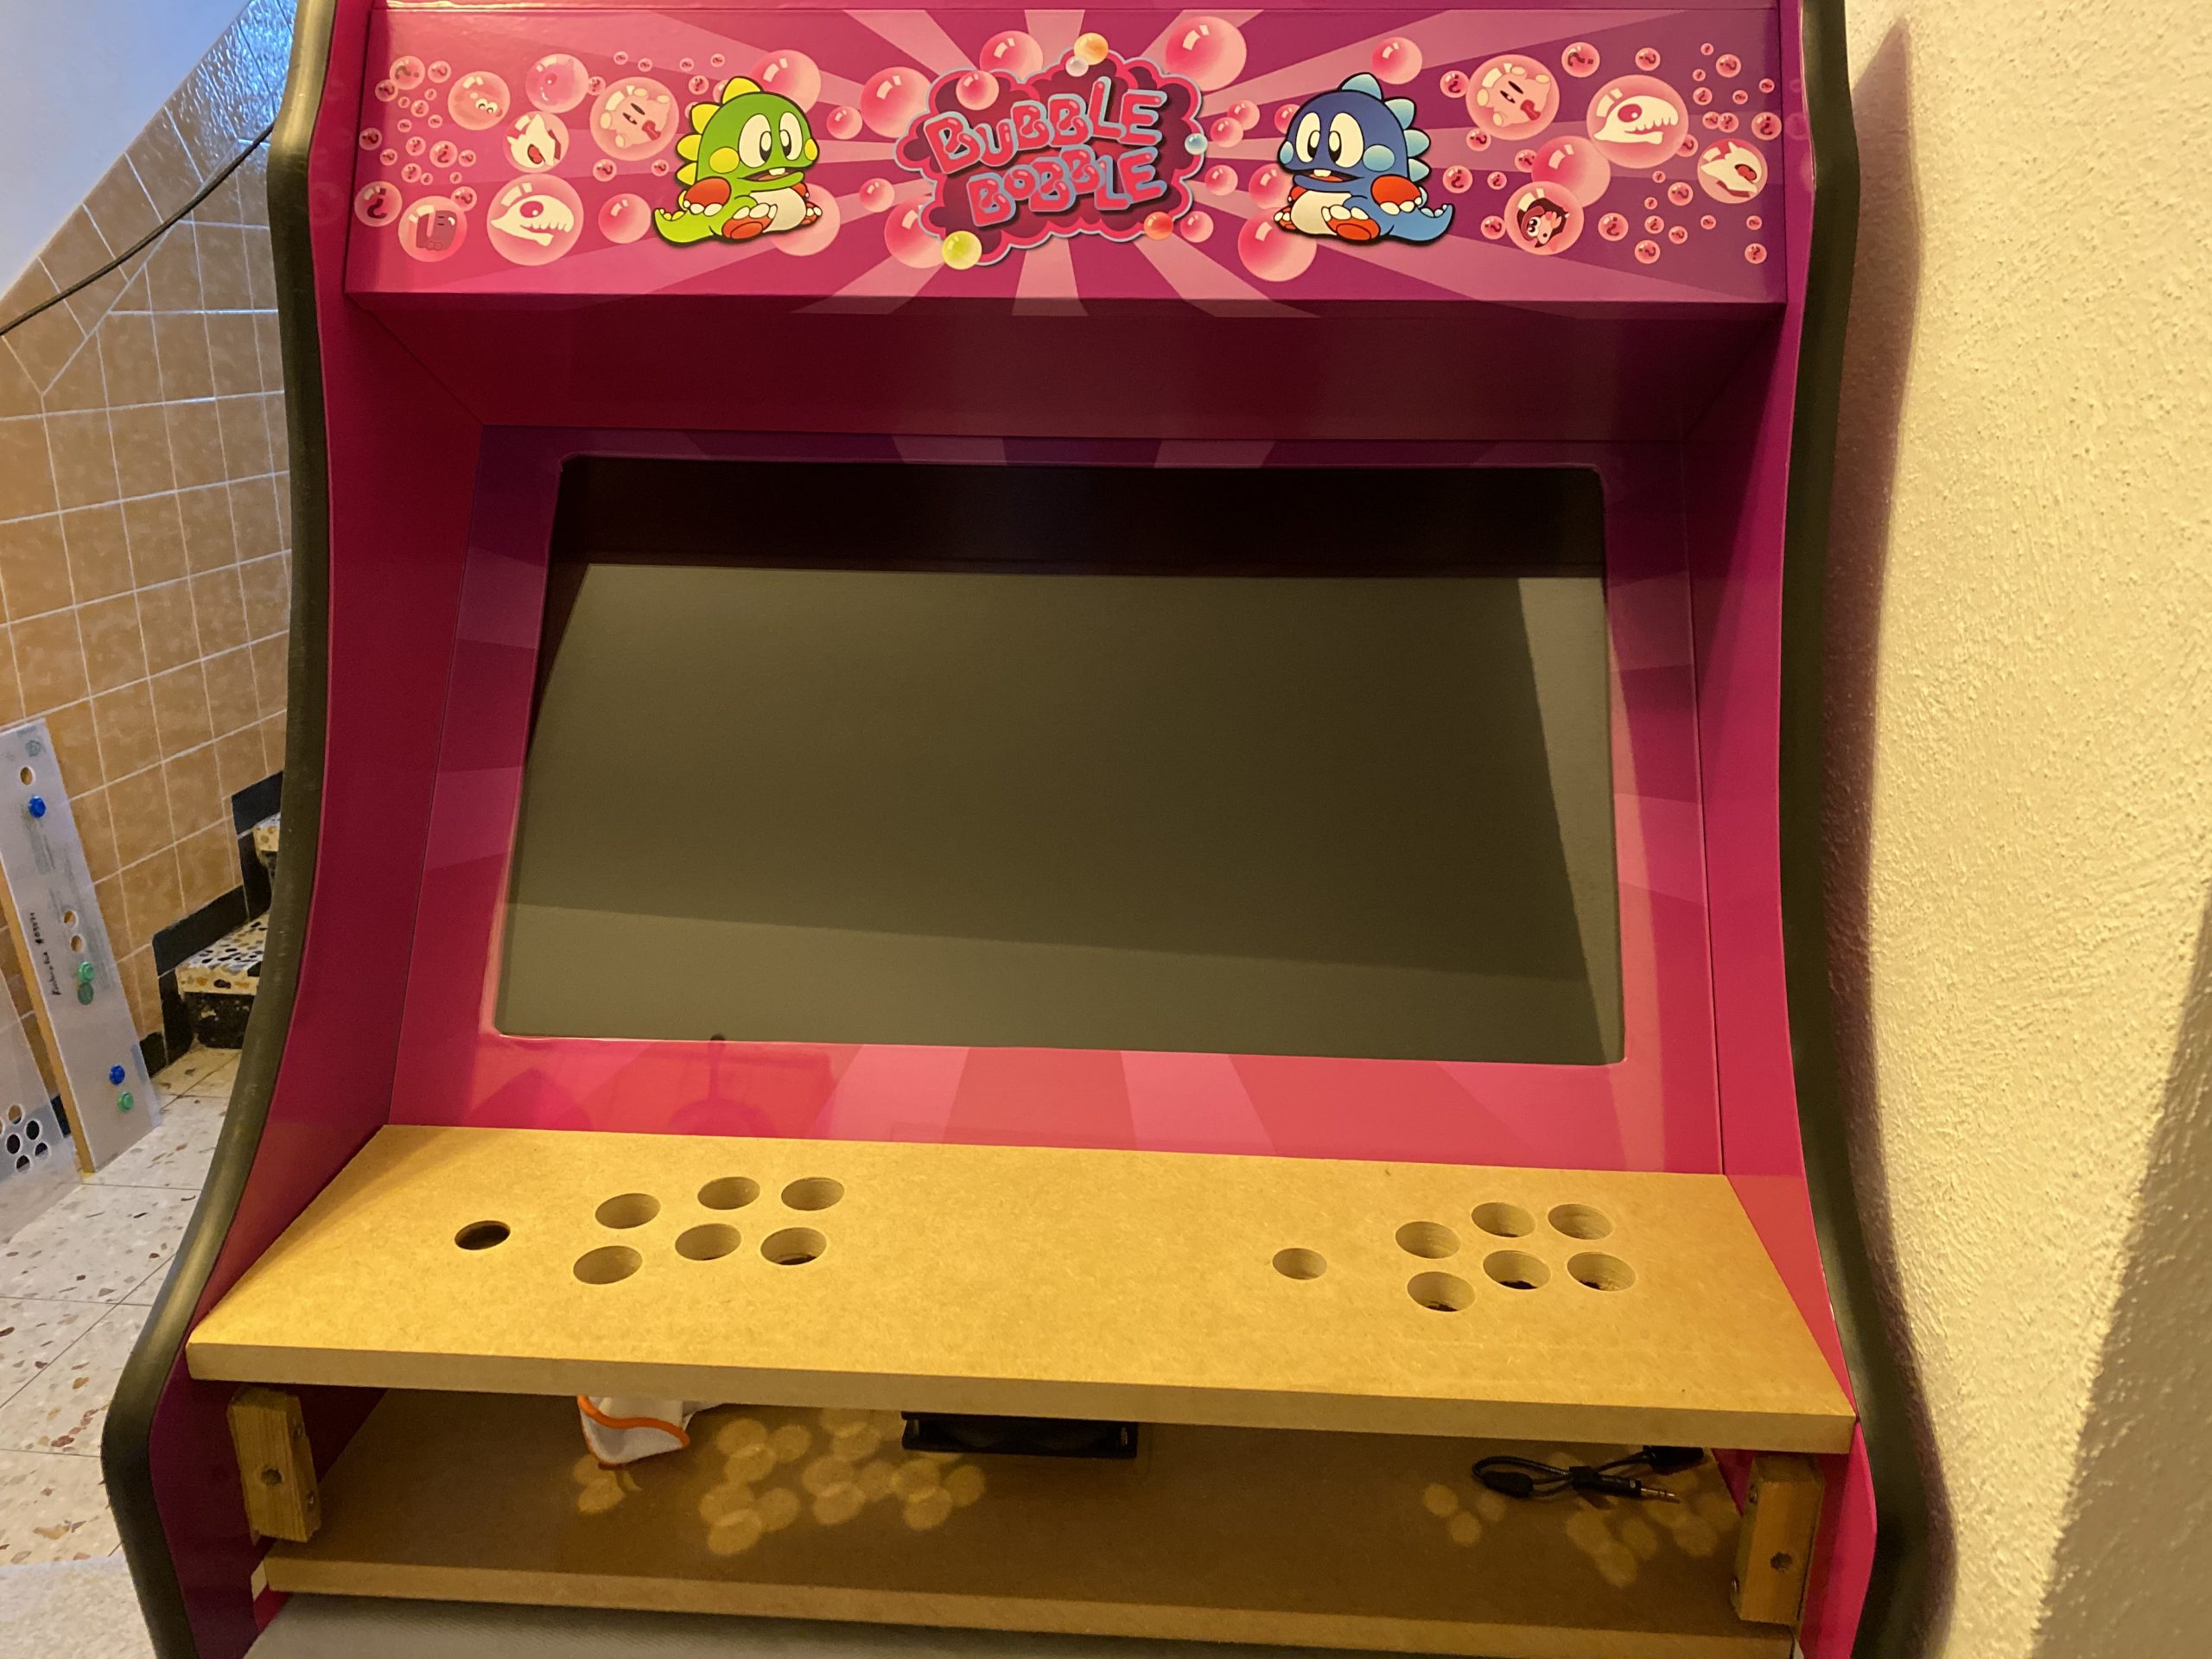
I like playing arcade games. I’ve had an “arcade” in my home town and I used to go there after school quite frequently. It was a small place – maybe 5 machines and some pinball machines.
In february this year it occured to be that with the power of the Raspberry Pi and a distribution called RetroPie I could build something that would bring back the games and allow me to play/try those games I never could because my arcade was so small back in the days.
To get a better idea of how to approach this I started to search around and found the build-log of Holbrook Tech where they’ve built a “Bigger Bartop Arcade”.
With their basic plans I started drawing in Inkscape and told my father about the plan. He was immediately in – as the plan now was to not build one but two bartop arcade machines. He would take the task of carrying out the wood works and I would do the rest – procurements, electronics, wiring, design and “painting”.
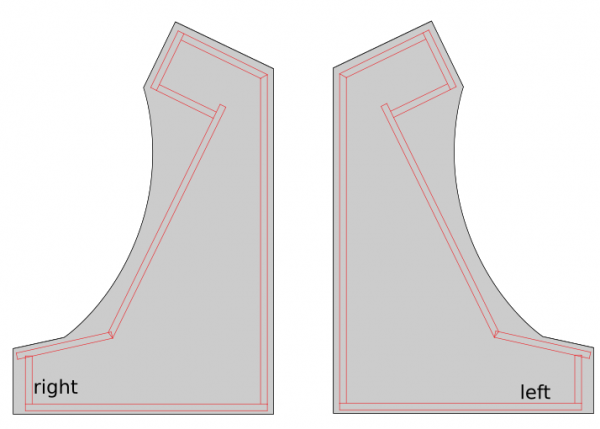
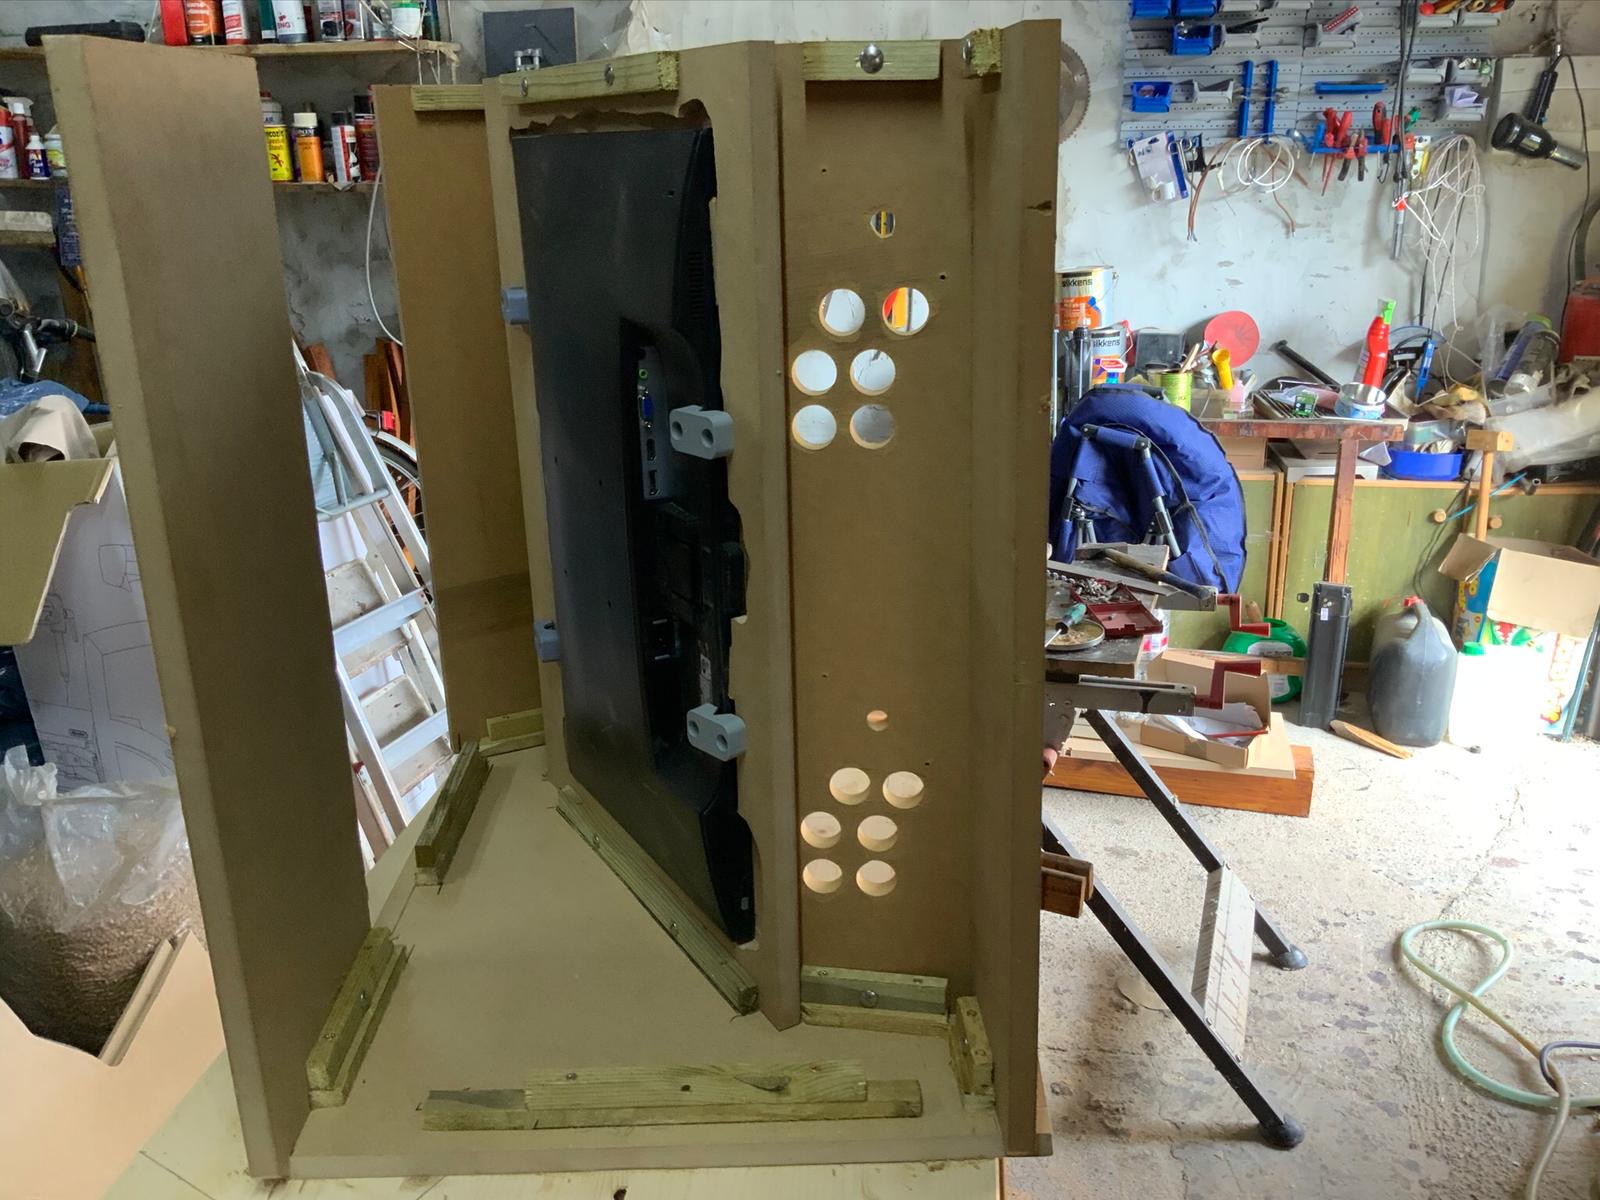
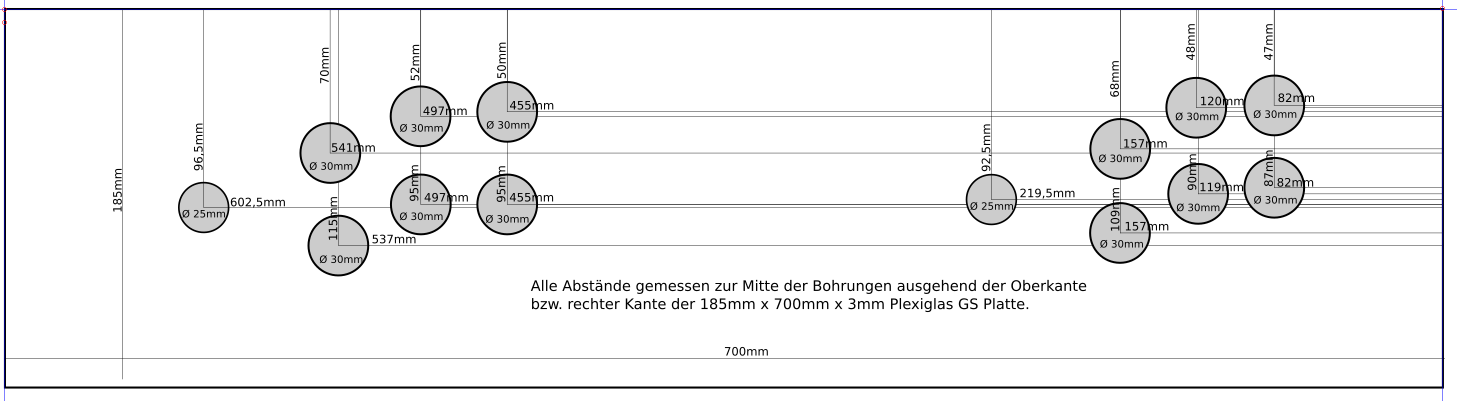
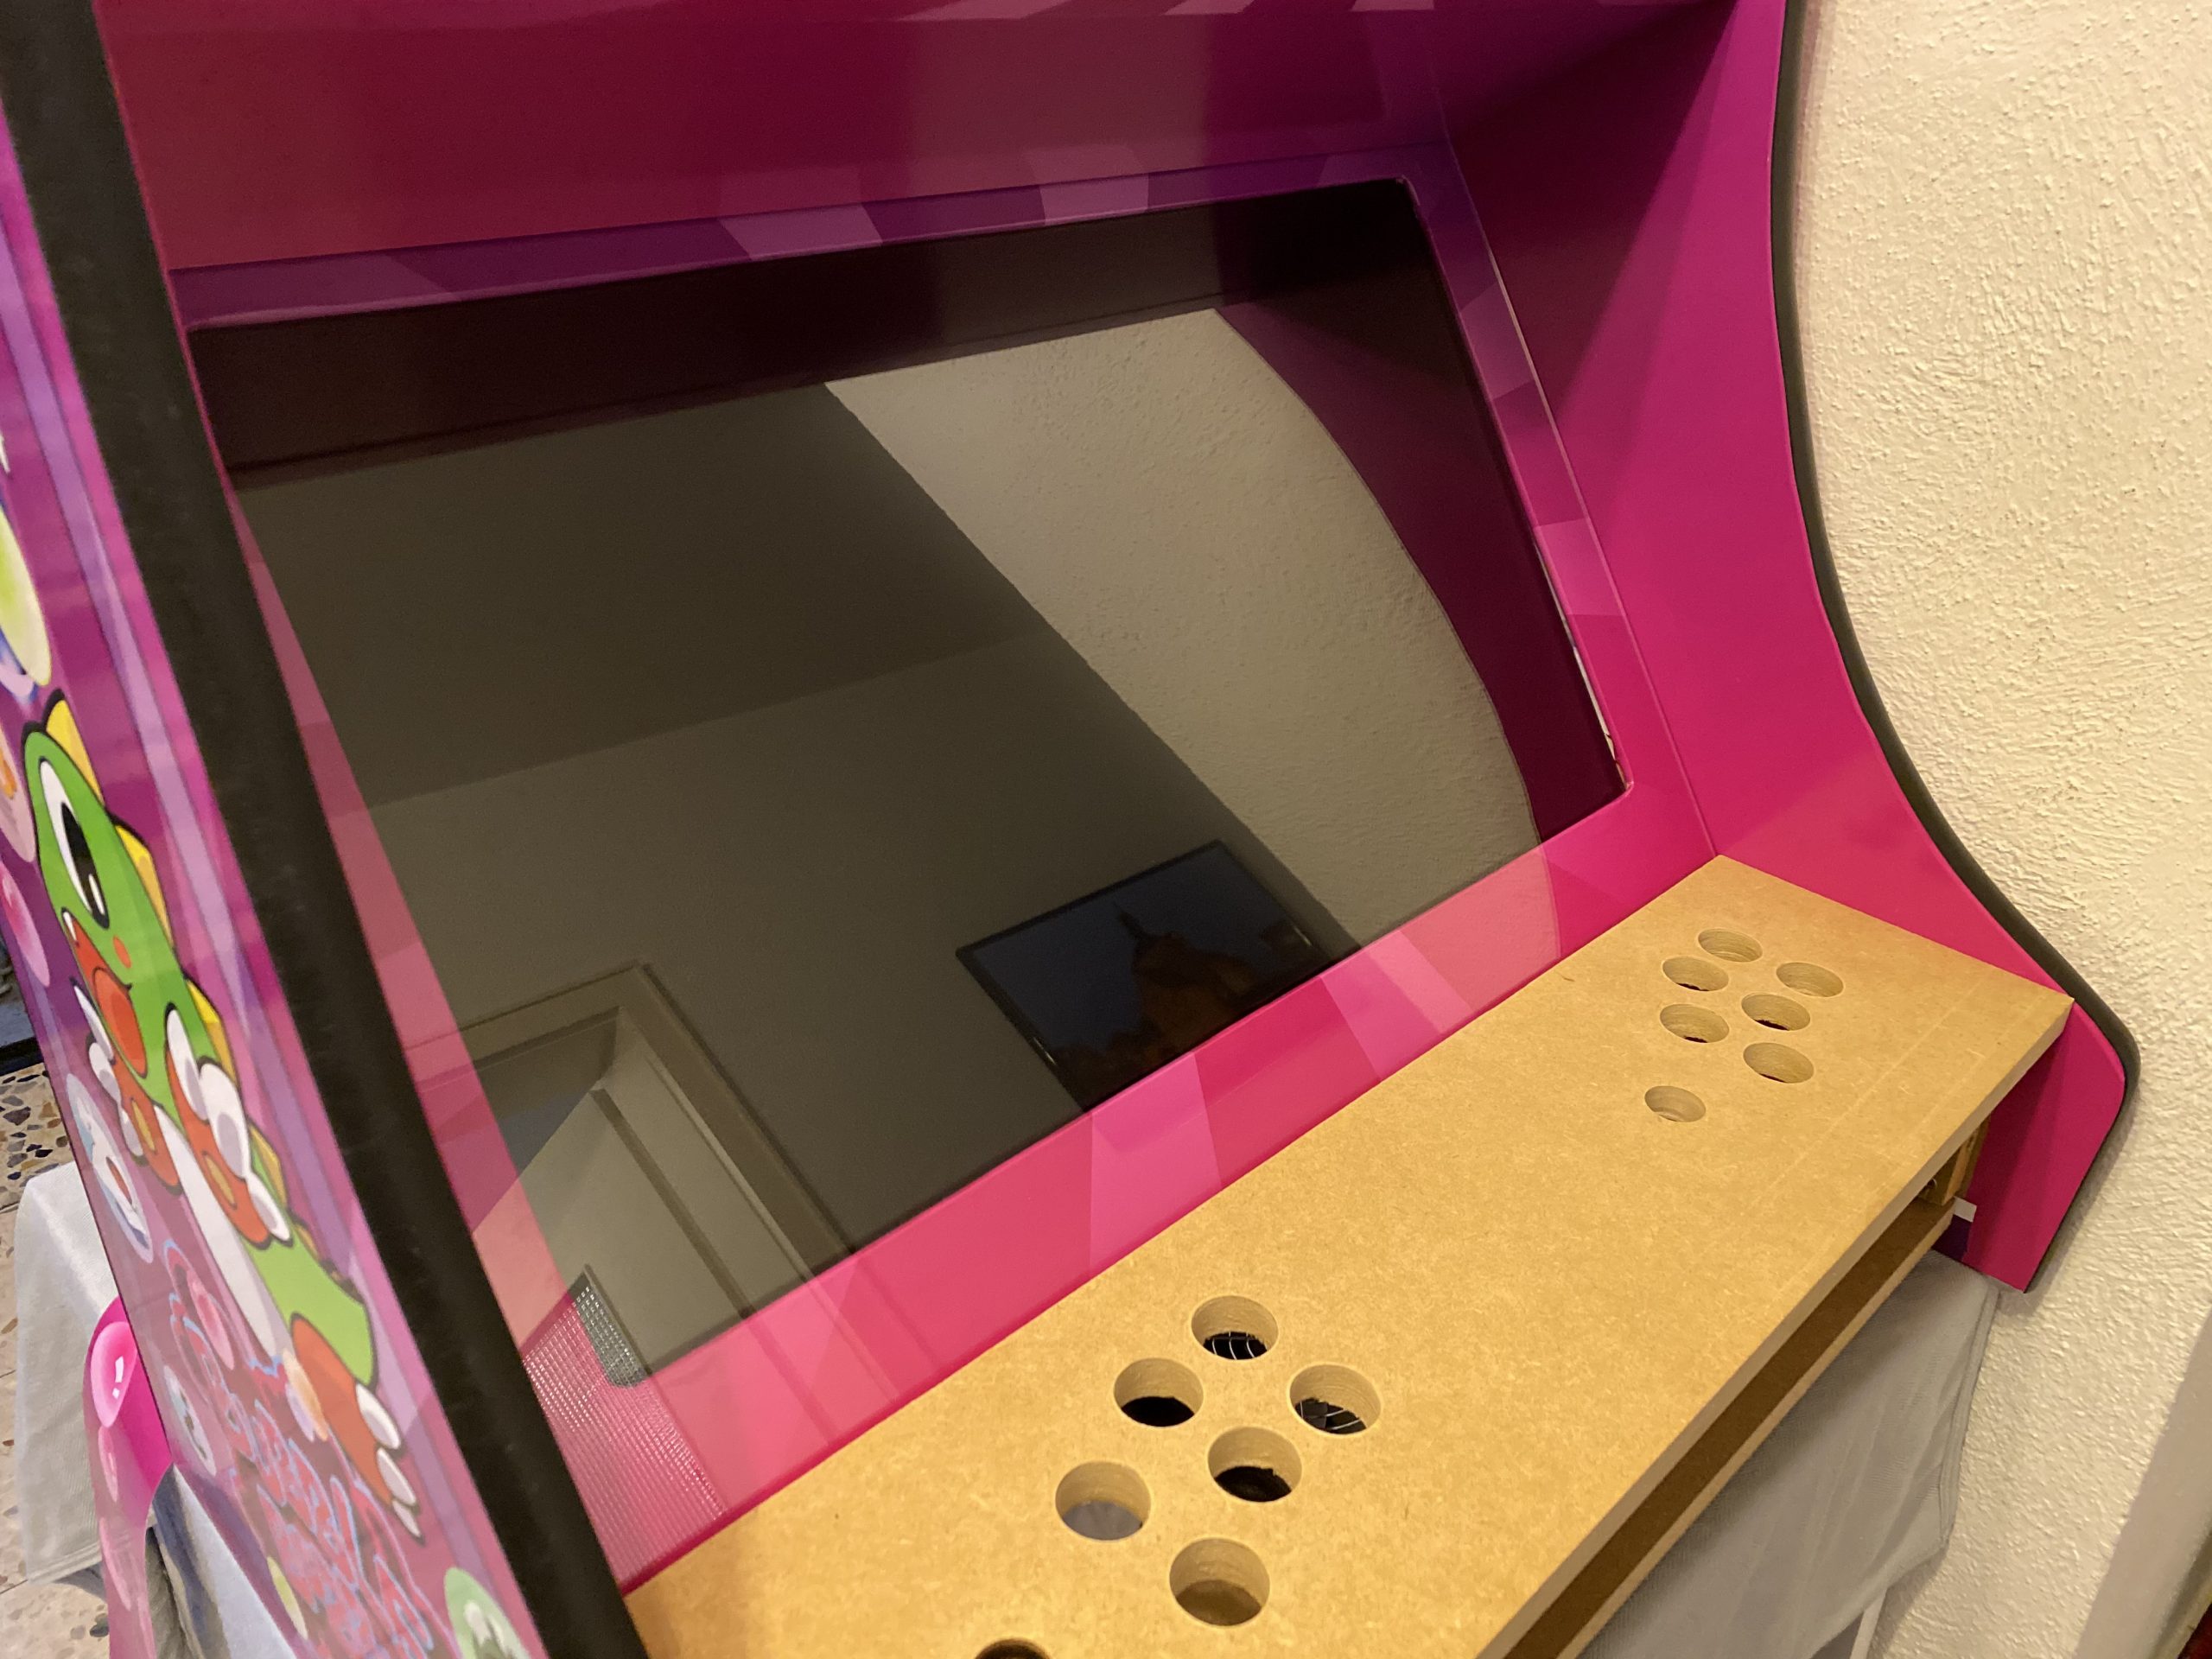
While I took the Holbrook Tech schematics as a base it quickly came apparent that I had to build/measure around the one fixed big thing in the middle: the screen.
I wanted something decently sized that the RaspberryPi would be able to push out to and that would require no maintenance/further actions when installed.
To find something that fits I had my requirements fixed:
I eventually settled for a BenQ GW2780 27″ monitor with all boxes ticked for a reasonable price.
After the monitor arrived I carried it to my fathers house and we started to cut the bezel as a first try.
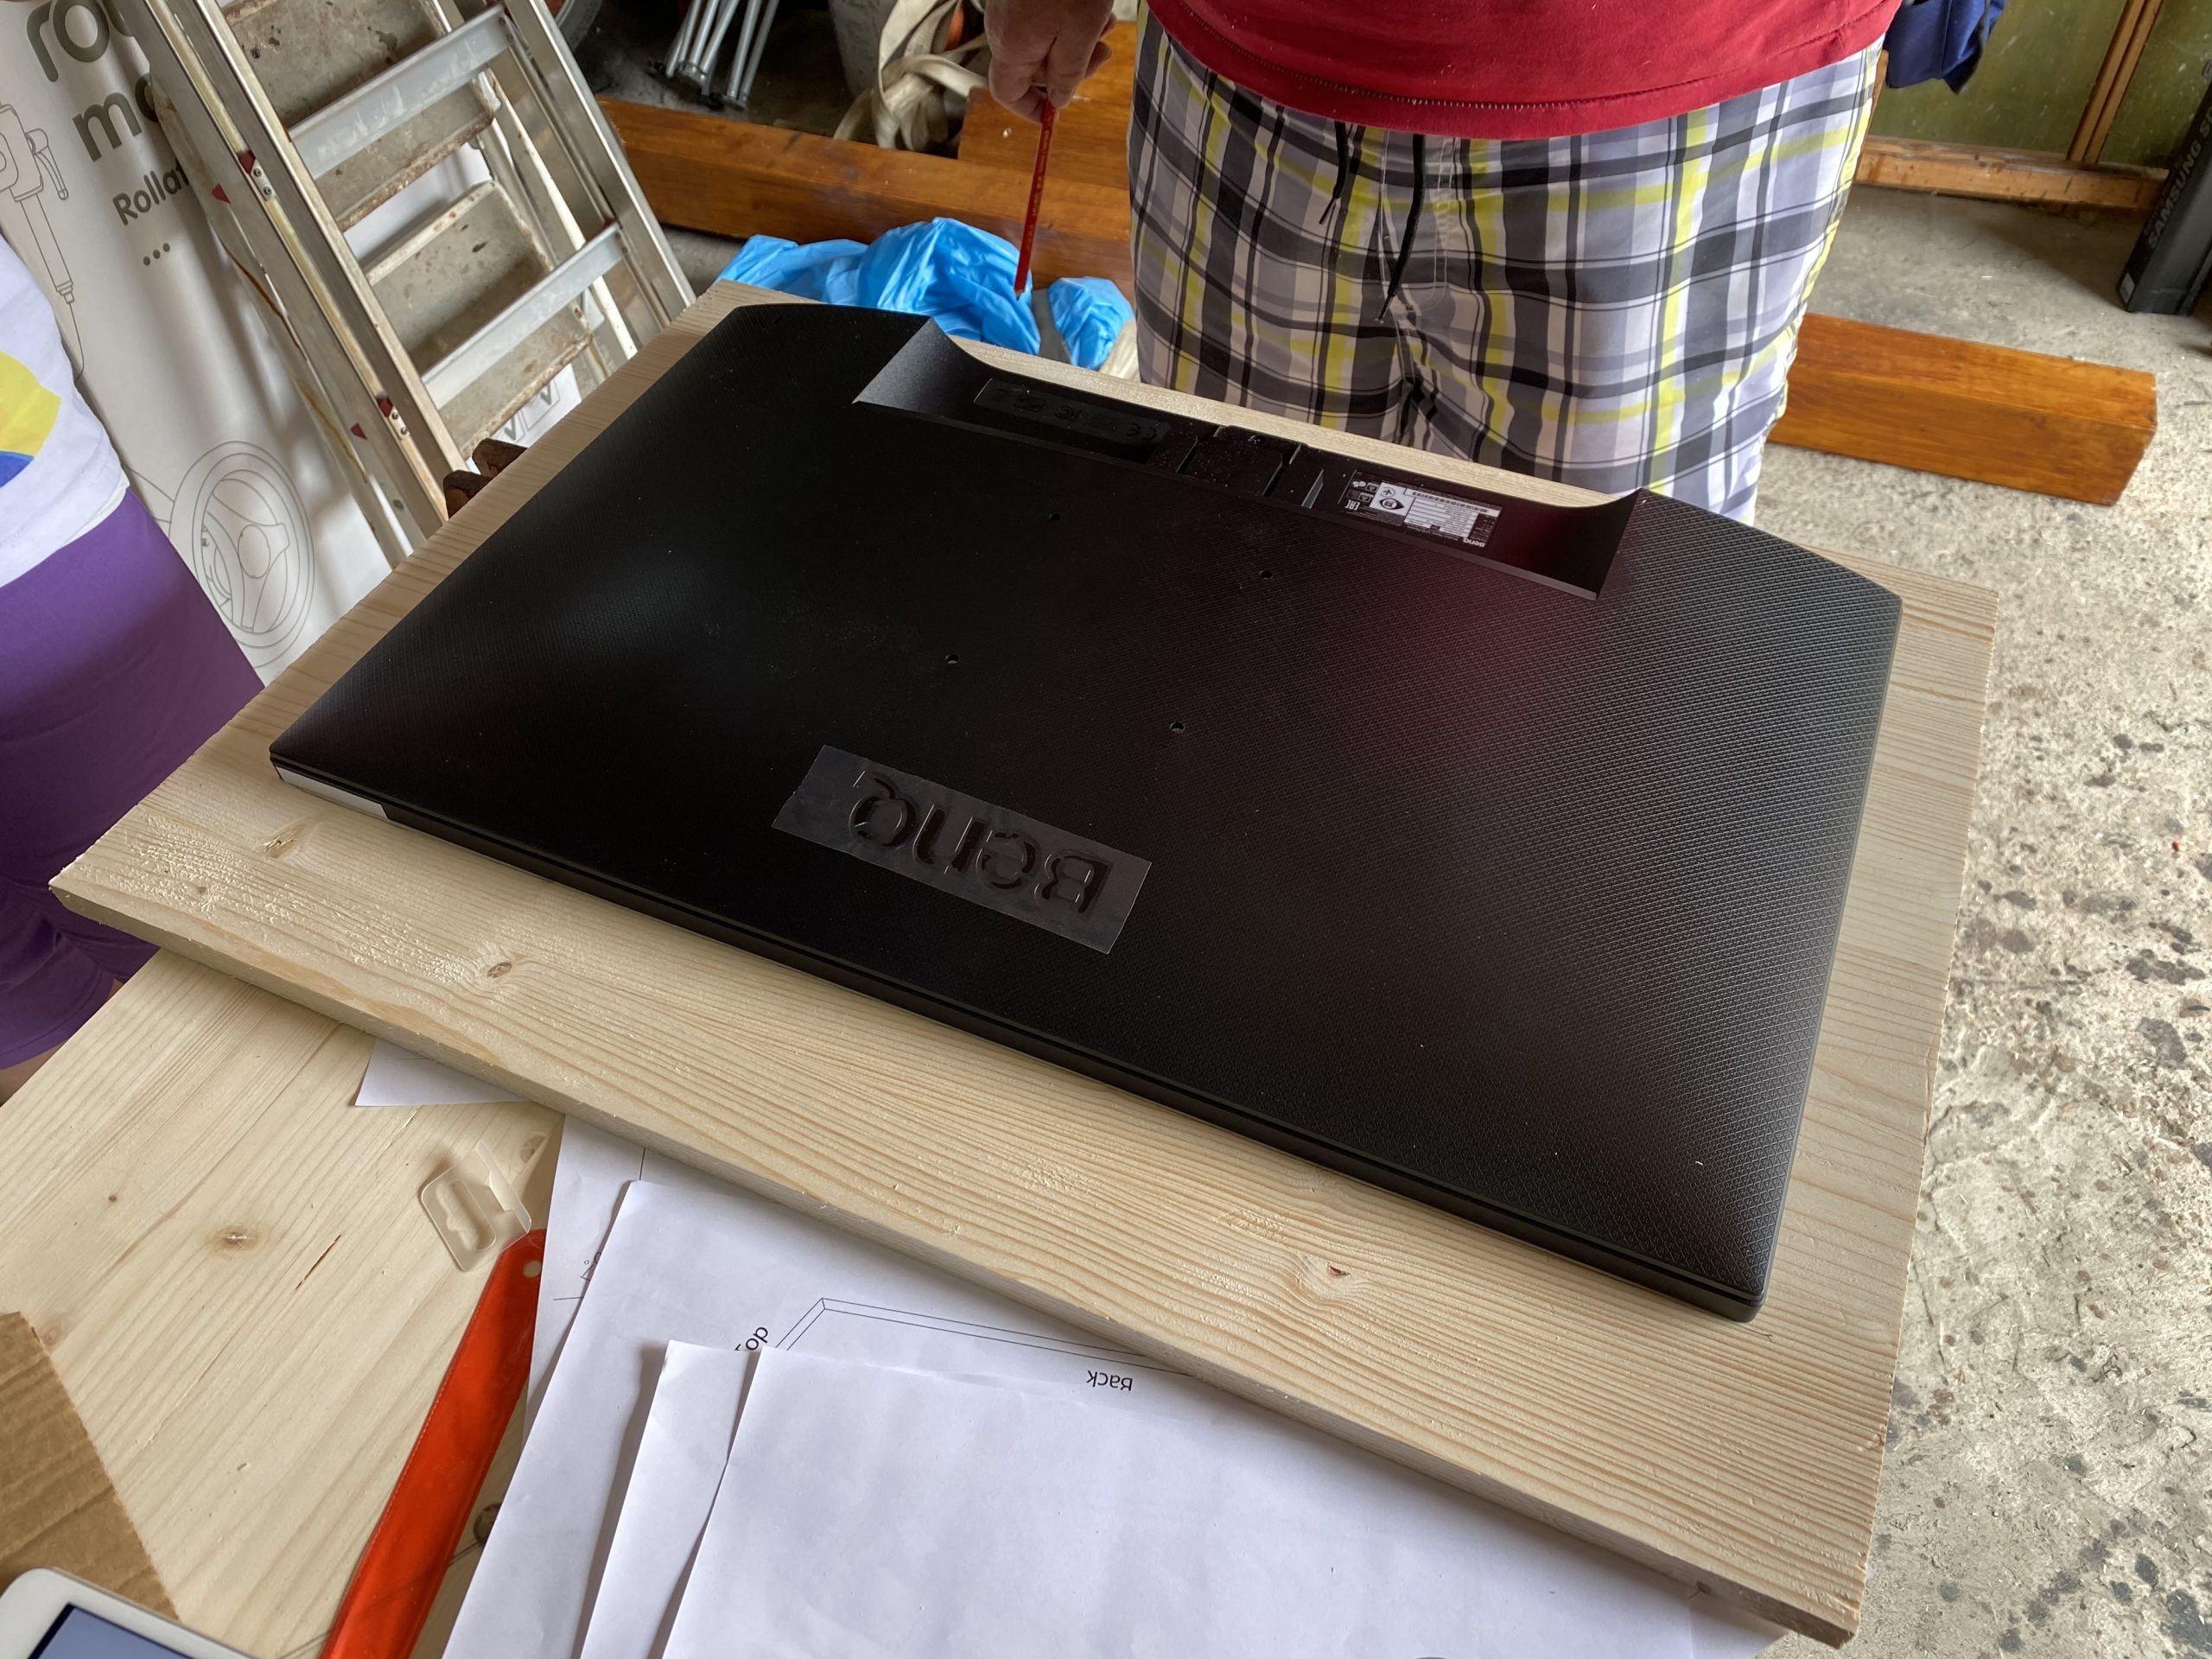
After some testing with plywood we went for MDF as it was proposed by others on the internet as well. This made the cutting so much easier.
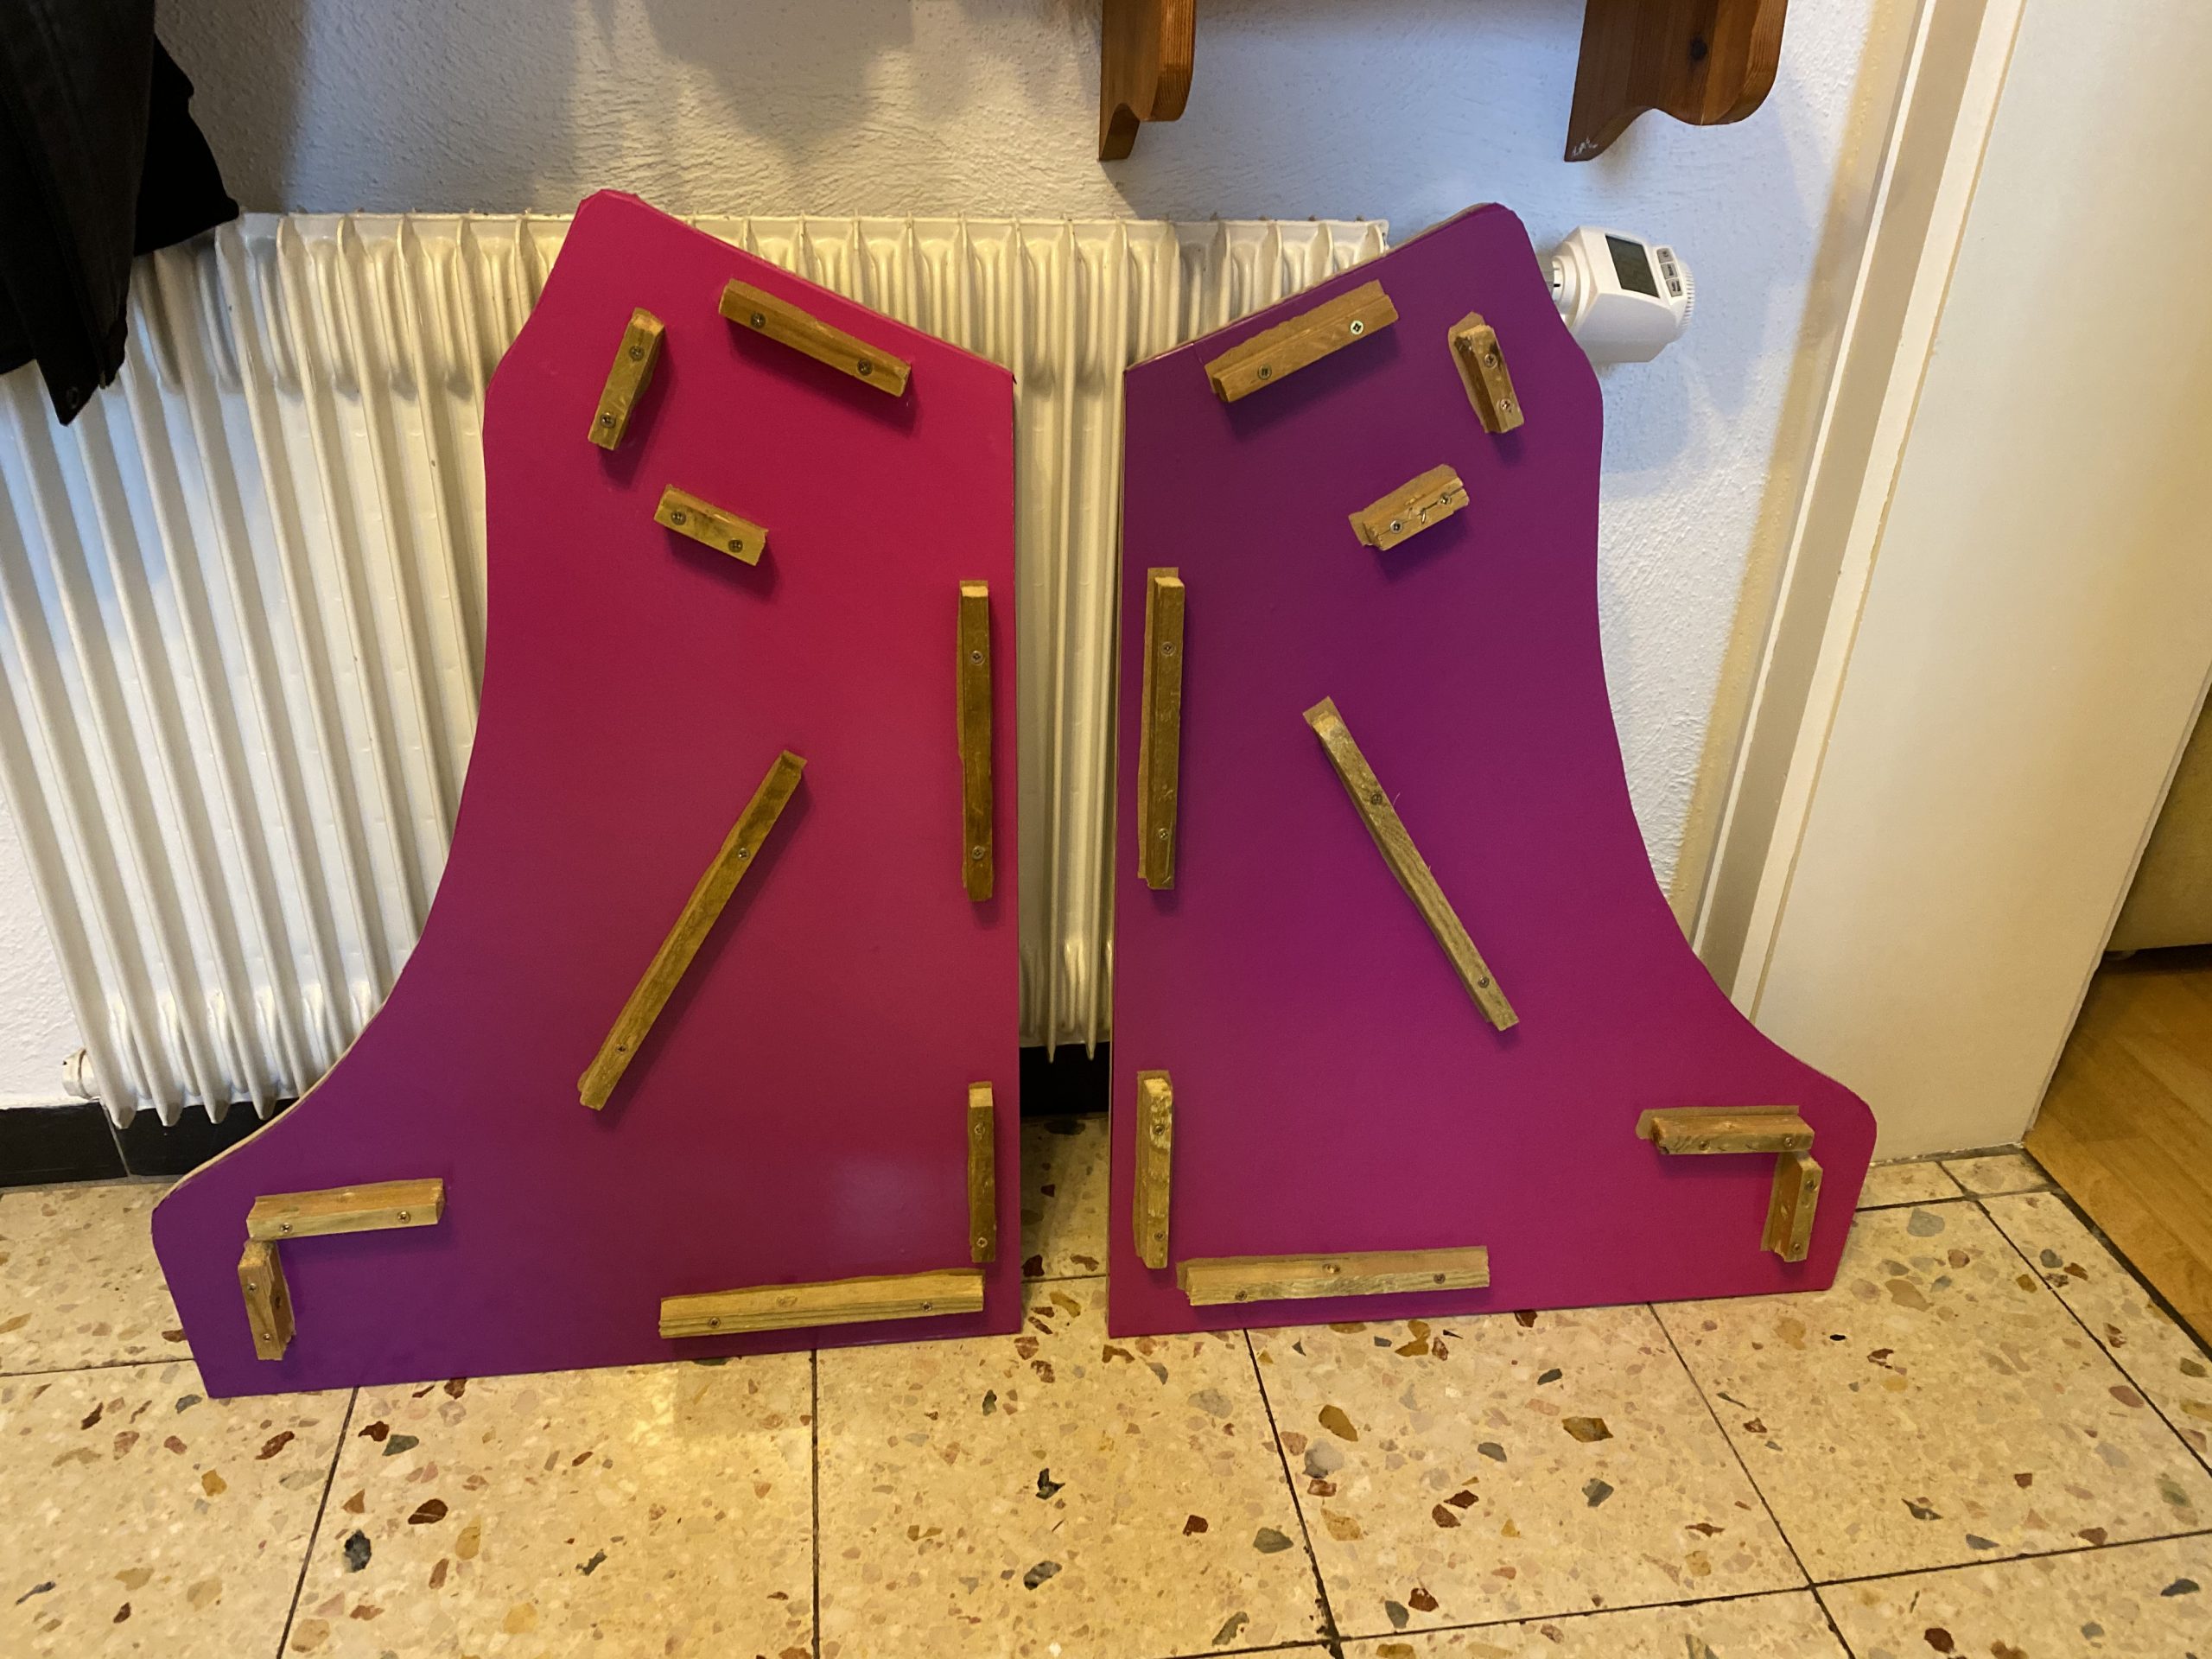
We went with standard 2cm MDF sheets and my father cut them to size with the measurements derived from the monitor bezel centerpiece.
Big thanks to my father for cutting so much wood so diligently! The next days he sent me pictures of what he’d made:
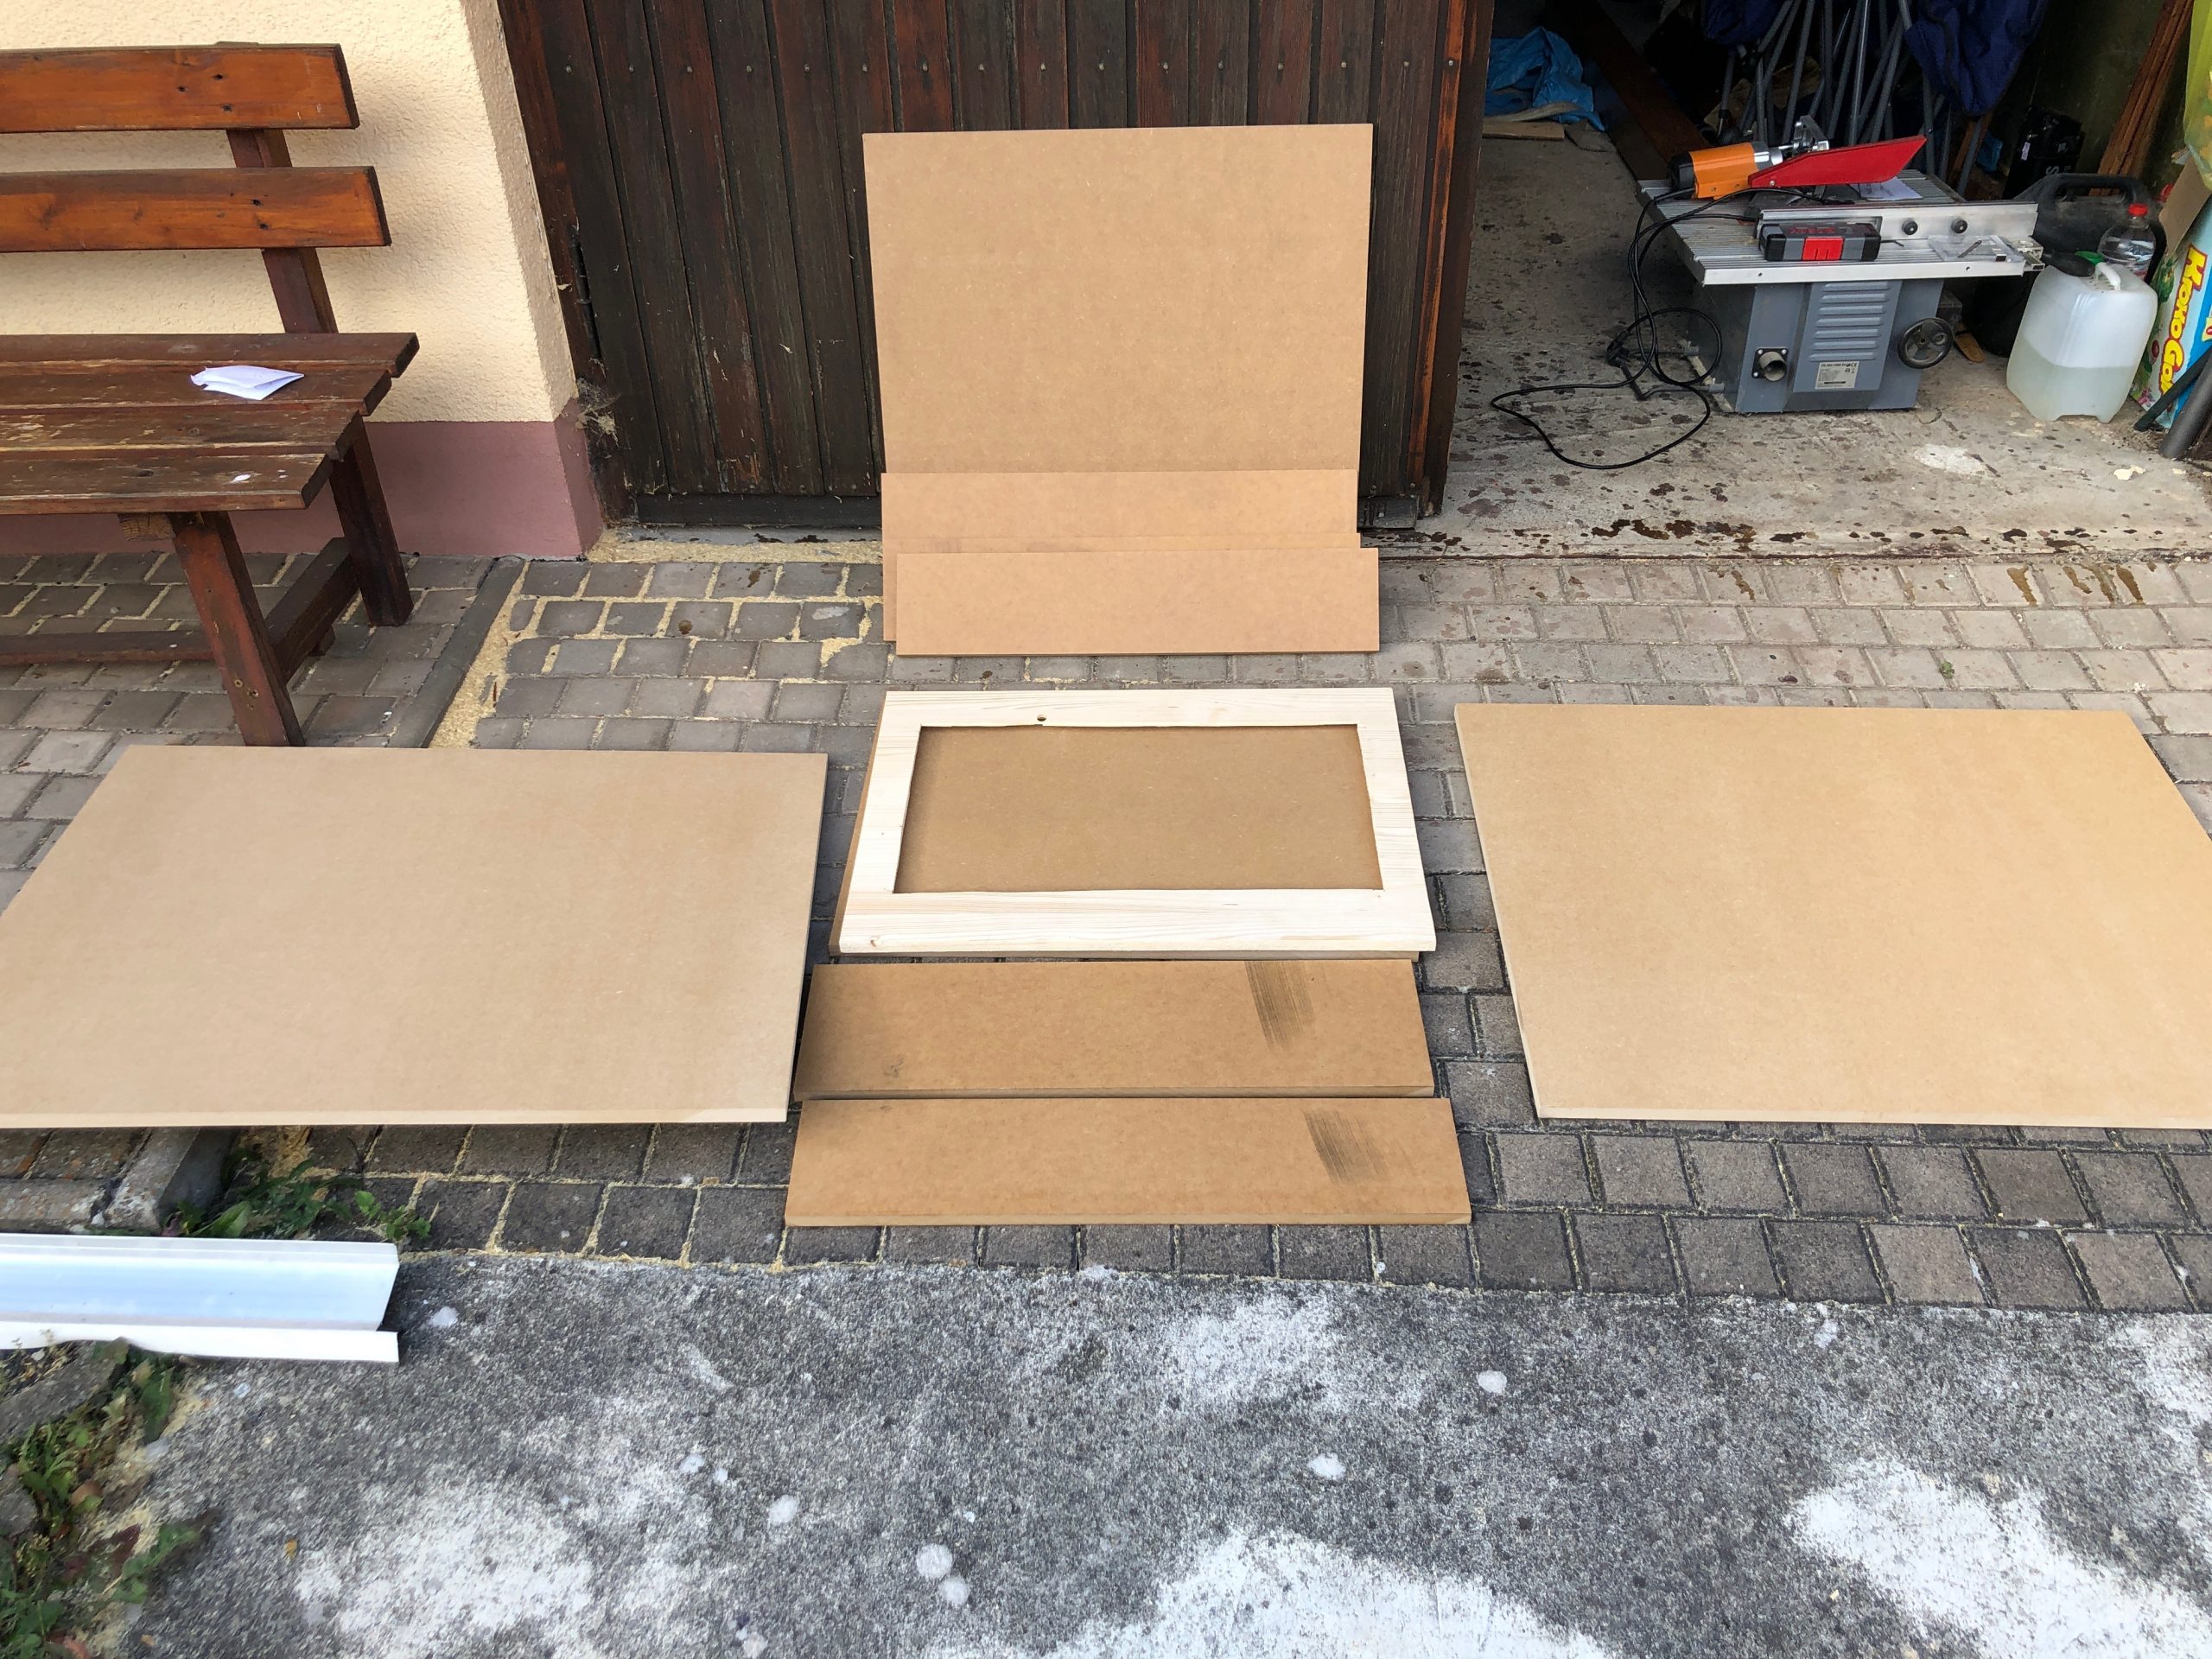
The side panels got a cut around for the black T-Molding to be added later.
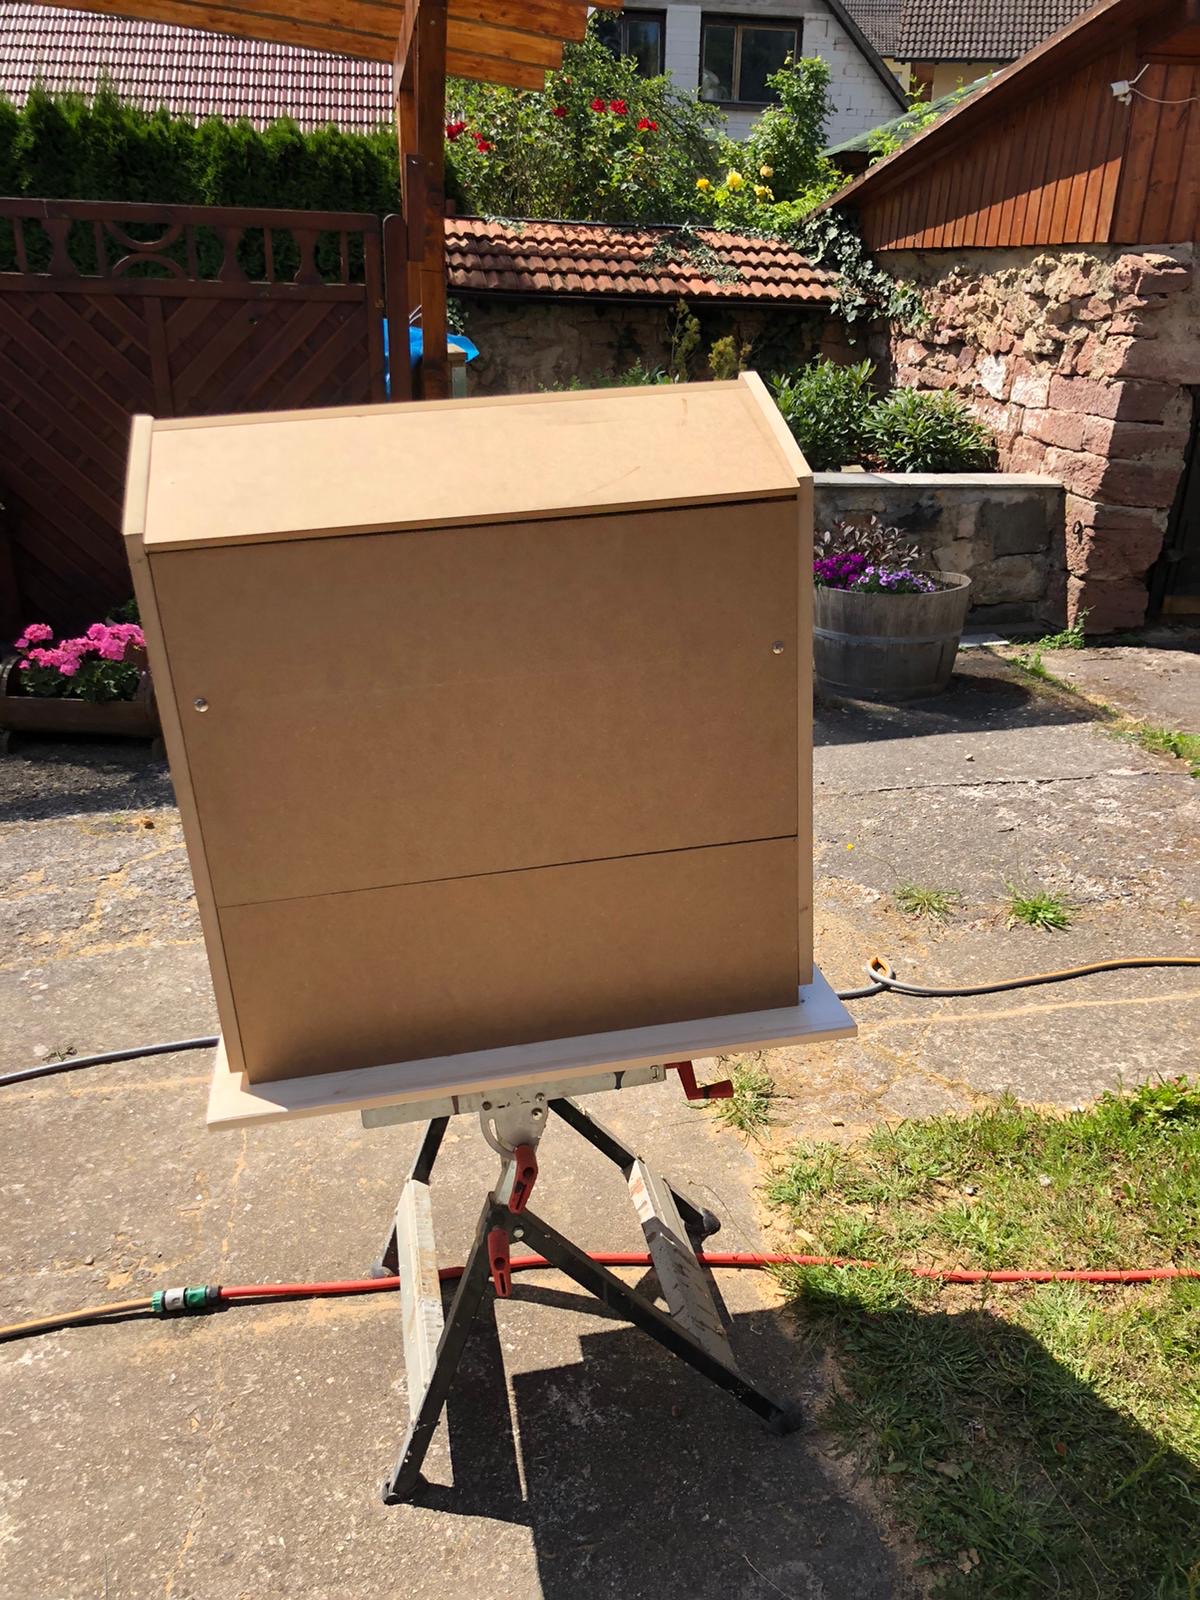
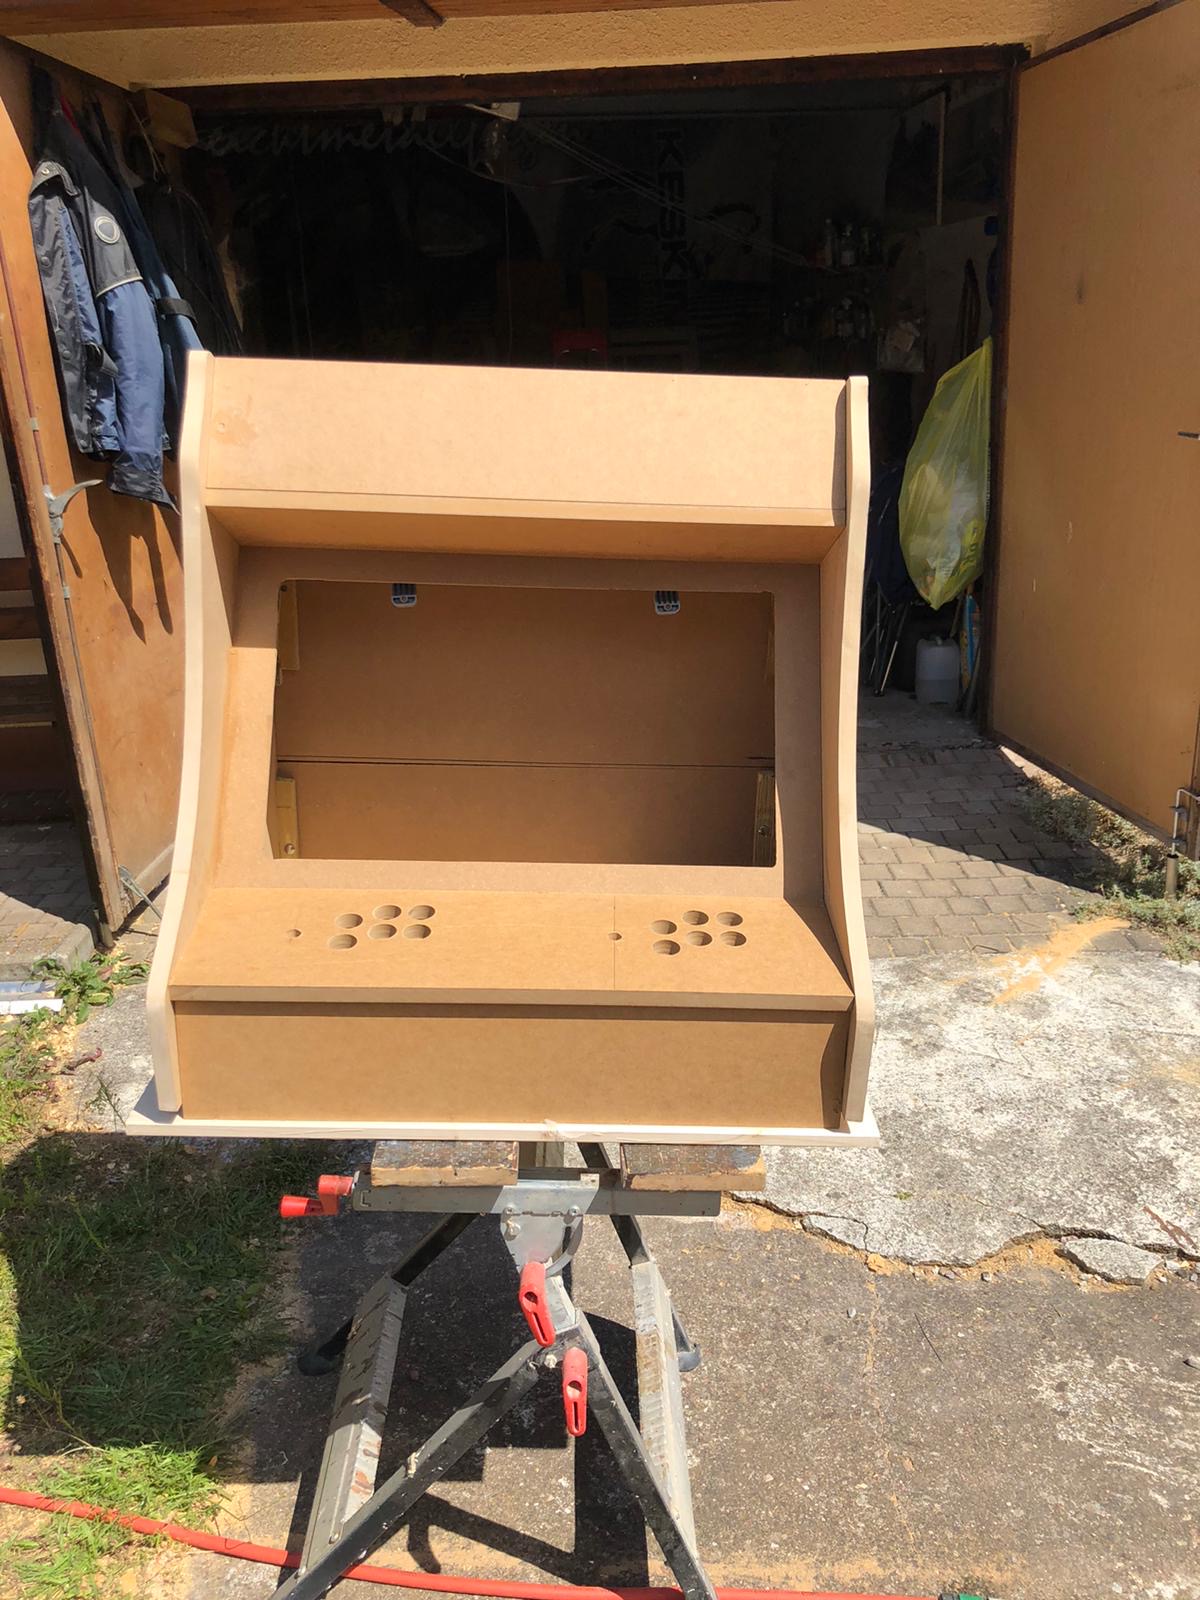
After about 2 weeks my father had built the first arcade out of sheets of MDF and I had taken delivery of the remaining pieces of hardware I had ordered after making a long list.
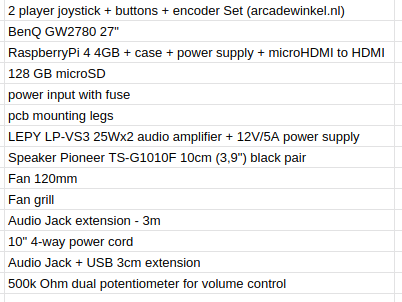
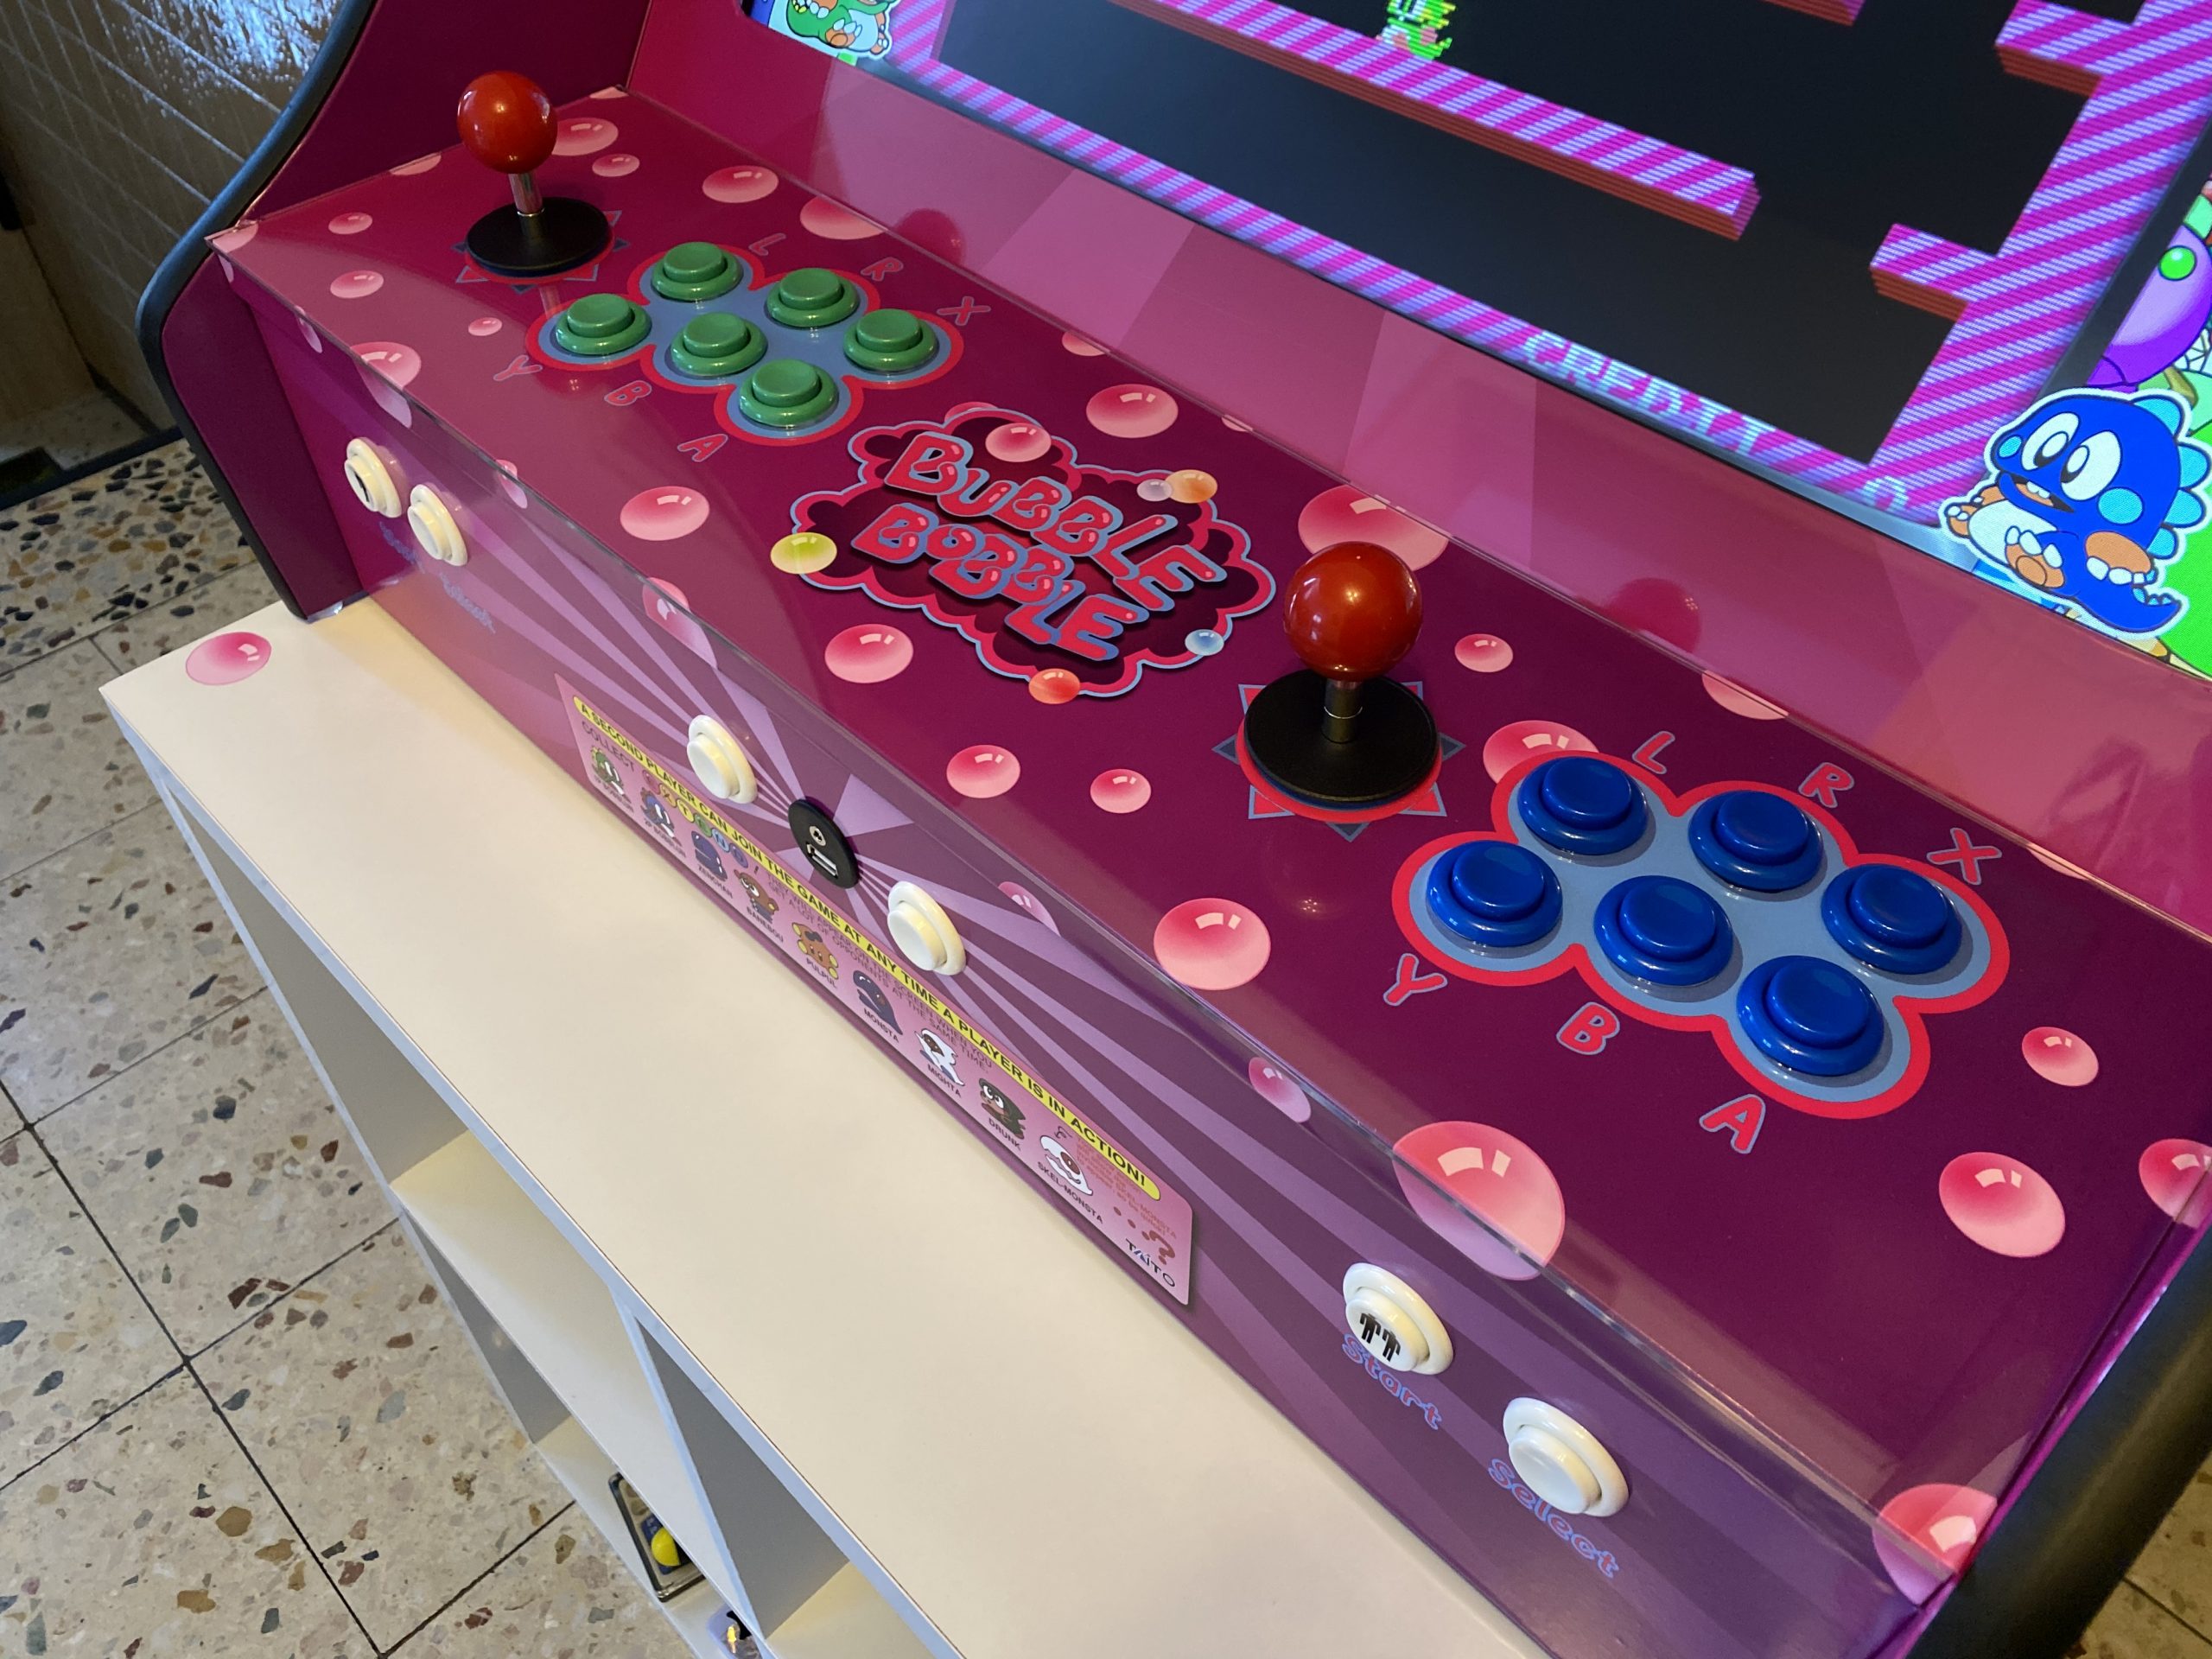
The most interesting parts of the above list might be the 2-player joystick + buttons + encoder set.
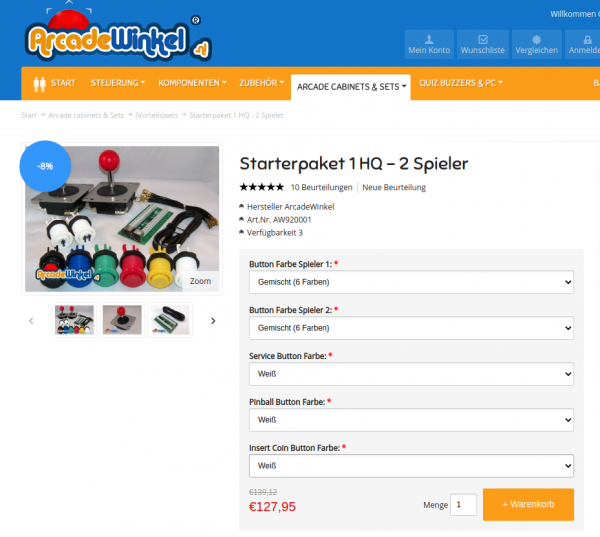
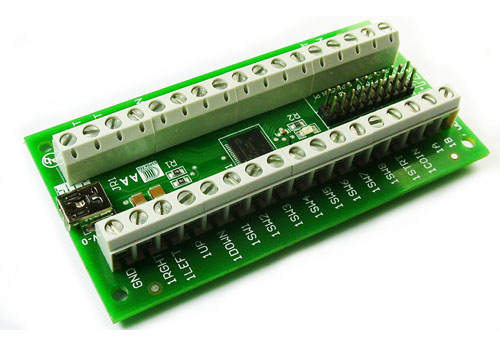
It contains 2 standard 4/8-way switchable arcade joysticks, 10 buttons, all microswitches required and the Ultimarc I-PAC-2 joystick encoder.
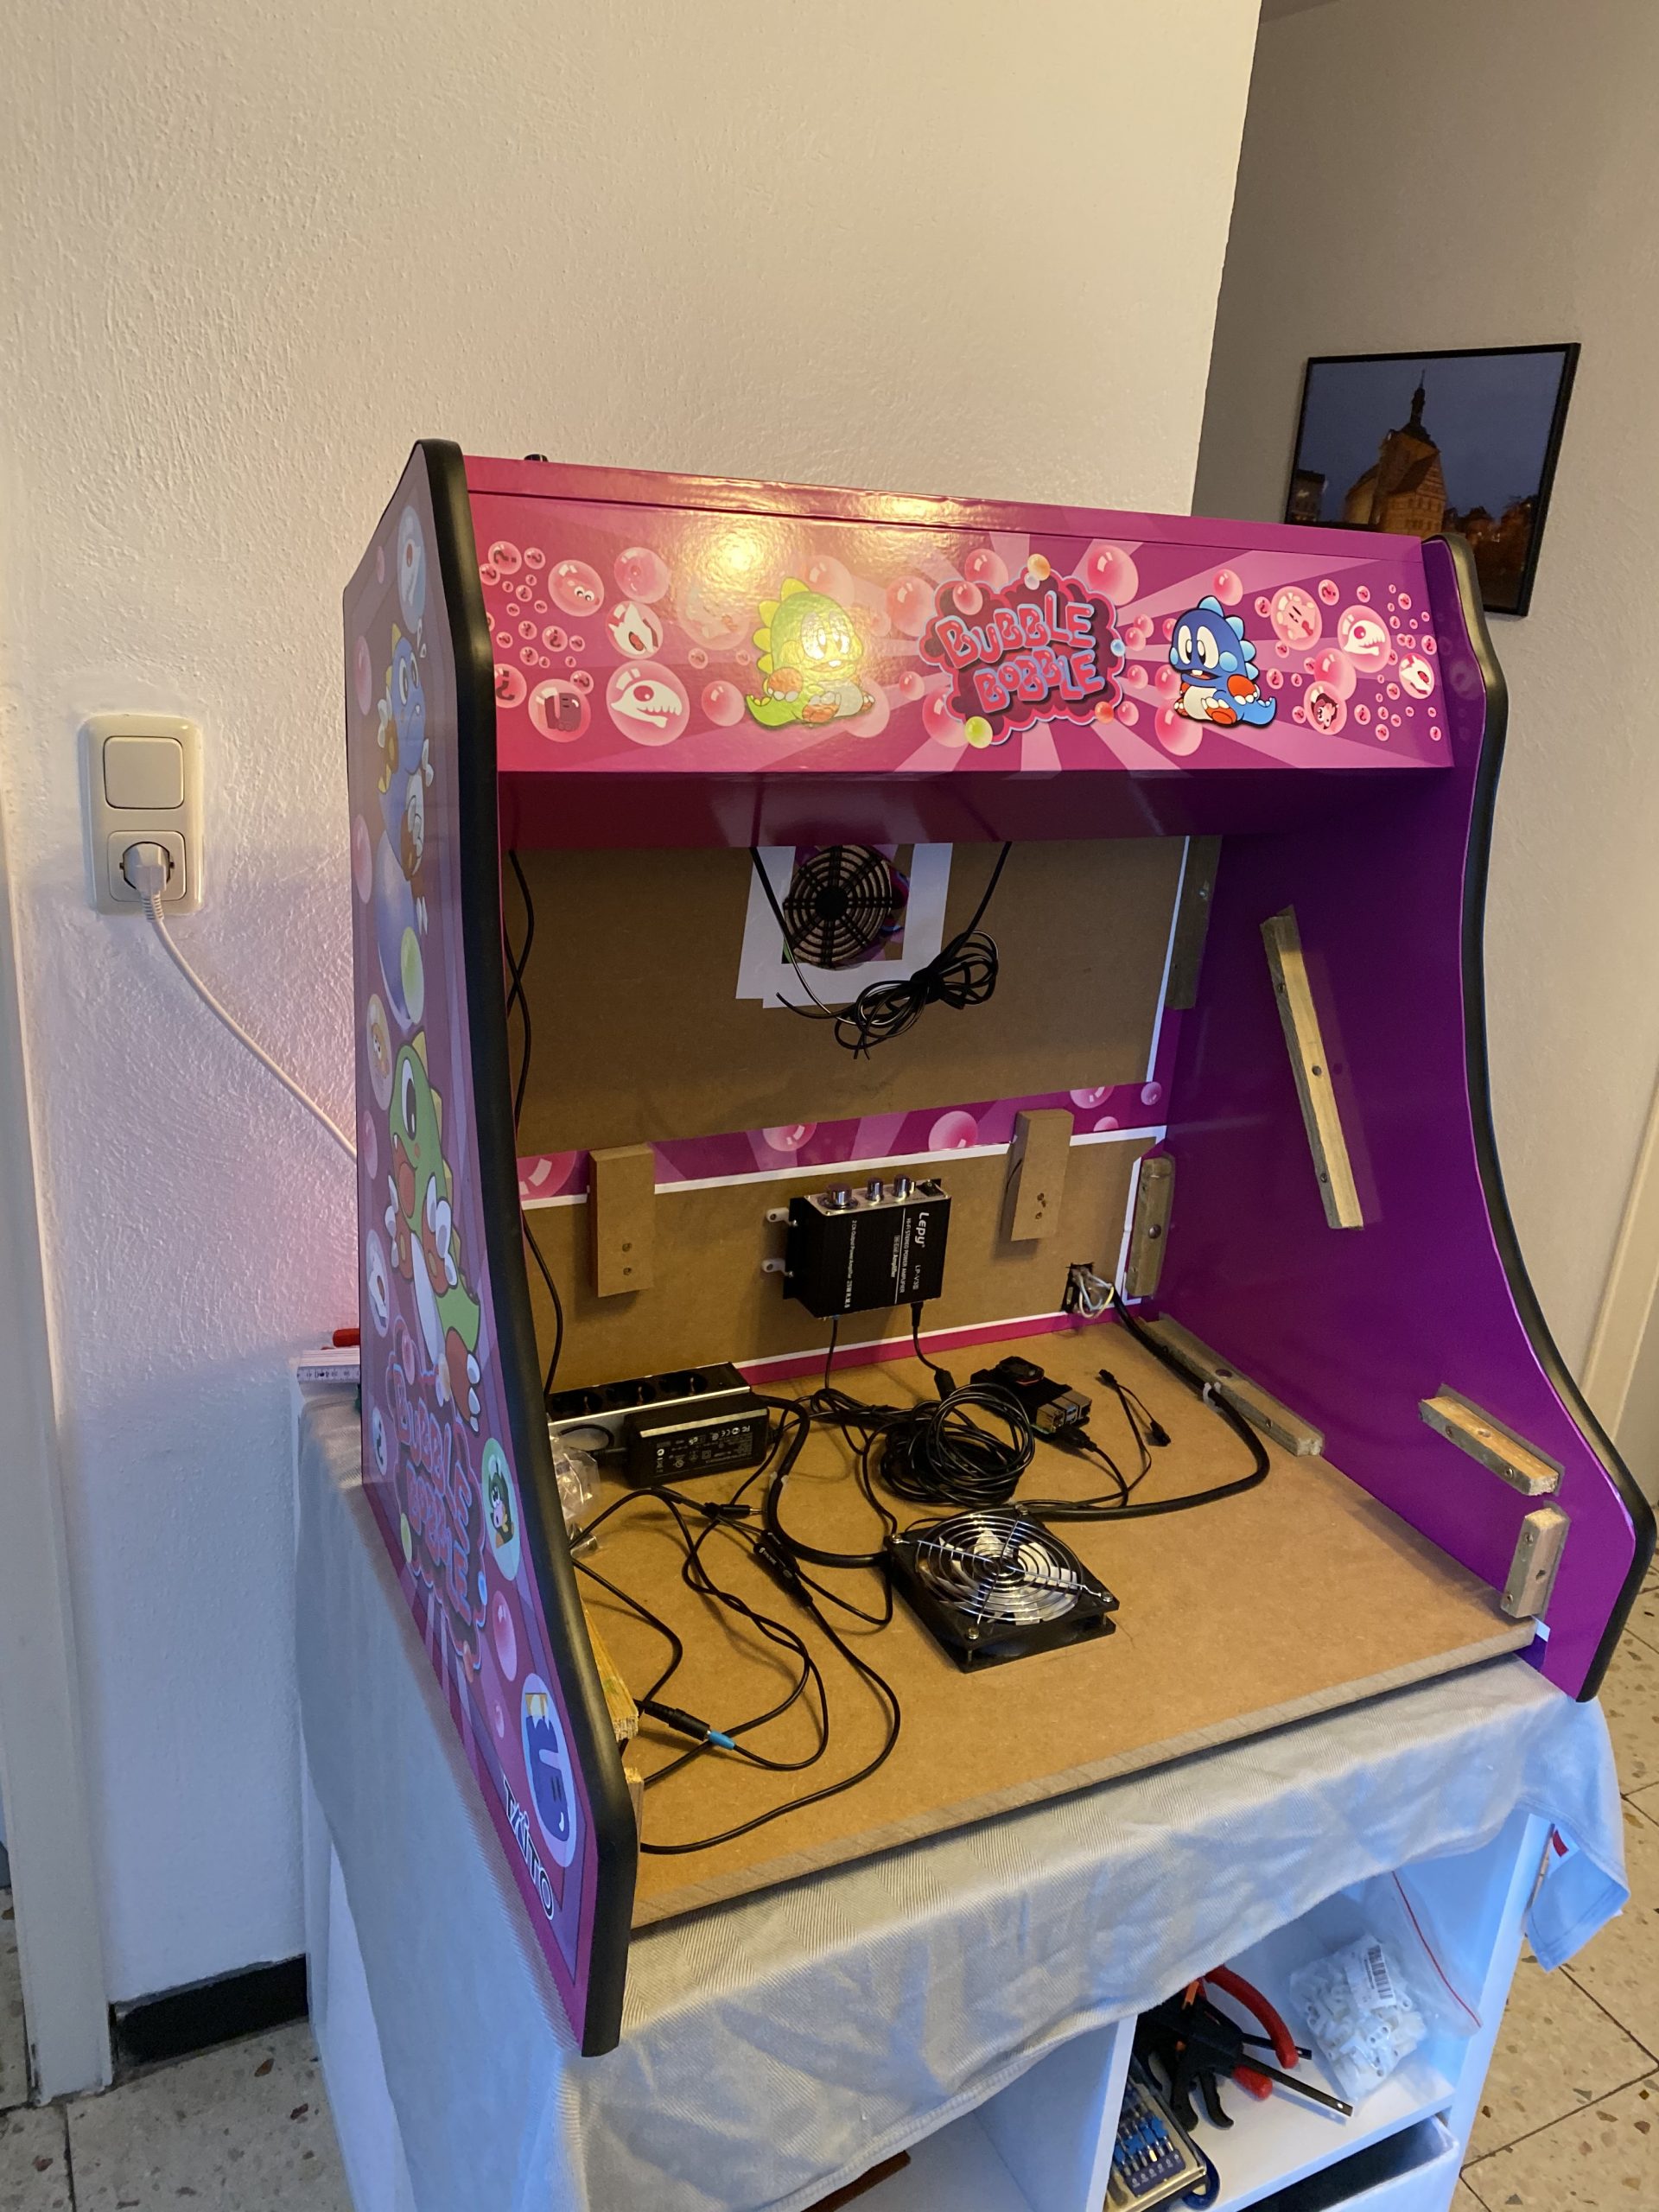
So when I got the first arcade from my father I started to put in the electonics immediately.

The sound was a bit more complicated. I wanted a volume control knob on the outside but also did not want to disassemble any audio amplifier.
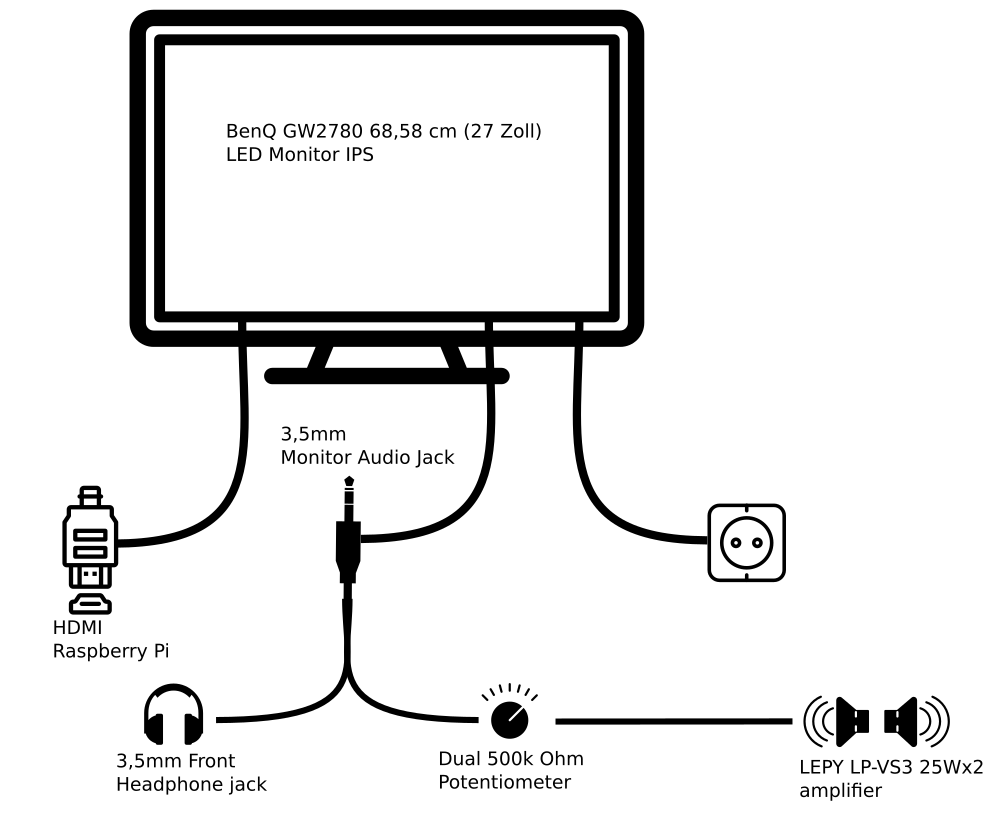
I went with the simplest solution: A 500k Ohm dual potentiometer soldered into the headphone extension cable going to the amplifier. The potentiometer then got put into a pot and a whole made it stick out so that a knob could be attached.
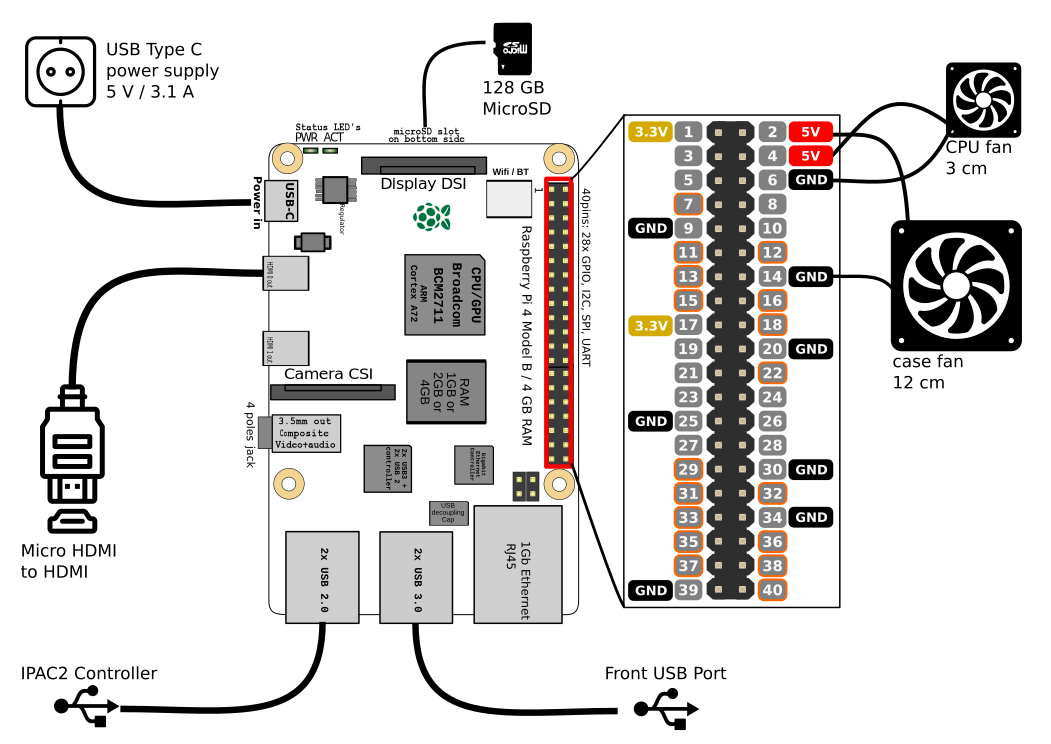
The RaspberryPi set-up then only lacked cooling. The plan was to put a 120mm case fan to pull in air from the bottom and went it out another 120mm case hole at the upper back. Additionally the RaspberryPi would get it’s own small 30mm fan on top of it’s heatsink case.
I attached both fans directly to the RaspberryPi – so I saved myself another power supply.
Now I had to make it all work together. As I wanted to use RetroPie in the newest 4.6 release I’ve set that up and hooked it all up.

On first start-up EmulationStation asked me to configure the inputs. It had detected 2 gamepads as I had put the IPAC-2 into gamepad mode before. You can do this with a simple mode-switch key-combination that you need to hold for 10 seconds to make it switch.
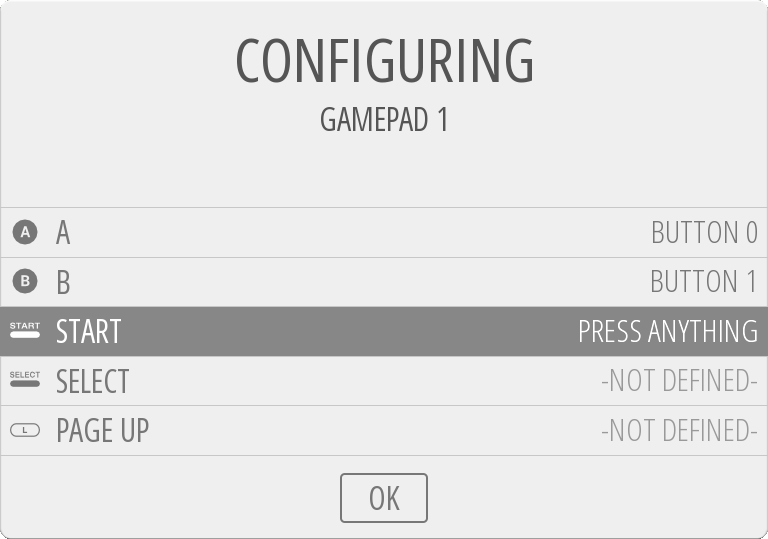
The configuration of the buttons of the two players went without any issue. First I had set-up the player 1 input. Then I re-ran the input configuration again for player 2 inputs.
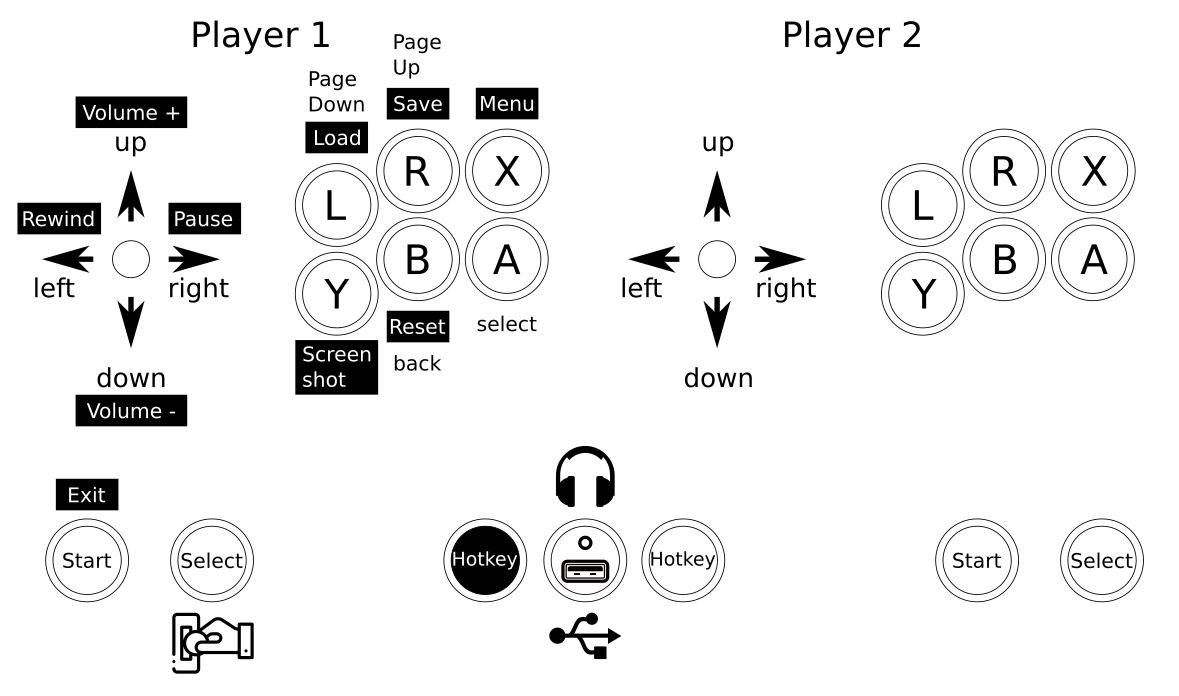
The controls where straight forward. I wanted mainly 4-way games but with enough buttons to switch to some beat-em-ups at will.
So I configured a simple layout into Retroarch with some additional hotkeys added:
I tossed around several design ideas I had. Obviously derived from those games I wanted to play and looked forward to.
There was some Metal Slug or some Cave shooter related designs I thought of. But then my wife had the best ideas of them all: Bubble Bobble!
So I went and looked for inspiration on Bubble Bobble and found some but none that sticked.
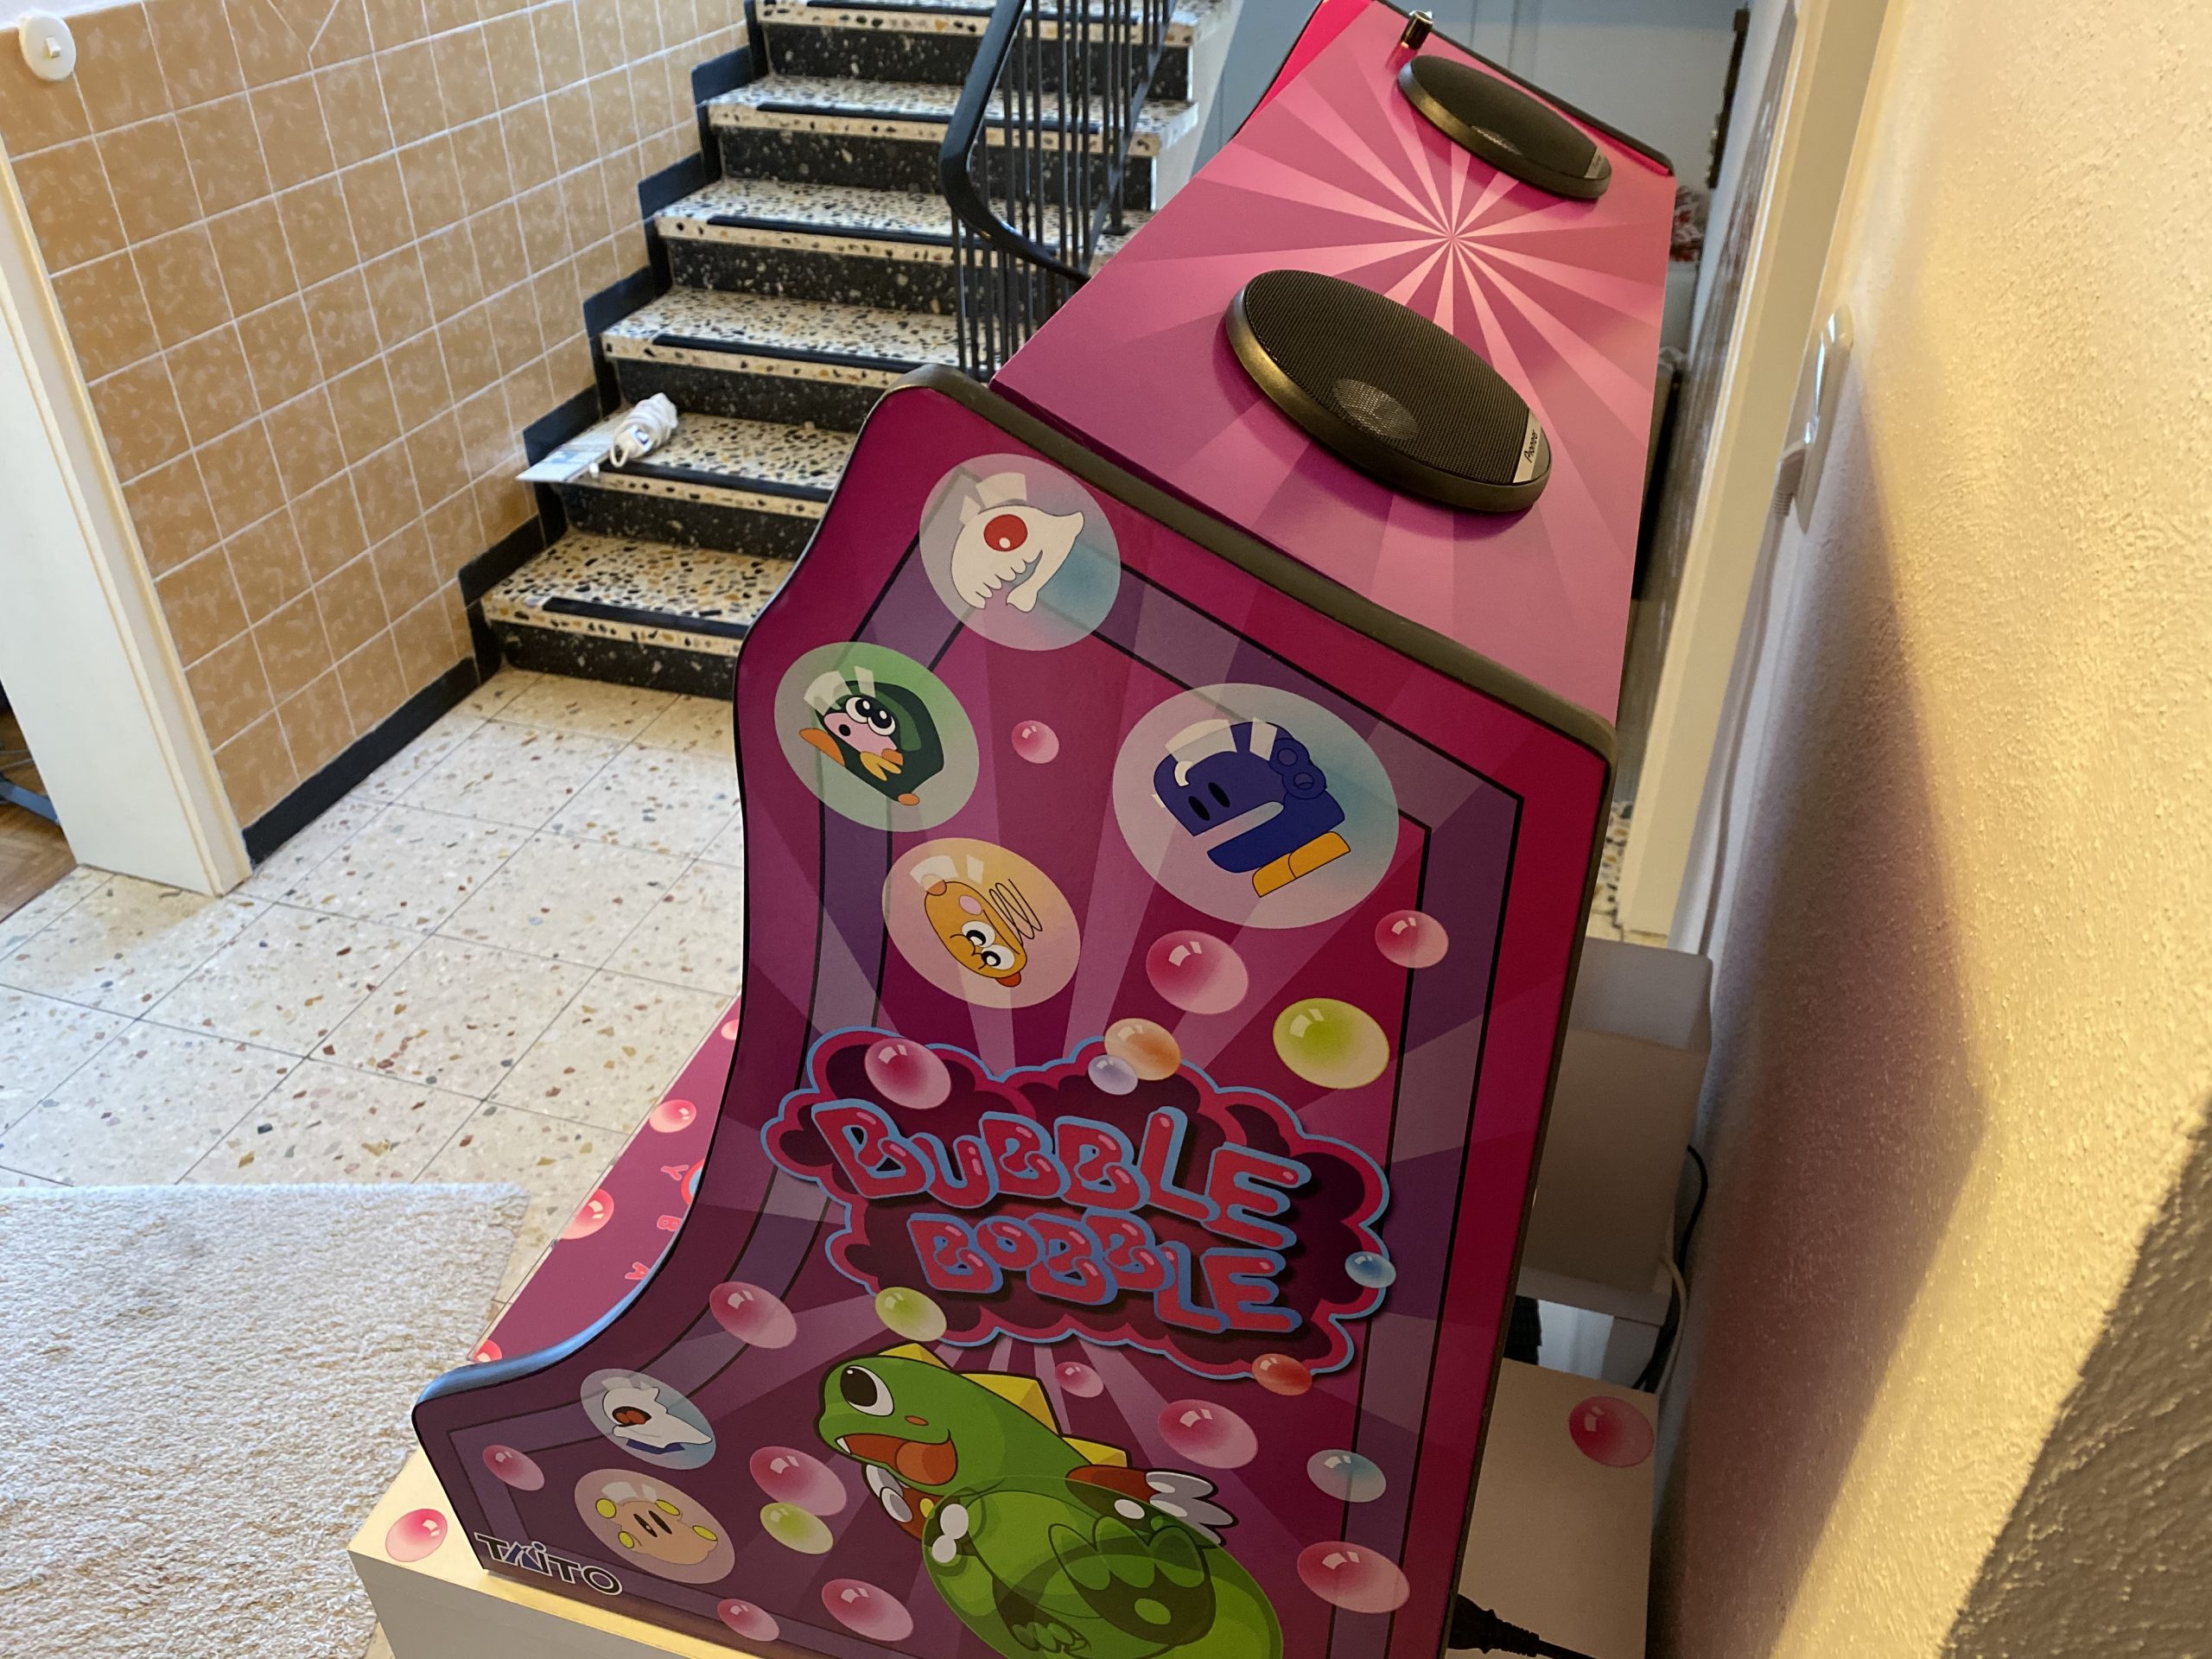
There was one a good inspiration. And I went to design based upon this one – just with a more intense purple color scheme.
I used Inkscape to pull in bitmap graphics from Bubble Bobble and to vectorize them one by one, eventually ending up with a lot of layers of nice scalable vector graphics.
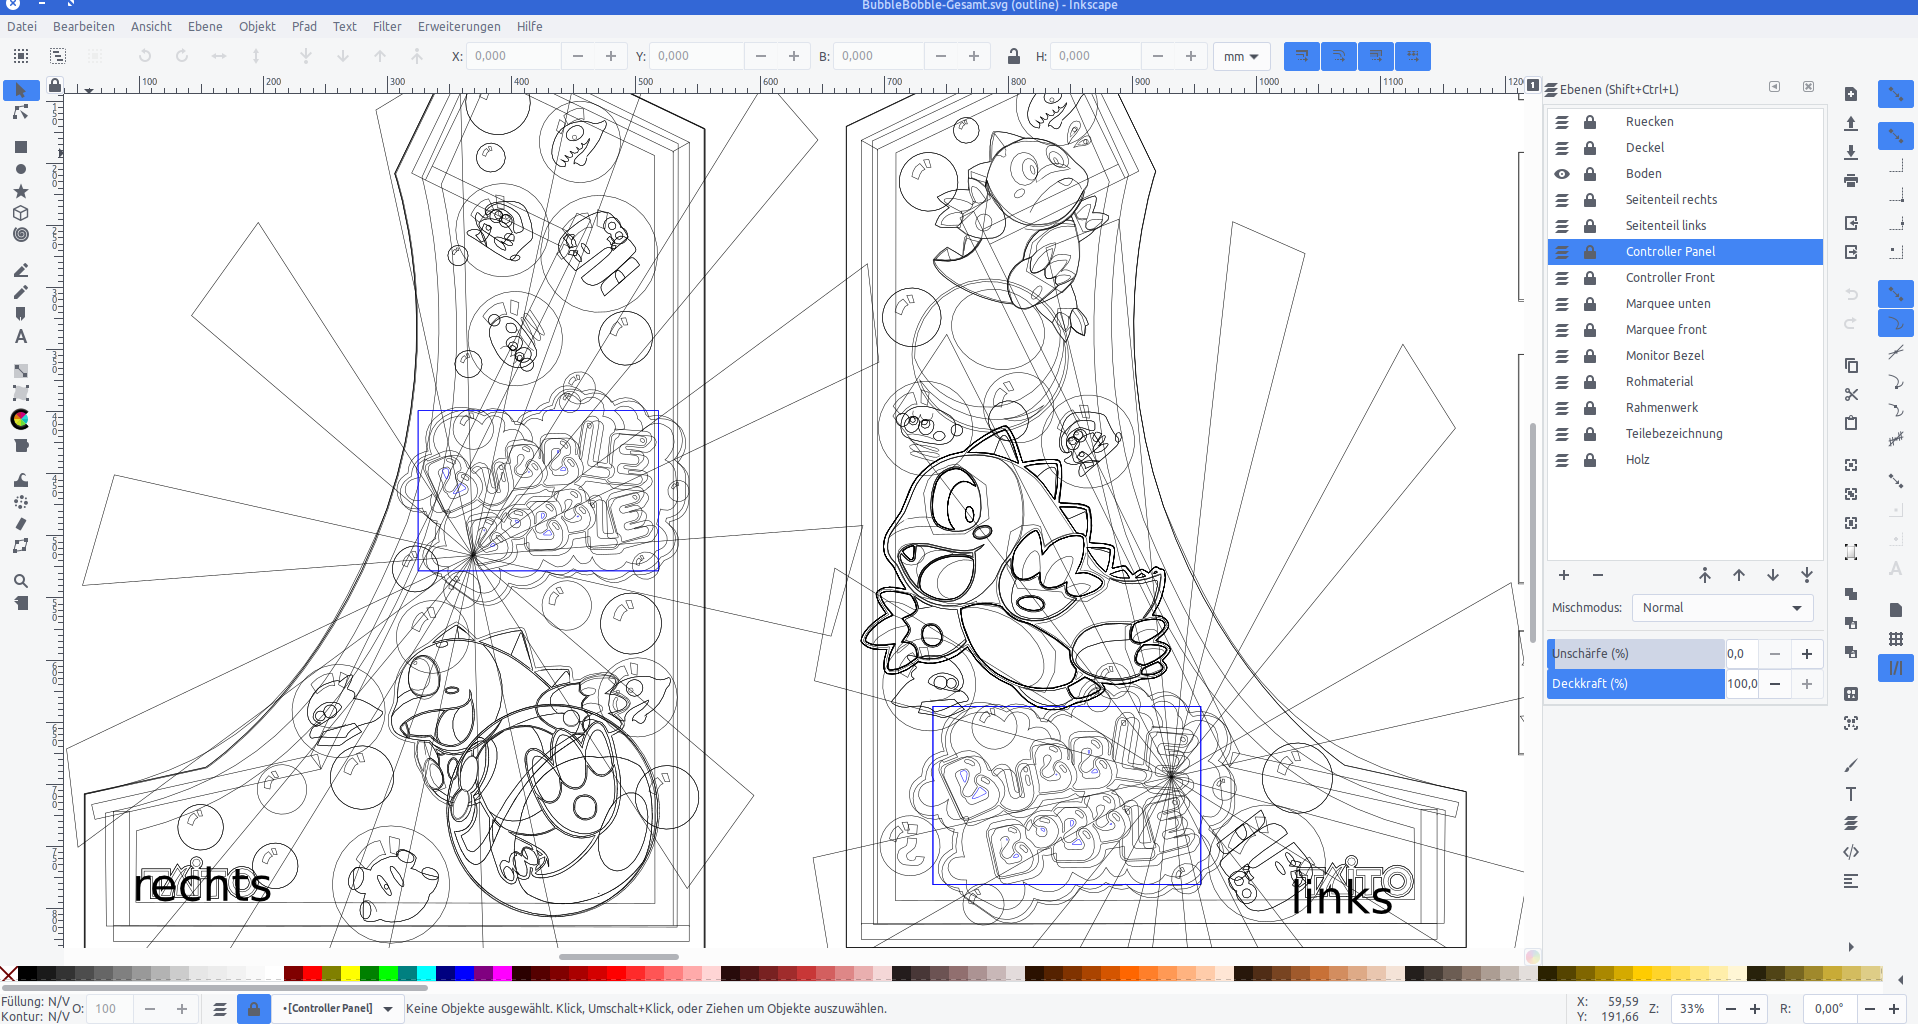
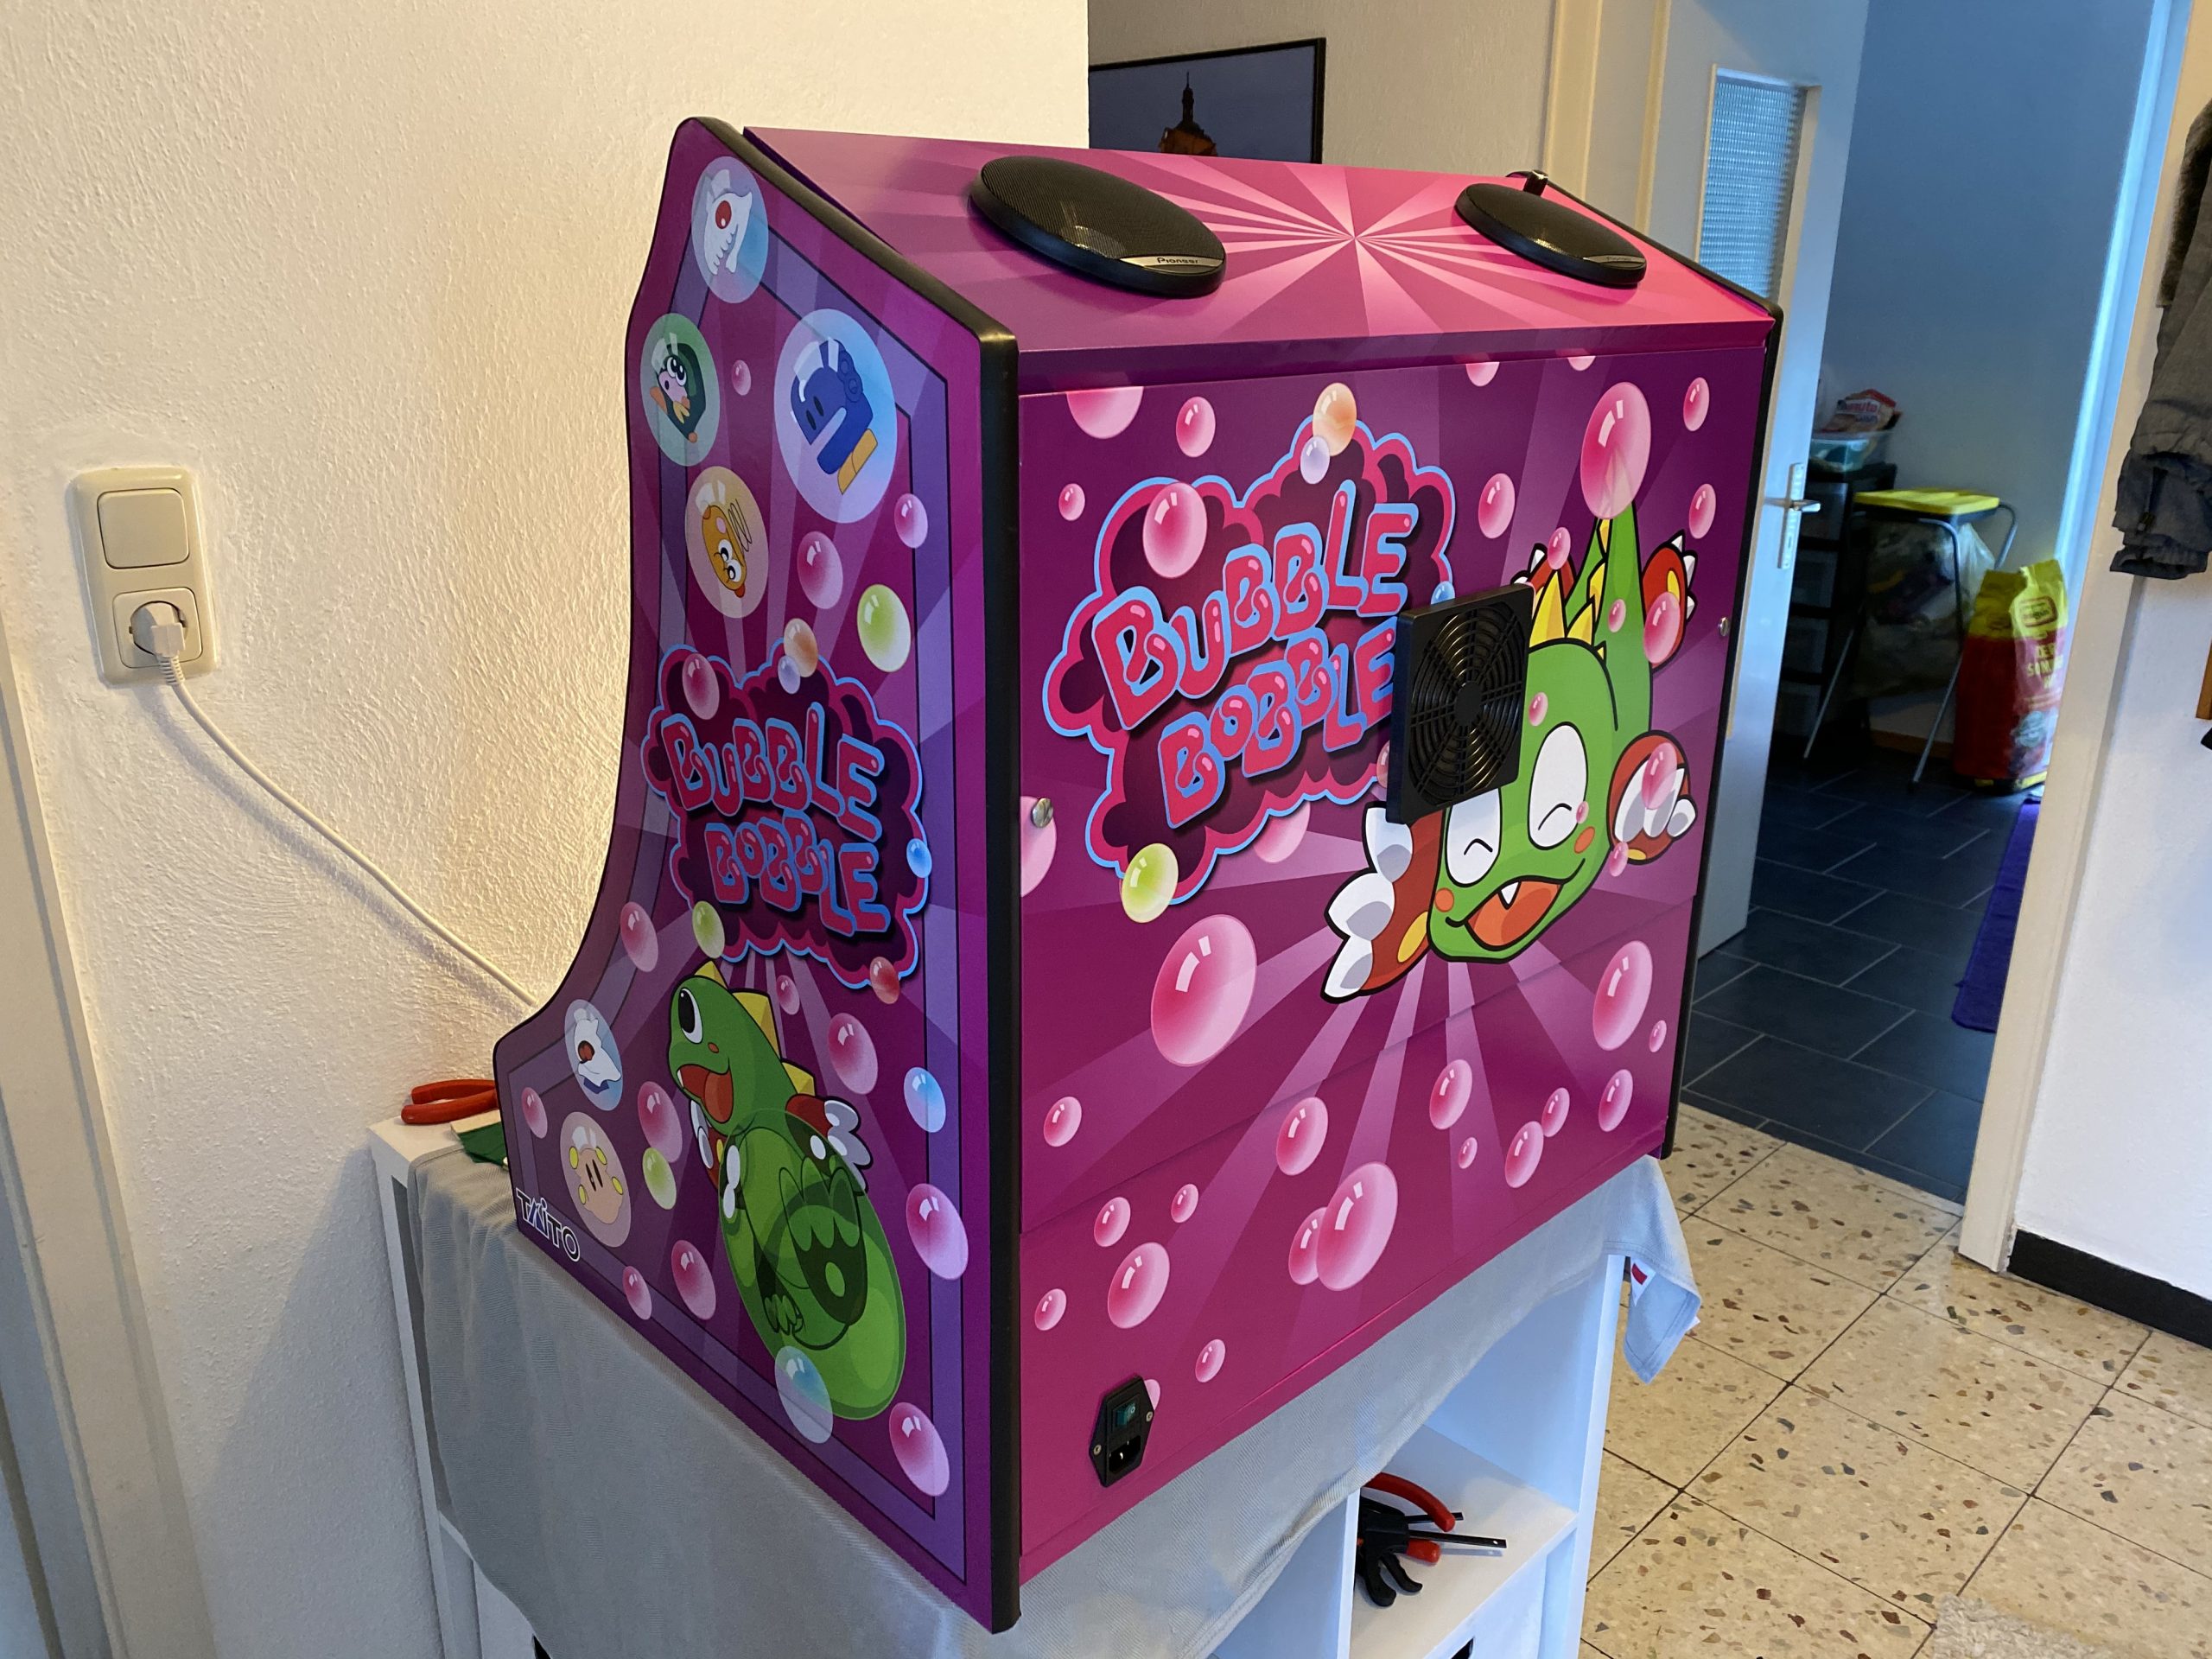
With all design set I went and sliced it up and found a company that would print my design on vinyl.
With the final arcade-wood accessible top me I could take actual measurements and add to each element 4cm of margin. This way putting it on would hopefully be easier (it was!).
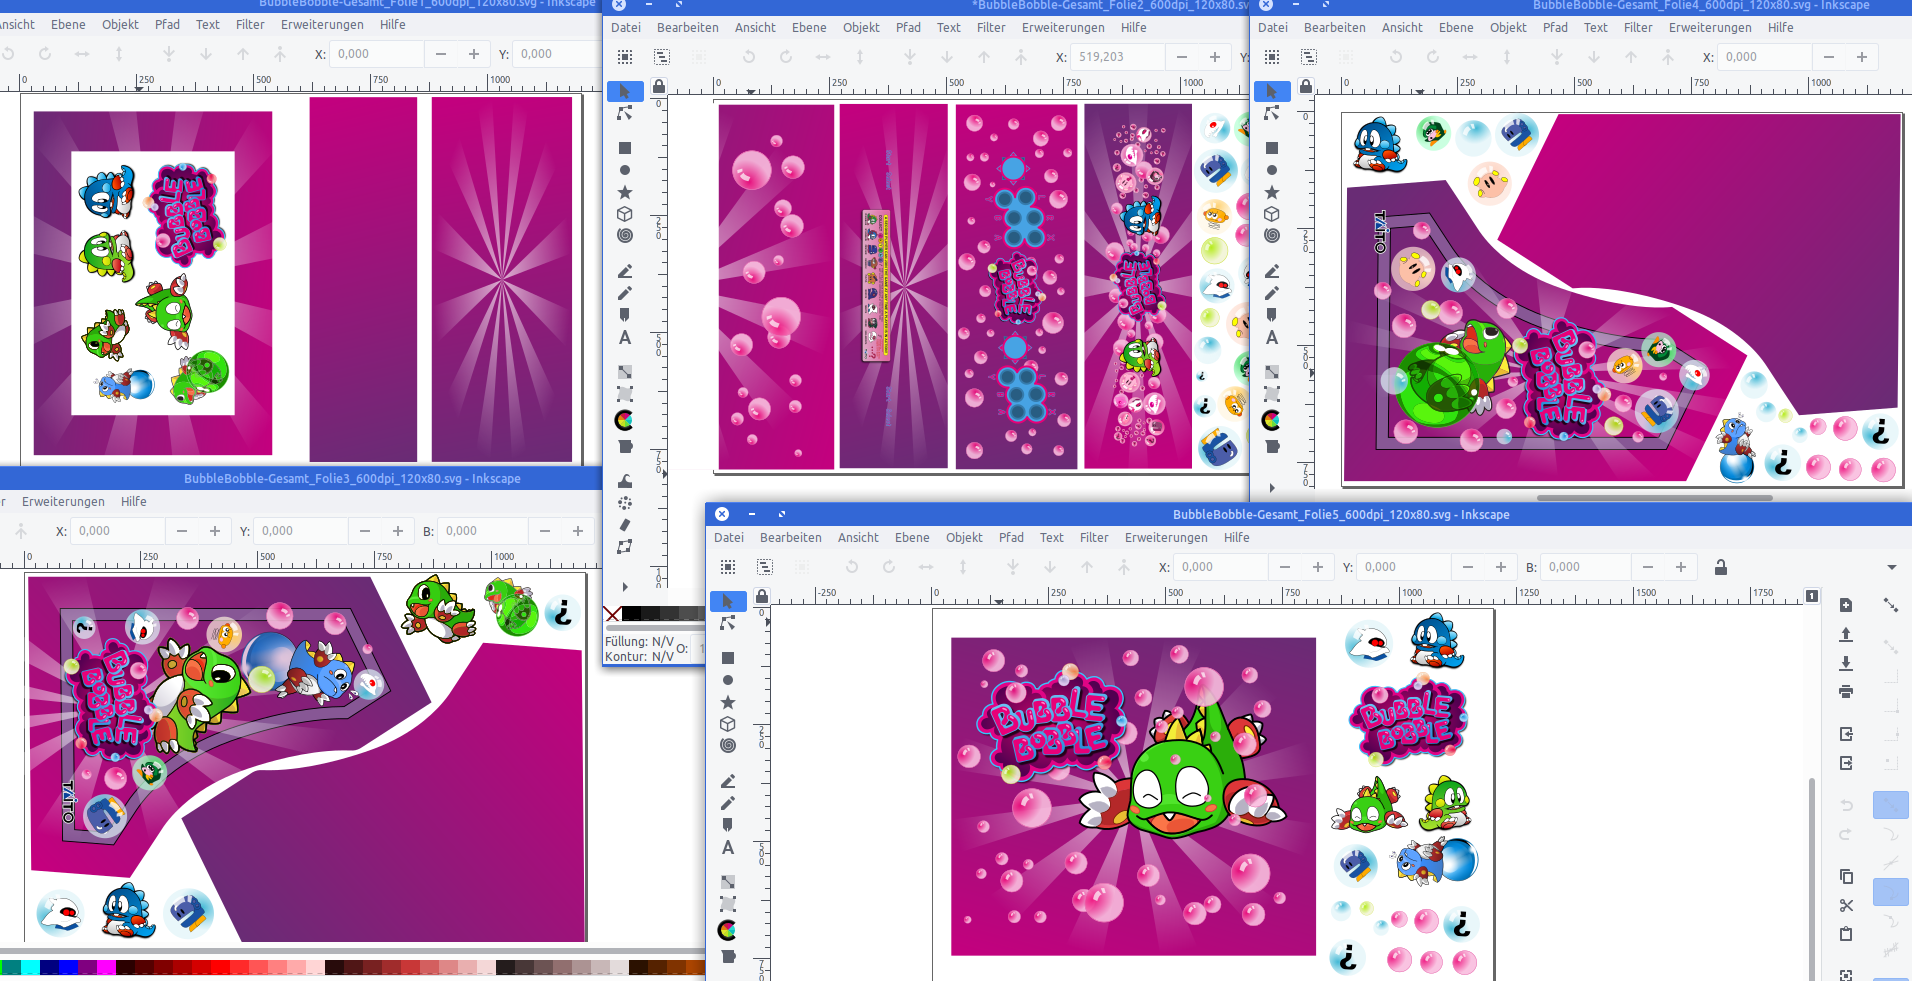
Originally I wanted to have it printed on a 4m by 1,2m sheet of vinyl. It all would have fit there.
But I had to find out that Inkscape was not capable of exporting pixel data at this size and a pixel-density of 600dpi. It just was too large for it to output.
So I had to eventually cut all down into 5 pieces of 1,2m by 80cm each.
After about 7 days all arrived printed on vinyl at my house. I immediately laid everything out and tried if it would fit. It did!
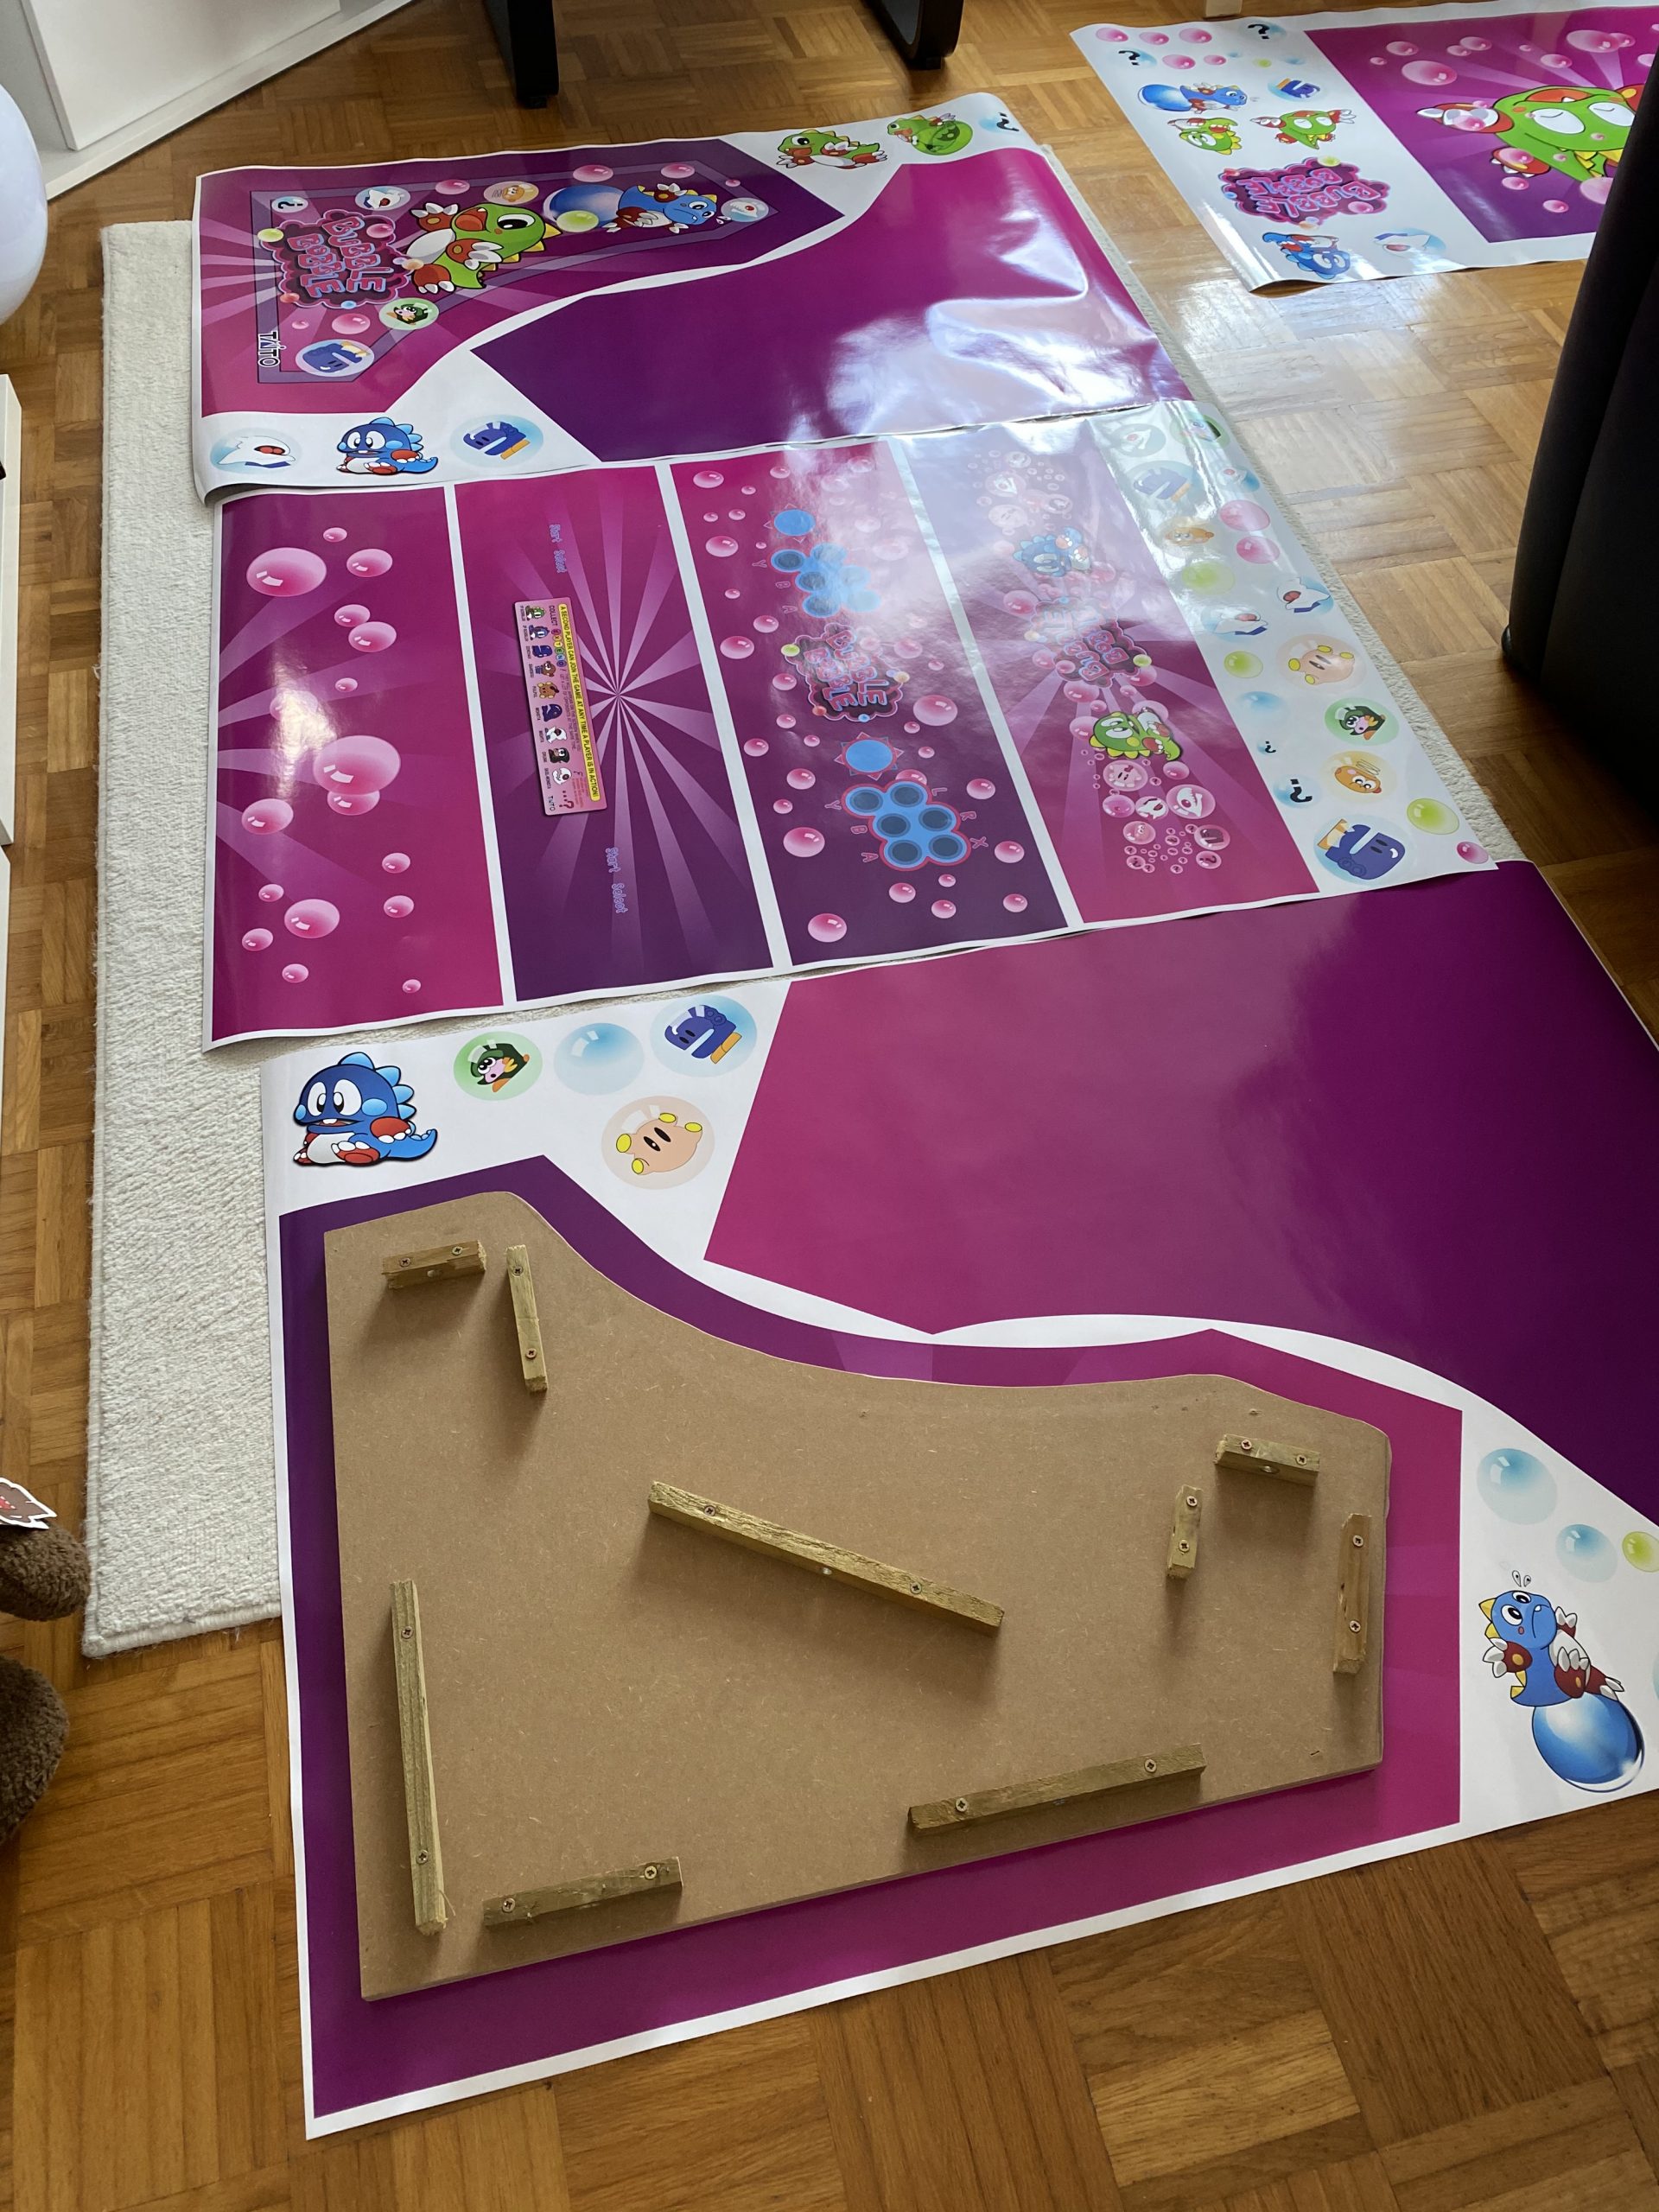
Now everything had to go onto the wood. I did a test run before ordering to check if it would stick securely to the wood. It did stick very nicely. So putting it on was some intense fiddling but it eventually worked out really really great.
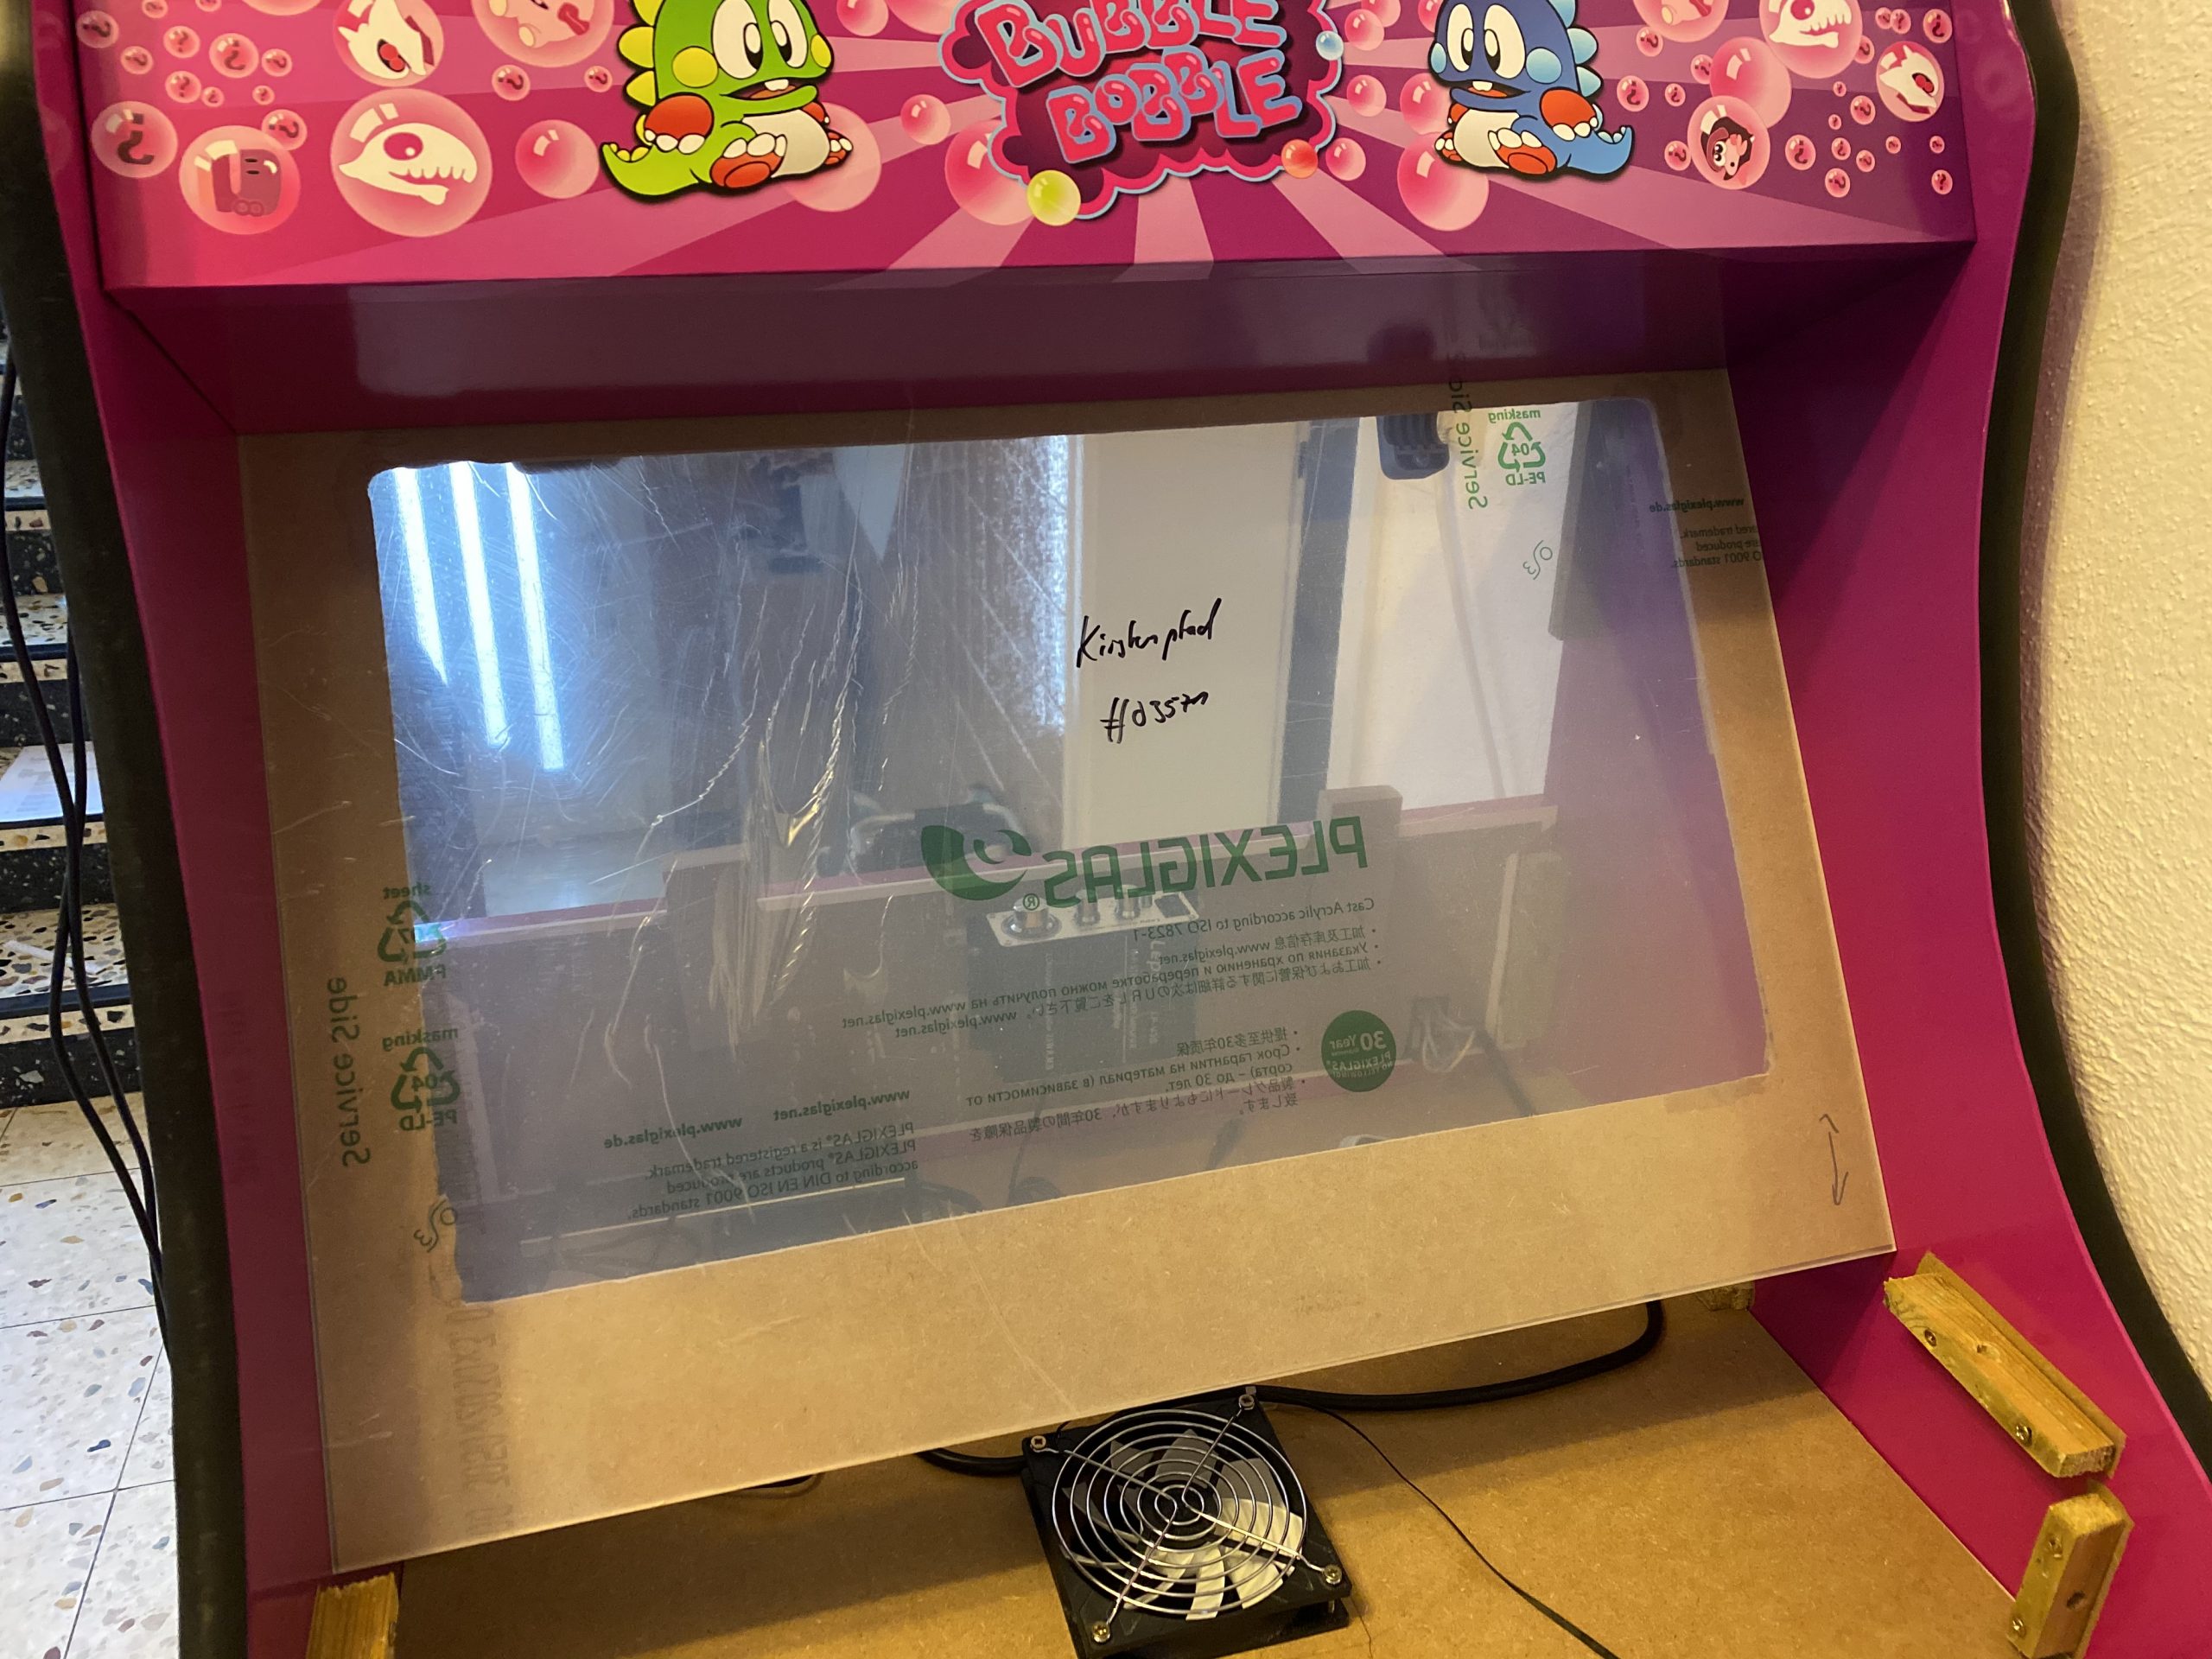
Now it was time for some acrylic. I wanted to get a good bezel and covering of the monitor as well as the handrest and the front buttons.
Cutting acrylic myself was out of questions – so I went with a local company that would laser-cut acrylic for me to my specification.
I’ve sent them the schematics and measurements and the panels for reference and 4 days later the acrylic arrived. We could then put the last bits together for completion!


I am really happy how this turned out – especially since with everything that required actual work with hands I am a hopeless case. With this somehow everything worked out.
I still employ the idea of a vertical shoot-em-up centered version… but maybe some day.
If you got any questions or feedback let me know!
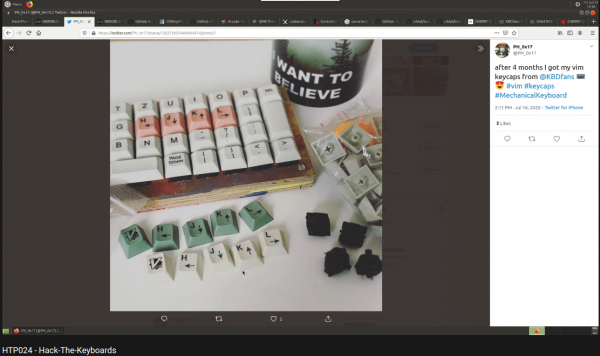
Wir haben uns wieder zusammengefunden – diesmal mit unserem Gast Philipp von nerdbude.com – und haben über Tastaturen, Github Arctic Vault, OCRmyPDF und einen selbstgebauten Arcade Automat gesprochen.
Wie schon bei der letzten Folge 23 haben wir zusätzlich zur Tonspure eine Videospur aufgezeichnet – allerdings nicht als “Talking-Heads” Episode sondern während wir über die Themen sprechen versuchen wir die Themen mit zusätzlichem Inhalt zu unterfüttern – Links und Bilder eben.
For some weeks now I am working on the design of something that is being built within the next couple of weeks out of wood and metal (and electronics).
It’s hopefully going to be as nice as I dream it up… What could it be?

I did this design based upon some pixel-material and pictures I’ve gathered around the internets – and took a lot of inspiration from them.
Although I had to create everything in vectors from those small pixel templates… But now everything above is going to be printed on vinyl in glorious vectors – no pixeljunk.
No Pants Day is a day to wear no pants, preferably in public.
No-Pants-Day
It’s been 12 years that I’ve married my wonderful wife.
And there’s story to the rings. We have them, we were wearing them on the day of our wedding. But actually never since. They don’t fit anymore anyways.
But, the story: Both rings got the date of our wedding engraved.
The 19th of April 2008 – or 190408 or – and this is what actually is engraved:
101110011111001000


After the demise of Skeuomorphism and material-design there’s a new kid on the block to take the trophy: Neumorphism!

Neumorphic card however pretends to extrude from the background. It’s a raised shape made from the exact same material as the background. When we look at it from the side we see that it doesn’t “float”.
uxdesign.cc
As you might have noticed I have already switched the drop-shadows on this blogs theme to also use this very simple shadow-recipe.
And if you want to – you can go here and generate all you need in a handy configurator:

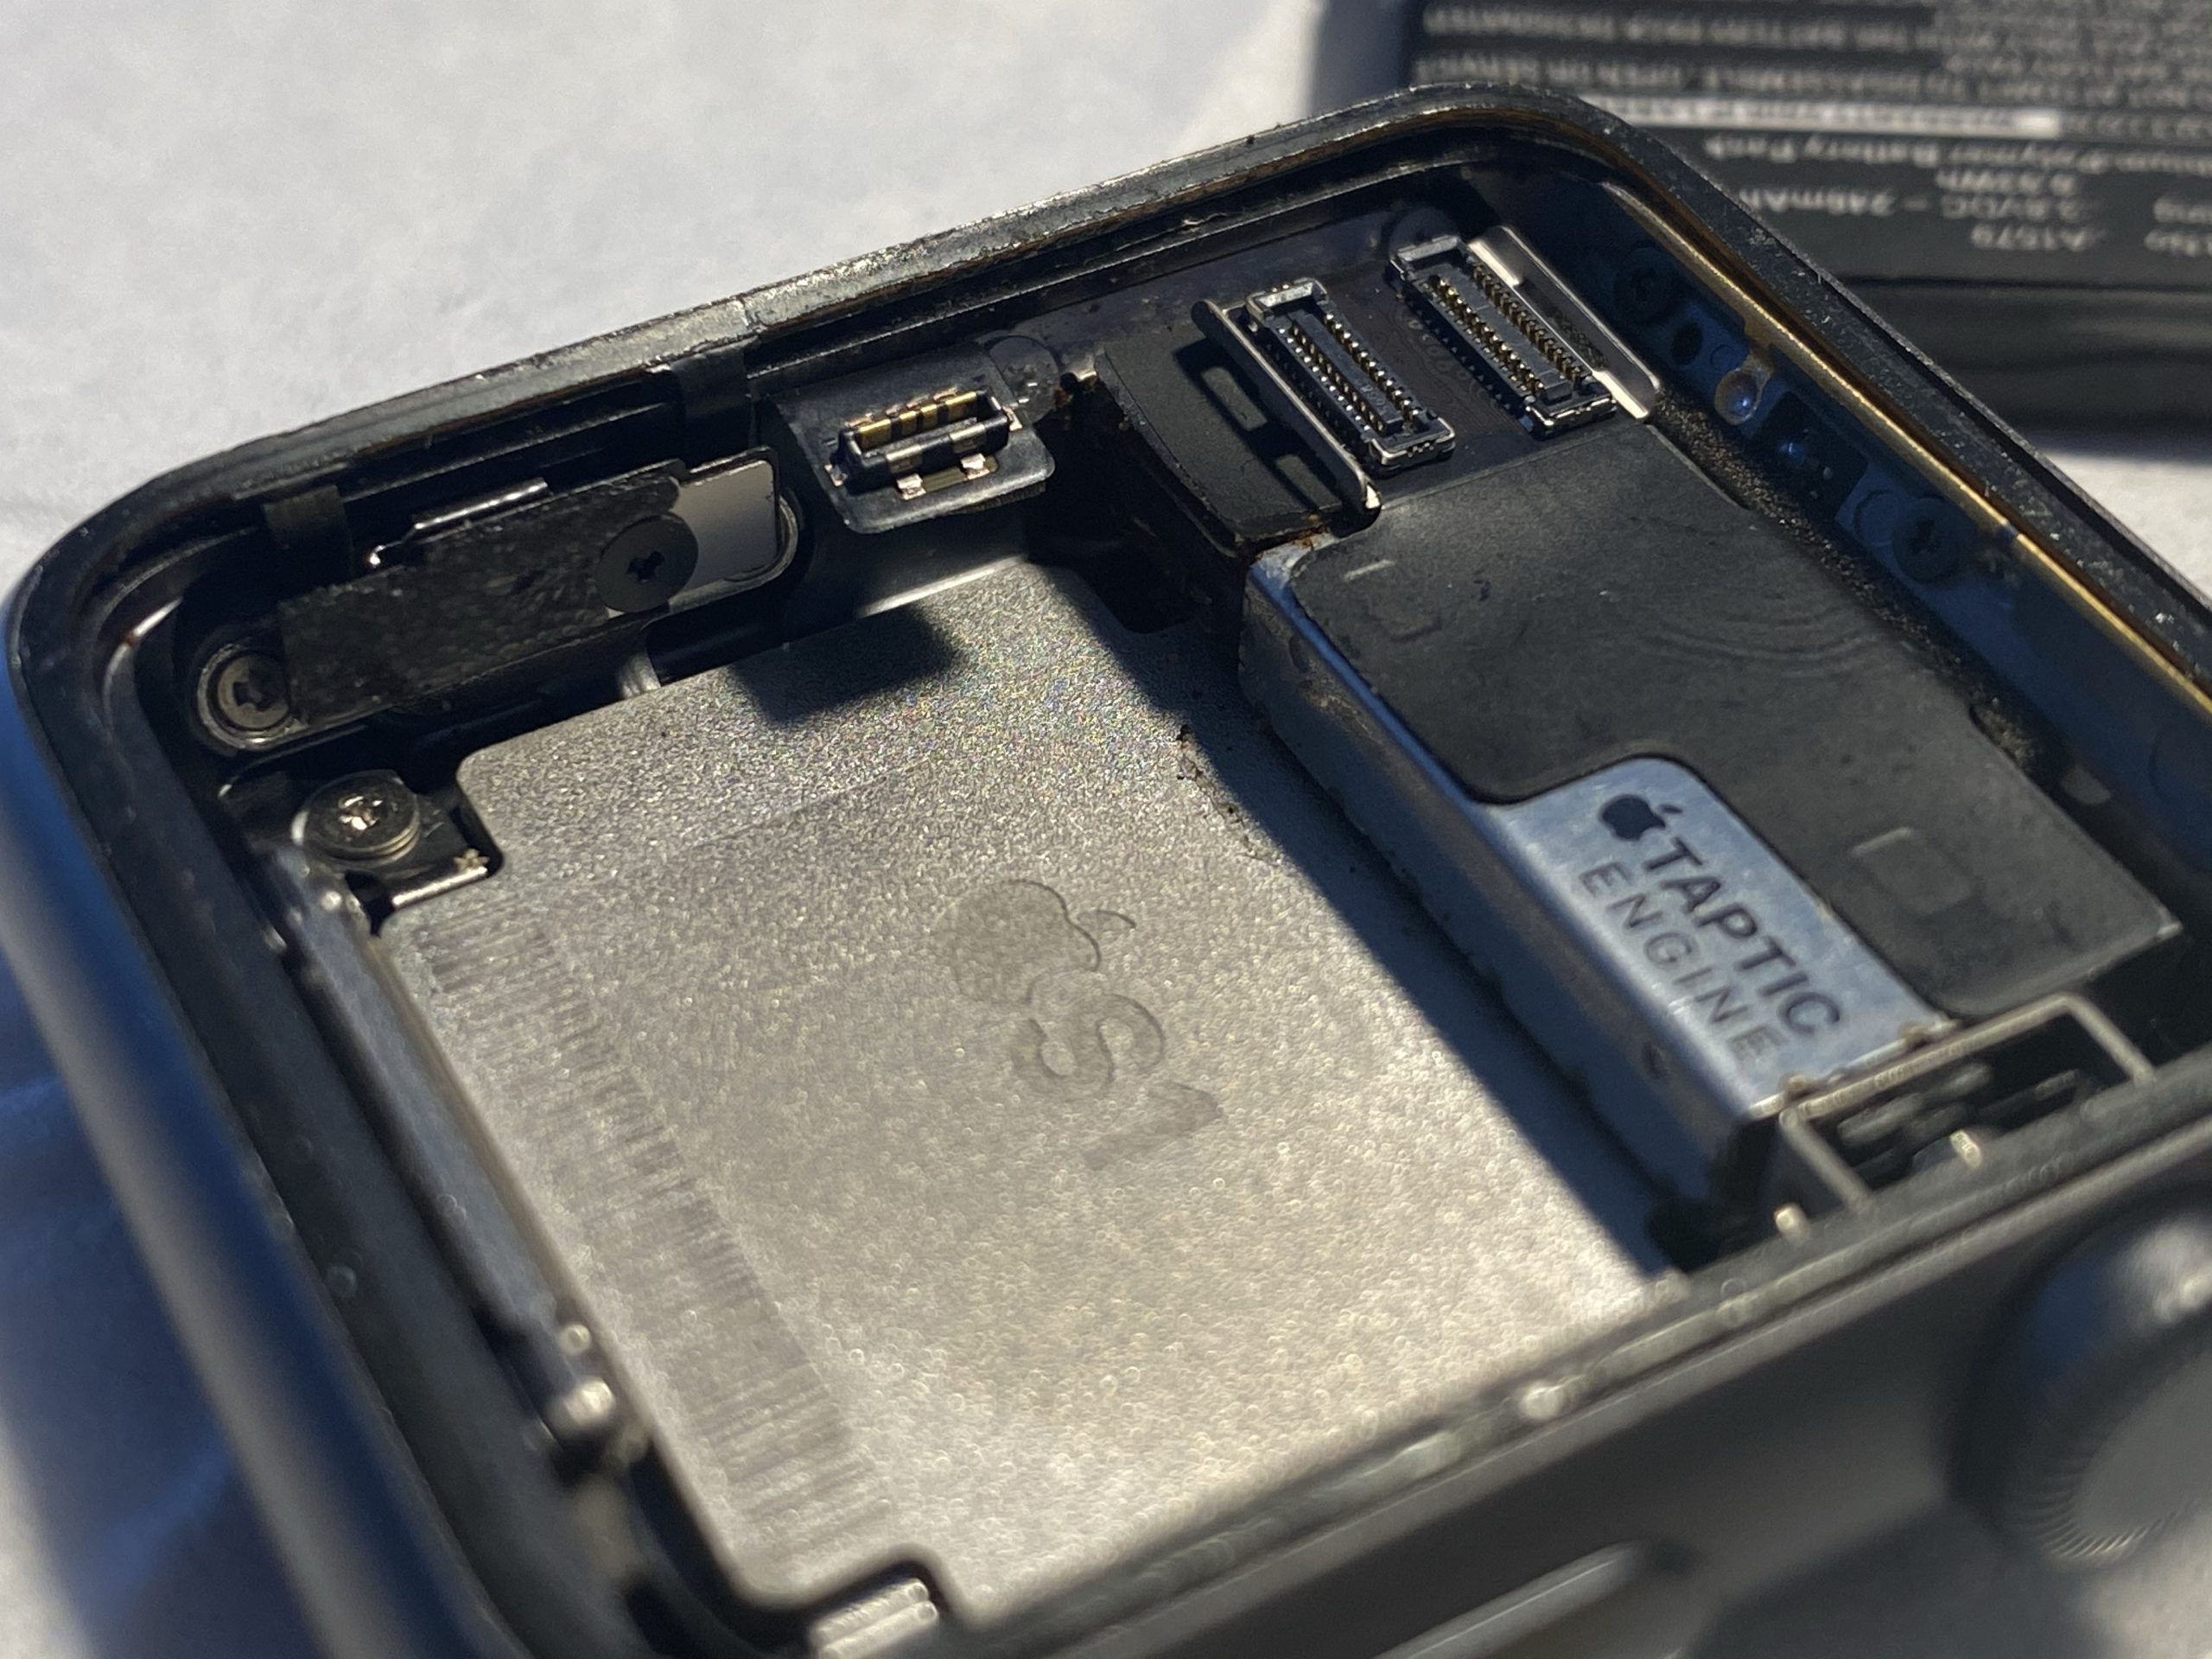
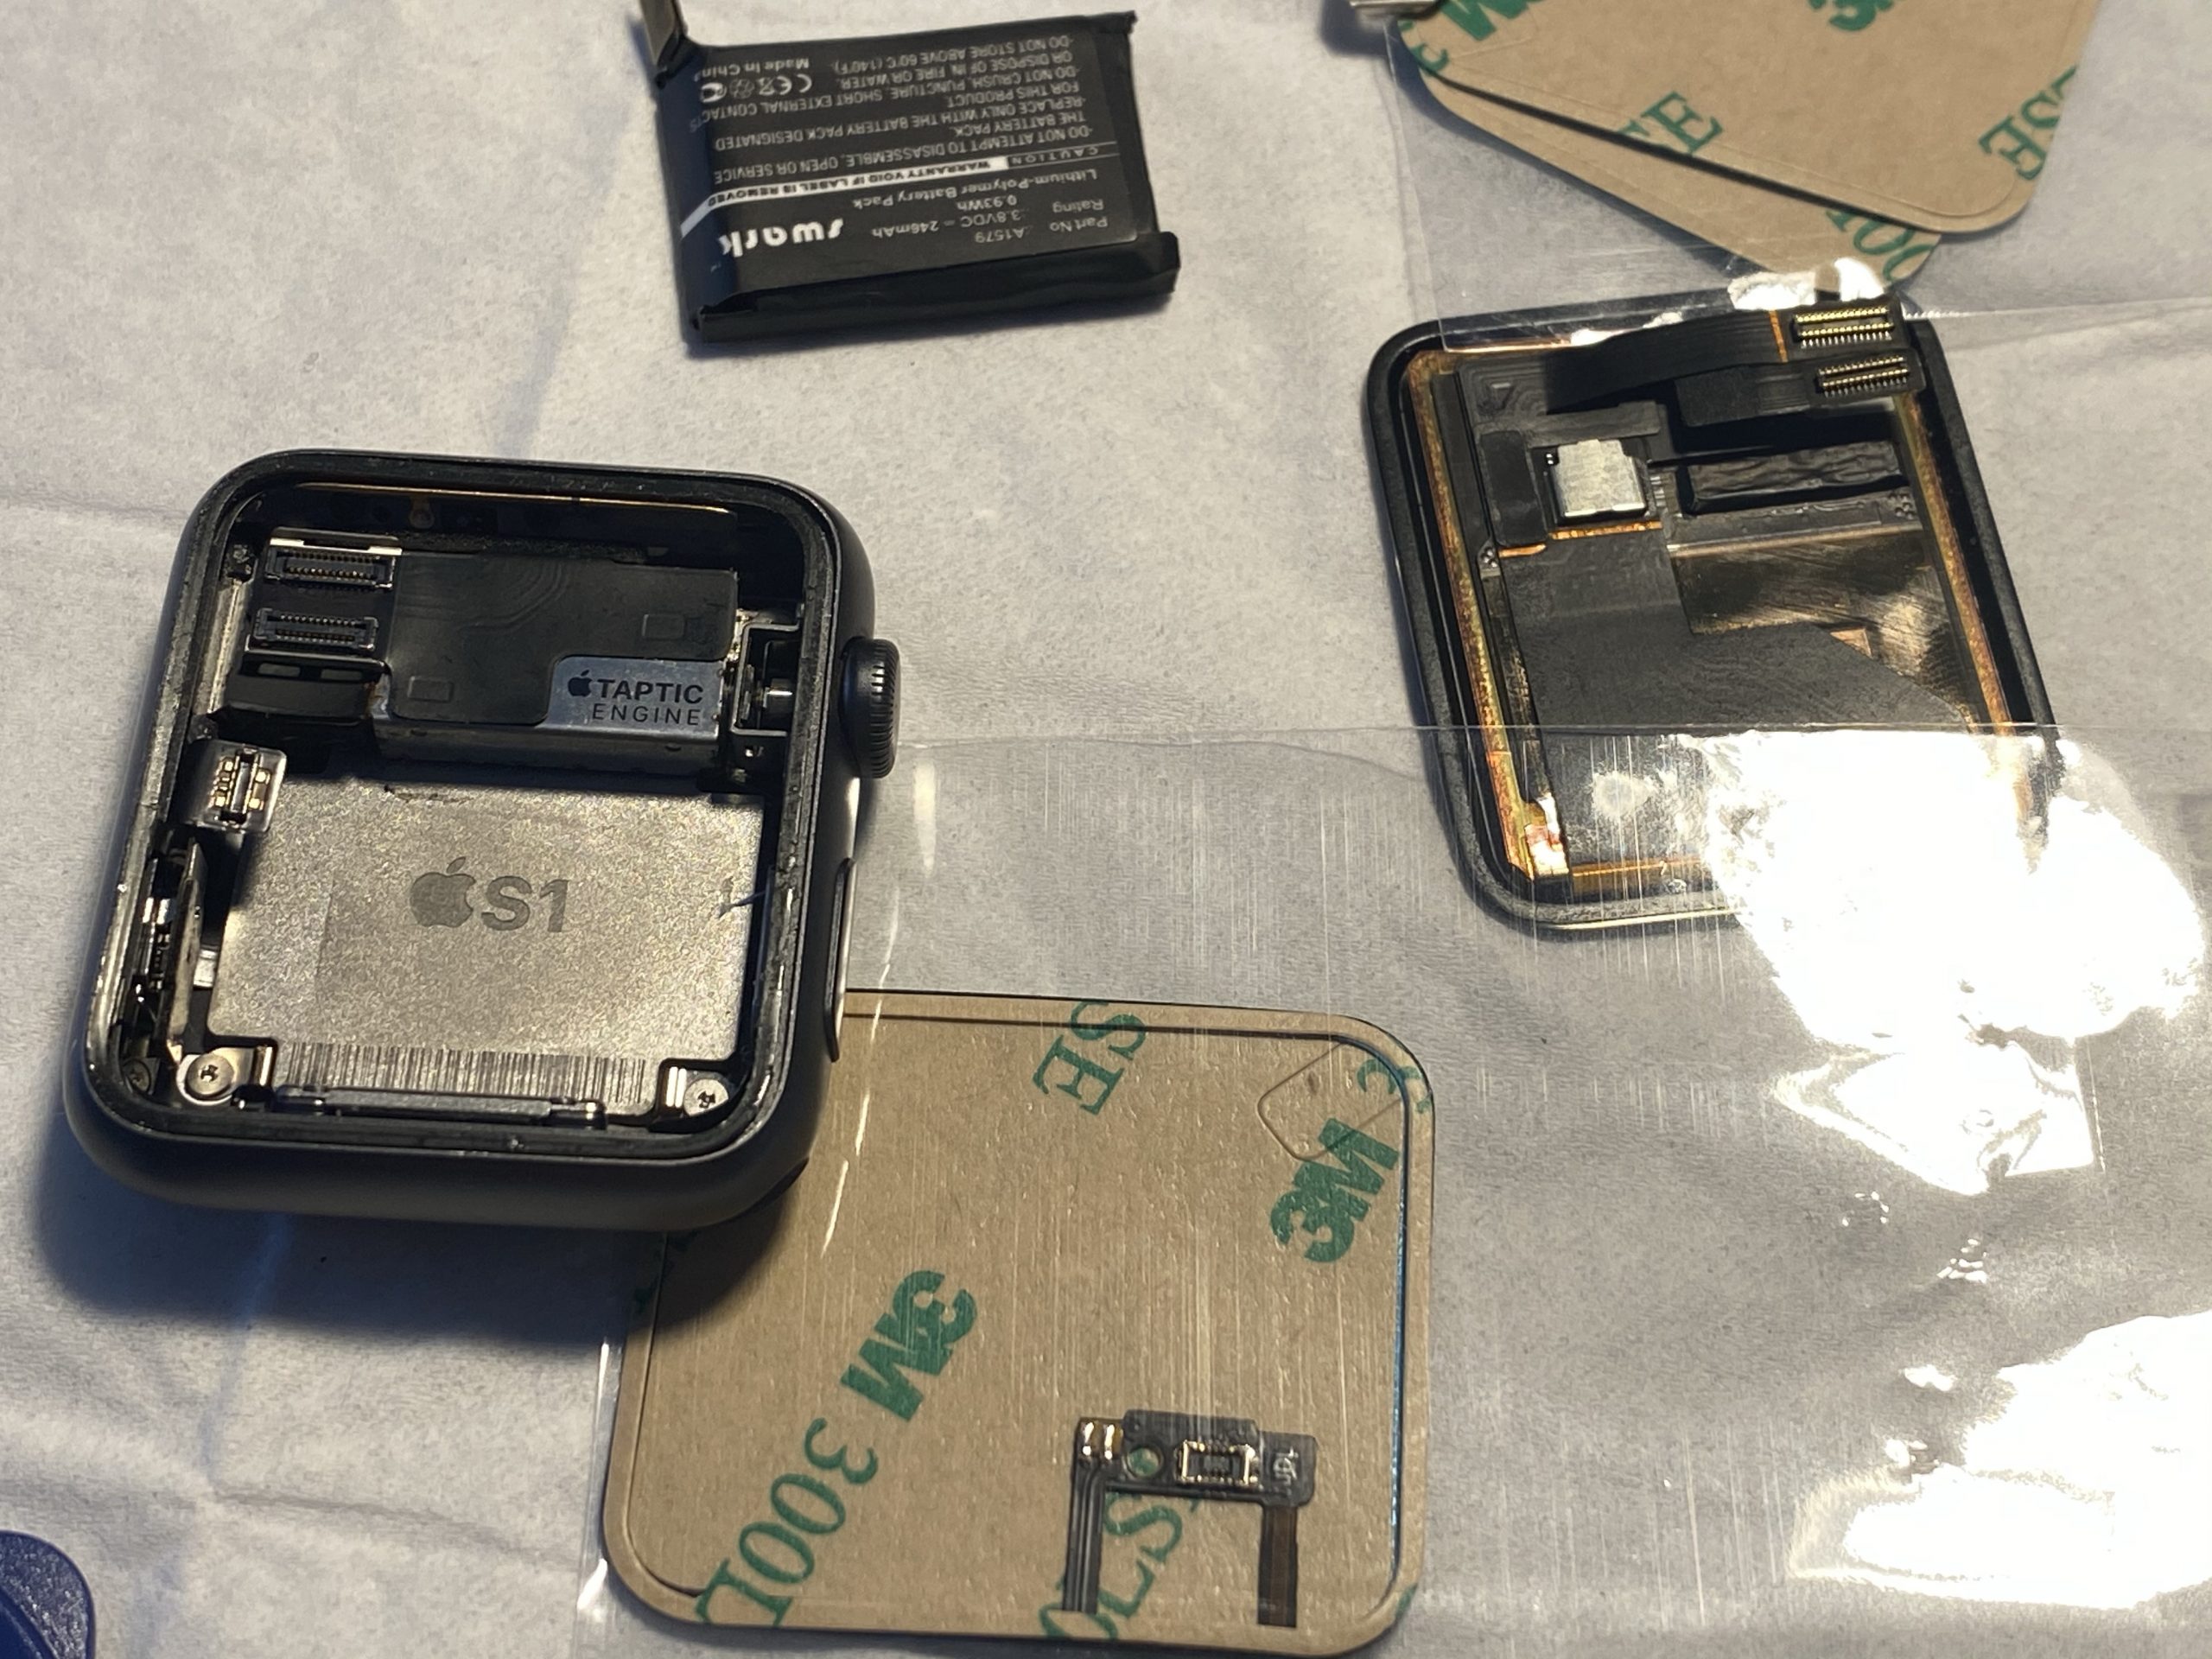
After years of use the display of my trusty Apple Watch popped off. It seems the glue had given in and failed.
As there was nothing wrong with the watch otherwise I am attempting a repair.
I’ve got the new adhesive seal, a new force touch sensor and a new battery while I am at it.
Add opening and disassembling was an adventure in itself I had to give up for now as I am missing an exotic Y000 screwdriver.
While I wait for this to arrive – here is the screw I had to stop at:
You might want to get one of these. Can be ordered since today. Delivered starting February 6th.
It runs emulators up to Playstation 1. Most importantly it will run SNES and NeoGeo flawlessly (so they say).

I will report when mine arrived.
So this is interesting: Normally a Windows program (executable) if you try to run it anywhere else will show a message “cannot be run here” and terminates.
Printing this message is actually done by a little program whos task is to only print out this very message. So it can be overwritten.
Michael Strehovský did exactly this, very impressively. He documented what he did to get the game “snake”, written in C#, running on DOS instead of the “does not run here” stub. In an executable file that would run both, on standard 90s MS-DOS as well as on Windows with the .NET Framework installed.

He used a quite elaborate toolchain – namely DOS64-stub.
You can read all of this in the full thread. I recommend a deeper dive, as it’s a great start to better understand the inner workings of your computer…

Apparently the german main train operator does offer their regional and nationwide train network in an overall one-pager plan version:
Now, if you take the nationwide one, it looks like this:

It looks okay, but not that great. Given the many examples of proper train network plans.
Someone as well was not satisfied, so this person created one and put it on reddit:
This is so much nicer! Of course this has to be taken with the addition of: there are several “jokes” hidden in the names and lines. Don’t take this as an actual reference – rather go by the official ones.
Jeder kennt das »Periodensystem der Elemente« aus dem Chemieunterricht. Das Periodensystem ist ein intuitiver und schneller »Lego-Baukasten«, der uns unterstützt, komplizierte Zusammenhänge zwischen Bausteinen (Atomen) und Molekülen (Naturstoffe, Steine oder Metalle) intellektuell zu erfassen.
Der amerikanische Informatiker Kristian Hammond hat den Versuch unternommen, eine Lingua Franca für künstliche Intelligenz zu konzipieren. In Anlehnung an die Chemie bezeichnet er sie als »Periodensystem der Künstlichen Intelligenz«.
Das Periodensystem der Künstlichen Intelligenz unterstützt dabei, den Begriff KI auf Geschäftsprozesse abzubilden und ein Verständnis der Elemente aufzubauen – ähnlich wie im Periodensystem der chemischen Elemente. Der Ansatz hilft beim Verständnis und bei der Einschätzung von Marktreife, Aufwänden, benötigtem Maschinentraining sowie Wissen und Erfahrungen der Mitarbeiter.

Video incoorporating image processing via python and BigGAN adversarial artificial neural network to breed new images. There are papers about “high fidelity natural image synthesis”.
Anthony Baldino – Like Watching Ghosts from his recently released album Twelve Twenty Two
Anthony Baldino

When you are dealing with IoT protocols, especially at hobby-level, you probably came across the MQTT protocol and the challenge to have all those different devices that are supposed to be connected actually get connected – preferably using the MQTT protocol.
Recently this little project came to my attention:
OpenMQTTGateway project goal is to concentrate in one gateway different technologies, decreasing by the way the number of proprietary gateways needed, and hiding the different technologies singularity behind a simple & wide spread communication protocol: MQTT.
OpenMQTTGateway

OpenMQTTGateway support very mature technologies like basic 433mhz/315mhz protocols & infrared (IR) so as to make your old dumb devices “smart” and avoid you to throw then away. These devices have also the advantages of having a lower cost compared to Zwave or more sophisticated protocols. OMG support also up to date technologies like Bluetooth Low Energy (BLE) or LORA.
Of course, there is a compatible device list…
Every once in a while I need to take an image or duplicate an SSD/SDCard/Harddisk. And it’s gotten quite complicated to get the proper formatting and alignment when you want to achieve certain things.
For example creating a EFI compatible bootable USB stick is not as straight forward as one would think.
In those cases, a tool called rufus helps:

For all other cases I am using the HDDGuru tool on Windows.
HDD Raw Copy Tool is a utility for low-level, sector-by-sector hard disk duplication and image creation.

HDD Raw Copy tool makes an exact duplicate of a SATA, IDE, SAS, SCSI or SSD hard disk drive. Will also work with any USB and FIREWIRE external drive enclosures as well as SD, MMC, MemoryStick and CompactFlash media.
When you need something to listen to it could be Podcasts that you are missing in your life.
A good place to start with those is a directory of podcasts, that even helps with categories and search functionality. Just like fyyd:

Of course as you can find all sorts of podcast there you can also find ours.
brace for marketing:
Friend OS, a modular, fully-customizable operating system accessible via any device that can support a modern web browser, or Friend’s Android and iOS apps. Friend OS leverages Internet and blockchain technologies to offer all the features of a commercial operating system, but one that gives you access to a secure and private cloud-based virtual desktop anytime, anywhere, no matter what hardware or software you use.
So what does this all mean? It’s apparently a web application scaled up to behave and be used like an operating system. It encapsulates an application and directory/filesystem like concept and essentially lives in one of your browser windows.

As long as you’ve got a supported browser, all your apps and data will be accessible through this. They claim.

It’s interesting as there is a lot of open source in there and even some docker effort made to get it running. Seems abandoned / not updated at the time of writing, but it’s a nice concept to begin with anyways.

It started with this tweet about someone called Ayliean apparently drawing a plant based upon set rules and rolling a dice.

And because generative art in itself is fascinating I am frequently pulled into such things. Like this dungeon generator or these city maps or generated audio or face generators or buildings and patterns…
On the topic of flowers there’s another actual implementation of the above mentioned concept available:
Jiří Praus@jipraus has made a nice LED sphere.

