Boomtime 5 Aftermath: The Apostle Malaclypse the Elder’s Holyday. A wandering Wiseman of Ancient Mediterrania (“Med-Terra” or middle earth), who followed a 5-pointed Star through the alleys of Rome, Damascus, Baghdad, Jerusalem, Mecca and Cairo, bearing a sign that seemed to read “DOOM”. (This is a misunderstanding. The sign actually read “DUMB”.)
Hack-The-Planet Podcast: Episode 009

- Folge mit Miataru HTP001: https://podcast.hack-the-planet.tv/2019/08/09/episode-0/
- Miataru http://miataru.com
- MyFitnessPal https://www.myfitnesspal.com
- New File Menu https://try-catch-finally.net/2019/09/24/easy-file-menu-for-macos/
- Xerox Star https://en.wikipedia.org/wiki/Xerox_Star
- Musashikosugi Typhoon Fotos → https://photos.app.goo.gl/56VtqNNP9unjzQw29
- Emperor Japan Parade https://www.keishicho.metro.tokyo.jp/kotsu/doro/regulation/ceremony_kisei.files/chirashi_e.pdf
- Tokyo Stadtnamen in iOS ersetzen:
- https://www.schrankmonster.de/2019/09/06/text-replacements-for-tokyo-ward-and-kens-on-ios-and-macos/
- TypeTasker Text Replacement: https://www.schrankmonster.de/2019/09/24/simple-windows-text-expander/
- Cherry G80-3000 https://www.cherry.de/cherry-g80-3000.html
- DasKeyboard: https://www.schrankmonster.de/2012/08/04/daskeyboard/
- DasKeyboard: https://www.daskeyboard.com/
- Kosugi Festa 2019: http://kosugifesta.com/
- Wireless Mac Keyboard von damals: https://geekhack.org/index.php?topic=6528.0
- Synology https://www.synology.com/de-de
- Prusa Mini 3D Drucker – https://www.prusa3d.com/original-prusa-mini/
- OSS Extruder: https://www.sciencedirect.com/science/article/pii/S2468067218300208
- MyFitnesspal selbst bauen: https://www.schrankmonster.de/2019/10/19/replacing-myfitnesspal/
- Public REST API https://www.hack-the-planet.net/2019/09/02/public-rest-apis/
- Swift Programming Language: https://docs.swift.org/swift-book/
- SwiftUI https://developer.apple.com/xcode/swiftui/
- HUD https://www.schrankmonster.de/2019/02/09/head-up-display-esthetics/
- HealthPost https://apps.apple.com/de/app/health-post/id1441893550?l=en
- FHIR https://en.wikipedia.org/wiki/Fast_Healthcare_Interoperability_Resources
- RaspberryPi https://www.raspberrypi.org/forums/viewtopic.php?p=1252786#p1252786
- https://www.raspberrypi.org/documentation/configuration/warning-icons.md
- XNA – XNA’s not acronymed https://en.wikipedia.org/wiki/Microsoft_XNA
- RISC-V https://youtu.be/67KW4t42SZk
- Unicode https://en.wikipedia.org/wiki/Unicode
TIL: iPhone Visual Voicemal is IMAP
Today I learned that the Apple iPhone re-purposes the IMAP protocol to implement the voice mail feature.
By sniffing the network traffic it was possible to examine the IMAP protocol revealing username and the corresponding hashed password (which allows to repeat a successful login) and of course all voicemail files. We want to highlight, that all the voicemail files have been transferred unencrypted.
Assessment of Visual Voicemail from 2012
replacing MyFitnessPal
Well, it’s about time to do something about MyFitnessPal. In our family we’re using their service by the daily. But just for logging. No reports, no further features used.
But still, we were using it for quite a time now:

The service has started to roll out ads for some time now in their apps. There are only iOS / Android apps available. And a mediocre website.
Just recently they started to announce that their free service will restrict how many years back are going to be stored. From those 5 years we will loose 3.
In addition the whole integration has never gotten to a point where I would have decided to upgrade to the paid premium version. No functionality ever got added. No interfacing with scales, no optimizations for UI/UX, …
But they now reduce the functionalities and service and want me to cough up a bit of money:

I am not generally against subscriptions. But I am not getting 9,99 Euro of value out of the service. A shared google sheet would almost achieve parity. And the price itself is just not value based. For 2 Euro I probably would not feel the urge to move on. For 9,99 (times 2 for 2 accounts) make me move.
So I’ve sat down with my wife and we scribbled up some things we want to have in a replacement. The content and feature-set is agreed. Now I’ll throw up a prototype app.
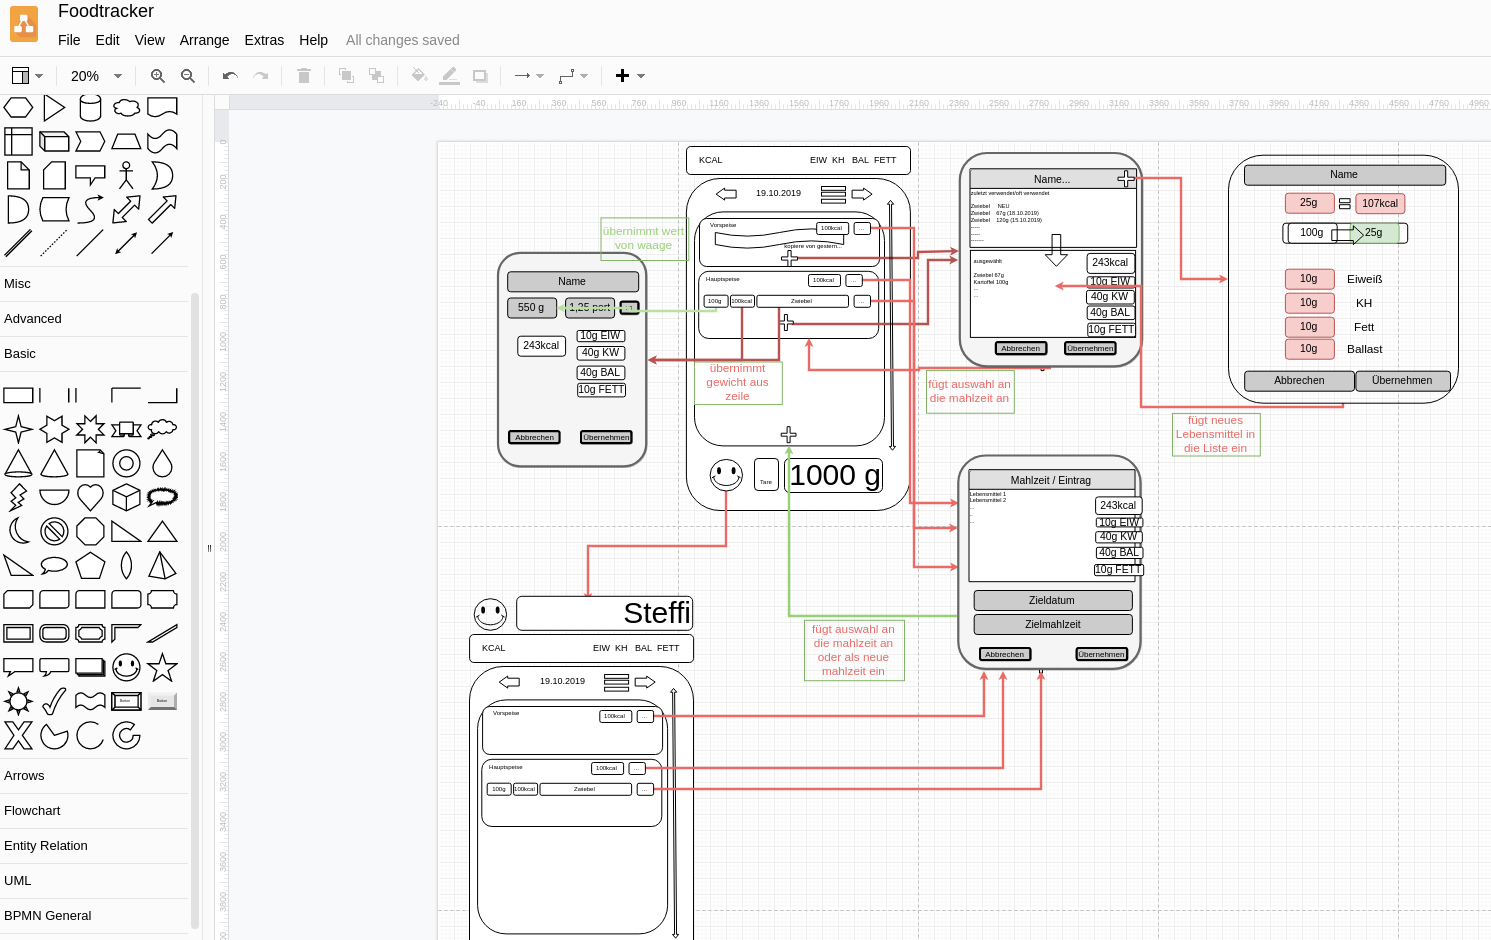
It’ll be integrated with the MQTT scales. And with the flow we came up with we hopefully will reduce the interactions dramatically over MyFitnessPal. And it’ll never stop saving history. And I’ll learn something new.
Celebrate Bureye
The 73rd and Last Day of the Season of Bureaucracy. Eye Day is celebrated by playing Discordian Games.
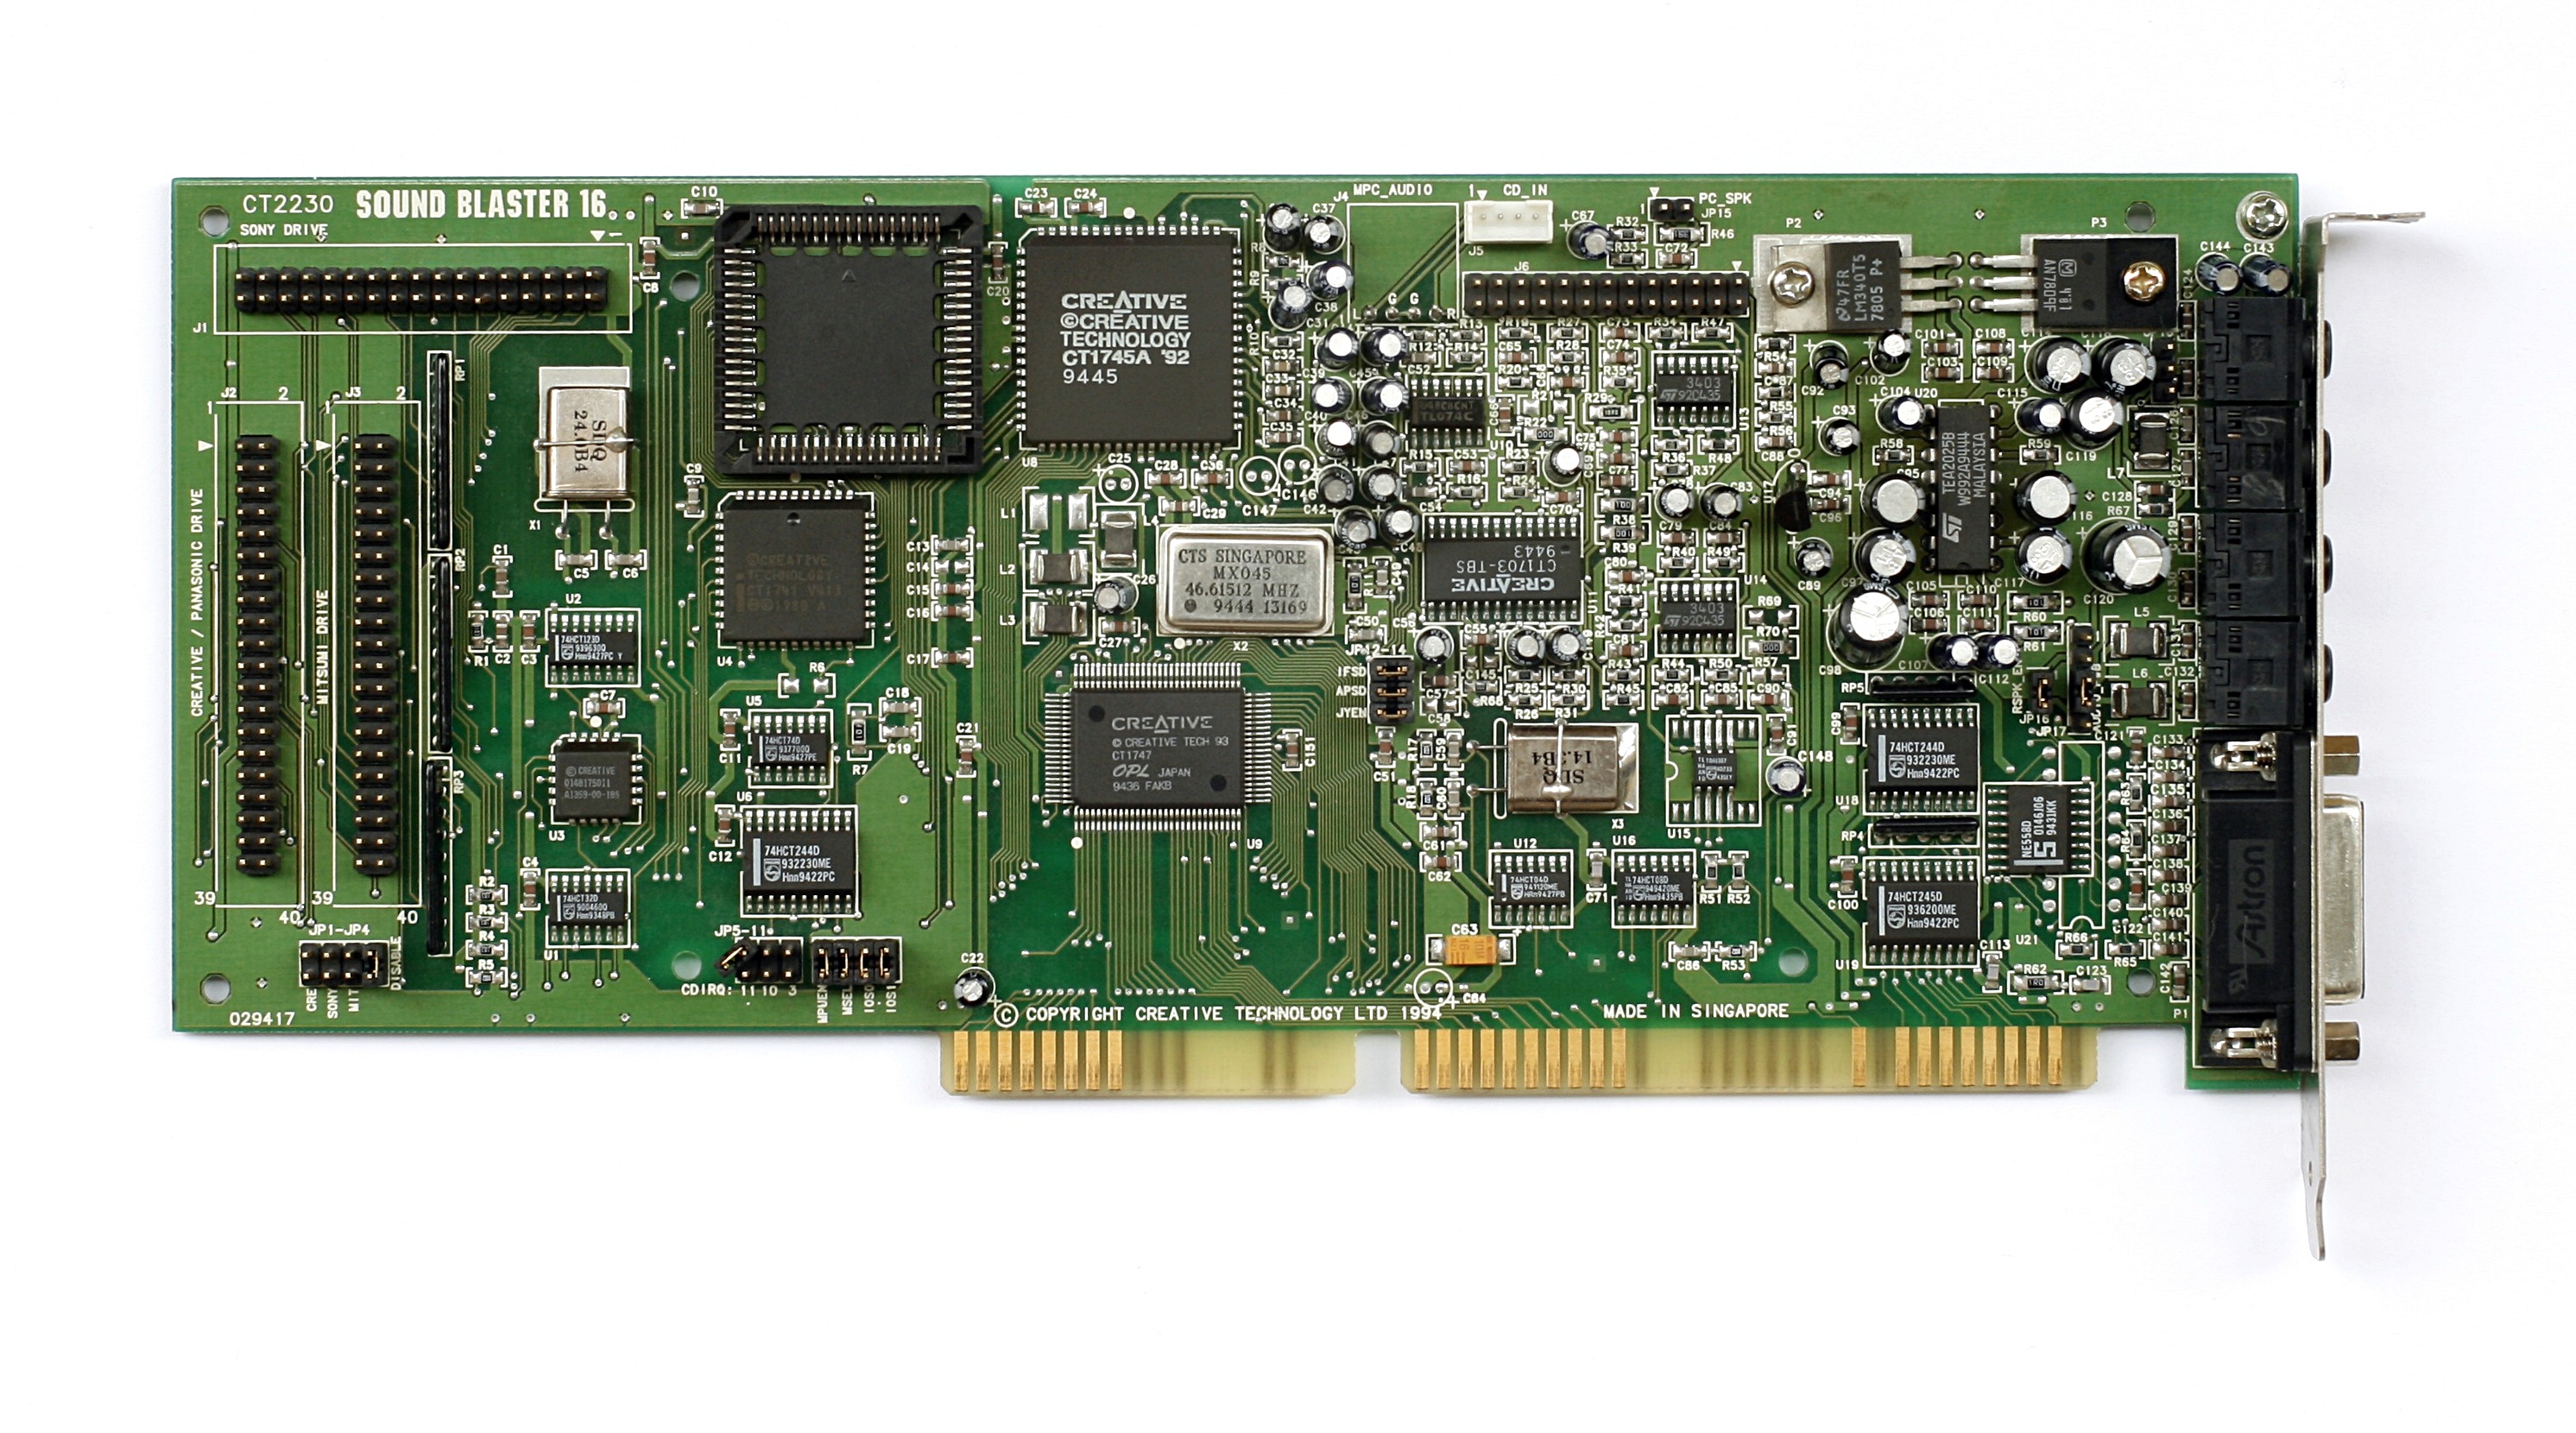
One Soundcard to rule them all
The first sound card I got as an upgrade to a PC without sound back in 90s was the glorious Sound Blaster 16:
There were several different sound card options back in the days and all sounded a bit different.
A sound card (also known as an audio card) is an internal expansion card that provides input and output of audio signals to and from a computer under control of computer programs. The term sound card is also applied to external audio interfaces used for professional audio applications.
Wikipedia
With the synthesizers and audio processing each series and make produced a distinctive sound. Some of us want to bring these sounds back. But keeping the (old) hardware running is an increasingly difficult task.
For example: The interface used by the above mentioned Sound Blaster 16 card is the ISA bus interface. This interface was introduced in 1981 and replaced in 1993. If you want to hear how such a sound card sounds today you would have to run hardware from this time period.
But some people are working towards getting at least some authentic sound back.
In this talk, Alan Hightower takes a look at the complexities, challenges, and even current progress at integrating all of the above cores into one FPGA based ISA sound card.
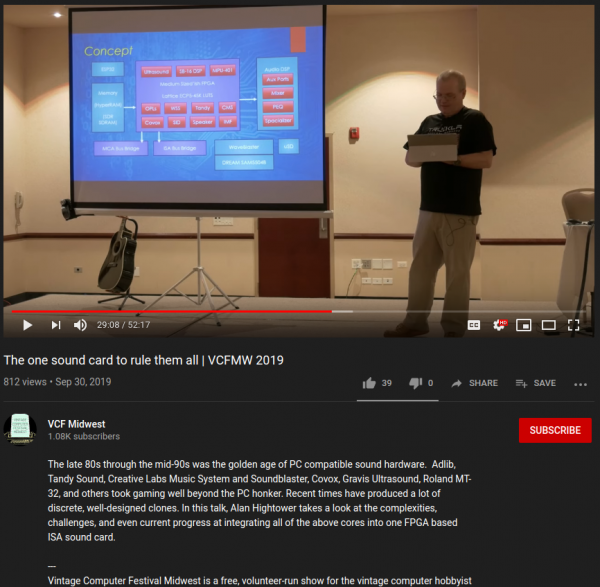
This is what the concept would bring if done:
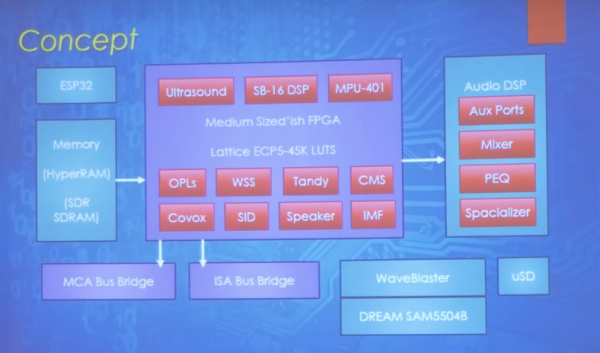
Oh that would be soooooo nice to have all these vintage sound interfaces available and to be able to actually use them for audio output.
Hack-The-Planet Podcast: Episode 008
Remember Habeas Corpus day
Setting Orange 66 Bureaucracy: A Discordian Holy Day of Fondle and Gropage, when all Discordians should grab their Legislative Representatives by the goolies and cry out “Where’s my Bill of Rights, you bastard?!”
On this day in 3025 YOLD (12 October 1859 AD), His Imperial Majesty, Emperor Norton I, Emperor of the United States and Protector of Mexico, ordered the Congress of the United States to dissolve.
“Fraud and corruption prevent a fair and proper expression of the public voice; that open violation of the laws are constantly occurring, caused by mobs, parties, factions and undue influence of political sects; that the citizen has not that protection of person and property which he is entitled.”
Habeas Corpus Day
global QR code scavenger hunt
I like location based stuff. I like QR codes. There is something that combines both.
Meet Munzee:

Munzee is the next generation in global scavenger hunt games.
Track down QR Codes hidden in the real world and capture them for points. Whether you are a casual player, an avid explorer, or a hardcore competition enthusiast, Munzee helps you rediscover the world around you.
more blacker
A month ago I wrote about a very black paint. This month brings me a papepr about an even blacker substance.
The synergistically incorporated CNT–metal hierarchical architectures offer record-high broadband optical absorption with excellent electrical and structural properties as well as industrial-scale producibility.
Paper: Breakdown of Native Oxide Enables Multifunctional, Free-Form Carbon Nanotube–Metal Hierarchical Architectures
Magnificent app which corrects your previous console command
We all know this. You typed a loooong line of commands in your shell and you made one typo.
That’s the worst.
Now. There’s a command that aims to help:
It is rather simple. But extremely effective.
The Fuck attempts to match the previous command with a rule. If a match is found, a new command is created using the matched rule and executed.
Grab it on github. Install it right away. It went into my toolbelt in an instant.
Why the MS-DOS floppy disk cache was valid 2 seconds…
If you’re old enough to have used MS-DOS you know the benefits a read cache introduced back at the time for floppy disks. Without such a cache everything data intensive was magnitudes slower.
Now after all these years more and more stories emerge about how certain thresholds and timeings where set back in the days.
This is such a story:
Mark Zbikowski led the MS-DOS 2.0 project, and he sat down with a stopwatch while Aaron Reynolds and Chris Peters tried to swap floppy disks on an IBM PC as fast as they could.
They couldn’t do it under two seconds.
So the MS-DOS cache validity was set to two seconds. If two disk accesses occurred within two seconds of each other, the second one would assume that the cached values were still good.
Raymond Chen blog
There are more links in the original article – so go there and down that rabbit hole!
Hack-The-Planet Podcast: Episode 007

good wireguard tutorial
If you, like me, are looking into new emerging tools and technologies you might also look at Wireguard.

WireGuard® is an extremely simple yet fast and modern VPN that utilizes state-of-the-art cryptography. It aims to be faster, simpler, leaner, and more useful than IPsec, while avoiding the massive headache. It intends to be considerably more performant than OpenVPN. WireGuard is designed as a general purpose VPN for running on embedded interfaces and super computers alike, fit for many different circumstances. Initially released for the Linux kernel, it is now cross-platform (Windows, macOS, BSD, iOS, Android) and widely deployable. It is currently under heavy development, but already it might be regarded as the most secure, easiest to use, and simplest VPN solution in the industry.
bold wireguard website statement
To apply and get started with WireGuard on Linux and iOS I’ve used the very nice tutorial of Graham Stevens: WireGuard Setup Guide for iOS.
This guide will walk you through how to setup WireGuard in a way that all your client outgoing traffic will be routed via another machine (server). This is ideal for situations where you don’t trust the local network (public or coffee shop wifi) and wish to encrypt all your traffic to a server you trust, before routing it to the Internet.
WireGuard Setup Guide for iOS.
Expect the Aftermath
The 50th Day of the Season of Bureaucracy. The Fluxday marking the approach of the Season of The Aftermath.
Aftermath (season)
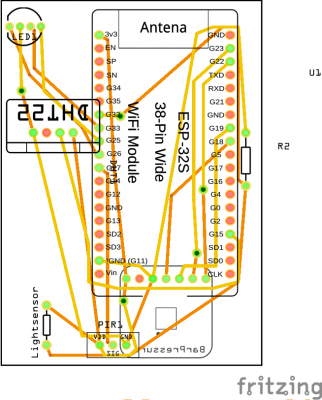
Multi-Sensor board progress
Still working on these…
Still lots of errors and challenges to positioning and casing. It works electrically and in software. Does not yet fit into a case.
It’s supposed to get you these sensors accomodated:
- barometric pressure
- temperature
- humidity
- PIR motion
- light intensity
- bluetooth scan/BLE connectivity
- Wifi scan / Wifi connectivity
And a RGB LED as output. All powered by USB and an ESP32.

Hack-the-Planet Podcast: Episode 006
Episode 006: “Monitoring Release Pipeline” ist fertig und steht bald zum Download und zeit-sourveränem anhören bereit.
Auf der Homepage, im Feed und auf YouTube:

Diesmal unterhält Andreas sich mit mir über:
- Traefik: https://traefik.io/
- Drive In Briefkästen: https://twitter.com/aheil/status/1173…
- Automated Konbini: https://www.forbes.com/sites/akikokat…
- Neue Packstationen: https://www.golem.de/news/deutsche-po…
- Arduino Aquarium Futter Automat: https://www.schrankmonster.de/2019/09…
- Louis Rossmann Macbook Repairs: https://www.youtube.com/user/rossmann…
- Make Buch: https://www.dpunkt.de/buecher/12488/9…
- Icinga: www.icinga.com
- SONOS Auto Bookmarker: https://github.com/bietiekay/sonos-au…
- TOTP – Time based one-time password: https://en.wikipedia.org/wiki/Time-ba…
- 1Password: https://1password.com/
- Enpass: https://www.enpass.io/
- ODroid GO: https://wiki.odroid.com/odroid_go/odr…
- ODroid Go: https://www.hardkernel.com/shop/odroi…
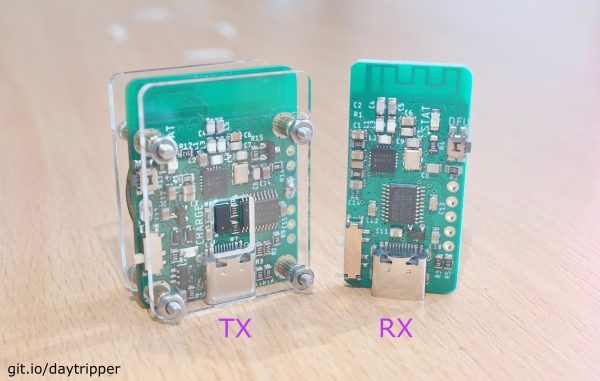
Laser Tripwire
Do you always slack off on your computer and worry about getting busted?Not anymore because Daytripper is here to save the day!
daytripper

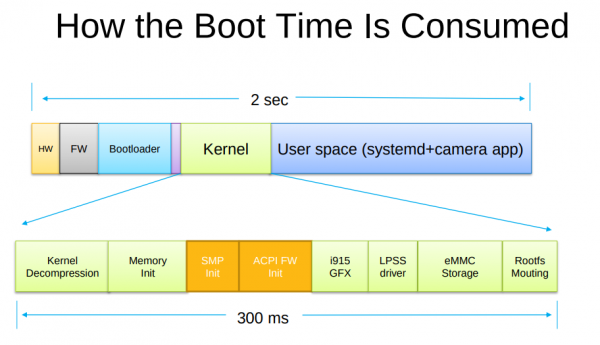
Booting Faster (with Linux).
Booting a computer does not happen extremely often in most use-cases, yet it’s a field that has not seen as much optimization and development as others had.
Find a very interesting presentation on the topic: How to make Linux boot faster here. The presentation was held at the Linux Plumbers Conference 2019.
QuickCharge 3 (QC3) enable your Arduino project
You might have asked yourself how it is that some phones charge up faster than others. Maybe the same phone charges at different speed when you’re using a different cable or power supply. It even might not charge at all.
There is some very complicated trickery in place to make those cables and power supplies do things in combination with the active devices like phones. Many of this is implemented by standards like “Quick Charge”:
Quick Charge is a technology found in QualcommSoCs, used in devices such as mobile phones, for managing power delivered over USB. It offers more power and thus charges batteries in devices faster than standard USB rates allow. Quick Charge 2 onwards technology is primarily used for wall adaptors, but it is also implemented in car chargers and powerbanks (For both input and output power delivery).
Wikipedia: Quick Charge
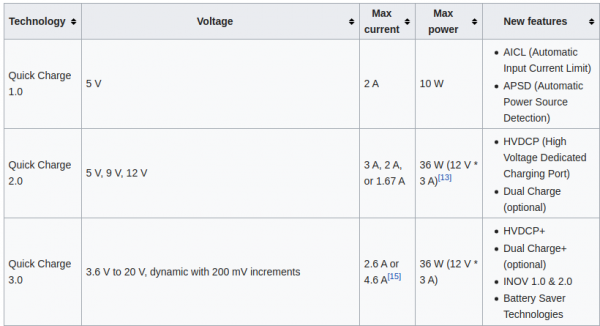
So in a nutshell: If you are able to speak the quick charge protocol, and with the right cable and power supply, you are able to get anything between 3.6 and 20V out of such a combination by just telling the power supply to do so.
This is great for maker projects in need of more power. There’s lots of things to consider and be cautious about.
“Speaking” the protocol just got easier though. You can take this open source library and “power up your project”:
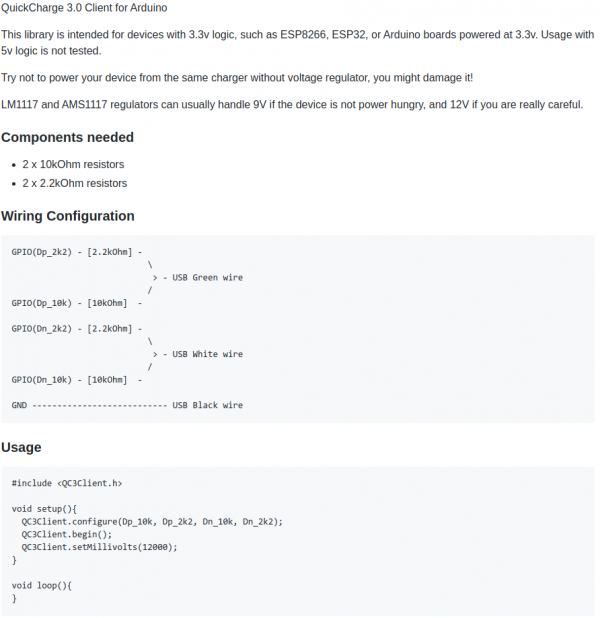
The above mentioned usage-code will give you 12V output from the power supply. Of course you can also do…:

Be aware that your project needs to be aware of the (higher) voltage. It’s really not something you should just try. But you knew that.
More on Quick Charge also here.
smart arduino fish pond feeder: TurtleFeeder
We’ve got several quite big fish tanks in our house. Mainly used by freshwater turtles.

These turtles need to be fed every once in a while. And while this is not an issue normally it’s an issue if you leave the house for travel for an extended period of time.
Of course there are humans checking on everything in the house regularly but as much as can be automated should and will be automated in our household. So the requirement wa to have the turtle feeding automated.
To achieve this is would be necessary to have a fixed amount of turtle food be dispensed into the tanks on a plan and with some checks in the background (like water quality and such).
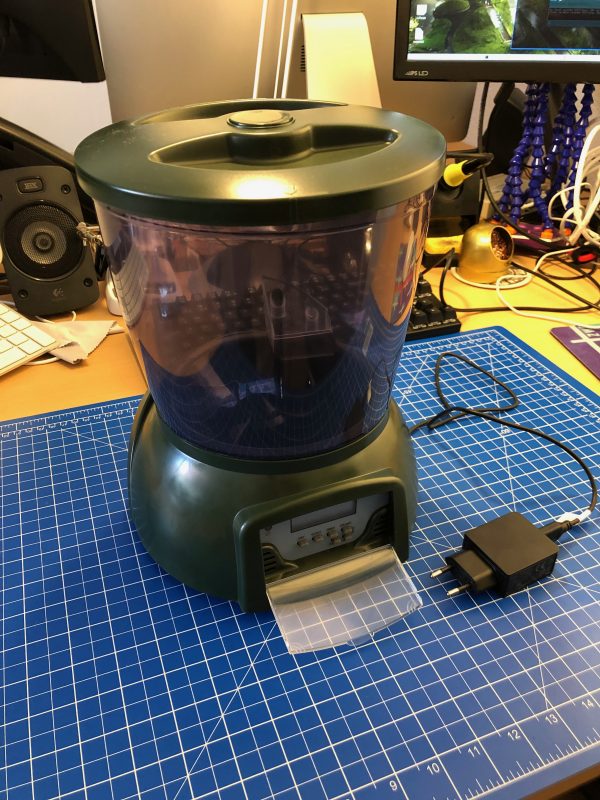
It’s been quite a hassle to come up with a plan how the hardware should look like and work. And ultimately i’ve settled on retrofitting an off-the-shelf fish pond feeder to become controllable through MQTT.
The pond feeder I’ve found and used is this one:

It’s not really worth linking to a specific product detail page as this sort of feeder is available under hundreds of different names. It always looks the same and is priced right around the same.
If you want to build this yourself, you want one that looks like the above. I’ve bought 3 of them and they all seem to come out of the same factory somewhere in China.
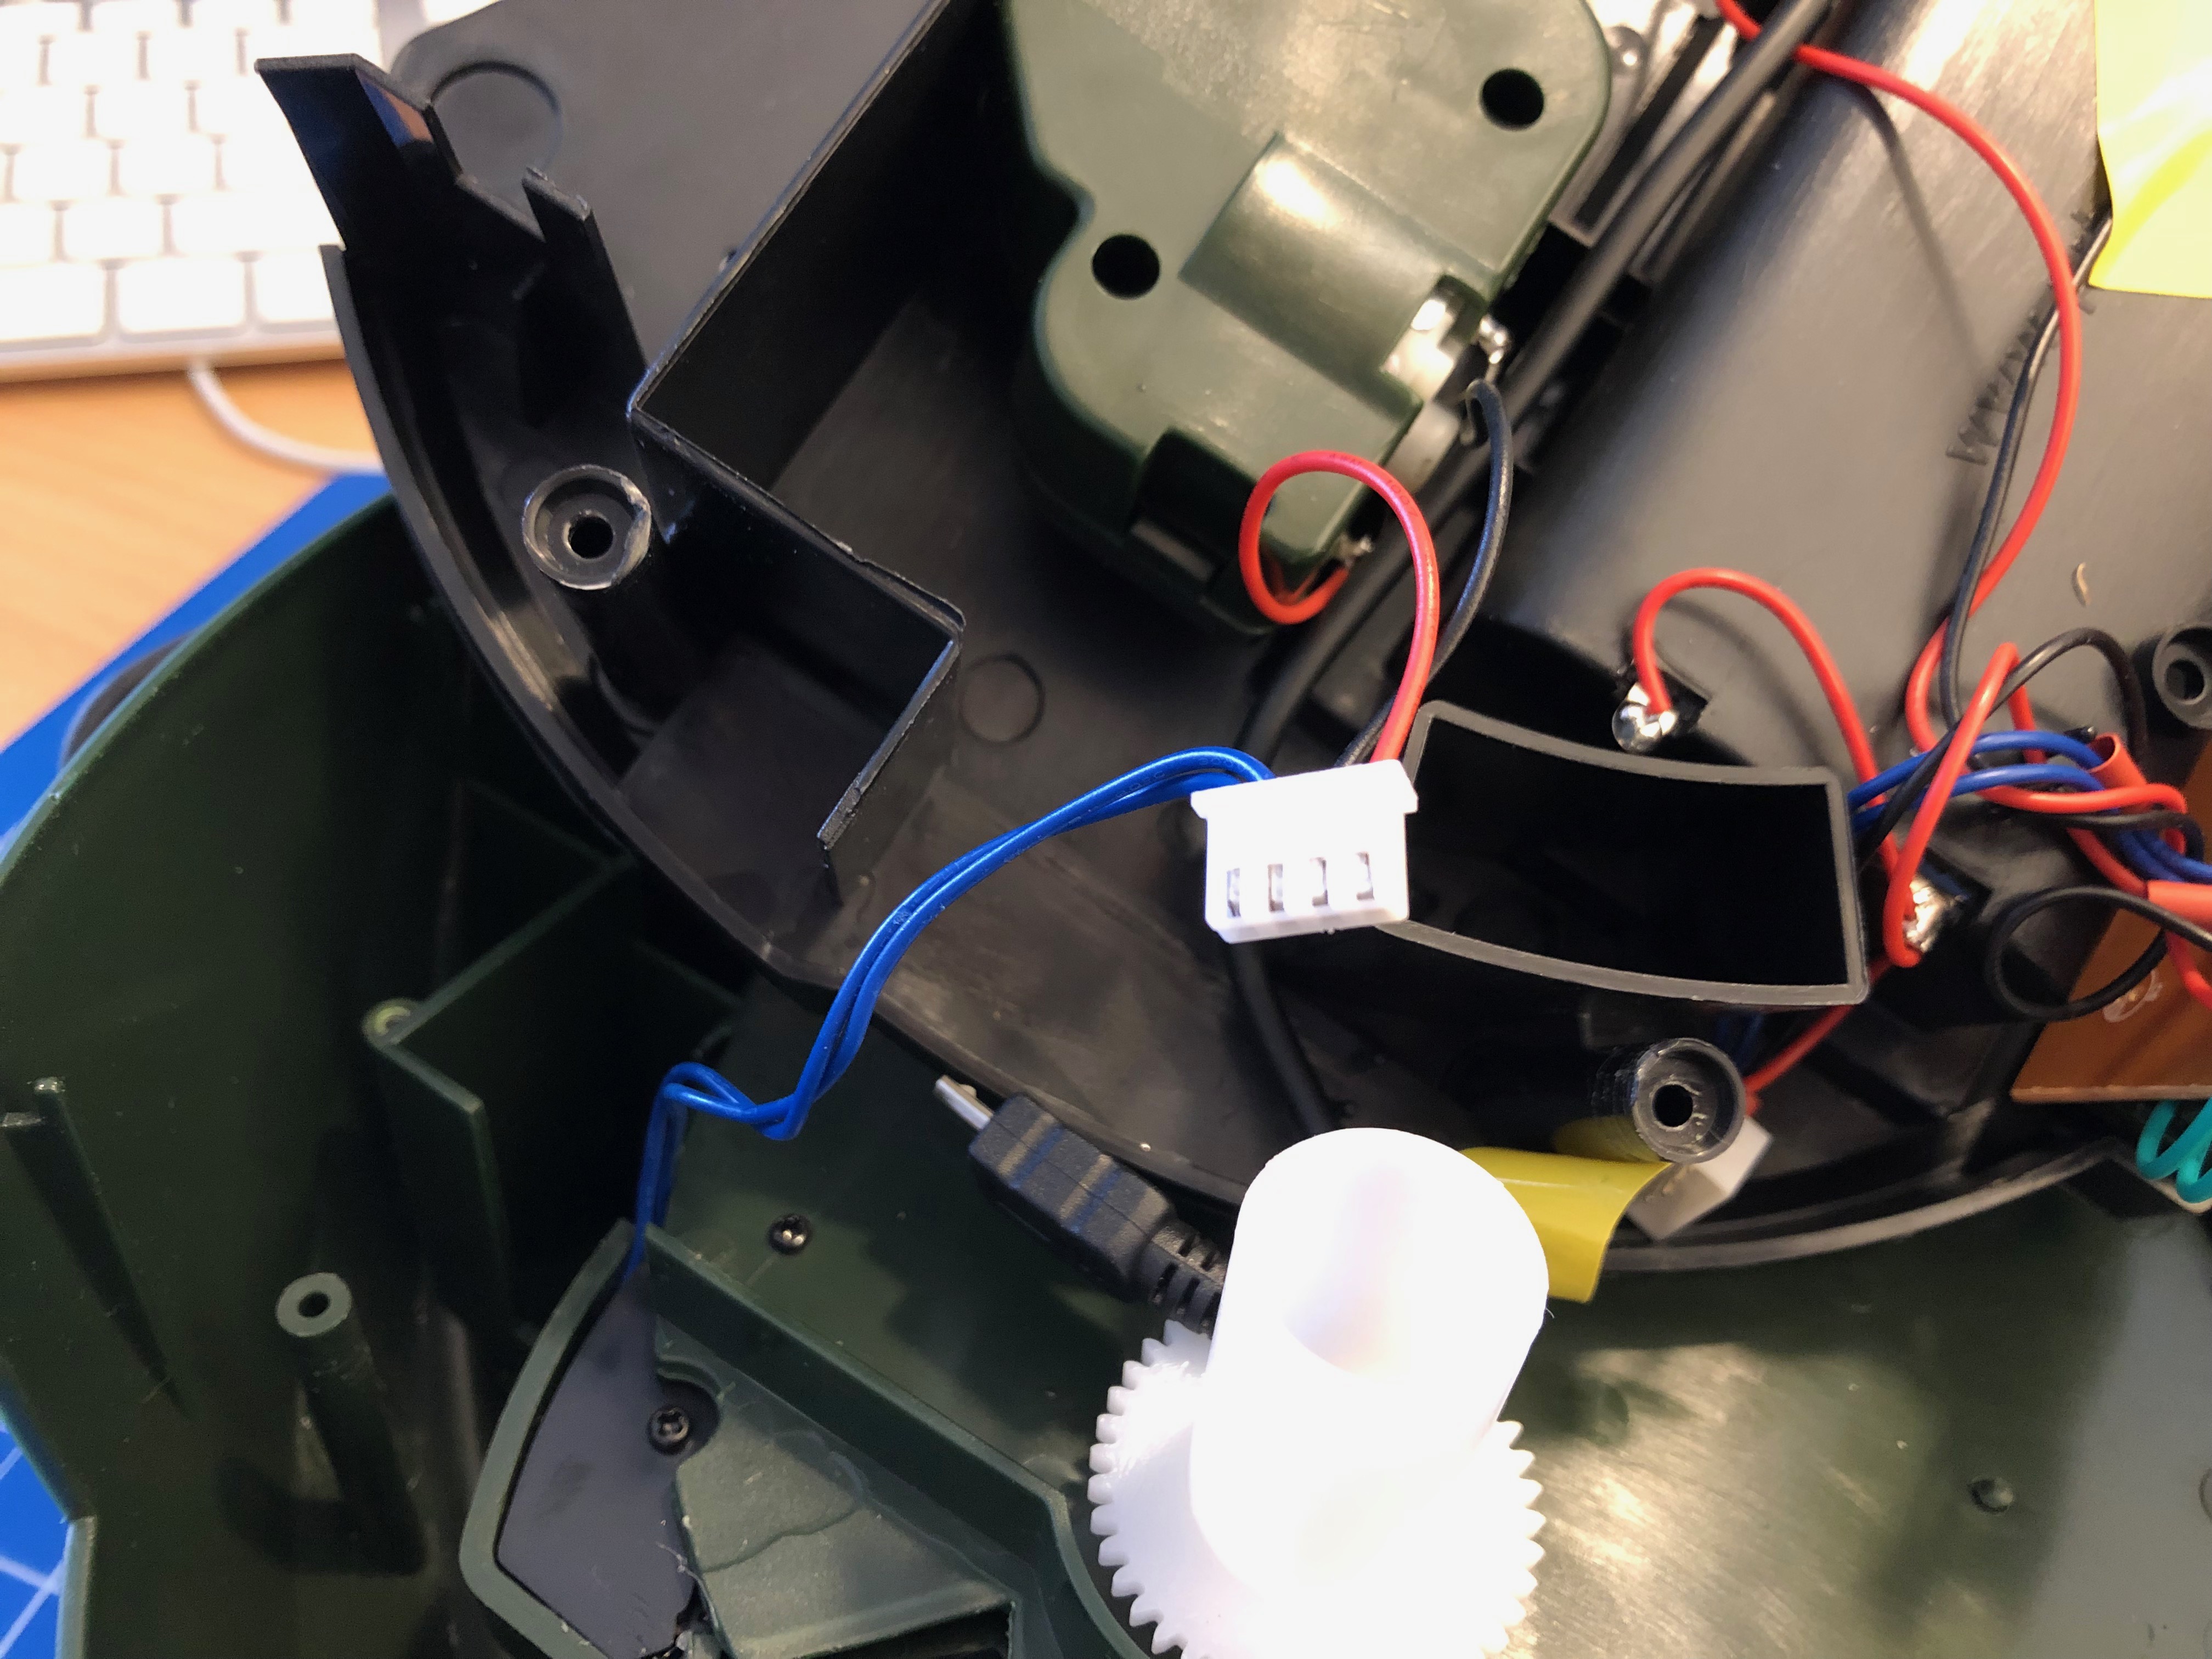
Anyway. If you got one you can easily open it up and start modifying it.
Hardware
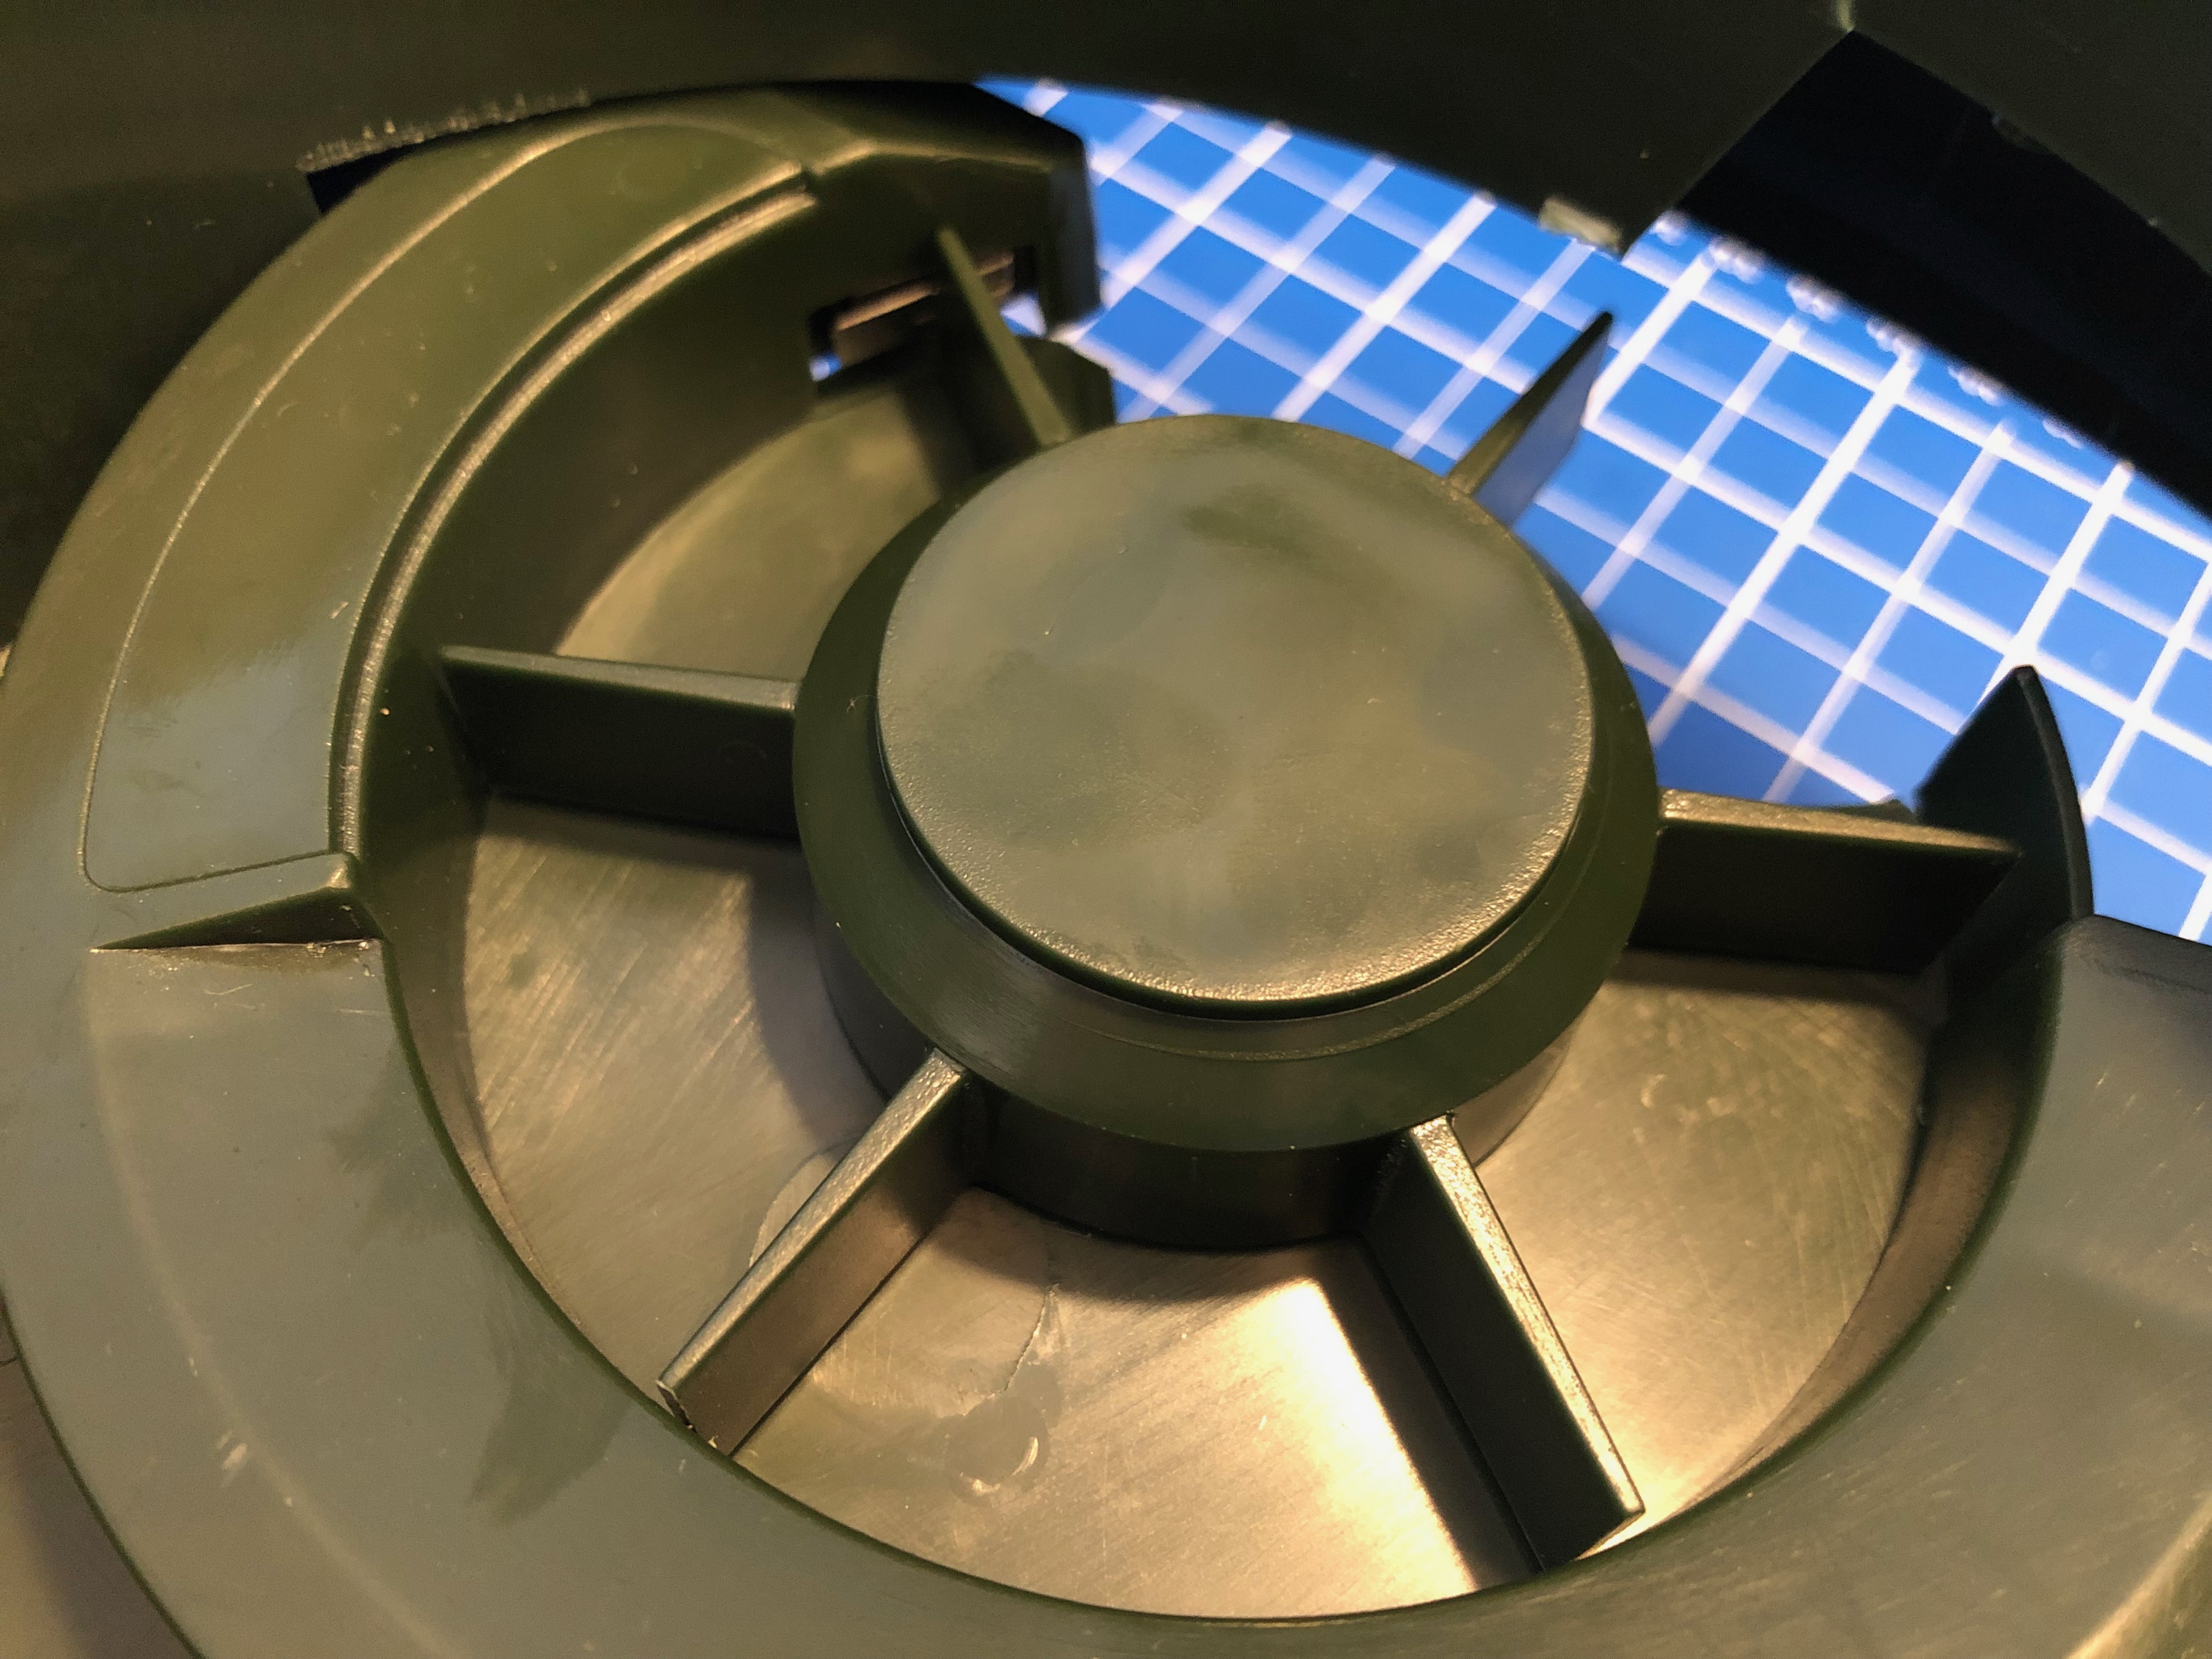
The functional principle of the feeder is rather simple:
- turn the feeder wheel
- take the micro-switch status in account – when it’s pressed down the wheel must be pushing against it
- turn it until the micro-switch is not pressed anymore
- turn some more until it’s pressed again
Simple. Since the switch-status is not known on power loss / reboot a calibration run is necessary (even with the factory electronics) every time it boots up.
After opening the feeder I’ve cut the two cables going to the motor as well as the micro-switch cables. I’ve added a 4-Pin JST-XH connector to both ends. So I can reconnect it to original state if desired.
These are all the parts needed:
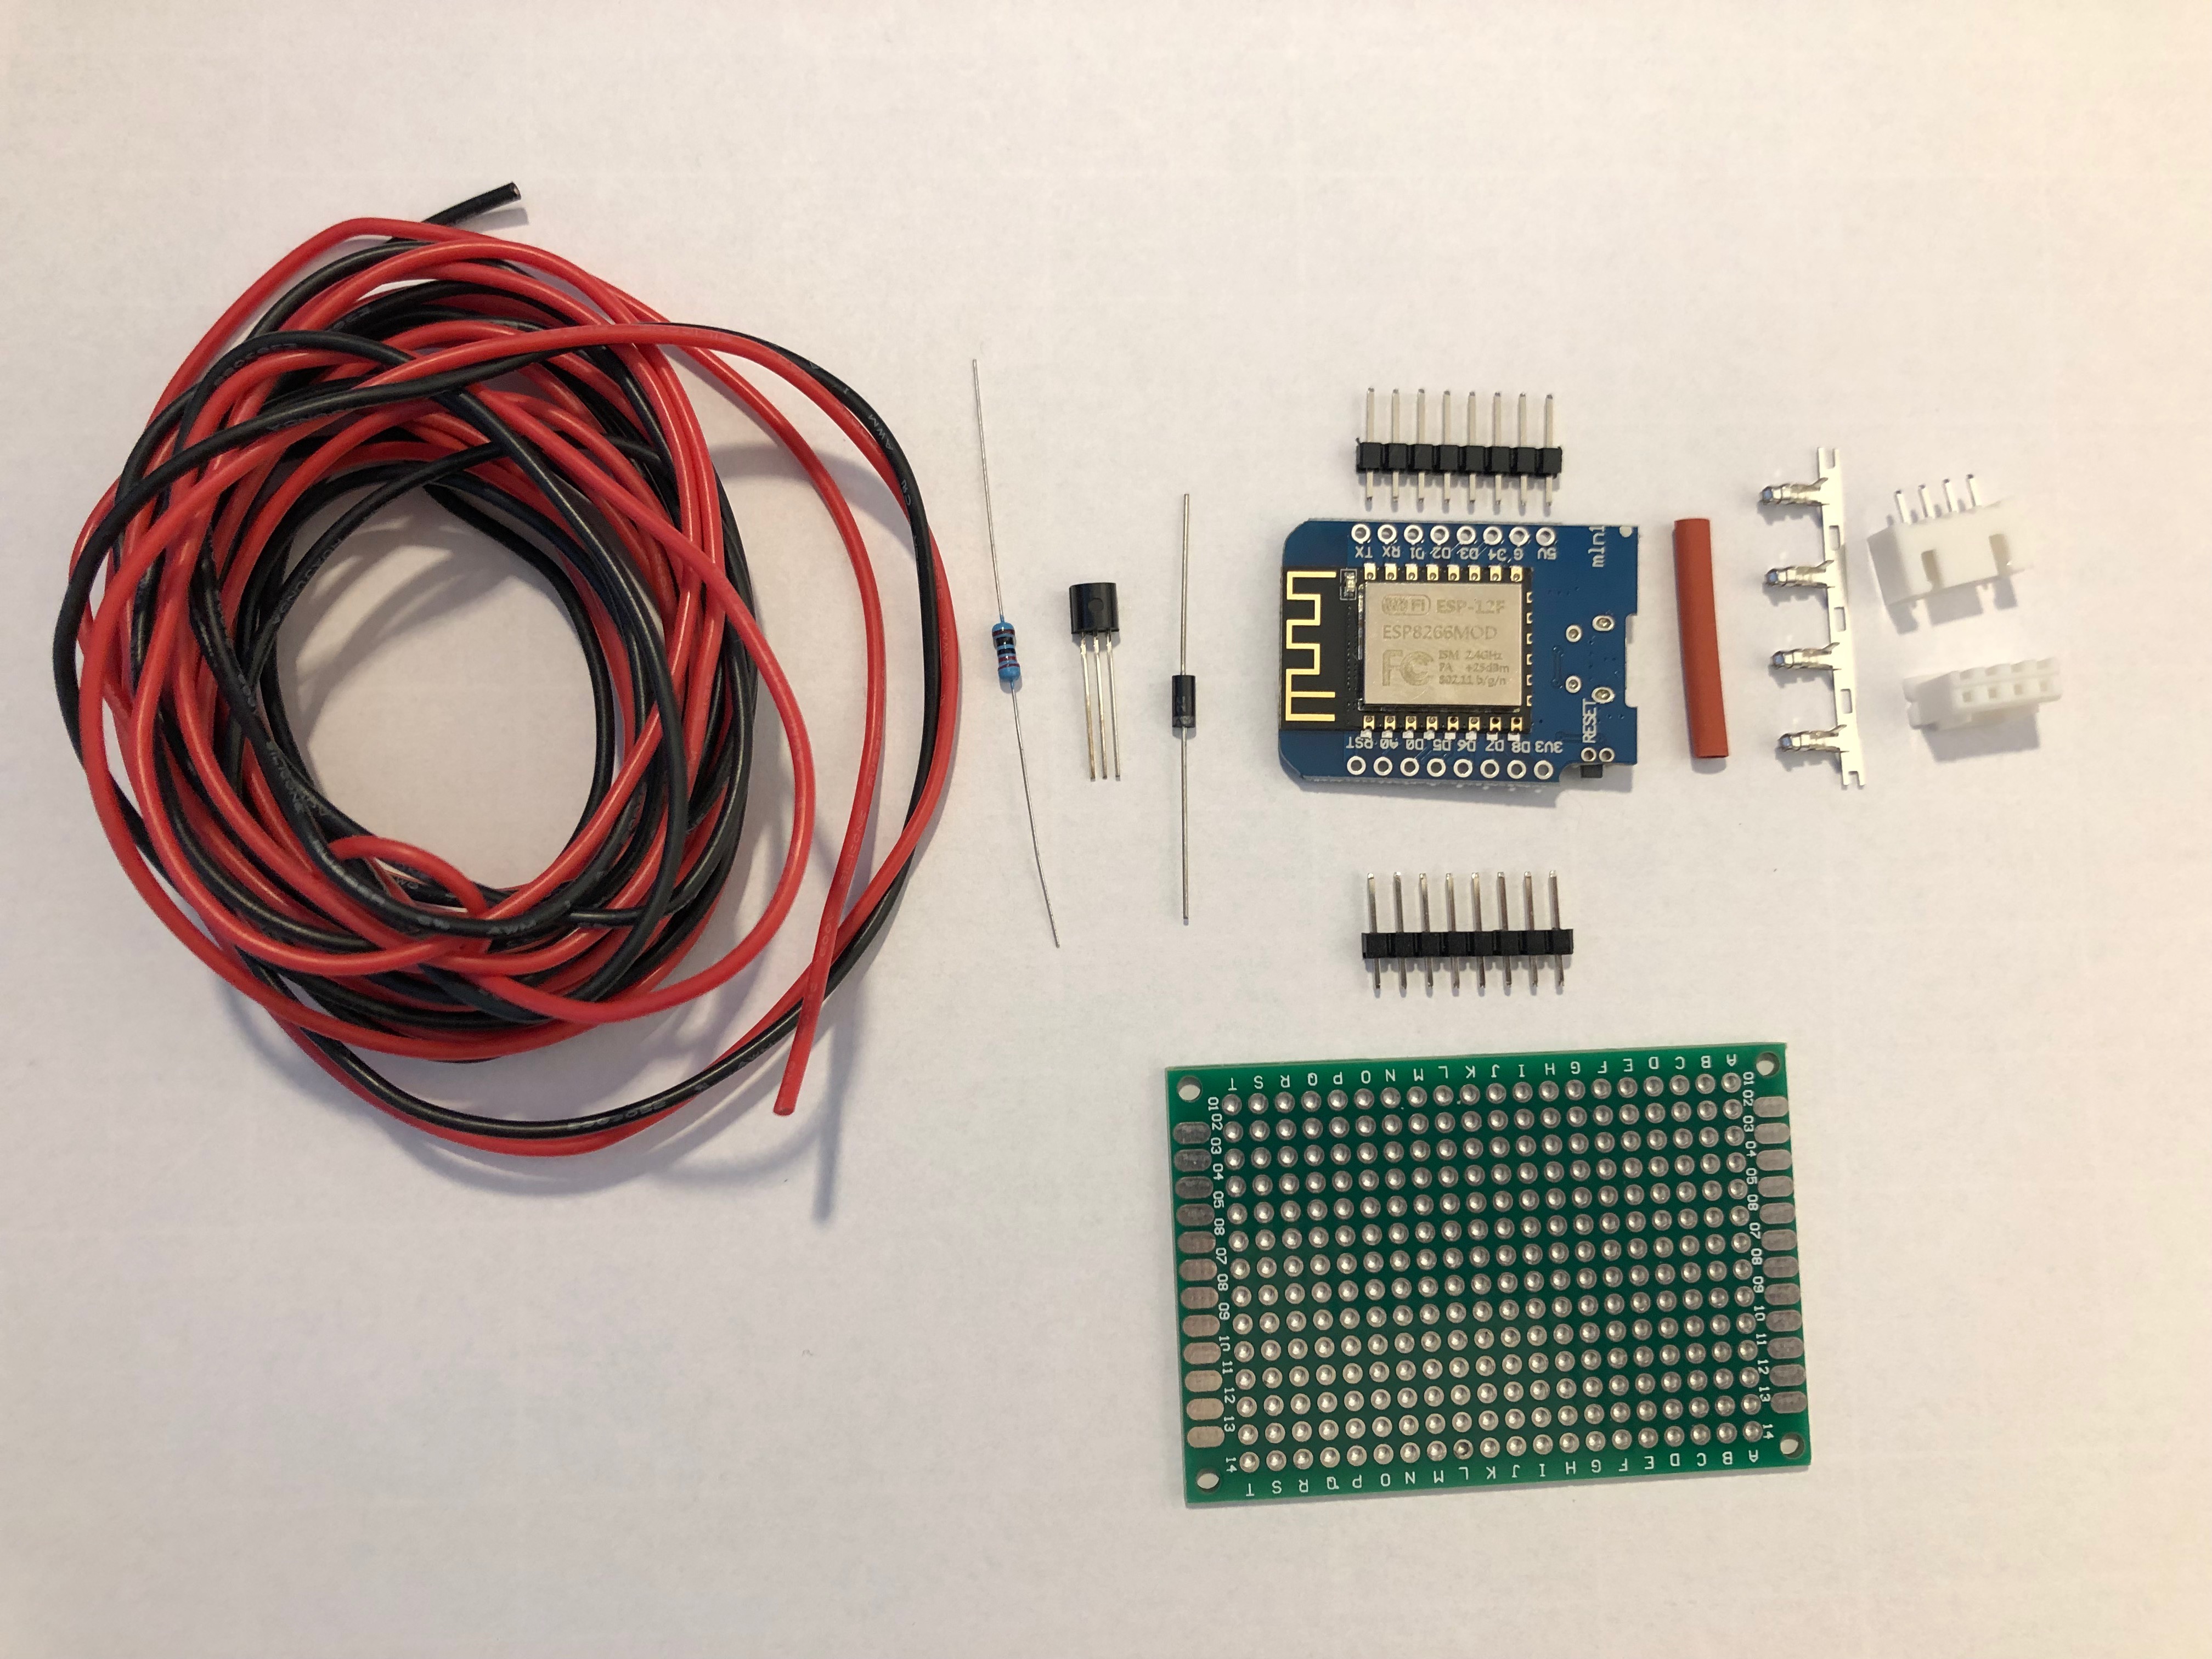
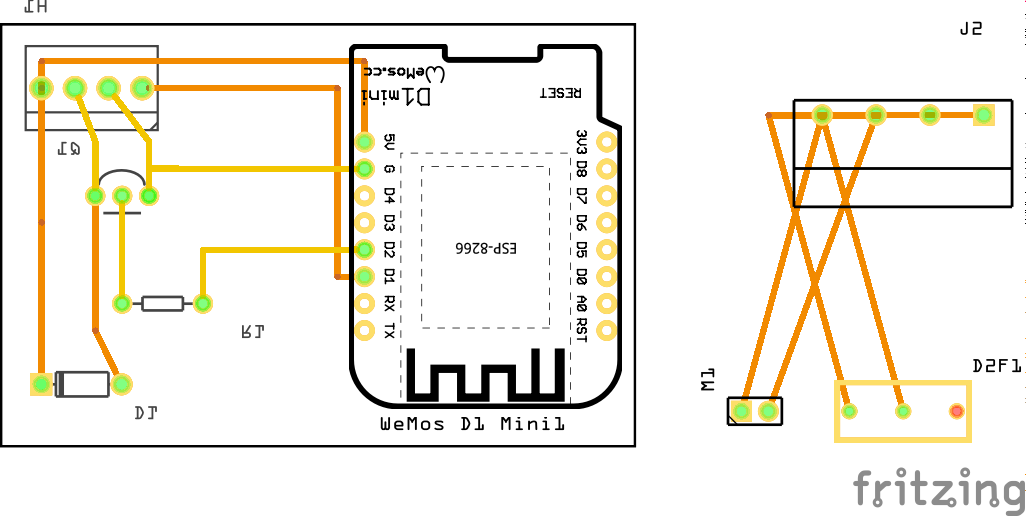
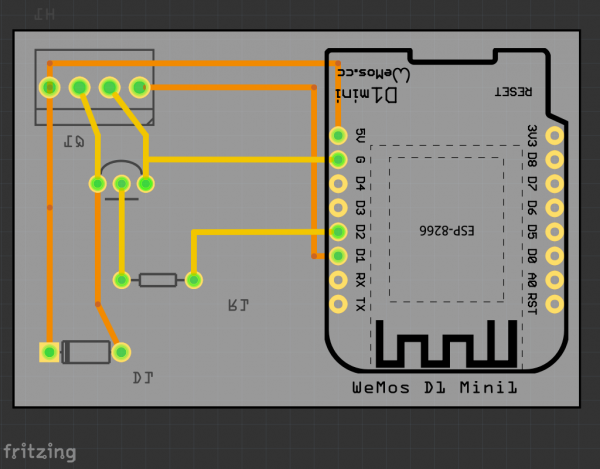
I am using a Wemos D1 Mini and a couple of additional components apart from the prototype board:
A PN2222 NPN transistor, a rectifier diode 1N4007 and a 220 Ohm resistor.
I’ve connected everything according to this schematic I’ve drawn with Fritzing:
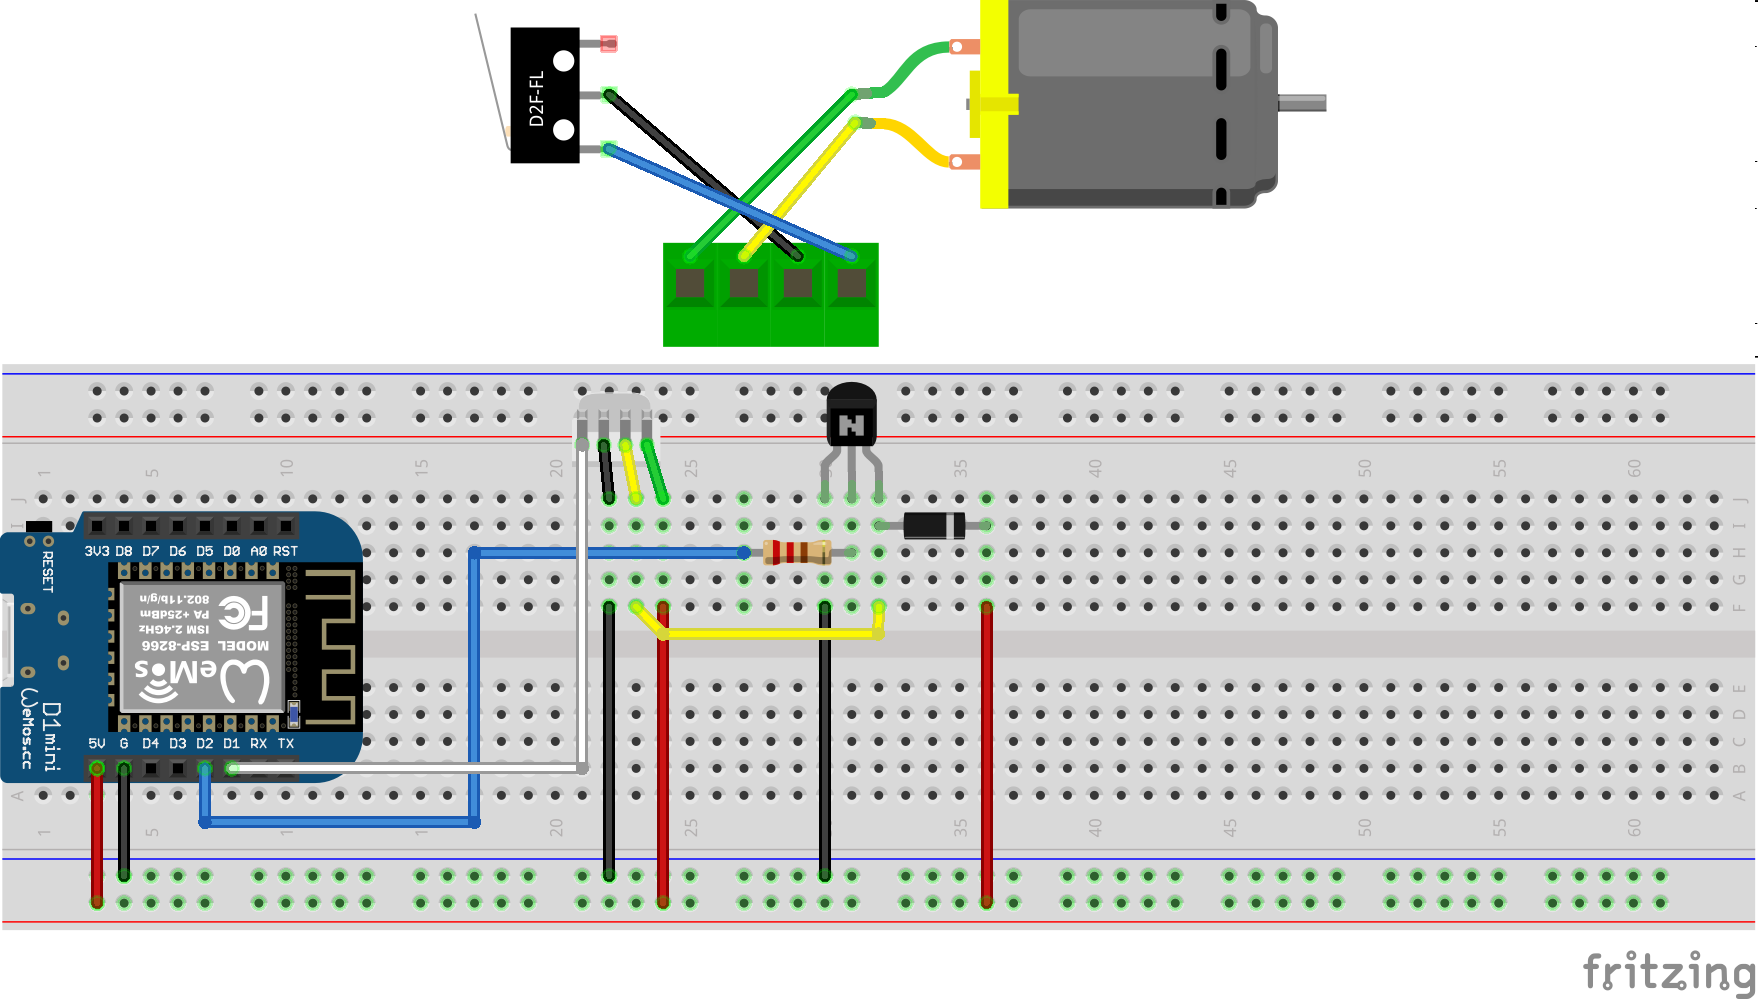
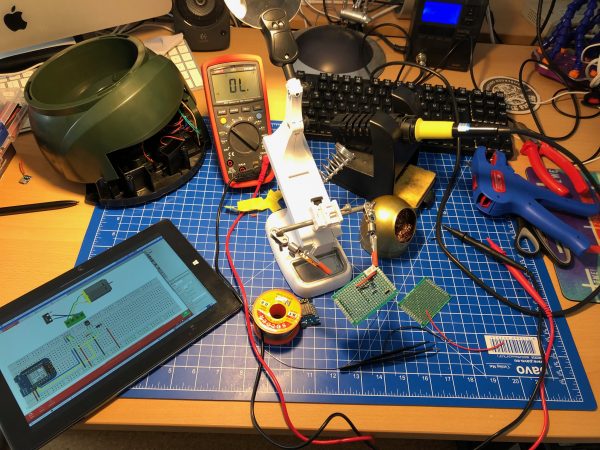
I’ve then prototyped away and put everything on the PCB. Of course with very limited solderig skill:
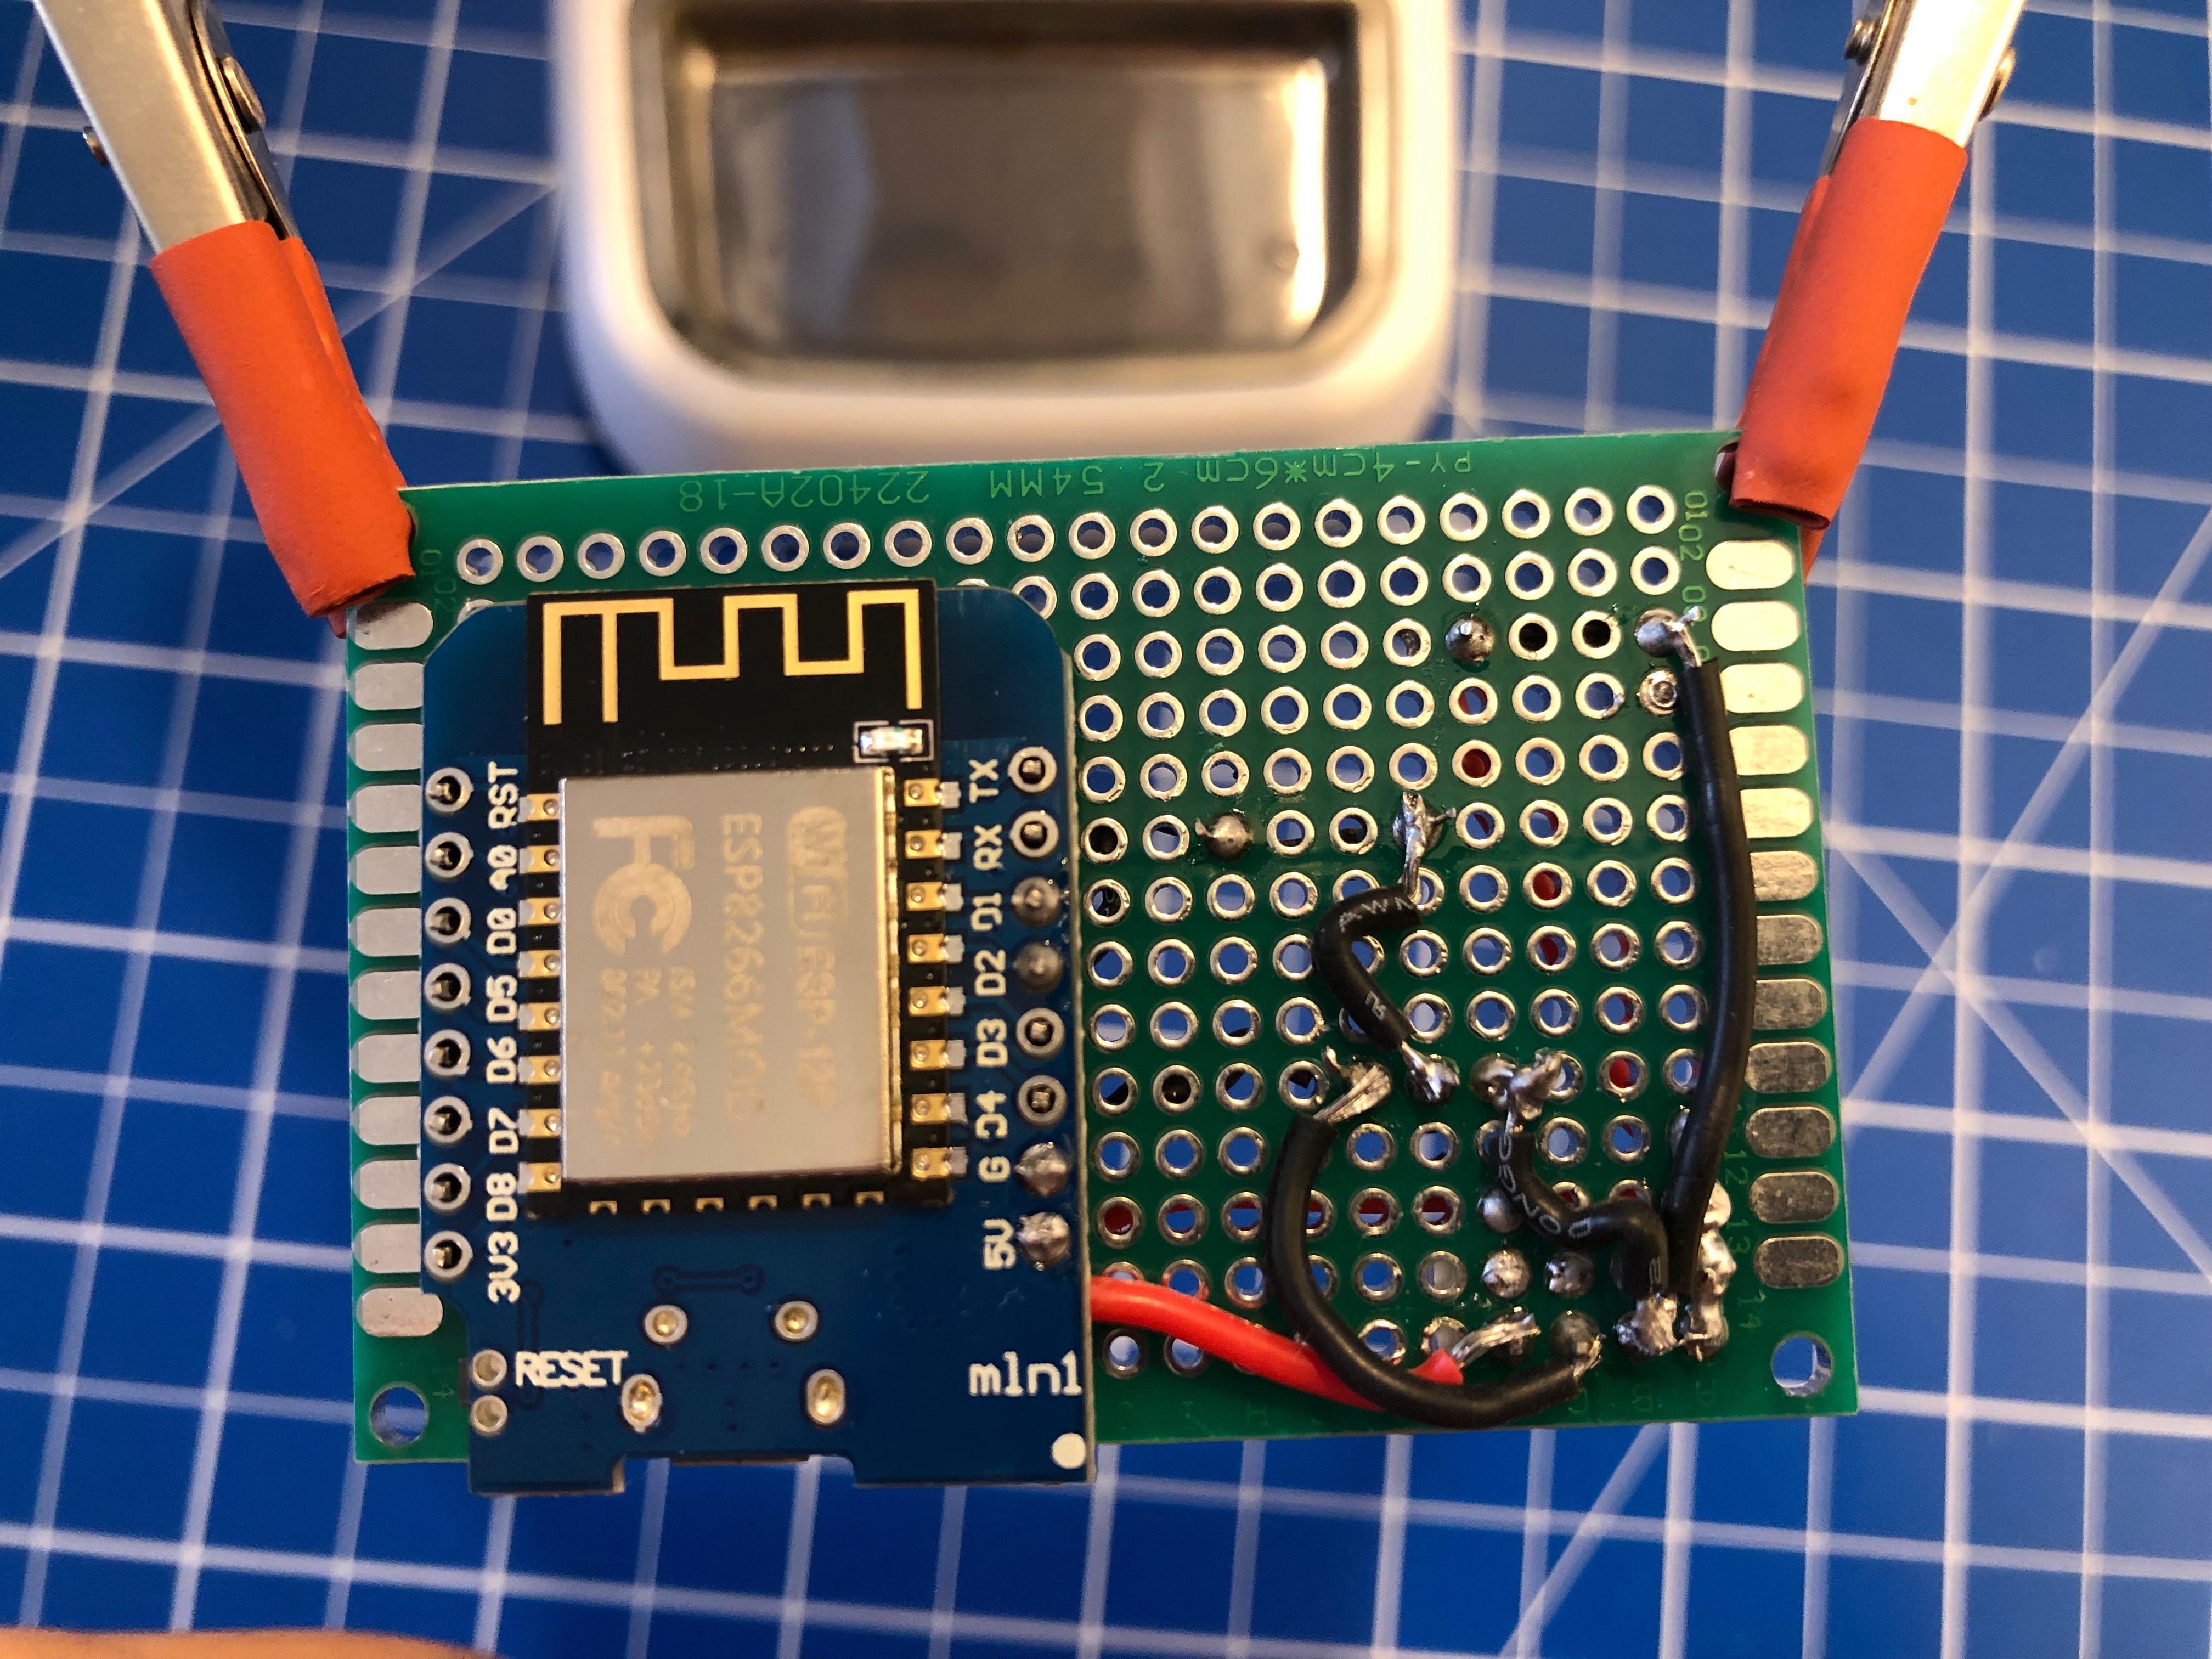

As you can see the JST-XH connector on Motor+Switch can now be connected easily to the PCB with all the parts.
Make sure you check polarity and that you did correctly hook up the motor and switch.
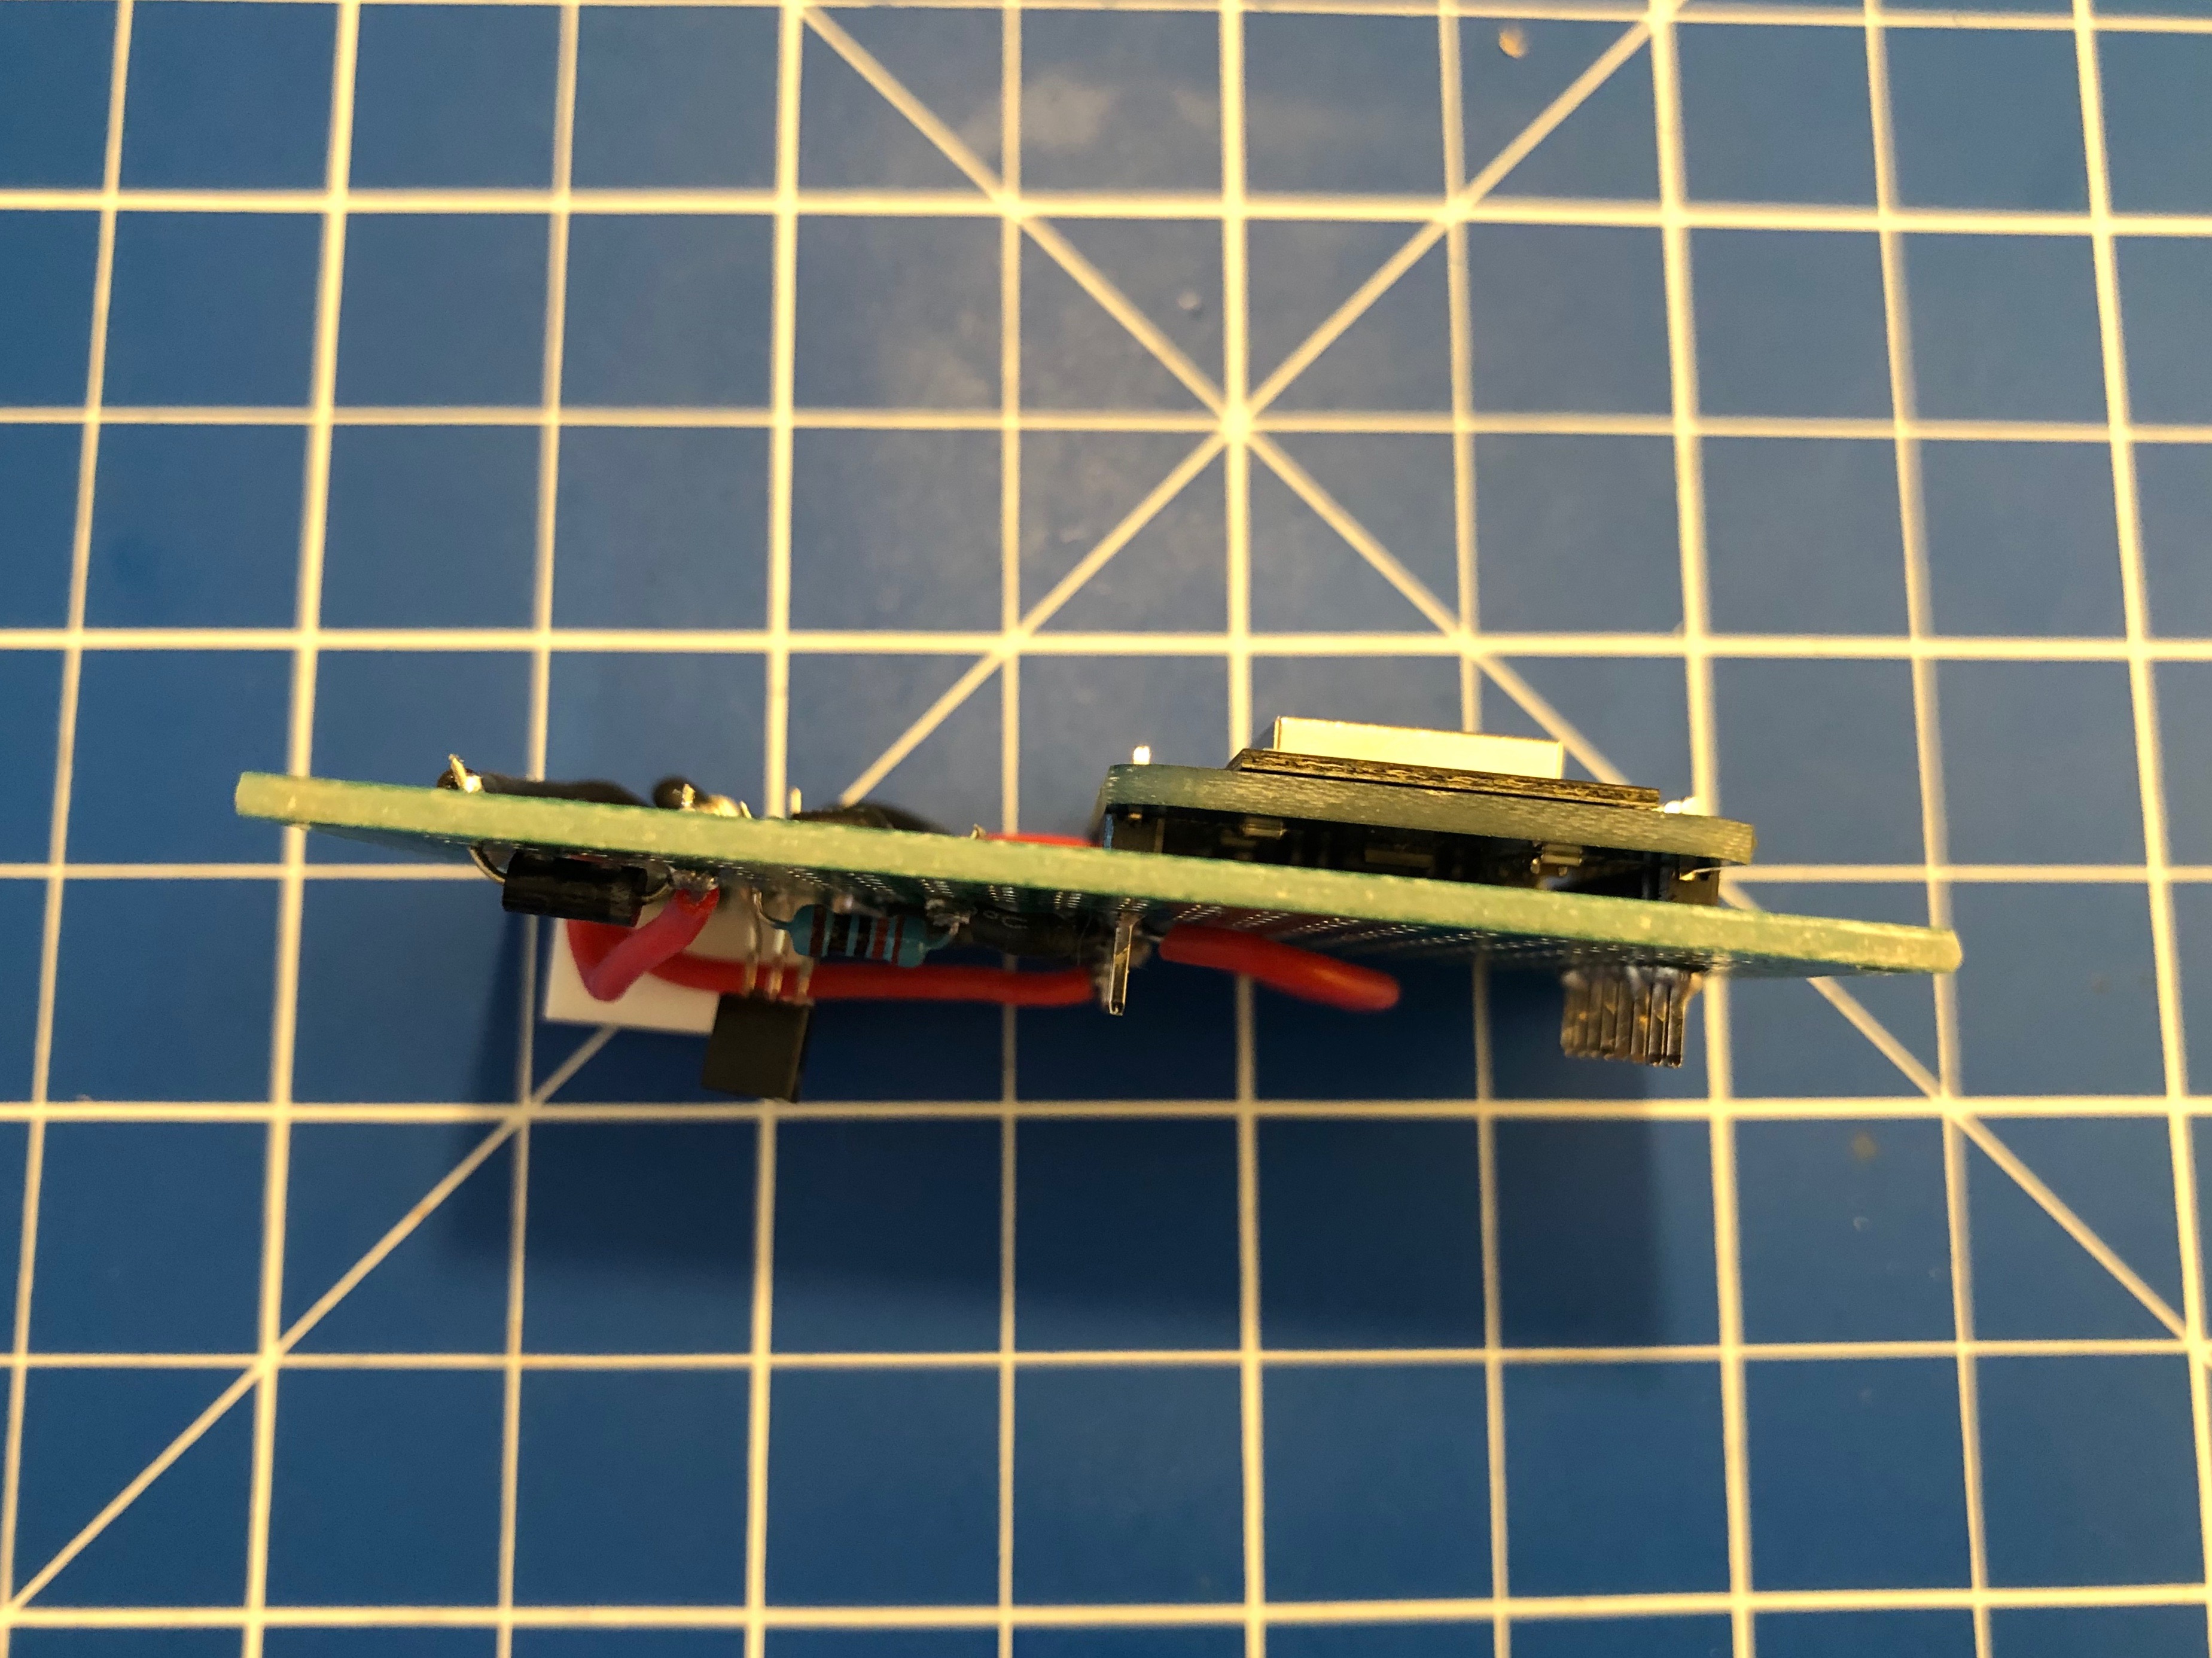
When done correctly the PCB (I’ve used 40mm x 60mm prototype pcb) and all cables will fit into the case. There’s plenty of room and I’ve put it to the side of it. I’ve also directly connected an USB cable to the USB port of the Wemos D1 Mini. As long as you put at least 1A into it it will all work.
Software
Since the Wemos D1 Mini sports an ESP8266 and is well supported by Arduino it was clear to me to use Arduino IDE for the software portion of this project.
Of course everything, from schematics to the sourcecode is available as open source.
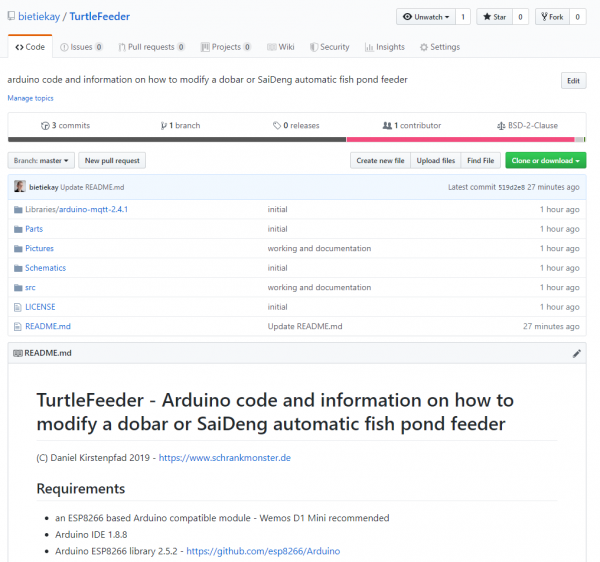
To get everything running you need to modify the .ino file in the src folder like so:
Configuration
What you need to configure:
- the output pins you have chosen – D1+D2 are pre-configured
- WiFi SSID + PASS
- MQTT Server (IP(+Username+PW))
- MQTT Topic prefix
Commands that can be sent through mqtt to the /feed topic.
MQTT topics and control
There are overall two MQTT topics:
- $prefix/feeder-$chipid/state
This topic will hold the current state of the feeder. It will show a number starting from 0 up. When the feeder is ready it will be 0. When it’s currently feeding it will be 1 and up – counting down for every successfull turn done. There is an safety cut-off for the motor. If the motor is longer active than configured in the MaximumMotorRuntime variable it will shut-off by itself and set the state to -1. - $prefix/feeder-$chipid/feed
This topic acts as the command topic to start / control the feeding process. If you want to start the process you would send the number of turns you want to happen. So 1 to 5 seems reasonable. The feeder will show the progress in the /state topic. You can update the amount any time to shorten / lengthen the process. On the very first feed request after initial power-up / reboot the feeder will do a calibration run. This is to make sure that all the wheels are in the right position to work flawlessly.
So if you want to make it start feeding 3 times:
mosquitto_pub -t house/stappenbach/feeder/feeder-00F3B839/feed -m 3
And if you want to see the state of the feeder:
mosquitto_sub -v -t house/stappenbach/feeder/feeder-00F3B839/state
All in all there are 3 of these going to be running in our household and the feeding is going to be controlled either by Alexa voice commands or through Node-Red automation.
Hack-the-Planet Podcast: Episode 005
Turtle Feeder is coming.
I am still working on it – but it is coming together nicely. During the next vacation our fish tanks are going to be well fed.

More soon.
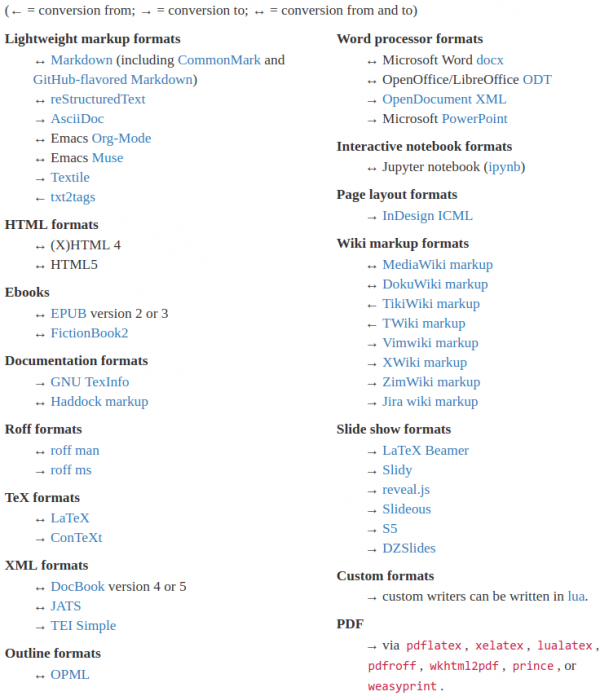
convert text formats
If you need to convert files from one markup format into another, pandoc is your swiss-army knife
https://pandoc.org/
Of course it’s open source – and of course there’s a docker image for it.
Hack-The-Planet Podcast: Episode 004
text replacements for Tokyo ward and kens on iOS and macOS
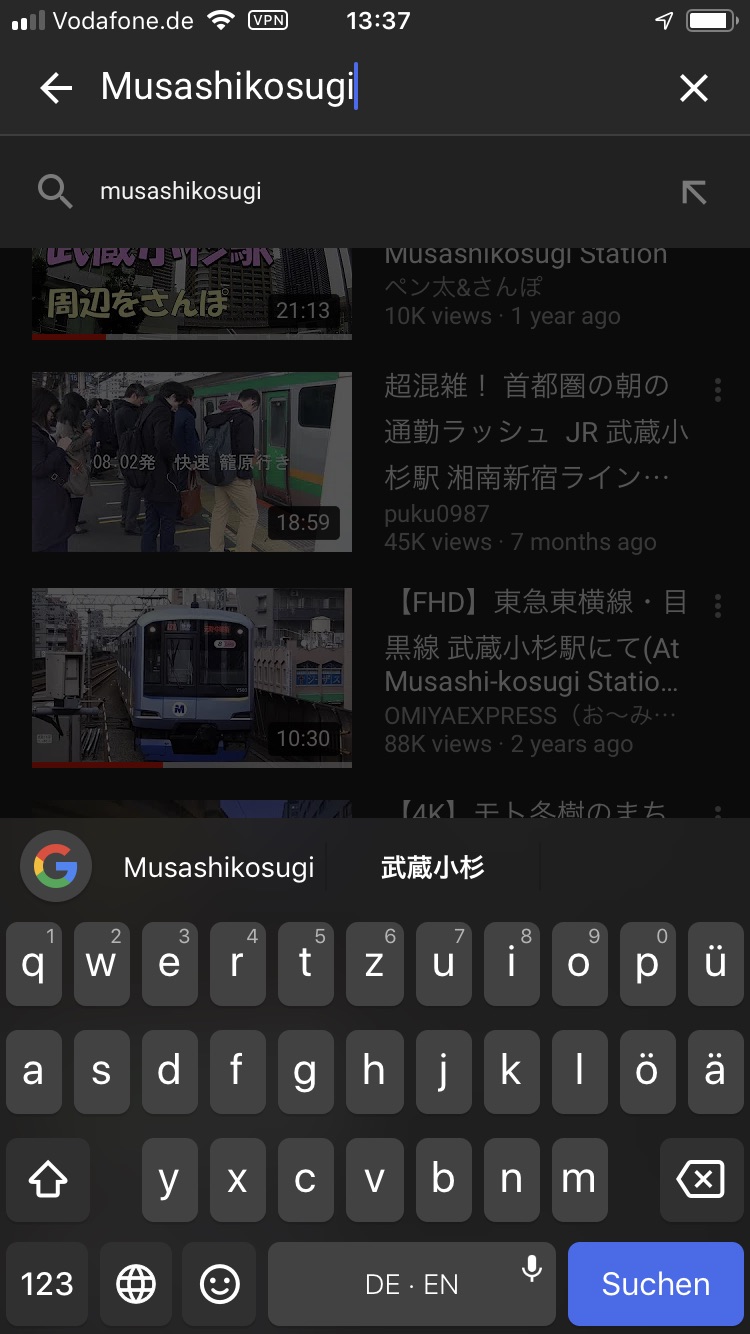
I am having a hard time learning japanese and reading/writing the kanji especially.
Having to write japanese city names frequently (for example when doing searches) I still do remember the spoken out version of the name but I do not quite yet remember the kanji version. Also I do not want to switch back and forth in keyboard languages.
For this, especially in macOS and iOS there is a nice way around this. With the built-in “Text Replacement” feature of your Mac or iPhone/iPad you can easily mass-import a mapping between the romanized version of a word and the japanese written out kanji version of that word.
While you are typing then you will be presented with recommendation text replacements, effectively the kanjis of what you’ve just tried to write.
Unfortunately I do not know a way how to mass-import these text-replacements on iOS.
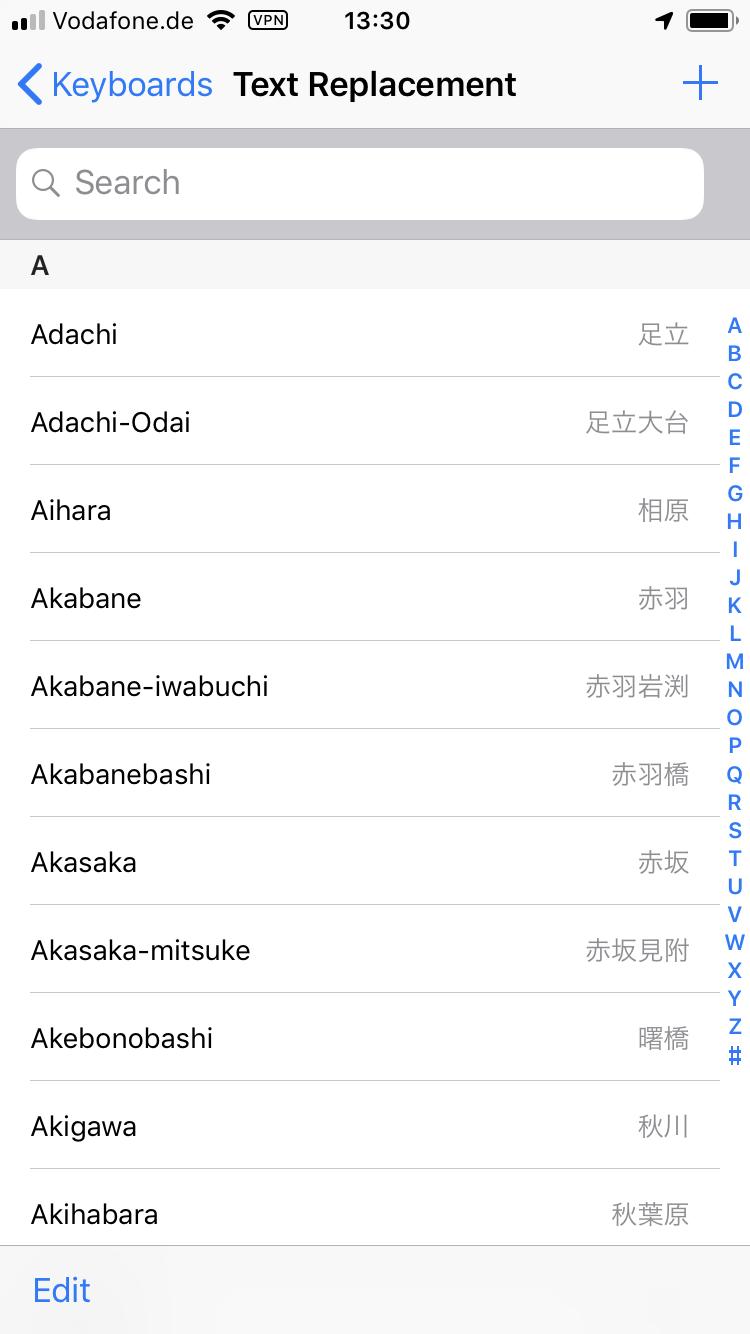
But if you own a macOS computer and you have it synced over iCloud with your mobile phone or tablet you will likely be able to open the text replacement pane in your system settings and import this plist file into it. Simply drag the file (after unzipping the ZIP file) into the text replacement window.
Download the Tokyo-Text-Replacement.zip file. Extract it (double clicking). And drag the .plist file into the Text Replacement Window.
For you to derive your own files you can find the raw data, a list of all designated Ken and Ward names in Tokyo here:

nodes – a new way to create with code
In Nodes you write programs by connecting “blocks” of code. Each node – as we refer to them – is a self contained piece of functionality like loading a file, rendering a 3D geometry or tracking the position of the mouse. The source code can be as big or as tiny as you like. We’ve seen some of ours ranging from 5 lines of code to the thousands. Conceptual/functional separation is usually more important.
Nodes.io
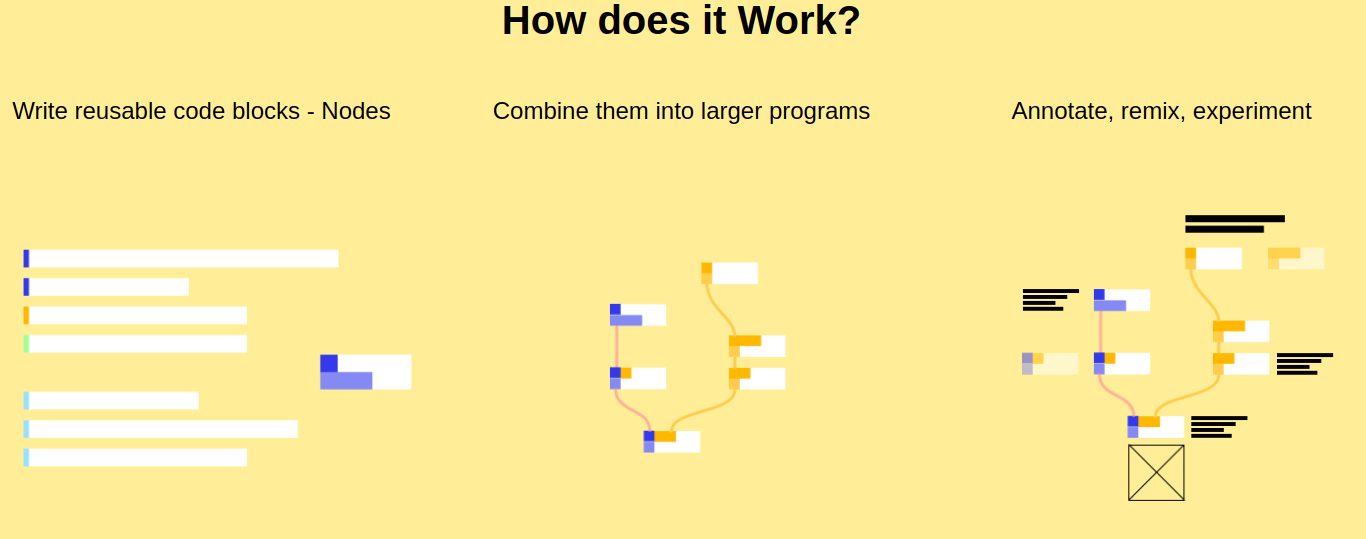
Nodes* is a JavaScript-based 2D canvas for computational thinking. It’s powered by the npm ecosystem and lives on the web. We take inspiration from popular node-based tools but strive to bring the visual interface and textual code closer together while also encouraging patterns that aid the programmer in the prototype and exploratory stage of their process.
*(not to be confused with node.js)

Hang around Buresloth!
The 27th Day of the Season of Bureaucracy: The Day of the Sloth, Holy Day of Slothage. Kick back. Hang around. Grow Moss.
Sloth-day
Hack-The-Planet Podcast: Episode 003
Wir haben wieder etwas aufgenommen. Der Release heute ab 15 Uhr wie gewohnt hier und hier sogar mit Live-Chat.

Diesmal geht es um:
- Scanner Pro auf iOS – https://apps.apple.com/us/app/scanner-pro/id333710667
- Scanbot auf iOS – https://scanbot.io/en/index.html
- Abo-Modelle bei Software und Diensten
- RING Kamera und Überwachungssystem – https://de-de.ring.com/
- Canary Indoor Camera – https://canary.is/
- Surveillance Station – https://www.synology.com/en-global/surveillance
- Ring has more than 400 police “partnerships” – https://arstechnica.com/tech-policy/2019/08/ring-has-more-than-400-police-partnerships-company-finally-says/
- Jumbo Privacy – https://blog.jumboprivacy.com/ – App Store: https://apps.apple.com/us/app/jumbo-privacy/id1454039975?ls=1
- Tim Berners-Lee Projekt “Solid”: https://solid.mit.edu/ – https://en.wikipedia.org/wiki/Solid_(web_decentralization_project) – https://solid.inrupt.com/how-it-works
- Ubuntu – https://ubuntu.com/
- Throw-Away Remote VNC Linux Desktop in a Docker container – https://www.schrankmonster.de/2019/08/27/a-throw-away-linux-desktop-in-a-container/
- Virtual Network Computing – https://en.wikipedia.org/wiki/Virtual_Network_Computing
- Stephen Wolfram – https://blog.stephenwolfram.com/
- Speed of Light in Medium – https://en.wikipedia.org/wiki/Speed_of_light
Functional Threshold Power
I am cycling for fun and for the effect it has on my body and well-being. I do about 30km of cycling every day on average.
After my first stationary trainer broke I bought a new one with the capability to measure wattage and also to apply resistance measured by the watt.
After looking at my average speeds, heart-rates and times on the device I was able to build a quite detailed understanding of the broader picture. What effects my power output and what does not. The effects of nutrition and health to what the body will deliver while being asked the exact same power output curve than the last time.
In a nutshell the numbers tell me that I am usually at a mediocre wattage of 150W constant load doing about 40 km/h average. My reserves usually allow me to go for 1-2 hours without a break doing this.
So far so good. Now I’ve found out from more serious cyclers that there’s something like “Functional Threshold Power“. I do regular have tests at the doctors to check for any heart-rate issues.
Reading about this Functional Threshold Power my curiousity is sparked.
How much could I do? Should I even go for measuring it?

a throw-away remote VNC linux desktop in a docker container
I am running most of my in-house infrastructure based on Docker these days…
Docker is a set of platform-as-a-service (PaaS) products that use operating-system-level virtualization to deliver software in packages called containers. Containers are isolated from one another and bundle their own software, libraries and configuration files; they can communicate with each other through well-defined channels.
All containers are run by a single operating-system kernel and are thus more lightweight than virtual machines.
Wikipedia: Docker
And given the above definition it’s fairly easy to create and run containers of things like command-line tools and background servers/services. But due to the nature of Docker being “terminal only” by default it’s quite hard to do anything UI related.
But there is a way. By using the VNC protocol to get access to the graphical user interface we can set-up a container running a fully-fledge Linux Desktop and we can connect directly to this container.
I am using something I call “throw-away linux desktop containers” all day every day for various needs and uses. Everytime I start such a container this container is brand-new and ready to be used.
Actually when I start it the process looks like this:
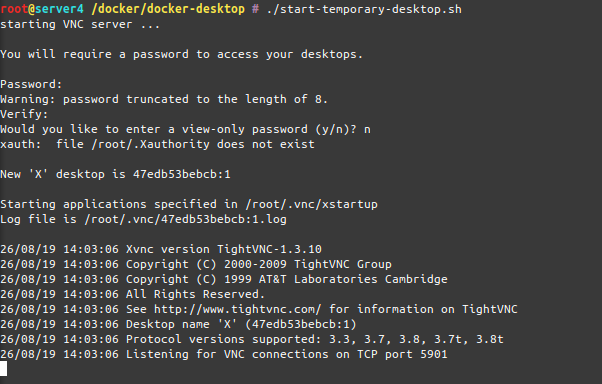
As you can see when the container starts-up it asks for a password to be set. This is the password needed to be entered when the VNC client connects to the container.
And when you are connected, this is what you get:
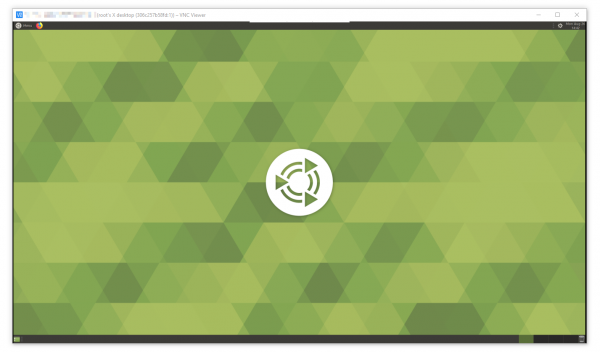
I am sharing my scripts and Dockerfile with you so you can use it yourself. If you put a bit more time into it you can even customize it to your specific needs. At this point it’s based on Ubuntu 18.04 and starts-up a ubuntu-mate desktop environment in it’s default configuration.
When you log into the container it will log you in as root – but effectively you won’t be able to really screw around with the host machine as the container is still isolating you from the host. Nevertheless be aware that the container has some quirks and is run in extended privileges mode.
Chromium will be pre-installed as a browser but you will find that it won’t start up. That’s because Chromium won’t start up if you attempt a start as root user.
The workaround:
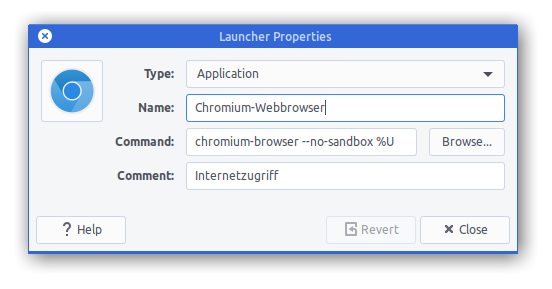
Now get the scripts and container here and build it yourself!
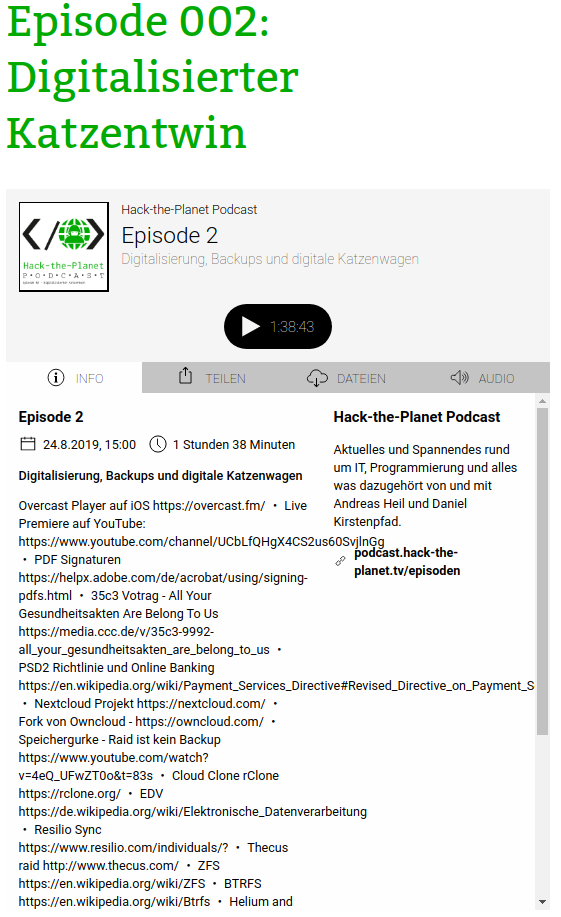
Hack-The-Planet Podcast: Episode 002
Password Managers…
I am using 1Password for years now. It’s a great tool. So far.
As I am using it locally synced across my own infrastructure I feel like I am getting slowly but surely pushed out of their target-customer group. What does that mean?
The current pricing scheme, if you buy new, for 1Password looks like this:
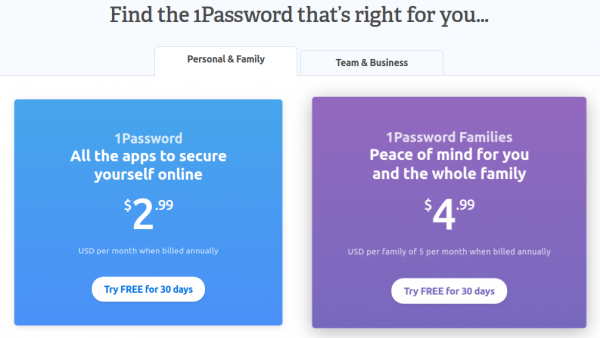
So it’s always going to be a subscription if you want to start with it and if you want it in a straight line.
It used to be a one-time purchase per platform and you could set-up syncing across other cloud services as you saw fit. If you really start from scratch the 1Password apps still give you the option to create and sync locally but the direction is set and clear: they want you to sign up to a subscription.
I am not going to purchase a subscription. With some searching I found a software which is extremely similar to 1Password and fully featured. And is available as 1-time purchase per platform for all platforms I am using.
Also. This one is the first that could import my 1Password export files straight away without any issues. Even One-Time-Passwords (OTP) worked immediately.
The name is Enpass and it’s available for Mac, Windows, Linux, iOS, Android and basically acts as a step in replacement for 1Password. It directly imports what 1Password is exporting. And its pricing is:
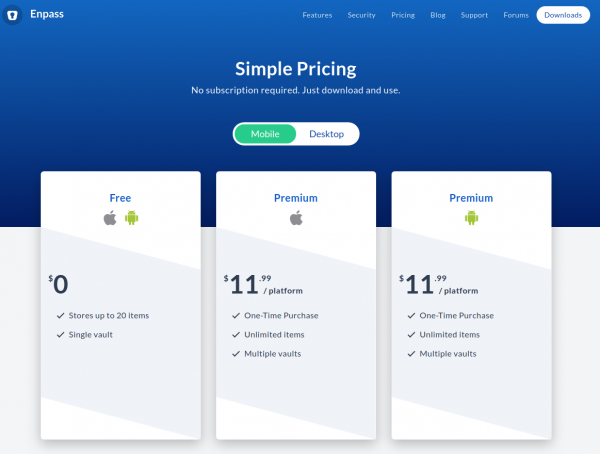
Subscriptions for services as this are a no-go for me. It’s a commodity service which I am willing to pay for trailing updates and maintenance every year or so in a major update.
I am not willing to pay a substantial amount of money per user per month to just keep having access to my Passwords. And having them synced onto some companies infrastructure does not make this deal sweeter.
Enpass on the other hand comes with peace-of-mind that no data leaves your infrastructure and that you can get the data in and out any time.
It can import from these:
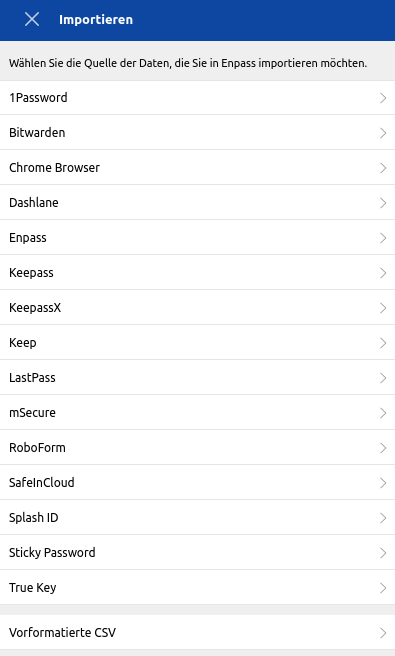
As mentioned I’ve migrated from 1Password in the mere of minutes and was able to plug-in-replace it immediately.